Manage Outstanding Payables in TallyPrime
When you purchase goods or obtain services from your vendors you need to keep track of all the payments that you have to make on the agreed timelines. All such pending or overdue payments to your parties are outstanding payables. You can manage such outstandings in TallyPrime using Outstanding Payables report that gives you an overview of what your business owes for supplies, inventory, and services. Moreover, you can get an overview of the amount and the creditors to whom you owe money. You can also see how much you owe each creditor and how long the money has been owed.
Record and Track Dues: You can get an overview of the amount and the creditors to whom you owe money and how much you owe each creditor and the duration of such pending or outstanding payments. Managing your outstanding payables will help you to know the time-to-time expenses, avoid overseeing the outstanding payments that you owe to the creditors, and help you manage the cash flow in your business.
Use Credit Period: To ensure that all the payments that you owe to your suppliers are tracked systematically, it is advised to maintain your accounts by specifying the credit period or due date for the party during purchases. You can specify a credit period of say 30 days in the party ledger for the party to make the payments. On recording a credit purchase for such parties, TallyPrime reflects the pending amount and the due date based on the credit period specified for the party. This helps to avoid conflicts with your parties, systematically track your outstanding payables, and make timely payments to your parties.
Bill-by-Bill: At times, when you have made a credit purchase from your party, you can mutually agree with your party to make part payments and make the total payment within a specified time. In such a case, you can use the bill allocation capability in TallyPrime to create one or more bill references as per the breakup decided. Each bill reference can also be specified with a credit period or a due date.
Manage Payables – Credit Purchase Without Bill-wise
When you purchase goods/services on credit, you may want to track and manage the amount that is due to your party. Once you record a purchase, TallyPrime reflects the purchase amount as Credit against the party in the corresponding report. Anytime you make the payment to your party, you can record a payment entry for that amount to clear the outstandings for that party.
In this section
- Record a credit purchase
- Record payments for credit purchases made without bill-wise
- Ledger Vouchers
- Group Summary
Record a Credit Purchase
When a company buys goods on credit or cash, Purchase voucher is used to record all the Purchase transactions of the company. Record a credit purchase.
Set credit limit for parties
To set the credit limit in the party ledger:
- In the party ledger screen, press F12 (Configure) > set Provide Credit Limit to Yes.
- On the party ledger screen, provide a value (in days or a date) for Specify credit limit.
Record payments for credit purchases made without bill-wise
When you are making a payment for the goods or services purchased, you can record a payment entry. Record a payment voucher.
Ledger Vouchers

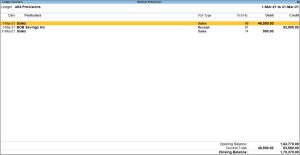
You can view a ledger account with the corresponding voucher details.
- Press Alt+G (Go to) > type or select Ledger Vouchers.
Alternatively, Gateway of Tally > Display More Reports> Account Books > Ledger. - Select the required Ledger.
- Press F2 (Date) to change the period as required.
A sample image of Ledger Vouchers report appears, as shown below:
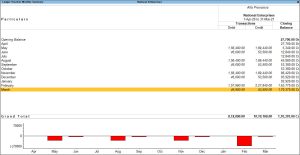
- Press F6 (Monthly) to view the monthly receivables and payments received from the party.
Cumulative balances or running balance for Ledger Voucher reports
- Press F12 (Configure) on Ledger Vouchers screen.
- Set the option Show Running Balance to Yes to see the running balances for Ledger Voucher report.
- Accept the screen. As always, press Ctrl+A to save the changes.
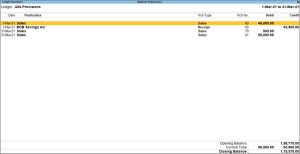
The Ledger Vouchers port with running balance column appears as shown below:
You can also access Ledger Vouchers by drilling down from different statements, such as Group Summary and Monthly Summary.
Group Summary
The group summary statement shows the closing balances of the accounts of a selected group for a specified period up to the current date. The default view is that of sub-groups within a group.
![]()
To view group summary,
- Press Alt+G (Go To) > type or select Group Summary.
Alternatively, Gateway of Tally > Display More Reports > Account Books > Group Summary > Select a group.
A sample image of the Group Summary screen appears, as shown below:
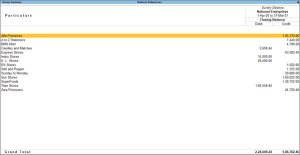
- Press Enter on any group to view the Legder Monthly Summary report. You can further press Enter on any month to view the Leger Vouchers report.
- On Ledger Vouchers screen, Press F5 (Bill-wise) to view all the outstanding bills in the report. You can press Enter on any of the bills and drill down to the respective voucher.
Manage Payables – Credit Purchase With Bill-wise
If you maintain bills with specific reference numbers for easy tracking in the future, you can use the bill-wise option in the party master. Next time you record a transaction for that party, TallyPrime will internally track the bill by using the voucher number as the reference number. All earlier transactions recorded for that party without the bill-wise option will be tracked as On Account. Whether there is a reference number or not, such dues can be settled by passing the corresponding payment entries.
In this section
- Enable Bill-wise in Party Master
- Record a Credit Purchase
- Record Payments for Credit Purchases Made Using Bill-wise
Enable Bill-wise in party master
In the Party Master screen:
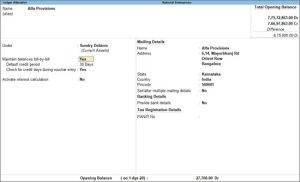
- Set Maintain Balances bill-by-bill to Yes.
If you do not see this option:
-
- Press F11 (Features) > set Enable Bill-wise entry to Yes.
- Press F12 (Configure) > set Provide bill-wise details to Yes
After maintaining balances bill-by bill, all bills generated earlier are reflected as On Account.
If you want to provide any lead time to your party to clear their dues, specify the Default Credit Period – for example, 30 or 60 Days. When you make a credit purchase from this seller, TallyPrime internally calculates the due date against the voucher entry date, based on the credit period you have agreed with your seller. You may override this during transaction, if you wish to.
Record a credit purchase
A purchase transaction without a corresponding payment entry is a sale on credit – until the you have made the payment. If you have enabled the bill-wise option in the party master, TallyPrime tracks the bill by using the voucher number as the bill reference number.
![]()
- Press Alt+G (Go To) > Create Voucher > press F9 (Purchase).
Alternatively, Gateway of Tally > Vouchers > press F9 (Purchase). - Press Ctrl+H (Change Mode) to select the required voucher mode (Item Invoice, in this case).
- Specify the supplier details.
- Supplier Invoice No. and Date: The invoice number and date should be the same as given in the corresponding sales bill.
- Party A/c name: Select Cash or Bank for cash purchases. For credit purchases, select the supplier ledger.
- Party Details: Enter the supplier’s name and address, if needed.
If you do not see the Party Details screen, press F12 (Configure), and set Provide Receipt, Order, and Import details to Yes.You may want to maintain specific details about your suppliers, such as address with landmark, alternative contact number, and so on, in the invoices. In such cases, you can create party ledgers with the required details. In the Suppliers field of Party Details screen, select the required ledger.
- Purchase ledger: Select the accounting ledger to allocate the stock items.
If you do not see this field on the screen, press F12 (Configure) and set Select common Ledger Account for Item Allocation to Yes.
In Accounting Invoice, you can select the purchase ledger under Particulars. - Provide the stock item or service details.
As in other transactions, you can create the item or ledger on the fly by pressing Alt+C.- In Item Invoice, select the stock item, enter the Quantity. The Rate will be auto-filled, if available for the stock item. However, you may choose to enter the Rate or Amount.
- In Accounting Invoice, select the service ledger and enter the Amount.
- Select additional ledgers, like transportation charges, insurance, or discount, if any.
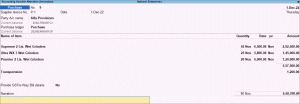
- Press Enter on the Amount field and fill in the bill-wise details screen with the Type of Ref and Name as required.
- Provide Narration, if needed, and accept the screen. As always, you can press Ctrl+A to save.
Record payments for credit purchases made using bill-wise
You can make payments to settle any specific purchase bill to ensure proper accounting for the credit transactions.
![]()
While recording a payment voucher for a purchase you have made:
- Under Particulars, select the party ledger to which you are making the payment against a purchase.
- In the Bill-wise Details screen, enter the bills for each purchase made from the party.
- Under Type of Ref, select Agst Ref.
You can break the total amount for payment into multiple bills against the same or different purchase bills, as per your convenience. - Under Name, select the purchase bill number against which you are making the payment.
Based on your needs, you can sort bills as per:- The Due Date in order to settle the oldest bill first. In case you had set any credit days for the party, the due dates are displayed including the credit days.
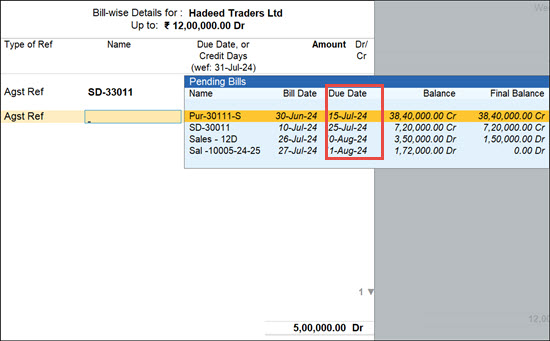
This is applicable TallyPrime Release 5.0 onwards. If you are using TallyPrime Release 4.1 or earlier, you will not find the Due Dates column for the bills. - The Balance or Final Balance in the order of highest or lowest amount for settlement.
You can settle any remaining unsettled purchase bills from the Ledger Outstandings report for the party Hadeed Traders Ltd.
- The Due Date in order to settle the oldest bill first. In case you had set any credit days for the party, the due dates are displayed including the credit days.
- Under Type of Ref, select Agst Ref.
- As always, press Ctrl+A to save the payment voucher.
Split a Credit Purchase into Multiple Bills
When you make a purchase of large amount and unable to pay at a time, and have agreed to make partial payments in regular intervals, you can split such purchases into multiple bills. This helps you to track the payment breakup against the bills created and manage your outstanding payables systematically.
In this section
Enable Bill-wise in party master
To learn how to enable Bill-wise in party master, click here.
Record a credit purchase – split bill
You can record a sale and split the amount into multiple bills using the Bill Allocation feature.
![]()
- Press Alt+G (Go To) > Create Voucher > press F9 (Purchase).
Alternatively, Gateway of Tally > Vouchers > press F9 (Purchase). - To split the sales bill into multiple bills, when recording a credit purchase:
-
- Press F12 (Configure) > set Use default Bill-wise details for Bill Allocation to No.
- In the voucher screen, press Enter on the total amount field to open the Bill-wise Details screen.
- In this screen, select New Ref and provide a Name for the bill. For example, if your voucher number is V1, your bill names can be V1a, V1b, and so on.
The bill name that you specify here can be used as the bill reference when you record a payment transaction to settle your dues. - If you had specified any Default credit period in the Party Master, the Due Date is set to the same value by default. To override the Credit Period, press F12 (Configure) > set Modify all fields to Yes. Now, specify the due date.
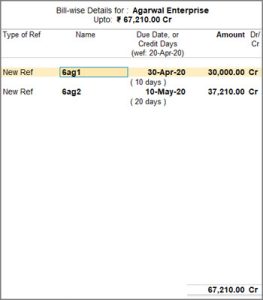
- Fill in the Amount based on how you want the total amount to be split and press Enter.
- As always, press Ctrl+A to save the voucher.
Ledger Outstandings
The Ledger Outstandings report displays the details of the outstanding payables – Opening Amount, Pending Amount, Due Date and Overdue days for the selected party. All the purchases recorded bill-wise or without any bill references and the corresponding payment entries recorded are displayed in this report. You can make the payments that are pending with your parties using the report.
View Ledger Outstandings report
- Press Alt+G (Go To) > type and select Ledger Outstandings.
Gateway of Tally > Display More Reports > Statements of Accounts > Outstandings > Ledger. - Select a ledger from the list. The Ledger Outstandings report appears as shown below:
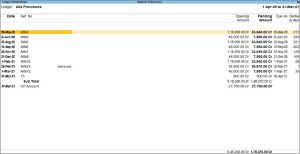
You can print or export Reminder Letters from the Ledger Outstanding report by enabling the option Print Reminder Letter in the Print Report or Export Report accordingly.
In the Ledger Outstandings report, you can:
- Press Alt+F4 (Ledger): to display the list of ledgers. Select the required ledger to view outstandings for the selected ledger.
- Press Alt+F5 (Detailed): Detailed or press Alt+F5 to display the Ledger Outstandings report in the detailed view. In the detailed view, the following will be displayed:
- Voucher details : Voucher Date, Voucher Type(s), Voucher Number(s), and Amount
- Inventory details : Quantity, Stock Item, and Rate
- Press F6 (Ageing Method): To display the Age wise analysis of the Ledger Outstandings report. To know more, refer to Ageing Analysis topic.
- Press Alt+B (Settle Bills): the Bill Settlement option helps to settle the selected or all bills from the Ledger Outstandings report.
- Press Alt+S (Contact): To view the ledger contact details.

- Press F12 (Configure): To change the report configurations, as required.
- Press Alt+F12 (Range): to use the Range Filter option to search for specific bills from the list of bills outstanding. Users may filter the transactions based on the Date, Original Amount, Pending Amount, Ledger, Reference number, and so on. This is a useful tool, as it makes the process of finding specific bills fast, easy, and simple.
Group Outstandings
This report helps to view the group-wise outstanding details, including the debit and credit balances. You can configure the report to see only the overdue payments and make payments to your parties accordingly.
In this section
View the group-wise outstandings report

- Press Alt+G (Go To) > type and select Group Outstandings.
Alternatively, Gateway of Tally > Display More Reports > Statements of Accounts > Outstandings > Group. - Select the Group from the list.
A sample image of the Group Outstandings report appears, as shown below:
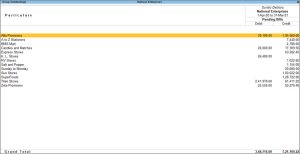
You can print or export Reminder Letters from the Ledger Outstanding report by enabling the option Print Reminder Letter in the Print Report or Export Report accordingly.
In the Group Outstandings report, you can:
- Press Alt+F4 (Group): To display the list of groups. Select the required group to view outstandings for the selected group.
- Press F5 (Ledger-wise): To display only the ledgers and their debit & credit balances.
- Press Alt+F6 (Ageing Method): To display the Age wise analysis of the Group Outstandings report. For more information, refer Ageing Analysis report.
- Press F8 (Ledger-wise Bills): To display the ledger-wise breakup of the Group Outstanding report.
- Press Ctrl+F8 (Bill-wise): To display all the bills outstanding from the ledgers falling under the selected group.
Configure and filter for specific report information
- Press F12 (Configure) to enable or disable the Group Outstanding report, as per your business needs.
|
Option |
Description |
|
Outstanding Bill Type |
Pending Bills : This will display the bills which are pending as on a particular date. Overdue Bills : This will display the bills which are not paid or due beyond their credit period or day |
|
Show Nett Balances |
Set this option to Yes to display only Nett Balance instead of Debit and Credit Balances. |
|
Show Contact Details |
Set this option to Yes to display the contact details of the party ledger. |
|
Appearance of Names |
Select the required option from the list to view the party ledger names as per the name style chosen i.e., Name only , Alias only , Name (Alias) or Alias (Name). |
|
Scale factor for values |
Select the required option from the list to view the amounts as per Scale Factor chosen i.e., hundreds, thousands, lakhs, millions, ten lakhs, ten thousand, ten million, crores or any user- defined scale factor mentioned. |
|
Show Base Currency |
Select the required option from the list to view the base currency |
|
Sorting Method |
Select one of the sorting methods from the list to sort the report based on Amount (Decreasing or Increasing or Alphabets (Decreasing or Increasing). |
|
Expand all levels in Detailed format |
Set this option to Yes to view the Group Outstandings report in detailed mode. |
- Press Alt+F12 (Range) to filter masters at the top level in the hierarchy of the current report. For example, you can filter to view the godowns with zero closing quantity.
For example, you can configure the date range and view outstanding payables for the selected period. To know more, Refer to Date behaviour in Reports | Bills Outstandings for selected period topic. - Press Ctrl+F12 (Value) to filter the vouchers based on the conditions you specify. For example, if you want to view the godowns from which sales had happened, use the Value filter and set the voucher condition to Sales.


