Print – FAQs
Print Invoice Template – FAQs
- Open an invoice, press Ctrl+P (Current) > Ctrl+H (Change Template).
- Press F9 (Edit Fields Properties).
- Select any field and press F8 (Reset field) to reset the changes made to the field properties.
To know more, refer to Add or Remove Fields in the Invoice Templates.
You can access the same template in other supported voucher types.
All common configurations saved in a template are applied uniformly across voucher types, while configurations specific to a particular voucher type appear with default settings when selected, which you can modify and save within the same template.
For example, a template is saved for a Credit Note and later accessed for a Sales voucher. In this case, the Show Declaration option is applicable in the Sales Voucher, and the configuration will be displayed with its default value.
If you want completely different sets of fields for different voucher types, such as one layout for Credit Note and another for Sales, you need to save them as different templates with unique fields and configurations.
Yes, you can create custom colours based on your business requirements.
- Open an invoice, press Ctrl+P (Current) > Ctrl+H (Change Template).
- Press F8 (Font & Colour).
- In the Font & Colour Properties screen, select Custom under List of Colours for Theme Colour, Background Colour, or Font Colour.
- Enter the required values for Red, Green, and Blue.
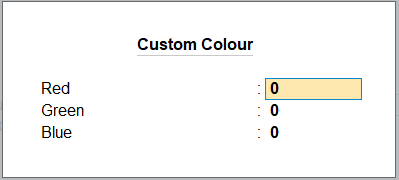
- Press Ctrl+A to save the custom colour.
- Press Ctrl+A to save in the Font & Colour Properties screen.
You will see the Custom colour applied to the font, theme, or background of the invoice.
You can also define custom Font colour and Background colours for each field, using the Edit Field Properties option.
- Theme is used to apply colour to the specific sections/headers depending on the layout design.
- Background Colour is used to apply colour to the entire invoice page.
The Theme Colour is applied on top of the Background Colour, which helps each section stand out clearly and remain visually distinct.
No Change ensures that all the previously applied settings such as font, theme colour, background colour and font colour at template level or field level are retained.
Auto means-font colour would be applied automatically on the basis of theme colour and background colour chosen to keep the text clear and readable in the invoice.
Although, you can still choose the font colour from the list of options provided.
You can add up to two custom fields in each section.
If you try to add more than two custom fields, you will see the following message:
“You have exceeded the maximum custom fields allowed for this section. Press any key to continue.”
To know more, refer to Add Custom Fields.
In TallyPrime, separate templates are provided to print the invoice in bilingual format.
If your company is set up for GCC, you can use Bilingual templates along with the templates that are printed in English.
- Open the invoice, press Ctrl+P (Current) and Ctrl+H (Change Template).
- In the Invoice Template screen, press F2 (Template List) to open the List of Templates along with the Bilingual templates.
Alternatively, press left or right navigation key to view the the Bilingual templates and set is as default.
- To use the Template 6 (multiple addresses) for your invoice, ensure that you have selected the multiple addresses against the configuration ‘Multi -Address details’ under F4 (Add/Remove Fields).
Open the invoice, press Ctrl+P (Current) > Ctrl+H (Change Template) > F4 (Add/Remove Field). - Select Multi-Address details and press Enter.
- In the Multi-Address screen, select enter the addresses from the List of Address Types.
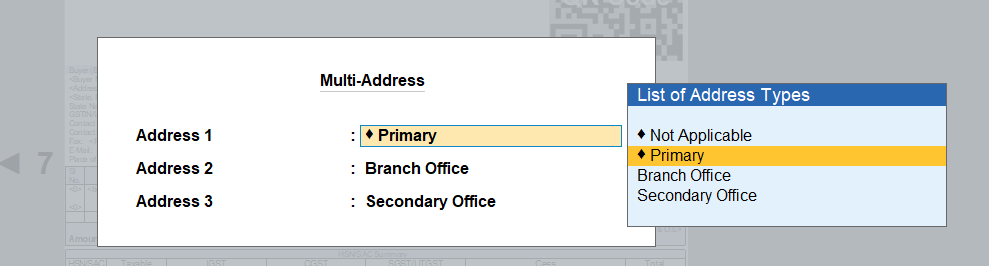
- Press Ctrl+A to save.
If you have not enabled the Multi-Address Details option using F4 F5 (Add/Remove Fields), you will receive a prompt to enable Multiple Addresses for the Company.
To enable Multiple Addresses for your Company,
- Press F11 > set the option Enable multiple addresses to Yes.
Alternatively, from the Company Features Alteration screen, press Ctrl+I (More Details) > Multiple Addresses. - In the Address Type screen, provide multiple address types for your company.
- Press Ctrl+A to save.
Refer to Set Up Multiple Address for Company for more information.
Now, you can follow the above-mentioned steps to update and save the addresses in the Multi-Address screen.
I am text block. Click edit button to change this text. Lorem ipsum dolor sit amet, consectetur adipiscing elit. Ut elit tellus, luctus nec ullamcorper mattis, pulvinar dapibus leo.
Yes, once you add and save the fields in the Create/Alter Custom Field screen, you can configure the details added through the Add/Remove Field.
- Open the invoice, press Ctrl+P (Current) > Ctrl+H (Change Template) > F6 (Add/Remove Field).
- Select any option such as Carrier Name/Agent, Cost Centre name, Description, and so on and press Enter to enable/disable it or update the value/values, as needed.
Once the custom field is added in the template, it will appear enabled by default under the Add/Remove Field section to enable or disable, as needed.
Yes, you can set a different default template for each voucher types.
- Press Alt+G (Go To) > Alter Master > Voucher Type > select from the List of Voucher Types and press Enter.
- In the Voucher Alteration screen, set a template as Default template to print from the List of Templates.
- Press Ctrl+A to save.
You can see the currently selected template in the Voucher Printing screen, where the Template Name gets displayed in the Voucher Printing screen.
No, you cannot view templates saved for All Companies from the Voucher Type Alteration screen. Since the voucher type is company-specific, views saved at the All Companies level will not be available to select.
You will only be able to see the default Tally Classic Format, Predefined Templates, and Saved Templates for This Company.
The default template is applied based on the following priority order:
- Voucher Type
- This Company
- All Companies
This means the template set at the Voucher Type level gets the highest priority.
If no default template is set, then the Tally Classic Format will be used.
If you delete the saved template file (user-saved template), the template will not load.
In this case, you will see an error message stating the template no longer exists.
After that, you need to select another template.
- Open the invoice, press Ctrl+P > Ctrl+H> Select your preferred template> F4 (Add/Remove Field) > QR Code size for e-Invoice.
- In the Party and Invoice Details screen, select the sizes for QR code and save.
No, you cannot define different colours for each section of the invoice.
You can only apply a single colour for specific sections within a template, using the Invoice Theme Colour option in the Font & Colour Properties screen.
No, you cannot change the font, font color, size, background color, and alignment for all fields at once.
The Font and Font Colour can be changed using the F8 (Font & Colour) option at template level. To know more, refer to Update Font & Colour of Template.
You can customise properties such as Size, Background Colour, Font, Font Colour and alignment using the F9 (Edit Field Properties) option, one field at a time. To know more, refer to Edit Field Properties.
This gives you the flexibility to configure each field individually based on your business requirements.
No, you cannot drag and drop fields or change their position in the template.
The position of fields within a layout is fixed based on the predefined design of that layout.
Yes, you can export and share invoice templates.
Currently, templates can be exported and shared only in JPEG and PDF formats.
No, you cannot delete all user-created templates at once.
You can delete only one template at a time.
- Open an invoice, press Ctrl+P (Current) > Ctrl+H (Change Template) and press the left or right navigation arrows to view the templates.
- Press Alt+D (Delete) to delete the template.
In the default invoice format (Tally Classic Format)of TallyPrime, you can edit the invoice by enabling or disabling configurations, as needed. However, visual properties such as font, colour, and layout design cannot be customised.
Note: You can use the Template 7 – Tally Classic, which is similar to the default invoice format of TallyPrime and customise, as needed.
No, Custom fields are template-specific and cannot be shared across templates.
If you want to use the same Custom field in another template, you need to create it again in that template.
The character limits for Custom fields are as follows:
- Field Title: Up to 150 characters
- Field Value: Up to 251 characters
If the template has not been modified, you can directly apply it using the Use Template option. However, if you perform any action to customize the template, the same option will function as Save & Use Template, allowing you to save the template along with the changes before applying it.
Prefer Use Template option to use the template only once, without saving it. Use Set as Default option when you want to make the template the default for future use.
If your default template is deleted, the next available default template according to the following priority, will be used as the default template.
- Voucher Type
- This Company
- All Companies
In case, there are no other templates available, the default invoice format of TallyPrime will be used.
If a template is not compatible with the file format during export or share, the default invoice format (Tally Classic Format) of TallyPrime will be used.
The templates do not support tax-related fields such as VAT, Service Tax, and Excise.
To print these fields, you need to use the default invoice format of TallyPrime which is Tally Classic Format.
No, once a template is deleted, it cannot be restored.
For the invoice templates, only Neat mode is available for printing.
- Open an invoice and press Ctrl+P (Current) > Ctrl+H (Change Template) > F9 (Edit Field Properties).
- In the template, select the ‘Draw/Upload Signature’ field, then press F6 (Edit Properties) or Ctrl+Enter to upload your signature image.
The Tally Classic option is provided to support specific use cases and is meant for occasional use, not for frequent switching between templates. Since users can navigate to Tally Classic from either the default template or any other template, it is not always possible to determine which template they would want to return to. Hence, a toggle to switch back has not been provided, and users can manually select their preferred template as needed.
You can upgrade to TallyPrime Release 7.1 only if you have a valid TSS. Once upgraded, your pre-defined and saved templates, including any personalised ones, will continue to work without any impact, even if your TSS expires later.
Yes, you can save the template as the configurations and settings applied in Print will also be used for Export and Share, ensuring consistent output across all formats.
Yes, you can configure terms and conditions for each voucher type and can create multiple sets based on your requirements and select the most suitable one while printing the invoice.
No, there are no specific size requirements. You can add images for the header, footer, signature, logo, or watermark without any predefined size restrictions in TallyPrime.
Yes, you can add customised fields (UDF) using the Custom Fields option.
- Open any invoice (for example, Sales).
- Press Ctrl+P (Current) > Ctrl+H (Change Template) > F7 (Custom Field).
- Select the relevant section where you want to add the field.
- In the Custom Field, enter as Enter Code Expression.
- Specify the Field Title and enter the System Formula in the Field Value.
No, custom fields cannot be added directly to the item table, as item-specific details may change and are not consistent across all items; such information should be captured in the transaction itself so that it can be displayed and used appropriately in reports and print formats.
The number of items that can be accommodated depends on factors such as the number of fields enabled and the font size selected; however, the new templates are designed to accommodate approximately 20–30% more items compared to the current invoice format.
You can do this using one of the following ways.
- Select A5 page size to print on half an A4 sheet.
- Use your printer settings such as Pages per sheet (this option name may vary). Select the required setting, and the printer will automatically arrange the output.
This option allows you to reduce the spacing and optimize the invoice layout so that more information can fit on a single printed page. You can choose from four compression levels, None, Low, Medium, and High, depending on the amount of content you want to accommodate while maintaining readability.
When you copy configurations from the Tally Classic format, the following settings are not copied:
- Print/Export/Share settings
- Jurisdiction
- Title
- Sub-title
In addition, any configuration that is unique to the Template and not available in the Tally Classic format retains its existing value. This may be the system default or a value that you previously configured.
You can print invoices on pre-printed stationery, such as letterheads, by adjusting the invoice margins in TallyPrime. This allows you to continue using your existing stationery while ensuring proper alignment and professional-looking invoice prints.
- Open the invoice, press Ctrl+P (Current) > Ctrl+H (Change Template) > F10 (Print Settings)
- In the Print Settings screen, configure the Top, Bottom, Left, and Right Margins as required by adjusting the margin values based on your pre-printed paper layout and printing alignment requirements.
To fit more details on a single page,
- Open the invoice, press Ctrl+P (Current) > Ctrl+H (Change Template).
- In the Invoice Templates screen, press F10 (Print Settings) to open the List of Configurations for Print/Export/Share Settings.
- Set Compress the template to fit more details on the page to None, Low, Medium, and High, depending on the amount of content you want to accommodate while maintaining readability.
This will reduce spacing and optimise the invoice layout, allowing more information to fit on a single printed page.
Print FAQs – General
In TallyPrime, table capability has been improved to list configurations. The configuration value can be changed by pressing Enter and movement across the configurations would happen using Up or Down arrow. The new experience has been brought so that users can easily search the required configuration just by typing it in the search box and then pressing Enter to do the changes. This will help user to complete the task faster.
Stripe View is supported even if you have disabled colour in TallyPrime. You will be able to view your reports and vouchers in alternate stripes of lighter and darker shades of grey. To know more, refer to the Enable Stripe View section in the Get Familiar with TallyPrime and TallyPrime Edit Log Features topic.
No, you do not have to enable Stripe View every time for Display/Print/Export/Share a report or voucher. You can enable Stripe View at the application level and the same will be applicable across all the reports and vouchers in TallyPrime.
To know more, refer to the Enable Stripe View section in the Get Familiar with TallyPrime and TallyPrime EditLog Features topic.
PDF and JPEG file formats support Stripe View for Print/Export/Share.
Dot Matrix Printers do not support printing a document with stripes. If you print a voucher or a report with stripes using dot matrix printers, stripes will not appear in the printed format.
Yes, you can enable Stripe View for either Display or Print/Export/Share.
To enable Stripe View only for Display:
- Press F1 (Help) > Settings > Display > under Application, set both Enable Stripe View for Reports to Yes.
To enable Stripe View only for Print/Export/Share of reports:
- Press Alt+P (Print) > select Configuration > under Printer Settings, and set Enable Stripe View for Reports to Yes.
This will also set the same configuration for Export and Share.
To know more, refer to the Stripe View section in the Working with Reports in TallyPrime topic.
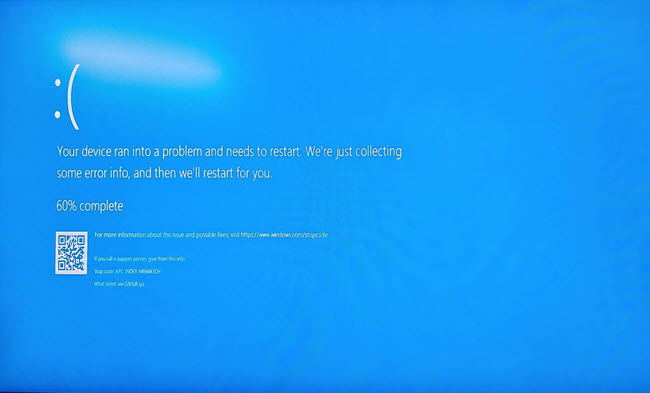
Cause: This might be happening because of the latest security patch of Windows 10 – KB5000808. This Windows 10 update has some issues with a few printers and therefore shows unusual errors when you try to print from any application. In such instances, as you open TallyPrime, Windows 10 application may crash with the following message:
Solution
You can do one of the following:
Option 1
- Check if any other Windows 10 update is available for your computer and upgrade accordingly.
- Start TallyPrime application.
Option 2
- Uninstall the patch KB5000808.
- Install the earlier Windows 10 patch.
- Start TallyPrime application.
- Open any voucher or report and press Ctrl+P > F8 (Print Format).
- In the Printer Settings screen, set up Print Format and select Quick/Draft Format.
This mode prints significantly faster and uses much less ink for printing. - Press Ctrl+A to save.
Multi-account printing will now be available under the Print menu that is available under the top menu. Now, you can easily connect with the context and find relevant functionality over there.
We are in the process of understanding entire business needs considering the maximum usage of features and its flexibility to align with different printers for default printing. We are planning to introduce it in our next release(s).
We have an option to print page numbers in the document using Ctrl+P (Print) > C (Configure) > set Show Page Number to Yes. This will print the page numbers in the document and will help in tracking the missing pages
- From the invoice, press Alt+P (Print) > Current > Configure.
- Type Optimize Printing to Save Paper and press Enter.
- Enable Choose details to show second page onwards and disable the details which you do not require to print on every page.
- Save the configurations and print your invoice.
- Press Alt+P (Print) > Current > Configure > type or select Show Language and press Enter.
- Select Arabic from the List of Language.
Once you have set this to Arabic, you can print your invoices in Arabic language.
- Press Alt+P (Print) > Others.
- Select the required Multi Account Report for printing.
- Press Alt+P (Print) > Configuration.
- Select Show More > Set no. of copies for printing vouchers > and press Enter.
- Under Printer Settings, specify the number of copies you need to print for the voucher types.
- Press F1 (Help) > Settings > Date and Number Format.
- Set the options under Format of Date, as per your business needs.