
Configure Printing for Invoices/Reports
You can configure invoices or reports instantly in TallyPrime.
Set No. of Copies
You can print one or more copies of your documents, and mark them as original, duplicate, triplicate, quadruplicate, and extra copies.
- Open any voucher or report and press Ctrl+P > F5 (No. of Copies).
- In the Printer Settings sub-screen, enter a number for Number of copies.
- Select the Type of Copy and save.
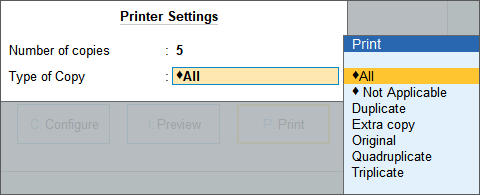
If you want to print only one type of copy – Original/Duplicate/Triplicate/Quadruplicate/Extra Copy, set the Number of copies to 1, and select the required Type of Copy.
Click here.| Scenario | Number of Copies | Type of Copy | Invoice Copies |
| GST is enabled | 2 | All< | The printed invoices will be marked as ORIGINAL FOR RECIPIENT and DUPLICATE FOR SUPPLIER. |
| 3 | All | The printed invoices will be marked as ORIGINAL FOR RECIPIENT, DUPLICATE FOR SUPPLIER and EXTRA COPY. | |
| GST is not enabled | 2 | All | The printed invoices will be marked as Original and Duplicate. |
| 3 | All | The printed invoices will be marked as Original, Duplicate and Triplicate. | |
| 4 | All | The printed invoices will be marked as Original, Duplicate, Triplicate, and Quadruplicate. | |
| 5 or more | All | The printed invoices will be marked as Original, Duplicate, Triplicate, Quadruplicate, and Extra Copy. |
Set Printer Settings
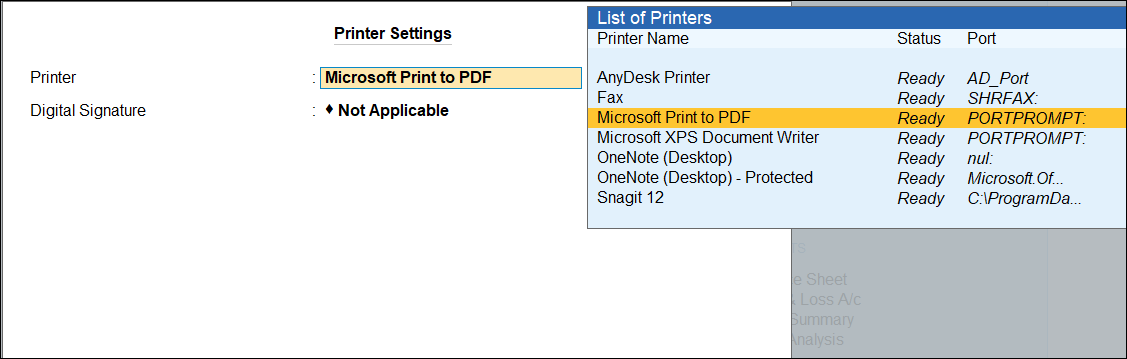
- Open any voucher or report and press Ctrl+P > F6 (Printer).
- In the Printer Settings screen, select the required printer from the List of Printers.
If you want to add Digital Signature, select Microsoft Print to PDF and provide the Digital Signature details.
-
In the Printer Properties window, set the Paper Size.
Based on the printer you have selected, you can configure print size, print quality and others as needed. -
Click OK to save.
You can also configure the Printer Settings for all your invoices and reports at the application level. (Link)
Print Titles/Subtitles
With TallyPrime, you can,
- Update the invoice title and subtitle based on your party, business type, or invoice type (such as GST or other taxations).
- Set titles and subtitles for reports based on the report period or purpose.
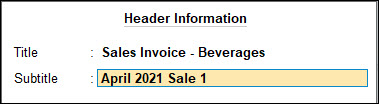
- Open any voucher or report and press Ctrl+P > F7 (Title).
Alternatively, press C (Configure), type or select Title or Subtitle under Header Information - In the Header Information sub-screen, provide the required Title and Subtitle for the document and save.
-
Press P (Print) to print the invoice.
Set Print Format
- Open any voucher or report and press Ctrl+P > F8 (Print Format).
- In the Printer Settings screen, set up Print Format.
-
Dot Matrix Format: In industrial, shipping, or banking environments, particularly for packing slips, invoices, or tickets where multiple copies need to be generated simultaneously, Dot Matrix Format is preferable.
-
Neat Mode: It is the default setting for inkjet or laser printers and the recommended print format, as it ensures sharper texts and clear graphics.
-
Quick/Draft Format: This mode prints significantly faster and uses much less ink for printing.

- Press Ctrl+A to save.
-
- Press P (Print) to print the invoice.
Set the Paper Type
To print an invoice or report, you can use either a blank sheet, or a Pre-Printed paper if your stationery already includes company branding, borders, headers, and so on.
- Open any voucher or report and press Ctrl+P > F9 to toggle between Plain Paper and Pre-Printed Paper formats.
Alternatively, press C (Configure), select Paper Type under Printer Settings, and press Enter to toggle between Plain Paper and Pre-Printed Paper formats.
If you are in Rel 2.1 and earlier, ensure that Alt+P (Print) > Configuration > Reduce space between Address and Name of Items/Particulars is set to No. - Save and press P (Print) to print the invoice.
Configure the Page Range
When handling multi-account reports or large voucher batches, you can select specific pages for printing. This allows you to target only the necessary data, significantly reducing paper waste and printing costs.
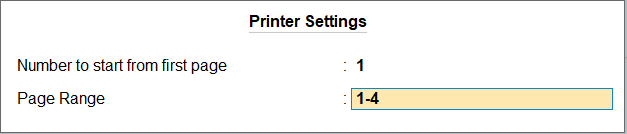
- Open any voucher or report and press Ctrl+P > F10 (Pages to Print),
Alternatively, press C (Configure) > Page Range > Enter. - In the Printer Settings screen, configure the page no. of the first page and the page range.
-
Number to start from first page: Enter a number to appear on the first page and automatically increment on subsequent pages.
-
Page Range: Enter a page range to print only those pages and skip the rest.
-
Press Ctrl+A to save.
-
- Press P (Print) to print the invoice.
Set Invoice Print Size to Use Less Paper for Printing
- Open any voucher and press Ctrl+P > C (Configure).
- In the Print Configuration screen, select Height of normal invoice (in Inches), press Enter, and specify the required height.
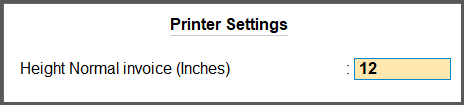
By default, the standard height is set to 10 inches for an A4 paper. If your invoice requires only half the size, change the height to 5 inches. If your printer’s tray contains A4 size papers, replace them with papers appropriate for printing. For example, to print an invoice of a height of 5 inches, use A5 size papers.
- Set Optimise printing to save paper to Yes to print the maximum information in the print area and saves paper.
This option appears only when:
– The Country selected for the company in India.
– The taxation feature for GST/VAT/TDS/TCS is enabled.
– The service tax and excise features are disabled. -
Press Ctrl+A to save.
- Set Optimise printing to save paper to Yes to print the maximum information in the print area and saves paper.
- Press P (Print) to print the invoice.
As you print the invoice after enabling the option Optimise printing to save paper, the list of stock items appears on a single page. Similarly, if you set this option to No, the same information gets printed on two pages.


