Configure and Print Multi-Account Reports
In TallyPrime, you can print multiple vouchers and the primary Books of Accounts, like the Cash and Bank Books, Account Ledgers, Sales and Purchase Registers and so on, without having to select the accounts one at a time and printing them.
Configure Multi-Account Reports
With TallyPrime, easily configure the multiple accounts to match your reporting needs.
Sorting Method for Printing Multi Account Reports
While printing Ledger Accounts and Group of Accounts from Multi Account Reports, you can sort the details as needed. The sorting method has the following options:
- The Default option will print Ledgers in Alphabetical order.
- The Group option will print Ledgers in Alphabetical order under respective Groups
- Press Alt+P (Print) > Others.
- In the list of Multi Account Reports, select All Ledger Accounts > and press Enter.
- Select the required Sorting Methods from the list of Sorting Methods.

Select Groups/Ledgers While Printing Multiple Accounts
You can print the required Groups/Ledgers in a sequence when printing Ledger Accounts from Multi Account Printing.
- Press Alt+P (Print) > Others.
- In the list of Multi Account Reports, select All Ledger Accounts > and press Enter.
- In the Print sub-screen, press C (Configure) > set Select Groups/Ledgers to Yes.

-
In the Selection for Groups/Ledgers screen, select the required groups and ledgers:
-
Include these Groups: Select the required group(s) from the List of Groups to include them. This will print all Ledgers belonging to the included groups, in case none of the groups/ledgers are selected in the other sections, namely, Exclude these Groups, Include these Ledgers and Exclude these Ledgers.
-
Exclude these Groups: Select the required group(s) from the List of Groups to exclude them. This will print all Ledgers belonging to the included groups other than the excluded groups’ ledgers.
Note: In case any group is selected under Include these Groups, this section will list only the sub-group(s) of the Included Group(s). For example, if Current Assets and Current Liabilities are selected under Include these Groups section, the Exclude these Groups section will list the groups/sub-groups of Current Assets and Current Liabilities only, which are, Bank Accounts, Cash-in-Hand, Deposit (Assets), Provisions, Sundry Creditors, Sundry Debtors, and so on. If no group is selected under Include these Groups, this section will list all the Groups. -
Include these Ledgers: Select the required ledger(s) from the list to include for printing.
Note: In case any group is selected under Include these Groups, this section will list all the ledgers other than the ledgers of the included groups, so that the user may select the required ledgers of other groups which have not been selected under Include these Groups. In case any group is selected under Exclude these Groups, this section will list all the ledgers of the Excluded Groups, so that the user may select the required ledgers from the same. -
Exclude these Ledgers: Select the required Ledger(s) to exclude for printing.
Note: This section will list all the Ledgers belonging to the included and excluded group(s), so that user can exclude the ledgers which are not required to be printed.

- Save the changes.
-
- Press P (Print) to print the invoice.
Set Alphabetical Print Range
You can print the ledgers as per alphabetical order, namely 0 to 9 and A to Z. Also, you can mention the required range to print the ledgers at one instance.
- Press Alt+P (Print) > Others.
- In the list of Multi Account Reports, select All Ledger Accounts > and press Enter.
- In the Print sub-screen, press C (Configure). In the Print Configuration screen,
- Set alphabetical range to print: Yes.
- Select Range of Alphabets and press Enter to set select the details for alphabet range.
- From (blank for beginning): Type the first alphabet in the range.
- To (blank for end): Type the last alphabet in the range.

Note: This option is also available for Cash/Bank Book groups, Group of Accounts, Inventory Books – All Items and Group of Items. This option will skip in case you have set Select Groups/Ledgers to Yes, while printing.
- Save the Configurations.
- Press P (Print) to print the invoice.
Configure the Page Range
When handling multi-account reports or large voucher batches, you can select specific pages for printing. This allows you to target only the necessary data, significantly reducing paper waste and printing costs.
- In the Print Configuration screen, press F10 (Pages to Print),
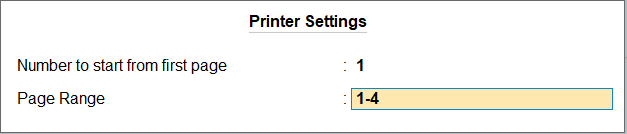
Alternatively, press C (Configure) > Page Range > Enter. - In the Printer Settings screen, configure the page no. of the first page and the page range.
-
Number to start from first page: Enter a number to appear on the first page and automatically increment on subsequent pages.
-
Page Range: Enter a page range to print only those pages and skip the rest.
-
Press Ctrl+A to save.
-
- Press P (Print) to print the invoice.
Print Multi-Account Reports
- Press Alt+P (Print) > Others.
- In the list of Multi Account Reports, select All Ledger Accounts > Enter.
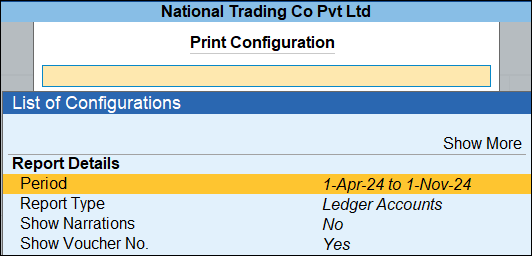
- Configure the report.
- In the Print sub-screen, press C (Configure).
For example, change the report period, if needed.
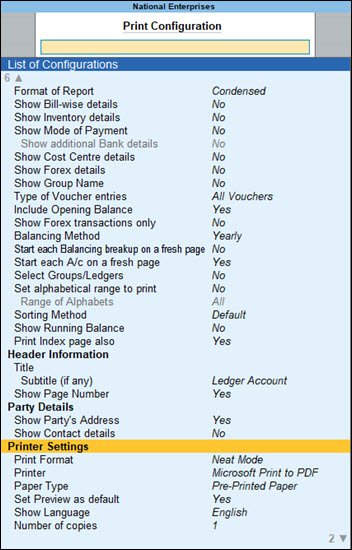
- Set the other options, as needed.
You can select Show More and press Enter, to view all the options provided for the selected report.
- Press Ctrl+A to save the configurations.
- In the Print sub-screen, press C (Configure).
- Press I to preview the report, if needed, and press P to print.
Similarly, you can print other Multi-Account reports in TallyPrime, such as Payslips, Reminder Letters, and so on.