
Configure and Print Business Details in Invoices
With TallyPrime, set up your company and bank detaild. You can also customise your invoices by adding declarations, formats, balances, and essential business details for better clarity and compliance.
Set Up Company Details for All Your Invoices
You can set up company details like name, address, and logo for all your invoices, so you don’t have to update them every time you print a voucher.
- To open the Print Configuration screen, press Alt+P (Print) > Configuration.
Print Company Name & Address
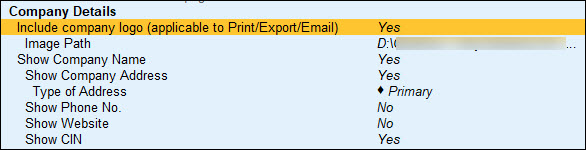
- In the Print Configuration screen, update the Company name and address under Company Details.
- Set Show Company Name to Yes.
- Set Show Company Address to Yes.
- Select Type of Address and press Enter to update Type of Address from the List of Address Types, if you have multiple addresses for the company.

- Press Ctrl+A to save the configuration.
When you print a document, the company address will appear in the printed document.
Print Company Logo
Before you begin | Prerequisite
- Ensure that the company logo is in BMP or JPEG format.
- Ensure that the recommended logo size of 96 pixels (width) × 80 pixels (height).
- In the Print Configuration screen, update the Company logo under Company Details.
- Set Include company logo to Yes.
- In the Company Details screen, update the Image File Name.
The Image Path field will be updated by default after updating the Image File Name.
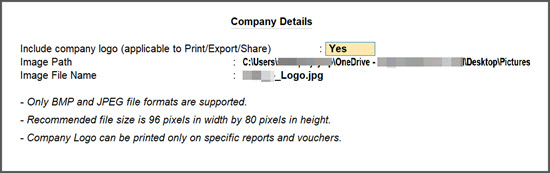
- Set Include company logo to Yes.
- Press Ctrl+A to save the configuration.
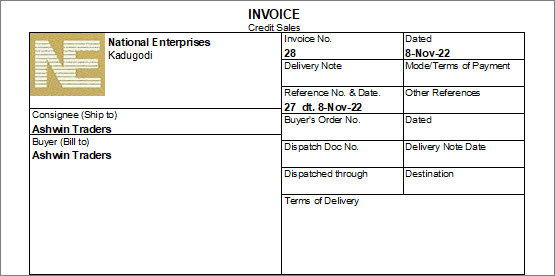
Next time you print an invoice or report, it gets printed with the company logo. The company logo appears on the top left side along with the company name on the printed invoice.
You can also choose to print a voucher with or without the company logo at the time of printing. (Will link to the addition of print logo at the voucher level).
Print Bank details
To open the Add/Remove Field screen for any voucher, open any voucher and press Ctrl+P > C (Configure).
If you are using TallyPrime Release 7.0 or earlier versions, the option will appear in the Print Configuration screen.
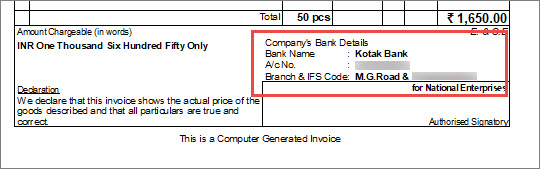
Print Company Bank Details
You can print bank details on sales invoices to enable customers to pay directly to your bank.
- Press Alt+G (Go To) > Alter Master > Ledger > select the company bank ledger and press Enter.
Ensure that the company bank ledger has the correct A/c Number, IFSC, and Bank Name. - In the Print Configuration screen, update the bank details.
-
Set Show Bank Details to Yes.
-
Select Bank Name and press Enter to select the Bank Ledger.
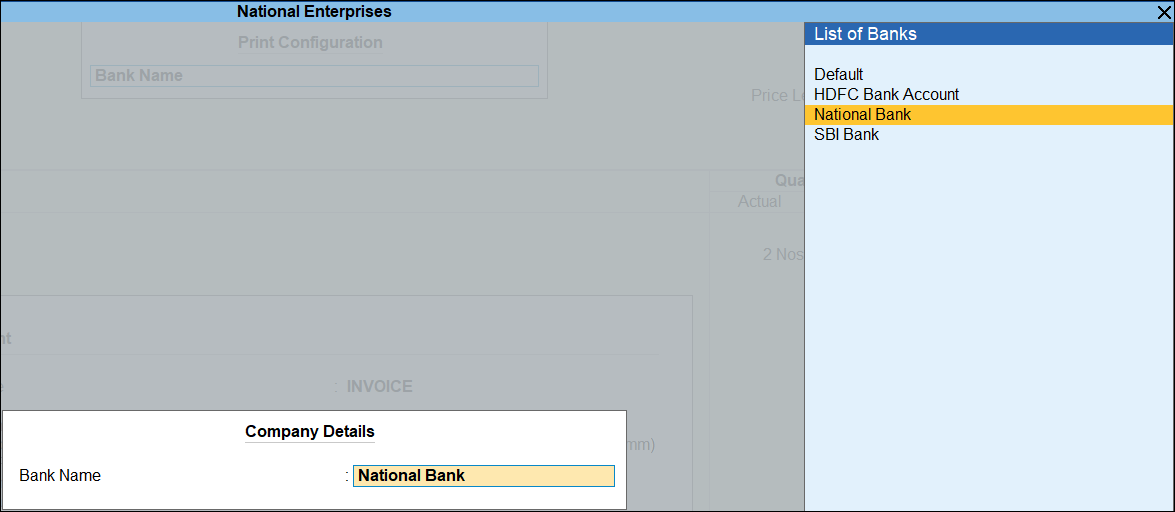
- Press Ctrl+A to save the configuration.
-
- Press P (Print) to print the invoice.
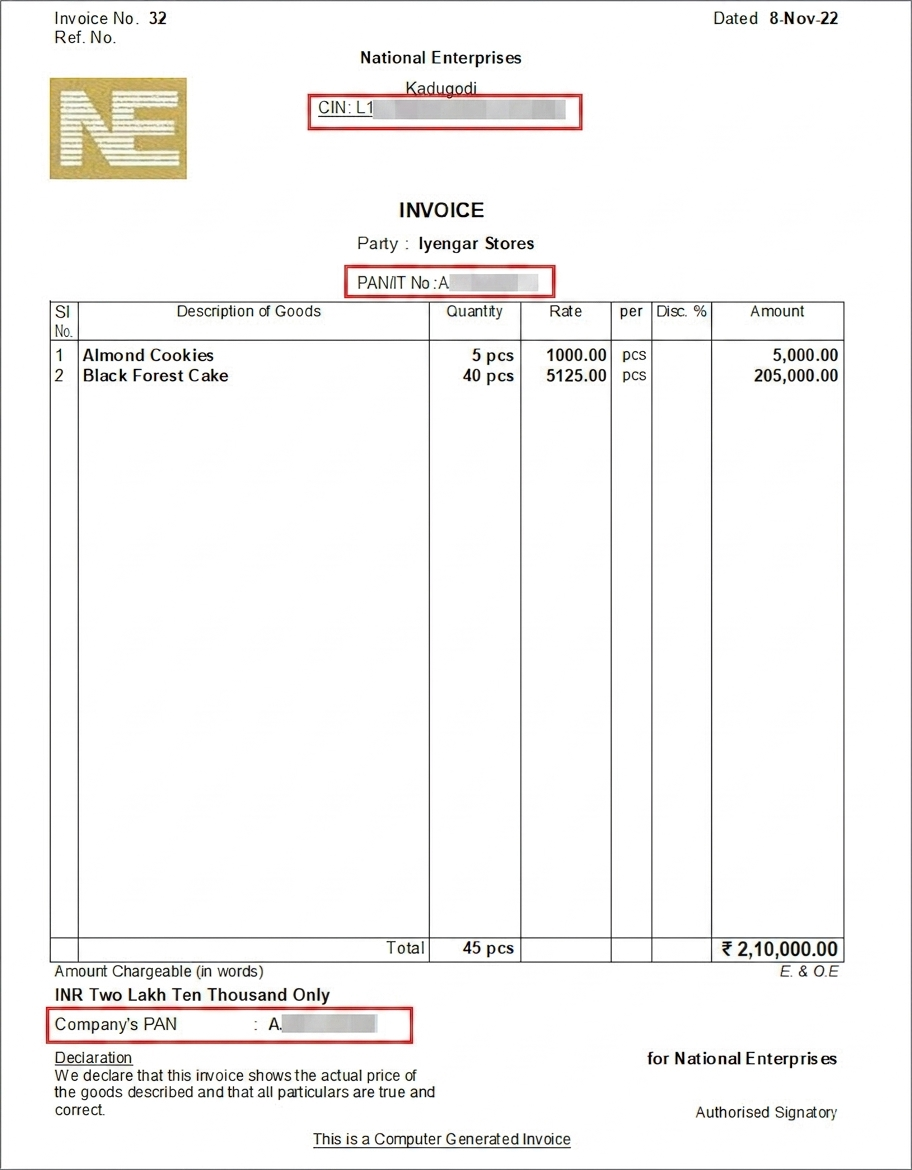
Print PAN and CIN in the Invoice
As per Section 139A(5)(c) of the Income Tax Act, it is mandatory to print the PAN number in the invoice for both buyer and seller if the invoice value is Rs. 2,00,000 or more. Additionally, as per Section 12(3)(c) of the Companies Act, it is mandatory to print the Corporate Identity Number (CIN) along with other details in all business documents, including invoices.
Before you begin | Prerequisite
- Ensure that the PAN/Income tax no. and Corporate Identity No. (CIN) are updated in the F11 (Features) screen.
- Ensure that in the party ledger the PAN/IT No. is updated with the party’s PAN number.
- In the Print Configuration screen, set Show PAN / Income Tax No. and Show CIN to Yes.
- Press P (Print) to print the invoice.
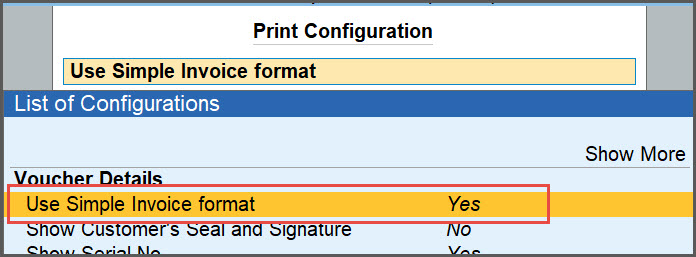
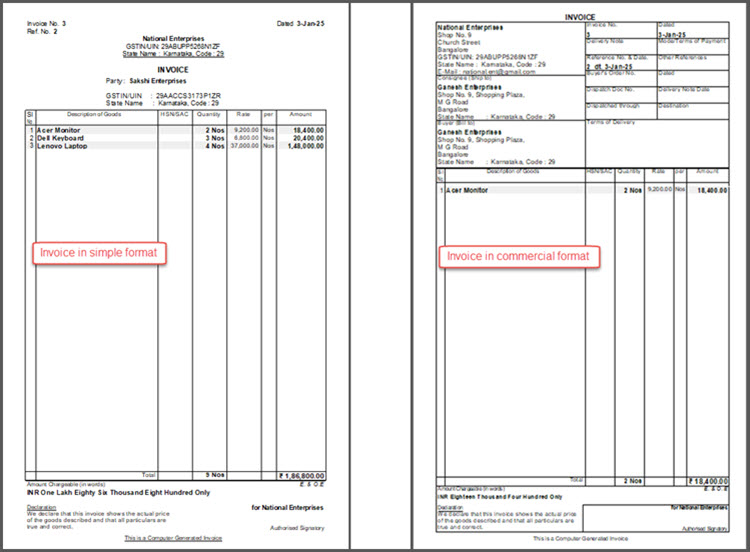
Print Invoices in Simple Format
This is applicable to outgoing documents like Sales Invoice, Receipt Voucher and so on and supported only on printers with Neat Mode print format.
- To open the Add/Remove Field screen, open any voucher and press Ctrl+P > C (Configure).
If you are using TallyPrime Release 7.0 or earlier versions, the option will appear in the Print Configuration screen.
Before you begin | Prerequisite
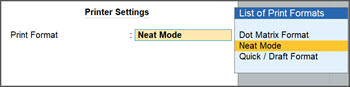
- Ensure that the Print Format is set to Neat Mode.
If not, open a sales invoice, Ctrl+P (Print) > F8 (Print Format) > Neat Mode.
- In the Add/Remove Field screen, set Use Simple Invoice format to Yes.
- Press Ctrl+A to save.
By default, this option is set to No to print the document in Commercial format.
Add Description for Items & Ledgers
You may deal with multiple variants of an item, say appliances of different motor capacities or services in different packages. You can add descriptions for these items or service details in the printed invoices for the buyer’s reference.
- To open the Add/Remove Field screen, open any voucher and press Ctrl+P > C (Configure).
If you are using TallyPrime Release 7.0 or earlier versions, the option will appear in the Print Configuration screen.
Additional description for stock items
Before you begin | Prerequisite
Ensure that the Sales voucher is configured as per the following:
- The option Provide Additional Descriptions for Stock Items is set to Yes.
- The additional description is updated in the sub-screen Description(s) for Item, if needed.
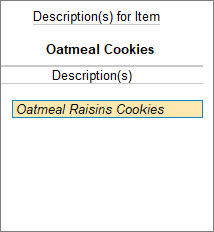
- If you had included any description in the stock item master, the same description is prefilled in the Description(s) for the Item screen.
- In the Add/Remove Field screen, set Show Additional Descriptions for Stock Items and press Enter to set it to Yes.
- Press P (Print) to print the invoice.
Additional description for ledgers
Before you begin | Prerequisite
Ensure that the Stock item ledger is configured as per the following:
- The option Provide Additional Descriptions for Ledgers is set to Yes.
- The additional description for the ledgers is updated in the sub-screen Description(s) for Ledger, if needed.
- If you had included any description in the ledger master itself, the same description is prefilled in the Description(s) for the Ledger screen.
- In the Add/Remove Field screen, set Show Additional Descriptions for Ledgers to Yes.
- Press P (Print) to print the invoice.
Print GST Details in Invoice
A GST sales invoice, apart from other details, must include GST rates, the GSTIN numbers of the buyer and seller, an HSN/SAC code, and party contact details.
- To open the Add/Remove Field screen, open a GST sales voucher and press Ctrl+P > C (Configure).
If you are using TallyPrime Release 7.0 or earlier versions, the option will appear in the Print Configuration screen.
Print GST rate details in the Invoice
When printing the sales invoice, you can configure it to print the GST rates in the invoice item-wise or consolidated.
Before you begin | Prerequisite
- Ensure that you have set up the GST Rates for the stock items and ledgers.
- Ensure that you have set up the HSN/SAC details for the stock items and ledgers.
- In the Add/Remove Field screen, set Show Item-wise GST details to Yes.
- Press P (Print) to print the invoice.
Print HSN/SAC in the Invoice
When printing the sales invoice, you can configure it to print the HSN/SAC codes item-wise or consolidated.
- In the Add/Remove Field screen, set Show HSN/SAC details to Yes.
- Press P (Print) to print the invoice.
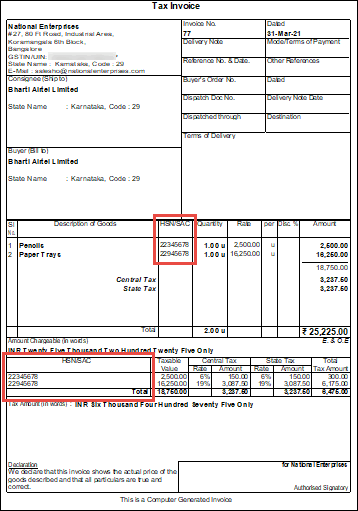
In the printed invoice, you can see the HSN defined for the stock items and the HSN/SAC along with the Taxable value and Total Tax Amount at the bottom of the invoice.
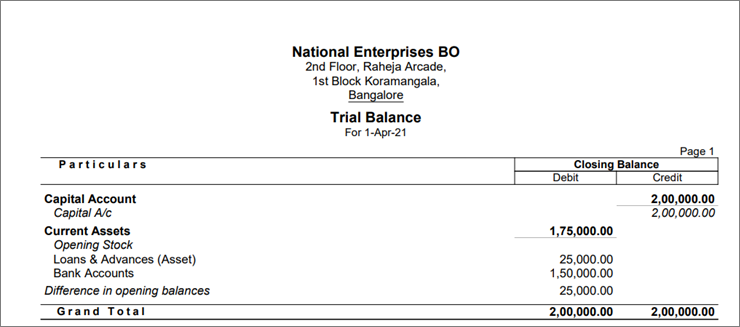
Print Previous & Current Balances in Invoices
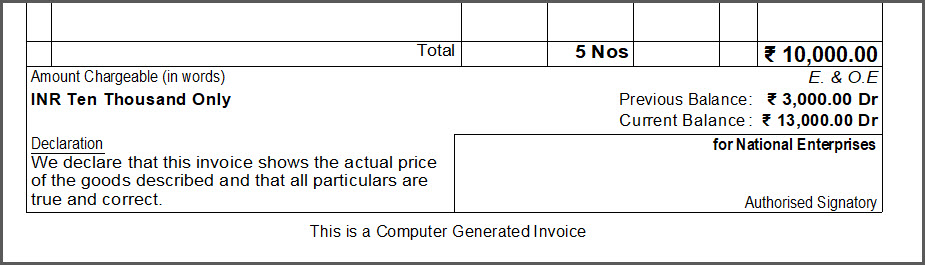
When you record multiple transactions with the same party on the same day, the latest balance (the Previous Balance and the Current Balance) will reflect the values as per the current date.
Say, you have a ledger with a balance of Rs 3000 Dr.
- Record a sales transaction, (say, Voucher No. 101) with an invoice amount of Rs 10,000.
- Print Voucher No. 101.
- Press Ctrl+P (Current) > C (Configure).
- Under Party Details, enable the Show Previous and Current Balances of Ledger option.
The Previous Balance will appear as Rs 3000 and the Current Balance will be Rs 13,000.
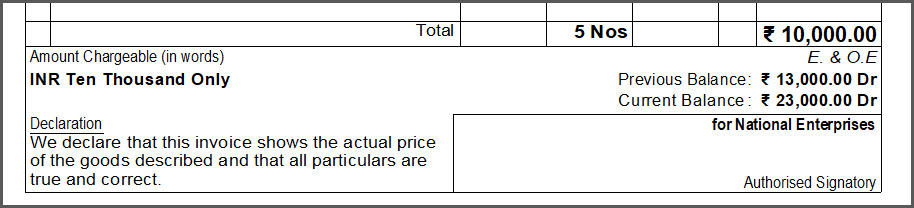
- Record another sales transaction, (say, Voucher No. 102) with the same ledger with an invoice amount of Rs 10,000.
- Print Voucher No. 101 again.
The Previous Balance will appear as Rs 13,000 and the Current Balance will be Rs 23,000, ensuring that the combined values are reflected from both the invoices.
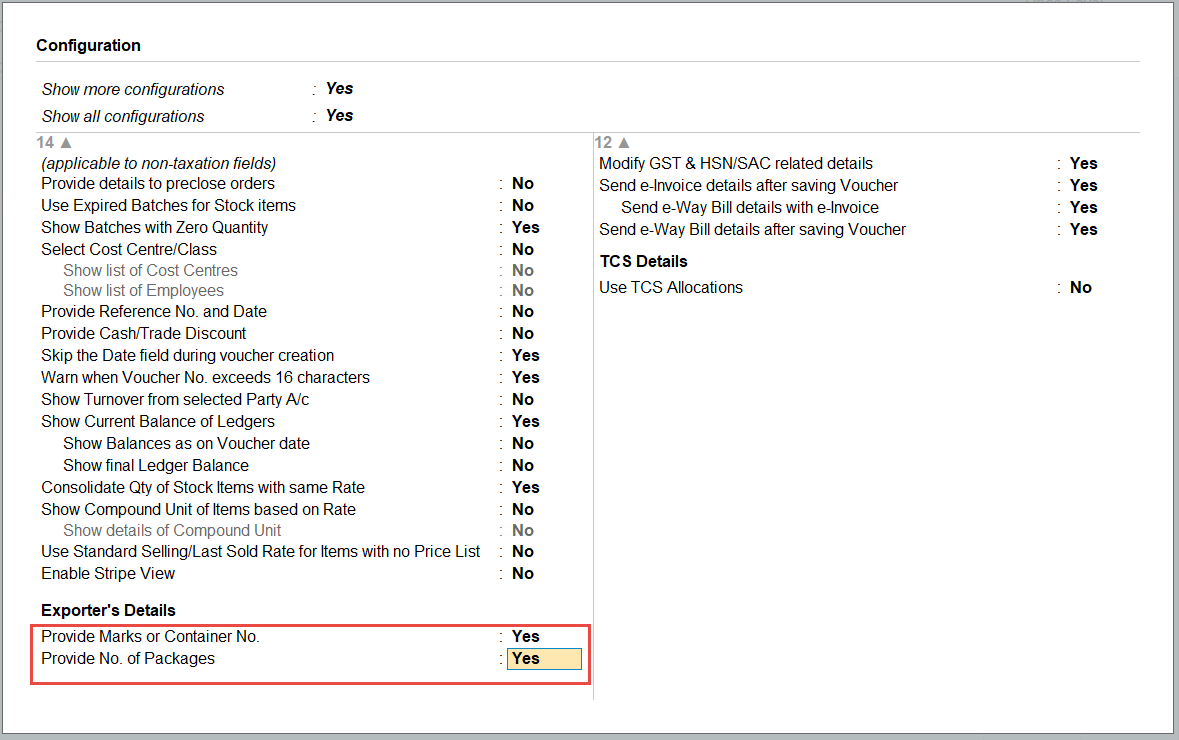
Print Marks or Container Number & Number of Packages
When you export goods, shipping details such as Marks, Container Number, and Number of Packages become critical for business operations. You can add these details to your sales voucher and print them for verification, shipment, and reference purposes.
Before you begin | Prerequisite
- Ensure that you have enabled the options Provide Marks or Container No. and Provide No. of Packages in the Configuration screen of Sales voucher.
- Record a sales transaction with code for Marks and No. of packages.
- In the sales voucher, press Ctrl+P (Current) > P to print the invoice.
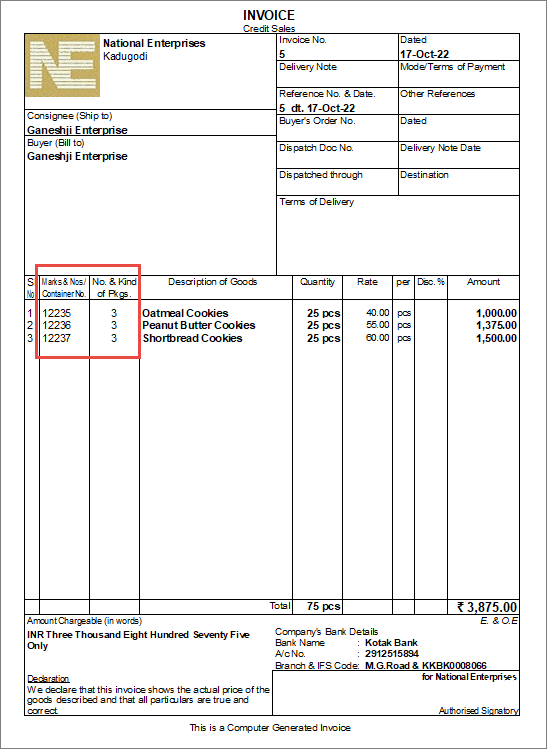
In the printed invoice, the code for Marks and No. of packages appears for each stock item as entered during voucher entry.
Print LR-RR Number and Motor Vehicle Number
Before you begin | Prerequisite
Ensure that the voucher is configured as per the following:
- The option Provide Dispatch, Order, and Export details is set to Yes.
- The option Provide Export Details option is set to No. If this option is enabled, the Motor Vehicle No. will not appear in the Dispatch Details screen.
Let’s consider a sales transaction.
- Select the party ledger and enter the LR-RR No. and Vehicle No. in the Dispatch Details of the Party Details screen.
Alternatively, you can enter the LR-RR number and the vehicle number in the Statutory Details screen of the sales voucher.
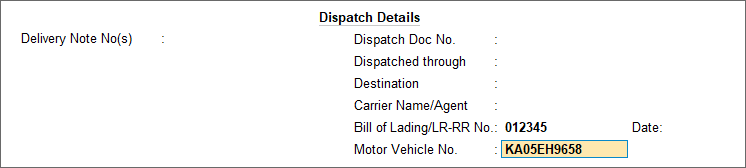
- In the Add/Remove Field screen, set Show Dispatch Details to Yes.
- Press P (Print) to print the invoice.
Print Declaration/Terms & Conditions
In TallyPrime there is a default declaration which appears in all the invoices.
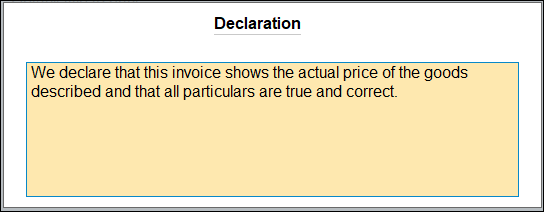
You can alter the declaration, if your business policy has any declarations related to the sales of goods and services and print it accordingly.
- Ensure that you have updated the declaration, and change the declaration, if needed.
- Press Alt+G (Go To) > Alter Master > Voucher Type > select the Voucher Type and press Enter.
- Set/alter declaration: Yes.
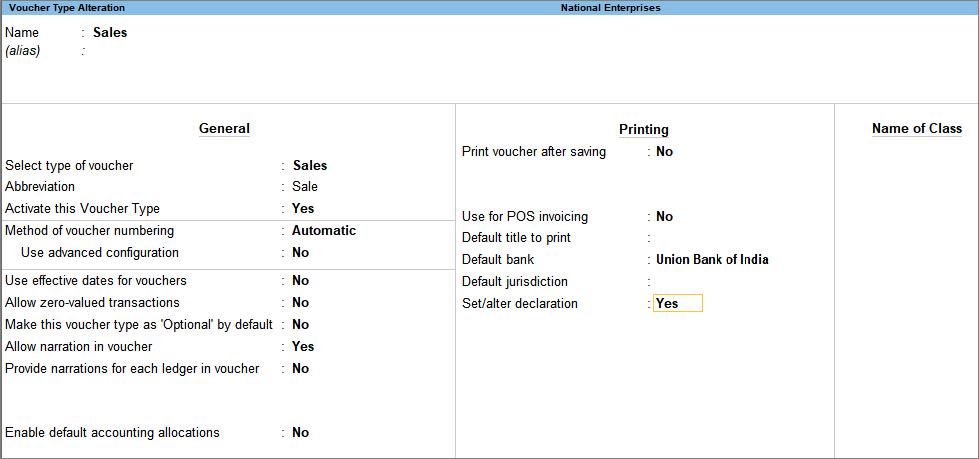
- Change or update the declaration, if needed and save.
- In the Add/Remove Field screen, set Show Declaration to Yes.
- Press P to print the invoice with declaration.
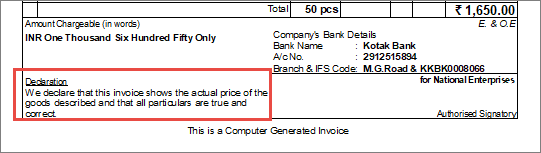
TallyPrime prints the declaration as provided in the invoice and applies the same declaration to all the future invoices.


