
TallyPrime License in Educational Mode
Your TallyPrime license may turn to Educational Mode due to several reasons. In most cases, you can resolve the issue by following the solutions provided on this page.
TallyPrime Turned to Educational Mode on the Server Computer
The server computer is the system where your TallyPrime license has been activated or reactivated.
- For the Silver license edition (single user), the standalone system itself acts as the server.
- For the Gold license edition (multi-user), one system functions as the server, while the other systems in the same LAN fetch the license from it.
The list of possible causes and resolutions are mentioned below:
Your TallyPrime license may turn to Educational Mode due to different reasons. You can resolve the issue in most of the situations by referring to the solutions listed on this page.
Cause 1
The server system has been formatted, the hard disk of the system has been replaced, or the system has been updated with the latest Windows version or updates.
Solution
Reactivate the license on the server machine. In case the server system has been upgraded to Microsoft Windows 11
- Delete the existing tallyprime.lic file from F1 (Help) > About > Application Path
- Reactivate the license.
Cause 2
If you have upgraded to a release for which your TSS is no more valid.
Solution
Download & install a TallyPrime release that is applicable within your TSS validity period and reactivate your license.
Cause 3
Your trial version or rental license has expired.
Solution
Renew your license and then reactivate your license.
Cause 4
You have reactivated your license on a different system, due to which the license on the server machine got surrendered automatically.
Solution
- If you have a single-user Silver license, ensure to close TallyPrime on the server system before accessing the license from another system within the same LAN network.
- If you have a multi-user Gold license, ensure that the license is activated on a dedicated server system, and all the systems on the same LAN are configured to the server.
Cause 5
TallyPrime is not connected to the Internet for more than 30 days. In such a case, TallyPrime reaches the offline usage limit and the license becomes invalid.
Solution
Connect the server system to the Internet and reactivate the license.
-
Best Practice: Ensure that the system where the license is activated or was last reactivated is connected to the Internet at least once in every 30 days.
Cause 6
The TallyPrime.lic file is missing from the TallyPrime installation folder in the server system.
Solution
Reactivate the license in your server system.
Cause 7
The Tally Gateway Server service is stopped or not responding in the server system.
Solution
Restart the service.
- Press Windows+R, type services.msc, and press Enter to open the Services window.
- Locate Tally Gateway Server, right-click, and select Restart.
- Once the service is restarted, check if the license becomes active.
If the license is still not active, you need to uninstall the Gateway Service to regenerate a valid gateway port by reactivating the license.
- Uninstall Tally Gateway Server:
- Open the Command Prompt in administrator mode.
- In the Command Prompt, navigate to the folder where Tally Gateway Server is installed.
- Type tallygatewayserver.exe – u and press Enter to uninstall the Tally Gateway Server.
You will get a confirmation as shown below.
- Reactivate the license.
TallyPrime Turned to Educational Mode on the Client Computer
Your TallyPrime may turn to Educational Mode on any client or node computer, while the license is still active in the server computer.
The list of possible causes and resolutions are mentioned below:
Cause 1
The TallyPrime instance on the client is not configured with the correct license details.
Solution
- Press F1 (Help) > Settings > License > Manage License.
- From the Manage License screen, press F4 (Use License From Network) > select Configure License Manually.
- Enter the Compute Name/IP and Port , where the license is activated.
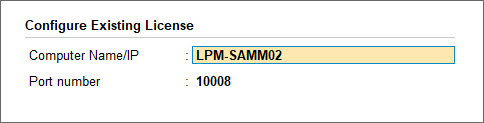
- Press Enter.
- Click Yes to save the configuration and restart TallyPrime.
Cause 2
The client machine is disconnected or unable to connect to the LAN hosting the license server.
Solution
- Press F1 (Help) > About.
- Check Local Area Network Connectivity under the section Connectivity and Tally Gateway Server.
If the Local Area Network Connectivity shows Yes, check if the client is communicating with the server computer.
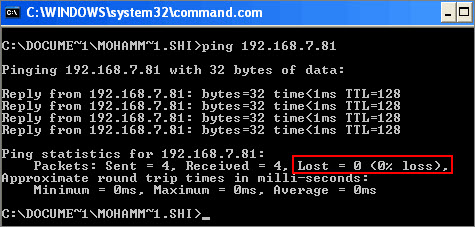
- Go to the Start menu > Run > Command Prompt.
- Enter Ping <IP Address>. For example, enter Ping 192.168.7.81. If the network is connected, you will get a response as shown below.
- Click the close button to exit.
Cause 3
Windows Firewall on Server system has blocked the license access.
Solution
- Add tally.exe, tallygatewayserver.exe, and TallyGateway port details to Inbound and Outbound rules in the Windows firewall exceptions list. For more information, refer to Add TallyPrime EXE & Ports to Firewall Exceptions List.
- Access the license on the client computer
If the problem persists, repeat the steps.
Cause 4
The Client & Server machines are not in identical IP address and Subnet mask range.
Solution
To check the IP address and Subnet Mask of the computer:
- Go to the Start menu > Run > Command Prompt.
- Enter ipconfig in Command Prompt.
- Check the IP Address, Subnet Address, and the Default Gateway.
The IP and the subnet addresses should be identical on the server and the client computers.
Example
| IP Address | Subnet Mask | Range of IP Addresses | License Sharing | |
| Case 1 | ||||
| Server | 192.168.2.1 | 255.255.255.0 | 192.168.2.1 – 192.168.2.254 |
In this scenario, the range of IP addresses is different. Hence, the license will not be served. |
| Client | 192.168.1.1 | 255.255.255.0 | 192.168.1.1 – 192.168.1.254 | |
| Case 2 |
||||
| Server | 192.168.2.1 | 255.255.240.0 | 192.168.0.1 -192.168.15.254 |
In this scenario, the range of IP addresses is same, though the subnet mask is different. Hence, the license will be served. |
| Client | 192.168.1.1 | 255.255.255.0 | 192.168.1.1 – 192.168.1.254 | |


