
E-mail Invoices and Reports in TallyPrime
Using the E-mail feature in TallyPrime, you can quickly send your invoices, payslips and reports in different file formats, such as PDF, XML, and so on, to one or more E-mail addresses at the same time. To send an E-mail from TallyPrime, all you need is an Internet connection, a valid source E-mail address, which can be your company E-mail, and the E-mail address of the recipients.
One-time Setup
In TallyPrime, you can set up your profile as a one-time setup to make the communication between you and your stakeholders a lot easier.
Create E-mail Profiles
![]()
You need to create a profile when you send an e-mail from TallyPrime for the first time. You can create multiple profiles if needed. Next time you can instantly select the profile from which you want to e-mail documents to your parties.
- On any invoice/report, press Ctrl+M (Current) > E-mail from > Create.
In the Create E-mail Profile subscreen appears, the E-mail sender name is pre-filled as per your Company Name. You can change the E-mail sender name, if needed.
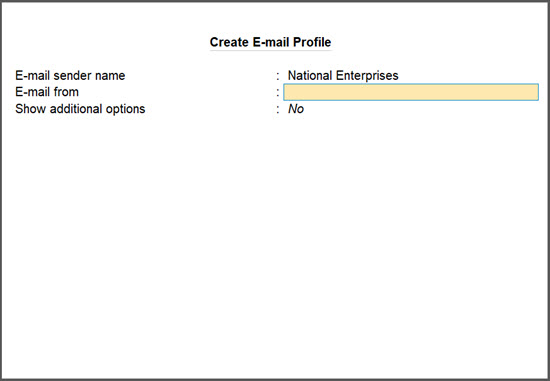
- Enter your E-mail address in the E-mail from field.
- Press Ctrl+A to save.
Your E-mail profile will be created and appear under List of Profiles.
Set up E-mail authentication
![]()
Depending on your E-mail server, you will have to set up the E-mail server configurations.
- In the Create E-mail Profile screen, set Show additional options to Yes.
- Update the Username (for authentication) field as per your preference. This field appears to be prefilled with the E-mail address provided in the E-mail from field.
- Configure the E-mail Server.
- Select the required E-mail Server from the list of Common E-mail Servers.
The remaining fields in the Create E-mail Profile subscreen will appear to be pre-filled, which you can change based on your preference. - If you are using a different E-mail server, select User Defined.
- For the Server address, enter the name of your SMTP server.
On selecting Gmail, Yahoo Mail, or Hotmail, the server address appears automatically. You need to manually configure other E-mail servers. For Outlook, enter the Server address as smtp-mail.outlook.com:25. - Enter the Port Number.
- For the Server address, enter the name of your SMTP server.
- Select the required E-mail Server from the list of Common E-mail Servers.
- Configure SSL and use of SSL/TLS.
- Set the option Use SSL to Yes, if you are using a secured network or sending E-mails using secured mail servers.
- Set the option Use SSL/TLS on standard port, as required. For Outlook or Hotmail, set this option to Yes.

- Press Ctrl+A to save.
After creating multiple E-mail profiles, you can easily select your preferred E-mail address from the List of Profiles while sharing the business documents, making the process more efficient and straightforward.
Create E-mail message templates
![]()
Similar to creating E-mail profiles, you can have predefined message templates and select them while sending E-mails.
- On any invoice/report, press Ctrl+M (Current).
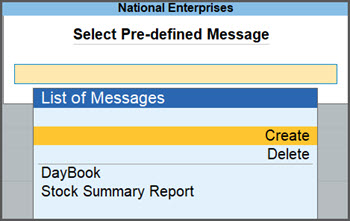
- In the E-mail screen, press Alt+S.
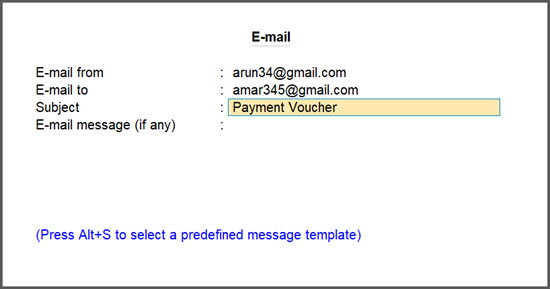
- In the Select Pre-defined Messages screen, select Create.
- In the Create E-mail Message screen, enter Message Name and Message.

The message template will be saved in the Message Name for easy reference.
- In the Select Pre-defined Messages screen, select Create.
- Press Ctrl+A to save.
The message will now appear under the List of Messages.
Similarly, you can create multiple E-mail messages and select one from the List of Messages while sending an E-mail.

Set up two-step authentication
To ensure that you can use your Gmail account to E-mail invoices, reports, and reminder letters, you need to authenticate your E-mail service providers, such as your Gmail and Yahoo account.
To change your Gmail settings to use your E-mail ID from TallyPrime,
- Log in to your Gmail account.
- From Google Apps, select Account > Security.
- Add Two-step verification and generate App passwords.
- Click Done.
To change your Yahoo Mail settings to use your E-mail ID from TallyPrime,
- Log in to your Yahoo account.
- Select Account Info > Account Security.
- Add Two-step verification and generate App passwords.
- Click Done.
Once you have generated the passwords, you can use the same passwords for authenticating your E-mail address while e-mailing the documents from TallyPrime.
E-mail an Invoice
E-mail an invoice from TallyPrime to your party’s e-mail address anytime you need. For illustration purposes, let’s consider e-mailing a sales invoice and a payment invoice with Payment link.
E-mail a sales invoice
![]()
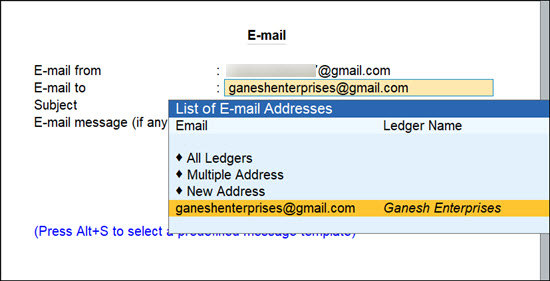
- On a sales invoice, press Ctrl+M (Current).
- Select an e-mail profile under E-mail from.
- Select your party’s e-mail address in the E-mail to field.
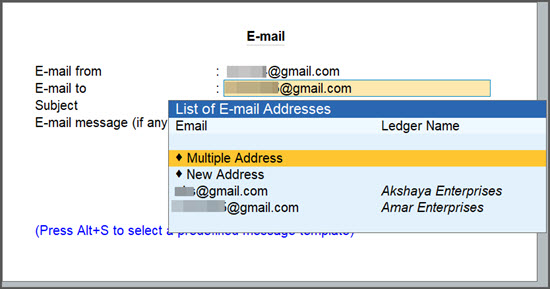
- Select Multiple Addresses, to send the invoice to multiple E-mail addresses.
- Select New Address, to send the invoice to a specific E-mail address.
- Verify the Subject field.
This field is prefilled with the invoice type. Change the subject, if needed. - For E-mail message (if any), enter a message, if needed. This is an optional field.
Press Alt+S to select a predefine message template, if you have created one earlier. - In the E-mail screen, press C (Configure) to configure, as needed.
- Press M (E-mail).
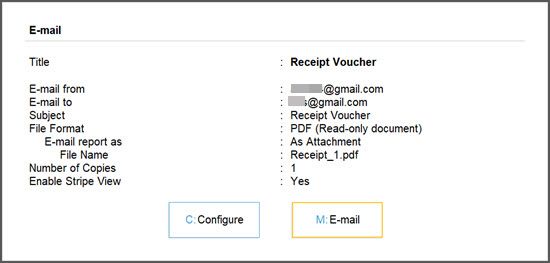
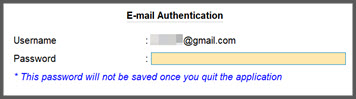
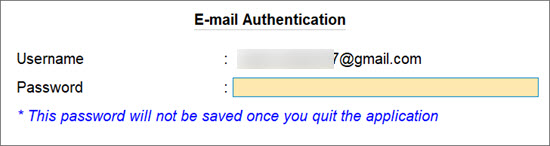
- Depending on your e-mail server, in the E-mail Authentication screen enter Password for your e-mail to authenticate.
With the ability to send invoices to multiple e-mail addresses simultaneously, TallyPrime enhances the convenience of sending e-mails in just a few simple steps.
E-mail a sales invoice with payment link
The steps for e-mailing a payment invoice are the same as you would do for sending any invoice.
- Open the invoice with Payment links or QR codes that you want to send, and press Ctrl+M (Current).
- Select an e-mail profile under E-mail from.
- Select your party’s e-mail address in the E-mail to field.
- Select Multiple Addresses, to send the invoice to multiple E-mail addresses.
- Select New Address, to send the invoice to a specific E-mail address.
- Verify the Subject field.
This field is prefilled with the invoice type. Change the subject, if needed. - For E-mail message (if any), enter a message, if needed. This is an optional field.
Press Alt+S to select a predefine message template, if you have created one earlier. - In the E-mail screen, press C (Configure) to configure, as needed.
- Depending on your e-mail server, in the E-mail Authentication screen enter Password for your e-mail to authenticate.
After receiving your E-mail, your customers will be able to pay you back instantly using the payment link or QR code.
E-mail Pay Slips
![]()
In TallyPrime, you can E-mail a single Pay Slip or multiple Pay Slips, as per your business needs.
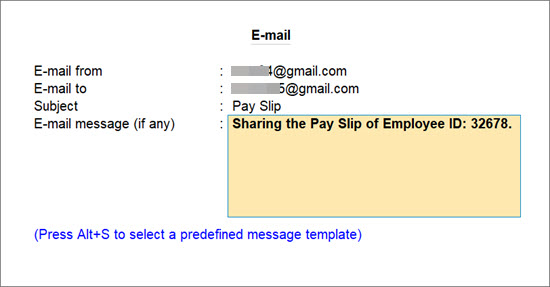
- Open the Pay Slip or Multi Play Slips report, and press Ctrl+M (Current).
- Select an e-mail profile under E-mail from.
If you have not created a profile yet, you can create one now. - Verify the E-mail to field.
- In case of a single pay slip, this field is prefilled with the e-mail address of the employee you have selected. You can enter a new e-mail address, if needed.
- In case of multiple play slips, this field does not appear. Based on the e-mail addresses for the employees, the pay slips will be e-mailed.
- Verify the Subject field.
This field is prefilled as Pay Slip. Change the subject, if needed. - For E-mail message (if any), enter a message, if needed. This is an optional field.
Press Alt+S to select a predefine message template, if you have created one earlier. - In the E-mail screen, press C (Configure) to configure, as needed.
- Press M (E-mail).
- Depending on your e-mail server, in the E-mail Authentication screen enter Password for your e-mail to authenticate.
The pay slips will be sent to the employee’s e-mail address instantly.
E-mail Reminder Letters
![]()
E-mail Reminder Letters, including the due amount and due date, to your parties for making timely payments.
Let’s consider the Bills Receivable report for illustration purposes.
- Open Bills Receivable report, and press Ctrl+M (Current).
- Select an e-mail profile under E-mail from.
- Select your party’s e-mail address in the E-mail to field.
- Select All Ledgers, to send reminders to all the parties in the report.
- Select Multiple Addresses, to send reminders to multiple e-mail addresses.
- Select New Address, to send the reminder letter to a specific e-mail address.
- Verify the Subject field.
This field is prefilled as Pay Slip. Change the subject, if needed. - For E-mail message (if any), enter a message, if needed. This is an optional field.
Press Alt+S to select a predefine message template, if you have created one earlier. - In the E-mail screen, press C (Configure) to configure, as needed.
- Set Report Type to Reminder Letter.

- Configure the Company Aging Alteration.

- Set Report Type to Reminder Letter.
- Press M (E-mail).
- Depending on your e-mail server, in the E-mail Authentication screen enter Password for your e-mail to authenticate.
In TallyPrime, you can E-mail a reminder letter to a single or multiple parties in one go. For detailed information, refer to Send Reminder Letters to Parties.
E-mail Multi Account Reports
![]()
Apart from a single voucher or a report, you can also e-mail Multi Account Reports from TallyPrime.
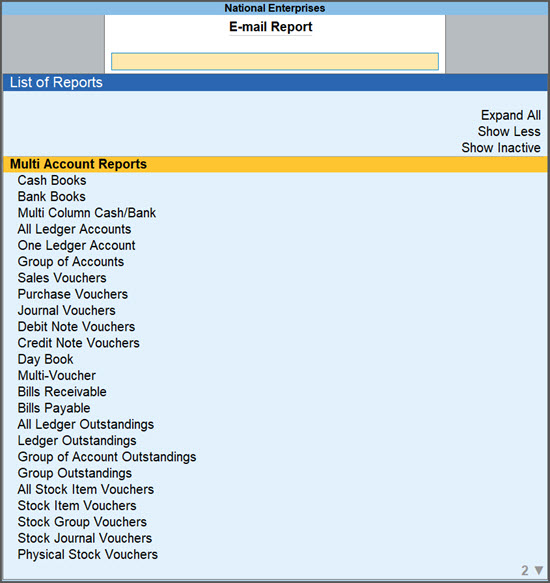
- Open the multiple account report that you want to e-mail.
- Press Alt+M (Share) > under E-MAIL select Others.
- Type or select the report you want to send via e-mail.
- Select an e-mail profile under E-mail from.
- Select your party’s e-mail address in the E-mail to field.

- Select All Ledgers, to send e-mail to all the parties in the report.
- Select Multiple Addresses, to send e-mail to multiple e-mail addresses.
- Select New Address, to send the e-mail to a specific e-mail address.
- Verify the Subject field.
This field is prefilled as per the document. Change the subject, if needed. - For E-mail message (if any), enter a message, if needed. This is an optional field.
Press Alt+S to select a predefine message template, if you have created one earlier. - In the E-mail screen, press C (Configure) to configure, as needed.
- Press M (E-mail).
- Depending on your e-mail server, in the E-mail Authentication screen enter Password for your e-mail to authenticate.
TallyPrime sends the document to the e-mail address as per your requirements.
E-mail Dashboard Tiles
![]()
Using E-mail in TallyPrime, you can share a single tile or all the tiles of your dashboard with stakeholders for their easy reference.
- Open Dashboard and select the tile that you want to e-mail.
- To send a selected tile, press Ctrl+M (Current).
- To send all the tiles, press Alt+M (E-mail) > All Tiles.
- Select an e-mail profile under E-mail from.
- Select your party’s e-mail address in the E-mail to field.

- Select Multiple Addresses, to send the Dashboard tile or tiles to multiple e-mail addresses.
- Select New Address, to send the Dashboard tile or tiles to a specific e-mail address.
- Verify the Subject field.
This field is prefilled with the select tile name or All Tiles. Change the subject, if needed. - For E-mail message (if any), enter a message, if needed. This is an optional field.
Press Alt+S to select a predefine message template, if you have created one earlier. - In the E-mail screen, press C (Configure) to configure, as needed.
- Press M (E-mail).
- Depending on your e-mail server, in the E-mail Authentication screen enter Password for your e-mail to authenticate.
Now, the recipient will be able to view the summary of your financials, sales and purchase trends, and so on, in the form of tiles.
Errors & Resolutions
E-mail cannot be sent
Cause
This message appears when you have entered incorrect E-mail or password, or not authenticated your Gmail or Yahoo account to be accessed by TallyPrime.
Resolution
The file size is larger than the permissible limit
Cause
This message appears when you attempt to attach files of size more than the limit applicable for your E-mail account. For example, in case of Gmail, you can attach files of size up to 25MB. When you exceed this limit, you will see this warning message.
Resolution
Ensure that the file size of the document is less than the permissible limit while sending an E-mail. For example, you can reduce the period of the report so that the file size for the report is within the permissible limit.
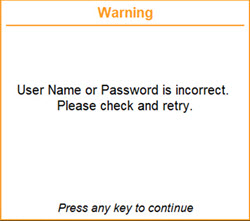
User Name or Password is incorrect. Please check and try again
This message appears if the SMTP Client Authentication is not enabled.
Resolution
To enable SMTP client authentication:
- Log in to the Powershell and connect to Office 365.
- Set-TransportConfig -SmtpClientAuthenticationDisabled $False
The above procedure should be tried with the help of system administrator.
Bad FROM Address
Cause
When the E-mail from mentioned is wrong due to any invalid character – such as /.
Resolution
Verify the email id entered in E-mail from field, ensure it is correct and then proceed with emailing.


