
Activate License
All About Licenses | ACTIVATE | Configure | Reactivate | Update | Surrender | Multi-Site
Once you have bought a new TallyPrime license, you will need to activate the same using the license key received on your registered e-mail address. Until you activate your license, your TallyPrime will be in education mode. Got a New TallyPrime License? Activate the license now.
Activate your TallyPrime silver or gold license in your system and get started. If you have a gold license, it is recommended to activate it in a system that can be available all the time as the server system.
To watch our short video, click: ![]()
1. Start TallyPrime in Administrator Mode
Right-click the TallyPrime icon in the installation folder, and click Run as Administrator.
2. Start License Activation
- In the Welcome to TallyPrime screen, select A (Activate License).

- Enter your License Serial Number, Activation Key, and E-mail ID/Tally.NET ID.
This E-mail address will be set as your Account ID for this license.
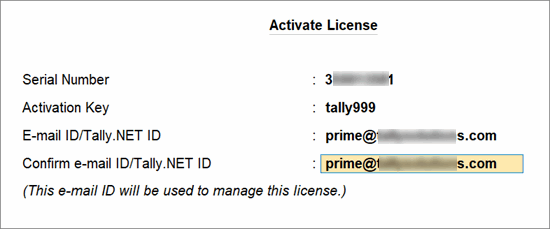
- Press Enter to receive the unlock key in your e-mail.
3. Unlock License
- In the Unlock License screen, enter the Unlock Key
- Press Enter to complete the process.
- You have successfully activated your TallyPrime license.
What’s Next
- If you have activated your gold license on a system, configure the license for multiple users for all other users in the same LAN network.
- If you need to have multiple silver or gold licenses and manage them together, configure your licenses for multi-site.
Save the Tally.Net ID and credentials shared via e-mail on activation of license for future license activities.
Questions & Answers
I have not received the license key on the registered e-mail ID. What should I do?
- Click the Unlock Key Service screen.
- Enter the required license details, and click the Get Unlock Key button.
If you are still not able to find it, write an e-mail with your license serial number to support.tallysolutions.com and we will get back to you with the details at the earliest.
What should I do if I have forgotten my Tally.NET Password?
Option 1: Update the password on the customer portal.
- On the login screen, select Forgot ID/Password.
- Click Reset password, enter your Tally.NET ID, enter Captcha, and click Reset.
Option 2: Update the password from TallyPrime
- Press F1 (Help) > Settings > Manage License.
If you are in the Reactivate or Update process, TallyPrime prompts you to enter your ID and password. - Press Alt+R (Reset Password) on the right button bar.
- Enter your Tally.NET ID and press Enter.
In both options, you will receive an e-mail notification on your registered e-mail address (your tally.NET ID).
Follow the instructions in the e-mail to setup your password and use the same to login next time.
What if I do not recollect my Tally.NET ID/registered e-mail address?
It is possible that the e-mail address registered is different from the e-mail registered with your Tally.NET ID. Or if you have forgotten your e-mail ID or password, no worries.
Simply write to support.tallysolutions.com with your license details and the correct e-mail address for you Tally.NET ID, and we will get the rest fixed.
How to activate a rejected license?
You can activate a rejected site license using new site ID.
Refer to the video to know the steps to activating a rejected site license.
What should I do, if I am unable to retrieve my license activation key?
Send an e-mail to Tally Support with your e-mail address and the license purchase details. Once we validate the details, you will receive your license activation key in the same e-mail address.
What should I do if I have forgotten my License No. and e-mail ID?
Your TallyPrime license no. should be available from one of the following:
- F1 (Help) > Settings > License > Manage License.
- F1 (Help) > About > under License Information.
In case you have forgotten your e-mail address, write an e-mail to Tally Support with the following details:
- Your license serial number
- The e-mail address you want to register for your license. Once registered, this will be your registered Tally.NET ID.
- Your contact details.
Once the details are updated, you will start receiving all license related communication in your registered Tally.NET ID.


