
This topic includes the frequently asked questions on VAT.
Here are the pros and cons of moving item level tax configuration to stock group level (through Enforce Tariff/Rate option)
Pros
- It allows to define tariff/rate for set of items in a group at a single location.
- It automatically clears any tax details from items or sub-groups under the group eliminating the need to delete the details manually.
- It allows to update the tariff/rate for items from a single location.
Cons
- It is not advised to use enforce option if group contains items with different tax rates, as a single rate is applied by enforce option.
- It is not advised to use the enforce option when items contain history with multiple rates for different periods.
Procedure to move stock item level tax configuration to stock group level
To move the stock item level tax configurations to stock group level
- Gateway of Tally > Alter > type or select VAT Rate Setup > and press Enter.
Alternatively, press Alt+G (Go To) > Alter Master > type or select VAT Rate Setup > and press Enter.
Or
Gateway of Tally > Display More Report > Statutory Reports > VAT Reports > Tax Rate Setup.
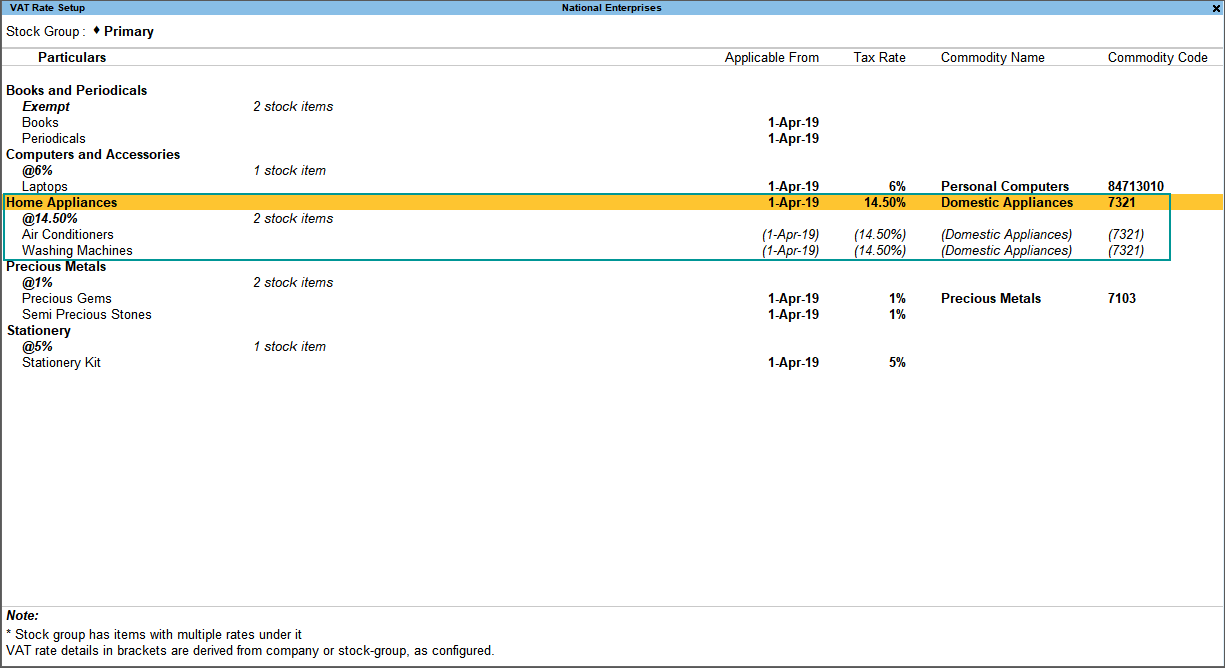
Alternatively, press Alt+G (Go To) > type or select VAT Rate Setup > and press Enter. - Select a group and press Enter to know the tax details updated in each stock item.

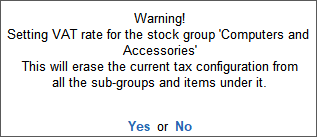
- Press Esc and select the select the stock group (for example, Home Appliances), and press Alt+V (Enforce Rate).
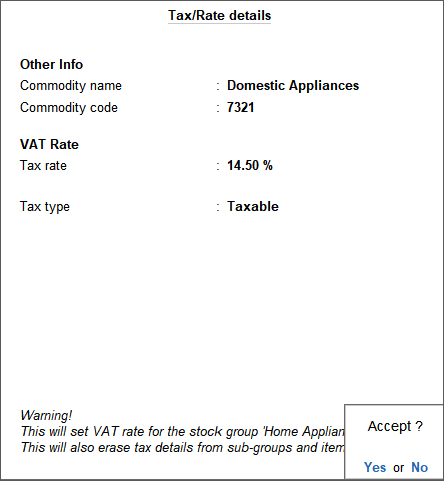
- Provide all the tax details.

- Press Enter . The warning message appears as shown below:
- Press Enter . Now you can see the tax configuration updated for the stock group.
Businesses recording both local and interstate transactions configure local VAT and CST rates while configuring company VAT details. Additionally, you can provide applicable rate by selecting appropriate nature of transactions, dealer location or type, and so on.
- Press F11 (Features) > set the option Enable Value Added Tax (VAT) to Yes, to open the Company VAT Details screen.
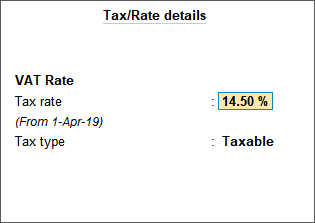
- Enable the option Set/alter tax/rate details to view the Tax/Rate Details screen. A single VAT rate for all stock items in a company can be defined in this screen.
- Press F12 (Configure) > set the option Set CST rate to Yes. > press Ctrl+A to accept the Configuration screen.
- Enter the applicable CST Rate and VAT Rate.
Note: VAT rate can be set at company level if all the items in the company are taxed at a single rate. If different items are taxed at different VAT rates, the same can be specified at stock group/stock item level.
Compute tax in transactions
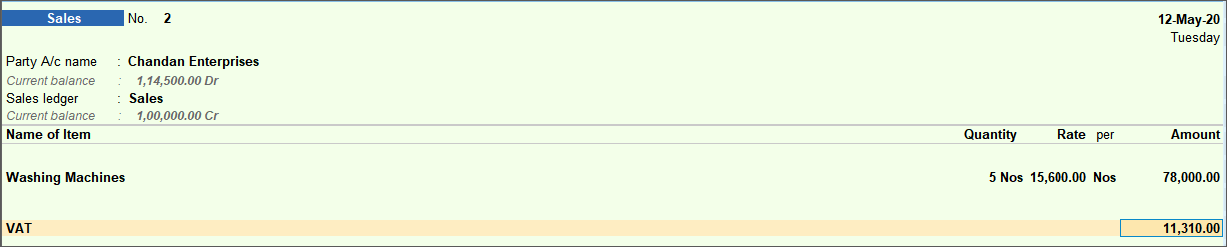
For local sale/purchase, ensure that party selected is configured with state same as that of the company’s state. On selecting the VAT ledger, the VAT amount gets calculated automatically at the configured rate as shown below:
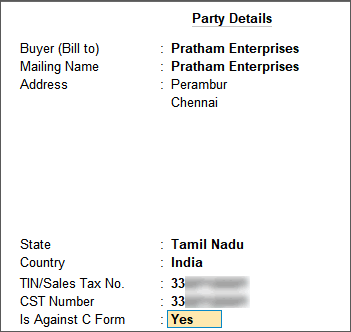
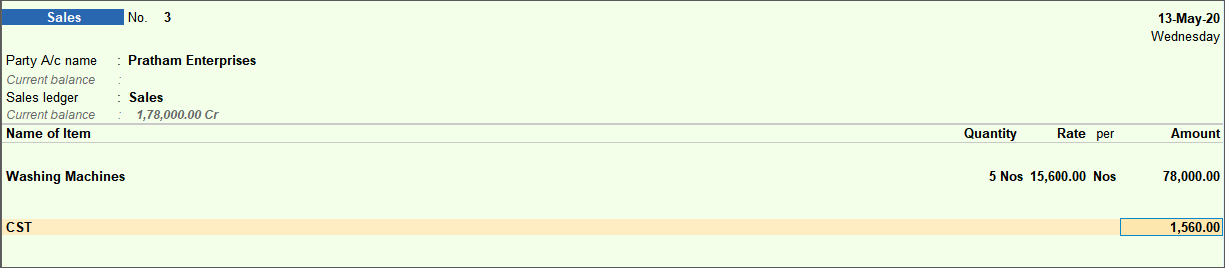
For interstate sale/purchase, ensure that the party selected is configured with any state other than the local state. While passing the transaction, enable Is Against C form in Party Details screen as shown below:
On selecting the CST ledger, the CST amount gets calculated automatically as shown below:
While recording purchase or sales with VAT/CST, you need to enable the configuration option Modify Tax Rate details for VAT in the following scenarios.

- When you are recording sales with a common VAT ledger, but selecting more than one stock item of different VAT rates in the invoice.
- When you have specified VAT rate in the stock item, entered a different VAT rate in the sales ledger, but have to select the stock item for interstate sales in the invoice.
- When you have not mentioned any VAT rate at item and sales ledger, you can use the F12 option Modify Tax Rate details for VAT. Otherwise not required.
- When purchase or sales is of Non Excise type, but you want to Include Excise Duty ledger.
- When you select any additional expense/income ledger, without enabling the option Include in assessable value calculation for available in the ledger master, but want to consider the value of additional expense/income ledger for VAT calculation.
- When company level has a common VAT/CST rate, but VAT /CST is not provided in the item or ledger master.
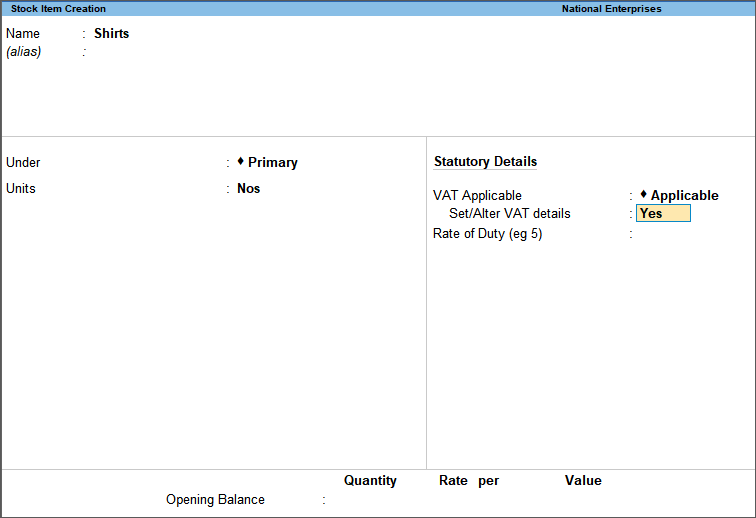
Scenario: I have different stock groups in my company. I want to configure a common VAT rate for all the items in a particular stock group. Do I need to set the VAT rate in each item configuration?
No, VAT rates can be configured at stock group level also.
- Gateway of Tally > Alter > type or select Stock Group > and press Enter.
Alternatively, press Alt+G (Go To) > Alter Master > type or select Stock Group > and press Enter. - Select the stock group and press Enter.
- Press F12 and set the option Set VAT details to Yes, and accept the configuration screen.
If you do not see this option:- Set Show more configurations to Yes.
- Set Show all configurations to Yes.
- In the stock group, enable the option Set/Alter VAT details.

- In Tax Rate field, enter the VAT rate applicable for the stock group. The date from when this VAT rate is applicable appears automatically. To change it, press Alt+W (Details) and update as needed.
- Accept the stock group to save the details.
In some states, like Delhi, VAT is calculated on the item rate.
Company Set up
- Press F11 (Features) > set Enable Value Added Tax to Yes > and press Enter.
- Select the State (for example, Delhi).
- Set the option Enable VAT calculation on stock item rate to Yes.
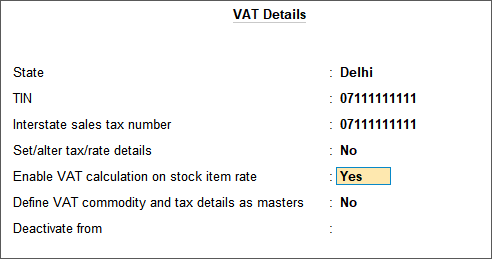
- Accept the Company VAT Details screen.
- Accept the Company Features Alteration screen.
Define tax on item rates in stock item
- Gateway of Tally > Create/Alter > type or select Stock Item > and press Enter.
Alternatively, press Alt+G (Go To) > Create Master or Alter Master > type or select Stock Item > and press Enter. - In the stock item master, set the option Set/Alter VAT details to Yes.
- Set the option Calculation type to On Item Rate.

- Specify the rate slabs and the tax rate for each slab.

- Accept the stock item to save the details.
The period in the Payment Details section always considers the return period and the month after, as the tax payments are made in the subsequent month. If you have recorded post-dated tax payment transactions which are two or more months after the return period, you can change the date of the Payment Details section by pressing F2 (Date) to view those transactions.
For example, consider data with transactions in the month of April with one transaction on 1-May-2015. If the report period is set from 1-Apr-2015 to 30-Apr-2015, the period of Payment Details section appears as 1-Apr-2015 to 1-May-2015, as shown below:


Considering the above example, if a transaction is recorded in the month of July, and the report period is set as April month, the Payment Details section displays the period as 1-Apr-2015 to 31-May-2015.
To change the last date of the Payment Details section
- 1.Press F2 (Date) in the VAT/CST triangulation report.
- 2.Change the date in the Payments Till Date screen to consider the post-dated tax payment vouchers, as shown below:

The date in the Payment Details section changes and the post-dated transaction gets considered in the count as shown below:


If VAT and excise amounts were altered in the voucher, the ledger which was selected first in the voucher will also be displayed in the adjustment journal, while recording a supplementary transaction for VAT or excise difference. This can be changed manually based on the type of adjustment (VAT or excise) to be made by selecting the required ledger.
To make adjustment for VAT difference amount, transaction should be made from VAT triangulation. For this,
- Select Uncertain Transactions and press Enter in VAT report.
- Select Mismatch in tax amount.
- Press Alt+L (Link Adjustment Vouchers).
Similarly, for excise difference amount adjustment, the transaction should be made from excise report.
You can override the tax details for transactions of deemed export and branch transfers.
To record sales transaction for deemed export by overriding tax details
- Gateway of Tally > Vouchers > press F8 (Sales).
Alternatively, press Alt+G ( Go To) > Create Voucher > press F8 (Sales). - Press F12 (Configure) > set Modify Tax Rate details for VAT to Yes to configure the sales invoice for overriding tax details.
- Select the customer ledger in Party A/c name field.
- Select the appropriate sales ledger in Sales ledger field.
As in other transactions, you can create the ledger on the fly by pressing Alt+C. Alternatively, press Alt+G (Go To) > Create Master > type or select Ledger > and press Enter. - Press Enter. The VAT Classification Details screen appears.
- Select Deemed Export in Classification / Nature field.
- Press Enter to return to sales voucher.
- Select the required stock items.
- Enter Quantity and Rate for each stock item.
- Set Provide VAT details to Yes. The Statutory Details screen appears.
- Enter the additional details for deemed export.
- Select Form H in Form to receive field.
- Press Ctrl+A to accept and return to sales voucher.
- Press O to override the tax details and accept.
Note: If you have logged-in as data entry operator, then the option to press O won’t appear. Press Y to accept. The administrator has to accept this voucher as is from the triangulation report.
To accept the invoice as is from triangulation report
- Press Enter on Incomplete/mismatch in information (to be resolved).
- Select the category of exception and press Enter.
- Select the transaction and press Alt+J (Accept as is) in the Exception Resolution screen.
Similarly, for branch transfer,
- Select Branch Transfer Outward in Classification / Nature field in VAT Classification Details screen.
- Select Form F in Form to receive field in Statutory Details screen.
When a dealer registered under VAT trades in fixed assets (machinery, furniture and so on), then the fixed assets/capital goods have to be treated like stock items purchased and sold.
Tax calculation does not change when a transaction is recorded for sale of capital goods or trading goods. You can use Sales Taxable as the Nature of transaction for sale of capital goods and trading goods.
In some of the states, the sale of capital goods and trading goods has to be captured in separate fields of forms and annexures. For this purpose, the option Type of goods is provided in the stock item master, as shown below:

While recording the sale of fixed assets, in the stock item master, the option Type of goods has to be set to Capital Goods to capture the values in the relevant fields of forms and annexures of the following states:
- Assam
- Dadra & Nagar Haveli
- Goa
- Haryana
- Himachal Pradesh
- Odisha
- Uttarakhand
For West Bengal, the option Nature of goods in stock item master has to be set to Not Direct Use in Business as shown below:


The values of sale of fixed assets will be captured in the relevant fields of forms and annexures
Record a Sales Invoice for Sale of Fixed Assets
Record the sales transaction with Sales Taxable selected as the Nature of transaction, as shown below:


Press Enter to save. This transaction appears in the field provided for sale of taxable goods in the state-specific VAT return forms.
Yes, you can print a covering letter from TallyPrime.
- Gateway of Tally > Display More Reports > Statutory Reports > VAT Reports > Declaration Forms.
- Under Forms Issuable, select the required Group or Ledger.
Alternatively, press Alt+G (Go To) > type or select Forms Issuable (Groups) or Forms Issuable (Ledgers). - Press Ctrl+P > press C (Configure).
- Change the Report Type to Covering Letter.
- Press Esc to return to the Print screen.
- Press P (Print) to print.


