
Merge Companies with Different GSTINs in TallyPrime
If your business maintains separate companies for different GST registrations, you can merge them into a single company and manage all GSTINs together.
Step 1: Upgrade to TallyPrime Release 3.0 or Later
Multi-GSTIN support is available from TallyPrime Release 3.0 onwards. Upgrade to the latest release.
Step 2: Migrate Company Data
If your companies were created in an earlier release, migrate the data to the upgraded version of TallyPrime.
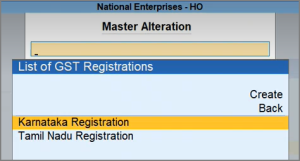
Step 3: Create the Required GST Registrations
Open the company in which you want to maintain multiple GST registrations, and create the GST registrations of the companies to be merged.
Step 4: Export and Import Masters and Transactions
Before exporting data, ensure that each company has a unique voucher numbering series to avoid duplicate voucher numbers after merging.
Export the masters and transactions from the companies that you want to merge, and import them into the company in which you want to maintain multiple GST registrations.
You may also create a new company and import both companies into it, if required. To learn more, refer to How to Create a Company in TallyPrime.
Step 5: Verify the Merged Data
After importing the data:
- Press Alt+G (Go To) > Alter Master > GST Registration to verify the created registrations.
- Check the Day Book or other reports to verify the imported transactions.
- Press Alt+G (Go To) > Day Book.
- Check the Statistics Report and Chart of Accounts of each company to verify masters and vouchers.
- Press Alt+G (Go To) > Statistics Report.
- Press Alt+G (Go To) > Chart of Accounts.
You can now maintain and record transactions for all GST registrations from the same company.


