
Set Up TallyPrime for GST Composition
Once you have packed the essentials for your GST Composition journey, TallyPrime is here to ensure that your journey goes as smoothly as possible.
Enable GST
Let us begin with a few baby steps. First and foremost, you will have to enable GST in TallyPrime and save the details of your GST registration in the Company master. These details, such as State, GSTIN/UIN, and Registration Type, will be reflected in your transactions, and you can easily print them in your invoices.
Moreover, your business might have multiple GST registrations (GSTINs) to cater to multiple geographies or business verticals. TallyPrime understands your special needs, and accordingly it allows you to conveniently save the details of all your registrations within the same company. After saving the details, you can select the relevant registration while recording transactions, wherever needed.
Set Up GST Rates
The next order of business is setting up GST rates. As a Composite dealer, you can save the tax rates in TallyPrime for your purchases, according to the nature of goods or services that your business deals with. TallyPrime offers you the flexibility to apply these rates at various levels, depending on your comfort and business requirements. For example, you can configure the GST rates up front for your company, or you can apply the rates directly in the purchase transaction.
What’s more, TallyPrime will also help you select the order or hierarchy in which you want to apply the tax rates. For example, if some of your stock items belong to a single stock group and fall under a common tax rate, then you can directly set the tax rate in the stock group. This rate will be subsequently applied to all the corresponding stock items.
Set Up GST Details for Parties
Once you have set up the GST details for your company, it is time to save the GST details for your parties as well. TallyPrime will help you create ledgers for all your customers or suppliers, and store the required details, such as GSTIN/UIN, Registration Type, Place of Supply, Assessee of Other Territory information, and so on.
Set Voucher Numbering
TallyPrime will also help you comply with department guidelines for maintaining GST transactions. For example, the department requires proper voucher numbering for your GST invoices, and accordingly TallyPrime will help you in easily creating and maintaining multiple series of voucher numbers.
Create or Update Masters for GST
TallyPrime also provides you with a host of other masters and ledgers that will help you record your transactions as a GST Composite dealer in peace. For example, you have a purchase ledger for GST, GST duty ledgers, service ledgers, expense/income/round-off ledgers, discount ledgers, and so on. You can also update your stock items and stock groups for GST, and easily manage HSN/SAC and the corresponding tax rates.
Activate GST for Composition Dealers – Single and Multi-Registration
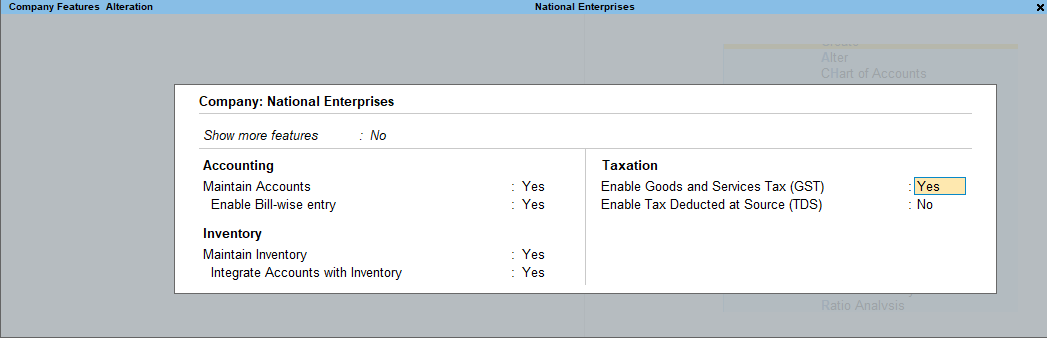
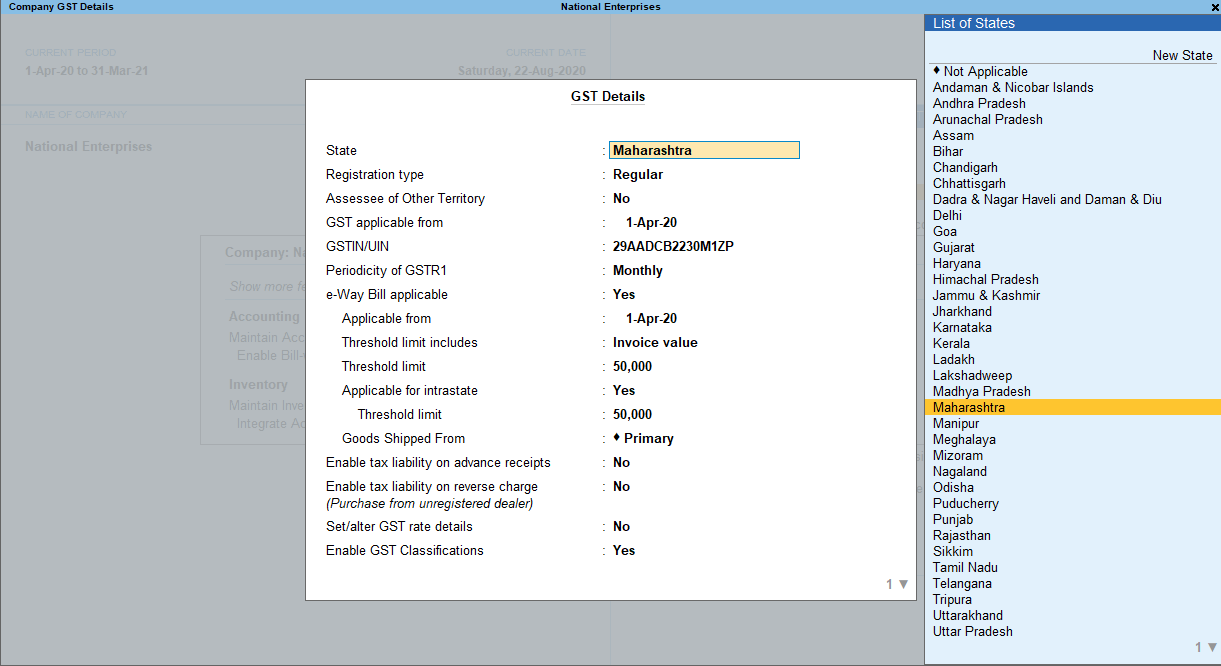
To use GST as a Composite Dealer in TallyPrime, you have to first enable GST for your company. After that, you can easily save the GST details such as State, GSTIN/UIN, Registration Type, and so on. Once these details are saved in the Company, they will be reflected in your GST transactions. Once GST is activated in the Company, GST-related features will be available in ledgers, stock items, and transactions, and you can conveniently generate GST returns for your business.
Furthermore, if your company has multiple GST registrations (GSTINs), then you can conveniently save the details of all your registrations within the same company, and select the relevant registration while recording transactions.
![]()
- Open the company and press F11 (Features)> Enable Goods and Services Tax (GST) > Yes.
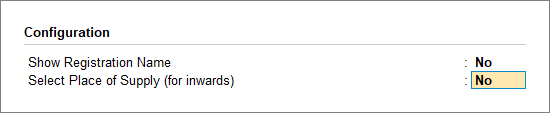
- Explore additional options by pressing F12 (Configure). You will find options related to Place of Supply and Registration Name.
- Fill in the relevant details for GST registration and e-Way Bill.
- State: The State selected during Company Creation will be reflected here. If you update the State here, it will also be updated in the Company and existing transactions.
- Registration type: Select the Registration type as Composition.
- Assessee of Other Territory: If your business is located in an Exclusive Economic Zone (Other Territory). then you can enable this option. GST details will be applied accordingly in your masters and transactions.
- Create another GST Registration for the Company: Use this option to save multiple GST registrations within the same company. After saving the details, you can select the relevant registration while recording transactions, wherever needed.
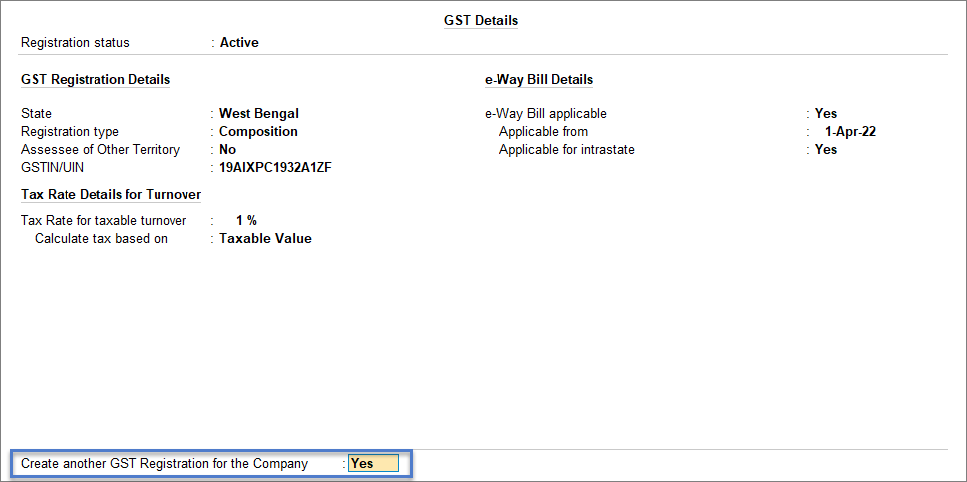
- Press Ctrl+A to save the details.
After saving the GST registration, you will have the choice to create a voucher numbering series for this particular registration:
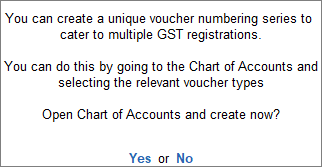
If you press Yes, you will be taken to the Chart of Accounts, where you can easily create the voucher numbering series. Refer to the section Create Voucher Numbering Series for GST Registrations to know more.
Set up Voucher Numbering from a GST Perspective
TallyPrime provides you with the best options to configure your voucher numbering as per GST requirements. When you are uploading invoices to the GSTN portal, the department expects the voucher numbers to be unique and to follow a proper sequence. For example, if you had recorded a sales transaction with the voucher number as 11, and a sales return takes place, then voucher number 12 should be assigned to the sales return or debit note. This will ensure that the overall voucher numbers follow the proper flow of the sales cycle.
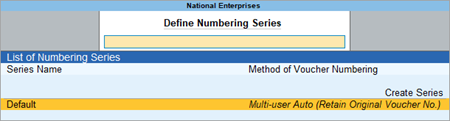
Based on your business requirement, you can select your preferred method of voucher numbering, such as Automatic, Manual, or Multi-User Auto. If you select the Automatic method of voucher numbering, then you also have the benefit of either retaining the original voucher numbers or renumbering the vouchers. Subsequently, while recording transactions, you can select the relevant voucher type, and then the voucher number series will be automatically selected.
Moreover, if your business consists of multiple GST registrations, then you can create and maintain special voucher numbering series for all your GST registrations. For example, using a single series for sales, you can maintain and track both sales transactions and sales returns. While creating or altering a numbering series, you can set the Series Name and Method of Voucher Numbering.
What’s more, you can also choose to use a common series for all your registrations. You can set this option from the Company Features (Set/Alter Company GST Rate and Other Details > Use common voucher numbering series for all GST Registrations).
![]()
Configure Voucher Numbering for GST
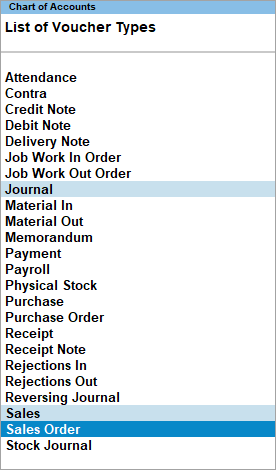
- Gateway of Tally > Create/Alter > Voucher Type.
Alternatively, press Alt+G (Go To) > Create/Alter Master > Voucher Type. - Select the voucher type from the List of Voucher Types, or create a new one, as needed. To learn more about voucher types, refer to the Voucher Types in TallyPrime article.
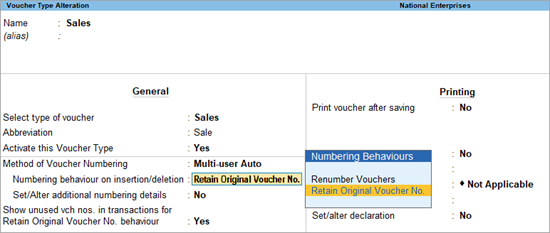
- Configure voucher numbering:
- Method of Voucher Numbering: Select the required method as per your business and GST requirements.
- Numbering behaviour on insertion/deletion: You will see this option if you have selected Automatic or Multi-user Auto as the Method of Voucher Numbering. Generally, when you insert or delete a transaction, your existing voucher numbers might get affected. However, you now have the option to either retain the original voucher numbers or renumber the vouchers, as per your requirement.
- Show unused vch nos. in transactions for Retain Original Voucher No. behaviour: When you delete transactions or mark them as optional, then the corresponding voucher numbers might remain unused. This option will help you view such unused voucher numbers during voucher entry and reuse the numbers, as required.
- Press Ctrl+A to save the details.
Create Voucher Numbering Series for GST Registrations
TallyPrime provides you with the flexibility to create multiple voucher numbering series either from the voucher type or from the Chart of Accounts. If your business consists of multiple GST registrations, then you can use this feature to create and maintain special voucher numbering series for all your GST registrations. Once you have created the required voucher numbering series, you can select it while recording transactions.
From Voucher Type

- Press Alt+G (Go To) > Create/Alter Master > Voucher Type.
Alternatively, go to Gateway of Tally > Create/Alter > Voucher Type. - Select the voucher type from the List of Voucher Types, or create a new one, as needed. To learn more about voucher types, refer to the Voucher Types in TallyPrime article.
- Press F12 (Configure) > Set Method of Voucher Numbering > Yes, and Define multiple numbering series for vouchers > Yes. Press Ctrl+A to save.
- On the Voucher Type Alteration screen, set the option Define multiple numbering series for vouchers to Yes. The Define Numbering Series screen will appear.
- Select an existing series or create a new one.
- Provide a relevant Series Name. For example, if your business has a branch office (say, in Bangalore), then you can name the series after the branch and save the details accordingly.
- Configure voucher numbering:
- Method of Voucher Numbering: Select the required method as per your business and GST requirements.
- Numbering behaviour on insertion/deletion: You will see this option if you have selected Automatic or Multi-user Auto as the Method of Voucher Numbering. Generally, when you insert or delete a transaction, your existing voucher numbers might get affected. However, you now have the option to either retain the original voucher numbers or renumber the vouchers, as per your requirement.
- Press Ctrl+A to save the details.
- Select an existing series or create a new one.
From Chart of Accounts
- Press Alt+G (Go To) > Chart of Accounts > Voucher Type.
Alternatively, go to Gateway of Tally > Chart of Accounts > Voucher Type. - Select Voucher Types from the List of Masters.
- Select the required voucher types and press Alt+S (Create Vch No. Series). A common numbering series will be created for the voucher types that you select.
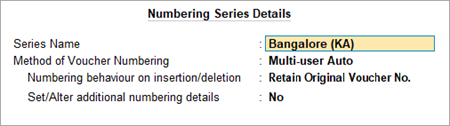
- Update the details in the Numbering Series Details screen:
- Provide a relevant Series Name. For example, if your business has a branch office (say, in Bangalore), then you can name the series after the branch and save the details accordingly.
- Configure voucher numbering:
- Method of Voucher Numbering: Select the required method as per your business and GST requirements.
- Numbering behaviour on insertion/deletion: You will see this option if you have selected Automatic or Multi-user Auto as the Method of Voucher Numbering. Generally, when you insert or delete a transaction, your existing voucher numbers might get affected. However, you now have the option to either retain the original voucher numbers or renumber the vouchers, as per your requirement.
- Press Ctrl+A to save the details.
Set Up GST Rates and HSN/SAC Details
After enabling GST as a Composite dealer, you can proceed to set up the GST rates for your goods and services. TallyPrime offers you the flexibility to apply GST rates at one or more levels. Depending on your business need, you can apply the tax rates upfront at the company level, if your goods or services fall under a common tax rate. Alternatively, you can choose a different level such as ledger, accounting group, stock item, stock group, or even apply the rates directly in the transaction.
Apart from applying GST rates at multiple levels, you have the additional benefit of deciding the order in which you want to apply the rates. You can select either the ledger or the stock item as the primary source for applying GST rates, and choose one of the following two orders:
- Option 1: Purchase Ledger > Accounting Group > Stock Item > Stock Group > Company
- Option 2: Stock Item > Stock Group > Purchase Ledger > Accounting Group > Company
Apply GST Rate and HSN/SAC Details in the Company
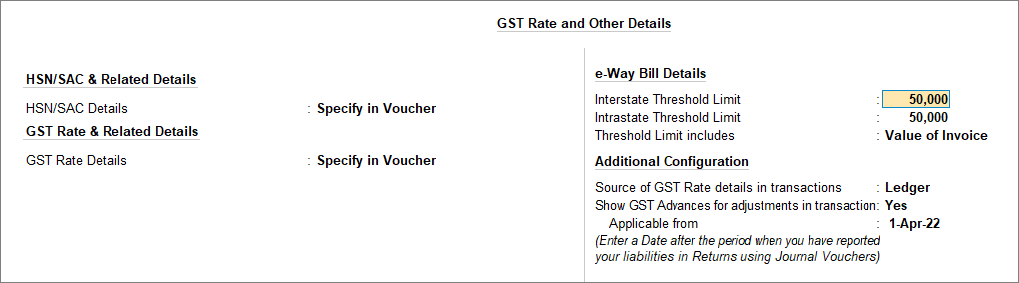
- Open the company and press F11 (Features) > Enable Goods and Services Tax (GST) > Yes, and then enable the option Set/Alter Company GST Rate and Other Details.
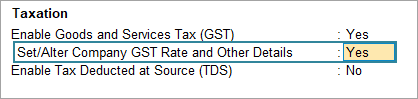
- Explore additional options by pressing F12 (Configure). You will find options related to HSN/SAC and GST rate details, Reverse charge calculation, and so on.
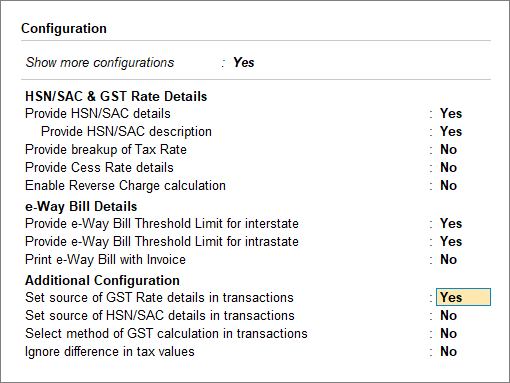
- Fill in the relevant details for HSN/SAC and GST.
- HSN/SAC Details: You have three options to choose from.
- Specify Details Here: Once you select this option, you will be able to enter the details right here in Company GST Details.
- Use GST Classification: This option allows you to select a previously created GST Classification, or create one on the spot. The details will be applied accordingly.
- Specify in Voucher: If you are not aware of the details at the moment, and if you want to add the details directly in the transaction, then you can select this option.
- GST Rate Details: Like in the previous field (HSN/SAC Details), you have the same three options to choose from.
- Additional Configuration:
- Source of GST rate details in transactions <anchor-name>source-gst-details</anchor-name>: This options helps you decide the order in which you want to apply the rates. You can select either the ledger or the stock item as the primary source for applying GST rates, and choose one of the following two orders:
- Ledger: Sales/Purchase Ledger > Accounting Group > Stock Item > Stock Group > Company
- Stock Item: Stock Item > Stock Group > Sales/Purchase Ledger > Accounting Group > Company
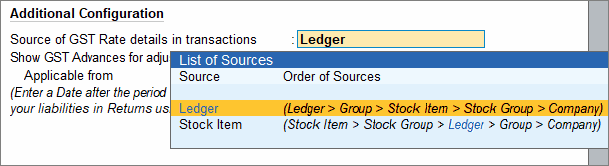
The GST rate will be applied in the selected order. For example, if you have selected Stock Item, and the GST rate has not been set in the Stock Item, then it will be picked up from the next level, which is Stock Group.
- Show GST Advances for adjustments in transactions: This option will help you in easily adjusting GST advances while recording transactions. You do not have to manually book tax liability and then again manually adjust it using a journal voucher. Once you enable this option, your advance receipts will be listed in the sales transaction under Bill-wise Details, and you can easily adjust the receipts directly.
- Source of GST rate details in transactions <anchor-name>source-gst-details</anchor-name>: This options helps you decide the order in which you want to apply the rates. You can select either the ledger or the stock item as the primary source for applying GST rates, and choose one of the following two orders:
- HSN/SAC Details: You have three options to choose from.
- Press Ctrl+A to save the details.
Create Stock Items and Ledgers for GST Composition
TallyPrime provides you with a host of masters and ledgers that will help you record your GST transactions in peace. For example, you have sales and purchase ledgers for GST, GST duty ledgers, service ledgers, expense/income/round-off ledgers, discount ledgers, and so on. You can also update your stock items and stock groups for GST, and easily manage HSN/SAC and the corresponding tax rates.
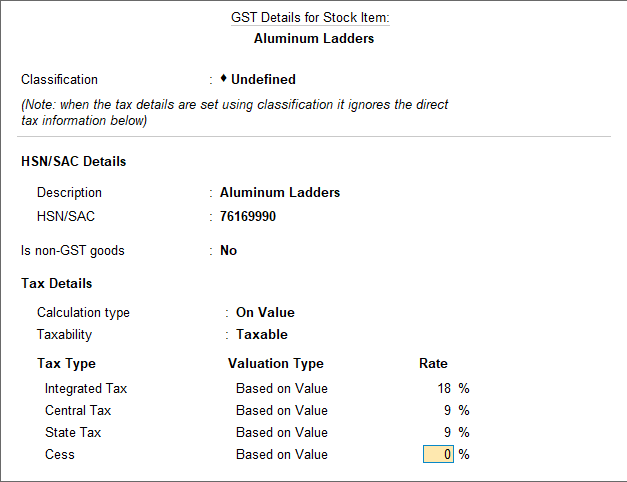
Apply GST Rate and HSN/SAC Details in the Stock Item
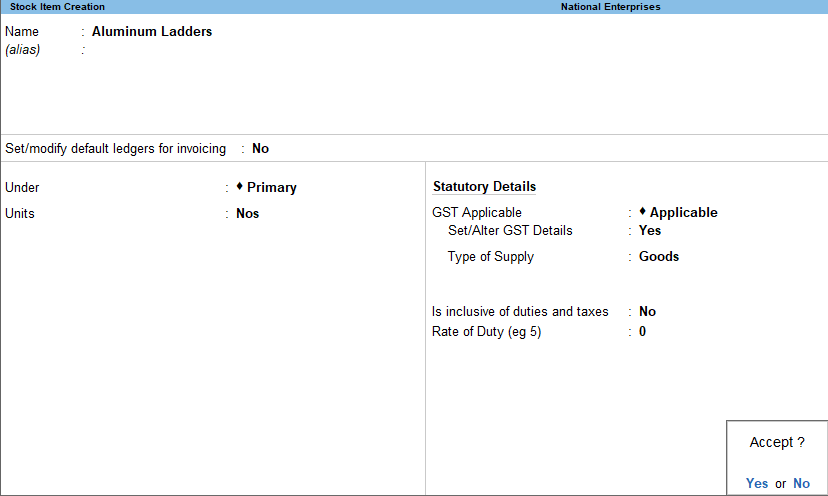
In TallyPrime, you can create stock items and specify the GST rate and other HSN/SAC details for calculating the tax during transactions.
![]()
- Press Alt+G (Go To) > Create/Alter Master > Stock Item.
Alternatively, Gateway of Tally > Create/Alter > Stock Item (under Inventory Masters). - Select the stock item from the List of Stock Items, or create a new one, as needed.
- Fill in the relevant details for HSN/SAC and GST.
- HSN/SAC & Related Details: You have three options to choose from.
- Specify Details Here: Once you select this option, you will be able to enter the relevant details right here in Stock Item Creation/Alteration.
- Use GST Classification: This option allows you to select a previously created GST Classification, or create one on the spot. The details will be applied accordingly.
- Specify in Voucher: If you are not aware of the details at the moment, and if you want to add the details directly in the transaction, then you can select this option.
- GST Rate & Related Details: Like in the previous field (HSN/SAC Details), you have the same three options to choose from. Select Specify Details Here and enter the relevant information.

- HSN/SAC & Related Details: You have three options to choose from.
- Press Ctrl+A to save the details.
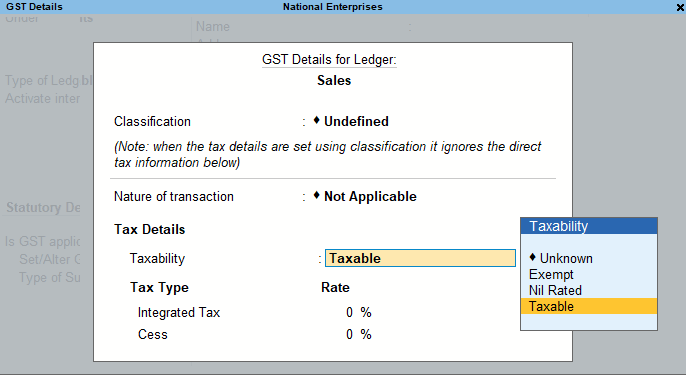
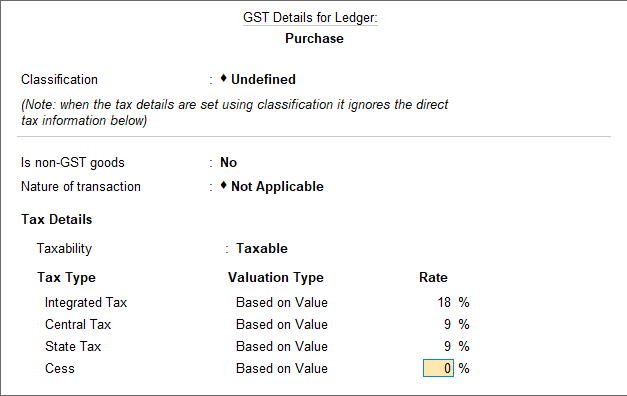
Apply GST Rate and HSN/SAC Details in Purchase Ledger
If your business sells many items with the same tax rate, then you can conveniently apply the tax rate and other GST details directly in a common sales ledger. This way, you only have to select the relevant sales ledger while recording the transaction, and the GST details will be applied seamlessly.
Similarly, if your business purchases many items with the same tax rate, then you can apply the GST details directly in a common purchase ledger and select it while recording a purchase.
![]()
- Press Alt+G (Go To) > Create/Alter Master > Ledger.
Alternatively, Gateway of Tally > Create/Alter > Ledger. - Select the required purchase ledger from the List of Ledgers, or create a new one, as needed.
- Fill in the relevant details for GST.
- HSN/SAC & Related Details: You have four options to choose from.
- As per Company/Group: This option will help you re-use the HSN/SAC details if you had already updated them in the company or accounting group.
- Specify Details Here: Once you select this option, you will be able to enter the relevant details right here in Ledger Creation/Alteration.
- Use GST Classification: This option allows you to select a previously created GST Classification, or create one on the spot. The details will be applied accordingly.
- Specify in Voucher: If you are not aware of the details at the moment, and if you want to add the details directly in the transaction, then you can select this option.
- GST Rate & Related Details: Like in the previous field (HSN/SAC Details), you have the same four options to choose from. Select Specify Details Here and enter the relevant information.
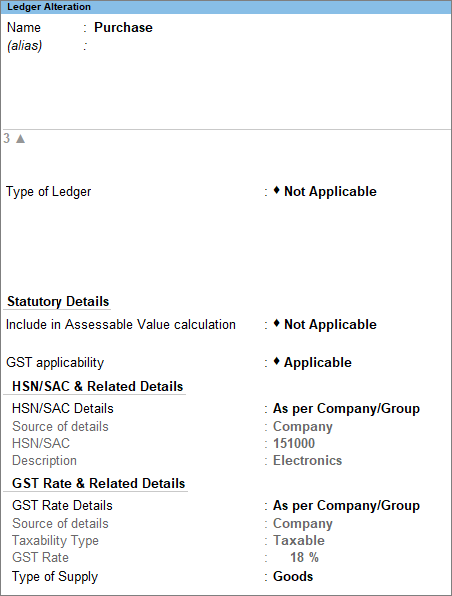
- HSN/SAC & Related Details: You have four options to choose from.
- Press Ctrl+A to save the details.
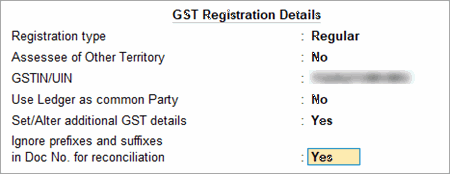
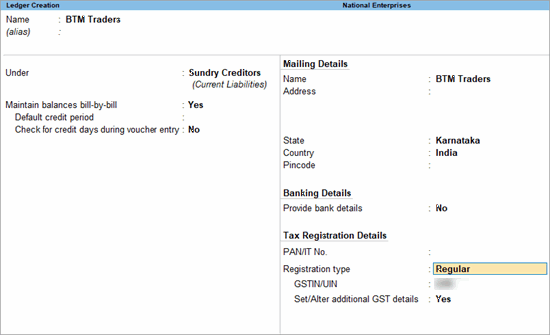
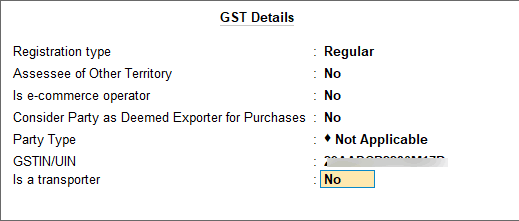
Update GST Details in Party Ledger
With TallyPrime, you can easily set up the ledgers of your suppliers and customers from a GST perspective.
![]()
- Press Alt+G (Go To) > Create/Alter Master > Ledger (under Accounting Master).
Alternatively, Gateway of Tally > Create/Alter > Ledger. - Select the required party ledger from the List of Ledgers, or create a new one, as needed.
- Select the party Registration type and enter the GSTIN/UIN.
- Press Ctrl+I (More Details) > GST Registration Details, and fill in the relevant details.
- Assessee of Other Territory: Set this option to Yes if the party is belongs to Exclusive Economic Zone (Other Territory).
- Ignore prefixes and suffixes in Doc No. for reconciliation: If your party uses prefixes or suffixes in the Doc No. but your business does not use them, then it might cause mismatch during reconciliation. This option will help you ignore such prefixes or suffixes, and lead to a smooth reconciliation.
- Press Ctrl+A to save the details.
The Ledger Creation screen appears as shown below:
- Press Ctrl+A to save the details.
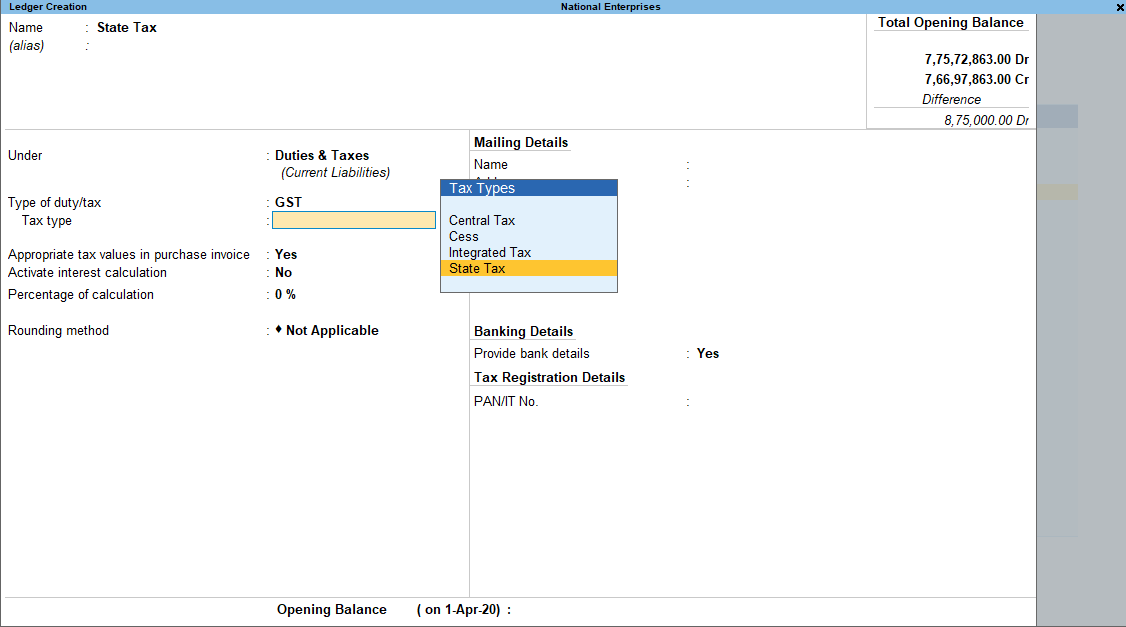
Update GST Rate in GST Ledger
If your business deals with many items with the same tax rate, then you can conveniently apply the tax rate directly in the duty ledger. Depending on the nature of your transaction (interstate or intra-state), you can update your IGST or SGST/UTGST and CGST ledgers. This way, you only have to select the relevant duty ledger while recording the transaction, and the GST details will be applied seamlessly.
![]()
- Press Alt+G (Go To) > Create/Alter Master > Ledger (under Accounting Master).
Alternatively, go to Gateway of Tally > Create/Alter > Ledger. - Select the required duty ledger from the List of Ledgers, or create a new one, as needed.
- Update the Type of Duty/Tax, Percentage of calculation, and other relevant details.
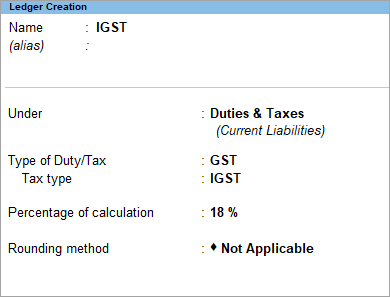
- Press Ctrl+A to save the details.
Set Up Expense or Income Ledger
In TallyPrime, you can create ledgers to record expenses or income like recycling waste sales, packaging charges, delivery charges, transportation costs, and so on. It can be shown in the voucher and is added to the overall item or service value.
![]()
- Press Alt+G (Go To) > Create Master > type or select Ledger > and press Enter.
Alternatively, Gateway of Tally > Create > Ledger > and press Enter.
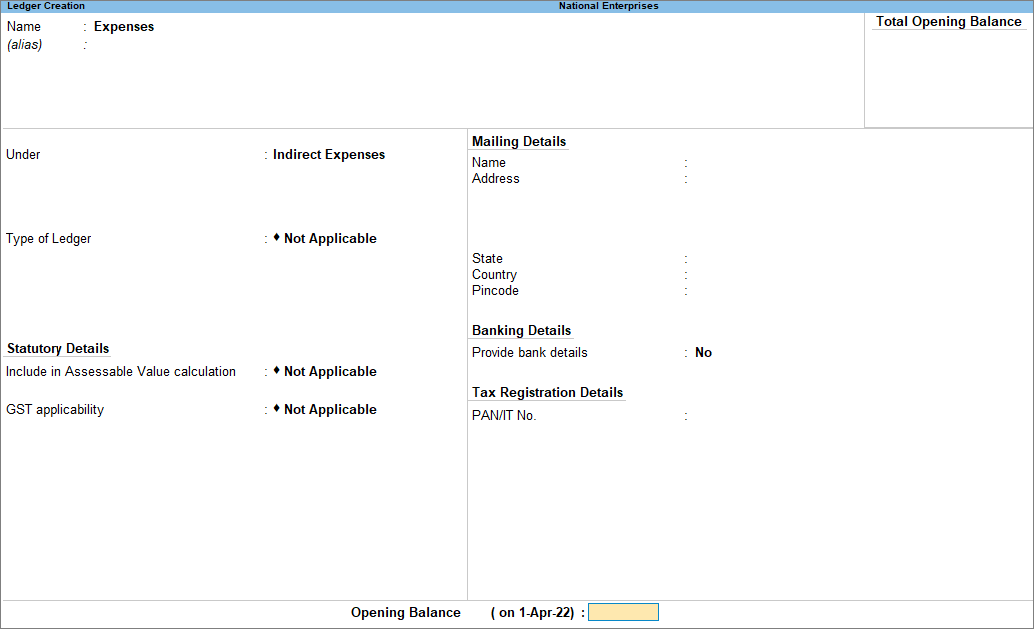
- In the Under field, select:
- Direct Incomes/Indirect Incomes for income.
- Direct Expenses/Indirect Expenses for expenses.
- Set Type of Ledger as Not Applicable.
- Set Include in Assessable Value calculation as Not Applicable.
- Set GST applicability as Not Applicable.
- Accept the screen. As always, press Ctrl+A to save.
Set Up Discount Ledger for Stock Items or Services
In TallyPrime, you can create ledgers for discounts on services and stock items. It can be shown in the voucher and it impacts the overall item or service value.
![]()
- Press Alt+G (Go To) > Create Master >type or select Ledger > and press Enter.
Alternatively, Gateway of Tally > Create > Ledger > and press Enter.
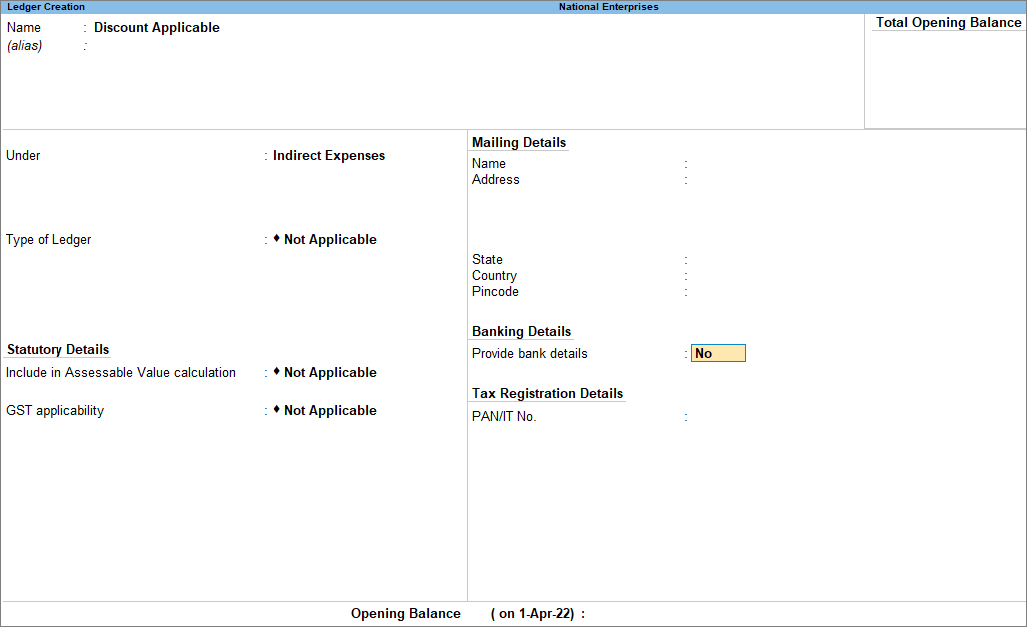
- In the Under field, select Indirect Expenses.
- Set Type of Ledger to Discount.
- Set Include in Assessable Value calculation as Not Applicable.
- Set GST applicability as Not Applicable.
- Accept the screen. As always, press Ctrl+A to save.
Tax Rate Setup – GST Composition
TallyPrime gives you the facility to quickly set up GST rates for your stock items, using the GST Rate Setup option. Based on the rates defined, the tax amount is auto-calculated in the purchase invoice. These rates will not be considered for calculating the tax on sales.
You must enable GST in your company to provide the GST rates. You can also set the GST rates for a particular price range or slab rate for multiple stock items. Alternatively, you can define the tax rate for each stock item from the stock item master.
![]()
For example, let us set GST rates for stock items.
- Press Alt+G (Go To) > type or select GST Rate Setup > and press Enter.
Alternatively, Gateway of Tally > Display More Reports > GST Reports > GST Utilities > GST Rate Setup. - Select Stock Items from the List of Masters.
GST Rate Setup screen appears.
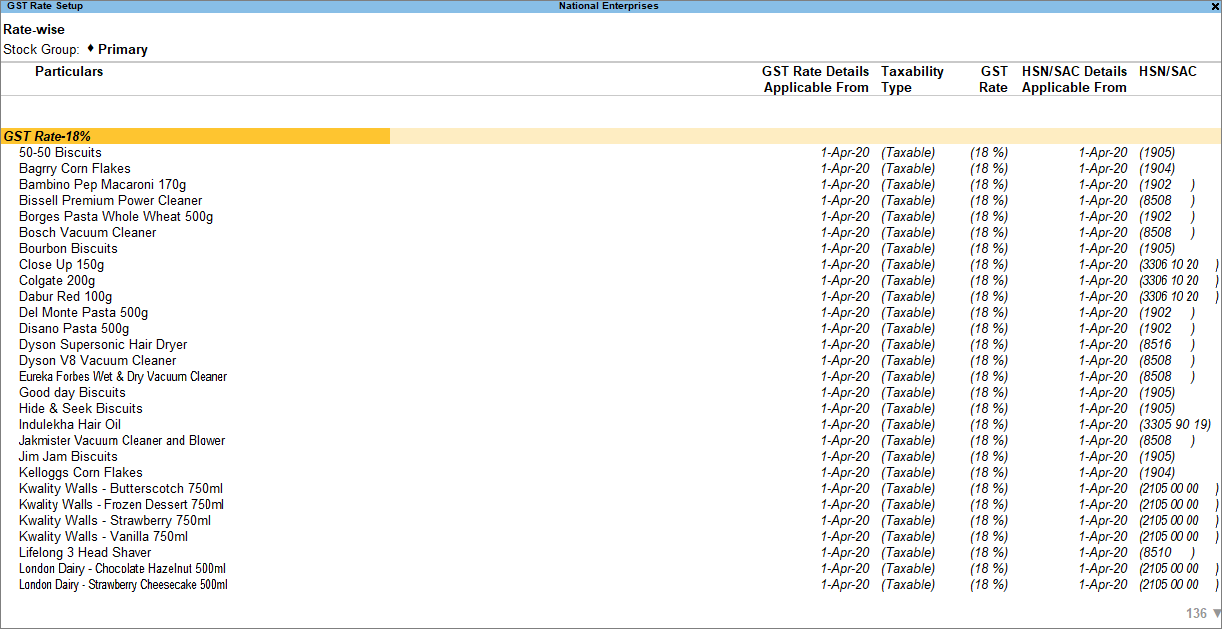
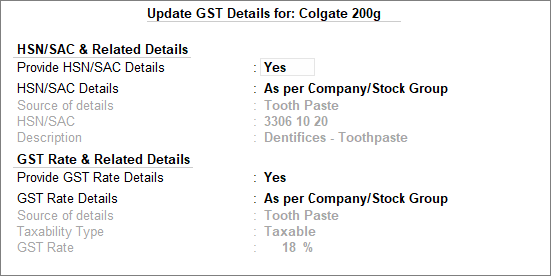
- Select the stock item, and press Alt+S (Update GST Details) to provide the applicable tax rates. You can press Spacebar to select multiple stock items. Set the tax rates and save.
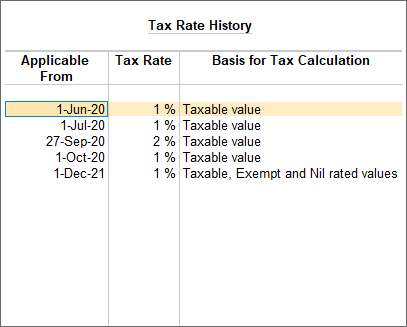
- To view the history of tax rate changes, press Alt+W (GST Rate Details (History)).
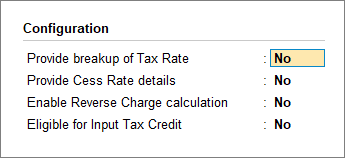
- To specify further GST-related details, press F12 (Configure.
- In order to remove a tax rate, use the option Alt+R (Remove GST Details). You can clear the rate of multiple items by selecting them using Spacebar.
Using TallyPrime 2.1 or Earlier?
Click here. If you are using the GST feature provided for regular dealers to maintain your books under the composition scheme, you can now start using the GST composition features. To maintain books under GST composition, you need to: You need not make any changes to the stock item and purchase ledger. The title of the printed sales invoice appears as per the requirements of the GST composition rule. If you are changing the registration type from regular to composition, the applicability date of GST regular registration will be retained. You can change the date as required. The updates when you change the registration type from regular to composition in TallyPrime are given below: If you are using After changing to composition Comments Sales ledger: Taxability – Taxable. Sales invoice: Recorded without selecting tax ledgers Sales ledger: The Taxability will be retained as Taxable. Sales invoice: Do not select GST ledgers. Sales ledger: The Taxability was set to Exempt. Sales ledger: The Taxability will be retained as Exempt. Change this to Taxable. Sales invoice: Do not select GST ledgers. Sales ledger: The Taxability was set to Unknown. Sales ledger: The Taxability will be retained as Unknown, but treated as Taxable. Sales invoice: Do not select GST ledgers. The updates when you change the registration type from regular to composition in TallyPrime are given below: While using regular registration On changing to composition Comments GST ledger: The ledger was grouped under Duties & Taxes, with the Tax type set to Central Tax, State Tax, Integrated Tax or Cess. The GST details configured in your stock item and purchase ledger will be retained, and you need not make any changes. The title of the printed sales invoice appears as per the GST Composition rules. Before enabling the composition feature, if you had defined the invoice title in the sales invoice print configuration, it will be overwritten by the title provided as per GST rules. To record GST composition transactions, you have to activate GST and also update or create the required ledgers. If you are changing the registration type from regular to composition, the applicability date of GST regular registration will be retained. You can change the date as required. You can record transactions using the ledgers with GST details, and print invoices with GSTIN. You can create the ledgers and stock items to record the transactions under the composition scheme of GST. Use the stock items to maintain the details of each item handled in your business. You can specify the tax rate for calculating the tax on purchase in the stock item. To modify the tax rates in alteration mode from a particular date, press Alt+W and enter the applicable date with the new tax rate. You can use these goods or services in purchase or sales invoice. You need to create sales ledgers to use them in sales transactions. Use the purchase ledger for recording purchases. The GST rates defined in this ledger is applied for: Create purchase ledgers Use party ledgers to maintain details of your parties. Create supplier or customer ledgers Use the GST ledgers to calculate: Create central, state, or integrated tax ledgers and cess ledger Use these ledgers for expenses or incomes which need to be shown in the invoice, like packaging, delivery, and so on, that form part of the item or service value. Use this ledger to specify the discount for stock items based on value or quantity, in your purchase and sales transactions. Use this ledger to specify the discount on services. Quickly set up GST rates for your stock items, using the GST Rate Setup option. Based on the rates defined, the tax amount is auto calculated in the purchase invoice. These rates will not be considered for calculating the tax on sales. You must enable GST in your company to provide the GST rates. You can also set the GST rates for a particular price range or slab rate for multiple stock items. Alternatively, you can define tax rate for each stock item from the stock item master. Set GST rates for stock items
Change Registration Type to Composition
Update Sales Ledger and Record Transactions
Create and Use GST Ledgers for Purchase
Stock Item and Purchase Ledger
Sales Invoice as per GST Composition Rules
GST Compliance for Composition Dealers
Activate GST for Composition Dealers

Create Stock Items and Ledgers
Stock Item
To view the history of tax rate changes, press Alt+L.
Sales Ledger
Alternatively, press Alt+G (Go To) > Create Master >type or select Ledger > and press Enter.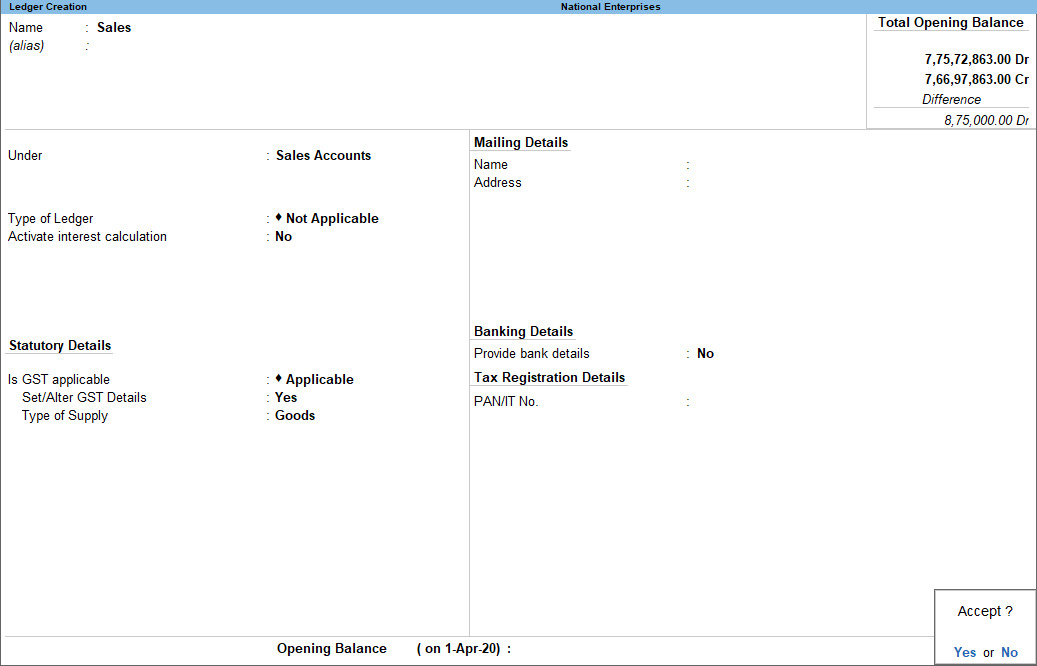
To view the history of tax rate changes, press Alt+L.
Purchase Ledger
Alternatively, press Alt+G (Go To) > Create Master >type or select Ledger > and press Enter.
To view the history of tax rate changes, press Alt+L.
Party Ledger
Alternatively, press Alt+G (Go To) > Create Master >type or select Ledger > and press Enter.
Similarly, you can create the required party ledgers.GST Ledgers
Alternatively, press Alt+G (Go To) > Create Master >type or select Ledger > and press Enter.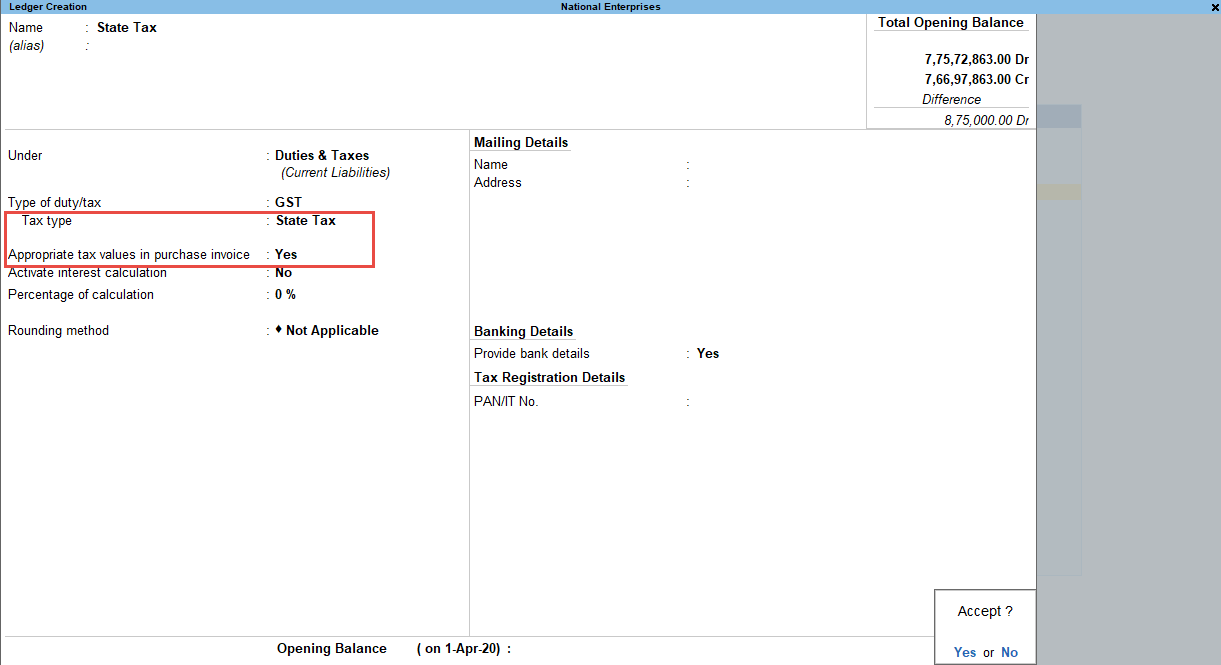
Similarly, create ledgers for Central Tax, Integrated Tax or Cess.Expense or Income Ledger
Alternatively, press Alt+G (Go To) > Create Master >type or select Ledger > and press Enter.
Discount – Stock Items
Alternatively, press Alt+G (Go To) > Create Master >type or select Ledger > and press Enter.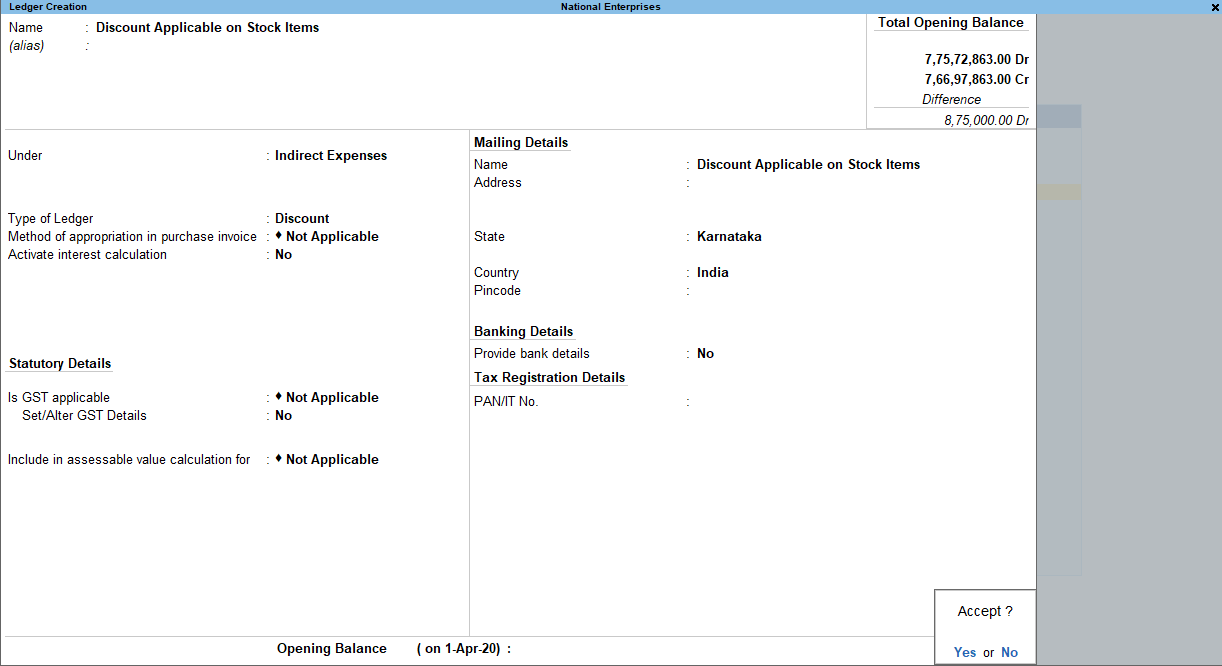
Discount – Services
Alternatively, press Alt+G (Go To) > Create Master >type or select Ledger > and press Enter.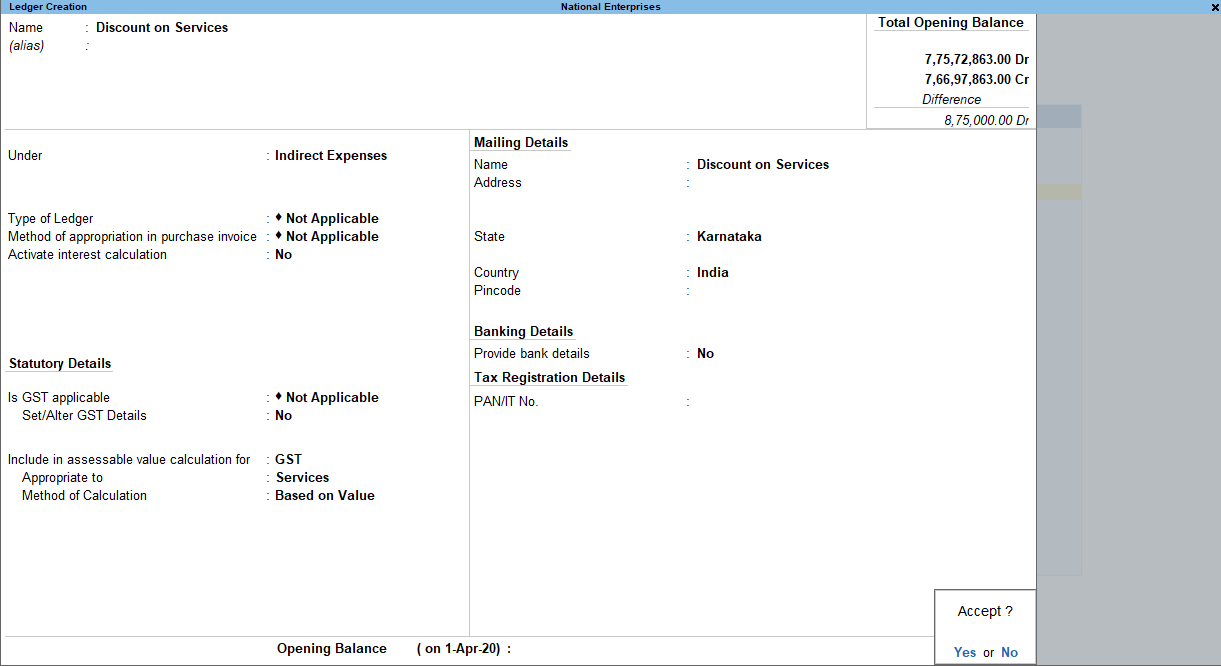
Tax Rate Setup-GST Composition
Alternatively, press Alt+G (Go To) >type or select GST Rate Setup > and press Enter.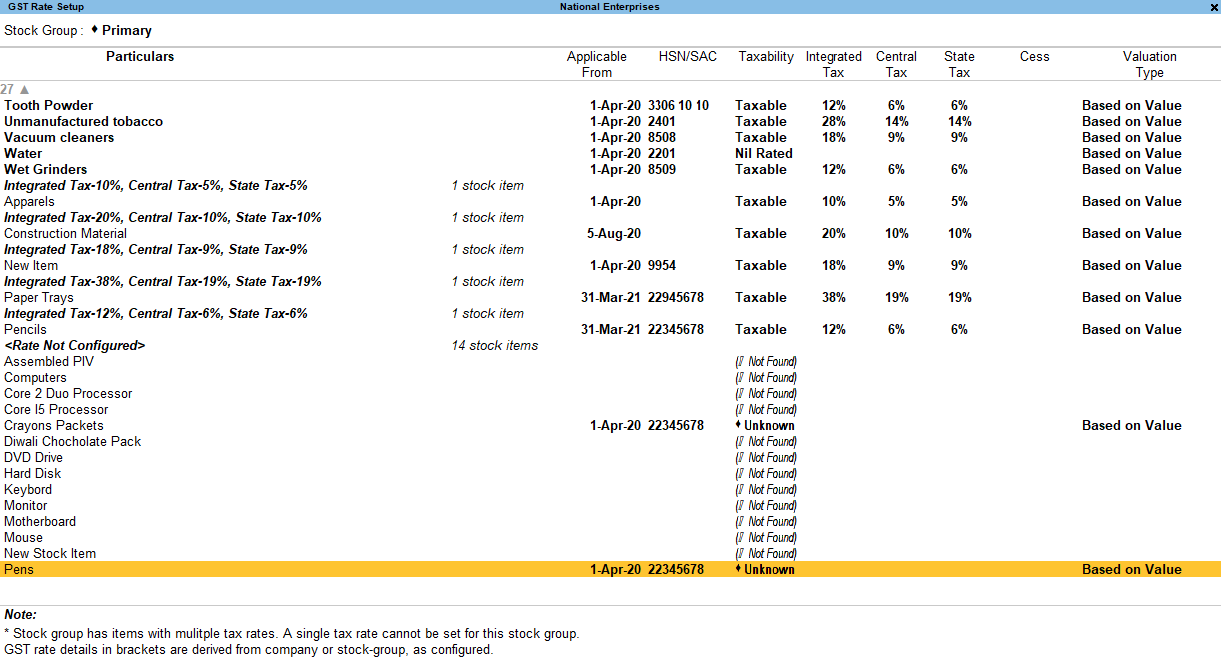
You can also navigate from Gateway of Tally > Tax Rate Setup > GST.
In order to remove a tax rate, use the option Ctrl+C. You can clear rate of multiple items by selecting them using Spacebar.

