
Set Up TallyPrime for GST (Regular – SEZ)
Setting up TallyPrime to record transactions involving GST is very easy. TallyPrime gives you all the flexibility to record for the different types of transactions and ensure the transactions are accounted in the respective ledgers. This also helps you to keep a track of transactions with specific parties and ledgers created for sales, purchase, and other purposes.
TallyPrime not only enables you to record transactions but also view report with a detailed analysis of your data along with the options to configure reports.
All your taxation requirements – be it GSTR-1 or GSTR-3B, are taken care in TallyPrime.
You can view and export returns to upload on the GST portal, whenever required, depending on your business practices.
Activate GST for SEZ Company
While creating or altering a Company in TallyPrime, you will need to provide GST-related information such as your GSTIN and other registration details. The option to choose Regular – SEZ registration type is introduced in TallyPrime Release 3.0.
- Press F11 > Enable Goods and Services Tax (GST) > Yes.
If you are configuring the Company during creation, then you do not need to press F11. - Press F12 and enable the required options related to Place of Supply, Reconciliation, LUT/Bond, and so on.

- Fill in the relevant details for GST registration:
- State: The State selected during Company Creation appears here. If you update the State here, then it will also be updated in the Company master.
- Registration type: Regular – SEZ.
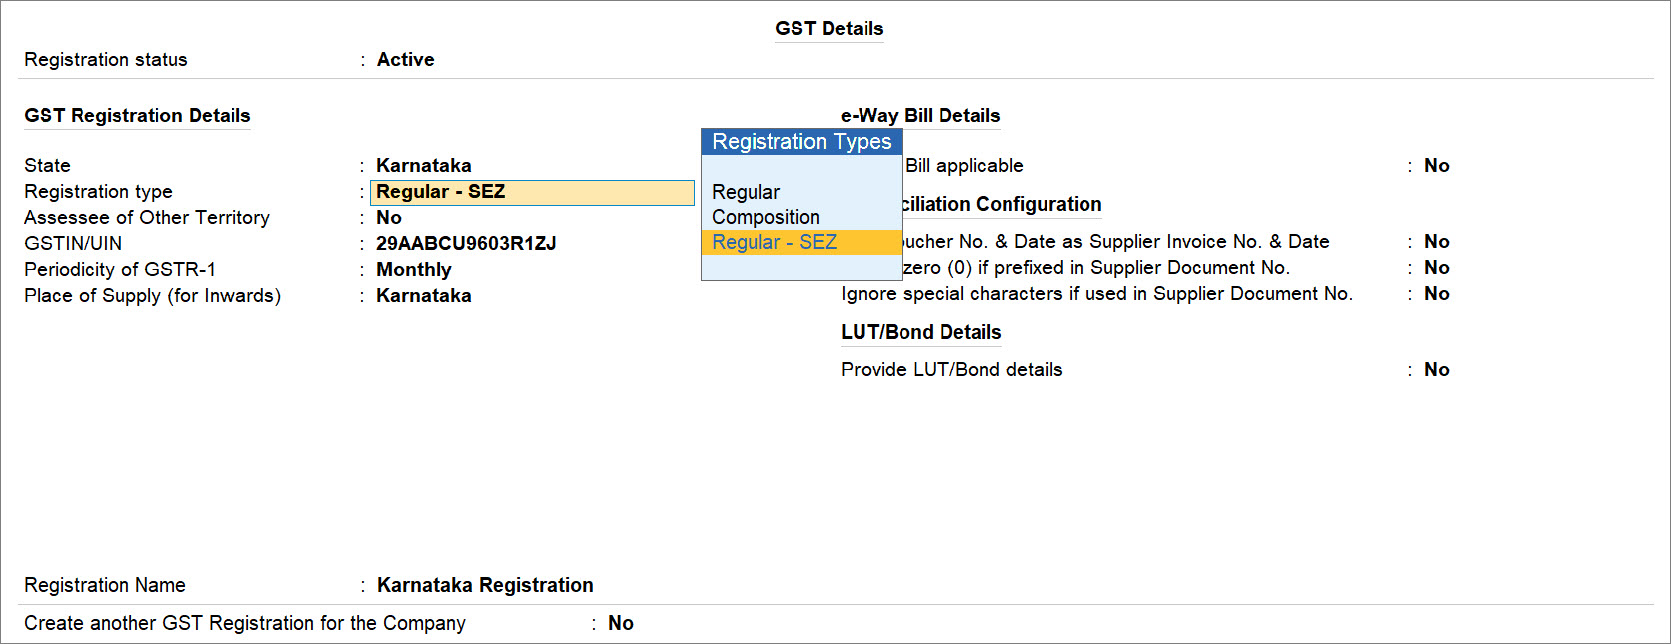
- Assessee of Other Territory: No.
- Periodicity of GSTR-1: Select the Periodicity of GSTR-1 as Monthly or Quarterly, based on the annual turnover of your business.
To know more about periodicity and other filing details, refer to our blog New Simplified GST Return Filing Model. - Reconciliation Configuration: A few options have been provided to help you with a smooth GST reconciliation. You can enable them based on your business practices.
- Use Voucher No. & Date as Supplier Invoice No. & Date: Once you enable this option, the Voucher No. and Date will be considered as the Supplier Invoice No. and Date during reconciliation. In other words, even if you have not provided the Supplier Invoice No. and Date, then you don’t have to worry, as this configuration is enabled.
- Ignore zero (0) if prefixed in Supplier Document No.: If your supplier follows this practice, but your business does not prefix zeroes in the Document No., then this might lead to a mismatch during reconciliation. However, once you enable this option, the prefixed zeroes will be ignored, and you won’t have to worry about a mismatch.
- Ignore special characters if used in Supplier Document No.: Your supplier might be using special characters, such as hyphen and slash, in the document number. However, your business does not follow such practices, then it might cause issues during reconciliation. However, once you enable this option, such special characters will be ignored and you will have a smooth reconciliation.
- Registration Name: This will be derived from the State selected earlier.
For example, if you have selected Karnataka, then the Registration Name will appear as Karnataka Registration for easy identification.
However, you can rename the registration, as needed.
For example, if you have many branches or GST registrations in Karnataka, you can name the branches as Bengaluru Branch, Mangalore Branch, and so on. - Create another GST Registration for the Company: Set it to Yes to save multiple GST registrations within the same company.
After saving the details, you can select the relevant registration while recording transactions, wherever needed.
You can also create multiple registrations for your company from the Gateway of Tally or Go To > Create Master > GST Registration.
- As always, press Ctrl+A to save the details.
Set Up GST Rates and HSN/SAC Details
You can apply GST rates at one or more levels, depending on your business practice. Moreover, you have the flexibility to set the tax rates up front at the company level, if your goods or services have a common GST rate. You can also choose to provide GST details at different levels such as ledger, accounting group, stock item, stock group, or even specify the rates directly in the transaction.
In addition to that, you can select the primary source for specifying rates GST rates, as per one of the following hierarchical orders:
- Sales or Purchase Ledger (Default): Ledger > Accounting Group > Stock Item > Stock Group > Company
This depends on the nature of your business and GST rates of stock items.
For instance, if most of your stock items have 12% GST rate, then you can specify GST rate in the sales or purchase ledger and use it in the transaction. For the rest of the stock items, you can create specify GST rates in stock items, and while recording transactions, you will need to select the common sales or purchase ledger, as applicable and select the respective stock items. - Stock Item: Stock Item > Stock Group > Ledger > Accounting Group > Company
To know more, refer to the Set Up GST Rates and HSN/SAC Details section in the Getting Started with GST in TallyPrime topic.
Apply GST Rate and HSN/SAC Details in the Company
TallyPrime gives you the flexibility to apply GST rate and HSN/SAC details in your Company.
To know how to do it, refer to the Apply GST Rate and HSN/SAC Details in the Company section in the Getting Started with GST in TallyPrime topic.
Set up Voucher Numbering from a GST Perspective
TallyPrime provides you with the best options to configure your voucher numbering as per GST requirements so that the voucher numbers are unique and as per proper sequence when you upload on the GST portal.
To know more, refer to the Set up Voucher Numbering from a GST Perspective section in the Getting Started with GST in TallyPrime topic.
Configure Voucher Numbering for GST
<anchor-name>configure-voucher-numbering-gst</anchor-name>
You can configure voucher number from a GST perspective for Voucher Types, as needed.
To know how to do it, refer to the Configure Voucher Numbering for GST section in the Getting Started with GST in TallyPrime topic.
Create Voucher Numbering Series
You can create multiple voucher numbering series either from the voucher type or from the Chart of Accounts in TallyPrime.
In case of multiple GST registrations, you can use this feature to create and maintain unique and sequential voucher numbering series for each GST registration.
To know more, refer to the Create Voucher Numbering Series section in the Getting Started with GST in TallyPrime topic.
Voucher Numbering Series from Voucher Type
To know how to create a voucher numbering series from voucher type, refer to the From Voucher Type section in the Getting Started with GST in TallyPrime topic.
From Chart of Accounts
To know how to create a voucher numbering series from Chart of Accounts, refer to the From Chart of Accounts section in the Getting Started with GST in TallyPrime topic.
Create/Update Masters for GST
TallyPrime also provides you with a host of other masters and ledgers to help you record your GST transactions. You have sales and purchase ledgers for GST, GST duty ledgers, service ledgers, expense/income/round-off ledgers, discount ledgers, and so on.
In this section:
- Apply GST Rate and HSN/SAC Details in the Accounting Group
- Apply GST Rate and HSN/SAC Details in the Stock Group
- Apply GST Rate and HSN/SAC Details in the Stock Item
- Apply GST Rate and HSN/SAC Details in Sales/Purchase Ledgers
- Update GST Rate in GST Ledgers
- Update GST Details in Party Ledgers
- Apply GST Details in Service Ledger
Apply GST Rate and HSN/SAC Details in the Accounting Group
Once you update the GST details for an accounting group, it will be carried forward to all the masters, sub-groups, or ledgers under this group.
To know how to do it, refer to the Apply GST Rate and HSN/SAC Details in the Accounting Group section in the Getting Start with GST in TallyPrime topic.
Apply GST Rate and HSN/SAC Details in the Stock Group
With stock group, you can apply the same GST rates and HSN/SAC details to all the stock items that fall under it.
To know how to do it, refer to the Apply GST Rate and HSN/SAC Details in the Stock Group section in the Getting Start with GST in TallyPrime topic.
Apply GST Rate and HSN/SAC Details in the Stock Item
When your stock items have different GST rates and HSN/SAC details, you can update the details in the stock item master.
To know how to do it, refer to the Apply GST Rate and HSN/SAC Details in the Stock Item section in the Getting Start with GST in TallyPrime topic.
Apply GST Rate and HSN/SAC Details in Sales/Purchase Ledgers
If your business sells many items with the same tax rate, then you can conveniently apply the tax rate and other GST details directly in a common sales ledger. This way, you only have to select the relevant sales ledger while recording the transaction, and the GST details will be applied seamlessly.
Similarly, if your business purchases many items with the same tax rate, then you can apply the GST details directly in a common purchase ledger and select it while recording a purchase.
To know how to do it, refer to the Apply GST Rate and HSN/SAC Details in Sales/Purchase Ledgers section in the Getting Start with GST in TallyPrime topic.
Update GST Rate Details in GST Duty Ledgers
You can use either a common duty ledger (without adding any tax rates) or separate duty ledgers (with specific tax rates), as needed. However, we recommend you to have a common duty ledger which you can use in the transactions.
To know more how to create Create/Alter Common Duty Ledger or Rate-wise Duty Ledger, refer to the Update GST Rate Details in GST Duty Ledgers section in the Getting Start with GST in TallyPrime topic.
Update GST Details in Party Ledgers
With TallyPrime, you can easily set up the ledgers of your suppliers and customers with GST details. You can add all the important details such as GSTIN/UIN and Registration Type.
What’s more, if your party is a Regular – SEZ dealer, then you can choose the registration type.
These details will be applied seamlessly in the transaction.
- Press Alt+G (Go To) > Create/Alter Master > Ledger (under Accounting Master).
Alternatively, Gateway of Tally > Create/Alter > Ledger. - Select the required party ledger from the List of Ledgers, or create a new one, as needed.
- Select the party Registration type and enter the GSTIN/UIN.
Registration type: Regular, Regular – SEZ, Composition, Unregistered/Customer, depending on the party.
If you do not see Regular – SEZ, then press Enter on Show More under GST Registration Types. - Enter GST Registration Details of the party.
- Press Ctrl+I (More Details) > GST Registration Details, and fill in the relevant details.
- Assessee of Other Territory: Set this option to Yes if the party belongs to Exclusive Economic Zone (Other Territory).
- Ignore prefixes and suffixes in Doc No. for reconciliation: If your party uses prefixes or suffixes in the Doc No. but your business does not use them, then it might cause mismatch during reconciliation. This option helps you ignore such prefixes or suffixes, and lead to a smooth reconciliation.
- Press Ctrl+A to save the details.
The Ledger Creation screen appears as shown below:
- As always, press Ctrl+A to save.
To know more on how to create or update party ledgers with GST Details in TallyPrime, refer to Update GST Details in Party Ledgers section in the Getting Start with GST in TallyPrime topic.
Apply GST Details in Service Ledger
If you are in a service-based business, then you can create a service ledger and update GST details in the same. You just need to select the Accounting Invoice mode while recording the transaction, and the GST details get applied seamlessly.
To know more, refer to the Apply GST Details in Service Ledger section in the Getting Start with GST in TallyPrime topic.


