
GSTR-4 in TallyPrime
TallyPrime gives you an overview of the GSTR-4 report, where you can see the company information on top, the Return view, and the Nature view of the transactions. You can also view the total number of vouchers along with the number of vouchers under different headings in the Return Summary of the report. GSTR-4 contains different sections or tables for recording multiple types of supplies, such as taxable, exempted, and even nil-rated. You can also learn about the GSTR-4 filing along with the descriptions for each section of this report.
GSTR-4 is a tax return that has to be filed annually by a composite dealer on the GSTN portal. The filing of a tax return might sound difficult, but with TallyPrime, your journey becomes easy. You only have to record your GST transactions in TallyPrime, as usual, and your transactions appear in sections of the GST returns based on their nature as of the date you record them. You can just verify and export the details and upload them to the portal, and all your GST data from TallyPrime appear seamlessly on the portal.
To file GSTR-4, you must upload the details of your GST sales in the relevant tables or sections on the portal. TallyPrime’s GSTR-4 report is perfectly mapped to the tables of the GSTR-4 form, and all your GST sales are automatically assigned to the relevant tables. Once your details are up and running in TallyPrime, you can rest assured that these details seamlessly reflect on the portal as well. You can view the report as Return view which is the mirror of how your data appears in the portal, and also in the Nature view which is the mirror of your data in your company books.
Overview GSTR-4 Report
We understand how important it is to balance the compliance and the business aspects of your transactions. Hence, TallyPrime comes with a GSTR-4 report that is tailored to meet your many requirements in one place. You can not only view your key GST figures as per the portal but also view how these numbers are reflected in your books.
Moreover, if there are any errors or uncertainties in your GST details, you can easily identify and resolve them in TallyPrime.
![]()
- Open GSTR-4 report.
Press Alt+G > type or search GSTR-4 > press Enter.
Alternatively, go to Gateway of Tally > Display More Reports > GST Reports > GSTR-4.
If you are in Rel 2.1 and earlier, you can view the report from Gateway of Tally > Display > Statutory Reports > GST > GSTR–4.TallyPrime shows the default period for the report as per the last voucher date entry. Press Alt+F2 to view the report for any period other than your current reporting period.
- Click F12: Configure and enable the option Show breakup of Tax Amount, to view the taxes in separate columns.
GSTR-4 has the following sections, which address your specific needs with great simplicity.
- Header – Company Information
- Return View – Mirror of the Portal
- Nature View – Mirror of Company Books
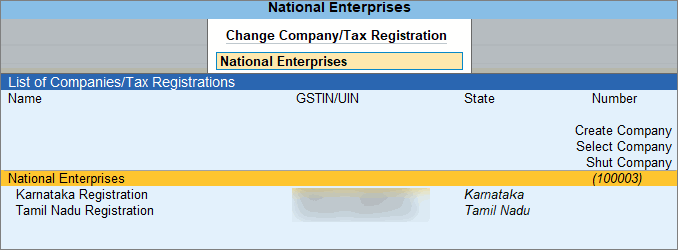
Header | View Company Information
The header section in GSTR-4 captures some of your key information, such as the Company name, GST Registration, Period, and so on. If required, you can change one or more of these necessary details, and the contents of the reports get updated accordingly.
![]()
What’s more, if your business consists of multiple GST registrations/GSTINs, then the GSTR-4 report provides you with an amazing view of your combined GST details and activities across registrations. However, TallyPrime also provides you with the flexibility to view GSTR-4 for only one registration, from any of your companies.
View GSTR-1 for a specific GSTIN
Press F3 (Company/Tax Registration) and select the required company or registration from the list.
Return View | View GST Details in the Format of the Portal
The Return View section is your personal map of the GSTN portal. Every section or table on the portal is faithfully represented in this section so that you can conveniently share the data with the tax department. The best part is that you don’t have to do anything extra from your end. Depending on the nature of a particular transaction, TallyPrime captures all your transaction in the respective sections or tables.
The Return View section displays the following sections, based on your transactions during the period.
- Inward Supplies from Registered Supplier (Other Than Reverse Charge)
- Inward Supplies from Registered Supplier (Reverse Charge)
- Inward Supplies (unregistered)
- Import of Services
- Debit/Credit Notes (Registered)
- Debit/Credit Notes (Unregistered)
- Tax on Outward Supplies
- Advance Amount Paid
- Adjustment of Advances Paid
- Interest, Late Fee, Penalty and Others
Inward Supplies from Registered Supplier (Other Than Reverse Charge)
This section displays the total value of purchases from a registered supplier and the value of the tax on purchases not attracting reverse charge.
Inward Supplies from Registered Supplier (Reverse Charge)
This section displays the total value of purchases from a registered supplier and the value of the tax on purchases attracting reverse charges.
Inward Supplies (Unregistered)
This section displays the total value of purchases from an unregistered supplier.
Import of Services
This section displays the total value of services imported.
Debit/Credit Notes (Registered)
This section displays the sales or purchase returns to registered dealers through credit or debit notes.
Debit/Credit Notes (Unregistered)
This section displays the sales or purchase returns to unregistered dealers through credit or debit notes.
Tax on Outward Supplies
This section displays the value of the tax on purchases.
Advance Amount Paid
This section displays the payment of any advance amount.
Adjustment of Advances Paid
This section displays any adjustments done against the advances paid.
Interest, Late Fee, Penalty and Others
This section displays any interest, late fee, or penalty that is levied for not filing GSTR-4 on or before the due date.
Nature View | View GST Details as per Company Books
Within the context of the GSTR-4 report, TallyPrime provides you with a quick and easy way to compare your return data with the data in your company books. To view these details, you simply have to change the view from Return View to Nature View by pressing F5. The Nature View section provides a general categorization of your GST sales, based on the nature of the transaction. You can view essential GST groups such as Outward Supplies and Inward RCM Supplies, with a breakup of taxable, exempt, nil-rated, and non-GST supplies.
Using the Nature View, you can quickly compare the GST details with the details in your company books, that is, in the Profit & Loss report, Sales Register, or Chart of Accounts. This helps you greatly in identifying and resolving any errors in your data before you can finalize the return.
In the Nature View section, you can find that all your outward supplies and inward RCM supplies are conveniently categorized based on your transactions during the period.
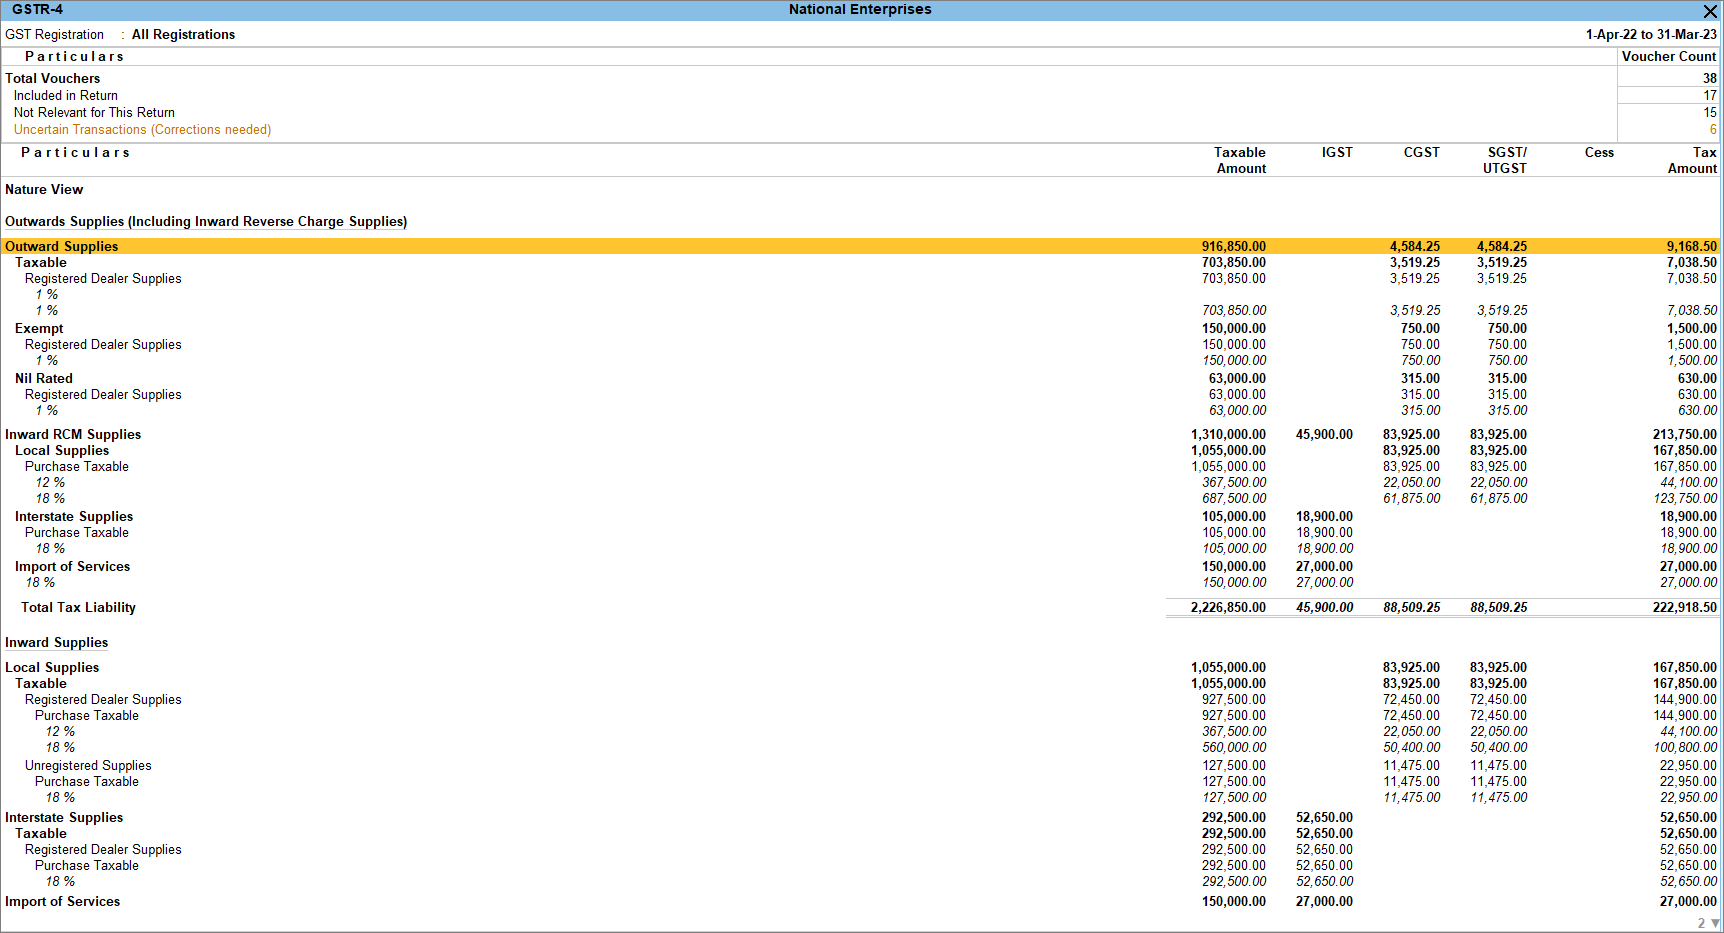
If you have more than one tax rate in the return period, based on the date of applicability, the break-up of nett value appears for taxable sales.
There are two sections in this report:
- Returns summary, which is a snapshot of the business operations in the given period.
- Particulars, which displays transactions participating in the returns.
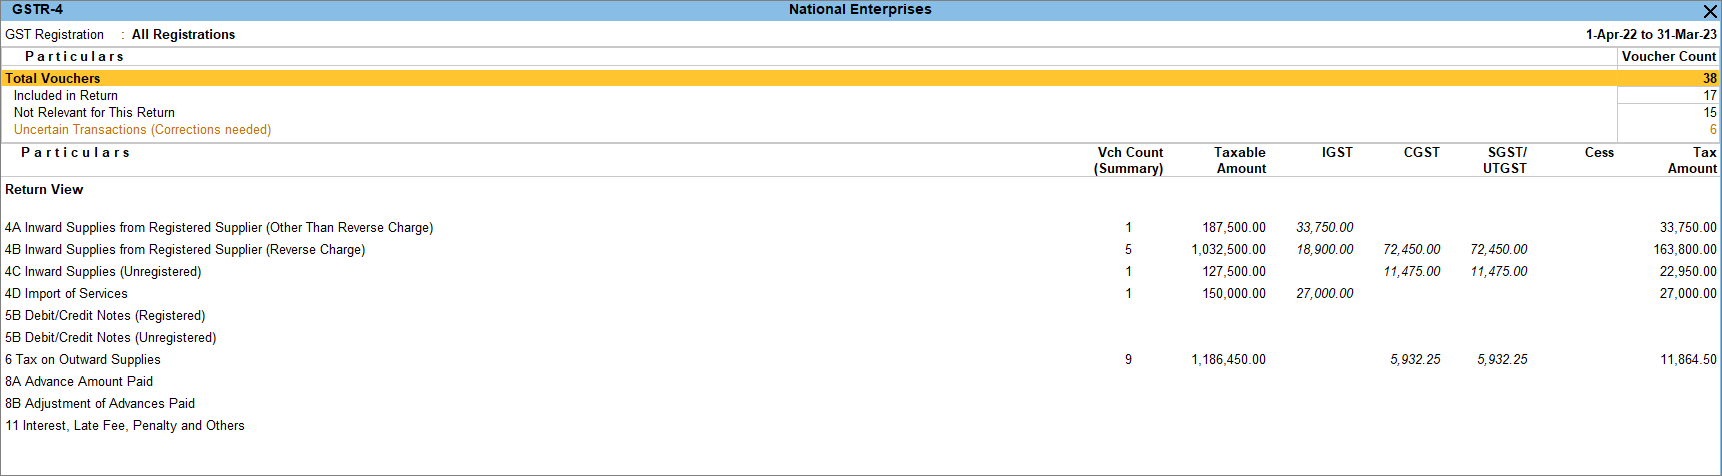
Returns Summary
This section provides a summary of all transactions recorded in the reporting period. You can drill down on each row to view the details.
![]()
![]()
Total Vouchers
The Total Vouchers section gives you a bird’s eye view of the key numbers and details across your GST transactions. You get a clear picture of the number of transactions included in the return, the transactions that are ready for export, the transactions where corrections are needed, and so on. You can drill down from each of these sub-sections to take a closer look at the transaction details.
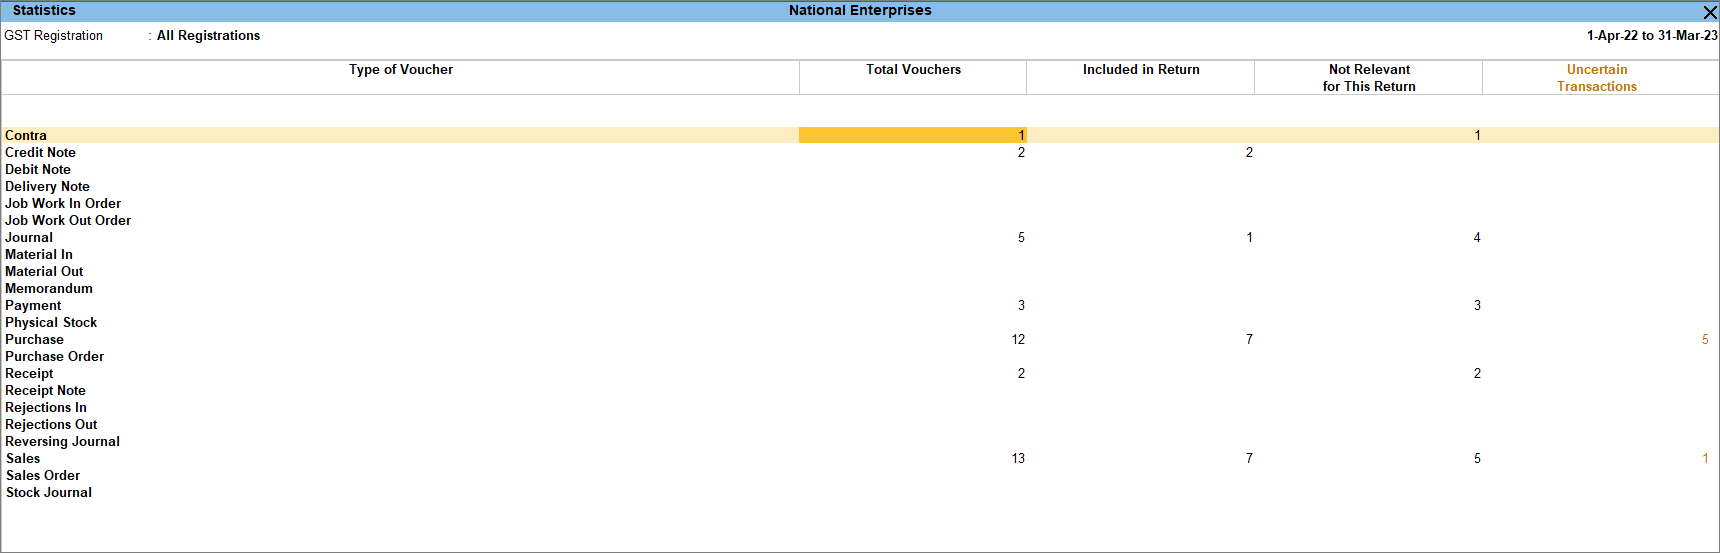
Included in Return
Included in Return gives you an overall count of the vouchers included in GSTR-4. You can further drill down for a detailed breakup of the type of vouchers involved. For example, you can see how many sales returns are included in the return. The best part is that you can further drill down to see the full list of sales returns that have been recorded during the specified period, and also set the Effective Date and GST Status, as needed.

Not Relevant for this Return
Not Relevant for this Return gives you an overall count of the vouchers that are not required to be filed in GSTR-4 in the selected period. This includes transactions of other registrations, returns, or return periods, and also includes non-GST transactions (such as payroll, inventory, and order vouchers) and transactions that were consciously excluded by you.
You can further drill down to view the different categories of transactions. For example, you can see how many non-GST transactions are present. The best part is that you can further drill down to see the full list of voucher types, such as credit notes, journals, payments, and receipts.

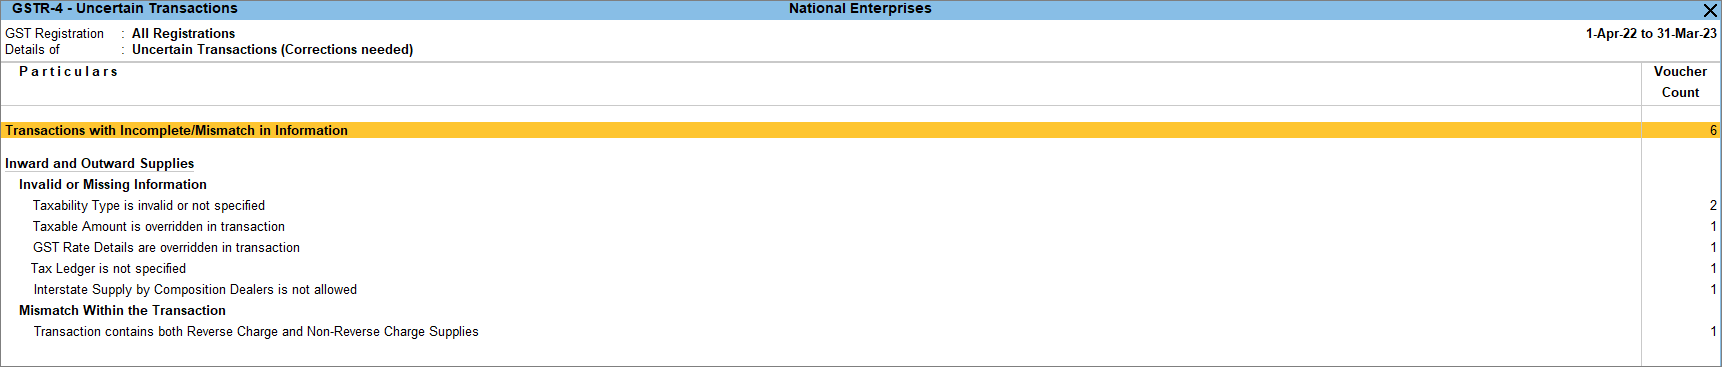
Uncertain Transactions (Corrections needed)
Uncertain Transactions gives you an overall count of the vouchers with GST-related errors. You can drill down further from the section to view all uncertain details and correct them. Even if you have hundreds of transactions, you can easily find and fix a particular error. Refer to the Resolve Uncertain Transactions section to know more.
Incomplete/Mismatch in information (to be resolved)
Displays the count of all vouchers for which information required for filing returns is missing in the invoice. You can correct exceptions in the vouchers before exporting GST returns.
Getting Ready for GSTR-4 Filing
Apart from assured compliance, easy design, and great speed, the GSTR-4 report comes with the following features, which make your return filing experience as smooth as possible.
Resolve Uncertain Transactions
Sometimes, you might experience problems in GSTR-4 filing, if there are any errors or missing details in your GST transactions. When you have hundreds or thousands of transactions, it might get difficult to keep a tab on all the supplies and ensure that all the correct details are in place. However, with TallyPrime at your fingertips, you do not have to worry about such uncertain details at all.
The GSTR-4 report in TallyPrime comes with an easy, intuitive classification of all such GST-related errors. You can drill down from the Uncertain transactions section to view all such uncertain details and correct them easily. Even if you have hundreds of transactions, finding and fixing a particular error is pretty easy. Moreover, if you think that certain details are correct, and you want to proceed with these details, TallyPrime also provides you with the option to accept such transactions as is.
All your uncertain transactions will be conveniently placed in one of the following groups:
- Transactions with Incomplete/Mismatch in Information
- Inward and Outward Supplies
- Tax and Other Adjustments

Within the above groups, you will find your uncertain details in one of the following sub-groups:
- Invalid or Missing Information
- Mismatch in Information Between Masters and Transactions
- Mismatch Within the Transaction
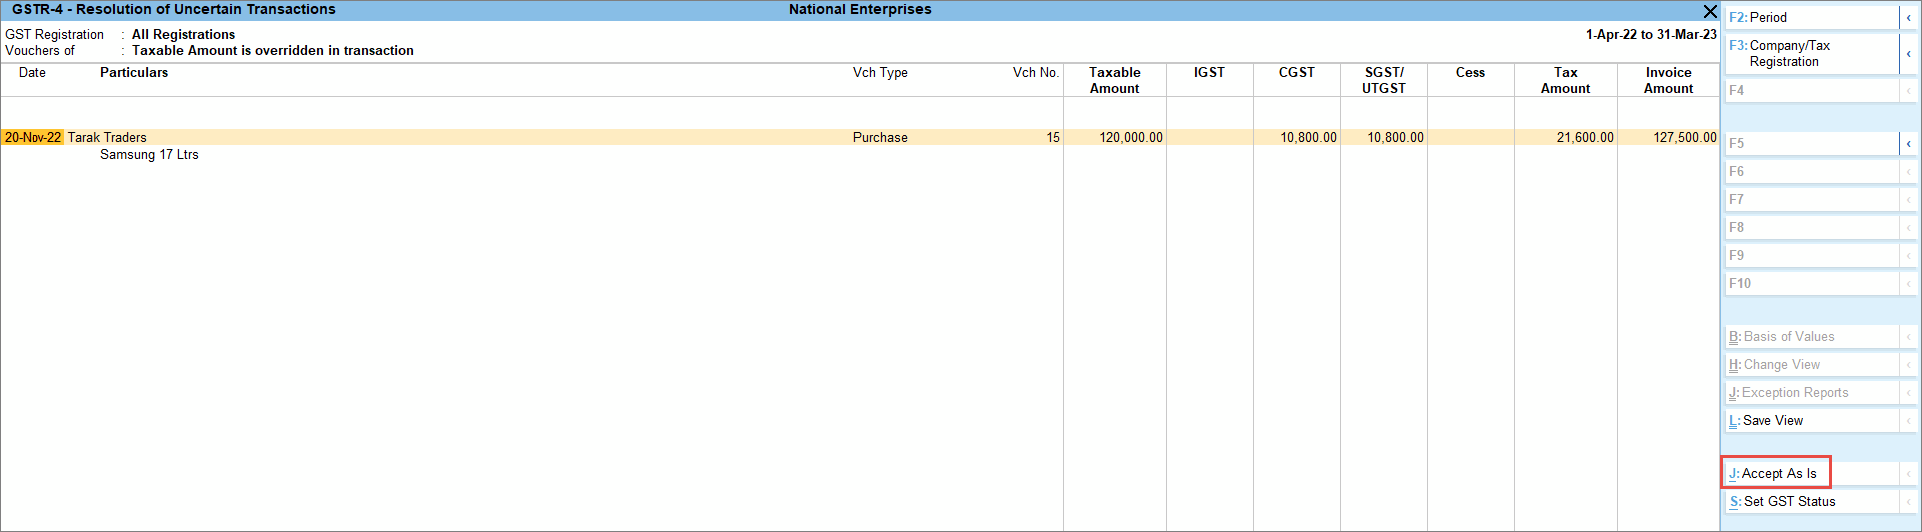
Based on your requirement, you can drill down from one of the uncertain sections to view the full list of transactions. For example, if you want to view all the transactions where the Taxable amount is overridden in transaction, then you can drill down from the Taxable Amount is overridden in transaction section and check the full list.
Moreover, if you think that the overridden Taxable amount is correct, and you want to proceed with those details, then you can select the required entry and press Alt+J (Accept As Is).
View Vouchers Accepted as Valid
![]()
- Press Ctrl+J > select Transactions Accepted as Valid > press Enter.
It displays the list of vouchers that you have accepted as valid and included in the returns. - To move the vouchers out of this list and make the required corrections,
- Press Alt+J (Undo Accept As Is) and press Enter.
The voucher moves to the relevant exceptions.
- Press Alt+J (Undo Accept As Is) and press Enter.
Details Captured in Offline Tool
Use the Microsoft Excel format to export the GSTR-4 details that need to be filed.
The description of the data captured in each sheet and columns of the exported file is given below:
|
Worksheet and column names |
Description |
|
4-A&B (B2B) 4A,4B. Inward Supplies received from a registered supplier (including supplies attracting reverse charge) |
Displays the details of local and interstate purchases made from registered dealers attracting reverse charges. |
|
GSTIN of Supplier |
Displays the GSTIN/UIN defined in the party ledgers, or entered in the Party Details screen of the voucher. |
|
Invoice Number |
Displays the Supplier invoice no. entered in the purchase voucher. |
|
Invoice date (dd-mm-yyyy) |
Displays the supplier invoice Date entered in the purchase voucher. |
|
Invoice Value |
Displays the total value of the voucher. |
|
Place Of Supply |
Displays the State name selected in the Party Details screen of the voucher. |
|
Reverse Charge |
Displays Yes. |
|
Invoice Type |
Displays Regular. |
|
Rate |
Displays the tax rate entered in the transaction. |
|
Taxable Value |
Displays the assessable value entered for each tax rate. |
|
Integrated Tax |
Displays the auto-calculated value. |
|
Central Tax |
Displays the auto-calculated value. |
|
State/UT Tax |
Displays the auto-calculated value. |
|
Cess |
Displays the value entered in the invoice. |
|
4D(IMPS) 4D. Import of Service |
Displays the details of import of services enabled for reverse charge from dealers outside India. |
|
Invoice Number |
Displays the Supplier invoice no. entered in the purchase voucher. |
|
Invoice date (dd-mm-yyyy) |
Displays the supplier invoice Date entered in the purchase voucher. |
|
Invoice Value |
Displays the total value of the voucher. |
|
Place Of Supply |
Displays the State name selected in the Company GST Details screen. |
|
Rate |
Displays the tax rate entered in the transaction. |
|
Taxable Value |
Displays the assessable value entered for each tax rate. |
|
Integrated Tax |
Displays the auto-calculated value. |
|
Cess |
Displays the value entered in the invoice. |
|
6(TXOS) 6. Tax on outward supplies made (Net of advance and goods returned) |
Displays the details of taxable sales. |
|
Turnover |
Displays the assessable value entered for each tax rate defined in Company GST Details screen. |
|
Central Tax |
Displays the auto-calculated value. |
|
State/UT Tax |
Displays the auto-calculated value. |
|
8A(AT) 8A. Advance amount paid for reverse charge supplies in the tax period |
Displays the value of the journal voucher recorded with the Nature of adjustment selected as Increase of Tax Liability. This is to account for tax on advance paid for purchase under reverse charge, for which purchase is not made in the same month. |
|
Place Of Supply |
Displays the Place of supply selected in the Statutory Details screen of the journal voucher (appears on enabling the option Provide GST details). |
|
Supply Type |
Displays the Supply Type selected in the Statutory Details screen of journal voucher (appears on enabling the option Provide GST details). |
|
Rate |
Displays the tax Rate entered for the tax ledgers in the GST Details screen of the journal voucher. |
|
Gross Advance Paid |
Displays the Taxable Value entered for the tax ledgers in the GST Details screen of the journal voucher. |
|
Integrated Tax |
Displays the auto-calculated value. |
|
Central Tax |
Displays the auto-calculated value. |
|
State/UT Tax |
Displays the auto-calculated value. |
|
Cess |
Displays the value entered in the invoice. |
|
8B(ATADJ) 8B. Advance amount on which tax was paid in earlier period but invoice has been received in the current period |
Displays the value of the journal voucher recorded with the Nature of adjustment selected as Decrease of Tax Liability. This is to reverse the tax on advance paid for purchase under reverse charge in the previous period, for which purchase is made in the current period. |
|
Place Of Supply |
Displays the Place of supply selected in the Statutory Details screen of the journal voucher (appears on enabling the option Provide GST details). |
|
Supply Type |
Displays the Supply Type selected in the Statutory Details screen of the journal voucher (appears on enabling the option Provide GST details). |
|
Rate |
Displays the tax Rate entered for the tax ledgers in the GST Details screen of the journal voucher. |
|
Gross Advance Paid |
Displays the Taxable Value entered for the tax ledgers in the GST Details screen of journal voucher. |
|
Integrated Tax |
Displays the auto-calculated value. |
|
Central Tax |
Displays the auto-calculated value. |
|
State/UT Tax |
Displays the auto-calculated value. |
|
Cess |
Displays the value entered in the invoice. |
Note: Currently, data of purchases from a regular dealer that do not attract reverse charge, purchase from unregistered dealers, credit and debit notes, and amendments will not be exported to the template.
File GSTR-4
GSTR-4 report includes the details of taxable outward supplies, and inward supplies under reverse charge, made by a GST composition dealer in a given period. With TallyPrime, you can file GSTR-4.
File your returns directly on the GST portal
When your data volume is very low, you can directly file the returns on the portal.
- Log in to the GST portal.
- Select the Return Filing Period, and click SEARCH.
- Click GSTR4.
- Click PREPARE ONLINE.
- Open each GSTR-4 table, copy the data exported from TallyPrime to GSTR-4 offline tool, and fill the tables.
- Submit your returns and e-sign.
If you are in Rel 2.1 and earlier, click here.
GSTR-4 report includes the details of taxable outward supplies, and inward supplies under reverse charge, made by a GST composition dealer in a given period. With TallyPrime, you can file GSTR-4 in three ways:
- By generating JSON from TallyPrime
- By using the GST Offline tool
- By filing your returns directly on the GST portal
Prerequisites for filing GSTR-4
- Internet connectivity: This is required for uploading the JSON file, downloading the offline tool, and filing returns.
- Microsoft Office: For exporting data to the offline tool, GSTN recommends MS Excel 2007 or later (if you are using the offline tool for filing returns).
Method 1: Generate JSON from TallyPrime
You can quickly generate JSON from TallyPrime and upload it to the portal.
Generate GSTR-4 returns in the JSON format
- Go to Gateway of Tally > Display More Reports> Statutory Reports > GST > GSTR-4.
Alternatively, press Alt+G (Go To) > type or search GSTR-4 > press Enter. - F2: Period: Select the period for which returns need to be filed.
- Press Alt+E and select E-Return from the menu.
- Select JSON (Data Interchange) as the File Format.
- Specify the folder path to save the e-return in the File path field.
- File Name is auto-filled retain the name and press Enter.
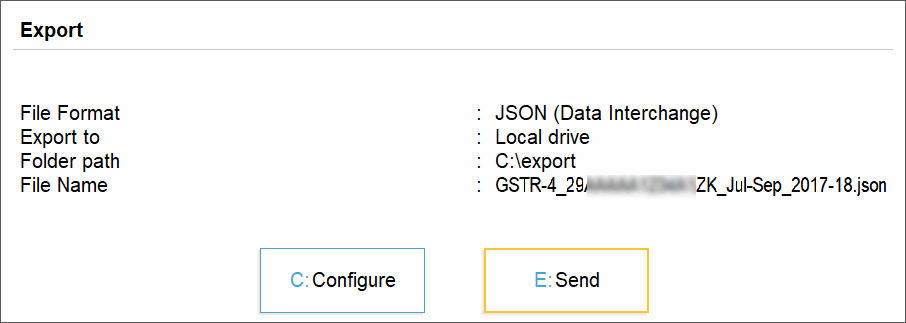
- Click Send to export the returns in JSON format.
If the company GSTIN/UIN is incorrect, you need to correct it to proceed with the export.
To open the file after export, click Configure and set Open file after Export to Yes.
Upload the JSON file generated from TallyPrime to the portal for filing returns.
The latest offline tool supports data export only until 31st March 2019. Hence, if you are exporting data from April 2019 onwards, a note appears at the bottom of the Export Report screen as shown below:
The data will be exported to JSON file for reference purposes only. You cannot use this to file returns, as the department does not have a provision to file quarterly returns from 1st April 2019.
File GSTR-4 returns
- Log in to the GST portal.
- Click Services > Returns > Returns Dashboard.
- Select the Return Filing Period, and click SEARCH.
- Click GSTR4.
- Click PREPARE OFFLINE.
- Click Choose File to import the JSON file generated from TallyPrime or the offline tool. Once your JSON file is uploaded successfully, you will be notified by a message.
- Verify the uploaded details after the time specified in the GSTR screen.
- Submit your returns and e-sign.
Method 2: Use the GST Offline Tool
You can export data to the offline tool provided by the department, generate JSON and upload the same to the portal.
Download the offline tool
- Go to the GST portal.
- Click Downloads > Offline Tools > GSTR 4 Offline Tool > Download.
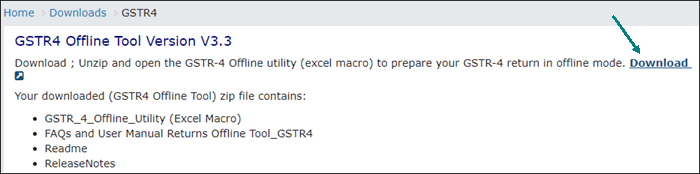
- Click Proceed.
- A .zip file containing the GSTR_4_Offline_Utility will be downloaded.
- Extract the file from the .zip file and copy it to the location where TallyPrime is installed.
Export GSTR-4 returns to the offline tool
- Go to Gateway of Tally > Display More Reports> Statutory Reports > GST > GSTR-1.
Alternatively, press Alt+G (Go To) > type or search GSTR-1 > press Enter. - F2: Period: Select the period for which returns need to be filed.
- Press Alt+E and select E-Return from the menu.
- Select Excel (Spreadsheet) or CSV (Comma Delimited) as the File Format.
- Specify the folder path to save the e-return in the File path field.
- Press Enter. If the template GSTR_4_Offline_Utility_v3.3.xls is not available in the File path, the message appears as shown:
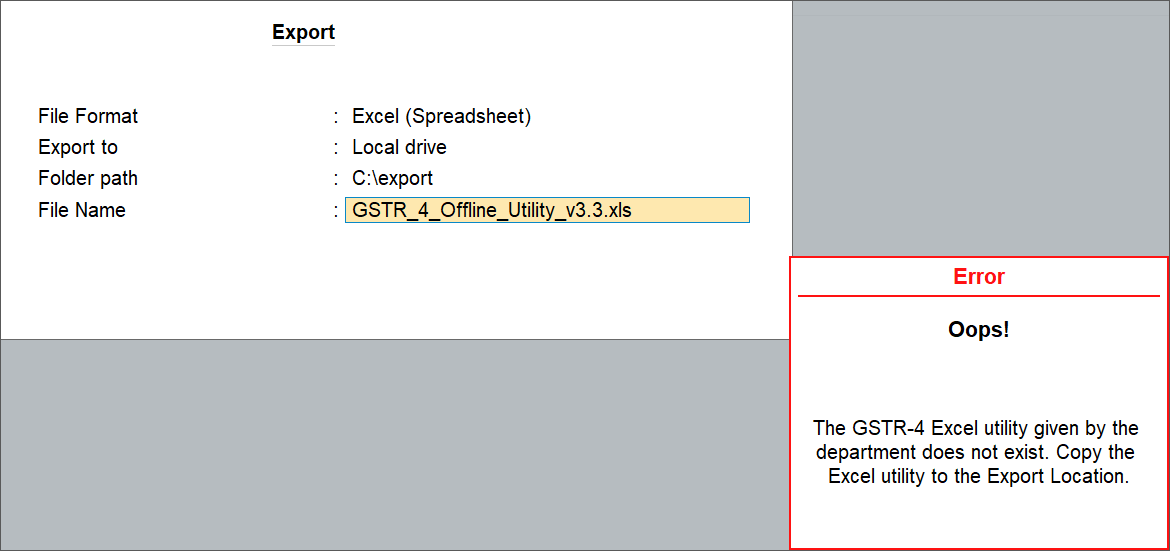
- Copy the template to the File path and continue.
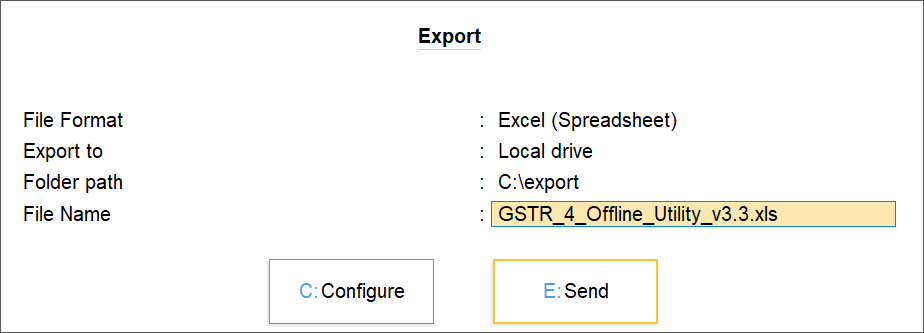
- Click Send to export.
The offline tool opens with the data updated in the relevant fields.
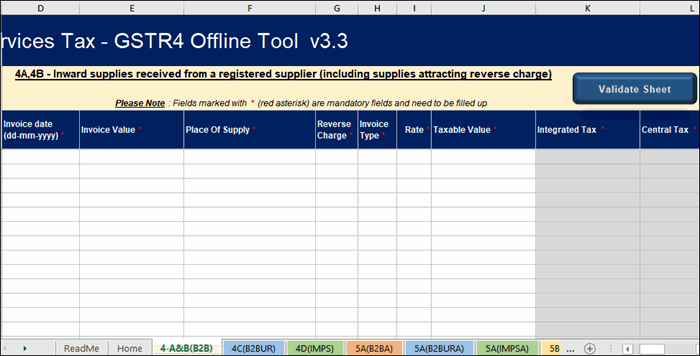
- In the offline tool click Validate Sheet to view the status of each sheet.
- In the Home tab:
- Click Get Summary.
- Click Generate JSON File to upload. On successful validation, the message appears as shown:
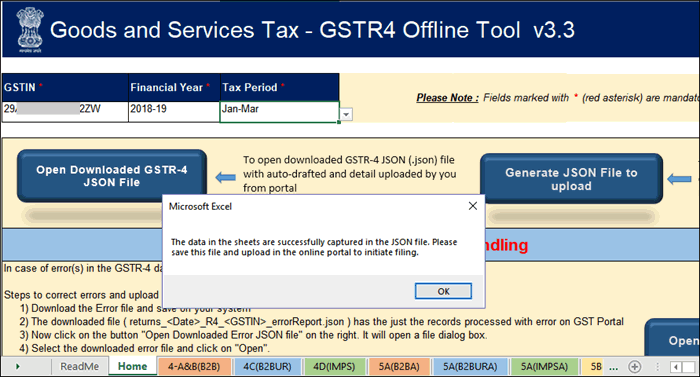
- Save the file in the required location.
- Upload this JSON file on the GST portal.
For more details on the information captured in each column of the offline tool, click here.
The latest offline tool supports data export only until 31st March 2019. Hence, if the report period is from 1st April 2019, a note appears at the bottom of the Export Report screen.
In TallyPrime, even though there is a provision to select the period from April 2019, the data will not be exported to the tool for the following reasons:
- The tool accepts data only until March 2019.
- As per Notification No. 20/2019 – Central Tax, issued by GSTN, annual returns will be applicable for composition dealers from April 2019.
If you want to export the details for reference purposes, you can press Alt+E from GSTR-4 and select Excel (Spreadsheet) format. Do NOT select Excel GSTR-4 (Spreadsheet).
Method 3: File your returns directly on the GST portal
When your data volume is very low, you can directly file the returns on the portal.
- Log in to the GST portal.
- Select the Return Filing Period, and click SEARCH.
- Click GSTR4.
- Click PREPARE ONLINE.
- Open each GSTR-4 table, copy the data exported from TallyPrime to GSTR-4 offline tool, and fill the tables.
- Submit your returns and e-sign.


