
One-Time Setup for e-Invoicing
e-Invoicing in TallyPrime is a smooth and hassle-free process that integrates seamlessly with your regular invoicing tasks.
To get started with e-Invoicing, you need to enable e-Invoicing in TallyPrime and create your e-Invoice profile in IRP.
e-Invoicing Setup on IRP
To get started with e-Invoicing, register your business on IRP and create an API user profile by selecting Tally India Pvt Ltd as your GSP.
Click here to watch the Hindi version of the video.
If you already have an e-Way Bill profile, and you are using it to generate e-Way Bills in TallyPrime, then you need not create another API User Profile for e-Invoicing.
In this section
Register on IRP | IRP Registration
- Open the IRP home page, and click Registration > Portal Login.
- Enter the GSTIN of your business in the following e-Invoice Registration Form, followed by the CAPTCHA code, and click Go.
- Enter the business details, as required, and click Send OTP to verify the details.
- Enter the code received on your registered mobile number, and click Verify OTP.
After verifying the OTP, you will be asked to enter a username and password to create your login credentials. - Confirm and save the details.
Create API User Profile
- Open the IRP home page, and click Login.
- Log in with the username and password created while registering on IRP.
- Click API Registration > User Credentials > Create API User.

- Select Through GSP in the following API Registration screen.

- Select Tally (India) Private Ltd in the Select your GSP field.
- Specify the API username and password, and click Submit to save the details.
A user profile will be created with Tally (India) Private Ltd as the GSP.
The API user credential is different from the IRP credential. You will need to use the IRP credentials whenever you need to log in to the e-Invoice screen in TallyPrime.
e-Invoicing Setup in TallyPrime
Once you have registered for e-Invoicing and created your API User profile, set up the e-Invoicing feature to configure options and generate e-Invoices as needed.
Click here if you want to watch the Hindi version of the video.
- Press F11 and set Enable Goods and Services (GST) to Yes. The GST Details screen opens.
If you are using a release earlier than TallyPrime 3.0, then click here.to view the screen.
If you are using the multiple GST registrations feature of TallyPrime Release 3.0 or later releases, then the GST Registration screen appears.
Select the GST Registration for which you want to enable e-Invoicing and press Enter.-
Select the GST Registration for which you want to enable e-Invoicing.
-
Press Enter.
-
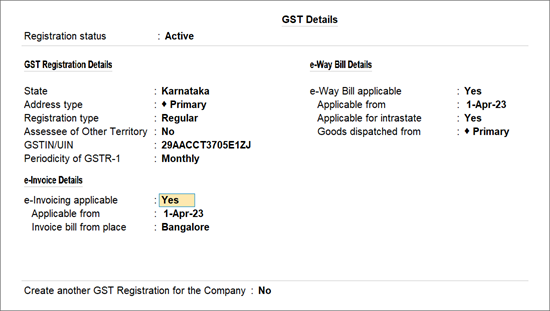
- Set the option e-Invoicing applicable to Yes. The related options for e-invoicing will now be visible:
- Applicable from: Set the date from which your transactions will be applicable for e-invoicing.
- Invoice bill from place: Specify the location where your supplies are billed from, which can be the same location or different from where your supplies are shipped from.
You can also generate your e-Way Bill along with your e-invoice, if needed by your business.
- Press Ctrl+A to save the details.
Changing GST details in your master records will update the related vouchers and their status in the GST reports.
After you set up e-Invoicing in TallyPrime.
-
Enter the correct HSN/SAC, tax rates, and Type of Supply details in the ledgers and stock items.
-
Enter the correct address, pincode, and GSTIN/UIN in the party masters.
-
Update the ISO code for all your foreign currencies, if you are an exporter.
You can easily generate an IRN while saving your invoice and also print the QR code and other details.
Update ISO Currency Code (For Exporters)
If your business deals in exports, ensure that you have updated the ISO currency codes for all foreign currencies to ensure smooth e-Invoicing.
- Press Alt+G (Go To) > Alter Master > Currency > press Enter.
Alternatively, Gateway of Tally > Alter > Currency > press Enter. - Select the foreign currency (for example, US Dollar ($)). You can also create a currency, if required.
- Select the Formal name and press Alt+H to open the List of Currency.
- Select the relevant Currency Code from the list. The ISO Currency Code field will be updated accordingly.
- Update other details, as required, and accept the screen. As always, you can press Ctrl+A to save the details.
Additional Security for e-Invoicing
In case of multiple users, TallyPrime offers added security by allowing you to control which users can upload e-Invoices to the IRP through configurable user rights.
-
You can secure e-Invoicing in TallyPrime by using the security control feature to set up User Rights for individual allowing only selected users to upload invoices to the IRP or blocking access to the e-Invoicing feature entirely.
-
If you use a firewall or antivirus, add TallyPrime to their exceptions list to avoid issues.
With built-in security and user access control, TallyPrime makes it easy to manage e-Invoicing across multiple GST registrations.
Q&A
- How to register e-Invoice in the GST portal?
The registration technique for GST taxpayers for the e-invoice system is quite simple. You must have your GSTIN as well as the phone number registered with the GST with you to proceed with the registration. Open the e-Invoice portal home page, and proceed with the registration process of e-Invoice.
- I am unable to upload invoices for IRN generation as the e-Invoice portal login for my Company is not working correctly. What will I do?
You need to reset the e-Invoice portal login credentials from F1 (Help) > Troubleshooting > Reset Login > Reset e-Invoice Login. This will remove the existing login credentials from TallyPrime. Then, log in to the e-Invoice portal with the correct credentials for the company. - How can I remove the e-Invoice portal logins for multiple companies in TallyPrime?
For each company, you need to reset the e-Invoice portal login credentials from F1 (Help) > Troubleshooting > Reset Login > Reset e-Invoice Login.
For any further queries, refer to e-Invoice – FAQ.


