Synchronise Data in TallyPrime
To be able to synchronise data, you will need to create client rules at the client end and activate the rules at the server system.
On this page, steps 1 to 3 are one-time setup if you already know what data you need to synchronise. Even if you are unsure, altering the rules any time to suit your sync requirements is very simple.
For one-way sync (client to server), perform steps 1 and 2 in the client machine and step 3 in the server machine. For two-way sync, perform all steps on both machines, as they act as server and client for each other.
Step 1: Create Rules for Synchronisation
You can create as many rules as you need depending on the data you want to sync. You can create a rule for synchronising masters and another rule for transactions. Similarly, you can create separate rules for sending data to the server and receiving data from the server.
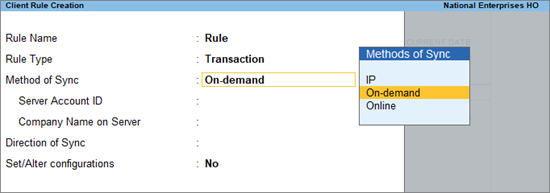
- Press Alt+Z (Exchange) > All Sync Options > Client Rules > Create.
If you are on TallyPrime Release 4.1 or earlier: Press Alt+Z (Exchange) > Client Rules > Create or Alter. - Enter the Rule Name.
- Rule Type: Master or Transaction – depending on the data you want to synchronise.
If you need to synchronise both masters and transactions, you can create multiple rules. - Method of Sync: Select On demand, Online or IP.
- On-demand: You need not connect to the client and server at the same time.
- Online: You have to connect the company to the Tally.NET server.
- IP: You need to connect both the server and client companies through a private network.
- In Server Account ID, enter your Tally.NET Server account ID.
- In Company name on Server, enter the company name on the server. You can find the company name by pressing Alt+K (Company) > Online Access > Contact Details report.
- Direction of Sync: Decide if the rule should apply for receiving or sending data.
- For masters, select Receive Data or Send Data.
- For transactions, select Receive Data, Send Data, or Both Data from to client: Send Data
- Set/Alter configurations: Depending on your data for synchronisation, you can set up additional configurations in the rules based on the Rule Type and Direction of sync.
- Press Ctrl+A to save the client rule.
Step 2: Synchronise Client and Server
After defining the rules at the client end, do a synchronisation to send these rules from the client to the server.
- Press Alt+Z (Exchange) > Synchronise, to send all the rules to the server.
- Select Synchronise Selected to send a selected rule, and press Enter.
You can view the syn status from F1 (Help) > Troubleshooting > Event Log.
If you are using On-demand synchronisation, the rules will be stored at the http://Tally.NET server until the server executes synchronisation.
Step 3: Activate Server Rules
After receiving the client rules at the server end, you need to activate the rules in the server machine.
- Press Alt+Z (Exchange) > All Sync Options > Server Rules > Activate.
If you are on TallyPrime Release 4.1 or earlier: Press Alt+Z (Exchange) > Server Rules > Activate. - Select the rule from the List of Rules.
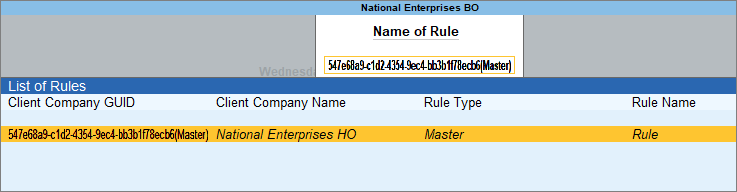
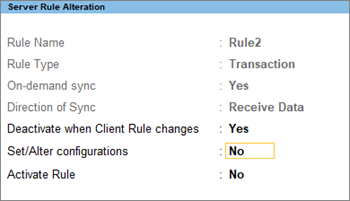
The Rule Type tells you if the rule you are selecting is for master or transaction. The Server Rule Alteration screen appears. - Activate rule: Yes.
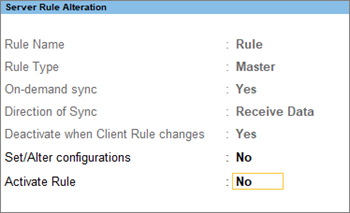
Deactivate when client rule changes – Yes, to auto-deactivate the rule when client rule is modified. This enables you to check and activate the required rule.
Similarly, activate the Client Rule for Transaction. Once the rules are activated, you can execute data synchronisation any time you need.
Step 4: Synchronise Data
If you have completed steps 1 to 3, just synchronise the data.
- Press Alt+Z (Exchange)
- Now, synchronise the data.
- To synchronise data for all the rules you have created, select Synhronise.
- To synchronise data for any selected rule, select All Sync Options > Synchronise Selected.

Based on the rules and their respective configuration, the data in the client and server gets synchronised. To time taken for completing the sync process depends on your data volume.
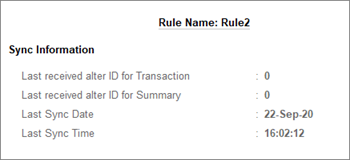
You can view the information on synchronisation for masters and transactions by pressing Alt+I (Rule Info.).