
Get Ready to Record Transactions of the New Financial Year in TallyPrime | Moving to the Next Financial Year
Read in Hindi (हिन्दी)
Existing users of TallyPrime can start recording transactions for the new financial year by changing the current period, creating a new company, or splitting the data.
The start of the financial year depends on your country’s accounting guidelines. In some countries, the financial year runs from 1 January to 31 December. In others, it runs from 1 April to 31 March.
Regardless of the period followed, you can easily move from one financial year to another in TallyPrime.
Before you begin | Prerequisites
- All pending purchase and sales bills are adjusted.
- Forex adjustments are completed, where applicable.
- GST Returns for the year are filed or reconciled.
- A full data backup is taken locally or on TallyDrive.
Change Current Period and Restart Voucher Numbering
You can continue using the same Company data by simply changing the period. This lets you start bookkeeping for the new financial year without the need to create the same data again. It also makes it easy to compare reports across financial years.
For the new financial year, we recommend restarting voucher numbers for all relevant voucher types. This creates a clean and consistent numbering series for each year.
The change period method is best suited when:
- Books are not yet audited
- You prefer to maintain continuous data
- Year-end adjustments may still be required
- Data size does not impact performance in the near future
- Comparing reports across years is important
Be aware of the following when using the change period method:
- Data size increases each year
- System performance may reduce over time
You can watch our detailed video or follow the steps mentioned below.
Step 1: Change Current Period
- On Gateway of Tally > press Alt+F2 (Period).
- Enter the From and To dates for the new financial year.
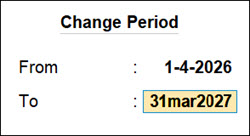
- If you have already taken a full backup, press Enter to change the period.
The CURRENT PERIOD and CURRENT DATE are updated on the Gateway of Tally screen.
When you change the Current Period, balances from the previous financial year are carried forward automatically. The Financial year beginning from and Books beginning from dates in the Company remain unchanged.
Step 2: Restart Voucher Numbering
The start of a new financial year is an ideal time to restart voucher numbering. You can assign fresh, unique voucher numbers for all voucher types. Specify the date from which the new numbering should apply.
- Press Alt+G (Go To) > Alter Master > Voucher Type.
- Set Method of Voucher Numbering as per the voucher entry practices followed in your business.
Selecting Automatic (Manual Override) generates voucher numbers automatically. You can manually change the voucher number whenever required.
If you are using numbering series for transactions- Press F12 (Configure) > Define multiple numbering series for vouchers: Yes.
- In the alteration screen, set Define multiple numbering series for vouchers to Yes and select the numbering series.
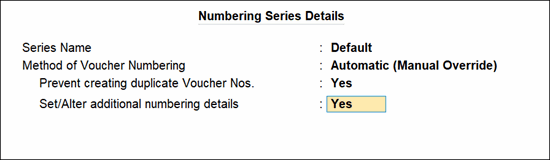
- Set Prevent creating duplicate Voucher Nos. to Yes, to ensure unique voucher numbers.
- Set the option Set/Alter additional numbering details to Yes.
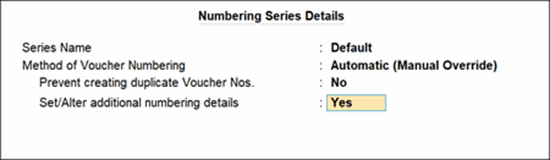
- In the Starting Number field enter 1, if you want a fresh batch of voucher numbers.
- Specify the Restart Numbering details, such as Applicable From, Starting Number, and Periodicity, as required.
- Enter the Prefix Details and Suffix Details, as required.

You can now start recording transactions with the new voucher numbering setup or series.
Sample sales voucher using the new number series

When you print the invoice, the same invoice number will be displayed in the printed tax invoice.
You can configure voucher numbering for all other voucher types in the same way.
Import Opening Balances from Old Company to a New Company
If you have created a new company (as explained above), export the closing balances of the ledgers and stock items of the old company, and import them as opening balances into the new company. You can also import the audited closing balance of the previous year, as the opening balance into the current year.
Choose to import opening balances from old company to a new company, if:
- You have closing balances in your ledger from the previous financial year.
- Historical transaction data might be needed for closure of year-end compliance audits.
- You prefer data continuity from previous financial year as the preferred bookkeeping practices.
Step 1: Export your existing data with Closing Balances into Excel or XML, as preferred
- Load the old company in TallyPrime, where your data already exists.
- Press Alt+G (Go To) > Chart of Accounts > Ledgers.
- Press Alt+E (Export) > Current.
- In the Export screen, press C to configure for Export.
- Select the File Format as Excel/XML, as preferred.
- Set up other details, such as Folder Path, File Name, and so on.
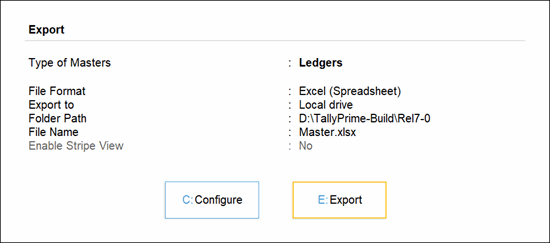
- Press E (Export) to export the data.
The data gets saved as per the specified folder path in the preferred file format.
Step 2: Create a new company
- Go to Gateway of Tally > press Alt+K (Company) > Create.
- Press backspace to change the Company Data Path, if needed.
- Enter 1-4-2026 as the Financial year beginning from date. The same date appears in the Books beginning from field.
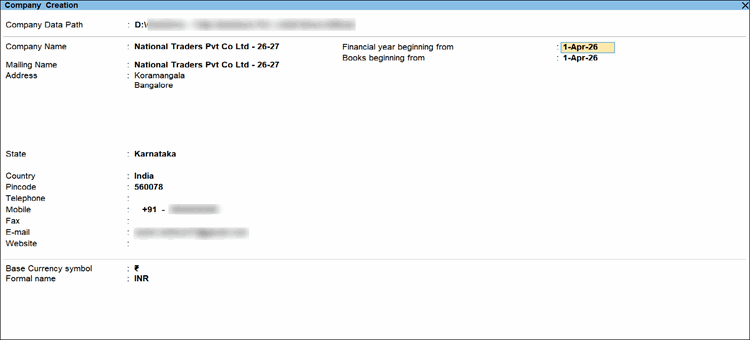
- Specify the same mailing details, contact details, and currency details, as in your old company, unless there is any change.
- Press Ctrl+A to save the company.
Step 3: Import the Closing Balance as Opening Balances into the new company
- Load the newly create company in TallyPrime.
- Press Alt+O (Import) > Masters.
- In the Import Masters screen, press C to configure for Import.
- Select the File Format as Excel or XML, as per the format used during export.
- Navigate and locate the File to Import from where you have saved the exported file.
The File Path gets updated accordingly. - Select the required option for Behaviour of import if master already exists.
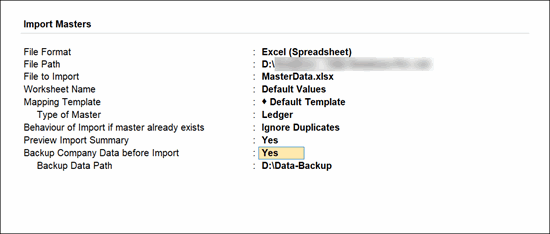
- Press Enter to import the data.
Open the masters in the new company to check and verify the opening balances. Ensure to also setup the voucher numbering method, as needed, before you continue to record your transactions for the new financial year.
Create New Company, New Masters, & Start Afresh
You can create a new Company and start recording the transactions without carrying forward any previous ledger opening balances.
Choose to create a new company, if:
- You are restructuring your business (new GSTIN/UIN, division, or ownership).
- You want a clean setup with only masters and opening balances.
- Historical transaction data is no longer needed for day‑to‑day operations.
- You prefer manual control over what gets carried forward.
Step 1: Create a new company
- Go to Gateway of Tally > press Alt+K (Company) > Create.
- Press backspace to change the Company Data Path, if needed.
- Enter 1-4-2026 as the Financial year beginning from date. The same date appears in the Books beginning from field.

- Specify other necessary details, like mailing details, contact details and currency details.
- Press Ctrl+A to save the company.
Step 2: Create the required masters and set up as needed for your transactions
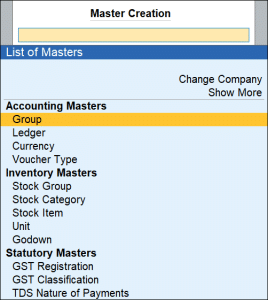
- Press Alt+G (Go To) > Create Master.
- Select Ledger, Stock Item, or any other masters that you want to create.
- On the master creation screen, provide the necessary details, and press Ctrl+A to save.
You can create and configure masters on the fly during voucher entry just by pressing Alt+C in the master selection fields.
If you wish to create multiple masters together, press Alt+G (Go To) > Chart of Accounts > Multi-Masters > Multi Create.
Step 3: Set up voucher numbering method
- Press Alt+G (Go To) > Alter Master > select Voucher Type.
- Select the required voucher type, for example Sales or Purchase.
- Set up the voucher numbering by selecting the numbering method or numbering series, as needed.
You can now start recording your day-to-day transactions for the new financial year, based on the voucher numbering method
Split Company Data
When you split the data, the original Company data is retained as a copy, and one or two child companies are created based on the options you select during the split process.
If data synchronisation is set up for the company, the synchronisation rules carry forward to the split data on both the server and the client. The new company name updates automatically in the Client Rule. If you rename the company after splitting the data, update the company name in the Client Rule on the server as well.
Choose to split the Company data if:
- Your business handles a high volume of transactions and system performance is slowing down.
- Books for the previous financial year are fully closed and audited.
- You want separate data folders for each financial year.
- You need long‑term data archiving with clear audit and compliance.
Do not choose data split, if:
- Your books are not yet finalised.
- Significant audit adjustments are still expected.
- You need to frequently modify vouchers from the previous year.
- Your business has limited annual data volume.
Before splitting the data:
- Complete all analysis and audits for the previous financial year.
- Adjust any unadjusted forex gains or losses shown in the Balance Sheet for multi-currency transactions.
- Review the Profit & Loss account and inventory statements for pending purchase and sales bills, and adjust them to the appropriate accounts.
- Back up your data to a local drive or TallyDrive
Step 1: Verify company data
- Press Alt+Y (Data) > Split > Verify Data.
Alternatively, press Alt+Y (Data) > Split > Split Data > V (Verify).
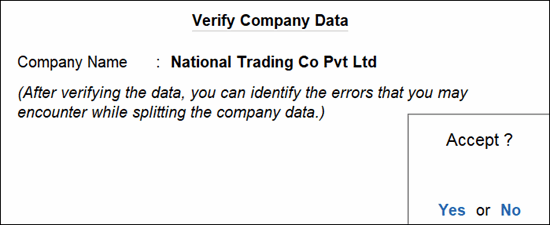
- Select the company and press Enter to view the Data Verification screen.

- If there are any errors, rectify them before you proceed to split the data.
Step 2: Split company data
- Press Alt+Y (Data) > Split > Split Data > S (Split).
- Select the required company for which the data has to be split.
- Change the Split from date, if needed, or retain it as recommended.
- Select the Split Company option as From Split Date, Before Split Date, or Into Two Companies.

- Press Enter to split the data.
Depending on Split Company option selected, the Company data will be split.
If you are splitting data having transactions of two or more years, with taxation transactions of pre-GST regime, the tax references are not carried forward in the split data.
Step 3: Check the data to ensure accuracy
Ensure the following:
- Opening balances match the closing balances of the previous financial year.
- GST opening credits are correct.
- Outstanding receivables and payables are settled.
- Stock valuation continuity is maintained.
- Voucher numbering is as needed.
If you have split the data from the first day of the new financial year, the child company will contain the data for the current financial year.


