
Exceptions Report in TallyPrime
TallyPrime ensures that your data remains safe to provide your a hassle-free experience. At times, your company data may encounter exceptions due to various reasons. When you import any external data into TallyPrime, due the import process, TallyPrime verifies the data for any possible exceptions. In case the data was tampered or modified, the data may not be completely compatible for use after importing. Similarly, when you migrate or repair your data, TallyPrime may identify that some of the details for your existing masters and vouchers are missing. The same can happen when you synchronise the data between different computers. In all such cases, TallyPrime ensures that the data is not completely lost. Instead, it identifies such data as exceptions and brings them together as data exception under a common report, so that you can resolve them in a few steps and seamlessly used in your day-to-day transactions.
Data Exceptions in Import
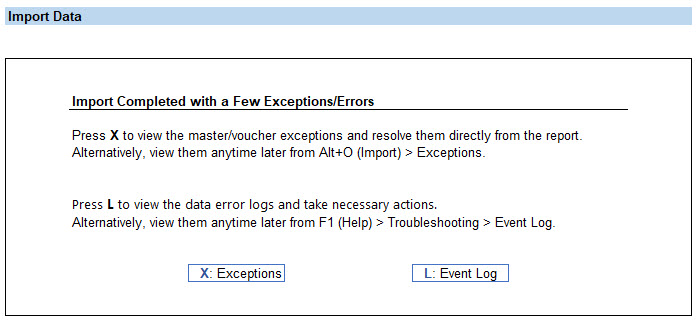
If the data in the Excel has any exceptions or errors, TallyPrime completes the Import process, but with a few exceptions/errors. TallyPrime imports the data, and displays the following message:
You also have the choice to either stop import of the data in the Import Configuration screen, if there is any exception or import data without recording any exception to avoid any risk of corrupting your existing data.
By default, TallyPrime will record the exceptions and proceed with the Import process.
While importing data, if any masters or transactions have any errors, the same is recorded either in the Exceptions Report or Event Log, depending on the type of error.
- Exceptions that require creation of new masters or transactions are logged under the Import Exceptions report. To resolve the Import exceptions,
- Press Alt+O (Import) > select Exceptions.
- Exceptions that require alteration of the existing masters or transactions are logged under the Event Log report. You will need to alter the specific masters or vouchers to resolve the errors listed in Event Log.
- Press F1 (Help) > Troubleshooting > Event Log.
View Data Exceptions
Exceptions in your masters and vouchers can happen when you import, repair/migrate or synchronise your data. In such cases, TallyPrime ensures that all the exceptions are available to you at a single location so that you can view them and take informed decisions. When the masters and transactions are under exception, those are not part of your reports. For examples, masters that are under exception do not appear in the Chart of Accounts.
View the exceptions report to take necessary resolution steps to correct the data.
- Press Alt+Y (Data) > All Exceptions.
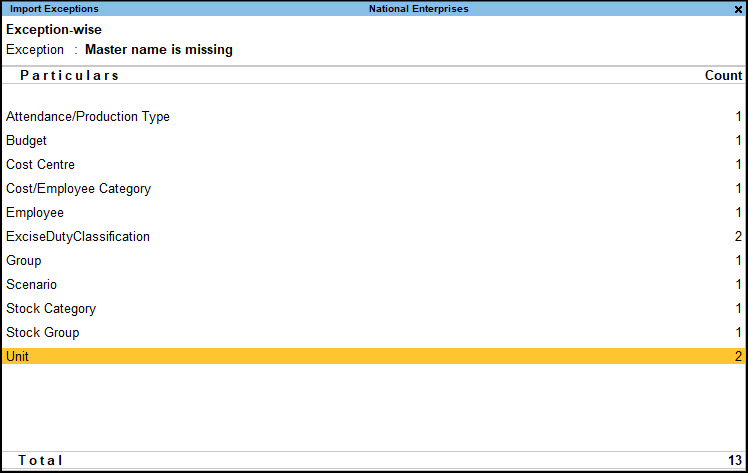
The All Exceptions report appears, displaying the number of exceptions caused due to Import, Migrate/Repair, and Synchronisation in TallyPrime. - Drill-down into each section – for example, Import – to view the exceptions.
You can view the report directly from specific menu options.- Import Exceptions: Press Alt+O (Import) > select Exceptions.
- Repair/Migrate Exceptions: Press F1 (Help) > Troubleshooting > Repair/Migrate Exceptions.
- Synchronisation Exceptions: Press Alt+Z (Exchange) > Exceptions.
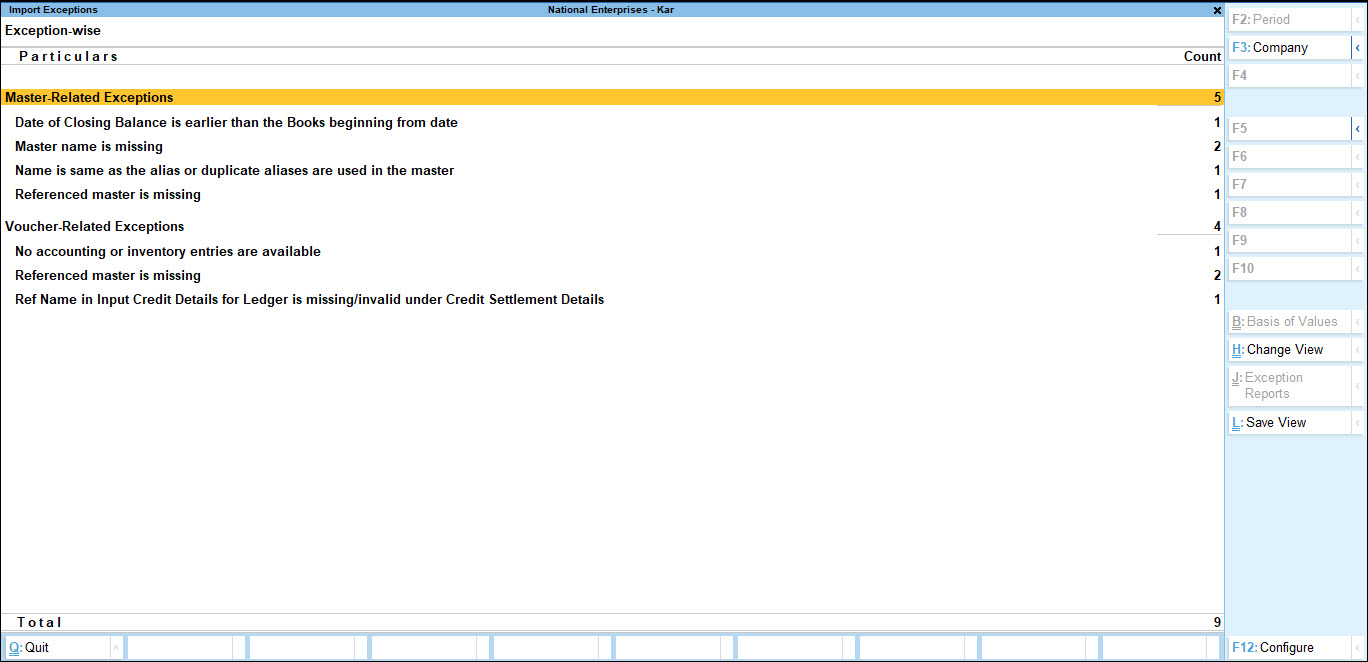
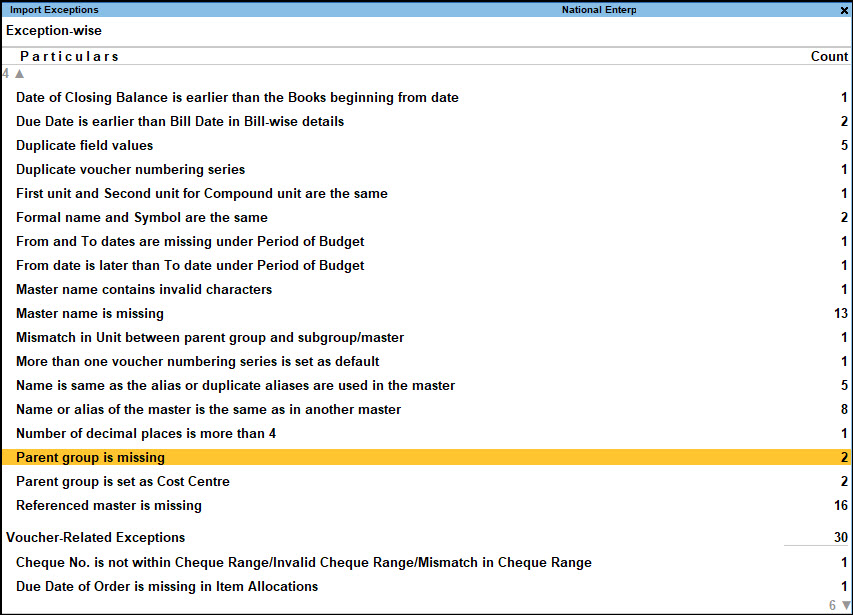
By default, the report displays all the errors Exception-wise under two categories:- Master-Related Exceptions
- Voucher-Related Exceptions
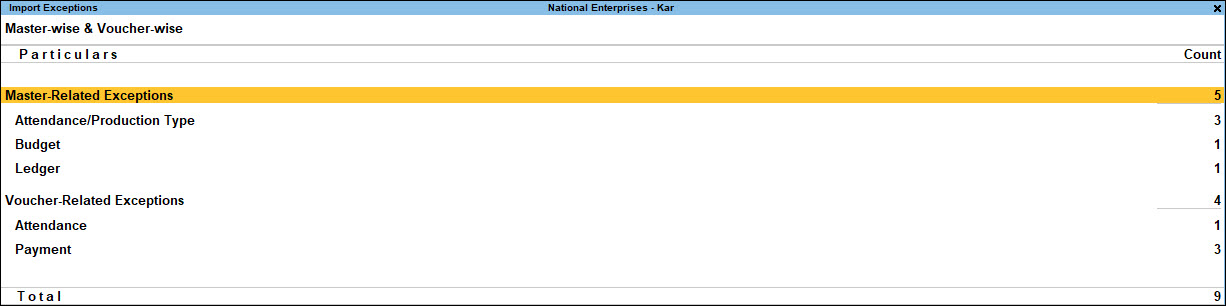
- To view the exceptions Master-wise and Voucher-wise, press Ctrl+H (Change View) > select Master-wise & Voucher-wise.
- To refer to the exceptions instantly, save the Exception report:
- Press Alt+S (Save View) > provide the required details and save.
- Press Alt+F5 (Detailed) to view the report in detailed format.
- If you are viewing the report Exception-wise, you can view the masters and vouchers related to that exception.
- If you are viewing the report Master-wise & Voucher-wise, you can view all the exceptions for the masters and vouchers.
- Once you have selected the view the way you want to see the Exception, drill-down on the Exception or the Master to see the details of the exception.
The report displays specific details of the exception, such as the master name/voucher the exception belongs to, count of the affected master/voucher, and so on. This enables you to resolve each exception by performing necessary steps.
Viewing the exceptions help you to analyse your data better. Depending on the exception, you can decide how to resolve them. TallyPrime’s data resolution framework provides a seamless experience without the risk of any data loss.
Resolve Data Exceptions
TallyPrime not only provides a consolidated view of all the exceptions, but also enables you to resolve them straight from the exception report. Depending on the exceptions, you can take necessary steps to resolve them. There are different ways you can resolve the exceptions.
In this section
Alter Masters/Vouchers
Certain exceptions will require you to drill down to update the missing or invalid information due to which an exception has occurred.
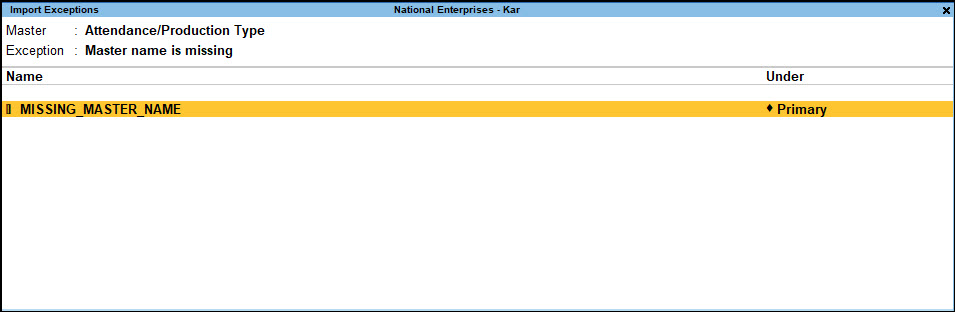
Let’s consider the following exception for illustration purpose:
Master name is missing
To resolve this exception:
- From the exception report, drill-down from the exception Master name is missing.
It displays the screen for that exception, as follows:
- Drill-down from field that represents the missing information; in this case, the Name of the master.
The master screen appears, as shown below:
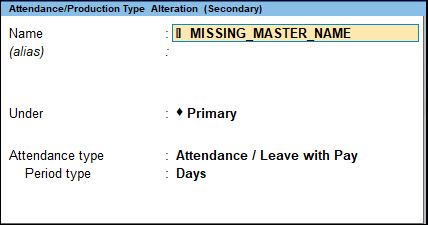
- Enter a valid master name (say Emp Attendance), and as always, press Ctrl+A to save.
The master Emp Attendance gets created and starts reflecting in your Books. In addition, the exception gets resolved and does not appear any more in the report.
Multi Alter
You may get an exception in one or more masters/vouchers. In such cases, instead of resolving the exception one after the other, TallyPrime allows you resolve the exception from the same screen.
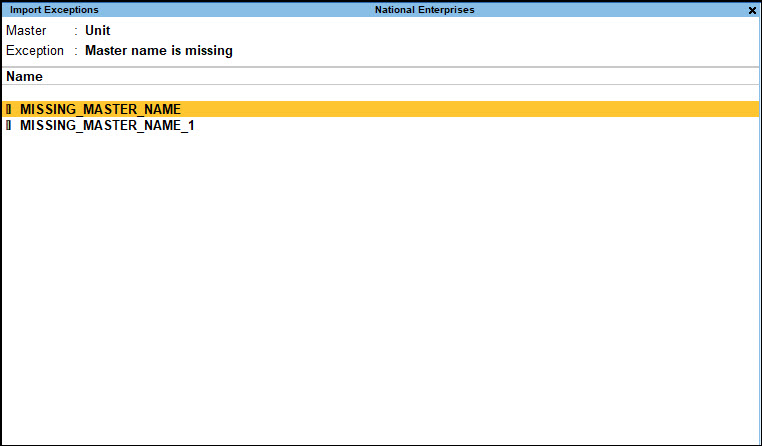
Let’s consider the exception Master name is missing for illustration purpose.
- In the exception report, drill down from Master name is missing.
It displays the list of all masters where the name is missing.
- Select one of the masters that you want to resolve, and drill down again.
It lists the number of units where the name is missing.
- Press Alt+H (Multi Alter).
The field that requires an update becomes editable for all the lines, allowing you to update the details – the master name in this case. - Update the required details for each of the rows and accept the screen.
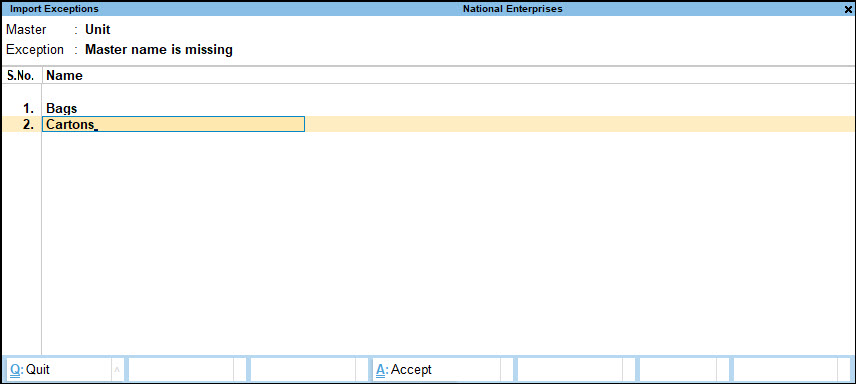
- Accept the screen. As always, press Ctrl+A to save the Import Exceptions screen.
As the masters get created, the exception gets resolved. The master that you did drill down from the Exception report is no more part of the exceptions.
Update Details to resolve exceptions
For a few exceptions, you can provide the missing information on the fly without the need to open the alteration screen of the master or voucher. Also, when you have multiple rows showing an exception, you might want to update the details of selected rows one after the other. In such a situation, you can use the Update Details option.
Let’s consider the exception Parent Group is missing for illustration purpose.
- Drill down from the exception to view the report that lists the masters the exception belongs to.
- Drill down again from the master and press Alt+U (Update Details).
The subform appears allowing you to enter the required details. In this case, since the Parent group is missing, the Change Parent Group screen appears.
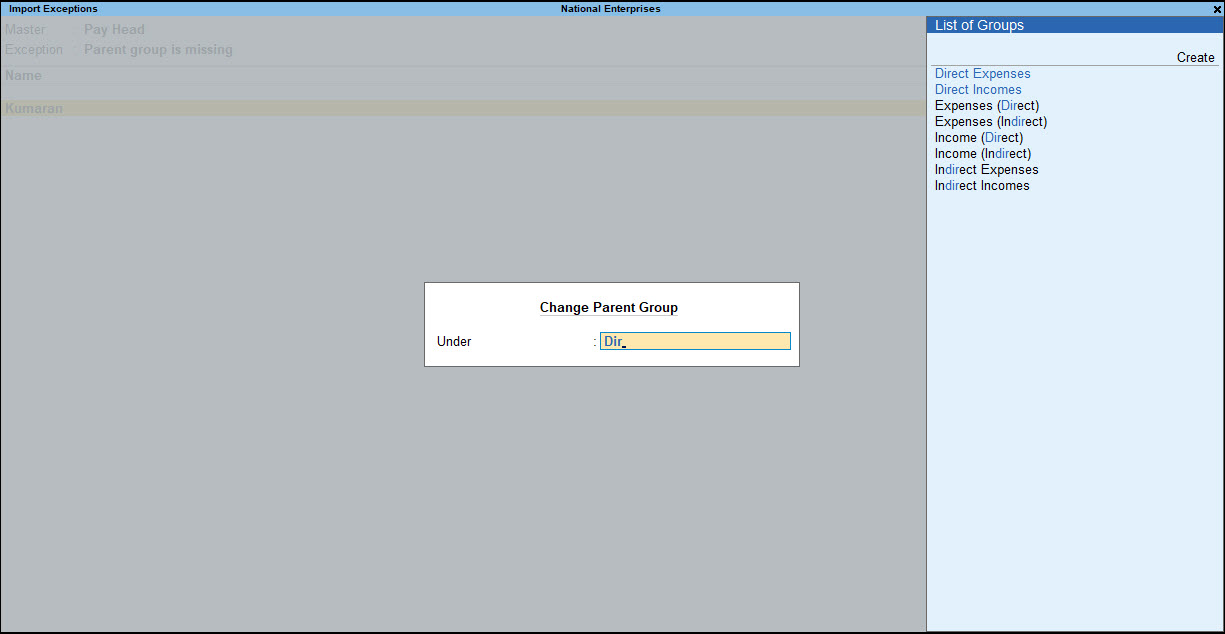
- Enter the required details and save. Select the parent group in this case.
You can also create a new group one on the fly, if needed.
As with other exceptions, the exception gets resolved.
Impact after Exception Resolution
- Books of Account: When the data has any exceptions, the affected masters and vouchers are not included as part of your Books. This is to ensure that your business reports are not impacted by inaccurate information. However, once you resolve the exception in the masters and vouchers, the same then becomes the part of your Books.
- Edit Log: When you resolve and exception, a voucher or master gets created. Therefore, the activity against the affected master or voucher is logged as ‘Created due to…” in Edit Log.
- Voucher Numbering: When you resolve an exception in a voucher, it is treated as a new voucher for the Books. This new voucher is saved with the next available Voucher No. depending on your existing transactions.
Referenced Master Is Missing
In case your company data has some masters missing which were earlier referenced in another master or voucher, such affected master or voucher are categorised under the exception Referenced master is missing. This exception occurs when there is a reference of the master in your imported data, but the referenced master is not available in the existing data in TallyPrime.
A referenced master is a master that is used as an input in a field of another master or voucher. The latter is known as the affected master or voucher. For example, if you are creating a godown Bangalore-Sub under another godown Bangalore-HO in TallyPrime, Bangalore-Sub is the affected master and Bangalore-HO is the referenced master. In this case, for any reason if Bangalore-HO was deleted from the data, TallyPrime identifies that this master is missing which has created an exception for Bangalore-Sub.
In such instances, TallyPrime helps you to create the missing referenced masters to resolve the exceptions in the affected masters and vouchers.
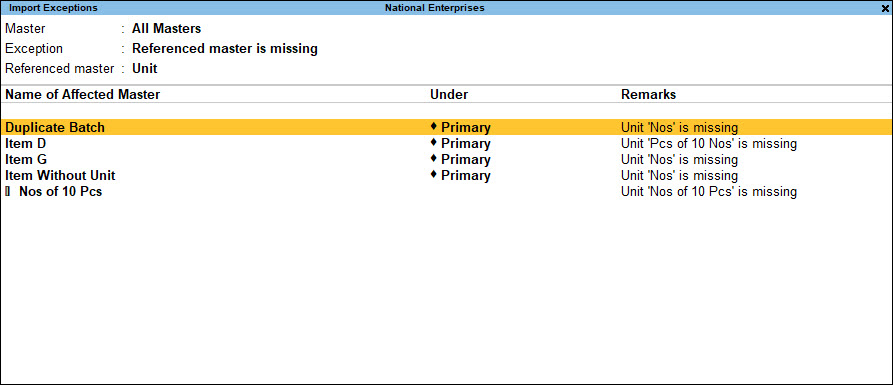
- In the exception report, drill-down from Referenced master is missing.
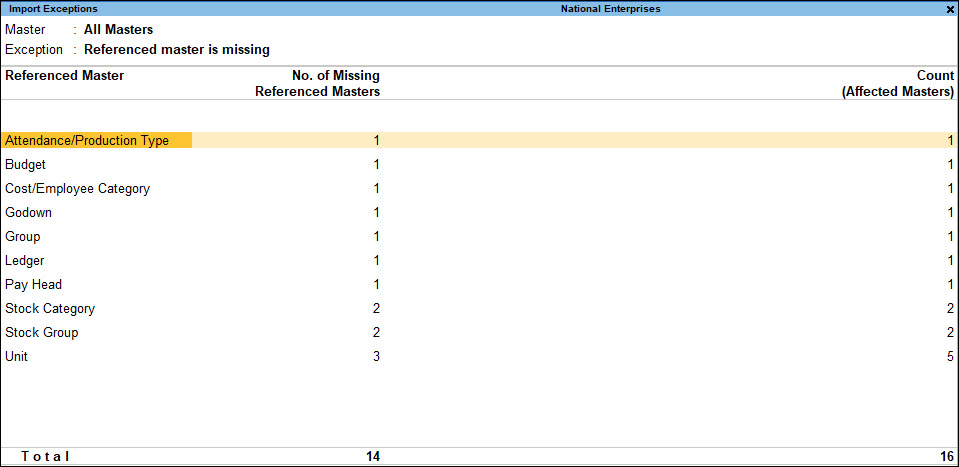
This report displays the referenced master that is missing from the data, the number of missing referenced master, and the number of affected masters. You can drill-down from any of these columns. - Drill-down from the respective columns to resolve the exception, as per your requirement:
- Drill-down from the Referenced Master or No. of Missing Referenced Masters columns to create the master by providing the required details.
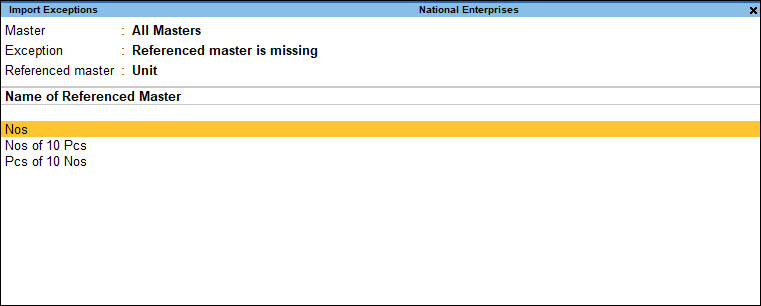
On creating the missing master, TallyPrime verifies all the affected masters/vouchers that will get resolved, as the necessary input – the referenced master – is now available. If there are more than one referenced master, you can create each of the masters one after the other.
When you create a missing referenced master, TallyPrime prompts you with the following message:
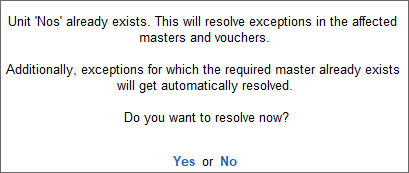
Press any key to continue to remove all affected masters from the exceptions report. - Drill-down from the Count (affected masters/vouchers) column and update the field with an existing master.
You can do so when you want to update the referenced master to something existing, instead of creating the missing master.
The Remarks column provides additional information that helps in understanding the exception better and deciding on the resolution.
- Drill-down from the Referenced Master or No. of Missing Referenced Masters columns to create the master by providing the required details.
On resolving the Reference master is missing exception, the affected masters/vouchers start appearing as part of your books, similar to results of resolving any other exception.


