
Record Advances Received Under GST in TallyPrime
As a supplier of services, you may require an advance payment at the time of receiving a purchase order to safeguard the expenditure on resources required for a specific service. For instance, there is an order for glass-coating 8,000 sq. meters of a pipeline in a power plant project. In such a case, you may require an advance payment from the party to secure the manufacturing and supply cost of the coating material.
So, in your business, there can be situations in which you will receive advance payments from parties. As per Section 12 to 14 of the CGST Act, 2017, the time of the supply of services decides the period in which you need to pay GST, and the time of supply is considered as per the voucher date of the advance payment received from the party.
So, if the purchase order is of INR 10 lakhs issued for the supply of services in the month of Jul-22, and you have an advance receipt of INR 1 lakh in the month of May-22, then you will need to pay GST for:
- INR 1 lakh in the May-22 return period.
- The rest of the sum (9 lakh), as per the voucher date on which the party gives the rest of the payment.
Advance receipts for composition dealers
It is important to note that as per notification 66/2017 dated 15.11.2017, if you have not opted for the composition scheme, then you are not liable to pay GST on the advances received.
All-new advance receipt experience in TallyPrime Release 3.0
In TallyPrime Release 3.0 onwards, you can account for the advances received under GST using the Advance Receipt voucher with automatic computation of the liability on the voucher. Subsequently, the voucher will reflect in the Table 11 of GSTR-1 in TallyPrime with the period and the type of tax to be paid as per the place of supply.
Flexibility to follow journal voucher approach
You can also use Journal vouchers to record advance receipts, if you follow the practice in your business.
Adjustment of advance received in sales invoice
If you have certain unadjusted advance amount, then TallyPrime Release 3.0 and onwards, you have a facility to specify the amount so that you can easily adjust the same in your sales invoices.
Refund of advance received
In case of refunds, you can create a Credit Note and the liability against the advance amount received gets reversed automatically, while you have the flexibility to reverse the liability using a Journal voucher.
In this topic, you will understand the procedures to account for the GST advances received in TallyPrime, setting off the advances received in a sales invoice, and how to record the refund of an advance received.
Set Up TallyPrime to Set Off GST Advance Receipts in Sales Invoices
You will need to set up TallyPrime to record GST advance receipts in TallyPrime. The setup will enable you to set off GST advances received from parties in sales invoices.
If you do not want to set off GST advances in sales invoices, then you do not need to set up TallyPrime for it. In that case, you can follow the procedure you followed in TallyPrime Release 2.1 or earlier. To know how to do it, refer to Account for Advance Receipts Under GST for TallyPrime Release 2.1 or Earlier.
- Press F11 (Company Features) > Set/Alter Company GST Rate and Other Details: Yes and press Enter.
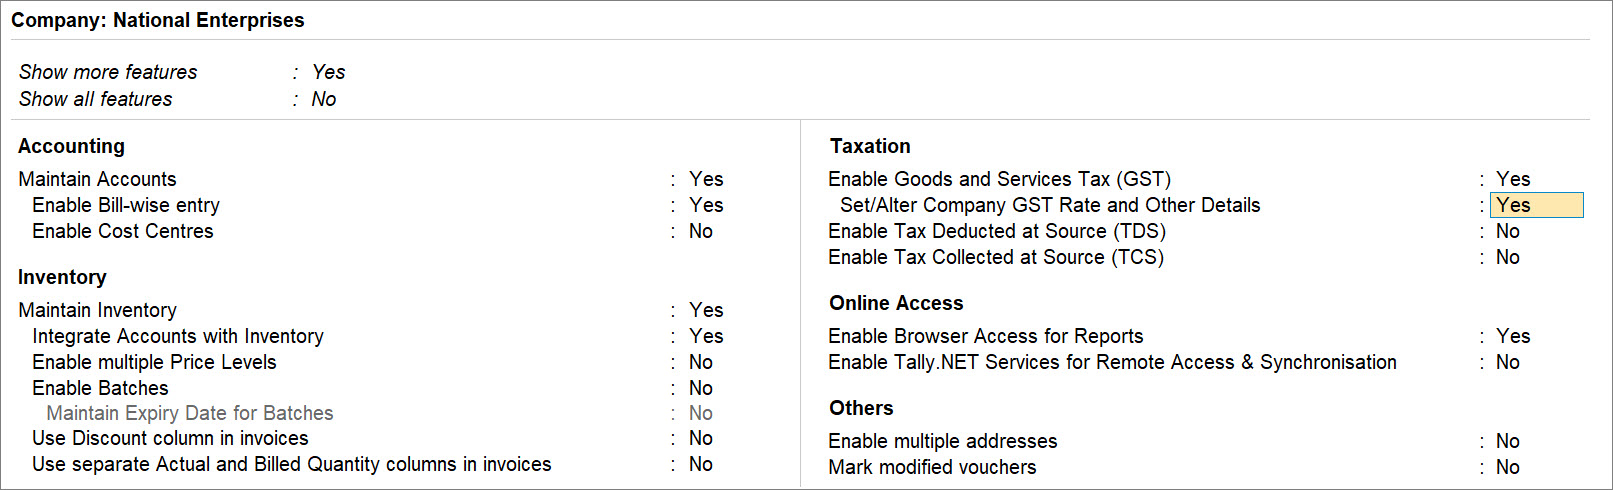
The GST Rate and Other Details screen appears. - Show GST Advances for adjustments in transaction: Yes.
An information screen appears.
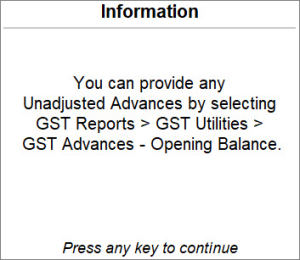
If you have received some advance amount from a party that you are yet to adjust in sales invoice, then you can specify the same using GST Advances – Opening Balance.
To know how to do it, refer to the Provide Opening Balance for Unadjusted GST Advances Received section. - Enter the Applicable from date.
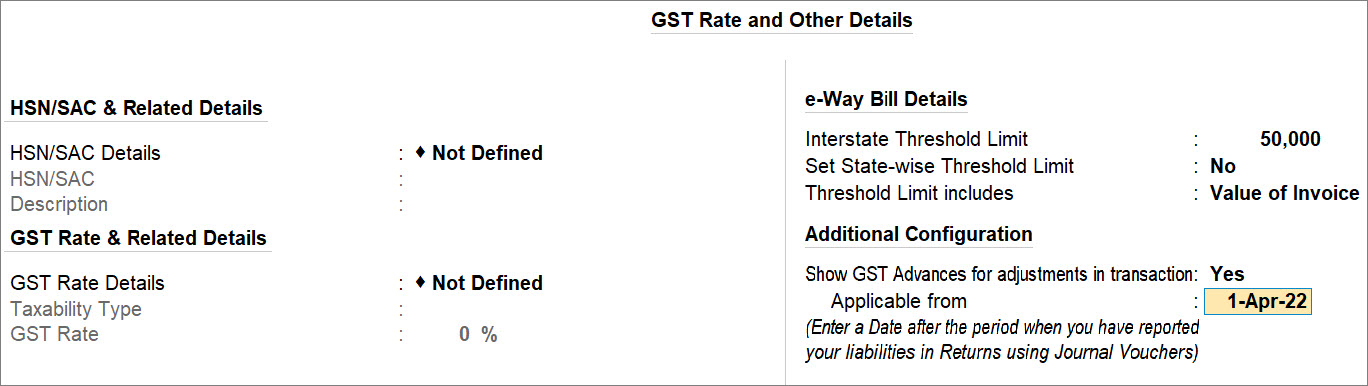
You will be able to set off GST advance receipts in sales invoices right from the Applicable from date.
For example, if you enter 1-Apr-22, then you can adjust advances in sales invoice, from 1-Apr-22 onwards.
It is necessary to enter a date that falls after the Return period in which you had reported GST liabilities using Journal vouchers. This ensures that your GST returns until that period remains unaffected.
For instance, if you had reported GST liabilities using Journal vouchers until 31-Mar-22, then the Applicable from date must be 1-Apr-22 or later than that.
This ensures that the GST returns of 31-Mar-22 and earlier remain unaffected and the Journal vouchers are retained in the GST returns.
In this case, if the Applicable from date is set 31-Mar-22 or earlier, then TallyPrime starts reporting GST liabilities in the GST Returns based on the Advance Receipts, thereby replacing the Journal vouchers with Advance Receipts.
To know how to adjust advance amount in sales invoice, refer to the Adjust GST Advances Received section.
If you have multiple GST registrations, then the setting will get implemented for all the GST registrations.
Raise Tax Liability for Advances Received
There may be some advances for which you have recorded the vouchers, but you are yet to raise the tax liability in TallyPrime.
You can record a Journal voucher to raise the tax liability for such vouchers.
- Press Alt+G (Go To) > Create Voucher > press F7 (Journal).
- Specify the stat adjustment details.
- Press Alt+J (Stat Adjustment).
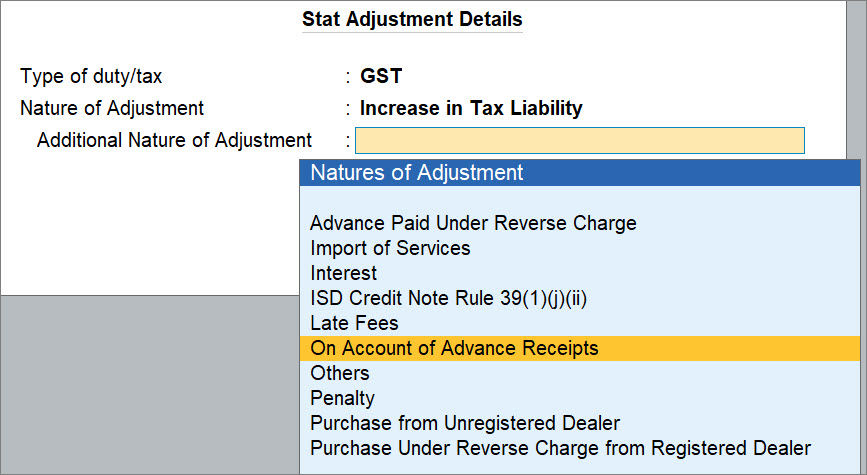
The Stat Adjustment Details screen appears. - Type of duty/tax: GST.
- Nature of Adjustment: Increase in Tax Liability.
- Additional Details: On Account of Advance Receipts.
- Press Alt+J (Stat Adjustment).
- Under By, select the ledger for GST on Advance grouped under Expense and enter the Amount.
- Under To, select the SGST and CGST or IGST, as applicable, and enter the Amount against each ledger.
- Provide other necessary details, as needed, and press Ctrl+A to save.
A sample Journal voucher recorded to raise the tax liability appears as shown below:
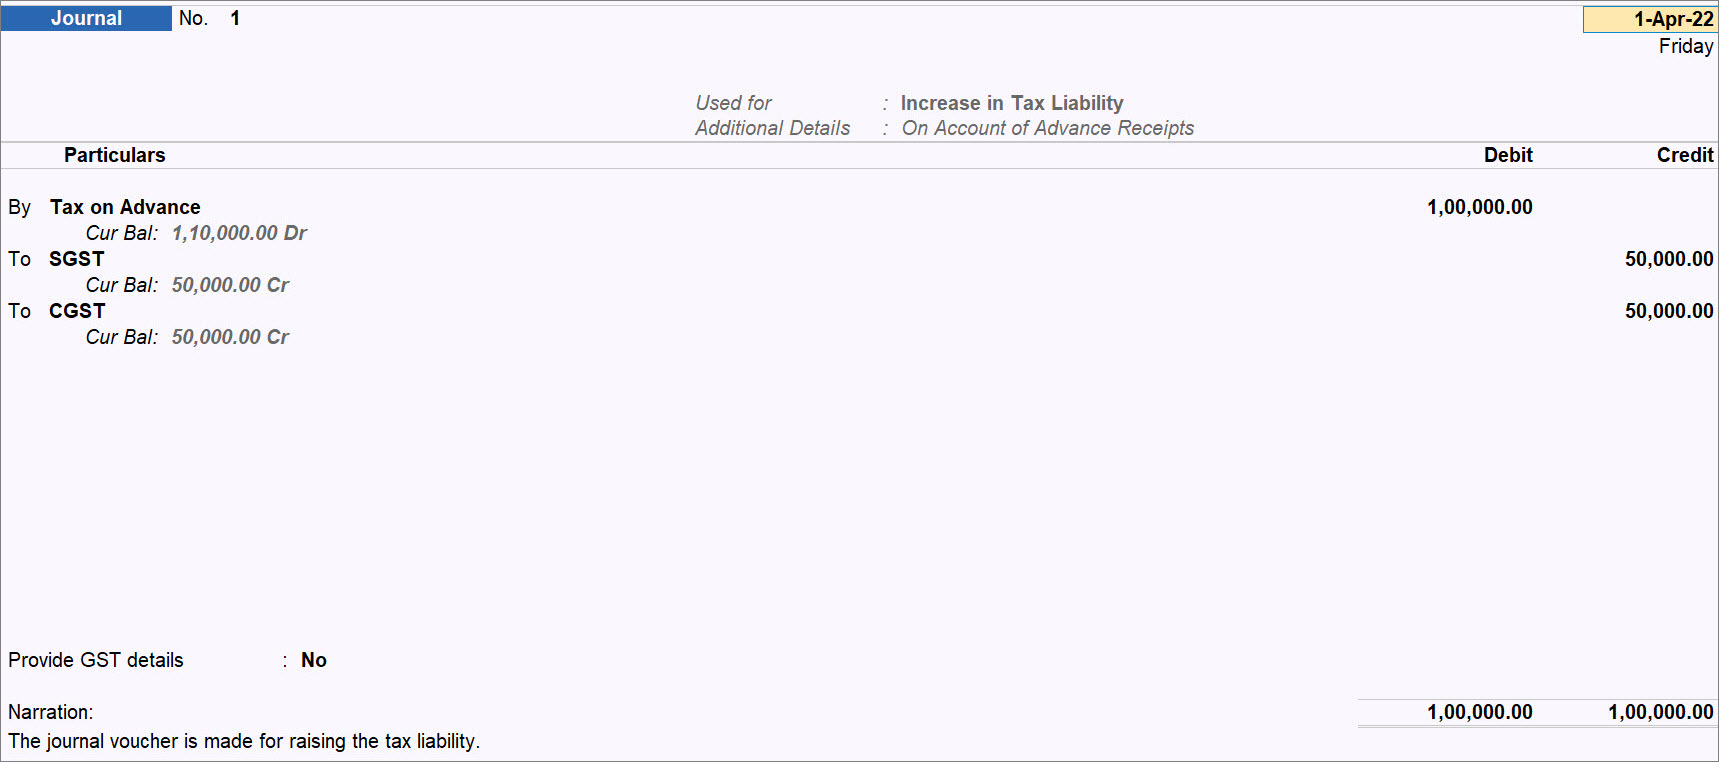
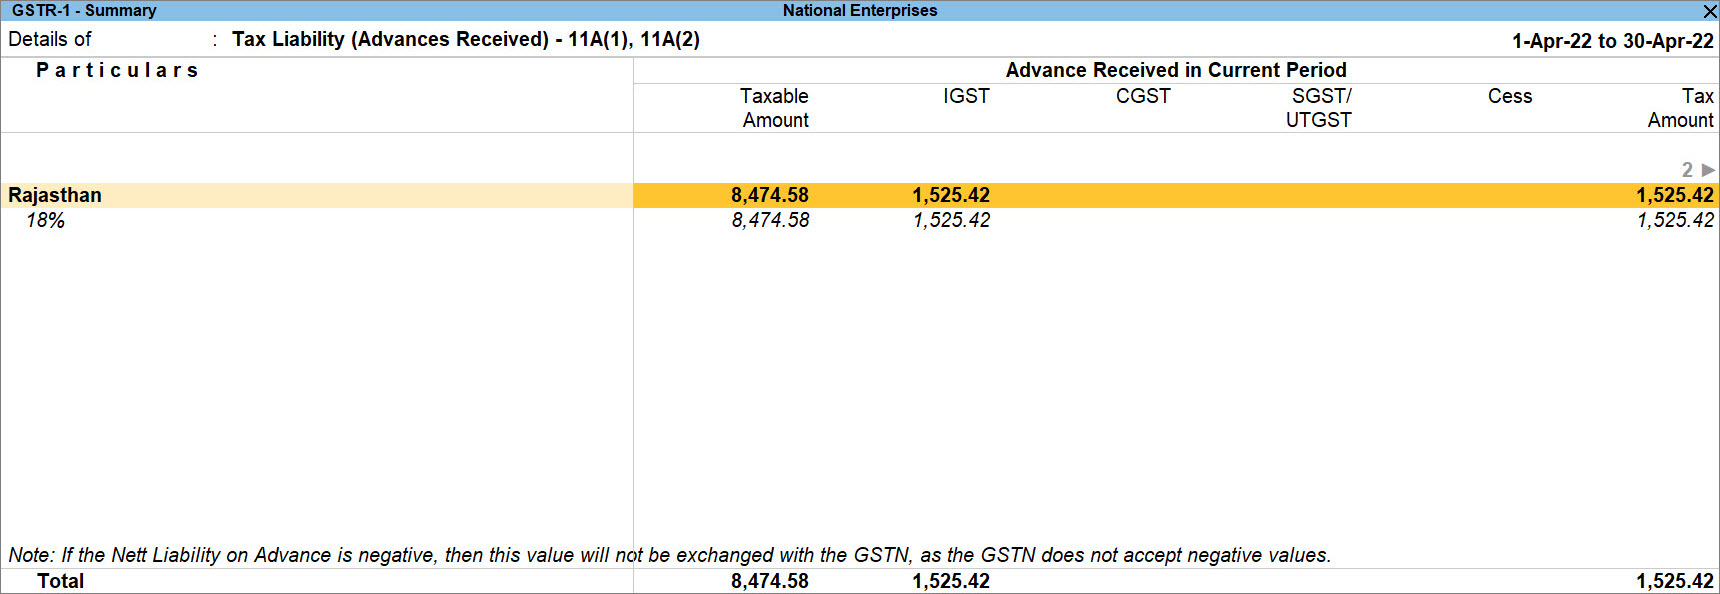
The Journal voucher for the tax paid on advance received appears under the Tax Liability (Advances Received) – 11A(1), 11A(2) section of GSTR-1.
Provide Opening Balance for Unadjusted GST Advances Received
You may have received some advance amount from a party that you are yet to adjust in sales invoice.
In TallyPrime Release 3.0, you have the facility to specify the unadjusted amount in the product so that you can adjust the same in sales invoices, whenever needed.
If you have any advance amount received from parties that is yet to be adjusted in sales invoices, then you can specify the amount in GST Advances – Opening Balance in TallyPrime.
- Press Alt+G (Go To) > type or select GST Advances – Opening Balance and press Enter.
The List of Unadjusted GST Advances screen appears. - Select Create Opening Balance (Advance Receipt) and press Enter.
The Opening Balance (Advance Receipt) Creation screen appears.
If you are using the multiple GST registrations feature of TallyPrime Release 3.0 or later releases, then you will need to select the GST registration.
Under GST Registration, select the Registration Name for which you want to provide the opening balance for advance receipt. - Provide the party details.
- Select Party Name from List of Ledger Accounts.
- Place of Supply: The place at which the party avails the services.
- Supply attracts Reverse Charge: Yes, if the services fall under GST reverse charge mechanism.
Otherwise, set it as No.
- Provide the details of advances received.
- Date of GST Advances: The date on which you had received the advance from the party.
The date should be earlier than the Applicable from date that you entered while enabling Show GST Advances for adjustments in transaction under F11.
- Taxability: Taxable.
- GST Rate: The tax rate applicable to the service.
- Unadjusted Advance Amount: The amount received from the party on the date that has remained unadjusted.
- Taxable Amount and IGST or CGST & SGST get calculated based on the specified GST Rate and Place of Supply.
You can add multiple GST advance amounts received from parties that are yet to be adjusted.
A sample Opening Balance (Advance Receipt) Creation screen is as shown below:
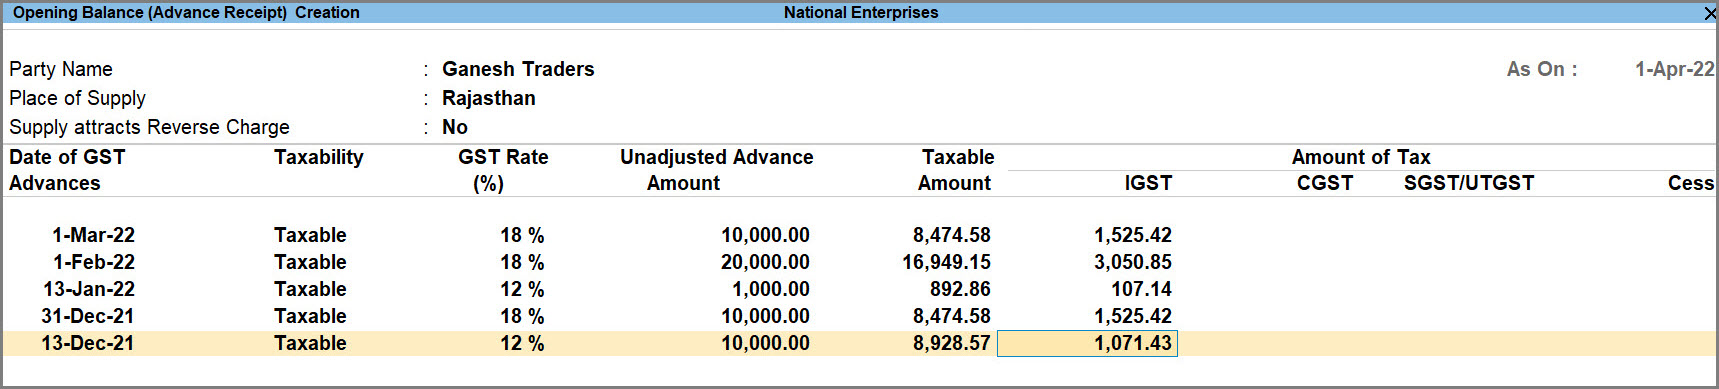
- Date of GST Advances: The date on which you had received the advance from the party.
- As always, press Ctrl+A to save.
Subsequently, you can set off the opening balance by selecting the amount while recording sales invoice for the party.
Record GST Advance Receipts in TallyPrime
Once you set up TallyPrime to account for advances received under GST from parties, you can record GST advance receipts.
- Press Alt+G (Go To) > Create Voucher > press F6 (Receipt).
- Specify the stat adjustment details.
- Press Alt+J (Stat Adjustment).
The Stat Adjustment for: GST screen appears. - Nature of Receipt: Advance Receipt.
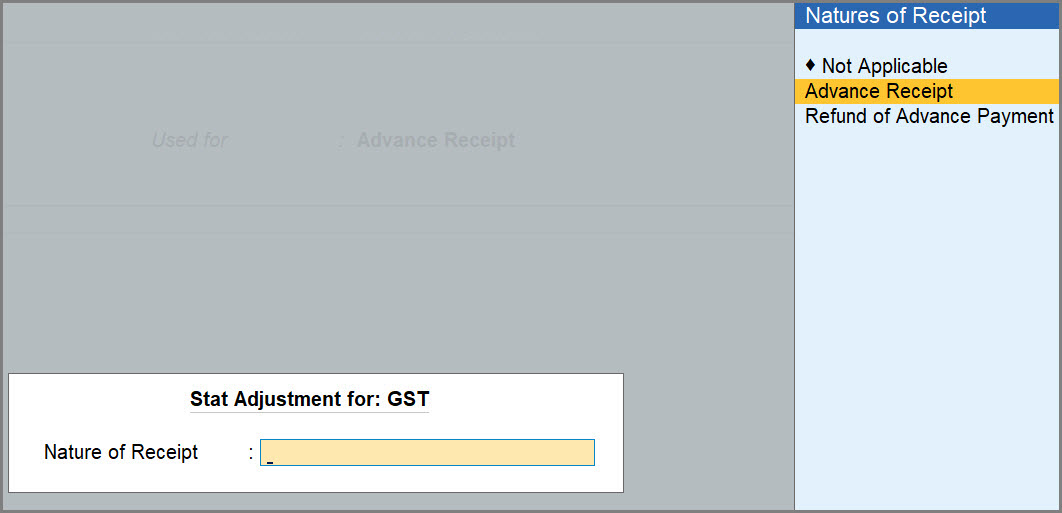
- Press Alt+J (Stat Adjustment).
- Under Account, select the cash or bank account from List of Ledger Accounts.
- Under Particulars, select the party.
The Advance Receipt Details screen appears. - Specify the advance receipt details.
- Particulars: Select the sales ledger, as applicable.
- Advance Amount: Enter the advance amount received from the customer.
- Taxable Value: The system will take the taxable value, based on the ledger.
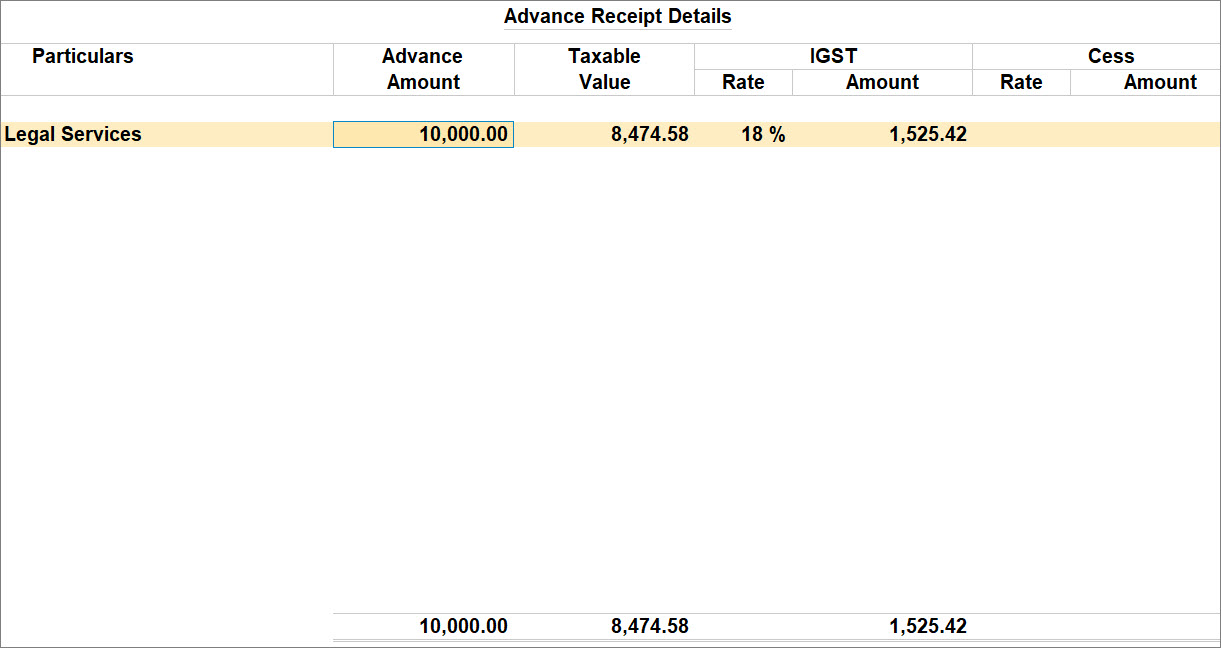
- Press Ctrl+A to accept the screen.
- Provide other necessary details, as needed, and press Ctrl+A to save.
A sample advance receipt voucher appears as shown below:
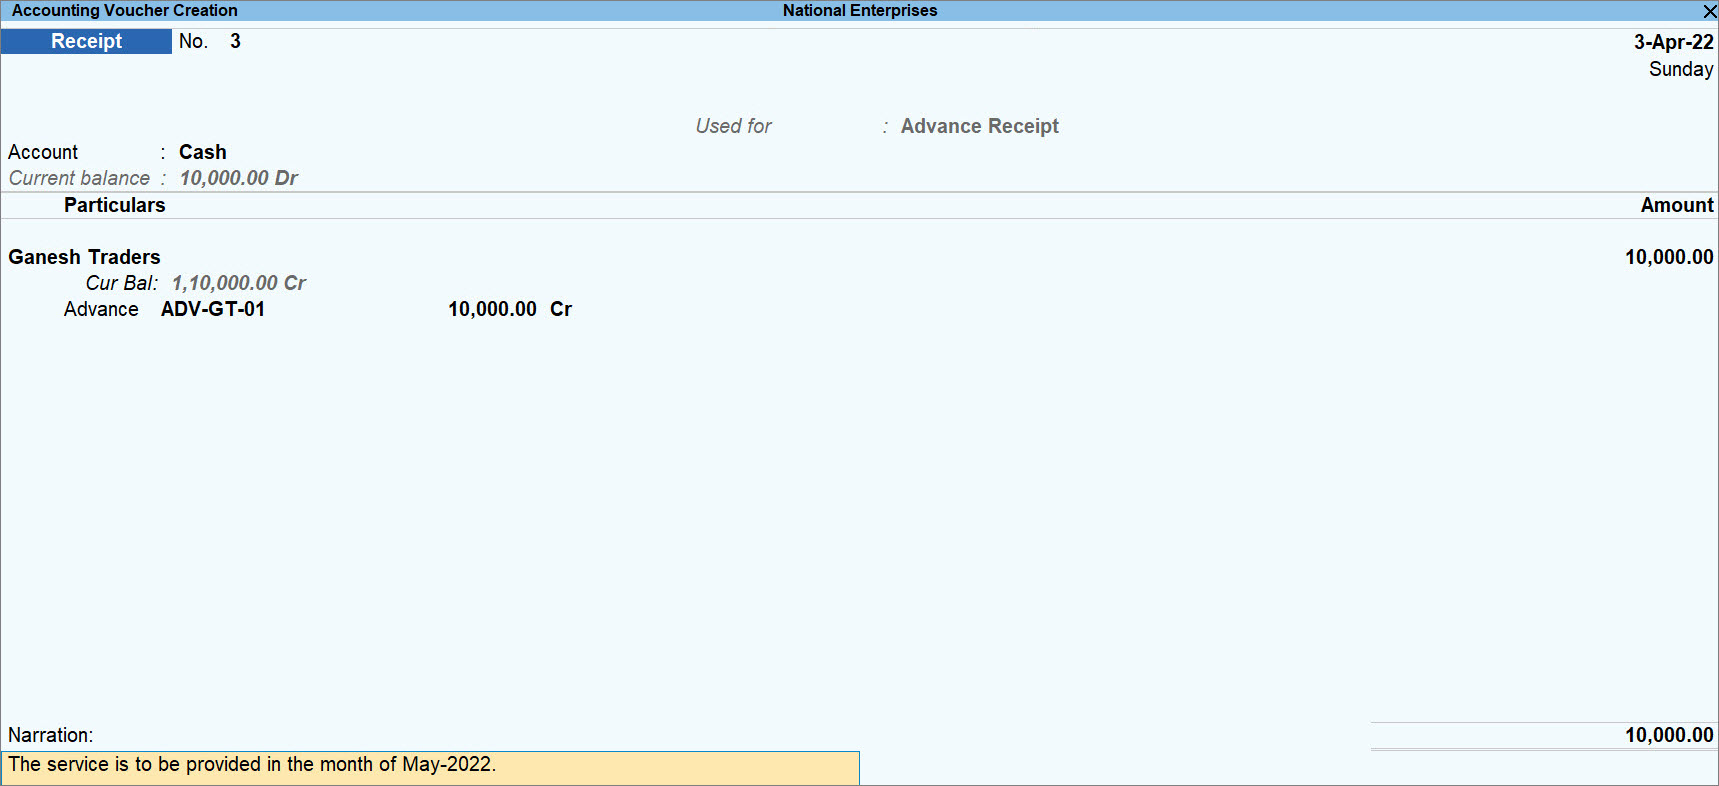
Once you record an advance received from a party, the voucher will be included in return and you can view it in GSTR-1 of TallyPrime.
In GSTR-1 – Voucher Register, the voucher will appear as Advance Receipts (Included in Returns).
- Press Alt+G (Go To), type or select GSTR-1 and press Enter.
Alternatively, Gateway of Tally > Display More Reports > GST Reports > GSTR-1 and press Enter. - Drill down on the Included in Return row to view the voucher.

Adjust GST Advances Received
Once you record the GST advance receipt or enter the unadjusted advance as opening balance, you can set off the amount received as advances while recording the sales invoice. TallyPrime Release 3.0 onwards, you have a facility to set off the advances received.
In this section
- Set off GST advances received in sales invoice
- Auto Adjust GST Advances received during voucher creation
- Add sales returns amount to GST Advances for adjustment
Set off GST advances received in sales invoice
In TallyPrime Release 3.0 or later releases, you can select the advance amount corresponding to the sales invoice and set it off while recording the sales invoice. TallyPrime automatically calculates the amount to be reflected in the returns.
If you are following the process of recording Journal vouchers to set off advances, then you can do so to keep your books of accounts updated.
- Ensure that you have recorded Advance Receipt or provided Opening Balance for the unadjusted advance amount, as applicable.
- Press Alt+G (Go To) > Create Voucher > press F8 (Sales).
- Select the party and provide the details in the Dispatch Details and Party Details screens.
In the Party Details screen, Place of Supply is the place at which the the services are going to be availed. - Select the service ledgers, and enter the Amount.
- Select the IGST or SGST & CGST ledgers, as per the Place of Supply mentioned in the Party Details screen, and press Enter.
- Press Enter on the total Amount, provide the Bill-wise Details for the party and press Ctrl+A to save.
The Details of Advance Amount to be Adjusted screen appears. - Provide the details of advance amount that needs to be set off in the the sales invoice.
- Select the advance amount against which you are creating the sales invoice and press Enter.
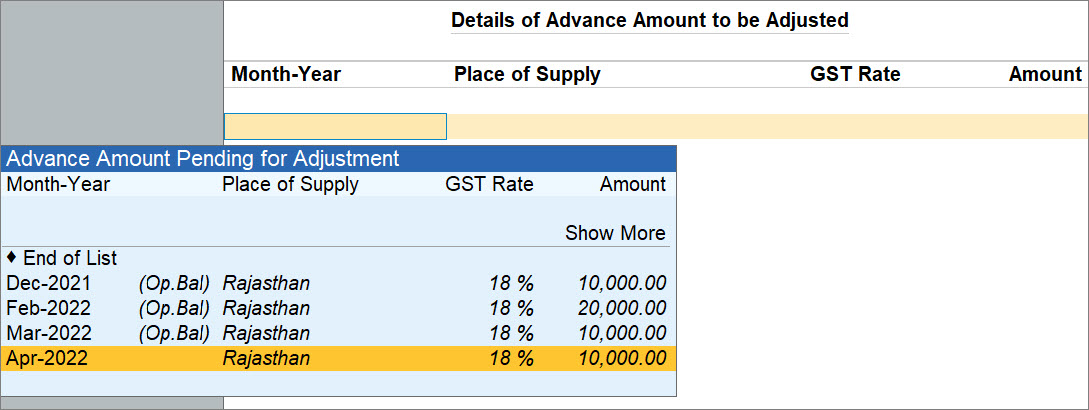
1. The advances pending for adjustment are displayed based on the Applicable from date entered under the Show GST Advance to set off in transactions in the F11 features.
If you have entered 1-Apr-22 as the applicability date, then the advance receipt amount recorded in the month of Mar-22 will not be displayed.
2. This screen displays the advance amount only if the Advance Receipt voucher created for the same is in the Included in Return section of GSTR-1.
If the sales invoice is uncertain due to mismatch of information or missing information, then even though you have set off the advance amount, TallyPrime will consider it unadjusted, until you resolve the invoice. - Change the Amount, if needed.
- Press Enter on Show More, if you want to view more advance amounts pending for adjustment.
- Press Ctrl+A to accept the screen.
- Select the advance amount against which you are creating the sales invoice and press Enter.
- Provide other necessary details, as needed, and press Ctrl+A to save.
A sample sales invoice for adjustment of the GST advance appears as shown below:
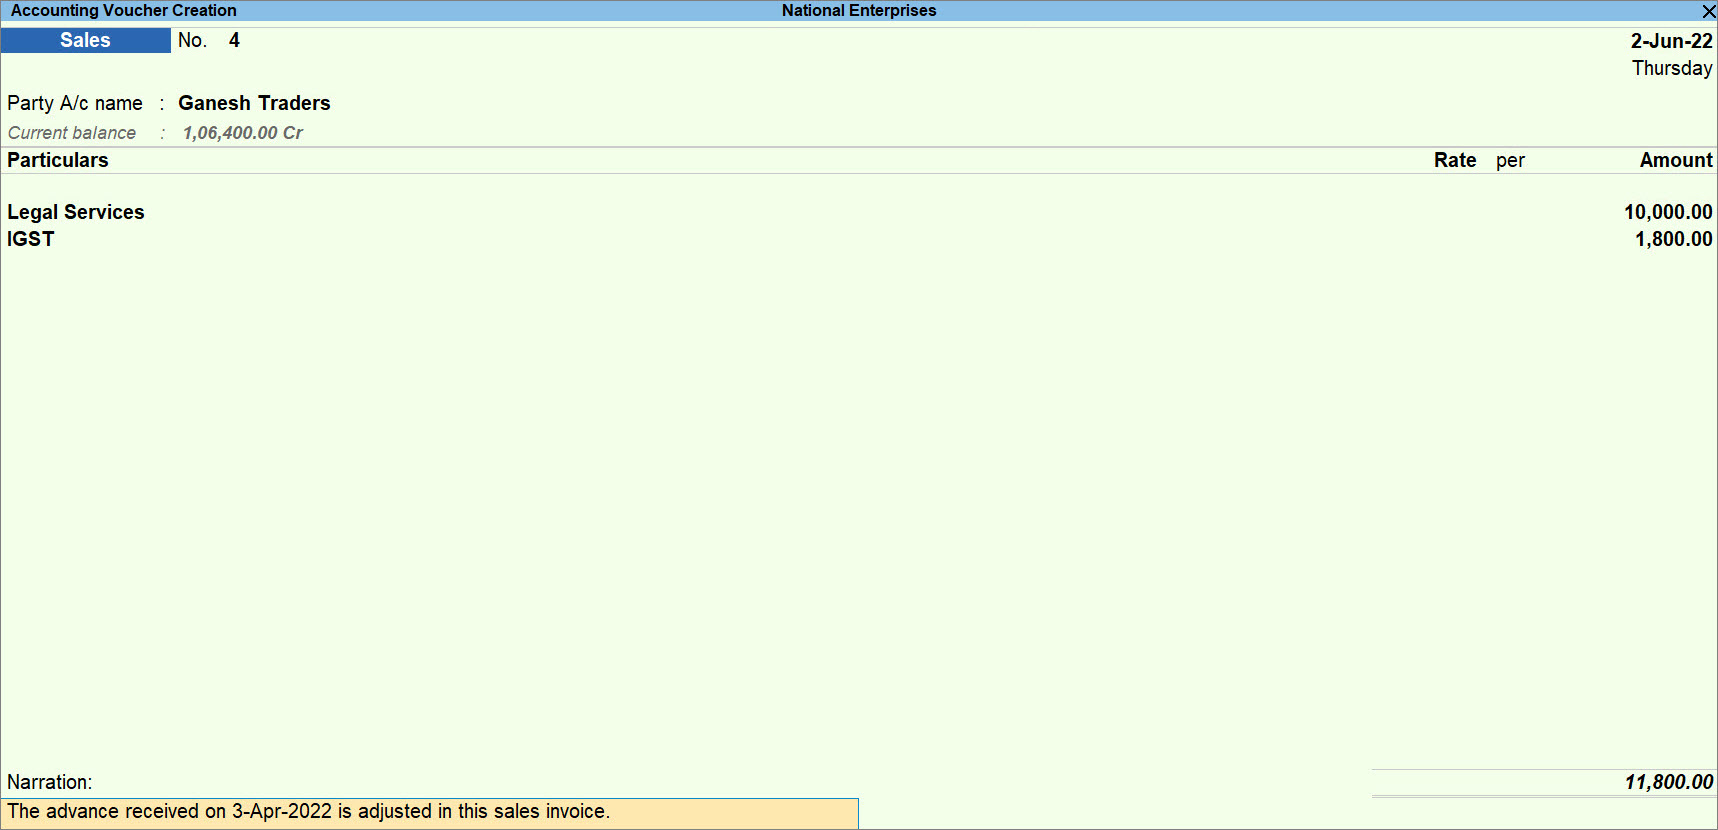
The amount of advance set off in the sales invoice gets deducted from the unadjusted advance amount.
If the sales invoice is lesser than the advance amount, then the differential advance amount appears as unadjusted, until you create a sales invoice for the party and adjust the amount in it.
However, if there is a case of sales return, you need to record a Credit Note for the party so that the amount starts appearing as unadjusted to set off in the sales invoice.
To know how to record a Credit Note for sales return of advance amount, refer to the Record Refund of Advances Received section.
Auto Adjust GST Advances received during voucher creation
You can set up TallyPrime to automatically adjust the advances received at the time of recording a sales invoice. In such a case, you will not need to select the amount of advance received to set off. On the other hand, TallyPrime will match the amount of advance received with the GST rate and place of supply mentioned in the advance receipt voucher and the party ledger and set off the amount automatically, based on First In, First Out (FIFO) system.
- While recording a sales invoice, press F12 (Configure).
- Auto-adjust GST Advance during voucher creation: Yes.
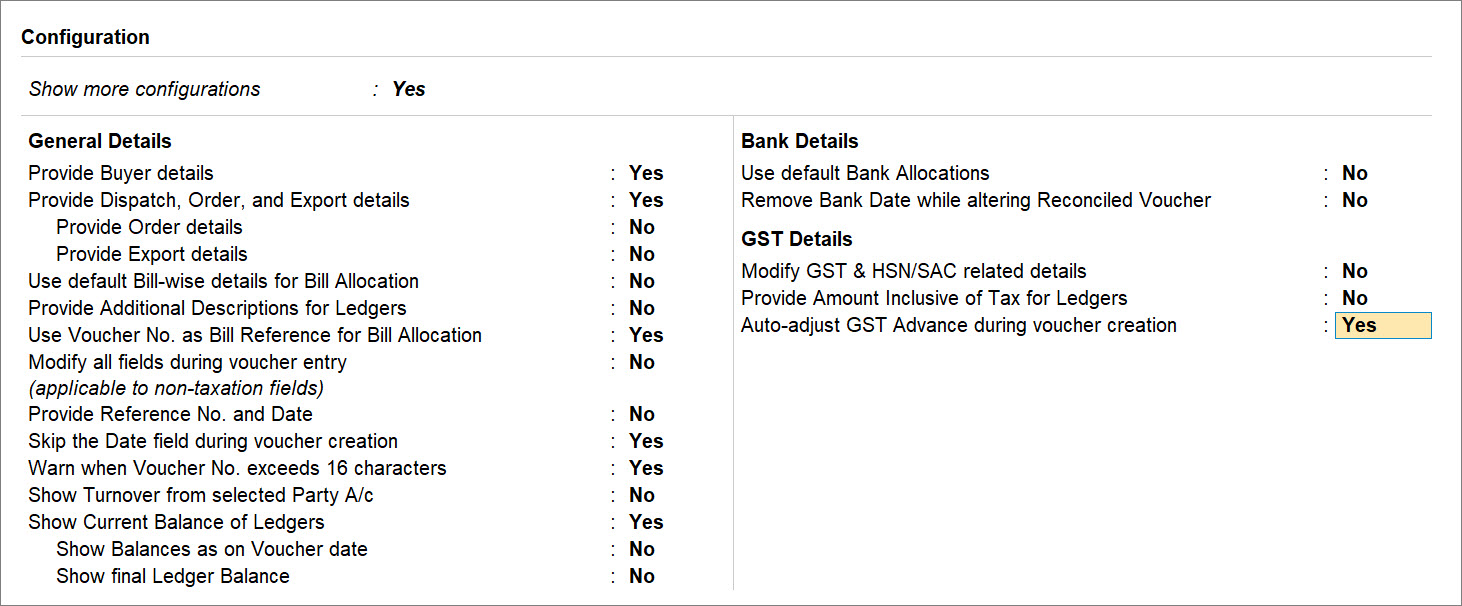
- Press Ctrl+A to save the setting, as always.
Henceforth, while recording sales invoices, you will not get the Details of Advance Amount to be Adjusted screen to set off amounts corresponding to the advances received, as TallyPrime will automatically do so.
TallyPrime identifies the unadjusted advance amount received from the party and adjusts it in the sales invoice, based on the invoice amount.
Add sales returns amount to GST Advances for adjustment
For reasons such as cancellation of service order, a situation of sales returns may arise. In such a case, you will need to record credit note for sales returns.
For instance, you may be an advocate or a CA and may have received a service order with an advance payment, which gets cancelled later. So, you will need to account for sales returns in TallyPrime.
TallyPrime Release 3.0 onwards, you have a facility to add sales returns amount to the GST advances so that you can set it off in the future invoices.
While recording a credit note for the sales return, follow the step given below.
![]()
- Press F12 (Configure) > Add Returns Amount to GST Advance for adjustments: Yes and press Ctrl+A to save.
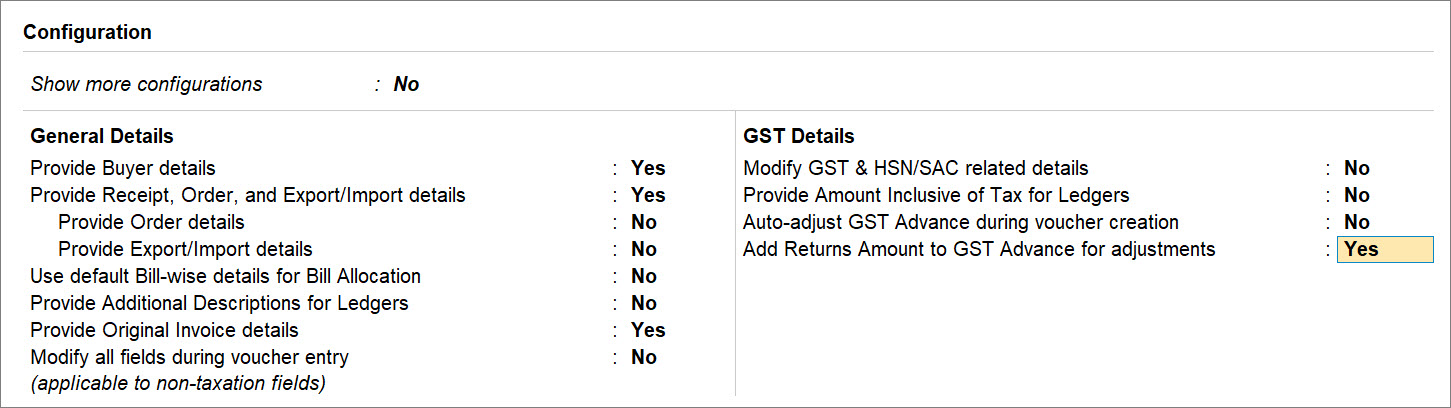
- Provide GST details: Yes.
The Additional Details screen appears. - Provide the details regarding the credit note.
- Reason of Issuing Note: 01-Sales Return.
- Buyer’s Debit Note No.: The number on the debit note issued by the buyer for the sales return.
- Date: The date on which debit note was issued by the buyer.

- Press Ctrl+A to accept the screen.
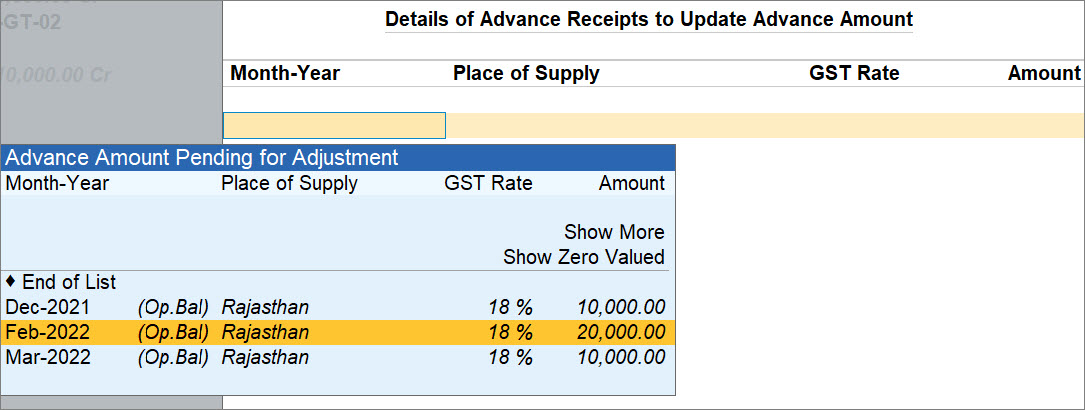
- Press Enter on the total Amount.
The Details of Advance Receipts to Update Advance Amount screen appears. - Select the advance amount from the Advance Amount Pending for Adjustment list and press Enter.
You can choose to set off more than one advance amount, as per the total amount in the voucher.
Once you choose an advance amount, it gets added to the reference and starts appearing as pending for adjustment when you create a sales invoice.
Moreover, you can also press Enter on Show Zero Valued and select a reference to which the value has to be added even though that reference does not have any value for adjustment.
This is useful when the advance is fully adjusted. So, the reference becomes Zero Valued.
When a sales return takes place and you choose the Zero Valued reference, the amount of sales return gets added to the Advance Amount Pending for Adjustment, which you can set off when you create a sales invoice for the party.
- Provide other necessary details, as needed, and press Ctrl+A to save.
A sample Credit Note recorded for the sales returns appears as shown below:
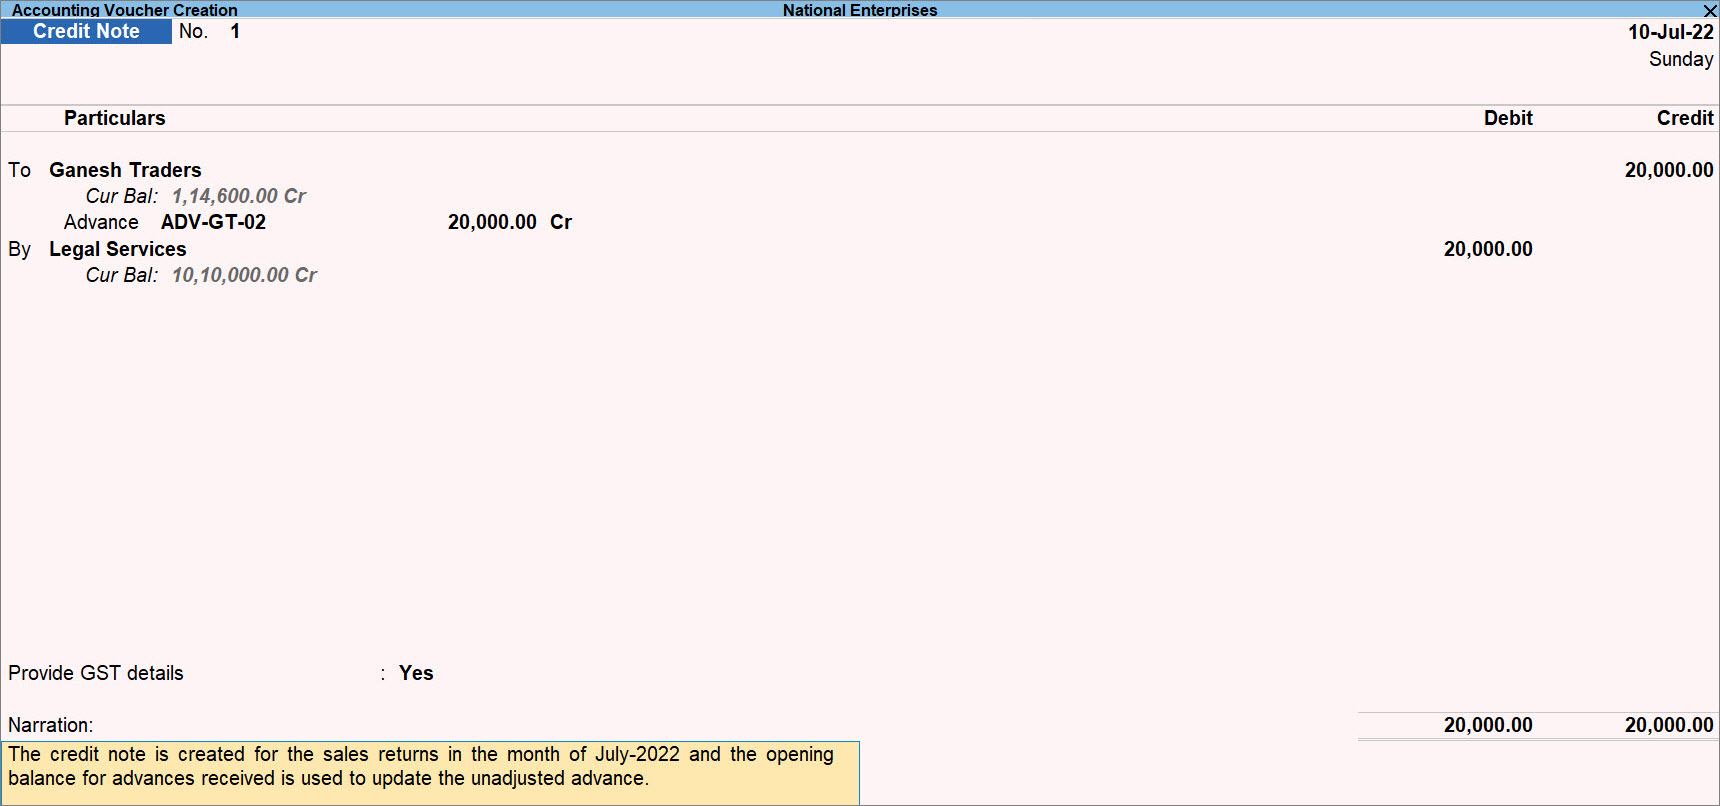
Once you record the credit note for a particular amount against a sales return, the total unadjusted advance in the next sales invoice you create will increase by the amount for which the credit note is created.
Record Refund of Advances Received
It may be possible that a party had paid you an advance, but later on, the party cancelled the order. So, you will be refunding the advance amount to the party. It may also happen that you will need to refund a certain part of the advance received on your service due to the decrease in the magnitude or duration of service you offered, as applicable.
You can account for the refund amount using a payment voucher in TallyPrime.
For instance, consider that the amount received from the party as on date is as per the screen shown below:
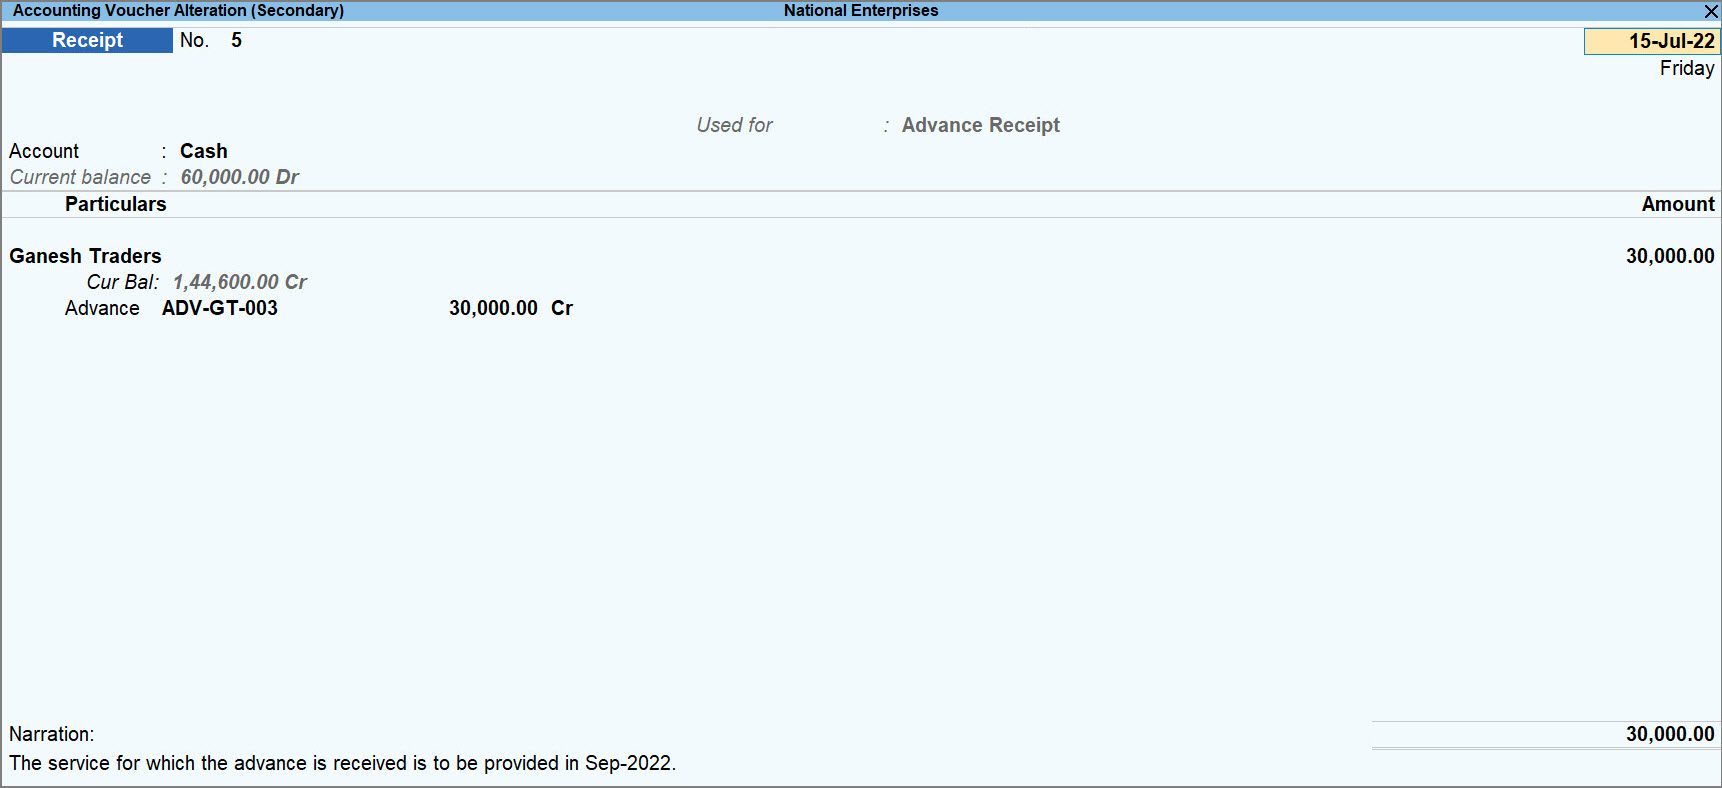
Now, consider that you need to make a refund of INR 30,000, as the party cancelled the order.
![]()
- Press Alt+G (Go To) > Create Voucher > press F5 (Payment)..
- Specify the stat adjustment details.
- Press Alt+J (Stat Adjustment).
The Stat Adjustment Details screen appears. - Nature of Payment: Refund of Advance Receipt.
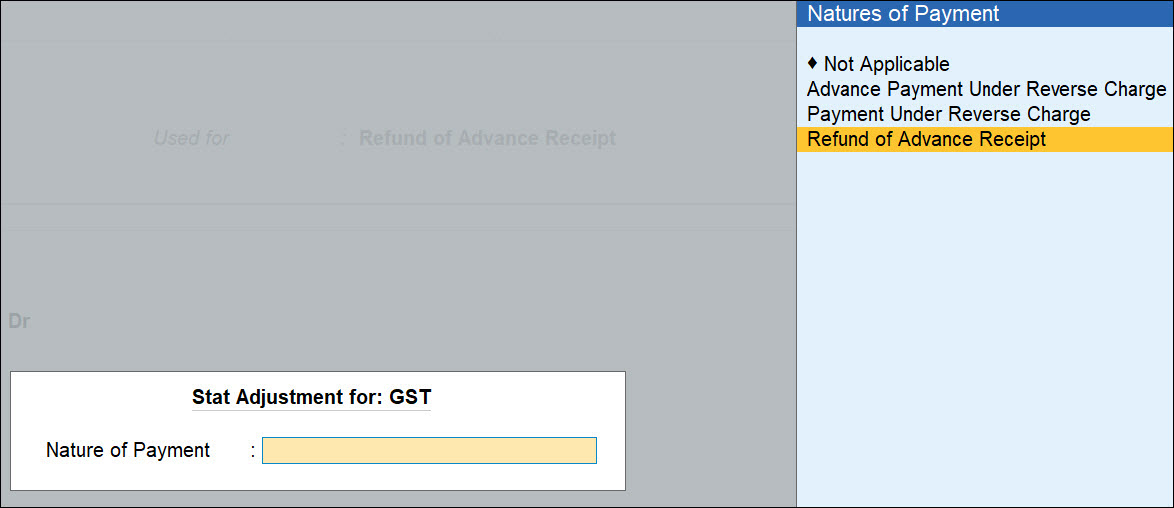
- Press Alt+J (Stat Adjustment).
- Under Particulars, select the Party from List of Ledger Accounts.
The Refund Details screen appears. - Provide the details of the refund.
- Ledger: Service ledger applicable to the advance receipt.
- Refund Amount: Enter the amount that you are refunding to the customer.
- Press Ctrl+A to accept the screen.
- Provide other necessary details, as needed, and press Ctrl+A to save.
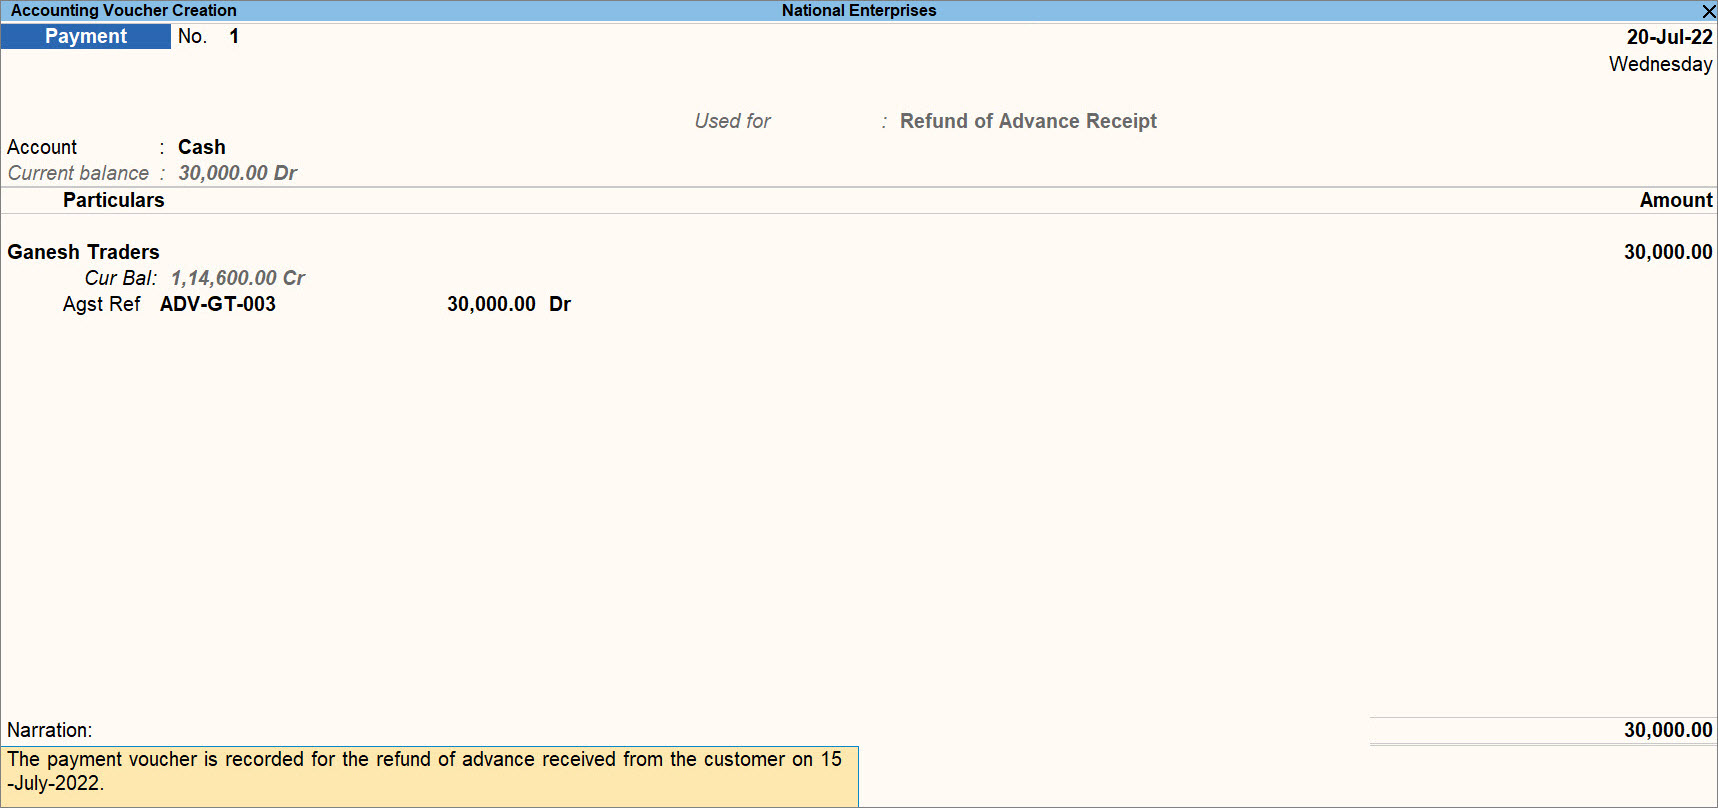
A sample payment voucher created for the refund of advance appears as shown below:
Account for Advance Receipts Under GST for TallyPrime Release 2.1 or Earlier
If you are using TallyPrime Release 2.1 or earlier releases, then you will need to follow the Journal Voucher approach to account for advance receipts under GST. Click If your turnover in the previous financial year was less than Rs. 1.5 crores you need not pay tax on advance receipts. The tax liability calculation on advance receipts for supply of goods is disabled by default. The journal transactions recorded to account for tax liability on advance receipts for supply of goods will not be included in GSTR-1 and GSTR-3B returns. All adjustment transactions recorded for this purpose using the following journal flags will be moved under Not relevant for returns in GSTR-1 and GSTR-3B reports. Nature of Adjustment Additional Details Increase of Tax Liability Advance Receipts for Export/SEZ sales Increase of Tax Liability On Account of Advance Receipts Decrease of Tax Liability Cancellation of Advance Receipts Decrease of Tax Liability Cancellation of Advance Receipts for Exports/SEZ sales Decrease of Tax Liability Sales against Advance Receipts Decrease of Tax Liability Sales against Advance Receipts for Export/SEZ sales You can record the advance amount received from customers in a receipt voucher by marking it as advance receipt, and print it with the required GST details. If the turnover of your business is over and above Rs 1.5 crores, set the option Enable tax liability on advance receipts to Yes in the Company GST Details screen to calculate tax liability on advance receipts. The liability will be included in GSTR-1 and GSTR-3B returns. You need to pay GST on advance received for goods or services, if the supply is not fulfilled in the same period. When a sales invoice is raised against an advance received in a different tax period, you need to track the sales against the advance received. Advance receipt for orders completed in the same month Advance receipt > Outward supply > File returns Advance receipt for orders completed in subsequent month Advance receipt > Raise tax liability > File returns > Outward supply in the next month > Reverse tax liability of advance amount > File returns Advance receipt for orders cancelled in the same month Advance receipt > Refund the amount > File returns Advance receipt for orders cancelled in subsequent month Advance receipt > Raise tax liability > File return > Refund the amount > Reverse the tax liability > File returns To record a receipt voucher for advance received from customer To record a journal voucher to raise the liability Place of supply has to be entered. You need not provide the party details. When the sales invoice is recorded, the receipt voucher has to be linked to it by selecting the Type of Ref as Agst Ref in the Bill-wise Details screen of the sales invoice. The GSTR-1 report displays the sales invoice, with tax on sales and advance amount as shown below: The GSTR-1 report appears as shown below: If an advance receipt voucher is recorded, a journal voucher is recorded to raise the tax liability, and then the transaction is cancelled partially or fully: Record an advance receipt voucher as shown below: Record a journal voucher to raise the tax liability as shown below: Place of supply has to be entered. You need not provide the party details. To record a receipt voucher for advance received from customer In the GST Details screen of the invoice, the option Is reverse charge applicable appears as set in the master, and the same configuration appears in brackets for reference. You can change this while recording the invoice, if required. When the sales invoice is recorded, the receipt voucher has to be linked to it by selecting the Type of Ref as Agst Ref in the Bill-wise Details screen of the sales invoice. The GSTR-1 report displays the sales invoice, with tax on sales and advance amount as shown below: If an advance receipt voucher is recorded, record a refund voucher to return the advance amount. Record an advance receipt voucher as shown below: To record a refund voucher for cancellation of advance amountAdvance Receipts if Turnover is Less than Rs. 1.5 Crores
Advance Receipts if Turnover is More than Rs. 1.5 Crores
Regular Taxable Transactions
Advance Receipt from Customer
Alternatively, press Alt+G (Go To) > Create Voucher > press F6 (Receipt).

As always, press Alt+C, to create a master on the fly. Alternatively, press Alt+G (Go To) > Create Master > type or select Ledger > press Enter.
The Advance Receipt Details screen appears with the list of stock items.
Based on the amount entered, the break-up of the GST amount gets auto calculated for Central Tax , State Tax , and Cess , if applicable. The Advance Receipt Details screen appears as shown below:

The printed receipt voucher with the GST details appears as shown below:
Journal voucher to raise the liability
Alternatively, press Alt+G (Go To) > Create Voucher > press F7 (Journal).
The tax liability raised on the advance amount appears in GSTR-1 , as shown below:
Reversing the liability on advance receipt after sales
Sales invoice linked to an advance receipt voucher
To reverse the tax liability on advance receipt
Alternatively, press Alt+G (Go To) > Create Voucher > press F7 (Journal).

Reversal of GST on account of cancellation of advance receipt

To record a refund voucher
Alternatively, press Alt+G (Go To) > Create Voucher > press F5 (Payment).

As always, press Alt+C, to create a master on the fly. Alternatively, press Alt+G (Go To) > Create Master > type or select Ledger > press Enter.


The printed refund voucher appears as shown below:

To reverse the liability on cancellation of a transaction
Alternatively, press Alt+G (Go To) > Create Voucher > press F7 (Journal).


Transactions under Reverse Charge
Advance Receipt from Customer
Alternatively, press Alt+G (Go To) > Create Voucher > press F6 (Receipt).


The Advance Receipt Details screen appears with the list of stock items. To select a ledger, press Alt+L (Show Ledgers). Press F12 (Configure) and set the options:
Based on the amount entered, the break-up of the GST amount gets auto calculated for Central Tax , State Tax , and Cess , if applicable. The Advance Receipt Details screen appears as shown below:


The printed receipt voucher with the GST details appears as shown below:
Sales invoice linked to an advance receipt voucher

Reversal of Advance Amount on Account of Cancellation
Alternatively, press Alt+G (Go To) > Create Voucher > press F5 (Payment).


The printed refund voucher appears as shown below:
Similarly, record the transactions for the journal voucher adjustments given below:


