
Reports and Printing
Till now we have concentrated on the language capabilities from the perspective of understanding the interface design elements, internal data object structure, data entry aspects, data storage, alteration, and so on. In this topic we will focus primarily on the output rendering capabilities and we will examine the display and print mode The initial sections begin with a discussion on the types of reports, design of the various report layouts and data retrieval within it. The various printing techniques also will be taken up in the subsequent section.
Watch this video to know about designing reports and customising invoice
Watch the below video for designing different types of reports such as tabular report, hierarchical reports and column based reports
Watch the below video for printing reports and invoices in different formats
Reports
In TallyPrime, financial statements are generated as Reports, based on the vouchers entered till date. Balance Sheet, Profit & Loss A/c, Trial Balance, etc., are some default reports in Tally.
Normally, a business requires reports in any of the following formats:
- Tabular Report: A report with fixed number of columns, which can be configured.
- Hierarchical Report: A report designed in successive levels or layers.
- Columnar Reports: A report with multiple columns or dynamically varying number of columns. TallyPrime caters to generating all these types of Reports.
Tabular Reports
A tabular report is the simplest format of all the Report formats. A typical tabular report has the following components:
- Report Title: It contains the name of the report, the title for each column, the day/period for which a report is generated, etc.
- Report Details: It contains the actual information.
- Report Total: It contains the total of the respective columns.
In a tabular report, the columns are fixed and interactive; an end user can change its appearance. The reports like Day Book, Stock Summary, Trial Balance, Group Summary, and so on are some default tabular reports in Tally.
Designing a Tabular Report
A typical tabular report will have the following sections:
- a Title Line
- a Details Line and
- an optional Total Line
The details line will be repeated over the objects of a collection. A tabular report can be made interactive by adding the following features:
- Adding buttons to change the period, to change the contents of the Report, etc.
- Adding explosions to the lines.
Displaying the Exploded Part
TallyPrime allows the user to display additional information about the current line object, when the key combination SHIFT + Enter is pressed. This functionality is called as explosion in Tally. Line attributes Explode and Indent, and the function $$KeyExplode, are used for the same.
Attribute – Explode
The attribute Explode refers to an attribute of the line, which is used to take the current data from the Line Object. A Part is displayed after the process of explosion is complete.
Syntax
Explode : <Part Name> : <Logical Condition>
Where,
< Part Name > is the name of the Part which displays additional information about the Line object.
< Condition > if True, will result in an explosion.
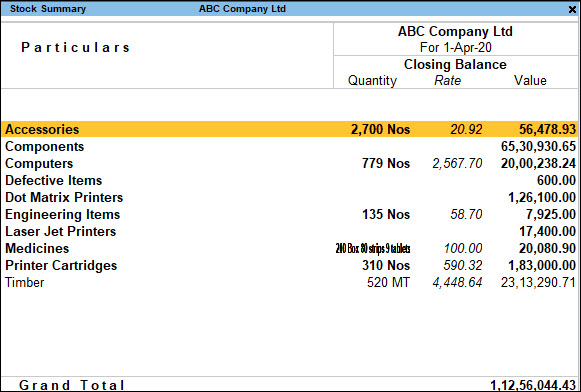
Example 1: Simple Tabular Report
Let us consider writing a simple Trial Balance.
[Part : My TB Part]
Lines : My TB Title, My TB Details
Repeat : My TB Details : My TB Groups
Scroll : Vertical
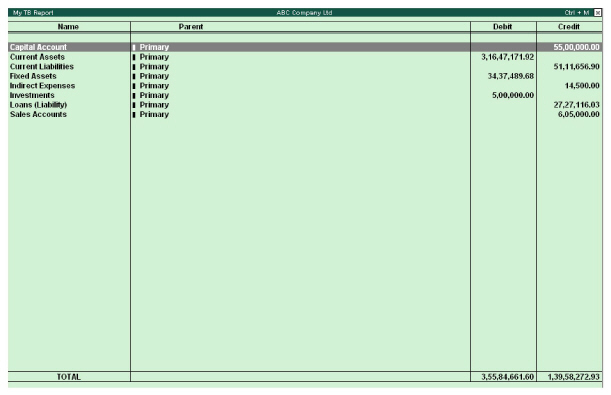
Example 2: A Simple Interactive Tabular Report
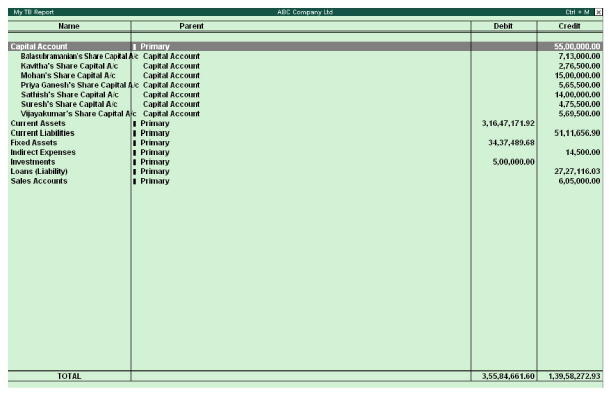
A report showing all the Primary groups can be created and exploded by pressing Shift + Enter to view the sub groups. The ledgers can subsequently be viewed on the same screen with an indent for each level. The report is as shown in Figure 9.3
The following code snippet displays the exploded part:
[Line : My TB Details]
Fields : My TB Name Field, My TB ParName Field
Right Fields : My TB Dr Amt Field, My TB Cr Amt Field
Explode : My TB Group Explosion : $$IsGroup and $$KeyExplode
[Field : My TB Name Field]
Use : Name Field
Set as : $Name
Variable : MyGroupName1
Simple Interactive Tabular Report. The code for the exploded part is as follows:
[Part : My TB Group Explosion]
Lines : My TB Details Explosion
Repeat : My TB Details Explosion : My TB GroupsLedgers
Scroll : Vertical
[Line : My TB Details Explosion]
Fields : My TB Name Field, My TB ParName Field
Right Fields : My TB Dr Amt Field, My TB Cr Amt Field
Explode : My TB Group Explosion : $$IsGroup and $$KeyExplode
Indent : 2 * $$ExplodeLevel
Local : Field : Default : Delete : Border
The Collection My TB GroupLedgers is a union of collections of Type Group and Ledger, respectively.
[Collection : My TB GroupsLedgers]
Collection : My TB Groups, My TB Ledgers
The Variable MygroupName1 is used in Child Of attribute, under the collections My TB Groups and My TB Ledgers
[Collection : My TB Groups]
Type : Group
Child Of : #MyGroupName1
[Collection : My TB Ledgers]
Type : Ledger
Child Of : #MyGroupName1
When the user presses the Shift + Enter keys, then the exploded part shows the Sub-groups under the group in the current line.
When the keys Shift + Enter are pressed by the user, one more exploded part shows the Ledgers under the current Sub-group, as shown in Figure 9.5.
Hierarchical Report (Drill down Report)
A Tally application provides a simple way of navigating from one report to another, which is commonly referred to as a drill down. A Drill Down facility moves from one report to the other to give a detailed view based on the selection in the current report. A user can return to the first Report from the detailed view. A typical drill down in TallyPrime starts from the Report and reaches the Voucher Alteration screen.
Designing Hierarchical Reports
Hierarchical Reports can be designed by incorporating the following changes to a Tabular Report:
- Variable attribute of Report definition
- Child Of attribute of Collection definition
- Display and Variable attributes of Field definitions
- Variable Definition
Example
The following code snippet demonstrates the Drill down action, which is based on the Group Name displayed in the field. The Drill down action is achieved by specifying the two attributes ‘Variable’ and ‘Display’ at the field level.
[Field : My TB Name]
Width : 120 mms
Set as : $Name
Variable : GroupVar
Display : My Trial Balance : $$IsGroup
A Variable is defined as Volatile and is associated at Report. The attribute Variable of Report definition is used to associate the Variable with the report.
[Variable : Group Var]
Type : String
Default : “”
Volatile : Yes
[Report : My Trial Balance]
Form : My Trial Balance
Variable : GroupVar
The same Variable is used in the Childof attribute of the Collection definition. When a line is repeated over this collection in the report; when the user presses the Enter key, the Report being displayed will have the objects whose Parent Name is stored in the variable.
[Collection : My Collection]
Type : Group
Child of : ##GroupVar
The following screen is displayed when the user selects the option from the Menu:
When the key Enter is pressed by the user, the next screen displays the Sub Groups of the current Group.
Column Based Reports
The reports in which the number of columns added or deleted as per the user inputs are referred to as column-based reports. There are four types of column-based reports in Tally, namely Multi-Column Reports, Auto-Column Reports, Automatic Auto-Column Reports and Columnar Reports. All these types are explained with examples in this section.
Multi-Column Reports
In Multi-Column reports, a column is repeated based on the criteria specified by user. Trial Balance, Balance Sheet, Stock Summary, etc., are some default Reports in TallyPrime having Multi column feature. Normally, this feature is used to compare values across different periods.
Designing a Multi Column Report
In a Tabular Report, Lines are repeated over a collection. But in a multi-column Report, columns are repeated in addition to the repetition of the Lines over a Collection. Based on the user input, columns are repeated. The column Report is used to capture user inputs like Period, Company Name, Stock Valuation, etc., based on which columns are generated.
Following attributes are used at various components of a Report to incorporate the multi-column feature:
Attribute – Column Report
Attribute Column Report of the Report definition, facilitates the creation of multi-column reports.
Syntax
ColumnReport : <Report Name>
Where,
< Report Name > is the name of the report used to obtain user inputs from the options displayed.
Attribute – Repeat
Attribute Column Report is associated with a variable, which in turn is specified in ‘Repeat’ attribute of Report definition. Both attributes are specified in ‘Report’ definition to create a multi-column report.
Syntax
Repeat : Variable
Example: Incorporating Multi Column Feature to Trial Balance report
Step 1 : Using Column Report & Repeat attribute at the Report
[Report: MulCol Trial Balance]
ColumnReport : MyMultiColumns
Repeat : SVCurrentCompany, SVFromDate, SVToDate
Step 2 : Modifying the System Variables in a multi-column Report
By clicking New Column button, ‘MyMultiColumns’ Report is displayed. In this Report, the user inputs are captured, which will be reflected in the System Variables.
[Field : My MultiFromDate]
Use : Uni Date Field
Modifies : SVFromDate
[Field : My MultiToDate]
Use : Uni Date Field
Modifies : SVToDate
[Field : My MultiCompany]
Use : Name Field
Modifies : SVCurrentCompany
Table : Company
Step 3: Repeating Columns over a Variable and Lines over Objects of a Collection
To repeat columns over a Variable, which is captured in MyMultiColumns Report, following needs to be done at various components of the MulCol Trial Balance Report.
1. Report Definition: Repeating over the values of system variable which is captured in MyMultiColumns Report
[Report : MulCol Trial Balance]
Repeat : SVCurrentCompany, SVFromDate, SVToDate
2 . Part Definition: Repeating Lines over objects of a Collection.
[Part : MulCol TB Details]
Lines : MulCol TB Details
BottomLines : MulCol TB Total
Repeat : MulCol TB Details : MulCol TB GroupLed
3. Line Definition:- Repeating Field
[Line : MulCol TB Details]
Fields : MulCol TB Name Field, MulCol TB Amount Field
Repeat : MulCol TB Amount Field
Auto-Column Report
An Auto column report is one in which multiple columns are repeated by just one click of a button. Trial Balance, Balance Sheet, Stock Summary, etc., are some of the default Reports in Tally.ERP 9 which have an Auto column feature.
Designing an Auto-Column Report
Auto column Report is similar to a Multi column Report, except that here, a set of columns are repeated, instead of one. User input will decide the criteria on which the columns are repeated.
Example: Incorporating Auto Column Feature to Trial Balance report
Step 1 : Adding the Configuration Screen to the Form
The Button MyAutoButton is added to Form. Through this Button, the configuration Report MyAutoColumns is arrived at through the Auto columns mode.
[Form : MulCol Trial Balance]
Bottom Button : MyAutoButton,
[Button : MyAutoButton]
Key : Alt+N
Action : Auto Columns : MyAutoColumns
Title : $$LocaleString:”Auto Column”
Step 2 : The Configuration Report MultiAutoColumns
- In configuration Report, the user will be given options like ‘Days’,’ Monthly’, Yearly’, ‘Company’, etc., based on which the columns are repeated. In TDL, these options are external objects.
[Collection : MyAuto Columns]
Title : $$LocaleString : “Column Details”
Object : MyCurrentCompany, MyQuarterly, MyMonthly, MyYearly, MyHalfYearly
Filter : Belongs
Format : $$Name, 15
;; ‘Belongs’ is a system formula which filters the objects
;; based on the value of the Methods ‘BelongsIf’ of all the objects
;; Function Name returns the Name of any given object
[Object : MyCurrentCompany]
Name : $$LocaleString : “Company”
VarName : “SVCurrentCompany”
CollName : “List of Primary Companies”
BelongsIf : $$NumItems : ListOfPrimaryCompanies > 1
IsAgeWise : No
Periodicity : “”
;; Function $$NumItems returns the number of selected companies
;; ‘BelongsIf’ is a method of the object MyCurrentCompany, which
;; is used to control the display of the objects in the collection
[Object : MyQuarterly]
Name : $$LocaleString : “Quarterly”
VarName : “SVFromDate, SVToDate”
CollName : “Period Collection”
BelongsIf : “Yes”
IsAgeWise : No
Periodicity : “3 Month”
[Object : MyHalfYearly]
Name : $$LocaleString:”Half-Yearly”
VarName : “SVFromDate, SVToDate”
CollName : “Period Collection”
BelongsIf : “Yes”
IsAgeWise : No
Periodicity : “6 Month”
[Object : MyMonthly]
Name : $$LocaleString:”Monthly”
VarName : “SVFromDate, SVToDate”
CollName : “Period Collection”
BelongsIf : “Yes”
IsAgeWise : No
Periodicity : “Month”
[Object : MyYearly]
Name : $$LocaleString:”Yearly”
VarName : “SVFromDate, SVToDate”
CollName : “Period Collection”
BelongsIf : “Yes”
IsAgeWise : No
Periodicity : “Year”
Columns can be repeated over any collection. They are not restricted only to a Period.
[Field : My SelectAuto]
Use : Short Name Field
Table : MyAutoColumns
Show Table : Always
[Field : My AutoColumns]
Use : Short Name Field Invisible : Yes
Set as : $$Table:MySelectAuto:$VarName
Set always : Yes
Skip : Yes
;; Function Table selects the Object Name from the previous Field My SelectAuto
;; and displays the corresponding method value of VarName
[Field : My CollName]
Use : Short Name Field
Invisible : Yes
Set as : $$Table:MySelectAuto:$CollName
Modifies : DSPRepeatCollection
Set always : Yes
Skip : Yes
;; We are modifying the value of the default variable DSPRepeatCollection by the value of the Method CollName from the selected Object DSPRepeatCollection is repeated in the Default Variables SVCurrentCompany, SVFromDate and SVToDate, which gets new values for each column
[Field : My StartPeriod]
Use : Short Date Field
Invisible : Yes
Set as : if $$IsEmpty:$$Table:MySelectAuto:$Periodicity then+
##SVFromDate else if $$Table:MySelectAuto:$Periodicity = “Day” then ##SVFromDate else +
$$LowValue:SVFromDate
Set always : Yes
Modifies : SVFromDate Skip : Yes
;; Value of Variable SVFromDate is set here based on the Periodicity Method.
;; $$LowValue is a Function that returns the beginning date of the Current Period
[Field : My EndPeriod]
Use : Short Date Field
Invisible : Yes
Set as : if $$IsEmpty : $$Table:MySelectAuto:$Periodicity then ##SVToDate else if $$Table:MySelectAuto: +
$Periodicity = “Day” then $$MonthEnd:#DSPStartPeriod else $$HighValue:SVToDate
Set always : Yes
Modifies : SVToDate
Skip : Yes
;; Value of the Variable SVToDate is set here based on the Periodicity Method.
;; MonthEnd is a Function that gives the last day for a given month
[Field : My SetPeriodicity]
Use : Short Name Field
Invisible : Yes
Set as : if NOT $$IsEmpty:$$Table:MySelectAuto:$Periodicity then $$Table:MySelectAuto:$Periodicity else “Month”
Set always : Yes
Modifies : SVPeriodicity
The generated values are sent to the Parent Report by using the Form attribute Output.
[Form : MyAutoColumns]
No Confirm : Yes
Parts : My AutoColumns
Output : My AutoColumns
Step 3 : Repeating Columns over a Variable and Lines over Objects of a Collection
To repeat columns over a Variable which are captured in an Auto Columns Report, the following needs to be done at various components of the ‘MulCol Trial Balance’ Report.
1. Report Definition: This involves repeating the Values of a System Variable which is captured in MyMultiColumns Report.
[Report : MulCol Trial Balance]
Repeat : SVCurrentCompany, SVFromDate, SVToDate
2. Part Definition: This involves repeating Lines over the Objects of a Collection.
[Part: MulCol TB Details]
Lines : MulCol TB Details
BottomLines : MulCol TB Total
Repeat : MulCol TB Details : MulCol TB GroupLed
3.Line Definition: This involves repeating a Field.
[Line : MulCol TB Details]
Fields : MulCol TB Name Field, MulCol TB Amount Field
Repeat : MulCol TB Amount Field
Automatic Auto-Column Reports
There may be situations when the columns are required; automatically without the intervention of the user when the report is opened. The Attendance Sheet is an example of the Automatic autocolumn Report in Tally.ERP9.
Designing an Automatic Auto Column Report
In order to design an Automatic Auto Column Report, the function $$SetAutoColumns, and the pre-defined variables DoSetAutocolumn and the DSPRepeatCollection are used.
The following points must be considered while creating the automatic auto-column reports:
- The value of the variable DoSetAutoColumn must be set to YES.
- The variable DSPRepeatCollection stores the Collection Name to be repeated.
- The function $$SetAutoColumns accepts the name of a variable which is repeated over the value of variable DSPRepeatCollection.
- The columns are displayed based on the values in the collection provided by variable DSPRepeatCollection.
Example
Consider the example of creating an auto-column for a Trial Balance. The same report can be modified to have automatic Columns for Multiple selected companies. As mentioned earlier, the following should be resorted to:
The variable DoSetAutoColumn must be set to Yes .
[Report : MulCol Trial Balance]
Set : DSPRepeatCollection : “List of Primary Companies”
The variable DSPRepeatCollection has to be set to List of Primary Companies
[Form : MulCol Trial Balance]
Option : Set Auto Option : $$SetAutoColumns:SVCurrentCompany
Add a dummy option in the ‘Form’ Definition such that the condition of the same is $$SetAutoColumns:SVCurrentCompany . The variable SVCurrentCompany will be repeated automatically as soon as you enter the report, provided multiple companies are loaded.
Also add the following lines to the Form Definition MultiCol Trial Balance
Option : Set Auto Option : $$SetAutoColumns : SVCurrentCompany
[!Form : Set Auto Option]
Multiple companies should be loaded for this program. Now, when the user selects the Menu Item, the following screen is displayed:
Columnar Report
All the Voucher Reports which contain Accounting Information (Ledger and/or Group Info) available in Vouchers, and can be displayed as Columns, are categorized as Columnar Reports. For example, Sales Register, Purchase Register, Journal Register, Ledger, etc., where the Voucher Registers can display multiple columns and respective values for each column, viz. the ledger, the parent of the ledger, etc., entered in the voucher, as opted by the user.
Note: These types of Reports also use the Auto Column concept for achieving disparate columns.
Stock Registers and Sales Registers are a classic example of Columnar Reports.
Printing
We have already understood the various types of reports and the techniques to generate them. An essential element of Reporting is printing. All the reports must be printable in one form or the other.
Printing Techniques : The techniques used for Printing are as follows:
Menu Action – Print/Print Collection
Menu Action Print or Print Collection enters the final Report in Print mode.
Syntax
[Menu : <Menu Name>]
Add : Key Item:[Position] : <Display Item> : <Unique Key>: <ActionKeyword> : <Action Parameter>
;; where Action Keyword can be ‘Print’ or ‘Print Collection’ which triggers a list and displays the
;; final report based on user selection
Example
[#Menu : Printing Menu]
Add : Key Item : My Ledgers : L : Print Collection : Ledger Vouchers
Add : Key Item : My Day Book : D : Print : Day Book
Here, we are adding the Item My Ledgers, which has an action Print Collection associated to it.
It displays a collection bearing the List of ledgers, which on user selection, enters the final report in ‘Print’ Mode. On accepting, it directly goes to the printer.
Button Action – Print Report
Another method of printing reports is by way of associating a Button with an action Print Report at the ‘Form’ definition. Action ‘Print Report’ prints the current report by default. This action accepts Report Name as its parameter. If any report other than current needs to be printed, an additional parameter containing Report Name needs to be specified. The current report can pass the user selection to the printing report through a default collection called Parameter Collection.
Syntax
[Button : <Button Name>]
Action : <Print Report> [: Action Parameter]
Example
Consider a report displaying a list of employees, wherein the user selects the required employees for whom pay slips need to be printed. On clicking the Print Button, the current report bearing the list of employees is not required. A new report printed for various pay slips allotted to the selected employees is needed.
[Button : Print Selected Pay slips]
;; Associate this button to the current report displaying the list of employees
Key : Alt + F11
Title : “Print Selected Pay slips”
/* Multiple Payslip Print Report will be printed on activation of this Button. The Report should be altered to include the in-built Collection ‘Parameter Collection’ to print the user selection for the list of employees*/
Action : Print Report : Multi Pay Slip Print
Scope : Selected Lines
[#Report : Multi Pay Slip Print]
Collection : Parameter Collection
Here, the Button Print Selected Pay slips is defined with the Action ‘Print Report’, which also has an action parameter, i.e., the Report Name to be printed. The scope of the Button is Selected Lines, which means that the final Report Multi Pay Slip Print must contain only the selected Objects from the current Report. The user selection is passed to the new Report through a Collection ‘Parameter Collection’, which must be used in the destination Report ‘Multi Pay Slip Print’. So, the Report ‘Multi Pay Slip Print’ can be modified and added to the collection ‘Parameter Collection’.
Page Breaks
A Page Break is the point at which one page ends and another begins. Handling Page Breaks is important, as the current page should indicate continuation to the next page, while the next page must indicate that the current page is continued from the previous page. So, there must be a closing identifier, i.e., closing page break information and an opening identifier, i.e., opening page break information.
In other words, Page Breaks specify the headers and footers for every page, and are printed across multiple pages. Closing Page Break starts printing from the first page and prints on every page except the last page, e.g., Continued… to be printed at the bottom of each page. Opening Page Break starts printing from the second page till the last page. Closing Page Break is specified before Opening Page Break, since in any circumstance, closing page break is encountered first.
In TDL, Page Breaks can be handled vertically as well as horizontally .
Types of Page Breaks
Vertical Page Breaks
In cases where a report containing data cannot be printed in a single page, one needs to use vertical page breaks. Vertical Page Breaks can be specified at 2 levels, viz. Form and Part .
Form Level Page Break
Vertical Page Breaks can be specified at Form through the Form Attribute Page Break. It takes 2 parameters, viz. First Part for Closing Page Break and Second Part for Opening Page Break.
Syntax
[Form: <Form Name>]
Page Break : <Closing Part>, <Opening Part>
Example
Consider a Trial Balance report of a company, which requires the title and address of the Company in the first page and the grand total in the last page. In the pages between the first and the last page, the text Continued…. may be required at the end of each page, and the Company Name and Address at the beginning of each page.
[Form : My Trial Balance]
Page Break : Cl Page Break, Op Page Break
;; where both Cl Page Break and Op Page Break are Parts
[Part : Cl Page Break]
Lines : Cont Line
[Line : Cont Line]
Fields : Cont Field
Border : Full Thin Top
[Field : Cont Field]
Set As : “Continued…”
Full width : Yes
Align : Right
[Part : Op Page Break]
Parts : DSP OpCompanyName, DSP OpReportTitle
Vertical : Yes
In this example, Closing Page Break is defined to print Continued… at the end of every continued page. Opening Page Break is defined to print the Company Name and Report Title at the beginning of all the continuing pages. Since more than one part is used within Part definition, specify the alignment as ‘Vertical’, if required.
Part Level Page Breaks
Vertical page breaks can be specified for a Part using the Page Break attribute. This is generally used when page totals need to be printed at the end of one page and at the beginning of the next page.
Syntax
[Part : <Part Name>]
Page Break : [<Closing Line>], [<Opening Line>], [<Logical Value>]
Where,
<Part Name> specifies the name of the Part in which the attribute is defined.
<Closing Line> specifies the Line used for page break at the start of the Part. Optional.
<Opening Line> specifies the Line used for page break at the end of the Part. Optional.
<Logical Value> controls whether the page break is applied. It is a optional parameter.
Example
[!Part: VPC TMPL InvAccDtls_PB_GCC]
Page Break : , VPC TMPL ItemSection PageBreak_GCC
In the example, the Part VPC TMPL InvAccDtls_PB_GCC uses VPC TMPL ItemSection PageBreak_GCC as the page break line at the end of the Part.
Horizontal Page Breaks
Horizontal Page Breaks are used if the number of columns run into multiple pages.
Line Level Page Breaks
Horizontal page breaks can be specified at Line through Line Attribute Page Break. It is generally used to repeat a closing column at every closing page and opening column at every opening page. It takes 2 parameters, viz. 1st Field for Closing Page Break & 2nd for Opening Page Break.
Syntax
[Line : <Line Name>]
Page Break : <Closing Field>, <Opening Field>
Example
Consider a Columnar Sales Register Report of a company, where multiple columns are printed across pages. Some fixed columns are required in subsequent pages which makes it easy to map the columns in subsequent pages.
[#Line : DSP ColVchDetail]
Page Break : Cl Page Break, Op Page Break
;; where both Cl Page Break and Op Page Break are Fields
[Field : Cl Page Break]
[Field : Op Page Break]
Fields : DBC Fixed, VCH No
In this example, the Field Cl Page Break is defined as Empty, since no Closing Column or Field is required and Field Op Page Break is defined with further fields DBC Fixed and VCH No, which are available in default TDL
|
Form Level Page Break |
Part Level Page Break | Line Level Page Break |
|
It is a Vertical Page Break |
It is a Vertical Page Break |
It is a Horizontal Page Break |
|
Page Break attribute accepts Part Names as its value |
Page Break attribute accepts Line Names as its value |
Page Break attribute accepts Field Names as its value |
|
Multiple Parts (parts within parts) can be printed both at closing and opening page breaks |
Multiple lines (lines within lines) can be printed at both closing and opening page breaks |
Multiple Fields (Fields within Fields) can be printed at both closing and opening page breaks |
|
Form Level Page Breaks cannot handle running Page Totals |
Running Page Totals can be handled with Part Level Page Break |
Column Page Totals can be handled with Line Level Page Break |
Enhanced Columnar Capability
Columnar Reports in General
A matrix report looks like a grid. It contains a row of labels, a column of labels, and information in grid format that is related to both the row and column labels. In Tally, two dimensional matrix reports can be designed using the Auto column report approach (using Repeat Variables). Traditionally, these types of Reports are referred to as columnar Reports. In particular, Matrix report is a variant of automatic auto column reports, where the columns are repeated over a variable associated at the Report. The collection repeated with this variable is used to populate the repeated values into the variable. The method value in the detail line is extracted from a different collection, based on the corresponding row and column indexes.
Enhanced Capabilities for Columnar Reporting
The latest enhancements in the area of Columnar Reporting enables us to design the reports using a new approach altogether. A field within a line can display method values from multiple objects of the collection. Context Free repeat within the part and line enable repetition on simple as well as list variable values. These features give a better control in the hands of the programmer
These features give a better control in the hands of the programmer in designing such reports.
If we consider the above report layout, the labels in columns can now repeat over a collection of Parties. The data in the cells can be populated based on the combination of row and column label values across the dimensions. In the previous table, for example, the highlighted cell contains the value of total sales quantity corresponding to the party “Party 2” for the Stock Item “Stock Item 2”.
The following enhancements have been enabled to achieve this functionality:
- ‘Repeat’ Attribute for Part and Line over a Collection
- Context Free Repeat for Part and Line, together with SET/Break On
- Usage of the function $$LineObject
Attribute ‘Repeat’ Enhancements – Part and Line
The Repeat attribute has been enhanced consistently across Part and Line Definitions to support Context Based as well as Context Free Repeat.
Attribute REPEAT – Part Definition
The common syntax allows the repetition of a contained line, with or without a collection.
Syntax
[Part : <Part Name>]
Repeat : <Line Name> [: <Collection>]
Set : <Count>
Where,
<Part Name> is the name of the part.
<Line Name> is the name of the line to be repeated.
<Collection> is the name of collection on which the line is repeated. It is an optional parameter.
<Count> denotes the number of times the line is to be repeated, if Collection Name is not specified.
Context based Repeat – The Repeat attribute of the Part can repeat the contained line over a collection. Each line in this case is associated with each object of the collection. This was the earlier capability even before Tally.ERP 9.
Context Free Repeat – From Release 1.8, the Collection parameter in the above syntax has been made optional. This allows the repetition of a contained line without a collection. Since the no. of times the line has to be repeated is not known, the usage of the attribute SET to specify the count becomes mandatory. In case of ‘Edit’ mode, the attribute ‘Break On’ can be used to specify the terminating condition for repetition.
Attribute REPEAT – Line Definition
So far, the Repeat attribute at Line definition has been accepting only a field name which internally uses the repeat behaviour of the Report and Variable for determining the no. of times it can be repeated. This attribute has now been enhanced to support the consistent syntax to enable “Context Based” and Context Free repetition of the same field horizontally.
Syntax
[Line : <Line Name>]
Repeat : <Field Name> [: <Collection Name>]
Set : <Count>
Where,
<Line Name> is the name of the Line.
<Field Name> is the name of the Field to be repeated.
<Collection Name> is the name of the collection on which the Field is repeated. It is optional.
<Count> denotes the no. of times the Field has to be repeated, if collection name is not specified.
Context based Repeat – The ‘Repeat’ attribute of the line can repeat the contained field over a collection. Each field in this case is associated with each object of the collection.
Context Free Repeat – The collection parameter in the above syntax is optional. This allows the repetition of a contained field without a collection. Since the no. of times the field is to be repeated is not known, the usage of the attribute SET to specify the count becomes mandatory. In case SET is not specified, the Field will be repeated as per the existing Columnar behaviour.
Example 1: Item-Wise Party-Wise sales quantity report using Context-Based Repeat of Field
Following is the code snippet to design the above report using enhanced columnar capability:
- Collection definitions for Stock Item wise Party, sales quantity etc., are as follows:
[Collection : Smp CFBK Voucher]
Type : Voucher
Filter : Smp IsSalesVT
[Collection : Smp Stock Item]
Source Collection : Smp CFBK Voucher
Walk : Inventory Entries
By : IName : $StockItemName
Aggr Compute : BilledQty : SUM : $BilledQty
Keep Source : ().
Filter : SmpNonEmptyQty
[Collection : Smp CFBK Party]
Source Collection : Smp CFBK Voucher
Walk : Inventory Entries
By : PName : $PartyLedgerName
Aggr Compute : BilledQty : SUM : $BilledQty
Keep Source : ().
Filter : Smp NonEmptyQty
[Collection n : Smp CFBK Summ Voucher]
Source Collection : Smp CFBK Voucher
Walk : Inventory Entries
By : PName : $PartyLedgerName
By : IName : $StockItemName
Aggr Compute : BilledQty : SUM : $BilledQty
Keep Source : ().
Search Key : $PName + $IName
;; System Formula
[System : Formula]
Smp IsSalesVT : $$IsSales:$VoucherTypeName
Smp NonEmptyQty : NOT $$IsEmpty:$BilledQty
From these Collections, following can be observed:
- The Rows, i.e., Stock Items, are repeated over the Collection ‘Smp Stock Item’.
- The Columns, i.e., Party Names, are repeated over the Collection ‘Smp CFBK Party’.
- The Intersection values between these Rows and Columns, i.e., Item wise Party wise Sales Quantity, are set using the Collection ‘Smp CFBK Summ Voucher’. This Collection is indexed on Methods $PName + $IName using the Collection Attribute ‘Search Key’. Thus, the Collection is indexed on Party Name and Stock Item Name, which makes it unique across all the Objects within the Collection ‘Smp CFBK Summ Voucher’.
The Lines for Title and Details are repeated for the Party Names as shown below:
[Line : Smp CFBK Rep Title]
Use : Smp CFBK Rep Details
Local : Field : Default : Type : String
Local : Field : Default : Align : Center
Local : Field : Smp CFBK Rep Name : Set as : “Particular s ”
Local : Field : Smp CFBK Rep Name : Widespaced : Yes
Local : Field : Smp CFBK Rep Party : Set as : $PName
Local : Field : Smp CFBK Rep Party : Lines : 0
Local : Field : Smp CFBK Rep ColTotal : Set as : “Total”
[Line : Smp CFBK Rep Details]
Fields : Smp CFBK Rep Name , Smp CFBK Rep Party , S mp CFBK Rep Col Total
Repeat : Smp CFBK Rep Party : Smp CFBK Party
Title Line uses the detail line where the Field Smp CFBK Rep Party is repeated over the Collection “Smp CFBK Party”. In the Title Line, the Field “Smp CFBK Rep Party” is set with the value “$PName”, which sets the Party Names from the Collection “Smp CFBK Party”.
- Retrieving the values in cells based on Party name available from context and stock item name available in the field as shown below:
[Field : Smp CFBK Rep Name]
Use : Name Field
Set as : $IName
Display : Stock Vouchers
Variable : StockItemName
[Field : Smp CFBK Rep Party]
Use : Qty Primary Field
Set as : $$ReportObject:$$CollectionFieldByKey:$BilledQty:@SKFormula:SmpCFBKSummVoucher
SKFormula : $PName + #SmpCFBKRepName
Format : “NoZero”
Border : Thin Left
In this code snippet, we can observe that the Field Smp CFBK Rep Party is the intersection between rows & columns. The value is gathered from the Collection Smp CFBK Summ Voucher using the function $$CollectionFieldByKey, where the Index Key in the current context is passed as a parameter. “$PName” in the current object context returns the Party Name. Similarly, the Field Value #SmpCFBKRepName in the current context returns the Stock Item Name. Hence, the Search Key Index “Party Name + Stock Item Name” for every Intersection point is passed to this function, which extracts and returns the corresponding Quantity from the Collection.
- Calculating Field Level Totals, i.e., Stock Item Totals, across all Parties is done using the Line Attribute ‘ Total ’ and the Function $$Total , as shown below:
[Line : Smp CFBK Rep Details]
Total : Smp CFBK Rep Party
[Field : Smp CFBK Rep Col Total]
Use : Qty Primary Field
Set as : $$Total:SmpCFBKRepParty
Line Smp CFBK Rep Details contains an Attribute ‘Total’, which accepts Field Names as its value. In other words, we declare at the Line that the Fields are to be summed for later use. This sum gets accumulated and rendered in the Field “Smp CFBK Rep Col Total”, where the function
$$Total returns the accumulated Total for the given Field Name as the Parameter to this Function.
Multiple Orientation Support for Printing
Currently, Tally supports printing of multiple forms within a single report in single orientation only, i.e., all the forms within a report can be printed either in Portrait or in Landscape format only, as specified in the report.
In order to support the printing of multiple forms within a single report in different orientations, the behaviour of Variable SVPrintOrientation has been enhanced.
To achieve this behaviour, the local declaration of the Variable SVPrintOrientation at Report level is mandatory, and its value must be set using the form level attribute ‘Set Always’ in individual forms.
This will be very useful in scenarios where multiple forms are being printed from a single report. For example, from a Payment Voucher, one needs to print both Voucher and Payment Advice. However, the Payment Voucher needs to be printed in ‘Portrait’ form, and the Payment Advice in Landscape.
Example
[Report: TSPL Smp VarSVPrintOrientation Extended]
Form : TSPLSmpVarSVPrintOrientationFrm1, TSPLSmpVarSVPrintOrientationFrm2
;; Mandatory Local declaration of Variable SV Print Orientation
Variable : SV Print Orientation : String
[Form: TSPL Smp VarSVPrintOrientation Frm1]
;; Orientation of this Form is set to ‘Portrait’
Set Always : SV Print Orientation : “Portrait”
[Form : TSPL Smp VarSVPrintOrientation Frm2]
Use : TSPL Smp VarSVPrintOrientation Frm1
;; Orientation of this Form is set to ‘Landscape’
Set Always : SV Print Orientation : “Landscape”
In this example, the report TSPLSmpVarSVPrintOrientation Extended has two forms, viz. TSPLSmpVarSVPrintOrientationFrm1 and TSPLSmpVarSVPrintOrientationFrm2 .
Based on the value set to the variable SV Print Orientation, both the forms are being printed in the respective orientation.
Columnar Capability in Edit Mode
Multiple-Column feature in Tally.ERP 9 has till date been used by the Tally users for various reporting needs like Comparative Analysis of Data across Multiple Periods (Months, Quarters, Years, etc.), Multiple Companies, Multiple Godowns, etc. It can also be used for comparative study of various parameters like Budget vs. Actual Performance, by getting the same displayed in the form of a column-based report.
It was felt highly desirable if, apart from these reporting functionalities, various data entry operations could also be performed in a Columnar or Tabular manner. This would not only facilitate data entry in a simple, user friendly manner, but also considerably reduce the time taken to enter the data. For instance, Attendance of Employees could be accepted against the Attendance Types or days, in a Tabular format. Similarly, other examples could be Employee-wise Pay Head-wise Salary Structure, Stock Item-wise Price Level-wise Price List, etc., where this capability could be used effectively. In order to make this possible in Tally, the Columnar capability was required to be extended to support Edit mode.
From Release 4.7 onwards, support for Multi Columns has been extended to Edit Mode too, to enable the developer to design and implement such functionalities in Tally, as per requirement.
To make this possible in TDL, the Horizontal Scrolling behaviour has been enhanced to work in Edit Mode, which will enable the developer to create a user friendly interface, thereby allowing the user to enter data conveniently in tabular format. To achieve the columnar scrolling behaviour; in TDL, fields within the required line can be repeated over either of the following:
- Collection of Objects , OR
- Sub-Collections under a Primary Object, provided the Sub-Collections contain Object(s)
In the absence of the above ‘Repeat’ specification, the only criterion to repeat the Fields/ Columns is that the number of Fields to be repeated must be known to the Line.
With respect to Object context, Horizontal Scroll will only happen if Objects/Sub Objects, on which Columns are to be repeated, exist. In other words, in Create Mode with Object Context, Horizontal Scroll will not work as the number of fields to be repeated is not known.
Please note that In TDL, to make the programming simpler and to optimise the reporting and query area, we have introduced two definitions – Rule Set and Name Set, and two data types – Flag Set and Num Set.
Definition – Rule Set
Rule Set is a definition in TDL and can be used to define a set of rules. You can use this definition to evaluate the rules efficiently. Rule Set can be defined with a single dimension or multiple dimensions along with flow control. The attribute Rule Set and related functions help to evaluate the defined Rule Sets. The result of a Rule Set is always an Object method of Flag Set data type. The functions related to Flag Set data type allow you to access the Flag Set. Storing the Flag Set result in the database is currently not supported. For example, during voucher acceptance, the Rule Set can be used to check the correctness of data.
The definition Rule Set makes TDL programming simpler because of its ability to allow a developer to scope only one validation at a time and not all of them together. It reduces the code size. It also provides the named identity to access flag set values. Rule Set increases the efficiency of the programme, which is measured on performance and memory usage.
Syntax
[Rule Set: <Rule Set Name>]
Where,
< Rule Set Name > is the name of the Rule Set.
Various attributes and functions, which are related to Rule Set are explained below:
Attribute – Break On
Break On is a single type attribute with constant value. You can use the attribute Break On in Rule Set definition to determine the continuation of evaluation in the current rule set. It provides vertical flow control to evaluate the rules. Break on can also be mentioned with Rule attribute.
Syntax
Break On: <Logical Constant>
Where, < Logical Constant > is Yes / No .
While evaluating each rule,
- If the value of Break On matches with the result of the rule, then the evaluation flow will break and further rules are not evaluated in the current Rule Set. The remaining rule values default to No .
- If the attribute Break On is not specified, the evaluation flow continues, irrespective of the result of rule.
Attribute – Walk On
Walk On is a single type attribute with constant value. The attribute Walk On helps to determine whether the next dimension will be evaluated or not, for the current rule. It has diagonal flow control to evaluate the steps.
Syntax
Walk On: <Logical Constant>
Where, < Logical Constant > is Yes/No.
While evaluating each rule,
- If the value of Walk On value matches with the result of the rule, then the evaluation flow continues to evaluate the next dimension in the current rule context. If the next dimensions are not evaluated, the rule values default to No.
- If the attribute Walk On is not specified, the evaluation flow continues to evaluate the next dimension, irrespective of the result of the rule.
Attribute – Rule
Rule is a Triple list attribute. You can use the attribute Rule to define a rule. It accepts three parameters.
Syntax
[Rule Set: <Rule Set Name>]
Rule : <Rule Identifier>: <Logical Expression>[: <Keyword>]
Where,
<Rule Identifier> is the name of the rule to identify or access the rule later. “*” and “?” are not supported as rule names.
<Logical Expression> evaluates in the context of requester/source/target object being passed from evaluation context.
<Keyword> specifies the value of Break On sub-attribute for current rule. If no specification is provided, it inherits the Break On attribute value at current rule set level.
Possible options are
True/Yes: When the result of the rule is True/Yes, it stops the evaluation further in the current rule set. The next dimension gets evaluated for the current rule.
False/No: When the result of the rule is False/No, it stops evaluating further.
Never: It continues the evaluation, irrespective of rule result.


