Data Security – FAQ
This topic contains some frequently asked questions (FAQ) related to the security feature in TallyPrime.
You can retrieve your data if you forget your Security Control username and password. If you have forgotten both Admin and User level password, you can restore earlier backup in which you have not mentioned the password.
- Only User level password forgotten.
- Open the company in Admin level.
- Alt+K (Company) > Users and Passwords > and press Enter.
Alternatively, Gateway of Tally > Alt+K (Company) > Users and Passwords > and press Enter. - Enter new Password for the required User Roles.
- Press Y to accept the screen.
- Share the password with the user.
- Alt+K (Company) > Users and Passwords > and press Enter.
- Open the company in Admin level.
- Only Admin level password forgotten.
- Open the company in user level.
- Create a new company with the same financial year.
- Export and import the data.
Click here for the detained instructions on how to export and import the data to a new company.
You can restrict users from accessing Back Dated vouchers.
Days allowed for Back Dated vouchers – By default this field is set to 0. Enter the required number of days. Alteration or Insertion of back dated vouchers can be done within the number of days mentioned from the Date of Last Entry of vouchers
Cut-off date for Back Dated vouchers – You can specify the required date. TallyPrime does not allow you to record a transaction prior to the date mentioned. This can be used in addition to Days Allowed for Back Dated vouchers. This input will be useful in situations where you have completed the audit and do not require any changes in the data.
Case 1: When the Cut-off date is set to 0 (zero).
Scenario: ABC company Ltd: The last date of transaction is 30 Apr 2021. The user should not alter or pass the transaction from 1 Apr 2021-14 Apr 2021. Users should only pass the transaction on 15 Apr 2021 and onward.
Note: Currently TallyPrime will not consider last date of transaction. Hence TallyPrime will allow you to alter or pass the transaction backward by 15 days from the last date of the transaction starting from 29 Apr 2021, so from 29 Apr 2021-15 Apr 2021.
Configure the following settings to restrict users’ access to Back Dated vouchers.
- Days allowed for Back Dated vouchers to 15.
Cut-off date for Back Dated vouchers to 0 (zero).
Click here for more detailed instructions on how to restrict access to Back Dated vouchers.
Note: With every change in the date of the last entry, the voucher restriction changes as well.
Case 2: When the Cut-off date is set to any date.
Scenario: ABC company Ltd: The last date of transaction is 30 Apr 2021. The user should not alter or pass the transaction from 1 Apr 2021- 14 Apr 2021. User should only pass the transaction from 20 Apr 2021 onward.
Configure the following settings to restrict users’ access to Back Dated vouchers.
- Days allowed for Back Dated vouchers to 15.
- Cut-off date for Back Dated vouchers to 20 Apr 2021.
Click here for more detailed instructions on how to restrict access to Back Dated vouchers.
Note: As of the last day of the transaction, if the cut-off date happens to fall before the days allowed for back dated vouchers, TallyPrime will restrict access to the voucher whichever date is earlier. For example, the last date of the transaction is 30 Apr 2021. The days allowed for the Back Dated vouchers are 15 days, and the cut-off date is set to 20 Apr 2021. TallyPrime will allow users to alter or pass the transaction starting from 29 Apr to 21 Apr. The user will not be allowed to alter or pass the transaction on 20 Apr 2021 backward until 15 Apr 2021.
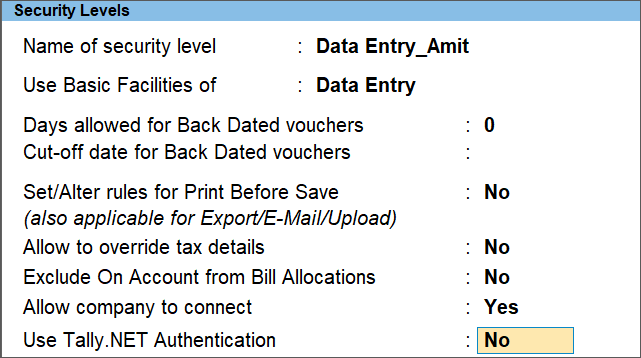
Security levels can be configured to allow or disallow access to a feature. Various type of access can be provided to a feature such as full access, create, alter, display, print, and preview.
Click here for detailed instructions on how to restrict user access to any particular items in Security Levels based on your requirement.
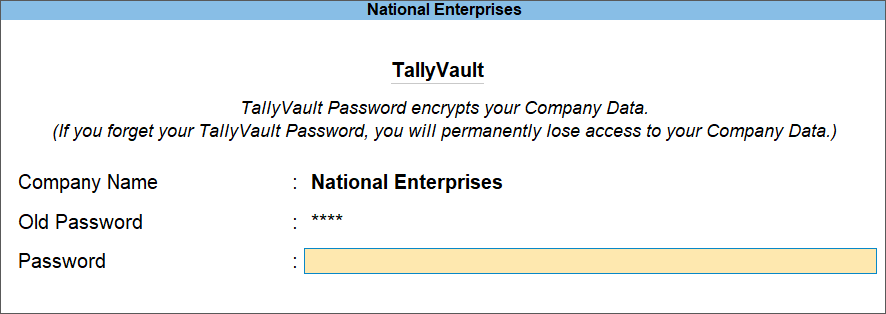
To remove TallyVault password specified earlier, open the required company, and enter the Tally Vault password.
- Alt+K (Company) > TallyVault.
Alternatively, Gateway of Tally > Alt+K (Company) > TallyVault. - Enter the details in TallyVault screen of your company.
- Specify the Old Password. A pre-filled company name will appear based on the company you selected to remove the TallyVault password for.
- Leave the Password field as shown below.
You will see a warning message stating that your company’s data will no longer be encrypted.
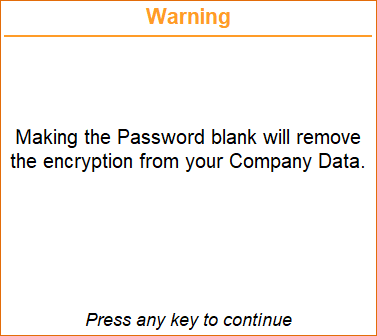
- Press Y to accept the screen. As always, you can press Ctrl+A to save.
A message will appear informing you that removing your TallyVault password will close all the reports, vouchers, and masters without saving any changes.
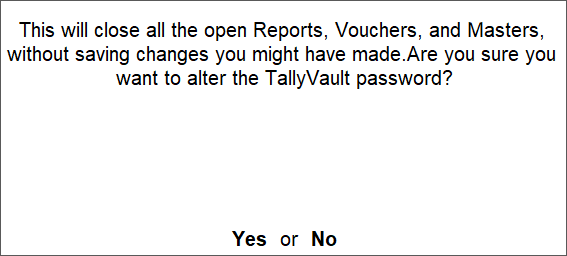
- Press Y to accept the screen.
A message will appear asking to create a copy of your company. - Choose the required option as needed.
On choosing Yes, TallyPrime will create a new company by assigning a new company number and retaining the existing company name.
For more information on TallyVault for your company, click here.
Take a backup of your data before changing the Admin username and password.
Click here for the detailed instructions on how to change Admin level username and password.
TallyVault is an enhanced security system to maintain the privacy of the company that you have created in TallyPrime. It uses a non-stored password with an advanced algorithm to validate a new user without prior knowledge of the password. The decrypted form of data is not stored on the system. Hence, the TallyVault password cannot be retrieved, resulting in permanently losing access to your company information.
You can remove the Security Levels provided to users when they are no longer required.
Click here for the detailed instructions on how to remove Security Levels defined for users.
In TallyPrime, the Tally.NET Auditor has the Owner’s rights by default. This right allows the Auditor to view all reports. In case the Auditors are different for GST, TDS, TCS and VAT, then the Client can configure the Tally.NET Auditor with corresponding rights so that only the concerned auditor can view statutory reports.
Click here for the detailed instructions on how to assign Security Levels for Statutory Reports.
As the Tally.NET Authentication was enabled in the Security Levels screen, you were unable to enter the password.

To disable the option in Security Levels:
- Alt+K (Company) > User Roles > Select the required Security Levels.
Alternatively, Gateway of Tally > Alt+K (Company) > User Roles > Select the required Security Levels.
The Security Levels screen appears.
- Set the option for Use Tally.NET Authentication to No.
You can now proceed to authorize the user and enter the password as required.
Currently, TallyPrime doesn’t support restricting users from altering stock item rates by default. However, you can enable the same functionality through customization.
For more information, contact your Tally Partner or visit TallyShop.
Yes. You can disable voucher duplication through security settings.
- Open the required company > press Alt+K (Company) > User Roles > select the security level.
- Under Disallow the following Facilities, select Full Access from Type of Access and Vouchers from List of Reports.
- Under Allow the following Facilities, select Create from Type of Access and Vouchers from List of Reports.
- Accept the screen by pressing Ctrl+A.
This ensures users can create vouchers but cannot duplicate them.
You can disallow voucher alteration while still allowing creation.
- Open the required company > press Alt+K (Company) > User Roles > select the security level.
- Under Disallow the following Facilities, select Full Access from Type of Access and Vouchers from List of Reports.
- Under Allow the following Facilities, select Create from Type of Access and Vouchers from List of Reports.
- Accept the screen by pressing Ctrl+A.
Now users can create vouchers but cannot alter them. If you wish to give access to user to alter the vouchers then under Allow the following Facilities, select Create/Alter from Type of Access and Vouchers from List of Reports.
Yes. Deletion rights can be restricted by not giving Full Access.
- Open the required company > press Alt+K (Company) > User Roles > select the security level.
- Under Disallow the following Facilities, select Full Access from Type of Access and Vouchers from List of Reports (or Masters, depending on what you want to restrict).
- Under Allow the following Facilities, select Create or Display/Print from Type of Access and Vouchers from List of Reports.
- Accept the screen by pressing Ctrl+A.
This way users cannot delete vouchers or masters, but can still view or create them as permitted.
When you’re running TallyPrime on AWS, the option Optimise batch processing for data operations is set to No by default, to avoid additional space consumption on the AWS server.
No, these optimisations aren’t applicable in TallyPrime on AWS.
TallyPrime Server improves company loading performance in TallyPrime Release 7.0. So, enabling or disabling this setting in TallyPrime makes no difference to the companies in TallyPrime Server.
No, enabling or disabling this option in TallyPrime will not impact the report performance in a TallyPrime Server company.