Use Control Centre for TallyPrime
The Control Centre for TallyPrime or TallyPrime Control Centre works as an interface between the user and TallyPrime installed at different sites. It enables the user to centrally configure and administer sites or users belonging to an account.
Access Control Centre from Portal
- Log in to tallysolutions.com
Alternatively, you can access Control Centre portal from TallyPrime.
Press F1 (Help) > Settings > License > Manage Account.- Enter your Tally.NET ID and Password.
- If you have forgotten your password
- Click Forgot ID/Password.
- In the Administrator E-mail ID screen, click Reset Password.
- Provide your Tally.NET ID on the Reset Password screen and click Reset.
 The password will be sent to your e-mail ID. You can use the password to login.
- Access your Account
- Click your Account ID under My Tally.NET Account(s).
If you have multiple Account IDs, all of them will be listed under My Tally.NET Account(s).
- Click your Account ID under My Tally.NET Account(s).
- Click Control Centre on the left navigation pane.
Control Centre involves the following features:
- Account Management – You can manage your Tally.NET account by updating your account profile, managing your licenses, changing Account Admin, and setting up configurations.
- User Management – You can manage all users and their security levels, create new users and also assign necessary security levels as per your business needs.
- TDL Management – TBD
- Report Access Control – You can manage the data sessions for the users of your company who have a valid Tally.NET ID and accessing your data remotely.
Account Management
You can enter essential information related to the Account/Site ID in Account Profile. You can change your Account ID and update your Business information when you need.
Update Account ID
- Log in to the portal and access Control Centre.
Alternatively, you can access Account Management from TallyPrime.
Press F1 (Help) > Settings > License > Manage Account. - Under Account Management, select Account Profile.
- In the Account Profile window, under Account Information, click Edit.
- Provide the new Account ID and click Save.
The following success message window id displayed:
Update Business Information
- In the Account Profile window, under Business Information, click EDIT.

- Fill in the necessary details as needed and click SAVE.
The following success message is displayed:
License Management through Control Centre
Using Control Centre, you can also manage your license related information. Using the License Management feature in control centre, you can view your license details, site/branch information, deployment information and so on. You can update them as needed.
Under Control Centre > Account Management, select Licence Management.
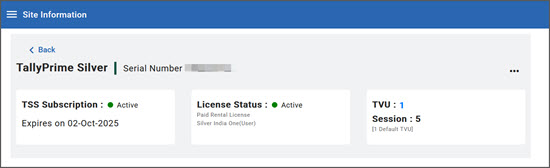
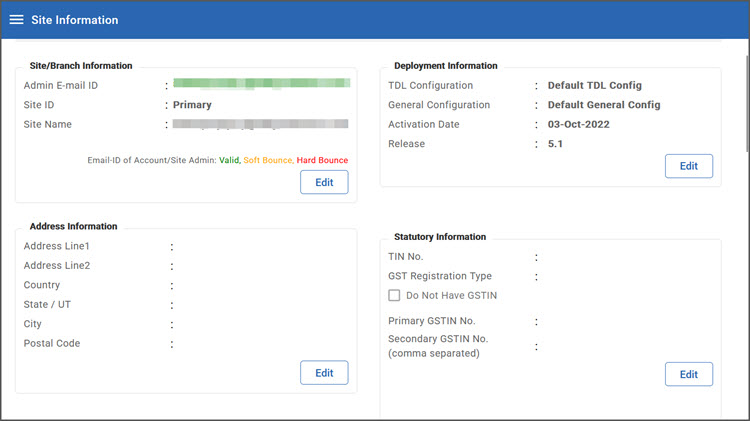
You can view your Site Information, as follows:
- Click EDIT under the required section to update the following information, as required:
- Site/Branch Information
- Deployment Information
- Address Information
- Partner Information
- Statutory Information
- Contact Details
- Click SAVE under each section.
Reject site license activation request
If you are an authorized license administrator and receive a site enablement request that seems suspicious or unreliable, you can reject the site license.
To reject the site license activation request,
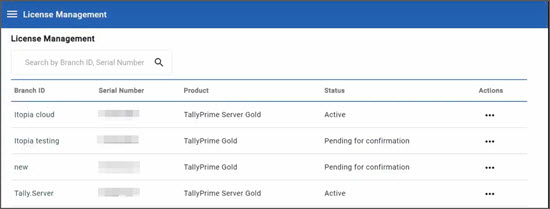
- Log in to the Customer Portal, and select Control Centre > Account Management > License Management.
- In the License Management screen, click the three horizontal dots under Actions for the particular Branch ID with status as Pending for confirmation to reject site license activation request.
- Click View/Edit Site Profile.
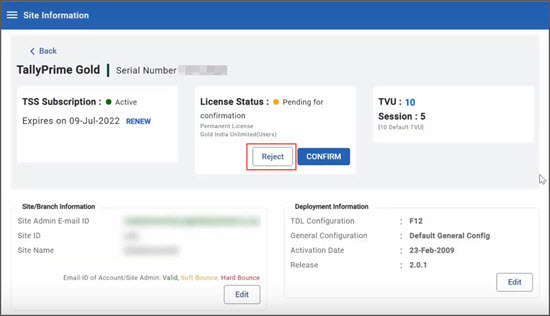
- In the Site Information screen, select Reject.
- Write your remarks in the Remarks section to highlight your reasons for rejection and select REJECT.
A message displaying successful site rejection will be displayed.
- Select OK to continue.
Once the site license is rejected, you can activate it again as a new license with a different site ID, if you believe it to be from a trusted source.
Activate Rejected Site License
Once you reject your site license, TallyPrime will open in Educational mode. However, you can activate the license again with a different site ID.
To activate the rejected site license in TallyPrime,
- Press F1 (Help) > Settings > License > Manage License.
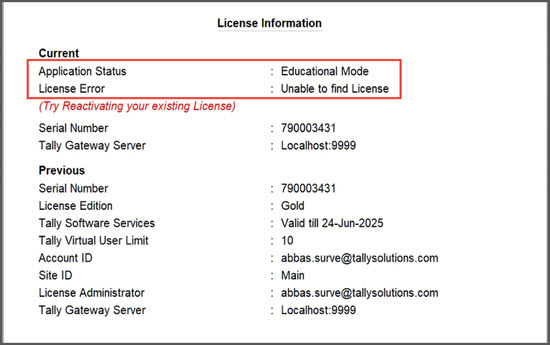
In the License Information screen, the Application Status will appear as Educational Mode and License Error as Unable to find License.
- Press F6 (Activate) to activate the license with a different site ID.
- Initiate license activation for Multi-Site.
- In the Activate License screen, press Alt+S (Multi-Site).
- Fill in your license details in the Activate Site License screen.
- In the Activate License screen, press C (Create New Site).
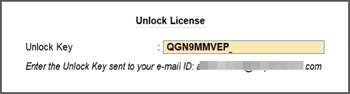
- In the Unlock License screen, enter the Unlock Key sent to your e-mail ID.
You will get a message confirming the successful activation of your license.
Now, you can confirm the license activation on the portal.
- Log in to the Customer Portal, and select Control Centre > Account Management > License Management.
- In the License Management screen, click the three horizontal dots under Actions for the particular Branch ID with status as Pending for confirmation to accept site license activation request.
- Click View/Edit Site Profile.
- In the Site Information screen, select CONFIRM.
- Write your remarks in the Remarks section to highlight your reasons for confirmation and select Confirm.
A message displaying successful site confirmation will be displayed.
- Select OK to continue.
Once the activation of the rejected site license is confirmed, you can start working on the licensed version of TallyPrime.
Change Administrator’s E-mail | Account Admin ID
In Control Centre, you also have permission to change the Account Admin ID.
- Under Control Centre > Account Management > click Change Account Admin.
- Provide the New Administrator E-mail ID.
Note: All the future communication related to your license and product will be sent to the new e-mail ID you have provided here.

User Management
In this section
Manage Tally.NET Users for your Company
In Control Centre, you can view or edit users from the existing list, delete a selected user, or change the status of the user.
- Under Control Centre, click User Management.
The Manage User screen displays the list of users, by default, including theNET ID, User Name, Security Level,andStatus. - Under Action, click … (ellipse).
- To view or edit the details of the selected user, click View/Edit User.
The Edit User screen is displayed. - You can:
- Change the Security Level
- Enable/disable the Tally.NET Services for the user
- Select the TallyPrime products for which the user has Tally.NET Service access.
- To delete the user, click Delete User.
You will be prompted, with the following message:
Click DELETE to proceed. - To change the status of the user, click Mark Inactive.
You will be prompted with the following message:
- To view or edit the details of the selected user, click View/Edit User.
Create a Tally.NET User
You can create as many Tally.NET User as per your business needs. Based on the security level you set for the users, the assigned users will be able to access your company data accordingly.
- Under Control Centre > User Management > Manage Users, click CREATE USER.
- In the Create User screen:
- Select the appropriate Security Level.
- Provide the Tally.NET ID.
Ensure that you have entered a valid e-mail ID. The password for the account ID will be sent to the same ID for logging in.
- Select the Enable Tally.NET Services check box to allow the user to access Tally.NET Services – such as Remote Access, Synchronisation, and Reports in Browser features in TallyPrime.
Manage Security Levels
In Control Centre, you can create new security levels assign them to the Tally.NET Users you have created for your company. Additionally, you can view or edit the existing users and their security levels.
- Under Control Centre > User Management > Security Levels.
In the Security Levels screen, you can view the list of existing security levels for your company. - Under Action, click … (ellipse).
- To view or edit the details of the selected Security Level name, click View/Edit.
The Edit User screen is displayed. - You can:
- Edit the Name the security level.
- Select the Facilities to be allowed.
- To view or edit the details of the selected Security Level name, click View/Edit.
- To create a new security level, in the Security Levels screen, click CREATE SECURITY LEVEL.
- In the Create Security Level screen, enter the Name of security level.
- Select the check box against the Facilities to be allowed and click the right-arrow (>) button.
- Click CREATE to create the security level. The following success message is displayed
TDL Management
Using Control Centre you can configure your customised solutions to the site or an account. To know more about configuring TDLs in your account click here
Report Access Management
Using Control Centre, you will be able to view the list of all the users available online. You can also view the history of user access for the last 15 days, the Companies the users were connected to, the Serial Numbers and so on.
In this section
Online Users
- Under Control Centre > Report Access Management, click Online Users.
The following Online Users screen is displayed:
Report Access History
- Under Control Centre > Report Access Management, click Report Access History.
The following Report Access History screen is displayed: