Set Up TallyPrime for Payments and Receipts Through Bank
Setting up TallyPrime for payments and receipts through a bank ensures that all the bank account details are in the company data. You can set up TallyPrime for seamless banking transactions.
Add Bank Account Details in Bank Ledger
To start with banking transactions in TallyPrime, you need to add your own bank account details in a bank ledger. This ensures that the payments are sent with all the required details and the payments made are accounted to a specific bank ledger.
In a bank ledger, you can also:
- Allocate cost centres in the bank ledger.
- Set up the ledger for e-Payments.
- Set up the ledger for Bank Reconciliation.
- Configure bank ledger for Cheque Printing
- Configure Bank Ledger to Record Receipts for Uncertain Banks.
Enhance Efficiency with Bank Account Details in Party Ledgers
Instead of specifying party’s account details while recording transactions, you can specify party’s bank account details in the party ledger. This ensures minimal data entry while recording the transactions.
In the party ledger, you can also add multiple bank account details of your party.
What’s more, you can quicken your data entry process by importing party account details through an MS Excel file, reducing the need for data entry.
Set up TallyPrime for Connected Banking
To use Connected Banking, you will need to register for Connected Banking using your Tally.NET ID. Thereafter, you can connect your bank accounts to TallyPrime in order to use the Connected Banking features.
To know more, refer to Enable Connected Banking in TallyPrime.
Security Control
To ensure that only specific users can access your banking transactions, you can specify security control for Connected Banking and e-Payments.

Before configuring ledgers for payments and receipts, you need to ensure that you can view the list of all banks. To do so, you need:
- A valid TSS
- Internet connection
Maintain Your Bank Account Details | Create/Alter Bank Ledgers
While you can update the bank details during ledger creation, you can alter the ledger any time in case any updates are required.

- Create the Bank Ledger.
- Press Alt+G (Go To) > Create Master > type or select Ledger, and press Enter.
- Enter the Name of the bank for the bank ledger.
- Select Bank Accounts from the List of Groups, in the Under if you are creating the Bank Ledger for Savings/Current account.
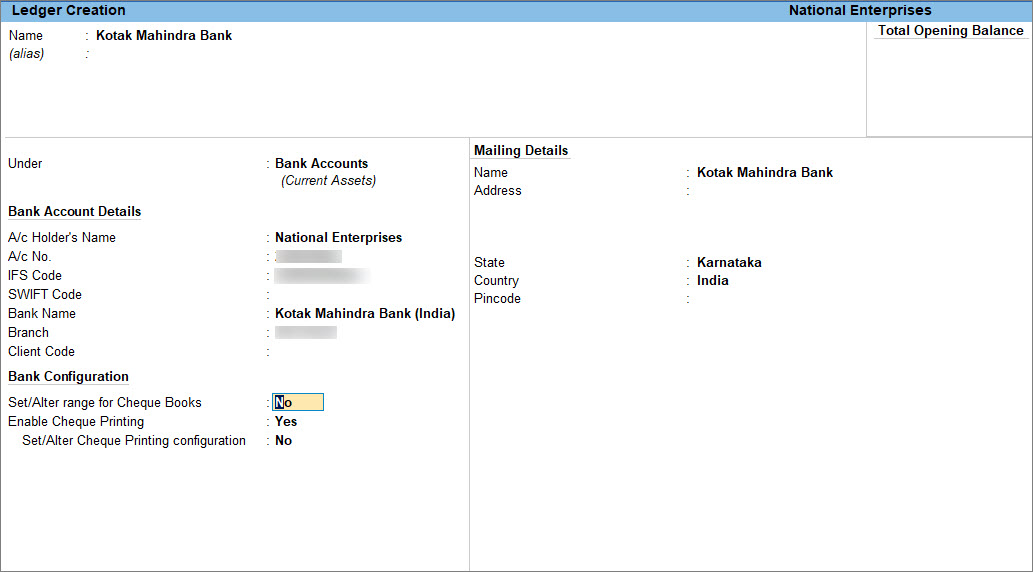
- Update Bank Account Details.
- A/c Holder’s Name: It prefills the company name; however, you can alter this name by pressing Backspace.
- A/c No.: Provide the account number of your bank.
- IFS Code: Provide the IFS code for your bank.
An IFS code follows a unique format prescribed by each bank. Therefore, you will need to enter the code in that specific format. If not, you will be prompted with a warning message, with the correct format of the code. - SWIFT Code: Applicable for international bank payments.
- Bank Name: Select the bank name from the List of Banks.
The List of Banks is displayed only when TSS and internet connectivity are available. Additionally, the bank configurations depend on the bank you select.
- Branch: Provide the Branch name of the bank.
- BSR Code: Provide the BSR code for your bank.
BSR code is applicable for bank transactions related to TDS. Therefore, you will see this option only if you have enabled TDS for your company in Company Features.
- Client Code: This is a unique code given by the bank to their customer as an identifier.
Client Code will be displayed only when Bank Name is selected as Kotak Mahindra Bank (India), Bank of Baroda (India) or Yes Bank and its a mandatory field in payment instruction file.
In case of Yes Bank this is mandatory field in payment instruction file in Delimited (|) format.
- Update Bank Configuration.
- Provide other necessary details, and press Ctrl+A to save the ledger.
Tracking of Payments and Receipts from Various Cost Centres
While making a payment, you can allocate amounts to specific cost centres for tracking. Enable the Cost Centre feature and configure the Bank Ledger to enable cost centres, if not already done.
- Enable the Cost Centre feature.
- Press F11 (Features) > set Enable Cost Centres to Yes.
- Enable Cost Centres for Ledger.
- In the Ledger Creation/Alteration screen for Bank Ledger, press F12 (Configure).
- Enable Apply Cost Centres for Ledgers.
- Press Ctrl+A to accept the configuration.
- Press Ctrl+A to save the ledger.
If you need to apply a cost centre for one specific ledger, press Ctrl+I (More Details) > set Cost centre applicability to Yes.
After you enable the cost centre feature for your bank ledger, you can allocate the payments and receipts to the respective cost centres and track them.
Configure Party Ledgers
You can pay your party by cash, cheque, or online transfer. In TallyPrime, you can:
- Configure party ledgers with bank account details, so that you can do seamless e-Fund or cheque transactions, as applicable.
- Add or update bank details when creating the party ledger, or later by editing it.
- Save multiple bank accounts for one party.
- Add bank details one by one or import many at once from Excel.
This helps you generate payment instructions in the format your bank needs.
- In the Ledger Creation/Alternation screen, under Banking Details, enable Provide bank details.
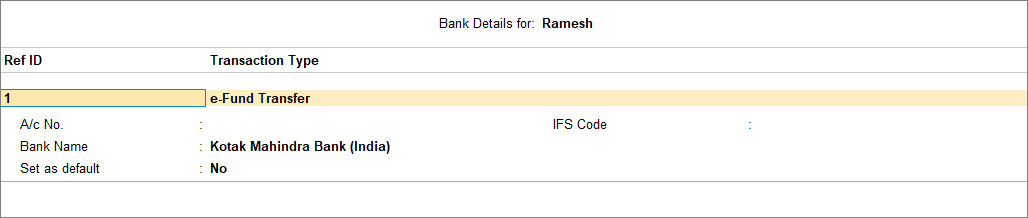
- In the Bank Details screen, specify the necessary details.
- Ref ID: Specify the reference ID.
- Transaction Type: select e-Fund Transfer.
- A/c No: Valid account number of the party.
- IFS Code: Specify IFS Code of the party’s bank.
- Bank Name: Select from the List of Banks
- Set as default: Enable this option to set the bank as a default option.
- Press Ctrl+A to save the screen.
- Press Ctrl+A to save the ledger.
To add multiple bank details manually to a party ledger, press F12 (Configure) > enable Allow multiple beneficiary details.
You can import bank details in bulk for your party from MS Excel which reduces the time and effort to update the details manually.
Import Beneficiary Details in Bulk
Importing beneficiary details in bulk in TallyPrime provides you with a great experience with banking, especially for e-payments.
You can save the required bank details of your vendors or employees in one place, and easily import them to TallyPrime as a one-time activity.
In this section
Update beneficiary details in MS Excel
TallyPrime provides you with a sample MS Excel with the columns required to update the details of the beneficiaries. You can download the sample file from the import menu and update the details in .xlsx format.
- Press Alt+O (Import) > Bank Details.
- Press Alt+B (Payee Sample file), if you want to download the Payee Sample file.
If you want to download the Employee Sample file, then press Alt+H (Emp. Sample file).
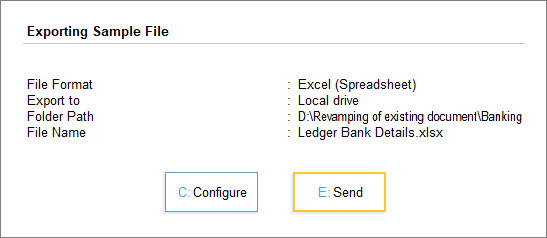
- Press E (Send) to save the sample file in your desired folder.
If you want to change the folder path or other settings, then press C (Configure) before saving the file. - Enter the details of your beneficiaries and ensure that the Ledger Name in the Excel sheet matches the name of the ledger in TallyPrime.
A filled-in Payee Sample file will appear as shown below. You can add multiple bank details of the same party and provide Ref ID for each account detail.

Import beneficiary details to TallyPrime
Once the MS Excel file is ready with the beneficiary details, you can import it to TallyPrime.
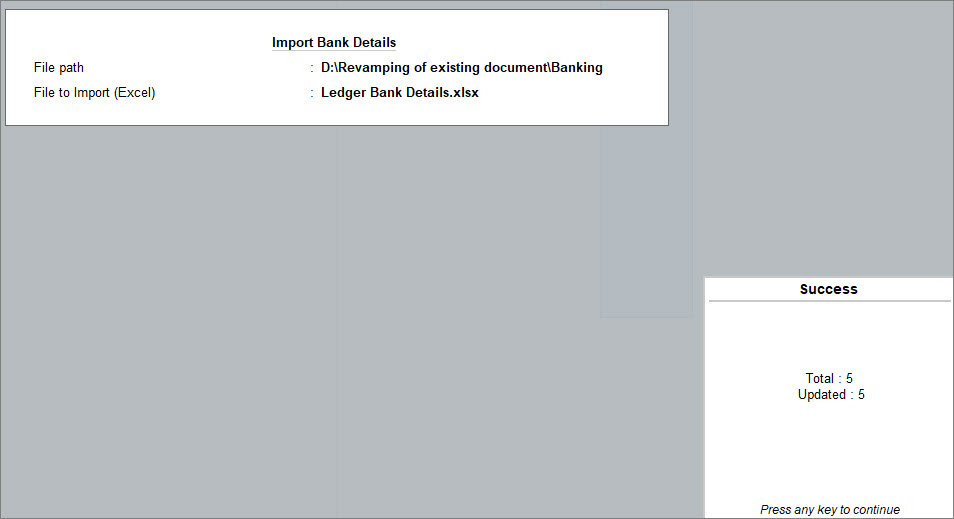
- Press Alt+O (Import)> Bank Details. The Import Bank Details screen opens.
- Specify the File path and the File to Import (Excel).

- Press Enter to import the beneficiary details. The following success message will appear after import:
You can open the respective party/employee ledger if you want to verify the details.
- Press Alt+G (Go To) > Alter Master > type or select Ledger and press Enter.
- Provide bank details: Yes.
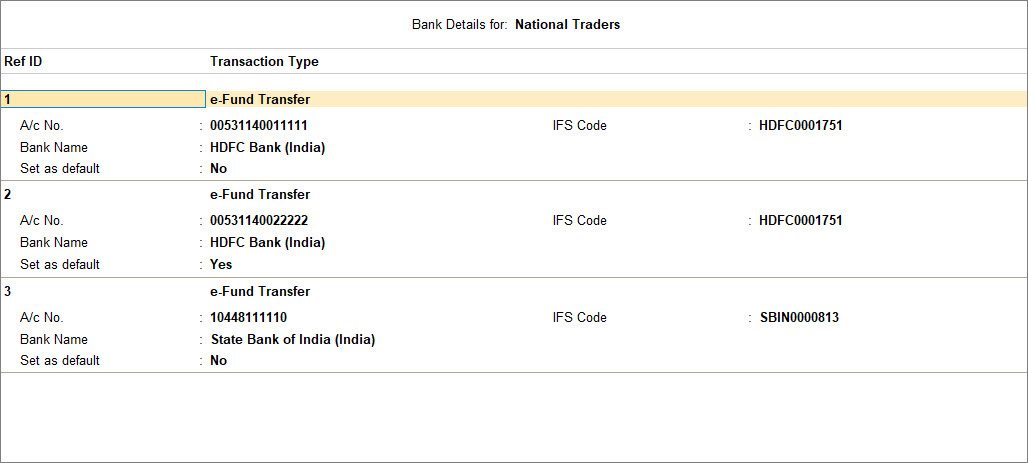
After the import of details in bulk, all the bank details maintained in Excel are updated in the party ledger. You can manually verify if the details are updated correctly.
Allow or Restrict Users from Performing Bank-Related Tasks | Security Controls
You can allow or restrict users from performing specific tasks related to banking.
Security for e-Payments
If you want your data entry operator to have no access to the e-Payments related reports, as it might have a complete view of financial data, then you can disallow the user to view and use the e-Payments reports.
To know more, refer to Security for e-Payments.
Security for Connected Banking
You can restrict certain users from accessing the Connected Banking facilities. For instance, you might not want a certain set of users to get the latest Bank Balance. You can restrict the users from doing so.
For instance, you may want to disallow data entry operators from viewing balance as per bank in Dashboard.
- Press Alt+K (Company) > User Roles > Data Entry.
- Under Disallow the Following Facilities, select Balance as per Bank – Connected Banking (Tile) and press Enter.
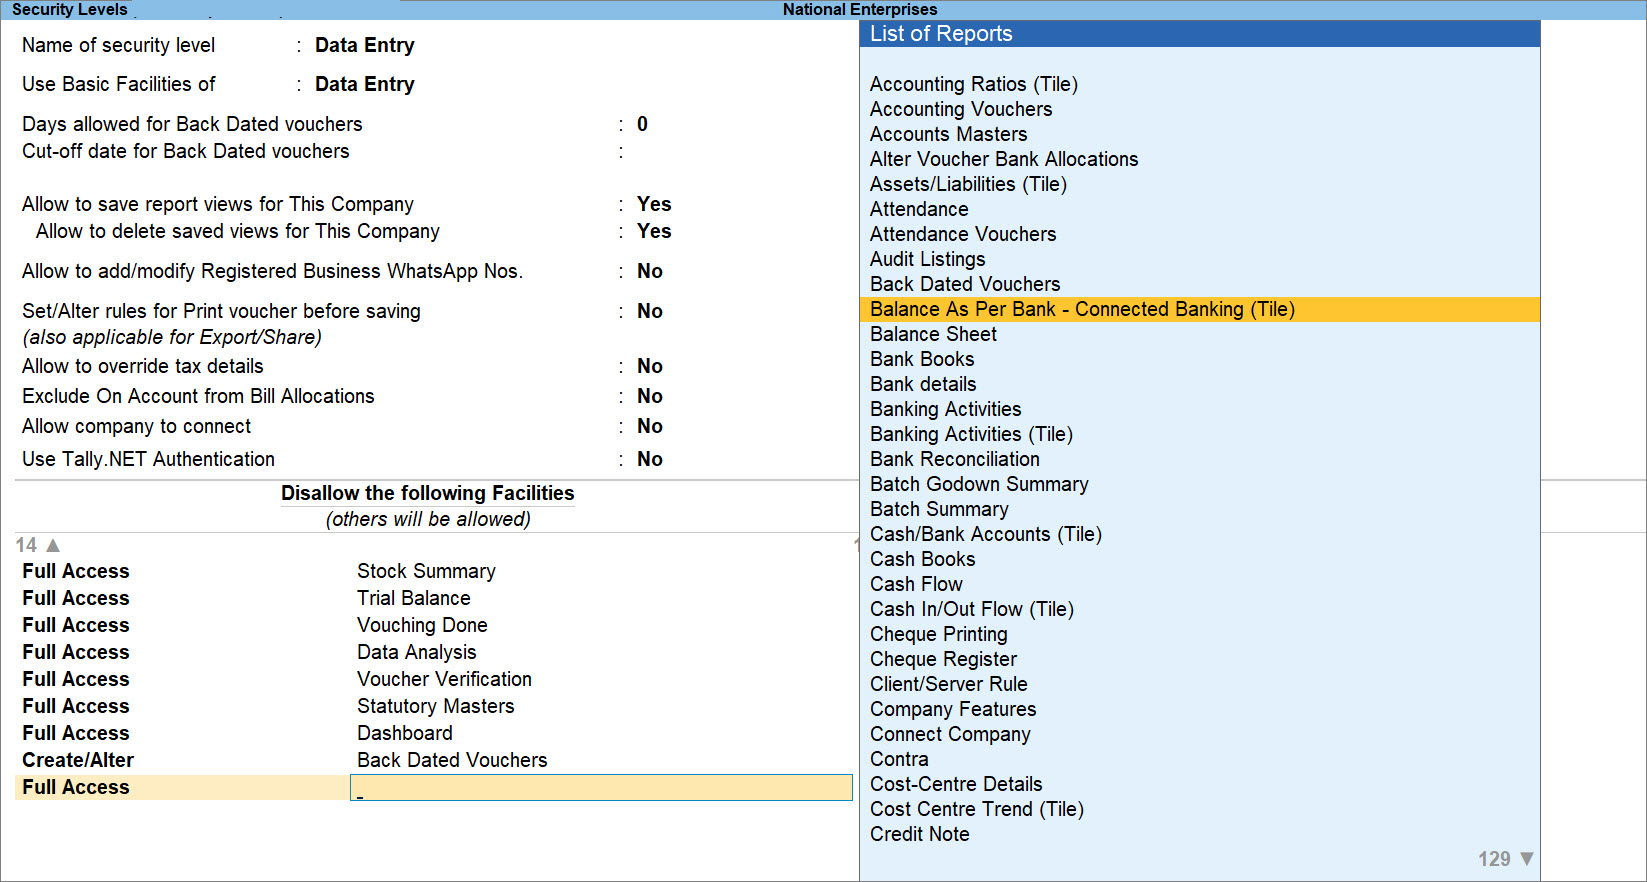
- Press Ctrl+A to save.
Questions & Answers
- How does TallyPrime handle payments when a party has multiple bank accounts?
Enable Allow multiple beneficiary details and mark one account as Set as default to make it the preferred bank account for transactions.
- Can I import beneficiary bank details for multiple vendors in one go?
Yes, you can download the sample Excel file and update beneficiary details, and import it through Alt+O > Bank Details.
- Why is the Client Code field visible only for certain banks?
Client Code appears only for Kotak Mahindra Bank, Bank of Baroda, and Yes Bank, where it is required for payment instruction files.
- Can I track bank payments by cost centre?
Yes, you can track bank payments by cost centre.
- Can I restrict users from viewing bank balances without blocking all banking features?
Yes, security controls let you restrict access to specific Connected Banking functions, such as the Balance as per Bank tile.
- Why can’t I see the List of Banks while configuring a bank ledger?
The List of Banks is available only when TSS is active and internet connectivity is available.