
Auto Wrap Text in Masters, Vouchers & Reports
Auto Wrap Text enhances the readability of long text entered in vouchers, masters, and reports. This ensures that text appears clearly not only during data entry and report viewing but also while printing, exporting, or sharing the details.
Moreover, you have full control over how the text is displayed. Auto Wrap Text will be enabled by default, and you have the option to disable it at any point.
- Press F1 (Help) > Settings > Display.
- Enable Auto Wrap Text.
- Press Ctrl+A to save the configuration.
Now let us see how Auto Wrap Text brings a real difference in readability.
In masters

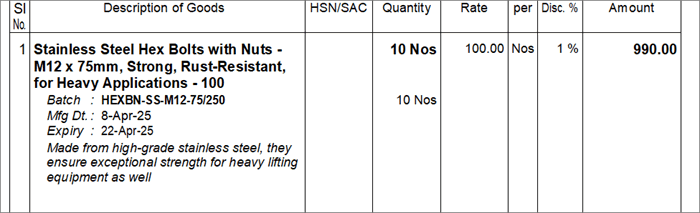
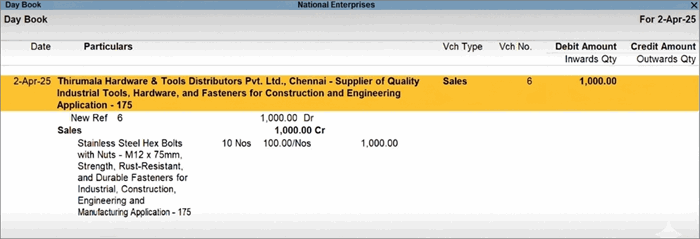
With Auto Wrap Text, you can see that the long text automatically rolls over in entry fields, resulting in clearer content.
In transactions
![]()
In print
In reports
In this way, Auto Wrap Text brings in improved clarity and readability of long text.
Customise Auto Wrap Text for Print, Export & Share
You have the option to further customise the Auto Wrap settings for print, export, and share.
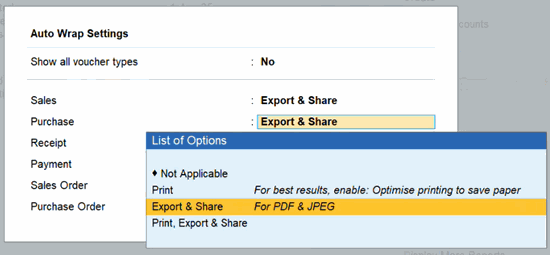
- Press Alt+P (Print) > Configuration.
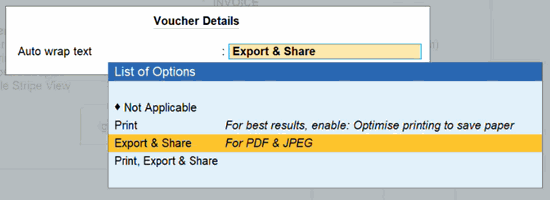
- Enable Auto wrap text in vouchers:
- Select the voucher type for which you want to apply Auto Wrap Text.
- Select the mode, such as Print or Export & Share, in which you want to apply Auto Wrap Text in vouchers.
If you select Not Applicable, then Auto Wrap Text won’t be applied for the selected voucher type.
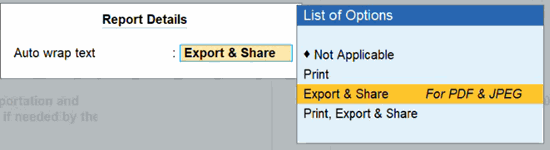
- Enable Auto wrap text in reports:
Select the mode, such as Print or Export & Share, in which you want to apply Auto Wrap Text in reports.
- Enable Optimise printing to save paper. This will ensure the best reading experience along with Auto Wrap Text.
- Press Ctrl+A to save the configuration.
Similarly, you can set the options for Export (Alt+E) & Share (Alt+M). But do note that for Export and Share, Auto Wrap Text works only in PDF and JPEG files.
Customise Auto Wrap Text in Specific Vouchers & Reports
You can also configure Auto Wrap Text directly in the required vouchers and reports. For example, if you want to apply this in your sales voucher, then you can open the voucher and directly configure Auto Wrap Text.
- Open the transaction and press Ctrl+P.
- Press C (Configure) and enable Auto wrap text (For Print/Export/Share).
- Select the mode, such as Print or Export & Share, in which you want to apply Auto Wrap Text.
Similarly, you can directly configure Auto Wrap Text in reports such as Stock Summary or Day Book.
Questions & Answers
- Does Auto Wrap Text work while printing, exporting, or sharing reports and invoices?
Yes. Once enabled, Auto Wrap Text helps in data entry, report viewing, and also while printing, exporting, or sharing invoices, transactions, and reports. - Can I control where Auto Wrap Text is applied (for example, only for print or export)?
Yes, you can enable Auto Wrap separately for vouchers and reports and choose the modes (Print or Export & Share) where it should apply. - For export, print, or share, how do I enable Auto Wrap Text for specific voucher types only?
Under Auto Wrap Settings, select the voucher type and the mode (Print or Export & Share). If you select Not Applicable, Auto Wrap will not apply to that voucher type. - For export, print, or share, can I set Auto Wrap Text directly from a voucher screen like Sales?
Yes. Open the transaction, press Ctrl+P, then C (Configure), enable Auto wrap text (For Print/Export/Share) and select the desired mode. - How do I use Auto Wrap Text in specific reports for export, print or share?
Open a report like Stock Summary or Day Book, press Ctrl+P and enable Auto Wrap Text for the applicable mode (Print or Export & Share). - Can I disable Auto Wrap Text later if I don’t want it?
Yes. Press F1 (Help) > Settings > Display and disable Auto Wrap Text. You can also mark specific voucher types or modes as Not Applicable in the configuration. - The text appears compressed after multiple lines of Auto Wrap. How can I clearly view the text?
In such cases, you can hover or place the cursor on the field. The complete text will be displayed via a tooltip for easy readability.


