
Set Up TallyPrime for Data Synchronisation
For data synchronisation in TallyPrime, you will need to do a few initial setups in TallyPrime to ensure smooth exchange of the data, as needed.
Before you begin | Prerequisites
Ensure your client and server meet the following system requirements:
- A minimum 1.8 GHz 64-bit (x64) architecture processor (Core2 Duo, Dual Core, Core i3, Core i5, Core i7 equivalent, or above) with Microsoft Windows 7, Windows Server 2008 R2, or above.
- A minimum RAM size of 4 GB on both server and client.
- Broadband Internet connection with a minimum internet speed of 256kbps.
- Public IP on Server in case of Direct IP Synchronization. The IP must be static.
For one-way sync (client to server), perform the following steps on the server. For two-way sync, set it up on both machines, as they act as server and client for each other.
Enable services for the Company
- Press F11 (Company Features)
- Set Enable Tally.NET Services for Remote Access and Synchronisation to Yes.
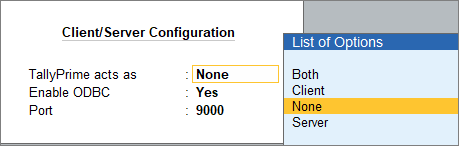
Set Up Client/Server Configuration
- Press Alt+Z (Exchange) > Configure > Client/Server Configuration.
- Configure the company as Both (Client & Server) in TallyPrime on both machines.
- Select Client: In the client system, for one-way (client-to server) sync.
- Select Server: In the server system, for both-way sync.
- Specify the required Port (for example: 9000).
These details will be displayed in F1 (Help) > About > Connectivity and Tally Gateway Server. - Save the configuration and restart TallyPrime to apply the changes.
Enable Security for the Company
Perform this step this only if user control security isn’t enabled for your company. You can follow the steps below or do it while connecting to Tally.NET Server in step 4.
- On Gateway of Tally, press Alt+K (Company) > Alter.
- Set Control User Access to Company Data as Yes.
- Enter Username and Password, confirm the password, and press Ctrl+A to save the details.
Connect Company to the Tally.NET Server for Synchronisation
- Press Alt+K (Company) > Connect under ONLINE ACCESS.
- Select the Company to connect and press Ctrl+A to save.
You can check the connection status from F1 (Help) > Troubleshooting > Event Log. The company once connected appears with an indicator on the Gateway of Tally screen.
Set up User Security
This section is optional. If you wish to set up specific user rights for synchronisation, you can do so in TallyPrime.
- Synchronisation: – You can allow or disallow a user to perform data synchronisation from the client or server company.
- View Synchronisation Reports: You can allow or disallow a user to view synchronisation reports.
- Manage Synchronisation Rule: You can allow or disallow a user to create/alter/delete the client or server rules at the client or server company.
To allow selective rights to users, you need to specify their rights using security level while creating users. For more information on adding/removing the tasks for the required security level, see Manage Users.


