
User Management in TallyPrime
The data you store in TallyPrime, including company details and business transactions, is securely protected. Enhancing this security is possible by implementing a username and password requirement. Access to your business data is restricted to your employees possessing these specific credentials. The creation of users with varying degrees of access privileges simplifies the management of user permissions. Further, you can change the user role or remove the user as required. User management ensures the safety of your company’s information while facilitating the accurate recording of relevant business transactions.
To keep track of user actions like adding, modifying, or deleting transactions, or if you want specific users to have comprehensive data access, you must create usernames and passwords for each user and assign appropriate permissions. For instance, you can grant voucher entry permissions exclusively to data entry operators while restricting their access to reports and backdated vouchers. For accountants, you might provide complete data entry permissions and access to specific reports.
In TallyPrime, if multiple users need to access your company information, you can assign role-based security rights to them. By default, TallyPrime offers two security levels: owner and data entry operator. Users with owner credentials can access all data, manage security settings, create and update user profiles, and more. Conversely, data entry operators can record vouchers, view specific reports, and perform related tasks. When you use owner credentials to access the company, you can add new users, modify existing user details, revoke user access, adjust permissions for different users within the company, and more.
Set Up Administrator/Owner Credentials
As a business owner, you want to protect your company data. Before you can set users in TallyPrime and their user roles, you have first to set the administrator credentials for your company. For example, the administrator has the privilege to create users for the company, or you may provide administrator access for one of your employees.
![]()
- Press Alt+K (Company) > Create/Alter.
The Company Creation/Alteration screen will open. - Set the option Control User Access to Company Data to Yes.
- Set the Username (Administrator) and Password. This user will have the administrator/owner privileges.
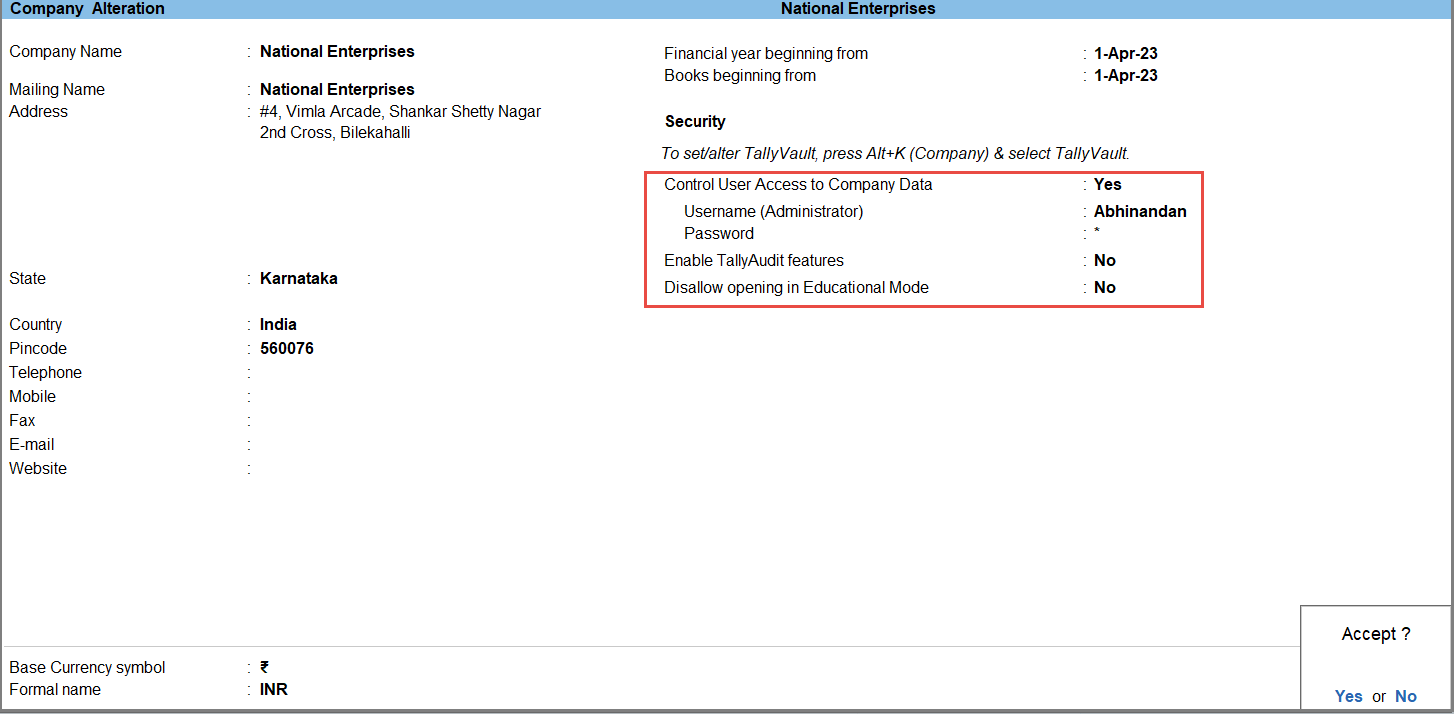
- As always, you can press Ctrl+A to save.
Now when you press Alt+K (Company), you can see the user options under the User Management section.

Set Up User Credentials
TallyPrime provides two default security levels: owner and data entry operator. The owner possesses full access to all data, enabling the configuration of security settings, user information management, and so on. Conversely, the data entry operator is limited to recording vouchers, viewing specific reports, and similar functions. As the owner, you also have the capability to extend the user list, edit current user credentials, delete users, and adjust permissions for various users within your company.
![]()
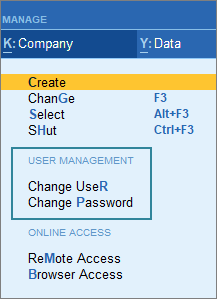
- Press Alt+K (Company) > Users and Passwords.
The Users for Company screen will appear. - Select the User Roles for the users that you want to create. For example, Owner, Data Entry, and so on.
- Enter the relevant Username and Password.
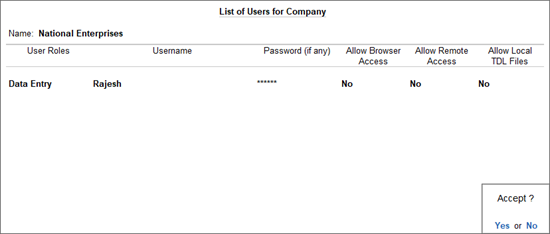
- As always, you can press Ctrl+A to save.
Password Policy
Through the Password Policy feature, you can enable supplementary choices for passwords, including enhancing password strength and setting password expiration intervals. Furthermore, you can authorise specific users to independently modify their passwords.
- Press Alt+K (Company) > Password Policy.
The Password Policy for Company screen appears, as shown below:
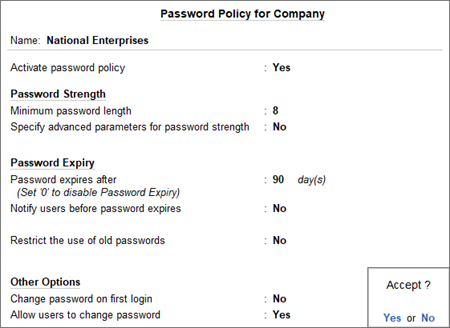
- Enable the required options, and press Ctrl+A to accept the screen.
Change User
Once the necessary user accounts have been established in the Users and Passwords system, as demonstrated in the previous section, Rajesh, a data entry operator, is now able to access the company’s resources.
- Press Alt+K (Company) > Change User.
The Change User screen appears.
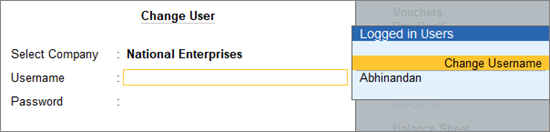
- Enter Username and Password.
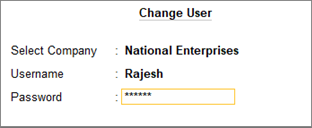
In accordance with the Password Policy, Rajesh, the Data Entry operator, has been granted the privilege to independently establish his password. Consequently, when Rajesh logs in, he will encounter the option to modify his password.
Remove Users/Security Levels
You can remove the security levels provided for users when they are not needed.
![]()
- Press Alt+K (Company) > Users and Passwords.
The Users for Company screen will appear.
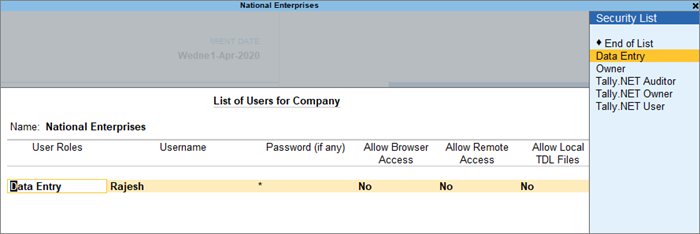
- Place the cursor on the Security Level that is not needed.
- Press Spacebar to remove it and select End of list.
- Repeat this to remove the security levels that are not required.
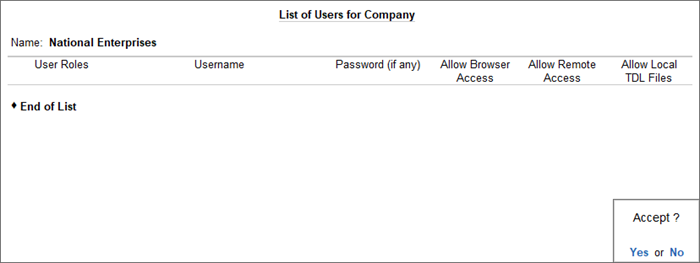
- As always, you can press Ctrl+A to save.
Get Familiar with Security Levels and User Roles
If you wish to track the actions of users who have inserted, modified, or removed transactions, or if you intend to grant specific users within TallyPrime complete access to the data, it will be necessary to generate individual usernames and passwords for these users. Subsequently, you can allocate the appropriate permissions based on their roles.
In this section
- Set up User Rights for Individuals
- Set up User Rights for User Roles
- Configure Security Rights Based on Scenarios
- Configure Security Rights for Vouchers
- Configure Security Rights for Back Dated Vouchers
- Configure Security Rights for Reports
- Configure Security Rights for Restricting Alteration of Stock Item Rates
Set Up User Rights for Individual
As an administrator, you can create a user and assign necessary permissions for various aspects such as vouchers, reports, adjustments to stock item rates to the user.
![]()
- Press Alt+K (Company) > User Roles. The Security Levels screen appears.
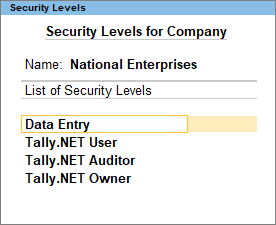
The available Security Levels, including Owner, Data Entry, and others, are visible. You have the option to retain these names or input alternative names of your choice. For instance, if your data entry operator name is Rajesh, you can edit Data Entry as Rajesh or go to the end of the list and press Enter to accepting the changes. - In the Security Levels screen, assign the relevant rights to Rajesh.
- Select Data Entry in the Use Basic Facilities of option, as Rajesh is a data entry operator.
- Days Allowed for Back Dated Vouchers: By default this field is set to 0. Enter the required number of days. Modifications or additions of backdated vouchers are permissible within the specified timeframe following the date of the most recent voucher entry.
- Cut-off date for Backdated vouchers: You can specify the required date. TallyPrime does not allow you to record a transaction prior to the date mentioned. This can be used in addition to Days Allowed for Backdated Voucher. This input will be useful in situations where you have completed the audit and do not want any changes in the data.
- Set/Alter Rules for Print Before Save: Use this option to prevent the printing of certain voucher type before saving the voucher, or restrict the printing all the available voucher types before saving the vouchers.
- Allow to override tax details: Set this to Yes if you need to allow the user (Rajesh) to override the tax details.
- Exclude On Account from Bill Allocations – If you set this to Yes, then the user will not get the On Account option in the list of bill-wise reference types.
- Exclude New Number from Item Allocations – If you set this to Yes, then the user will not have the option to select a new number in tracking and order references.
- Allow company to connect – Set this to Yes if you need to connect the company to the Tally.NET Server.
- Under Disallow/Allow the following facilities, select the Type of Access (such as Full Access, Create, Alter, and so on) and List of Reports (such as Accounts Masters, Balance Sheet, and so on) as required.
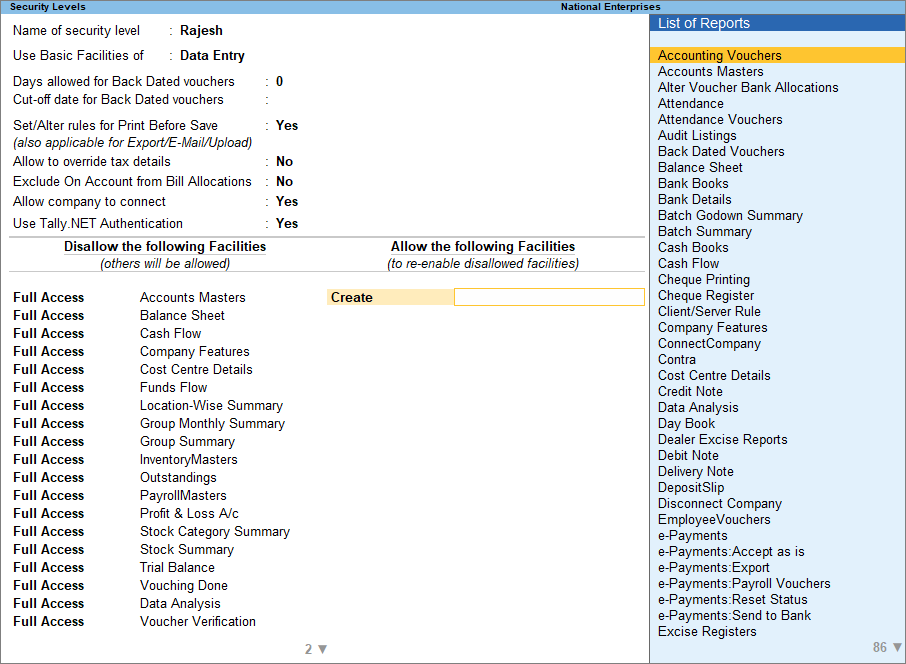
- Accept the Security Levels screen.
The user is created with the assigned security privileges.
Set Up User Rights for User Roles
As an administrator, you have the capability to establish security privileges for various aspects such as vouchers, reports, adjustments to stock item rates, and more. It’s possible to provide restricted permissions or rights, allowing them solely to observe Back Dated vouchers and Statutory Reports, while constraining their authority to create or modify them.
If you prohibit the creation and modification of reports, you will lose the ability to drill down into reports such as the Day Book, Trial Balance, Profit & Loss Account, and others. They will also be unable to make any updates to the report, such as Bank Reconciliation. Nevertheless, the user will retain the capability to view the vouchers within the report in Display mode by using the shortcut Alt+Enter.
There might be instances when you need to prevent users from changing the rates of stock items after the price list has been established. This ensures that when an invoice is created, it will bypass the rate field and instead utilize the rates specified in the price list.
Under such circumstances, if a user attempts to alter something for which they lack the necessary permissions, they will receive an error message as notification.
![]()
- Press Alt+K (Company) > User Roles.
The Security Levels for Company screen appears. - Select the appropriate Security Level from the List of Security Levels and press Enter.
- Enter the Security Levels details.
- Enter the user role in the Use Basic Facilities of field by selecting from the Security List.
The Name of security level field is prefilled with the security level that you have provided or selected the existing security level under the List of Security Levels on the Security Levels for Company screen. - Enter the other required fields in the Security Levels screen, as applicable.
- Enter the user role in the Use Basic Facilities of field by selecting from the Security List.
- Under Disallow/Allow the following Facilities, select the Type of Access for the relevant items.
- Select End of List to come back to the Security Levels for Company screen.
- As always, you can press Ctrl+A to save.
Configure Security Rights Based on Scenarios
Security levels can be configured to allow or disallow access to a feature. Different types of access privileges can be assigned to a feature, including Full Access, Create, Alter, Display, Print, and Preview.
Let’s dive into certain scenarios that you might encounter in the course of managing your business and how TallyPrime can assist you in establishing security levels according to user roles.
Configure Security Rights for Vouchers
Scenario 1: Allow only viewing of the vouchers.
- Enter details under the Disallow the following Facilities column.
- Select Full Access> Vouchers.
- Enter details under the Allow the following Facilities.
- Select Display> Vouchers.
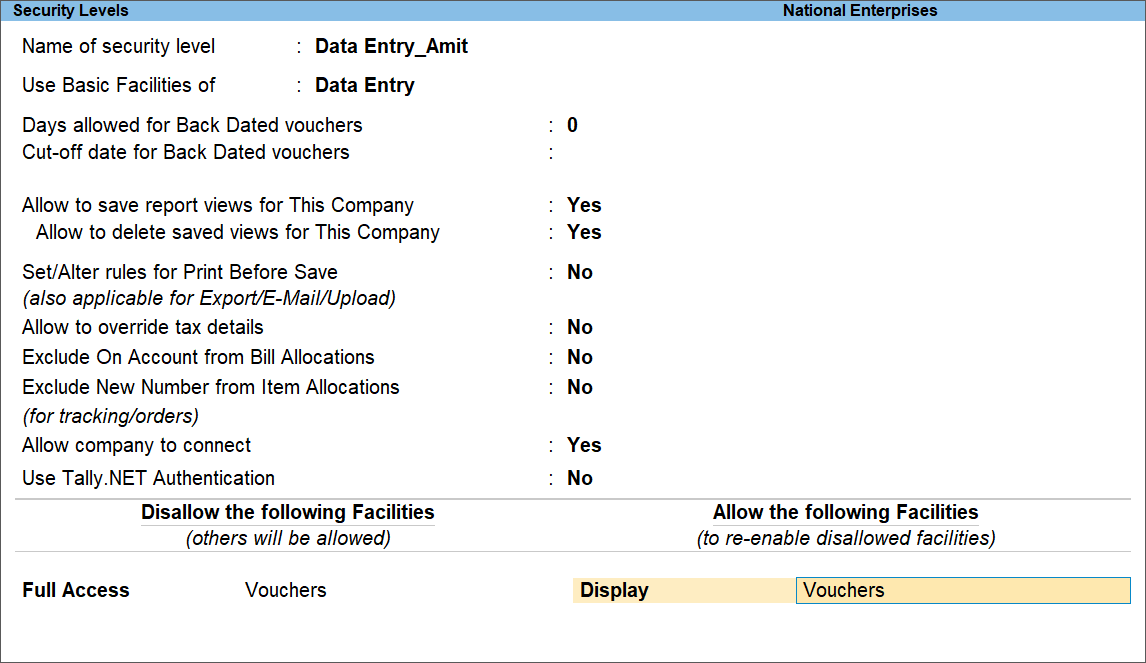
- Select Display> Vouchers.
Scenario 2: Allow creation and alteration of current dated vouchers.
- Enter the details under the Disallow the following Facilities column.
- Select Full Access > Vouchers.
- Enter details under the Allow the following Facilities
- Select Create/Alter > Vouchers.
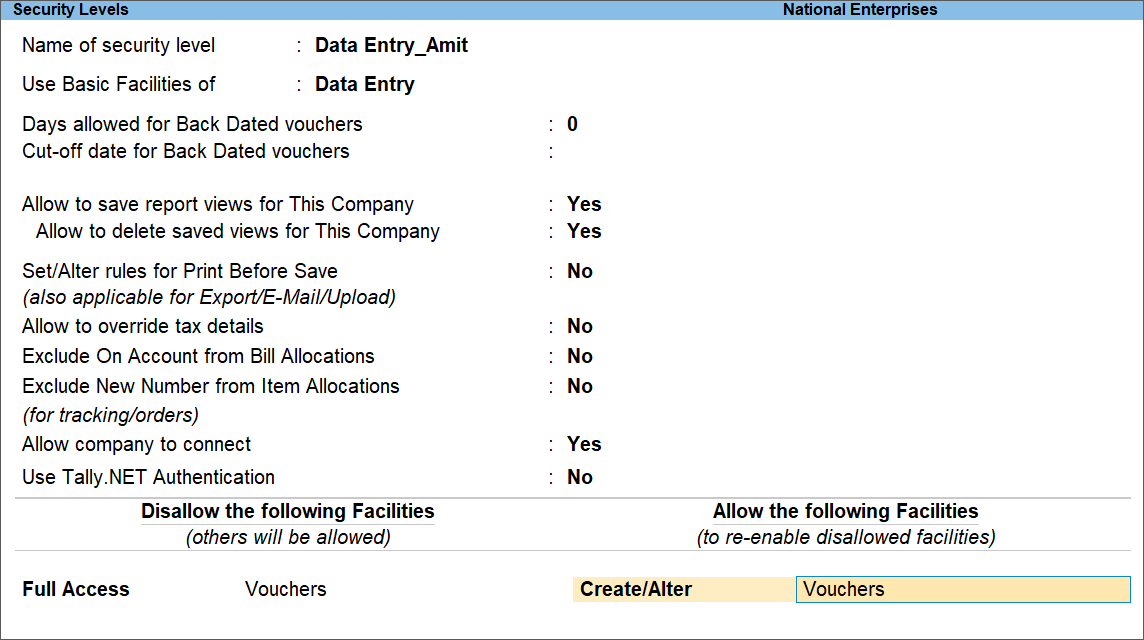
- Select Create/Alter > Vouchers.
Configure Security Rights for Back Dated Vouchers
Scenario 1: Allow viewing and printing of Back Dated vouchers.
- Enter details under the Disallow the following Facilities column.
- Select Full Access> Back Dated Vouchers.
- Enter details under the Allow the following Facilities
- Select Display/Print> Back Dated Vouchers
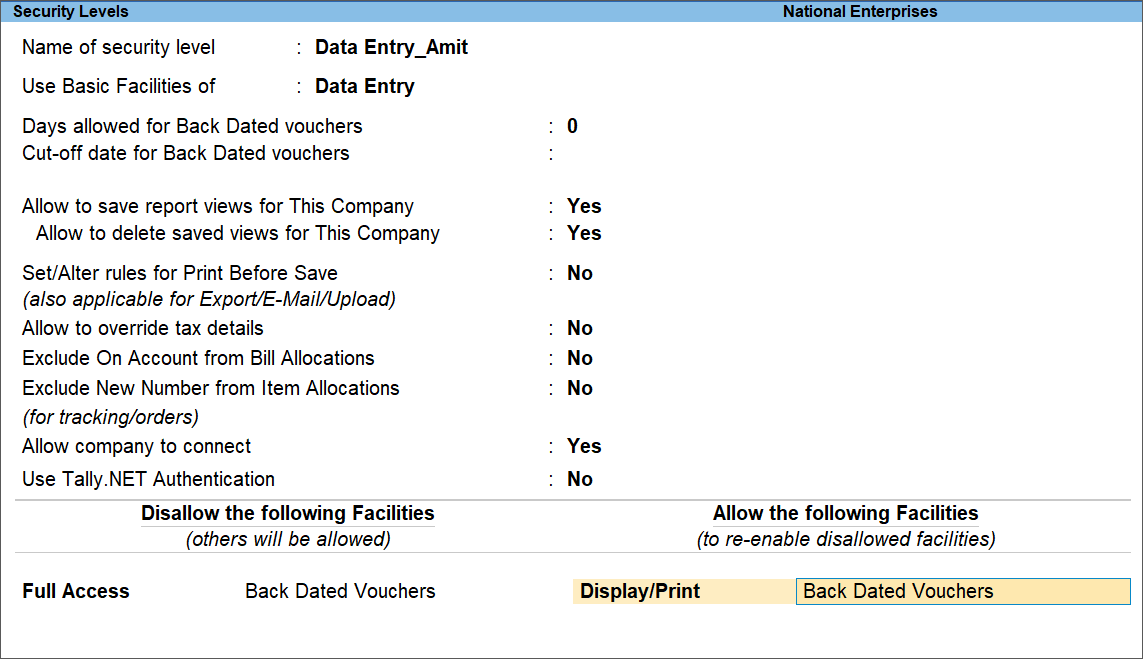
- Select Display/Print> Back Dated Vouchers
Scenario 2: Allow alteration of Back Dated vouchers and disallow creation of Back Dated Vouchers.
- Enter details under the Disallow the following Facilities column.
- Select Full Access > Back Dated Vouchers
- Enter details under the Allow the following Facilities
- Select Alter > Back Dated Vouchers
Configure Security Rights for Reports
Scenario 1: Allow viewing and printing of Reports.
- Enter details under the Disallow the following Facilities column.
- Select Full Access > select any specific report such as Day Book, Trial Balance, Profit & Loss A/c, Payroll Reports, and so on.
- Enter details under the Allow the following Facilities column.
- Select Display/Print > select specific report to view and print such as Day Book, Trial Balance, Profit & Loss A/c, Payroll Reports, and so on.
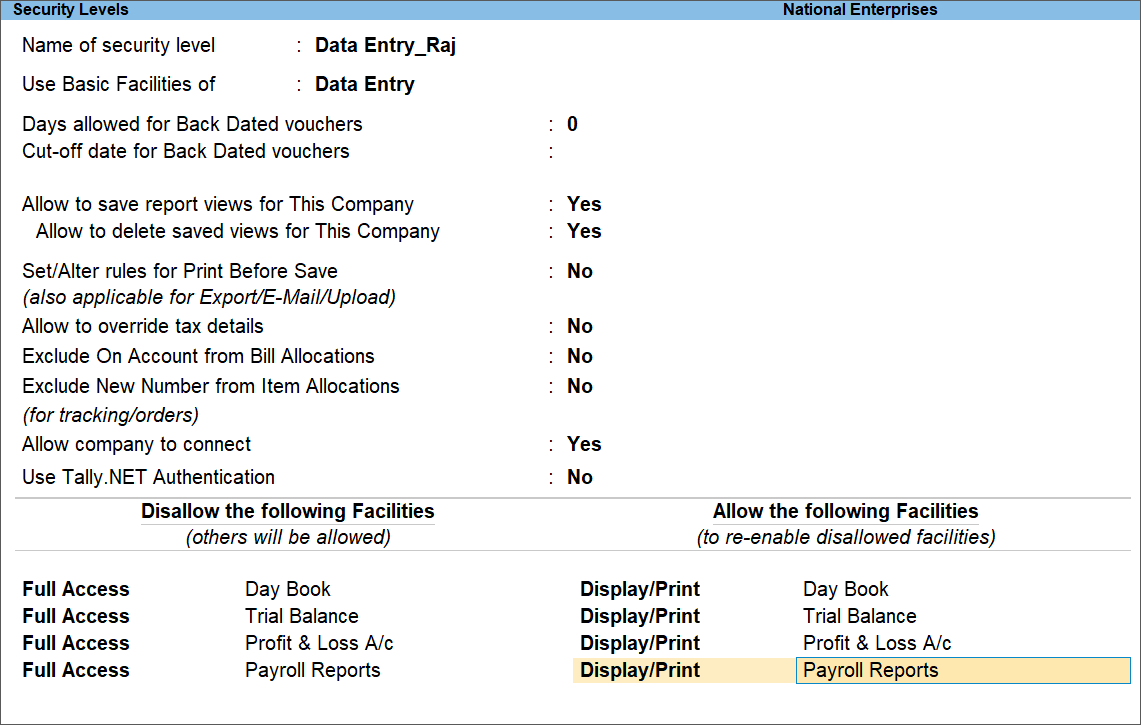
- Select Display/Print > select specific report to view and print such as Day Book, Trial Balance, Profit & Loss A/c, Payroll Reports, and so on.
Similarly, you can also configure Security Rights for Statutory reports and Inventory reports based on the user roles.
Scenario 2: Allow viewing and printing of Statutory Reports.
- Enter details under the Disallow the following Facilities
- Select Full Access > select any specific statutory report such as TCS Reports, TDS Reports, Service Tax Reports, and so on.
- Enter details under the Allow the following Facilities
- Select Display/Print > select any specific statutory report to view and print such as TCS Reports, TDS Reports, Service Tax Reports, and so on.
Configure Security Rights for Restricting Alteration of Stock Item Rates
Before restricting users from altering stock item rates, it is essential to create a price list with various price levels for the respective stock items. This ensures that when an invoice is entered, the rate field will be bypassed, and the rates specified in the price list will be applied.
Click here for the detailed instructions on how to create a Price list for stock items.
Configure the following setting to restrict users’ access to alter stock item rates.
- Enter details under the Disallow the following Facilities
- Select Full Access > Accounts Masters
- Select Full Access > Price List
- Select Full Access > Override Invoice Defaults
- Enter details under the Allow the following Facilities
- Select End of List
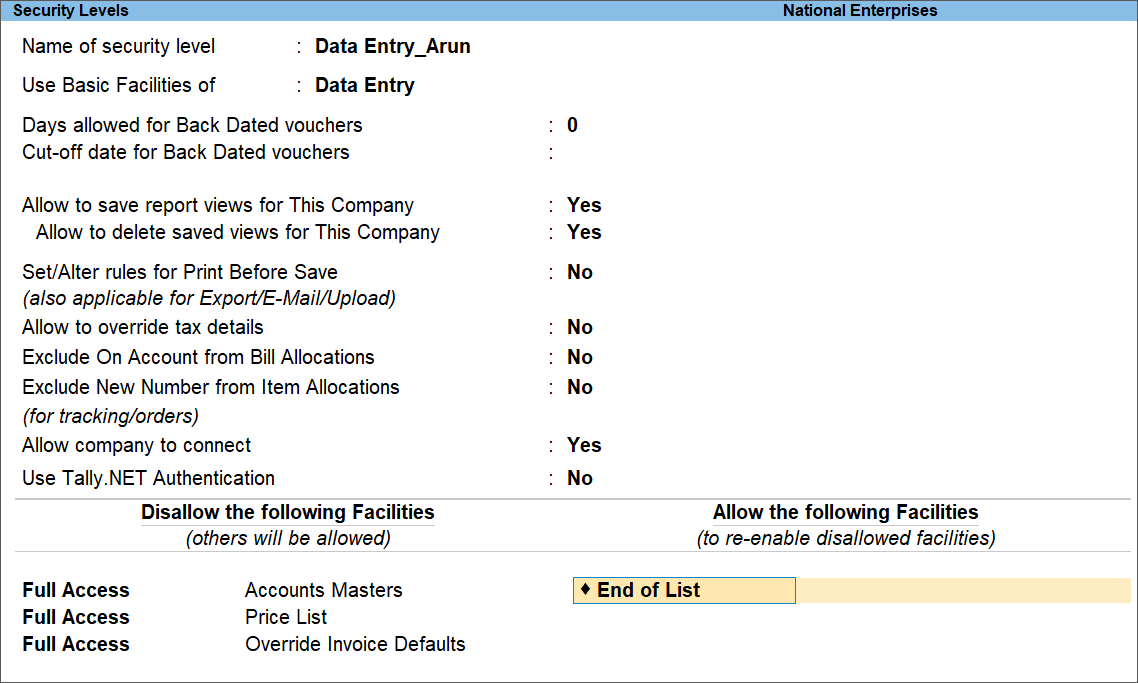
- Select End of List
As a result, this allows the user to alter/create/display/print the current dated vouchers, reports, statutory reports, back dated vouchers, or others based on their assigned security level. Any activity for which a user does not possess the necessary security level cannot be performed. Any action that exceeds a user’s security authorization level will be restricted.
Now, you are able to manage your users by providing specific rights, using the password to protect the data, and so on.
You can also ensure that the users under a specific user role are:
- Allowed or disallowed to view Dashboard.
- Allow to view Dashboard but disallowed to view specific tiles.
This ensures you can hide a few tiles from the users under a specific user role, if it contains vital financial information that you want to keep private.
To know how to allow or disallow users to view Dashboard or specific tiles, refer to the Access Dashboard Based on User Roles | Security Controls section in the Use Dashboard in TallyPrime to Analyse Business Information and Data Trends topic.
Set up Security for WhatsApp in TallyPrime
If you are managing your business and wish to setup security for all the users who have access to your business as well as sharing the business documents, you can do so in TallyPrime. In TallyPrime 4.0, you can
- restrict other users from creating or altering the existing registered business WhatsApp No.
- prevent users from accessing certain reports in TallyPrime which will include Display, Print, Export, and Share of the particular reports.
- set passwords to prevent any kind of alterations by anyone who has access to your business.
To know more, refer to the Set up Security for WhatsApp in TallyPrime section in the How to send documents from TallyPrime using WhatsApp topic.
In this section
Restrict a user from adding a WhatsApp No.
Prevent a user from printing vouchers before saving in TallyPrime
Disallow a user from accessing one or more reports
Disallow a user from using one or more WhatsApp No.
Restrict a user from adding or modifying a WhatsApp No.
Your business practices and policies might require you to limit adding the Business WhatsApp Nos. in TallyPrime to only specific users. To meet such requirements, you can set the security feature in TallyPrime for users based on their user roles. By doing so, you can
- allow only specific users to manage the Business WhatsApp Nos. of the company.
- control unauthorized access to add or modify the Business WhatsApp Nos. by other users.
Before starting with the process, you can ensure that the security is enabled for your Company in TallyPrime.
To know more, refer to the Restrict a user from adding or modifying a WhatsApp No. section in the How to send documents from TallyPrime using WhatsApp topic.
Prevent a user from sharing vouchers before saving in TallyPrime
In TallyPrime 4.0, you are allowed to share the vouchers before saving them in TallyPrime. But at the same time, you can prevent a certain user from doing so and the user will not be able to either export or share the specific voucher.
To know more, refer to the Prevent a user from sharing vouchers before saving in TallyPrime section in the How to send documents from TallyPrime using WhatsApp topic.
Disallow a user from sharing one or more reports
In TallyPrime 4.0, you can restrict users from sharing some specific reports by disallowing a certain user to access the report. You can block the user from doing any kind of activity for that particular report, which will include Display, Print, Export, and Share of that report through WhatsApp.
To know more, refer to the Disallow a user from sharing one or more reports section in the How to send documents from TallyPrime using WhatsApp topic.
Disallow a user from using one or more WhatsApp No.
You can use multiple Business WhatsApp Nos. for sharing documents with your parties in TallyPrime 4.0. However, if you want, you can also restrict a user from using one or more WhatsApp No. for sharing the documents from TallyPrime.
To know more, refer to the Disallow a user from using one or more WhatsApp No. section in the How to send documents from TallyPrime using WhatsApp topic.


