
Find Details Entered in Masters and Transactions in TallyPrime
List of field names | Find with Conditions | Know More About Find
Find in TallyPrime makes searching effortless. Just enter any detail like a party name or vehicle number and it instantly locates user-entered information in masters and transactions, all without leaving your screen. It remembers your past queries and displays previously entered keywords as you type, helping you locate information faster. You can turn off history tracking anytime.
Find delivers precise results:
-
Even when words are slightly varied or misspelled.
-
Whether you want to match all keywords or any of them.
-
Across one company or multiple loaded companies.
-
When you narrow your search to specific fields.
You can also restrict users from viewing the Find – Results screen for specific companies. When multiple companies are loaded, users can only see results for the ones they have access to. If access to certain voucher types is restricted, users won’t be able to drill down or view Details of Match for those vouchers.
TallyPrime lets you configure the results for your current session or save them for future use from F1 (Help) > Settings > Find.
If you are in Rel 7.0, click here for the video.
Find Details Instantly
If you want to quickly identify which party a specific cheque was issued to, use TallyPrime’s Find feature.
![]()
-
From any screen, press Alt+F.
-
Enter the cheque number and press Enter.
In the Find – Results screen, under Matches Found In, you can view the field name where the match is found.
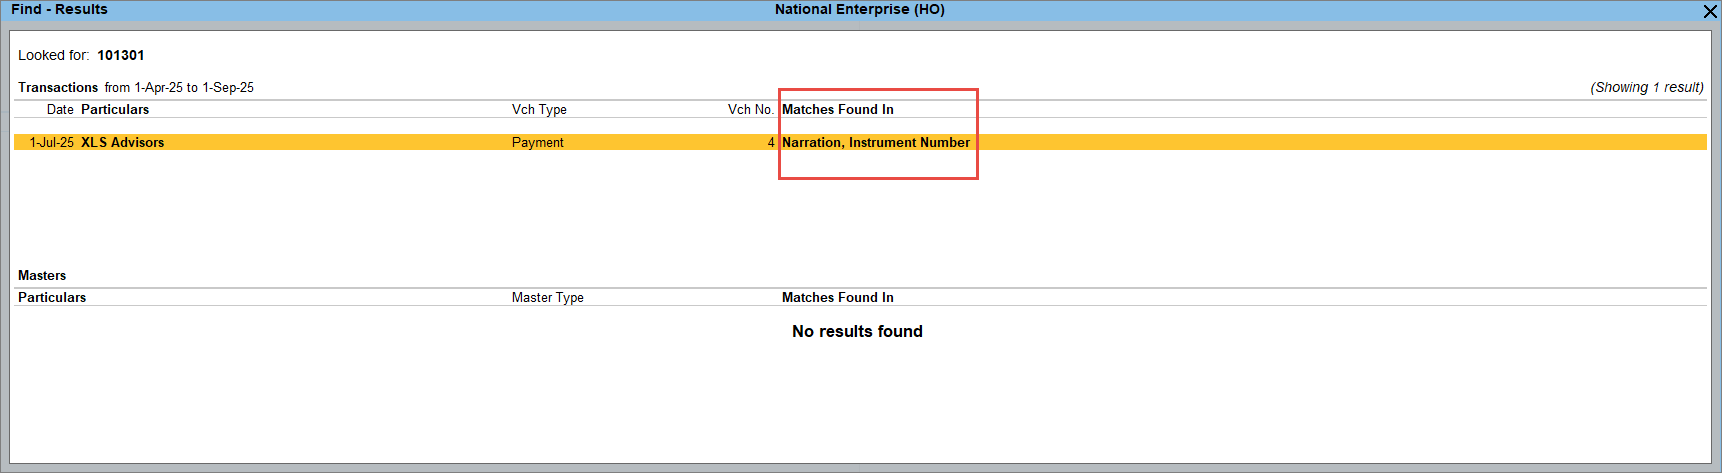
- Select the transaction and press Alt+H (Details of Match). The matched keyword appears in bold for an exact match and in bold italics when it matches a keyword with similar spelling.

You can further drill down from the transaction to view or edit the voucher.
Include Similar Spellings
Before creating a ledger, you might want to check if one already exists with a slightly different spelling to avoid creating duplicates. You can do this using the Include Similar Spellings option. For text, results that match both exact and similar spellings are displayed. However, for numbers or alphanumeric values, only exact matches are shown.
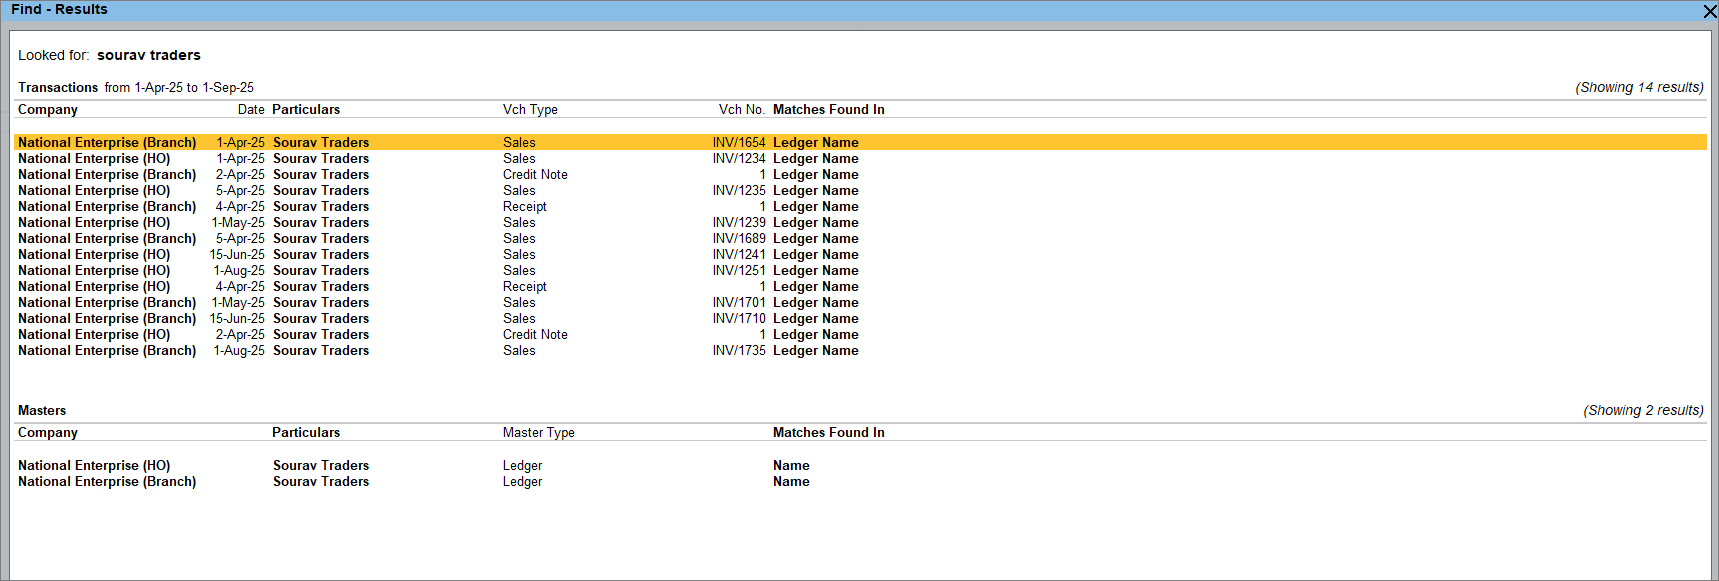
If you are looking for Sourav Traders, by default, Find will show only exact matches.

![]()
-
Press F9 (Include Similar Spellings) to modify the current results.
Alternatively, press Ctrl+B (Basis of Values) and enable Include Similar Spellings.
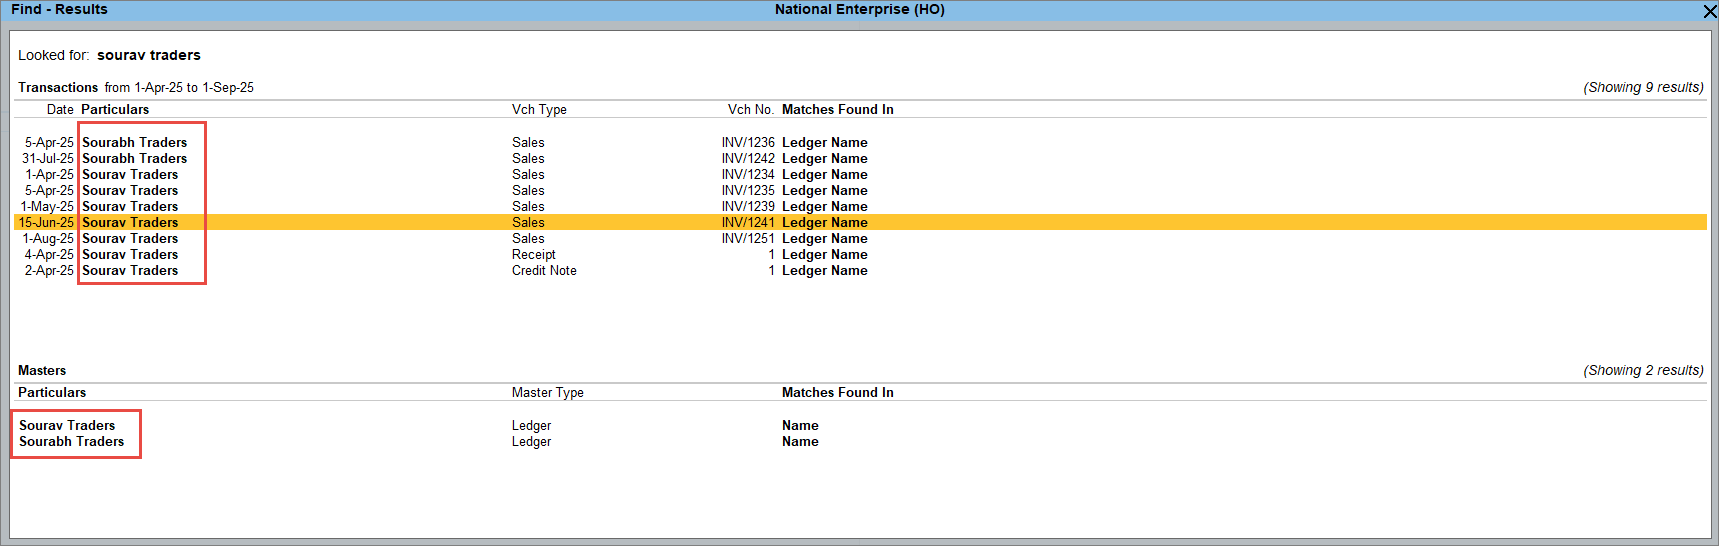
To always include similar spellings, go to F1 (Help) > Settings > Find > Include Similar Spellings and enable it.
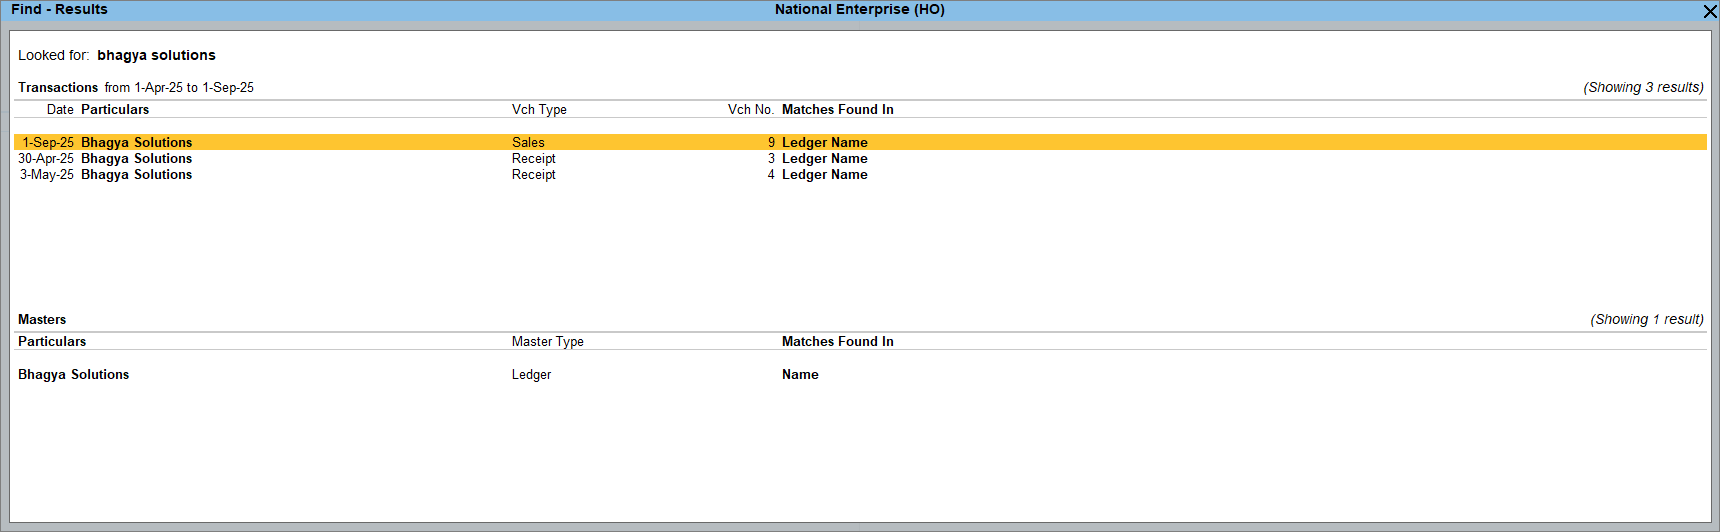
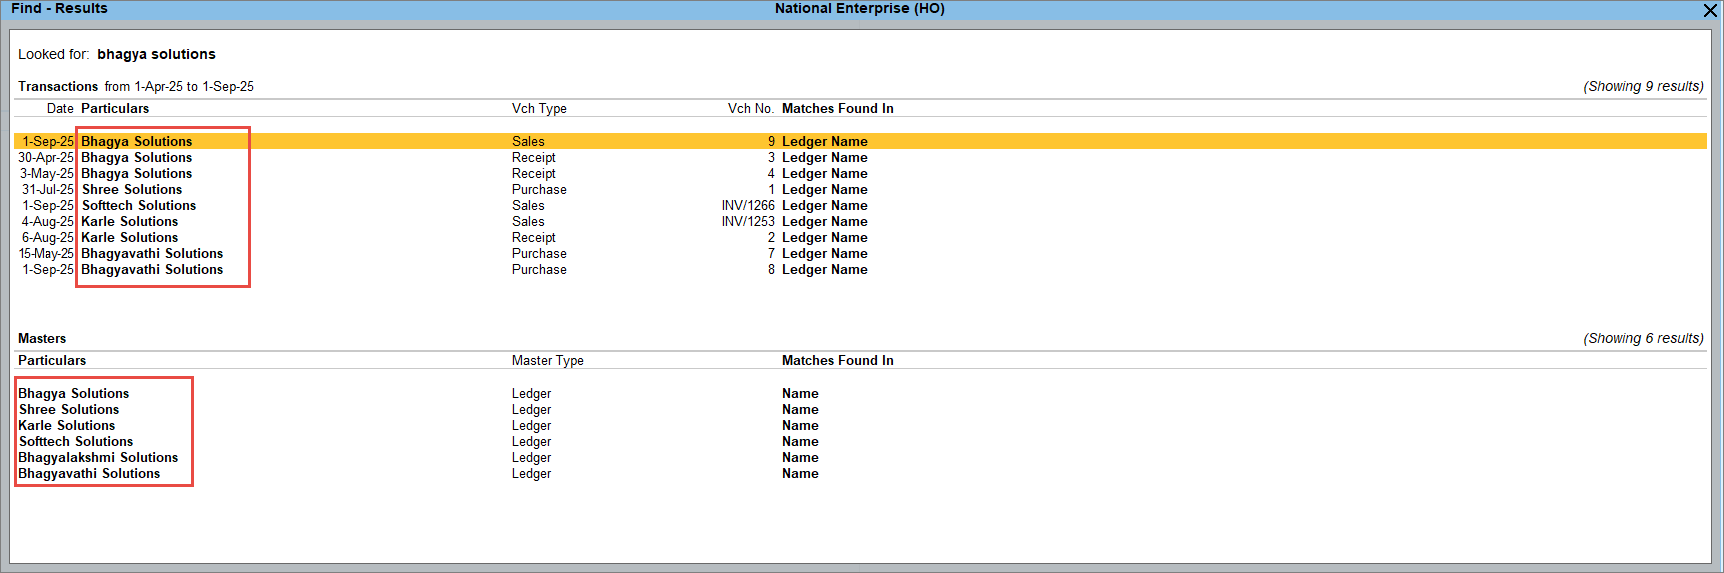
Include Partial Match
If you recall only part of a name, be it a party, stock item, or godown, the Include Partial Match option helps you find all entries that contain your keyword.
For example, if you are looking for Bhagya Solutions, then by default, only exact matches will appear.
![]()
- Press F8 (Include Partial Match) to modify the current results and press again to exclude it.
Alternatively, press Ctrl+B (Basis of Values) and enable Include Partial Match.

To always include partial match, go to F1 (Help) > Settings > Find > Include Partial Match and enable it.
If you are in TallyPrime Release 7.0, then click here.
If you recall only part of a name, be it a party, stock item, or godown, the Include Contains Match option helps you find all entries that contain your keyword.
For example, if you are looking for Bhagya Solutions, then by default, only exact matches will appear.
![]()
To always include contains matches, go to F1 (Help) > Settings > Find > Include Contains Match and enable it.
Include All or Any Keywords
When you enter multiple keywords, Find by default shows results containing all those words. You can configure it once to show results with any of the keywords, and it will continue to do so until you change the setting.
For example, if you are looking for Bhagya Solutions, it will show entries containing both Bhagya and Solutions.

To see results including any words like Bhagya or Solutions,
![]()
- Press F1 (Help) > Settings > Find > Show results when, and select Any Word is Present and enter Bhagya Solutions.
Find Across Multiple Loaded Companies
If you have multiple companies loaded and want to check whether a party exists in one of the companies, you can check that by pressing F3 (Company).
By default, Find shows results only from the current company.

![]()
For example, if you want to see whether Sourav Traders exists in all the loaded companies, then
To always include results from all loaded companies, press F1 (Help) > Settings > Find > Find Within > Loaded Companies.
To view the results company-wise, press F5 (Company-view).
Find in Specific Fields
If you want to find keywords entered in a specific field of a transaction or master, you can mention the field name along with its value.
For example, to see only transactions where the destination is Delhi, type Destination:Delhi. This will show only those transactions where the destination field has Delhi.

![]()
If you want to look for multiple keywords within a specific field, type the keywords inside quotes.
For example: Ledgername: ‘Bhagya Solutions’ or Ledgername: “Bhagya Solutions”. Otherwise, only the first keyword will be applied to the specific field, and the remaining keywords will be looked across all fields.
You can view the List of field names here.
Additionally, you can apply more conditions when searching in specific fields and use operators like OR (|), NOT (!) , >, <, or = to refine your results. To know more, click here.
Maintain History for Find
Find automatically stores the keywords you looked for. When you begin typing, it displays suggestions based on your previously entered keywords. When you press Alt+F, you will see the last five keywords. The other keywords remain saved and appear when you enter similar terms.
If you do not wish to view the saved history, you can clear the history. And if you prefer not to maintain any history, you can disable the option.
To disable Maintain History,
Press F1 (Help) > Settings > Find > Maintain History.
Configure Results Display
You can configure the display of your results by pressing F12 (Configure).
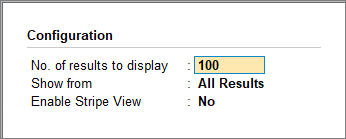
- No. of results to display: By default, TallyPrime shows top 100 results each under Transactions and Masters. You can change this number anytime.
- Show from: By default, TallyPrime displays results for both masters and transactions. If you want to see results for only one of them, you can select Transactions or Masters.
When you choose to view results from Masters or Transactions, you can further refine your view in the Find – Results screen using F4 (Master Type/Voucher Type).
Find Details Entered in Another Language
In Find, you can look for keywords in other languages if your master or transactions are created in that language. However, if you are looking for keyword, along with the field name, then please ensure that the field name is always entered in English.
For example: Narration: <keyword can be in any other language>
Access Results Based on User Role
If a user doesn’t have access to the Find – Results screen for a company, no results will be displayed for that company when they look for any details.
To disallow full access to Find – Results screen:
![]()
-
Press Alt+K (Company) > User Roles.
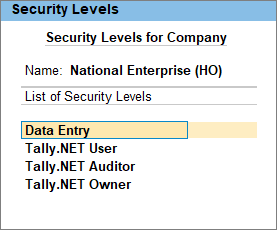
- Select the required role from the List of Security Levels (for example, Data Entry).

-
In the Security Levels screen:
-
Under Disallow the following Facilities, set Type of Access to Full Access.
-
From the List of Reports, select Find – Results.
-
-
Press Ctrl+A to save the changes.
A note will appear at the bottom of the screen, indicating that the results are shown based on the user’s access permissions.
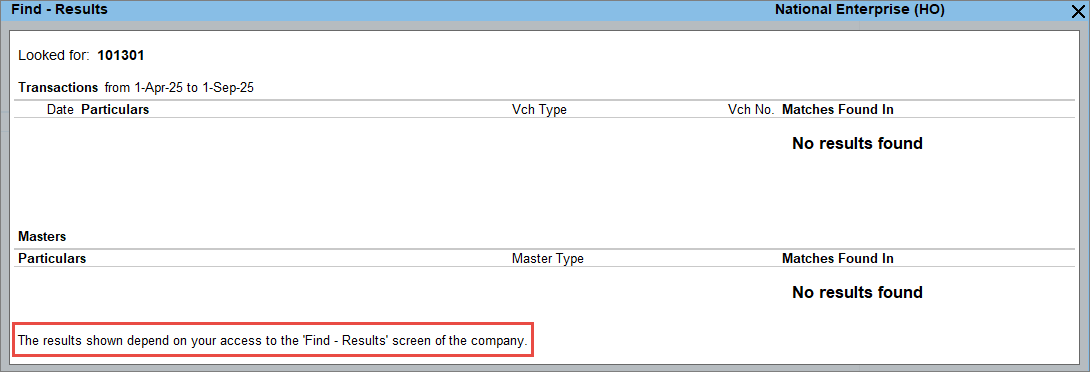
When multiple companies are loaded, no results are displayed if printing or previewing is disallowed for any of the companies.
To know more about restricting or providing access, refer to the User Management in TallyPrime.
You can use the Sample Data to test this feature in TallyPrime, without affecting your company data. The Read Me file has the instructions on using the sample data.
Questions & Answers
- Why is Find not showing results even though the data exists?
- How can I get results for keywords that contain special characters in Find?
- How can I view the next 100 results on the Find Results page?
- How can I get the results from Current Financial Year?
- I have created a stock item as Note Book, but Find doesn’t show any results when I type Notebook. Why?


