Use Mapping Templates for Importing Data | Additional Import Scenarios
Importing data from Excel into TallyPrime can be quick and hassle-free with Mapping Templates. Whether you’re managing employee attendance, sales transactions, or ledger entries, these mapping templates will help you in organising and mapping your data effortlessly.
Once the mapping templates are created, the import process remains the same, making it easy to reuse templates for similar data imports in the future.
Mapping of Top and Bottom Entries in Vouchers Using Ledger Entries from Fixed Columns
You may have entered the details of the sales vouchers in multiple columns in your Excel file. You may have entered the top ledger and bottom ledger details of the sales vouchers in different columns in your Excel sheet.
The required Excel file and mapping template are listed below:
Once the Mapping Template is created, import the data in TallyPrime by using the respective mapping template. You can view the Day Book to view the imported transactions in TallyPrime. Consider that you have column headers for each column of data in the Excel file. The required Excel file and mapping template are listed below:
If any column in the Excel does not have a column header, you can specify the column while mapping. In the Mapping Template for Masters, The required Excel file and mapping template are listed below:
Once the Mapping Template is created, import the data in TallyPrime by using the respective mapping template. You might have Opening Balance stored in multiple columns, with or without column headers in the Excel file. Similarly, you might want to compute values from different columns in the Excel worksheet. In such cases, you can use the Compute Value mapping options for importing such data. Let’s say you maintain an Excel sheet for entering the opening balances of your party accounts. You have separate columns for entering the debit and credit amount for each party and you want to import this list into TallyPrime. In the Mapping Template Creation screen, Once the Mapping Template is created, import the data in TallyPrime by using the respective mapping template. Let’s say that you have maintained stock item details in Excel sheet as follows: In case you want to use the details from the Column Headers Model and Size as the stock item name, you can map using the Compute Value option in the Import process. In the Mapping Template Creation screen, There are certain fields in TallyPrime that accept only Yes/No as the input, like Maintain Balances bill-by-bill, Cost centres are applicable and more. In you Excel file, you may have entered values other than Yes/No which you want to map with the fields in TallyPrime. Let’s say your Excel file has data as follows and you want to map the value for Maintain balances bill-by-bill: In the Compute Value for: screen, By using this option, you can easily map your Excel data to TallyPrime fields that accept logical values like Yes or No. It simplifies the process of importing data and ensures that your data is correct and consistent within TallyPrime. Let’s say you have entered details of multiple parties in an Excel file, without specifying their Group, as they all belong to the same group – Sundry Debtors. However, as you know that Group Name is mandatory during ledger entry, while importing you will need to specify the Group for the ledgers. You can use the Specify Fixed Field Value option while mapping the data to import such masters easily. In the Mapping Template for Masters, As a result, all the parties in your Excel file will be systematically assigned to the specified group in TallyPrime, simplifying the data import process and ensuring that your ledger details are accurately organized for the import process. Based on the parameters you select for creating the uniqueness, the masters or transactions will be created. When you import masters from an Excel file, TallyPrime by default creates masters based on each unique master Name. Similarly, when you import vouchers from an Excel file, TallyPrime by default creates vouchers based on each unique Voucher Type Name, Voucher Date and Voucher Number. However, you can choose the unique values based on which the masters or transactions should be created when importing data. Once you have mapped the fields with the Excel file, select the required option under Unique values for creating masters > Additional Options.
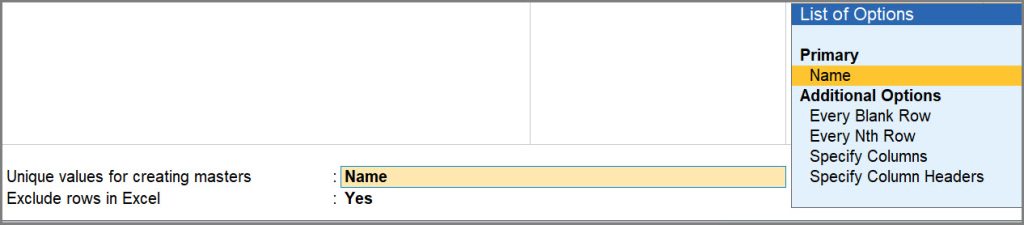
 In case you do not see this option in the mapping template, press F12 (Configure) > Show Additional Options for creating Masters > Yes. You can specify the conditions based on which data from one or more rows should be excluded while importing the data. Let’s say you have entered transaction details with parties in an Excel worksheet in the following manner: Now, let’s say you want to exclude rows that contain the entries for Sunday. In the Mapping Template Creation screen, You can select more than one Column Header or more conditions for the same Column Header for excluding rows in the Excel worksheet. By using this option, you can easily set conditions to filter out unwanted data during the import process. Whether you need to exclude rows based on dates, specific values, or other criteria, TallyPrime empowers you to tailor your data for importing. In your business, the employee attendance details maybe stored in Excel files by the Admin/HR department or in an Attendance Machine by Biometric. To process the salaries, you may often need to transfer this data to the Accounts department. With TallyPrime’s Import feature, you can seamlessly import attendance details from Excel files into TallyPrime. For example, if your employee attendance data is recorded in the following format: You can create a separate mapping template for each Attendance Type (Absent, Present and Leaves). The value of each Attendance Type will be recorded in separate vouchers. Mapping Templates for Employees: Absent
Present
Leaves
Set the option Unique values for creating vouchers as Every Blank Row. This will create single Voucher Type for each Attendance. Once the Mapping Template is created, import the data in TallyPrime by using the respective mapping templates for the attendance data.Excel Data with Column Headers
Excel Data Without Column Headers
Mapping Data by Computing Values from Excel | Compute Value when the Field Value is Nett Amount
Opening Balance in different columns for debit & credit | Compute Value using Cr/Dr
The Compute Value for: Ledger – Opening Balance screen appears.
Combine Values where the Field Value is a Combination of Multiple Cell Values
The Model and Size of the stock items appear as Name in the Chart of Accounts in TallyPrime.
Compute Values where the Field Value should be set to “Yes”
Mapping data that is Common/Fixed in Multiple Rows in the Excel File | Fixed Field Value
A List of Groups is displayed on the screen to provide you a seamless experience for mapping.
Additional Options as Unique Values for Creating Masters or Transactions
Exclude Rows in Excel for Importing Data
In case you do not see this option, press F12 (Configure) > set the option Exclude rows in Excel while importing Data as Yes.
The screen for setting the Conditions for Excluding Rows appears, as shown below:
Mapping Template for Attendance Data