
Enable Excise for Importers
You can enable excise for importers in TallyPrime by using the Press F11 (Features) > set Enable Excise to Yes.
- Press F11 (Features) > set Enable Excise to Yes.
If you do not see this option:- Set Show more features to Yes.
- Set Show all features to Yes.
The Excise Registration Details screen appears as shown below:
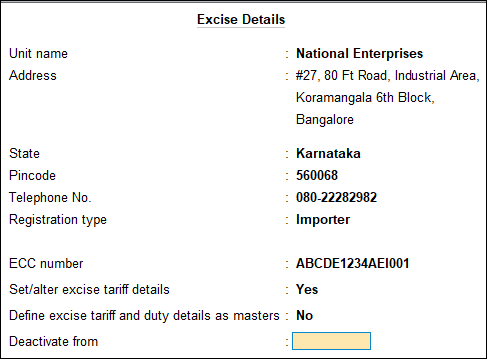
- Select Importer as the Registration Type.
- Enter ECC No. The ECC number is PAN based, and has 15 digits. The format of ECC no. is ABCDE1234HXM001.
- Enable the option Set/alter excise tariff details to record tariff details.
If all the stock items that the importer deals have the same tariff details, then tariff details can be recorded here.- Enter Tariff name.
- Enter HSN code.
- Select the unit of measure from the List of Excise Reporting UoMs.
- Ad Valorem is selected as the Type of Valuation. The cursor skips this field.
- To modify the type of valuation
- Press F12 (Configure).
- Enable the option Allow Modification of Valuation Type.
- Press Ctrl+A to save the configuration.
- Select the required Valuation type in the Excise Details screen.
- Enter the Rate of duty.
- Press Enter to save the Excise Tariff Details.
- Alter or provide the other details, such as Unit Name, Address, State, PIN Code and, Telephone Number, if required.
- Press Enter to save the excise details.
If all stock items that the importer deals with belong to the same tariff, then define the tariff at the company level. Else, tariff can be created at the group level, the stock item master level or accounting ledger level.
Configurations for Excise Details
You can configure excise details related to excise for importers, according to your business requirements.
Enabling Multiple Excise Units
Each premise or unit has to be registered under the Central Board of Excise and Customs department. If a manufacturer owns more than one premise, then each unit has to be registered individually.
TallyPrime allows you to create and maintain multiple excise units.
To enable the multi excise unit
- Press F12 (Configure) from the Excise Registration Details screen.
- Set the option Enable multi excise unit to Yes.
- Press Ctrl+A to save the configuration.
You can now create multiple tax units, and record excise registration details of each unit.
The excise unit defined in the Excise Registration Details screen will be considered as the default excise unit in TallyPrime.
Recording Importer Exporter Code (IEC)
- Press F12 (Configure) from the Excise Registration Details screen.
- Set the option Enable IEC Number to Yes.
- Press Ctrl+A to save the configuration.
- Enter the IEC number in the Additional Excise Details section of the Excise Registration Details screen.
Creating or Modifying Rule 11 Invoices
When the registration type selected is Importer, the default rule 11 book gets created. As per business requirements, you can either create more rule 11 books or modify the default book.
To enable Rule 11 book details
- Press F12 (Configure) from the Excise Registration Details screen.
- Set the option Enable Rule 11 book details to Yes.
- Press Ctrl+A to save the configuration.
- Enable Set/alter Rule 11 book details to configure the default book, or create a new Rule 11 book.
To configure the default Rule 11 book
- Press Ctrl+ Enter on the Default Book.
- Alter the book name and numbering details, as required.
Note: The fields Method of numbering, Prefill with zero, and Used For cannot be altered.
Creating a new book
- Enter the Name of the new Rule 11 book.
- Press Enter. By default the cursor skips the fields Method of Numbering and Prevent Duplicates.
- Enter the Starting number. This will be the first invoice number for this Rule 11 book.
- Enter the Width of the numerical part, as required.
- Enable the option Prefill with zero, if required. This will automatically add zeroes before the invoice number. The number of zeroes included depends on the width of the numerical part.
For example, Starting number is 1, width of the numerical part is 3. The rule 11 invoices in the book will be numbered 001, 002, 003, and so on. - The field Used for is pre-filled with Rule-11 Invoice. The cursor skips this field.
- Define the parameters for changing the invoice numbering periodically, if required.
The invoice numbers can be renumbered periodically, and the format of the invoice numbers can be defined, as required. - Press Enter to save the Book Creation screen.
Enabling RG23D Numbering
RG23D is a register that should be maintained by business establishments involved in importing and selling goods and materials. For any item that is purchased the company has to enter details in separate pages in an RG23D register.
- Press F12 (Configure) from the Excise Registration Details screen.
- Set the option Enable RG23D numbering to Yes.
- Press Ctrl+A to save the configuration.
The options Enable RG23D Numbering in voucher and Set/alter RG23D details is available in the Excise Registration Details screen. - Enable Set/alter RG23D details to configure the register.
- Enter the Prefix and the Suffix for the register numbering. These can be alphabetic or numeric. The entered details will be captured in the transactions.
Recording Jurisdiction Details
Details pertaining to range, division, and commisionerate to which the excise unit belongs to can be defined.
- Press F12 (Configure) from the Excise registration details screen.
- Set the option Enable jurisdiction details to Yes.
- Press Ctrl+A to save the configuration.
- Enable Set/alter jurisdiction details in the Excise Registration Details screen.
- Press Enter.
- Press Alt+W (Details).
- Enter the period from which the details of range entered, will be applicable from.
- Enter the Code, Name and Address of the Range.
- Press Enter.
- Enter the date Applicable From, Code, Name and Address for another period, if required.
- Press Ctrl+A to save the details.
- Similarly record details of Division and Commisionerate, as applicable.
- Press Enter.
More Configurations
The configurations related to excise tariff details for importers at company level:
Enable selection of Tariff Type
Goods are of two types:
- Dutiable: The ones that are taxable
- Non-Dutiable: The goods that are exempt from taxes.
To classify an item as dutiable or non-dutiable
- Enable the option Set/alter excise tariff details in the Excise Registration Details screen.
- Press F12 (Configure) from the Excise Tariff Details screen.
- Set the option Enable selection of tariff type to Yes.
- Press Ctrl+A to save the configuration. The option Type of tariff is available in the Excise Details screen.
For any given business, at any point of time there can be more one type of duty. For example, for importers, the duty can be basic excise duty, additional duty of imports and so on.
To enable multi duty details
- Enable Set/alter excise tariff details in the Excise Registration Details screen.
- Press F12 (Configure) from the Excise Tariff Details screen.
- Set the option Enable multi selection of duty details to Yes.
- Press Ctrl+A to save the configuration. The required duties can now be created under Type of Duty.
To create duty types
- Select New as the Type of Duty from the List of Excise Duty Classifications.
- Enter the name of the duty that is to be created in the Name field in the Excise Duty Classifications Alteration (Secondary) screen.
- Select Duty code from the List of Excise Duty Codes.
- Select Calculation method from the Calculation Methods.
- Press Enter to save the configuration. The newly created type of duty will appear in the Type of Duty column.
Sometimes there can be items which have valuation types different from that of the valuation type of the duty. For example, the valuation type of the type is ad quantum while the valuation type of the duty is ad valorem.
To record different valuation types
- Enable Set/alter excise tariff details in the Excise Registration Details screen.
- Press F12 (Configure) from the Excise Tariff Details screen.
- Enable Override valuation type for duty head.
- Press Ctrl+A to save the configuration. A new column titled Valuation Type now appears next to Type of Duty. Valuation type of the duty head when different from valuation type of the tariff item can be recorded here.


