
Sales at MRP (VAT)
You can create sales voucher with VAT on MRP.
1.Gateway of Tally > Vouchers > press F8 (Sales).
Alternatively, press Alt+G (Go To) > Create Voucher > press F8 (Sales).
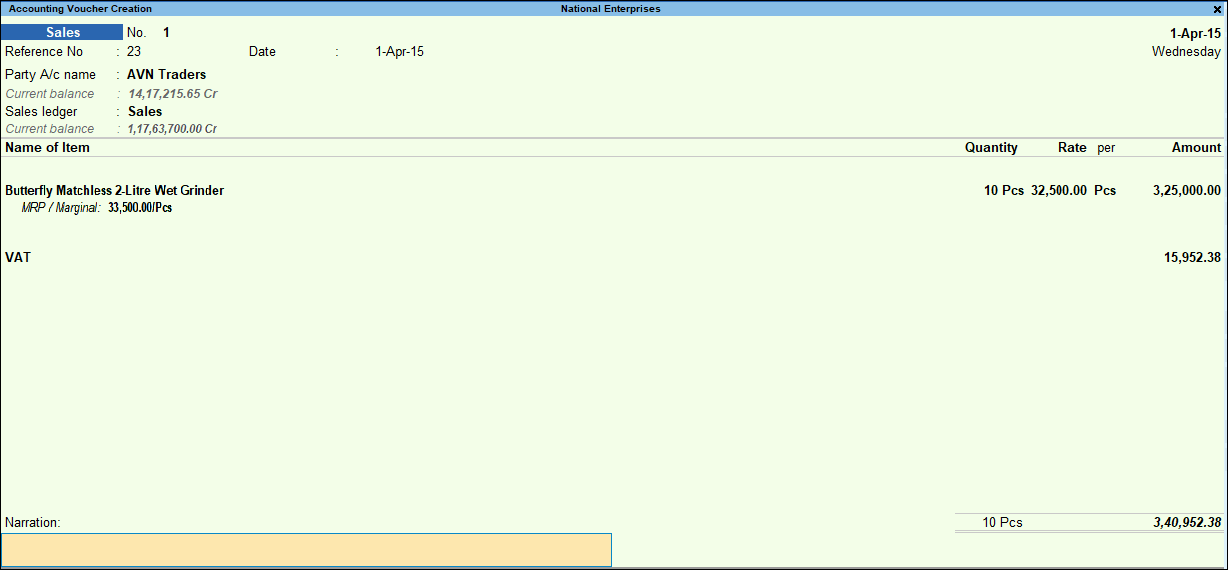
2.Select the customer name in the Party’s A/c Name field.
3.In the sales invoice, press F12 (Configure) > set Modify MRP in vouchers to Yes, to enable altering the MRP rate while recording the voucher.
Press Ctrl+A to accept.
4.Select the required Sales Ledger.
As always, press Alt+C, to create a master on the fly. Alternatively, press Alt+G (Go To) > Create Master > type or select Ledger > press Enter.
5.Select the stock item for which Calculate VAT on MRP
To create stock item with MRP
1.Gateway of Tally > Create > type or select Stock Item > and press Enter.
Alternatively, press Alt+G (Go To) > Create Master > Stock Item > and press Enter.
2.In the Stock Item Creation screen, press F12 (Configure) > set Provide MRP Details to Yes.
Press Ctrl+A to accept.
3.Enter the stock item name in Name field.
4.Select the required group in Under field.
5.Select the unit of measure in the Units field.
As always, press Alt+C, to create a master on the fly. Alternatively, press Alt+G (Go To) > Create Master > type or select Units > press Enter.
6.Select the option Applicable in the VAT Applicable field.
7.Enable Set/alter VAT details.
- Enter the Tax rate. Tax type is set as Taxable if tax rate is above 0.
- Set the option Calculate VAT on MRP? to Yes.
- Press Ctrl+A to accept the VAT Details screen.
8.Enable Set/Alter MRP details to Yes.
- Set the option Allow MRP modification in voucher to Yes, to enable altering the MRP rate while recording the voucher.
- Enter the MRP value in the MRP Rate field of MRP Details screen.
- Press Enter.
9.Press Enter to save.
10.Select the common VAT ledger. The ledger must be grouped under Duties & Taxes in which the options:
- Type of duty/tax set to VAT (CST in case of interstate sales).
- Percentage of Calculation (eg 5) set to 0.
- The rate will be calculated automatically based on MRP defined for the item.
11.To display the Tax Analysis screen
If you need to use this option only for the current invoice, press Ctrl+O (Related Reports) > type or select VAT – Tax Analysis> and press Enter.
If you are on TallyPrime Release 1.1.3 or earlier, follow the step:
If you need to use this option only for the current invoice, press Ctrl+I (More Details) > type or select VAT – Tax Analysis> and press Enter.
12.Press Alt+F5 (Detailed) to view in detailed mode. The Tax Analysis screen appears as shown below: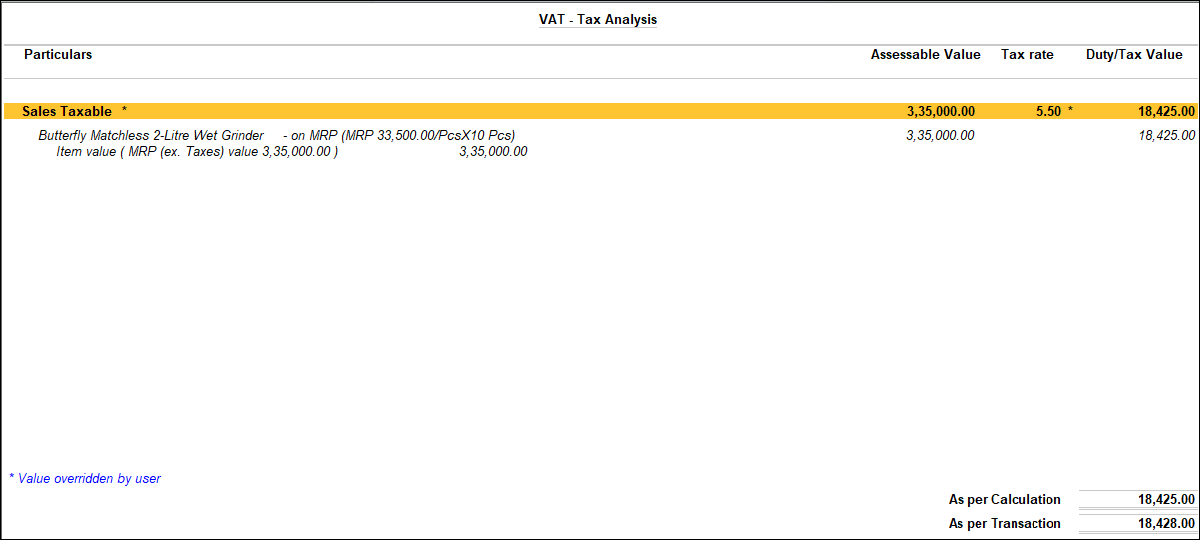
In the VAT Details screen of stock item, the option MRP Incl. of VAT is set to Yes. Hence, VAT is included in MRP.
13.Enter Narration, if required.
14.Accept the screen. As always, you can press Ctrl+A to save.


