Payroll – FAQ
Get answers to all the frequently asked questions about Payroll.
If you have converted cost centres to employee masters and want to convert them back to cost centres, you need to:
- Create an Excel list of the employee names to be converted to cost centres.
- Import this Excel file into TallyPrime.
This will restore the employees as cost centres in TallyPrime.
- Create and save an Excel list of employee names to be converted to cost centres.
- Import the Excel in TallyPrime.
- Create a mapping template for Cost Centres.
- In the Mapping Template for Masters, select Type of Master as Cost Centre.
- Add Use as Employee in the Field column and set No as Fixed Value.
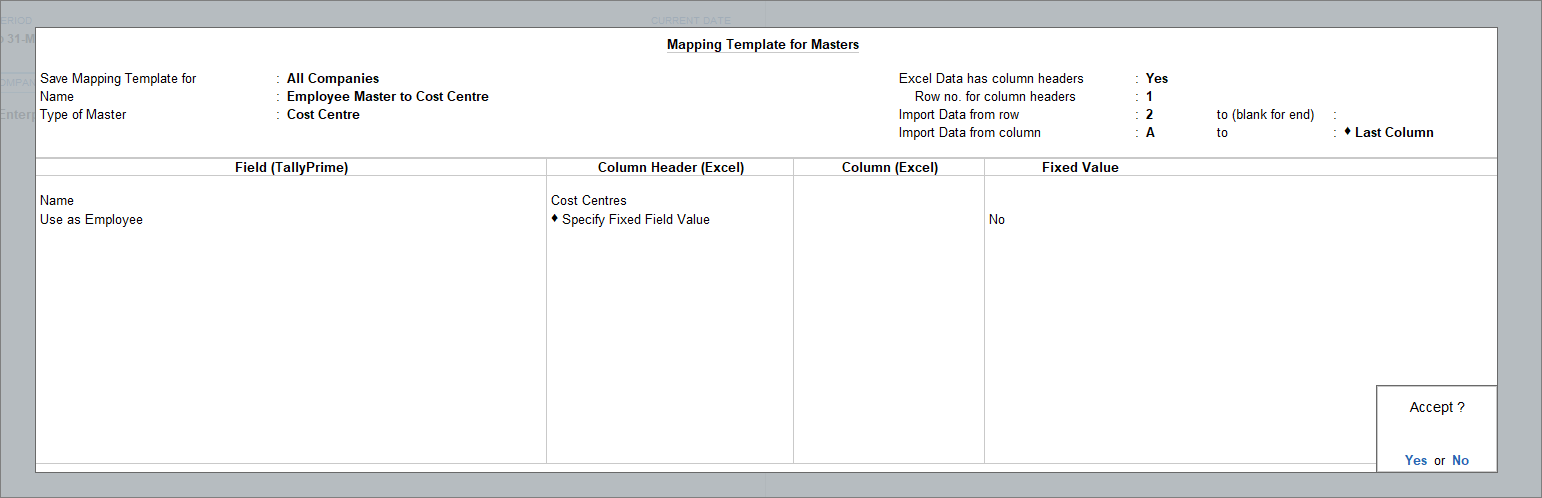
- Press Ctrl+A to save the mapping template.
- Press Ctrl+A to accept the Import Masters screen
- Press I (Import) to import the Excel File.
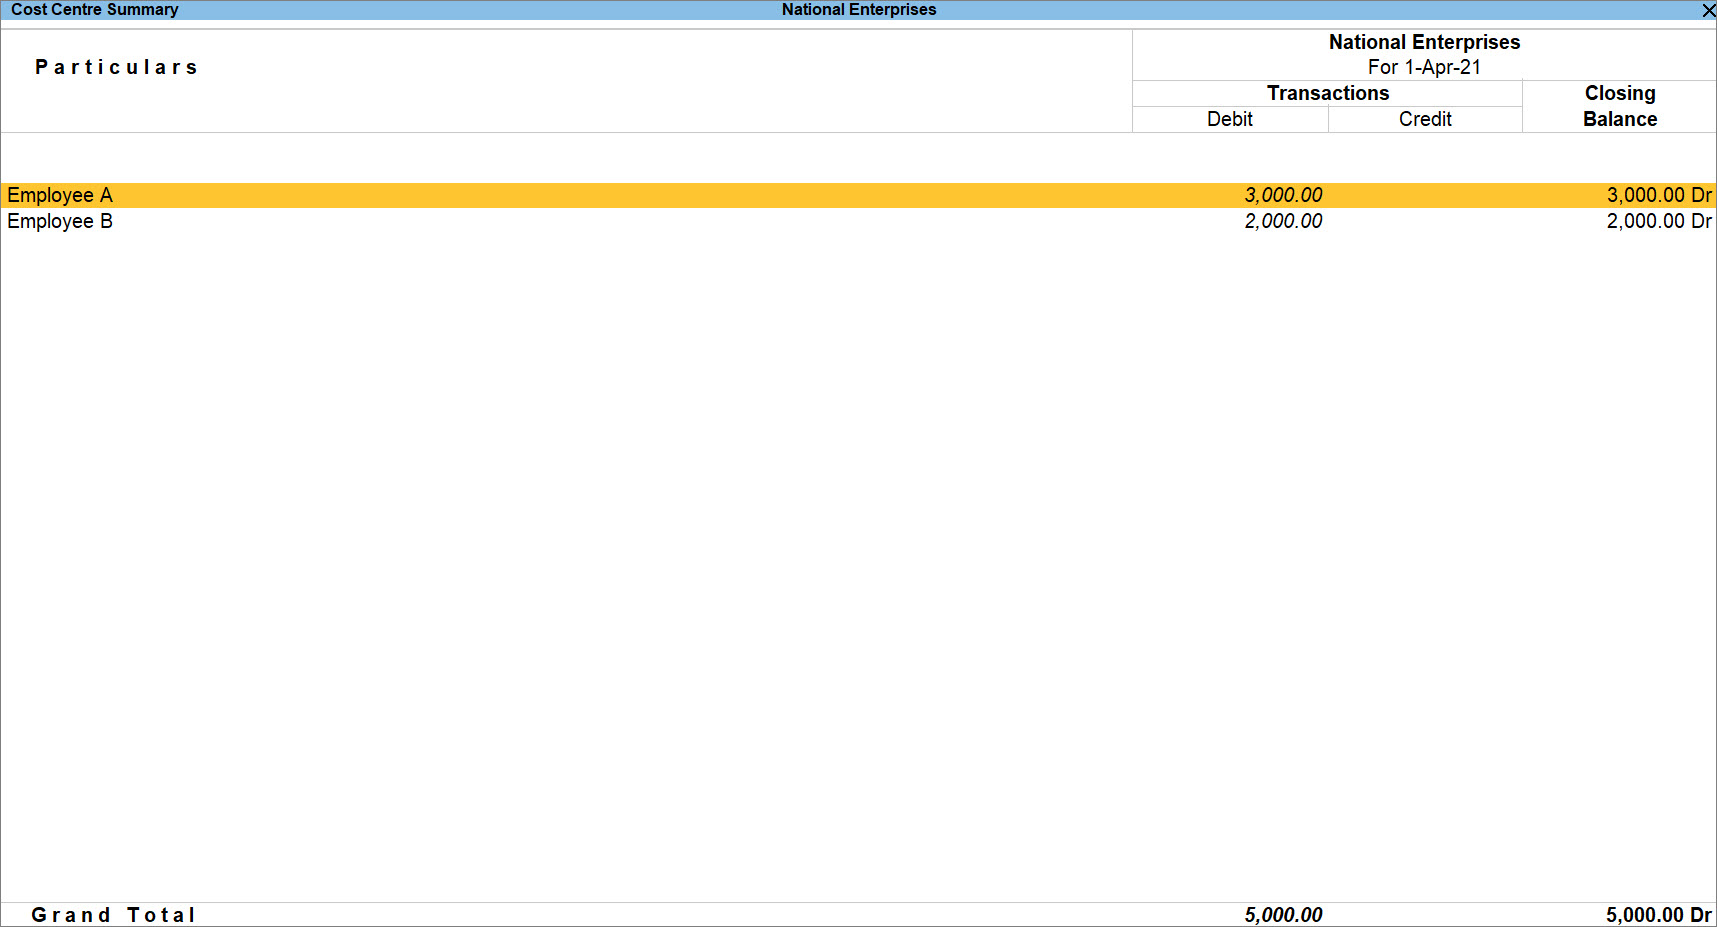
Once the import is done, you can see the employee master is now converted back as the cost centre.
If you want to use an existing Cost Centre as Employee Group, to track payroll expenses along with other expense heads, then you need to:
- Create an Excel list of existing cost centres.
- Import the Excel file to view the cost centres as employee groups.
This will allow you to select the department cost centre as an employee group when creating a new employee.
- Create and save an Excel list of existing cost centres.
- Import the Excel in TallyPrime.
- Create a mapping template for Employee Group.
- In the Mapping Template for Masters, select Type of Master as Employee Group.
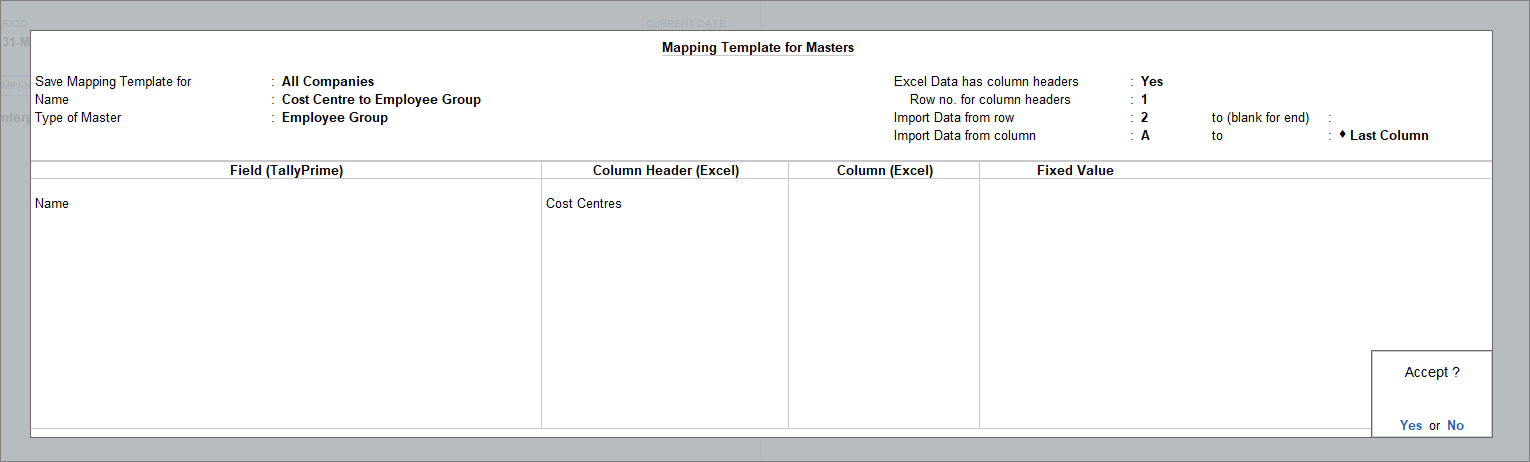
- Press Ctrl+A to save the mapping template.
- In the Mapping Template for Masters, select Type of Master as Employee Group.
- Press Ctrl+A to accept the Import Masters screen
- Press I (Import) to import the Excel File.
Once the import is done, you will be able to see the department names under Employee Group. Although you will not see the department names in the list of cost centres, but at the time of recording transactions, you can select the departments as cost centres.
We are considering updates in TallyPrime soon to provide you a seamless experience based on the budget updates for payroll in 23-24. Meanwhile, you can record your payroll transactions in one of the following way, as convenient to you.
- While recording your payroll transactions, you can continue to use the Auto-fill feature as per the earlier slab followed prior to the new budget updates. Once we release TallyPrime with the updated budget changes under Payroll, it will automatically consider any differential amount from the past transactions as you continue recording your payroll transactions in the upcoming months.
- For employees who have opted for the new tax regime, with applicability for the new tax slabs, standard deductions, and/or marginal relief:
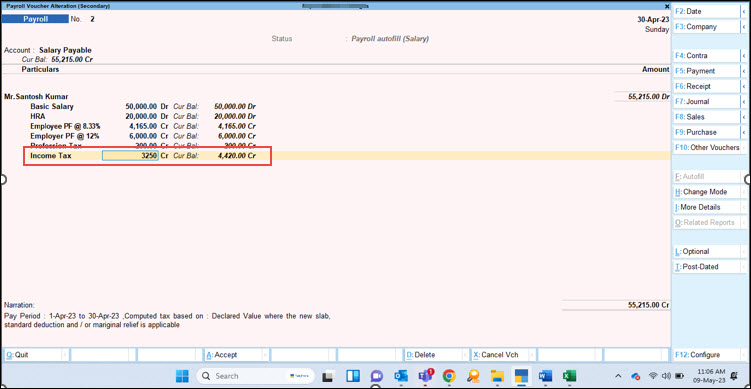
- Record the payroll transaction as usual, using the Auto-fill option. This will currently consider the earlier income tax slab for calculation.
- Alter the transaction to update the income tax value, considering the latest changes in income tax slab, standard deductions, and/or marginal relief.
Once we release TallyPrime with the updated budget changes under Payroll, it will automatically consider the calculations based on the new slab rate from the upcoming month. As you continue recording your payroll transactions in the upcoming months, you will not have to alter the transactions to update the income tax values separately.
- For employees who have opted for the new tax regime, for whom Rebate U/s 87A on income tax is applicable:
- Record the payroll transaction as usual, using the Auto-fill option. This will currently consider the earlier income tax slab for calculation.
- Alter the transaction to remove the income tax component from the transaction, by selecting End of List.
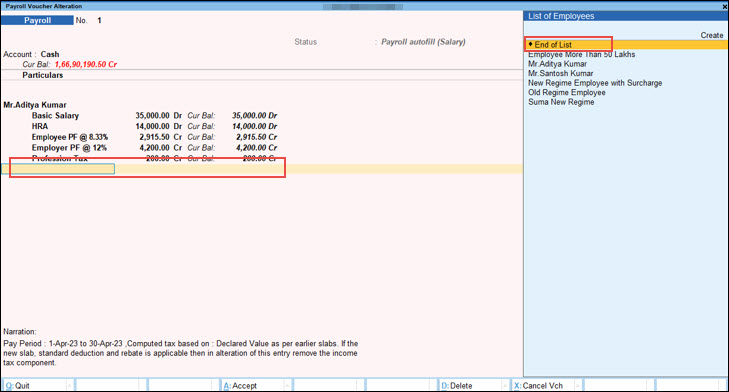
Once we release TallyPrime with the updated budget changes under Payroll, it will automatically consider no income tax deductions as per rebate on income tax. As you continue recording your payroll transactions in the upcoming months, you will not have to alter the transactions anymore to remove the income tax component separately.
Consider the following details for the salary calculation of an employee.
Attendance:
- Number of days present = 28
- Sick leave = 1, Absent = 1
- Total working days in a month = as per calendar days
- Basic pay to be calculated for 28 (present) + 0.5 (sick leave) days
- HRA, Special Allowance and other allowances, except Basic pay, are considered only for 28 (present) days
To process Payroll as per the above scenarios;
- Create Attendance Types as:
- Present – Attendance/leave with pay
- Sick Day – Attendance/leave with pay
- Create the Pay Heads as:
- Basic on present days
- Basic on sick leave of 0.5-day (half the amount to be paid for 0.5-day present)
- Basic pay payable (1+2)
- Attendance Type Creation
- Present
- Sick Leave
- Present
- Pay Heads creation
- Basic on Present Days
- Create Pay Head for Basic on Present Days under a new group Basic Pay Calculation, and set the Attendance/Leave with Pay as Present.
Note: After creating this Pay Head you need to enter monthly fixed value for it in the salary details. This is used for calculating Basic Pay and entering the monthly Fixed Value.
- Basic on Sick Leave
For calculating half-a-day salary due to sick leave, create a new pay head as given below:- Create Pay Head Basic on Sick Leaves under the same group Basic Pay Calculation, and set the Calculation Type to Computed Value.
- Under Computation Info, select Specified Formula and specify the formula as Basic on Present Days/Present Days X Sick Days.
- In Slab Type select Percentage.
- In the Value Basis field select 50%.
- Create Basic Pay Payable (1+2) Pay Head
The above two Pay Heads are required only for calculation purposes. But all the above Pay Heads should be selected in the Salary Details for each Employee.To create the payable Basic Pay in addition to Basic on Present Days and Basic on Sick Leaves, create Basic Pay as the Pay head under Direct/Indirect Expenses. Set the Calculation Type as Computed Value, with the specified formula – Basic on Present Days + Basic on Sick Leaves.
- Create Pay Head for Basic on Present Days under a new group Basic Pay Calculation, and set the Attendance/Leave with Pay as Present.
- Basic on Present Days
- Create/Alter Salary Details
Create/Alter Salary Details for each employee as shown:
- Create Payroll Voucher Class
The Pay Head Basic Pay Calculation is only for calculation purposes. It need not be shown as part of salary calculation. Hence, this Pay Head should be excluded using the Voucher Class.- Gateway of Tally > Alter > Payroll Voucher Type > Payroll.
Alternatively, press Alt+G (Go To) > Alter Master > Payroll Voucher Type > Payroll. - Enter the Name of Class> press Enter.
- Under Exclude the pay head Basic Pay Calculation.
- Select Salary Payable pay head under Ledger Name.

- Accept the payroll voucher type.
- Gateway of Tally > Alter > Payroll Voucher Type > Payroll.
- Recording the Attendance
Record the Present Days and Sick Leaves in the Attendance Voucher. - Processing Payroll
- Gateway of Tally > Vouchers > press F10 (Other Vouchers) > type or select Payroll.
Alternatively, press Alt+G (Go To) > Create Voucher > press F10 (Other Vouchers) > type or select Payroll. - Select Payroll Voucher Class to process the salary.
- Press Ctrl+F > select Payroll Autofill > select Salary in the Process for field.
- Accept the payroll voucher.
The Basic Pay for present days and half-a-day salary for sick leave appears in the voucher. Other allowances will be calculated only for the present days.
- Gateway of Tally > Vouchers > press F10 (Other Vouchers) > type or select Payroll.
To print Pay Slip(s) with the company’s logo, you need to:
- Enable Company Logo feature.
- Print Pay slips with Company logo
Note: You can follow the same process for exporting and e-mailing Pay Slip(s) with the company logo.
Enable Company Logo feature
- Press Alt+P (Print) > press Enter on Configuration.
- Set the option Include Company logo (applicable to Print/Export/Email) to Yes.
- Select the Image File Name and Image Path.
Print Pay Slip
- Press Alt+G (Go To) > type Pay Slip > select Single or Multi Pay Slip, as required. The Pay Slip appears.
- Press Ctrl+P > press C (Configure).
- Ensure the option Show Company Logo is set to Yes.
- Press Esc to return to the Print
- Press I (Preview) to check the print preview > press P (Print) to print.
Follow the steps given below to handle the distribution and recovery of Salary Advances given to the Employees:
- Create a Pay Head for Salary Advance.
- Make the Salary Advance payments using Payment Vouchers.
- Create/Alter Employees Salary Details to include the Salary Advance Pay Head.
- Process Payroll at the end of the month.
- View Pay Slip.
- View the report for remaining amount to be recovered from the employee.
Create a Pay Head – Advance to Employees
Create the Salary Advances Pay Head Advance to Employees as shown below:
- Gateway of Tally > Create > Pay Heads.
Alternatively, press Alt+G (Go To) > Create Master > Pay Heads.While creating the Pay Head, select the required Calculation Type to recollect the Loan Amount. For example, you can select As User defined Value.
Note: The Calculation Type can be set to Flat Rate, if a fixed EMI amount needs to be deducted from the employee's salary.
Salary Advance Payment to Employee
Record a payment voucher for providing the salary advance to the employees.
- Gateway of Tally > Vouchers > press F5 (Payment).
Enter the other details as shown below:

Create/alter salary details
Add the pay head for salary advance and specify the amount to be deducted from the employee’s salary.
Record Payroll Voucher for deduction towards Salary Advance
- Gateway of Tally > Vouchers > press F10 (Other Vouchers) > type or select Payroll.
Alternatively, press Alt+G (Go To) > Create Voucher > press F10 (Other Vouchers) > type or select Payroll. - Press Ctrl+F (Autofill) > select Payroll Autofill > select User Defined in the Process for field.
- Record the payroll voucher, by entering the deductions made from the employee’s salary
- Record another payroll voucher for making the salary payment.
View the Pay Slip
- Press Alt+G (Go To) > type Pay Slip > select Single Pay Slip > select the employee name > and press Enter.
View the balance Advance Salary amount to be recovered
- Press Alt+G (Go To) > type or select Employee Pay Head Breakup.
- Select Advance to Employees. The details appear as shown below:

Overtime allowance can be calculated based on basic pay per hour.
To calculate the Overtime Allowance based on the Per Hour Basic Pay (or Basic Pay and DA) received;
- Create/alter basic pay head.
- Create/alter overtime hours as a Production Type.
- Create/alter overtime allowance pay head.
- Define salary details.
- Record attendance and overtime details.
- Record a payroll voucher.
Create/Alter Basic Pay Head
Create/Alter the basic pay head with calculation period, for example, 30 days in each month.

Similarly, create DA Pay Head, if required.
Create/Alter Overtime hours as a Production Type
Create the Attendance/Production Type as shown below:

Create/Alter Overtime Allowance Pay Head
Create the Overtime Allowance Pay Head as shown below:
Note: If DA is not applicable, then the OT Allowance formula will have only basic pay component for the computation of OT.
The above pay head should not affect the net salary and hence the option is set to No. Basic salary divided by total present days will give per day salary. Assuming that there are 8 hrs in a day,
8 Hours = 100%
1 Hour = 12.50%
Note: In this case study, 8 hours is considered as working hours. In other cases, the following table can be used to compute the Per Hour OT amount.
| Working Hours | Percentage of Basic | Overtime Percentage |
| 8 | 100 | 12.5 |
| 8 | 200 | 25 |
| 8 | 125 | 15.625 |
| 9 | 100 | 11.11 |
| 9 | 125 | 13.8888 |
Define Salary Details
Provide salary details as shown below:
Record Attendance and Overtime details
Create the attendance voucher as shown below:

Record payroll voucher as shown below:

You can follow the solution given below to update the balances of loans and advances brought forward from previous year.
- Create a ledger for Loans & Advances
- Modify the Loans & Advances pay head
- Create/Alter salary details for employees
- View Trial Balance report
- Create a Journal Voucher for the adjustment entry
- Check Pay Slip breakup and other reports
For more information, refer to the Carry Forward Balance Loans and Advances topic
Employee Details can be exported into Microsoft Excel using ODBC feature. To export the data:
- Enable ODBC server capability in TallyPrime.
- Open Microsoft Excel and perform the query for Tally database.
- Format the Microsoft Excel sheet as per requirement.
Enable ODBC Server Capability in TallyPrime
- Press F1 (Help) > About.
- Select the option Client/Server and ODBC Services and press Enter.
- Set Enable ODBC to Yes.
- In the Port field, specify the required ODBC port (for example, 9000).
Note: ODBC port number can be any number above 9000.
- The details will appear in the About page.
Open Microsoft Excel and perform the query for Tally database
- Open a new Microsoft Excel Sheet.
- Click Data > Get Data > From Other Sources > From ODBC.
- In the Navigator, select the company name, and select Employees.

- Click Transform Data > Close and Load. The imported data in excel sheet will appear as shown below:
Format the Excel to organize data as per your requirement.
You can calculate the TDS (Tax Deducted at Source), on the interest paid on the unsecured loans.
Consider the following example: On 1-4-2021, ABC Company, took an unsecured loan of Rs. 5,00,000 from Kiran @ 10% rate of Interest. Interest is payable monthly after deducting TDS.
- Prerequisites
- Create Ledgers
- Record the Receipt Voucher (receipt of loan amount)
- Create Voucher Class for Credit Note
- Record the Credit Note to account the Interest Payable on Unsecured Loan
- Resolve the exception by linking the booking voucher to deduction voucher
- Record a Journal Voucher to Deduct Tax at Source (using Helper)
Prerequisites
Press F11 (Features) and set the following options to Yes.
- Enable Bill-wise entry
- Enable Interest Calculation
Create Ledgers
Ledger for Unsecured Loan
- Gateway of Tally > Create > Ledger.
Alternatively, press Alt+G (Go To) > Create Master > Ledger. - Enter the ledger Name, and group it under Unsecured Loans.
- Set the option Maintain balances bill-by-bill to Yes.
If you do not see this option, press F12 (Configure) and set Maintain balance Bill-by-Bill and For Non-Trading Accounts also to Yes. - Specify interest parameters.
- Set Activate interest calculation to Yes.
- In Interest Parameters screen set the parameters as shown:
If you do not see the option Override advanced parameters, press F12 (Configure) and set Use advance interest parameters to Yes.
- Enable the ledger to provide advance TDS details.
- Set the option Is TDS Deductable to Yes.
- Set Treat as TDS Expenses to No.
- Select the Deductee type.
- Set Deduct TDS in Same Voucher to Yes.
- Set Use Advanced TDS entries to Yes.
If you do not see this option, press F12 (Configure) and set the option Allow advanced entries in TDS masters to Yes.
- Provide the advanced TDS details.
- Set the option Ignore Surcharge Exemption Limit to No.
- Set the option Ignore Income Tax Exemption Limit to Applicable.
- Select Interest Other Than Interest on Securities.
- Set the option Set/Alter Zero/Lower Deduction to No.
- Enter Mailing Details and Tax Registration Details.
Expenses Ledger
To account for the expense of interest on unsecured loan, create the ledger as shown below.

TDS Ledger
To account for the tax deducted from the interest payable on unsecured loan, create the ledger as shown below.
Record the receipt voucher for receipt of loan amount
- Debit the unsecured ledger and enter the loan amount received.
- Enter the bill-wise details, and accept the details displayed in the Interest Parameter screen.
- Credit the bank/cash ledger, as needed.
Create Voucher Class for Credit Note
- Gateway of Tally > Alter > Voucher Type > type or select Credit Note > and press Enter.
Alternatively, press Alt+G (Go To) > Alter Master > Voucher Type > type or select Credit Note > and press Enter. - Tab down to Name of Class field and enter the Name of Class. Press Enter to view Voucher Type Class
- Set the option Use Class for Interest Accounting to Yes.

Record the Credit Note to account for the interest payable on unsecured loan
- Gateway of Tally > Vouchers > F10 (Other Vouchers) > type or select Credit Note.
Alternatively, press Alt+G (Go To) > Create Voucher > F10 (Other Vouchers) > type or select Credit Note. - Select the voucher Class created for the credit note.
- Credit the unsecured loan ledger, and press Enter to view Interest Details.
- In Interest Details screen, in Name field select the bill reference, Loan – 001 and save the interest details screen.
Note: Interest gets calculated as per the options set in the ledger master.
- Enter the bill-wise details.
- In Interest Parameter screen, specify ‘0’ in Rate field, as the interest is not being calculated on the accounted amount.
- Press Enter to confirm.
- Credit the Interest Payable ledger.
Note: In Credit Note while accounting Interest Payable, there is no provision to deduct the TDS.
- Accept the voucher. As always, press Ctrl+A to save.
This voucher will appear as an exception under No link is available in booking and booking with deduction voucher of Form 26Q.
Resolve the exception by linking the booking voucher to deduction voucher
- Press Alt+G (Go To) > type or select Form 26Q.
- Select Uncertain Transactions and press Enter.
- Select No link is available in booking and booking with deduction voucher and press Enter.
- Press Alt+L (Link All) to create the reference for the voucher.
The voucher will now appear under the Deduction at Normal Rate of Form 26Q.
Record a journal voucher to deduct tax at source using Autofill option
- Gateway of Tally > Vouchers > F7 (Journal).
Alternatively, press Alt+G (Go To) > Create Voucher > F7 (Journal). - Use autofill option to deduct TDS.
- Press Ctrl+F (Autofill).
- Select TDS Deduction as the Type of transaction.
- Enter the date until which the TDS transactions are to be considered for deduction.
- Select the party for whom the tax to be deducted in Party field.
- Select the nature of payment against which tax to be deducted in Nature of Payment field

The TDS Deduction details appear in the voucher.
- In the Bill-wise Details screen, select Agst Ref with the reference provided in the credit note, C/N-001.

- Accept the journal voucher. As always, you can press Ctrl+A to save.
Consider the example given below, for the procedure to create salary structure for employees based on gross salary.
| Gross Salary | Basic (60% of Gross) | HRA (20% of gross) | Conv (5% of Gross) | Medical (15% of Gross) | PT (As per Slab) | PF (12% of Basic) | |
| Hitesh | 17000 | 10200 | 3400 | 850 | 2550 | 200 | 1224 |
| Savita | 7500 | 4500 | 1500 | 375 | 1125 | 175 | 540 |
Create Gross Salary Pay Head
- Create a pay head for gross salary as Earnings of Employees.
- Select a user-defined group which can be excluded using voucher class while processing salary.
- Set the option Affects Net Salary to No.
Create Other Pay Heads
Create all the pay heads as computed value, with computation method as On Specified Formula.
The pay head for basic salary appears as shown below.
Create employee and define salary details
- Gateway of Tally > Create > Employee.
Alternatively, press Alt+G (Go To) > Create Master > Employees. - Enter the relevant details, and set Define salary details to Yes.
- Specify the salary structure by including the gross salary pay head as per the order shown below, as all the pay heads depends on the gross salary pay head.

Create Voucher Class
The voucher class should be created to exclude the gross salary pay value while processing the payroll voucher.
- Gateway of Tally > Alter > Voucher Type > Payroll.
Alternatively, press Alt+G (Go To) > Alter Master > Voucher Type > Payroll. - Enter the Name of Class.
- Exclude the user-defined group by selecting the same under Exclude these Groups (this group is used only for gross salary pay head).

- Accept the voucher type.
Process Payroll
- Gateway of Tally > Vouchers > F10 (Other Vouchers) > Payroll > select the voucher class.
Alternatively, press Alt+G (Go To) > Create Voucher > F10 (Other Vouchers) > Payroll > select the voucher class. - Press Ctrl+F (Autofill) > select Salary in the Process for field.
The salary will be processed as per the requirement. Similarly other pay components can also be processed.
Consider an example where basic salary is calculated on both present days and leave days (casual leave, sick leave, and so on). To create these pay heads, follow the steps given below:
Create Attendance Types
- Gateway of Tally > Create > Attendance/Production Type.
Alternatively, press Alt+G (Go To) > Create Master > Attendance/Production Type. - Enter the Name as Pay Days.
- Group it under Primary.
- Select Attendance/Leave with Pay in the Attendance Type field.

- Accept the screen. As always, you can press Ctrl+A to save.
- Create an attendance type for Present, by grouping it under Pay Days, as shown below:
- Create an attendance type for Casual Leave, by grouping it under Pay Days, as shown below:
- Create an attendance type for Sick Leave, by grouping it under Pay Days, as shown below:
- Create an attendance type for Paid Leave, by grouping it under Pay Days, as shown below:

Create Basic Pay as the pay head
- Gateway of Tally > Create > Pay Heads.
Alternatively, press Alt+G (Go To) > Create Master > Pay Heads. - Enter the Name as Basic Pay, as an Earnings for Employees.
- Set Affect Net Salary to Yes and specify the required name.
- Select the Calculation Type as Attendance, with Attendance/Leave with Pay set to Pay Days.
- Set the Calculation Period to Months of 30 Days.
- Accept the screen. As always, you can press Ctrl+A to save.
Define salary details
- Gateway of Tally > Alter > Define Salary > select the employee > and press Enter.
Alternatively, press Alt+G (Go To) > Alter Master > Define Salary > select the employee > and press Enter.

- Accept the screen. As always, you can press Ctrl+A to save.
Process Attendance to record presence and leave details
The attendance for Present and Leave can be captured using two separate Attendance Vouchers (using autofill) or single voucher (without using autofill).
- Record Attendance voucher.
The attendance voucher recorded without using autofill appears as shown below.
- Accept the screen. As always, you can press Ctrl+A to save.
Process Payroll
- Record a payroll voucher using autofill option, as shown below:
- In the Attendance Sheet, the details for different leaves (CL, SL and PL) along with the present days appear as shown below:

As per Section 192, TDS on salary is calculated for Payroll. For details on income tax, click here.
TallyPrime calculates PF admin charges and EDLI admin charges based on the rules specified by the PF department.
Both PF admin charges and EDLI admin charges are calculated based on PF Gross, which is a combination of pay heads used for the calculation of employee contribution to provident fund (A/C No 1) and EPS calculation (A/C No 10). The different components of salary (pay heads) participating in PF calculation are Basic Pay, Dearness Allowance (if any), and Retention Allowance (if any). In TallyPrime, when pay heads are being created for PF and EDLI admin charges, the calculates it On PF Gross.
Currently, the PF admin charges and EDLI admin charges are calculated at 1.10% and 0.01% of PF gross respectively with minimum of Rs. 500 for PF admin charges and Rs. 200 for EDLI admin charges.
When the PF admin charge is below Rs. 500 for the employees, the balance amount, that is Rs. 500 minus the calculated admin charges for all employees, is divided by the number of employees, and the amount is equally added to the PF admin charge against each employee as shown in the illustration below:
| Employee Name | Basic | DA | PF Gross of the employee |
| Employee A | 15000 | 7000 | 22000 |
| Employee B | 13000 | 5000 | 18000 |
Based on the above salary structure, the PF Admin charges @1.10% for both employees is Rs. 242 and Rs. 198 (total – 440). The difference from the minimum PF Admin charges payable is Rs. 60 [500-(242+198)]. Now dividing 60 by 2 employees and adding the resultant Rs. 30 (60/2) to each employee will give us Rs. 272 (242+30) for employee A and Rs. 228 (198+30) for employee B. Similar calculation goes for EDLI admin charge also.
Also, note that these charges are paid by employer, there is no impact on employee’s salary.
You can follow the steps given below, for the disbursement of salary based on the mode of payment selected for the bank.
- Ensure bank details are provided in the employee master.
- Open the Payroll Voucher, and press Ctrl+F (Autofill) > select all employees or group of employees.
- Select Salary Payable pay head as the Payroll/Bank/cash Ledger.
The payroll voucher displays the salary payable to each employee.
- Open a payment voucher to make the salary payment, and press Ctrl+F (Autofill) > select the Type of transaction as Payroll Autofill.
- Provide the other details.

The details in the payment voucher appear as shown below.
In Bank Allocations screen, the employee-wise mode of payment appears as shown below.
- Accept the payment voucher. As always, you can press Ctrl+A to save.
You can account for the employee’s total eligible leave in the year beginning. You can also check the remaining leave (deducting the availed leave) of the employees.
- Create the Attendance Type.
- Record the Attendance Voucher to account the total eligible leave.
Note: To capture employee's eligible leave, in Attendance Voucher enter the number with a negative symbol.
- Record the Attendance Voucher to account for the leave taken. During the year if employees avail leaves, record the attendance voucher by specifying the number of leaves availed.
In the above attendance voucher, you can observe that the current balance is (-22). Ajay is eligible for 24 days of leave in a year and in the month of April he has availed 2 days leave. After deducting the availed leaves, the remaining leave is displayed as the current balance. - Verify the remaining leaves. You can check the remaining leaves (with a negative symbol) in the Attendance Sheet. In this report, the leave taken accounted in positive number, will be adjusted against eligible (in negative symbol) and the balance will be displayed.

You can calculate the PF for an employee whose basic salary is greater than Rs.6500, by specifying the PF slab based on Attendance. That is, if the employee is absent for a few days, the PF should get calculated on the pro-rated slab amount based on attendance.
For example:
- Vijay’s Basic Salary is Rs. 10,000.
- He is absent for 2 days.
- Employee PF @ 12% is calculated on the slab of Rs. 6,500. When the employee is absent for 2 days even the slab should be pro-rated.
Therefore PF should be [(6500/30)*28] = 6067*12% = 728
Solution:
- Create a group called Calculation Group under Indirect Expenses.
- Create a pay head for Basic Salary.
- Create a pay head for PF gross under the Calculation Group, as shown below:
The PF Gross Pay Head is created to give a slab amount for PF calculation. This way the PF calculation does not depend on the basic salary.Note: PF Gross is created under Calculation Group, so it can be excluded during Payroll Process and not affect Net Salary.
- Create Employee PF @ 12% on Specified Formula as PF Gross, as shown:
- Similarly create Employer’s PF @ 8.33% taking PF Gross as the Specified Formula.
- Create Employer’s PF @ 3.67% taking Employee PF @ 12% – Employer’s PF @ 8.33% as the Specified Formula.
- Define the Salary Details for the employees as follows. For Vijay, specify the basic salary as 10000, with PF to be calculated on 6500.

- For Ajay, specify the basic salary as 7000, with PF to be calculated on 6500.
Note: Salary Details can also be defined from the employee/employee group master.
- Create a voucher class to exclude the Calculation Group during the voucher entry.
- Exclude the Calculation Group, and select the Salary Payable ledger.
- Record the attendance voucher for absence of 2 days for both the employees.
Process the Salary using the Voucher Class
- Gateway of Tally > Vouchers > press F10 (Other Vouchers) > Payroll.
Alternatively, press Alt+G (Go To) > Create Voucher > press F10 (Other Vouchers) > Payroll. - Select the voucher class.
- Press Ctrl+F (Autofill) > select Payroll Autofill as the Type of transaction.
- Select Salary under the Process for field.
- Select All Items in the Employee/Group field.
- Press Y to accept the screen. As always, you can press Ctrl+A to save.
The PF will be calculated on pro-rated slab amount (PF Gross) based on attendance.
Consider an example where the loan of Rs. 10,000 was given to an employee in the month of February 2021. A total of Rs. 4000 was recovered in two instalments of Rs. 2000 each from the salaries of Feb and Mar 2021. Balance loan was to be recovered while splitting the company at the end of Mar 2021 was Rs. 6000.
- Press Alt+G (Go To) > type or select Employee Pay Head Breakup.
Alternatively, Gateway of Tally > Display More Reports > Payroll Reports > Employee Pay Head Breakup. - Select the Pay Head grouped under Loans & Advances, and press Enter.
The Employee Pay Head Breakup report displays the closing balance of the loan pending for recovery as shown below:

Once the Company is split, the same report appears as shown:

The Pay Head created under Loans and Advances will have the details of the pending loan amount that needs to be recovered.
The total pending loan amount to be recovered, is carried forward to the new company after splitting. However, the information of employees from whom the loan is pending is not carried forward.
Now you need to allocate the pending loan amount to the employee’s account.
Create a ledger under Loans & Advances
- Gateway of Tally > Create > Ledger.
Alternatively, press Alt+G (Go To) > Create Master > Ledger.
Transfer the Opening Balance from Pay Head to Ledger
Manually delete the opening balance from the Pay Head, and save the Pay Head as shown:
Add the opening balance to the ledger created for employee loans.
Record a journal voucher to transfer the loan amount back to the Pay Head, and allocate it to the respective employee
- Press F11 (Features) and set the option Enable Cost Centres to Yes.
- Enable the option Cost centres are applicable in the ledger.
Record the Journal voucher
- Gateway of Tally > Vouchers > F7 (Journal).
Alternatively, press Alt+G (Go To) > Create Vouchers > F7 (Journal). - Select the pay head and ledger as shown below.
Check the Employee Pay Head Breakup Report
- Gateway of Tally > Display More Reports > Payroll Reports > Employee Pay Head Breakup.
Alternatively, press Alt+G (Go To) > type or select Employee Pay Head Breakup. - Select the Pay Head (Staff Salary Advance) grouped under Loans & Advances (Assets), and press Enter.

You can track the arrears paid to the employees by creating the required pay heads, a voucher class for payroll, and process the payroll. The details will appear in the reports.
Create a Pay Head for Arrears under Current Liabilities
- Gateway of Tally > Create > Pay Heads.
Alternatively, press Alt+G (Go To) > Create Master > Pay Heads. - Enter the details as shown:
Create a voucher class for payroll
- Gateway of Tally > Alter > Voucher Type > Payroll.
Alternatively, press Alt+G (Go To) > Alter Master > Voucher Type > Payroll. - Enter the Name of Class.
- Press Enter. The Voucher Type Class creation screen appears.
- Provide the details as shown below:
- Press Enter to accept.
- Accept the screen. As always, you can press Ctrl+A to save.
Record Payroll Voucher
Let us assume that the payroll has been processed for the month of April. Now, as the salary is revised from the month of April (for example, Basic has increased from Rs. 10,000 to 12,000 and you have updated the same in the salary details of the employee), you need to record the payroll voucher again for the month of April, by selecting the Voucher Class to track the Arrears.
- Gateway of Tally > Vouchers > press F10 (Other Vouchers) > Payroll.
Alternatively, press Alt+G (Go To) > Create Voucher > press F10 (Other Vouchers) > Payroll. - Select the voucher class.
- Press Ctrl+F (Autofill) > select Payroll Autofill as the Type of transaction.
- Select Salary under the Process for field.
- Accept the screen. As always, you can press Ctrl+A to save.
Track the arrears by viewing the Report
- Gateway of Tally > Display More Reports > Payroll Reports > Pay Head Employee Breakup > select the required employee.
Alternatively, press Alt+G (Go To) > type or select Pay Head Employee Breakup.
- Drill down further to view the Ledger Monthly Summary report.
Process the Arrears payment using Payment Vouchers

Check the Reports
- Gateway of Tally > Display > Payroll Reports > Pay Head Employee Breakup > and select the employee.
Alternatively, press Alt+G (Go To) > type or select Pay Head Employee Breakup > and select the employee.
Drill down further to view the Ledger Monthly Summary Report.
Consider the scenario where you need to configure the conveyance in Payroll to be calculated at 5% of the Basic Salary, provided the basic salary does not exceed Rs. 20,000. If the Basic salary exceeds Rs. 20,000, then the conveyance amount needs to be calculated accordingly.
- Create the pay head for conveyance.
- Gateway of Tally > Create > Pay Heads.
Alternatively, press Alt+G (Go To) > type or select Pay Heads > and press Enter. - Create the conveyance pay head with the options configured as shown below:
- Gateway of Tally > Create > Pay Heads.
- Update the salary details.
- Gateway of Tally > Alter > type or select Define Salary > and press Enter.
Alternatively, press Alt+G (Go To) > Alter Master > type or select Define Salary and press Enter. - Select the conveyance pay head.
- Gateway of Tally > Alter > type or select Define Salary > and press Enter.
- Record a payroll voucher.
- Gateway of Tally > Vouchers > F10 (Other Vouchers) > press Ctrl+F (Autofill) > specify the details as shown below:

- Based on the salary details defined for:
- Akshay is above Rs. 20,000, the conveyance is calculated at a flat rate of 1000.
- Vishal is 10,000, the conveyance is calculated at 5% of basic salary, as 500.
- Gateway of Tally > Vouchers > F10 (Other Vouchers) > press Ctrl+F (Autofill) > specify the details as shown below:
Note: Salary Details can be Created/Altered from Employee/Employee Group Master.
To calculate the Bonus amount based on each month’s salary and accumulate this amount to be payable at the year-end, follow the steps given below:
Create a Group for Bonus under Indirect Expenses
- Gateway of Tally > Create > Group.
Alternatively, press Alt+G (Go To) > Create Master > type or select Group > and press Enter.
Create Bonus Payable Pay Head under Current Liabilities
- Gateway of Tally > Create > Pay Heads.
Alternatively, press Alt+G (Go To) > Create Master > type or select Pay Heads > and press Enter.

Create Bonus Pay Head
- Gateway of Tally > Create > type or select Pay Heads.
Alternatively, press Alt+G (Go To) > Create Master > type or select Pay Heads.
Note: Percentage may be changed as per your requirement.
Creating Voucher Class for Salary Payable to exclude Bonus pay Group
- Gateway of Tally > Alter > Voucher Type > type or select Payroll > press Enter.
Alternatively, press Alt+G (Go To) > Alter Master > Voucher Type > type or select Payroll > press Enter.

- Select the group and pay head as shown below:
Similarly, create another Voucher Class called Bonus.

- Select the group and pay head as shown below:

Define Salary Details to include Bonus Pay Head
Note: Salary Details can be Defined from Employee/Employee Group master. Click here to know how.
Process Payroll
Record the payroll voucher using voucher class.
- Gateway of Tally > Vouchers > F10 (Other Vouchers) > type or select Payroll > press Enter.
Alternatively, press Alt+G (Go To) > Create Voucher > F10 (Other Vouchers) > type or select Payroll > press Enter. - Select the Payroll voucher class for calculating the salaries for each month.
- Select Bonus in the month along with the Payroll when you want to pay the Bonus.
Process Payroll without Bonus
Process the salary by excluding Bonus Pay Head using Payroll voucher class.
- Press Ctrl+F (Autofill) and record the voucher.
Now the salary for the month of April is processed, and the amount is passed to Salary Payable Ledger.
Similarly, you can process the other components such as Employer PF Contribution also.
Process the Bonus payable
The bonus should be processed for all the months and paid at the end of a specific period.
- Press Ctrl+F (Autofill) and enter the details as shown below:
The complete Payroll Voucher for Bonus computation is as shown:

The Bonus amount will be calculated and passed on to Bonus Payable Ledger.
You cannot enter the Leave Opening Balance for all the employees when creating a new Company for Payroll.
This will be handled when the Leave Management module is provided as part of the payroll module in TallyPrime future releases.
The Payroll Autofill button is only available in Single Entry mode. In the Double Entry mode, the Autofill button is not available and hence you need to change the mode to Single Entry by pressing Ctrl+H (Change Mode) and selecting the option Double Entry from the List of Modes/Usages.
The employees’ signature can be taken on the Pay Sheet while making the payment to the Employee. TallyPrime provides the option to print a Pay Sheet with additional width.
You can also affix a revenue stamp and sign the Pay Sheet printed with additional width.
The Employer’s Contribution towards PF is divided into two parts:
- 67% which goes to PF A/c No. 1 (EPF Account)
- 33% or a maximum of Rs. 541, which goes to PF A/c No. 10 (EPS Account)
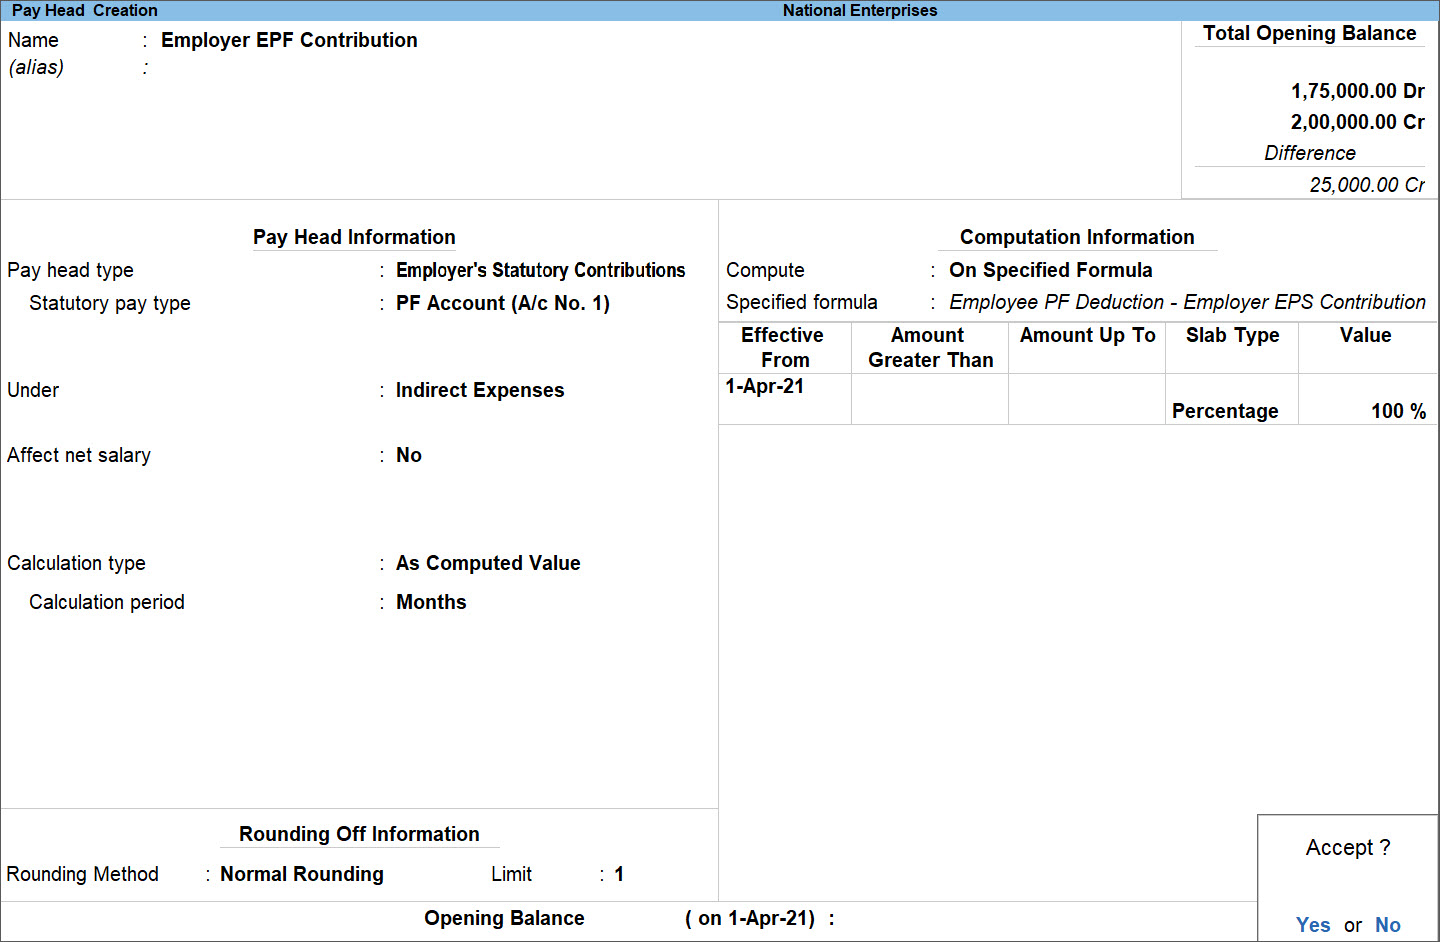
For the employees more than 58 years the entire amount should be deposited to A/c No. 1 and hence you need to create a separate Pay Head for Employer PF Contribution and the same should be included in the Employee’s Salary Details.
To create separate Pay Head only for employees more than 58 years:
- Gateway of Tally > Create > Pay Heads > press Enter.
Alternatively, Alt+G (Go To) > Create Master > Pay Heads > press Enter. - Enter the details in the Pay Head Creation screen as shown below:
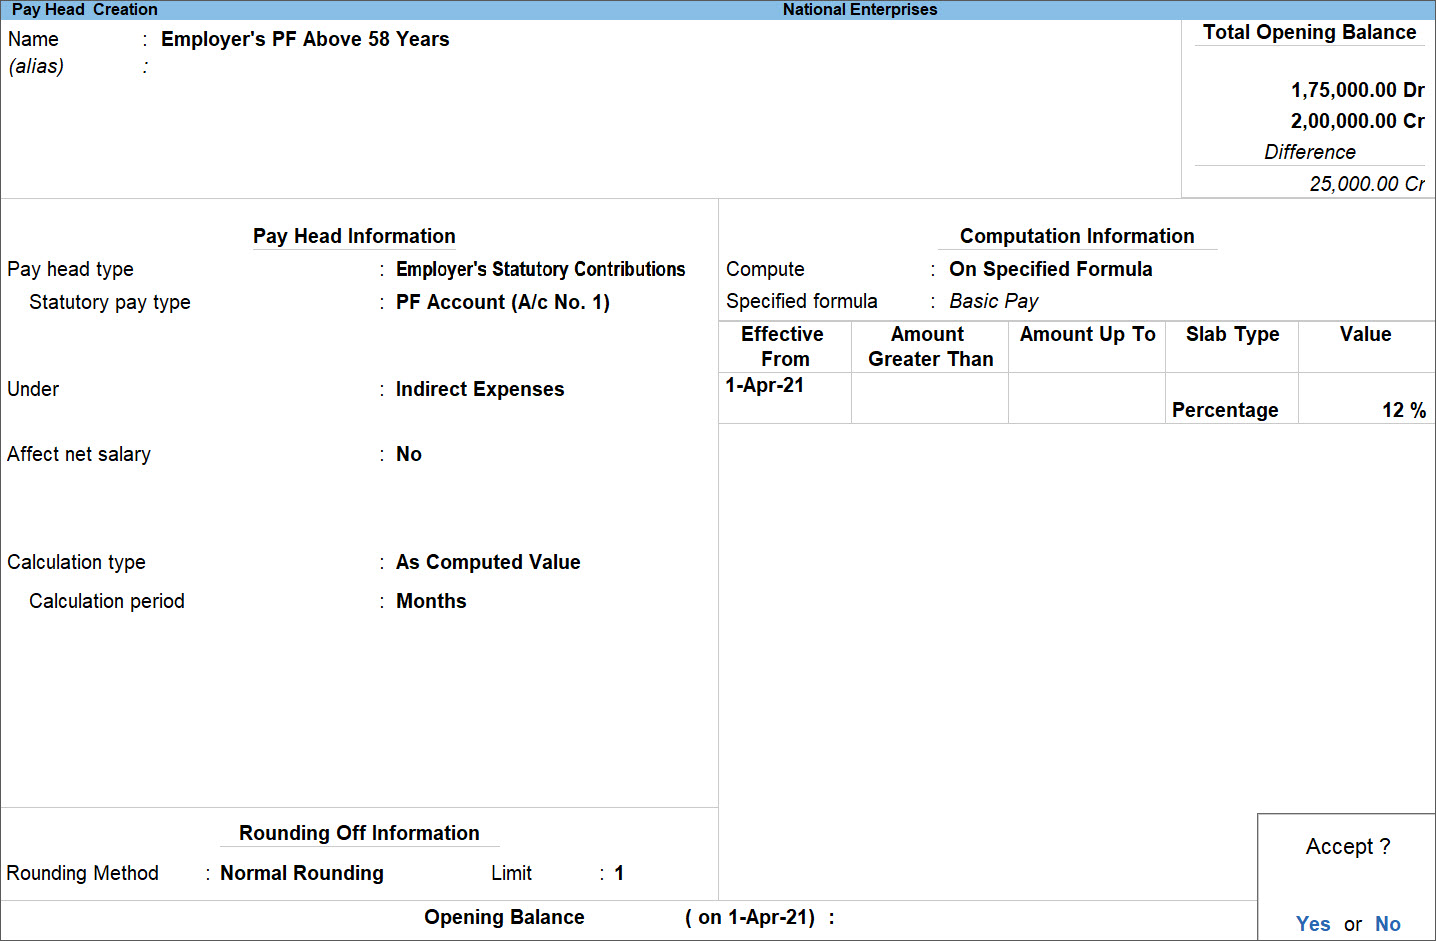
Note: If the PF contribution is made on maximum of 6500, the same can be specified in the Amount Up To field under Computation Information.
- Alter the Employee’s Salary details by including the above Pay Head and removing the Pay Heads created for PF @ 3.67% and EPS @ 8.33% by specifying a new Effective Date as shown:
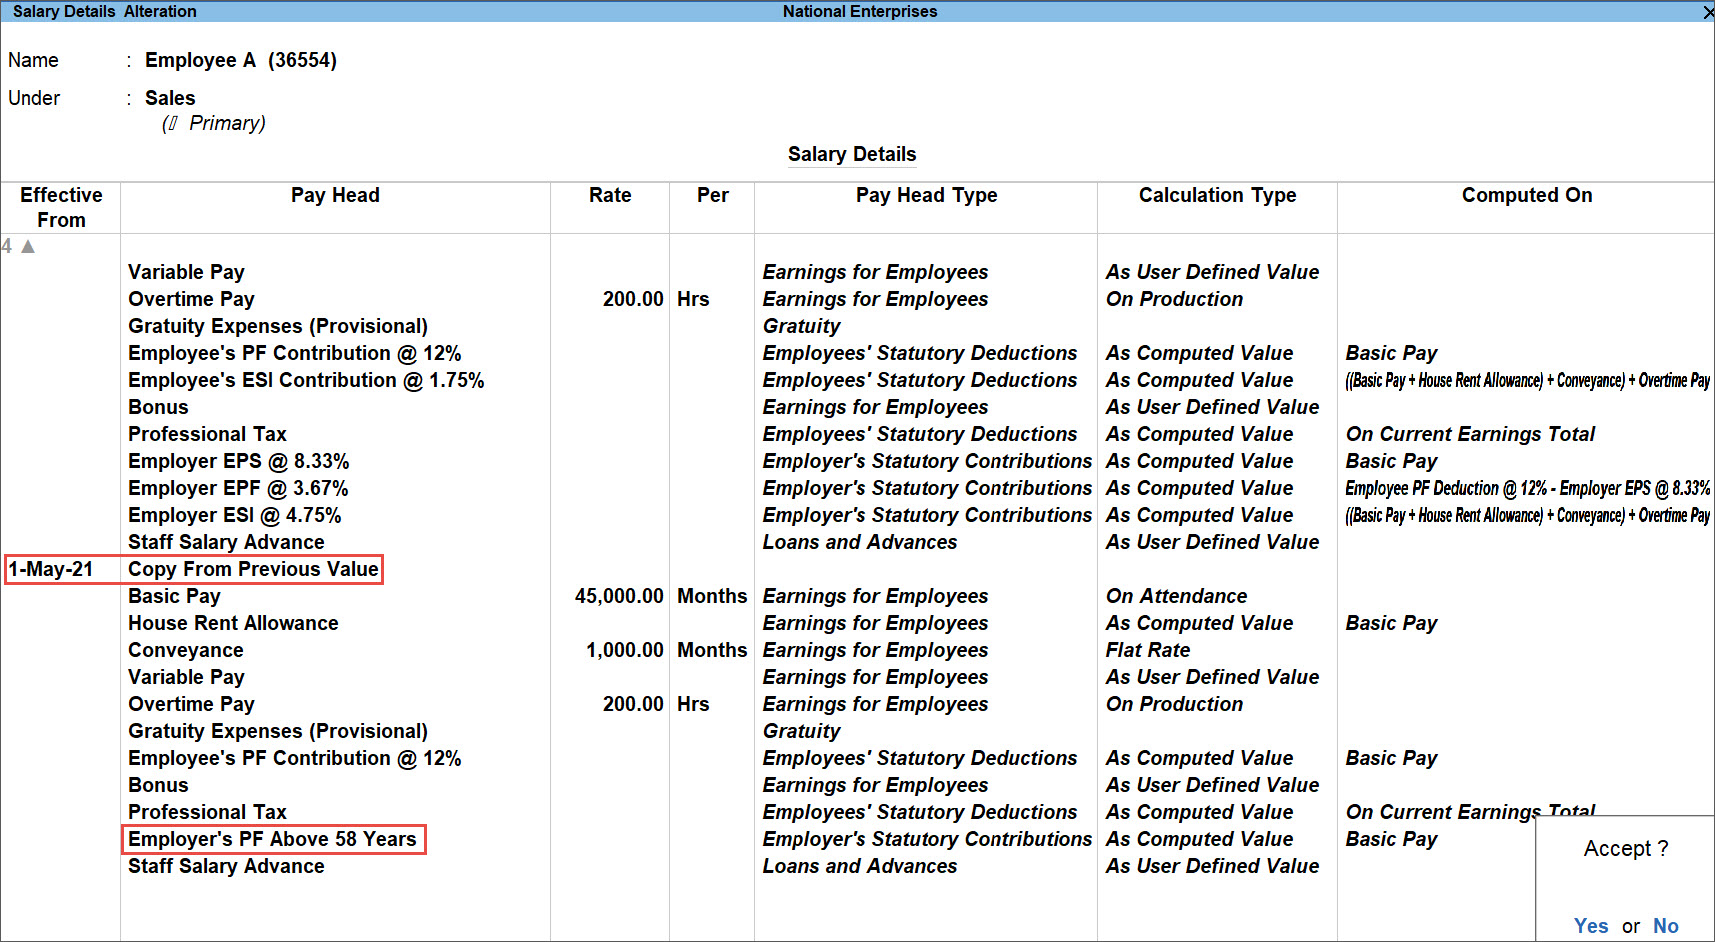
Note: EPS Account Number should be removed in Employee Master for the employees more than 58 Years of age.
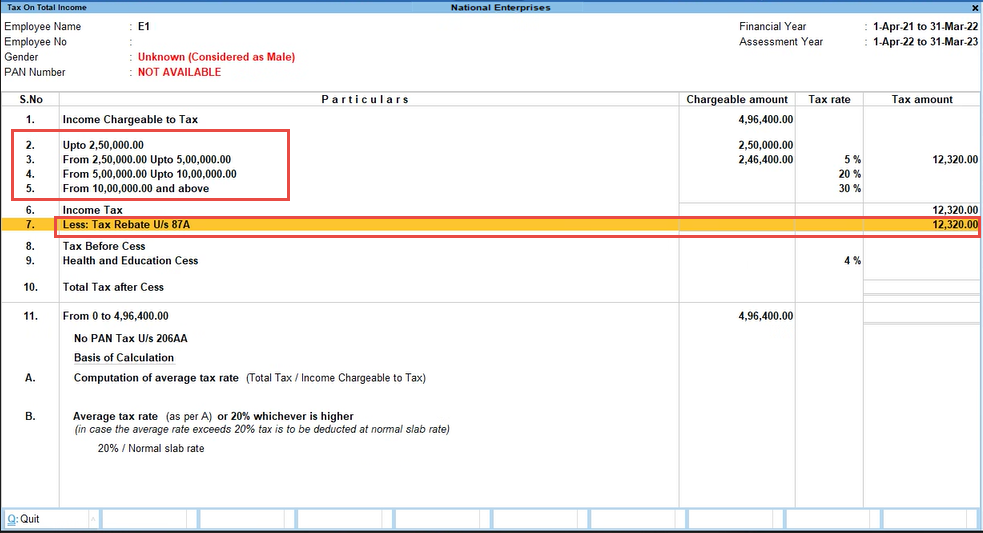
Yes, a Tax Rebate (U/s 87A) calculated based in the different slabs of income, as shown in the image below (Applicable on the income of persons whose taxable income does not exceed Rs. 5,00,000).
- Ensure that the Salary Details have been defined appropriately for the employee(s) for whom income does not exceed Rs. 5,00,000.
- Record salary payment entry.
The effect of tax rebate can be seen in Tax on Total Income report.
- Press Alt+G (Go To) > Income Tax Computation > select the employee > press Enter.
- From the Income Tax Computation screen, select Tax on Total Income.
The following screen appears:
According to the Employee State Insurance (ESI) scheme, the contribution to Employee State Insurance Corporation comprises the employer’s contribution and the employee’s contribution at specified rates. Currently, the employee’s contribution rate is 1.75% of the wages received and that of the employers is 4.75% of the wages paid or payable to the employees in a wage period.
Employees receiving a daily wage below Rs. 100/- (or monthly wage below Rs. 3000) are exempted from contribution to ESI. However, employers will contribute their share (that is, 4.75%) for these employees. On the other hand, employees receiving a monthly wage of more than Rs. 21,000 are not eligible for the ESI scheme.
ESI contributions from the employee and employer are automatically calculated in TallyPrime while processing salary and ESI payment transactions.
- Press Alt+G (Go To) > Alter Master > Payroll Income Tax Configuration > Enter.
Alternatively, Gateway of Tally > Alter > Payroll Income Tax Configuration > Enter.
The Tax Configuration screen appears:

- Select Value of Perquisites u/s 17(2) (as per Form 12BA).
- Provide necessary details under Income Tax Allowance Setup.
- Select Perquisite Details (Form 12BA) – as Single Employee/Multi Employee and select the employee name.
- In the Perquisites screen, select Rent Free Accommodation under Name of Perquisite.
- Enter the Effective From date from which this is applicable, and enter the Value for the year to be taxed.
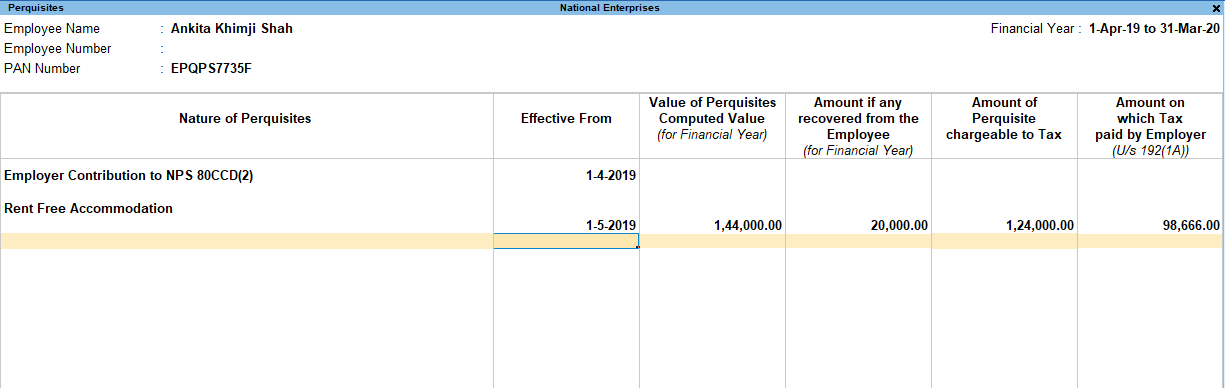
- Accept the screen. As always, press Ctrl+A to save.
Based on the details you have provided, Income Tax will get deducted on Rent Free Accommodation. Similarly, you can enter the value of other perquisites.
The current Professional Tax slabs for the state of Maharashtra as given below:
- For monthly salaries less than Rs. 7500 – Nil
- For monthly salaries from Rs. 7501 to Rs. 10,000 – Rs. 175 per month
- For Salaries more than Rs. 10,000 – Rs. 2500 p.a. The amount can be paid in the following manner:
- 200 per month except for the month of February.
- 300 for the month of February alone.
To implement the above scenario in TallyPrime, the Professional Tax Pay Head should be created with multiple slabs for one year with different Effective Dates in the Computation Information section.
The completed Professional Tax Pay Head Creation screen for the above scenario is shown below:
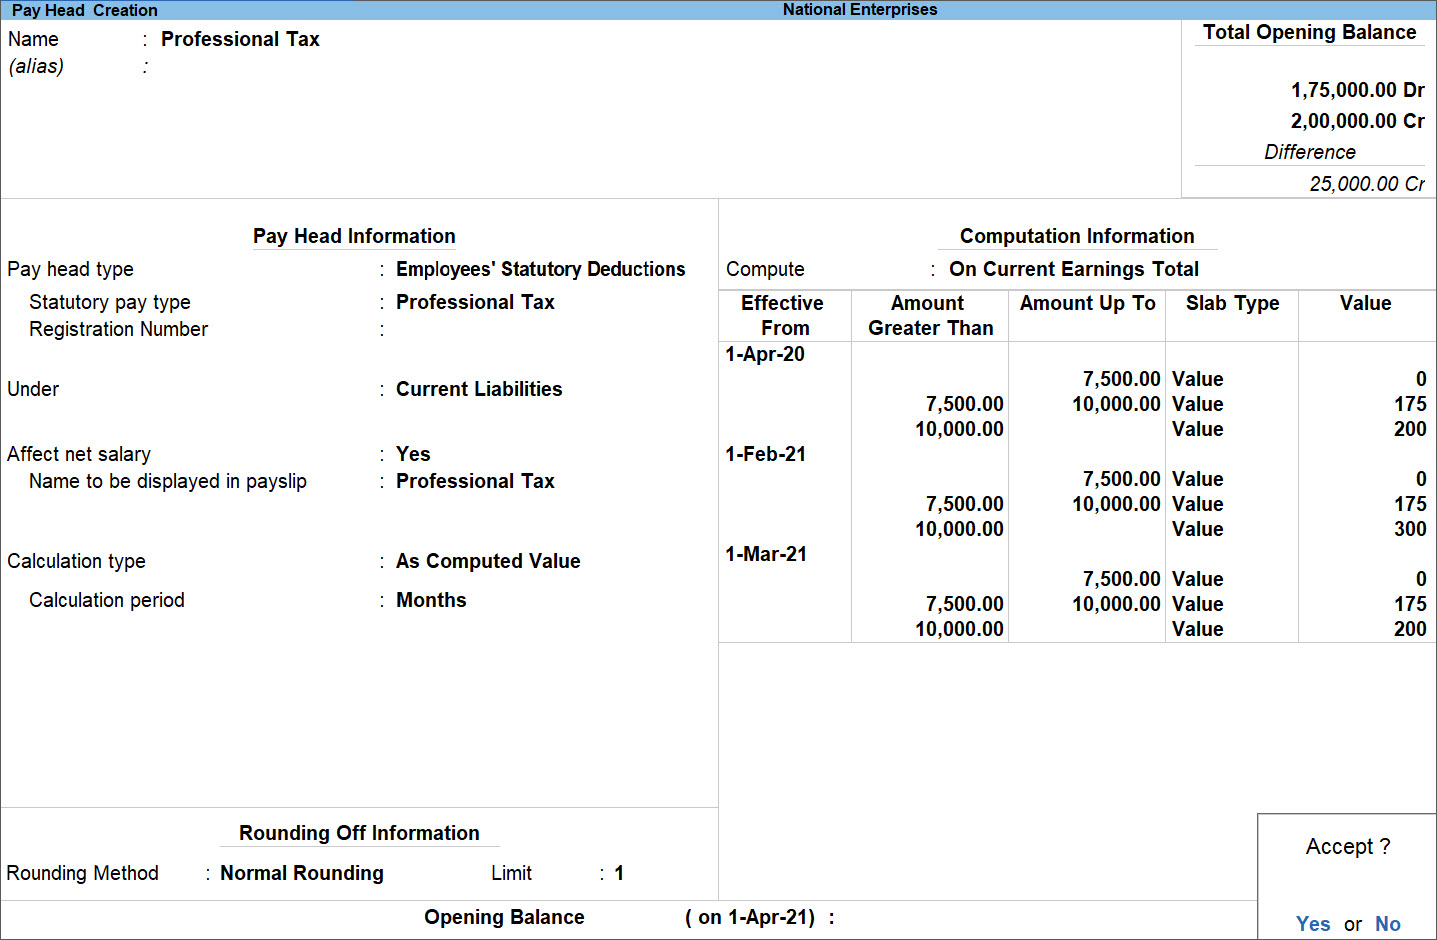
Note: The slab rates should be changed in the subsequent year also as shown in the above screen.
You cannot calculate the Leave encashment amount using the Payroll module. But you can handle the Leave encashment amount calculated outside of Payroll, and the related effects on PF, ESI, and PT are also managed in the Payroll module.
For more information, you can visit our website https://tallysolutions.com/ for the detailed product roadmap.
Some pay components are considered for the ESI Amount computation once the Employees falls under ESI purview, but the same may not be used for the ESI eligibility computation. e.g. Overtime which is not regular in nature is usually not considered for ESI Eligibility but once the Employee starts paying ESI, even the Overtime amount will be considered to compute the ESI Contributions.
In TallyPrime, a new feature has been provided in the Pay Head Creation screen to allow or disallow the particular Pay Head (which is not regular in nature). e.g. Overtime.
The Overtime Pay Head Creation/Alteration screen appears as shown:
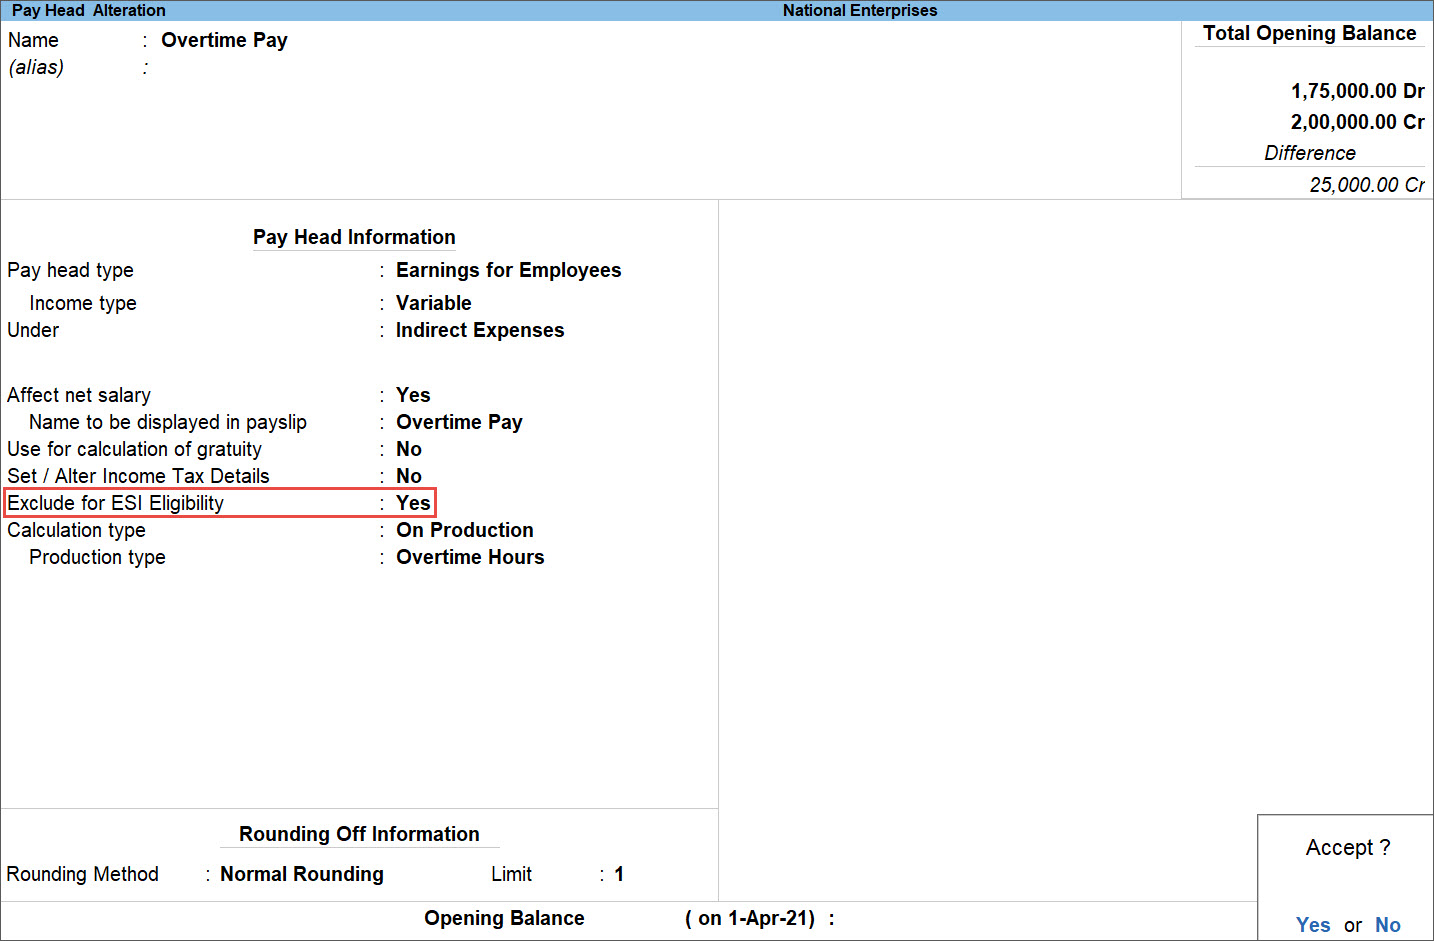
Note: The Exclude for ESI Eligibility option will be available in the Pay Head Creation/Alteration screen, if Exclude Pay Head for ESI eligibility is set to Yes under F12 (Configure).
The ESI Pay Heads for both Employee and Employer should also consider the Overtime Pay Head for the Computation purpose in the specified formula.
Employee ESI deduction Pay Head is as shown:

Employer’s ESI contribution Pay Head is as shown:
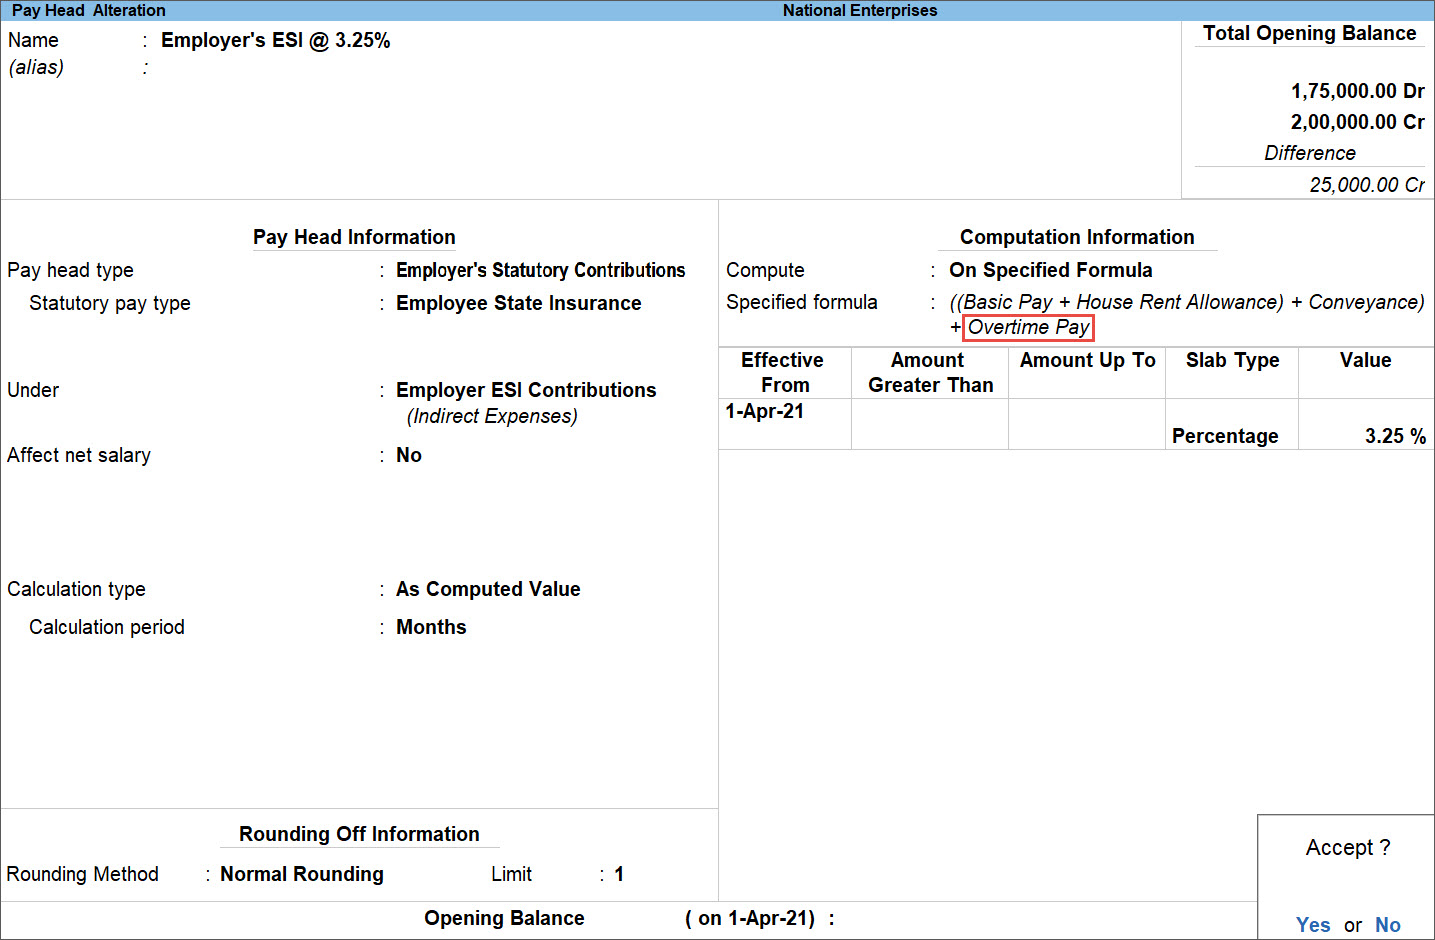
If the Pay Heads are created as per the above descriptions, then the computation for the ESI Amounts will consider the Overtime Pay Head though it’s not considered for the ESI Eligibility criteria.
The PF Contribution from Employer and Employee can be either on the entire Basic (or Basic+DA) or it can be on a maximum of Rs. 6500 (Basic or Basic +DA) i.e. a maximum of Rs. 780 is contributed by both Employer and Employee.
Employees share of PF goes to EPF (A/c. No -1), while the PF Contribution from Employer is further divided into two parts:
- EPF (A/c. No -1)
- EPS (A/c. No- 10)
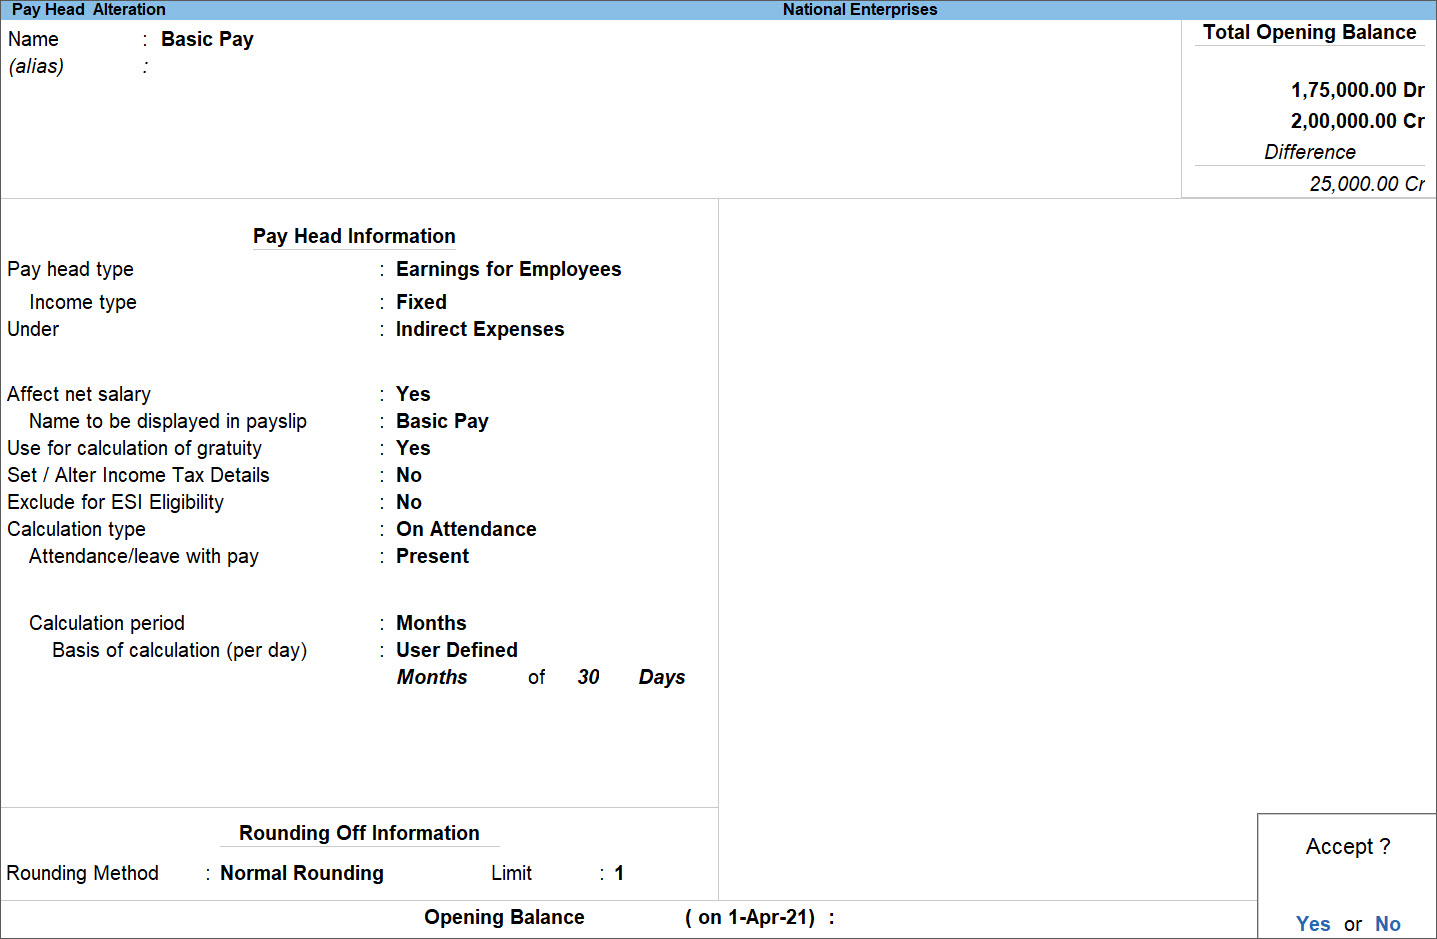
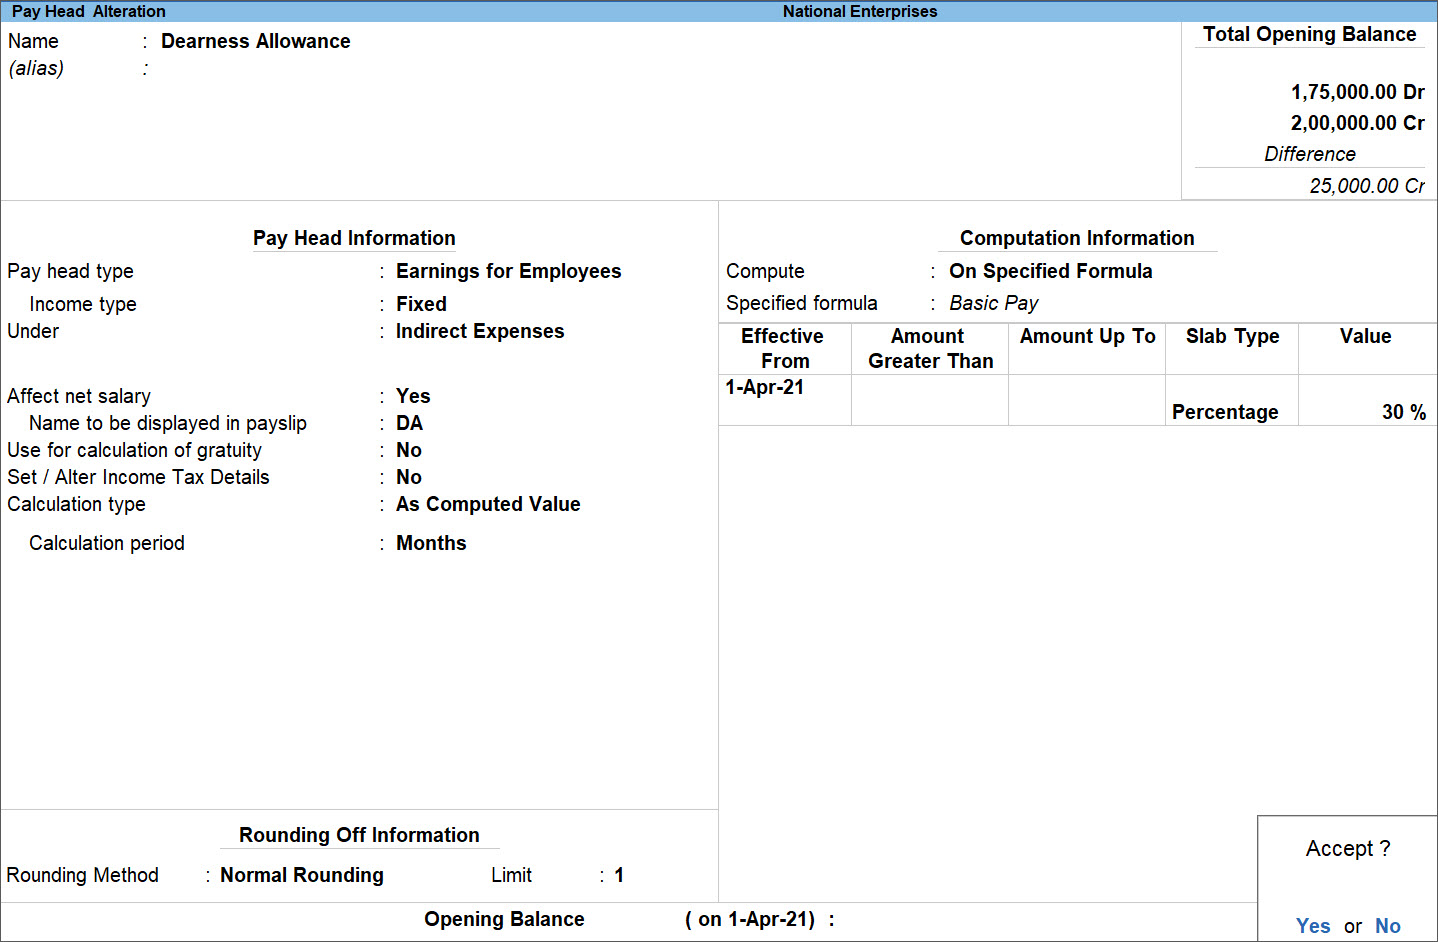
Let us assume that PF is computed on Basic and DA components and DA is 30% of Basic salary.
- Create the following Pay Heads:
Basic Pay Head
DA Pay Head
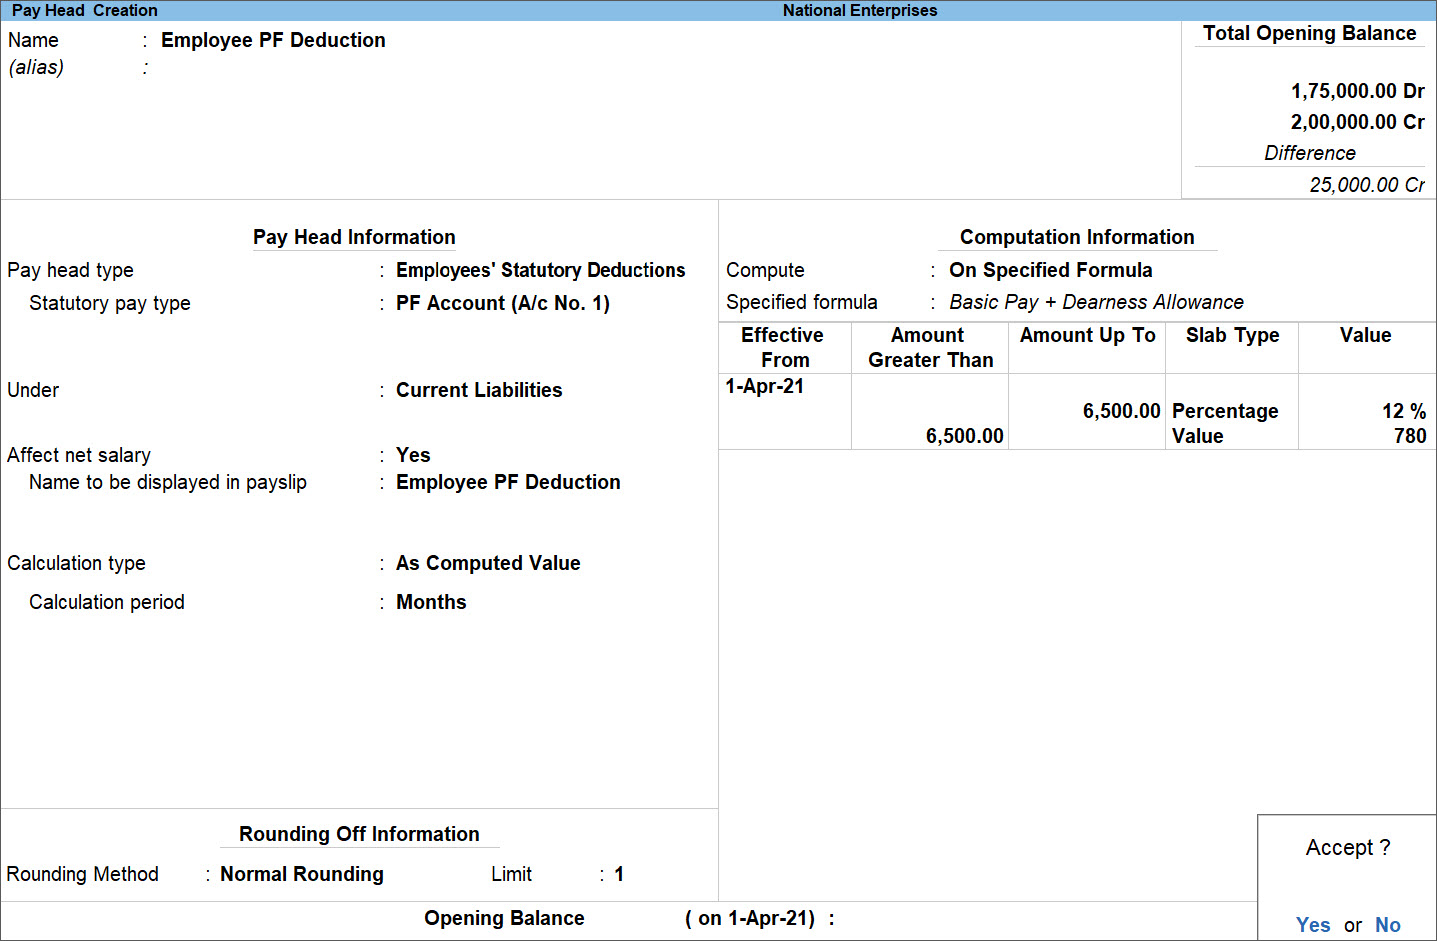
Employee PF Deduction Pay Head
Employer EPS Contribution Pay Head
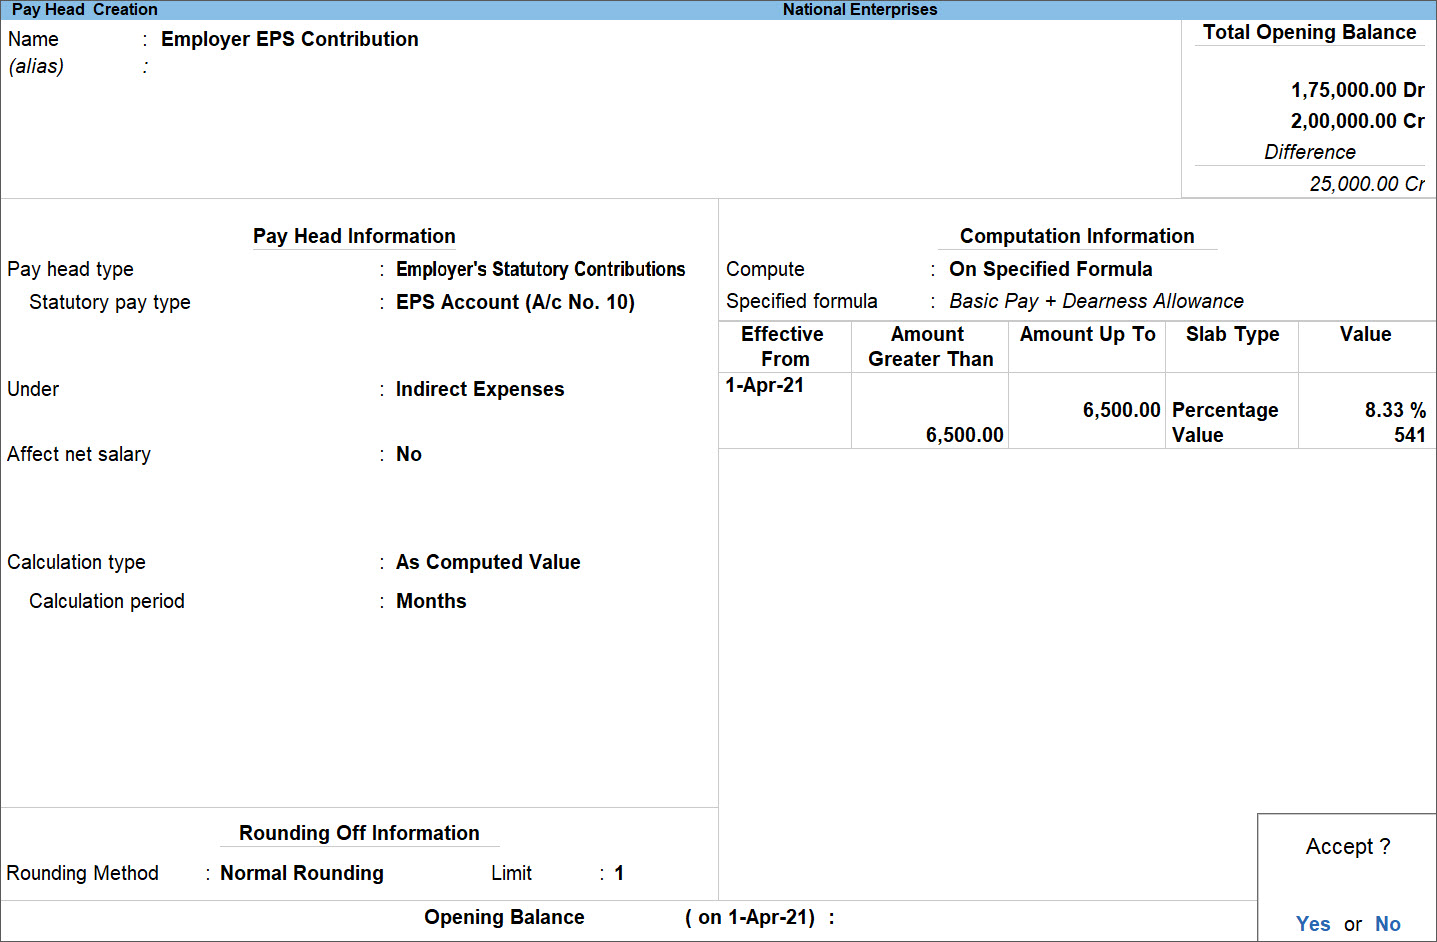
Note: 8.33% of 6500 is Rs. Rs. 541.45 which is rounded off to 541 while creating the Pay Head.
Employer EPF Contribution Pay Head
Note: The Pay Heads should be created in the specified orders as the Employer EPF Contribution Pay Head is dependent on the Employee EPF Deduction and Employer EPS Contribution Pay Heads. In Salary Details also, the Pay Heads should be specified as per the order mentioned.
You can convert Cost Centres masters to Employee masters.
- Gateway of Tally > Alter > Cost Centre > press Enter.
Alternatively, press Alt+G (Go To) > Alter Master > Cost Centre > press Enter. - Select Cost Centre that has to be converted to an Employee master, from List of Cost Centres. The Cost Centre Alteration screen appears as shown below:
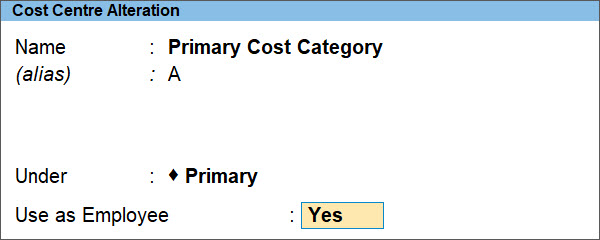
- In the Cost Centre Alteration screen, set the option Use as Employee to Yes.
- Press Ctrl+A to save. The Cost Centre gets converted into an Employee master.
Note: More than one Cost Centre can be converted into Employee Masters through Multi Cost Centres alteration screen.
Form 16 displays the amount based on the Payroll vouchers processed (salary paid) till date, whereas the Income Tax Computation report displays the Yearly Projection.
Note: Both the reports will match by the end of the Financial Year.
Labour Welfare Fund is a fund constituted for financing and conducting activities to promote welfare of labour in the State. Every employee and every employer has to pay the yearly specified contribution to the fund. Contribution to the fund by employee, employer and state Government (if any) and the month in which it has to be deducted (from employees) and paid varies from state to state.
For example: In Karnataka, in respect of every employee whose name stands in the register of an establishment on 31st December of a year sum of [three rupees, six rupees and three rupees] respectively shall be payable as contribution for that year by the concerned employee, the employer and the state Government. The employer’s contribution and the employee’s contribution in respect of a year shall be paid by the employer to the Board on or before 15th January of the following year.
- Create the Labour Welfare Fund Pay Head as shown below:
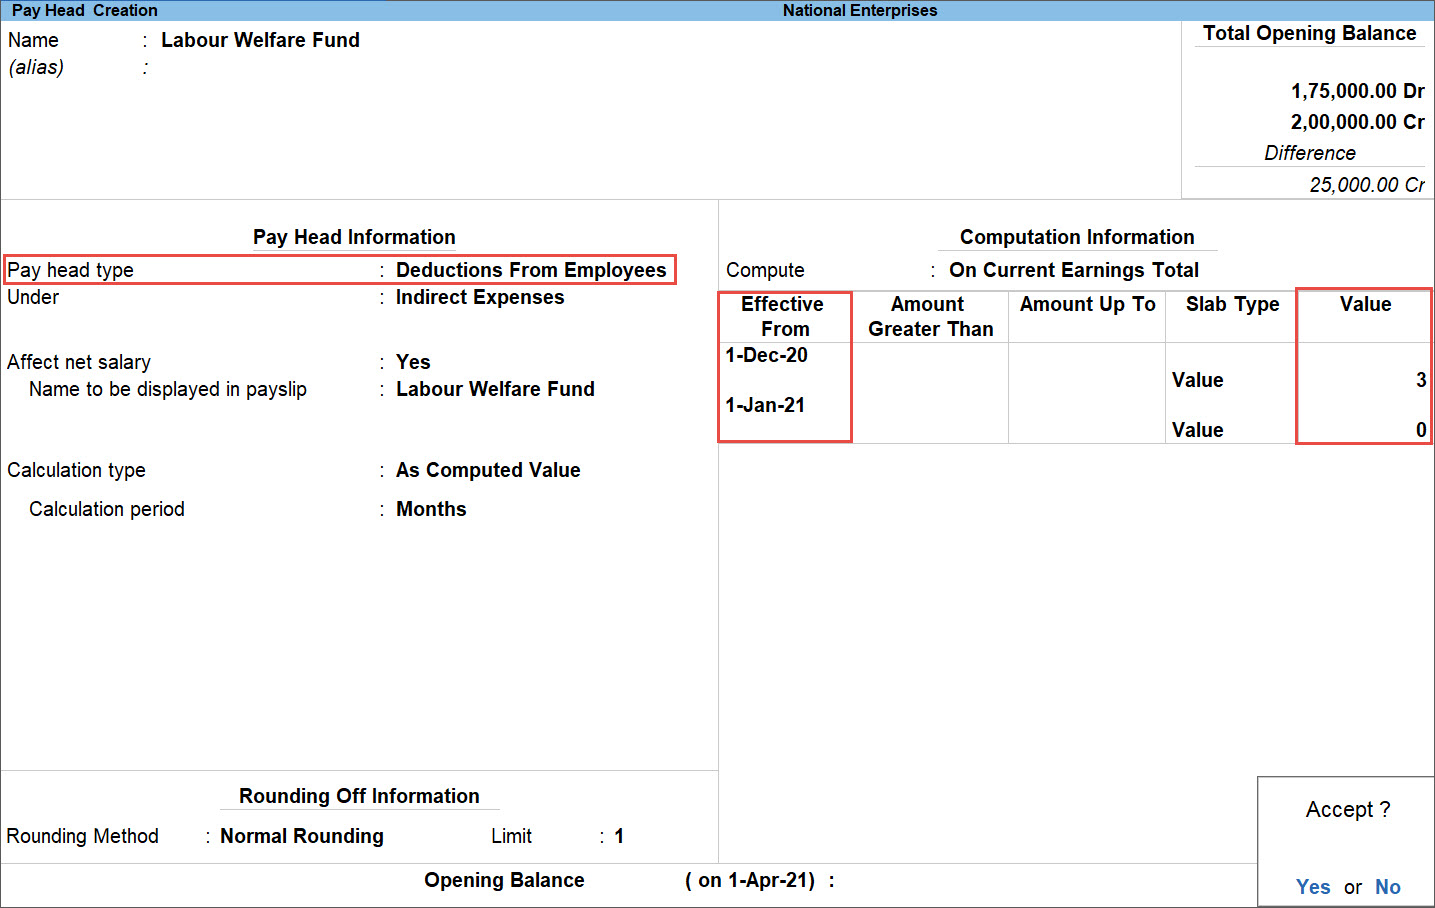
- Select Deductions From Employees in the Pay head type field.
- In Computation Information section, define the Effective From and Value as applicable.
Note: The value will be deducted only for the month (December) specified in the Pay Head.
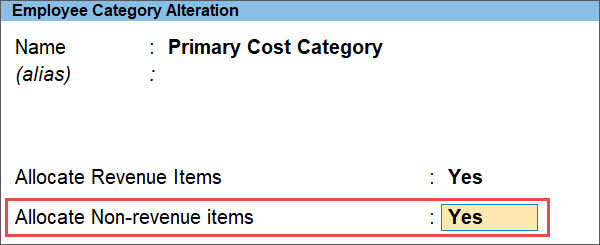
Unable to select the Cost Category or Employee Category for passing the Payment Vouchers for Salary, PF, ESI, and PT payments.
Solution
To successfully make the Payments for the Salary, PF, ESI, and PT, the option Allocate Non-revenue items should be set to Yes along with the option Allocate Revenue Items for the Category which is selected for processing. For example, if you are selecting the Primary Cost Category for processing the Payments, then the mentioned options should be set to Yes for Primary Cost Category.
- Gateway of Tally > Alter > Stock Category > select the required Category > press Enter.
Alternatively, Alt+G (Go To) > Alter Master > Stock Category > select the required Category > press Enter. - Set Allocate Non-revenue items to Yes.
- Press Y to accept the screen. As always, you can press Ctrl+A to save.
- Retry the payment process for Salary, PF, ESI and PT.
Salary paid to Mr. Gopal includes Basic, Allowance, Overtime paid on monthly basis.
| Pay Heads | Per Month |
| Basic | 4000/- |
| Allowance | 7000/- |
| Overtime | 10500/- |
The Monthly rate differs every month due to the number of Sundays falling in a month i.e. the number of days considered for calculating salary are excluding Sundays.
| Month | No. of days in a month | No. of Sundays | Working Days |
| April | 30 | 4 | 26 |
| May | 31 | 4 | 27 |
| February | 28 | 4 | 24 |
Note: In the above illustration we are taking April, May and February as the number of days varies for each of this month. So, the “Working Days” considered for April, May and June are 26, 27 & 24 respectively.
Attendance and Overtime details of Mr. Gopal for the month of April, May and February.
| Particulars | April | May | February |
| Working Days (As calculated value) | 26 | 27 | 24 |
| Present | 24 | 24 | 24 |
| Absent (Working Days – Present Days) | 2 | 3 | 0 |
| Overtime | 3 | 3 | 3 |
Note: For information purpose, Absent days (instead of Present) will be considered for salary calculation to reduce data entry.: For information purpose, Absent days (instead of Present) will be considered for salary calculation to reduce data entry.
Expected Salary to be calculated/paid for the month of April:
- Basic: 4000 / 26 * 24 = 3692/-
- Allowance: 7000 / 26 * 24 = 6462/-
- Overtime: 10500 / 26 * 3 = 1212/-
- Total: 11366/-
Expected Salary to be calculated/paid for the month of May:
- Basic: 4000 / 27 * 24= 3556/-
- Allowance: 7000 /27 * 24 = 6222/-
- Overtime: 10500 / 27 * 3 = 1167/-
- Total: 10945/-
Expected Salary to be calculated/paid for the month of February:
- Basic: 4000 / 24 * 24 = 4000/-
- Allowance: 7000 / 24 *24 = 7000/-
- Overtime: 10500 / 24 * 3 = 1313/-
- Total: 12313/-
To handle this scenario in TallyPrime:
- Create the Attendance masters Absent, Overtime and Calendar Days under “Attendance Type” Leave without Pay, Leave with Pay and User Defined Calendar type respectively.
- Create Basic Pay & Allowance Pay head based on Leave without Pay i.e. Absent and taking the Per Day Calculation basis as User Defined Calendar Type i.e. Calendar Days.
- Create Overtime Pay head based on Leave with Pay component i.e. Overtime and taking the Per Day Calculation basis as User Defined Calendar Type i.e. Calendar Days.
- Define Basic, Allowance and Overtime in the Salary details of Mr. Gopal.
- Process Attendance Voucher for Absent, Overtime & Calendar Days.
- Process Payroll Voucher.
Creation of Attendance Masters
- Gateway of Tally > Create > Attendance/Production Type > press Enter.
Alternatively, Alt+G (Go To) > Create Master > Attendance/Production Type > press Enter. - Create Attendance/Production Type as Absent.
- Select Attendance type as Leave without Pay.

- Press Y to accept the screen. As always, you can press Ctrl+A to save.
Creation of Overtime Masters
- Gateway of Tally > Create > Attendance/Production Type > press Enter.
Alternatively, Alt+G (Go To) > Create Master > Attendance/Production Type > press Enter. - Create Attendance/Production Type as Overtime.
- Select Attendance type as Attendance/Leave with Pay.
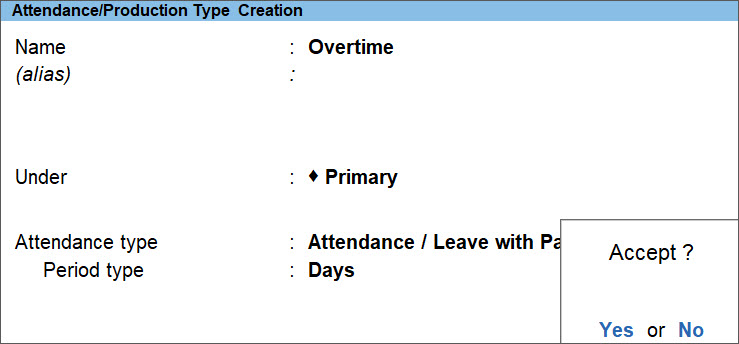
- Press Y to accept the screen. As always, you can press Ctrl+A to save.
Creation of Calendar Days
- Gateway of Tally > Create > Attendance/Production Type > press Enter.
Alternatively, Alt+G (Go To) > Create Master > Attendance/Production Type > press Enter. - Create Attendance/Production Type as Calendar Days.
- Select Attendance type as User Defined Calendar Type.
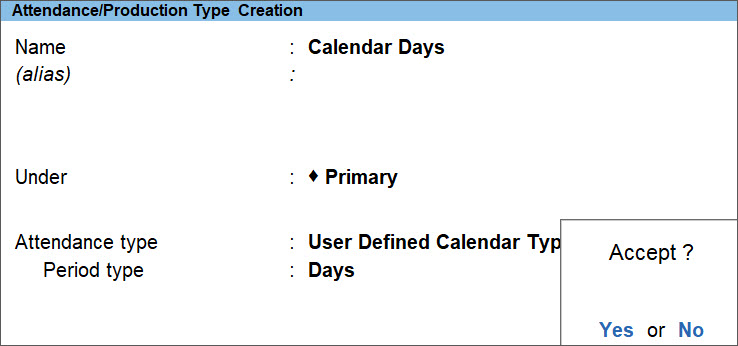
- Press Y to accept the screen. As always, you can press Ctrl+A to save.
Creation of Pay Heads
Basic Pay Head
- Gateway of Tally > Create > Pay Heads > press Enter.
Alternatively, press Alt+G (Go To) > Create Master > Pay Heads > press Enter. - In the Pay Head Creation screen, select the appropriate options for the following fields:
- Pay head type: Earnings for Employees
- Calculation type: On Attendance
- Attendance/leave with pay: Not Applicable
- Leave without pay: Absent
Note: We are defining the Basic pay head on Negative attendance - Absent so that the entries can be passed only when the Employee is Absent this will reduce the data entry.
- Calculation period: Months
- Basis of calculation (per day): User Defined Calendar Type
- User defined calendar: Calendar Days
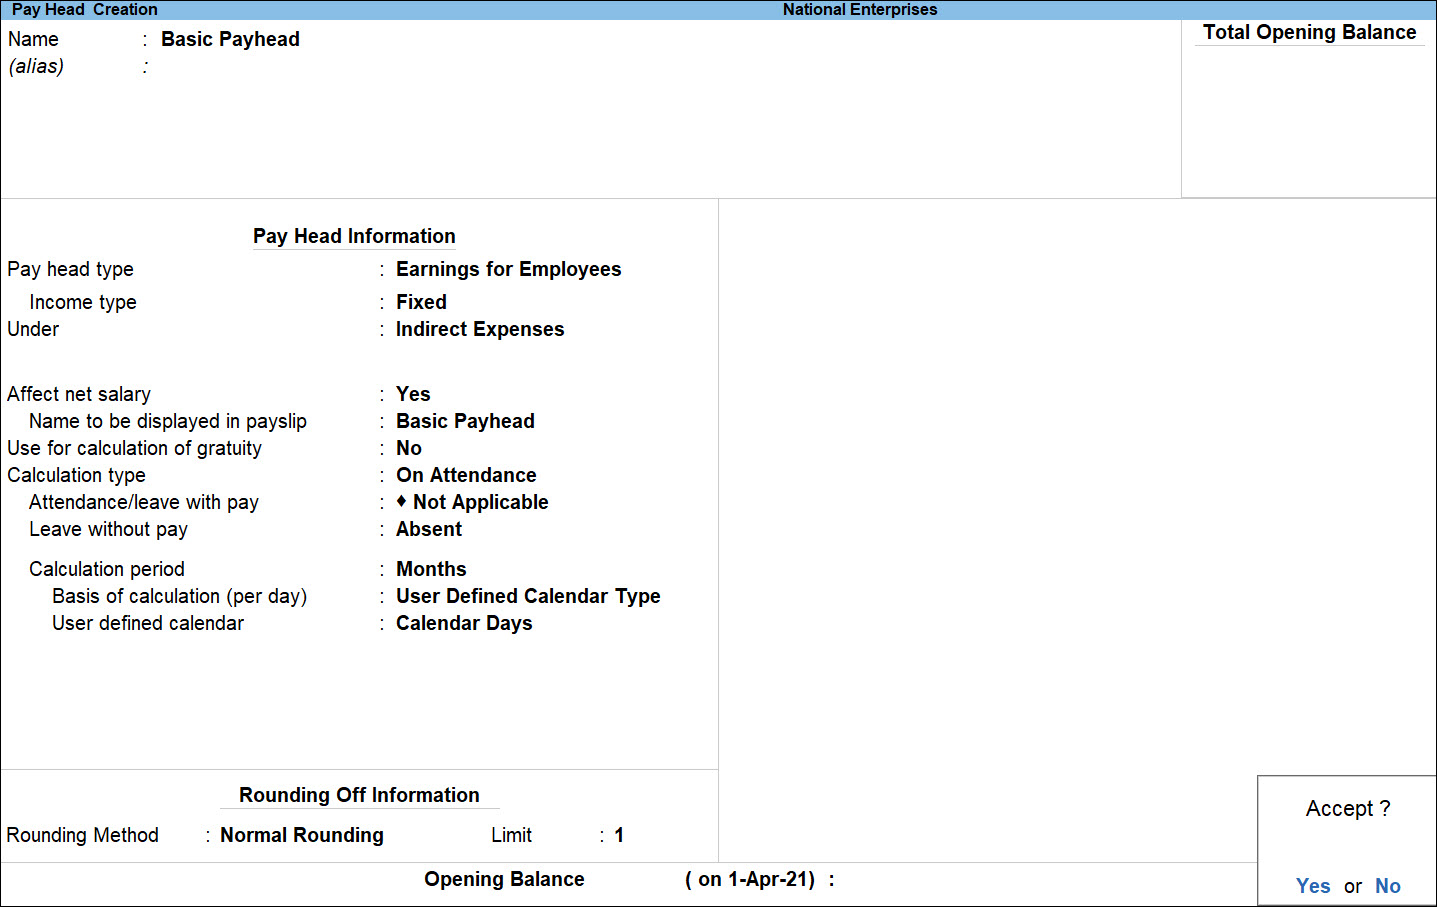
- Press Y to accept the screen. As always, you can press Ctrl+A to save.
Similarly, create an Allowance Pay Head.
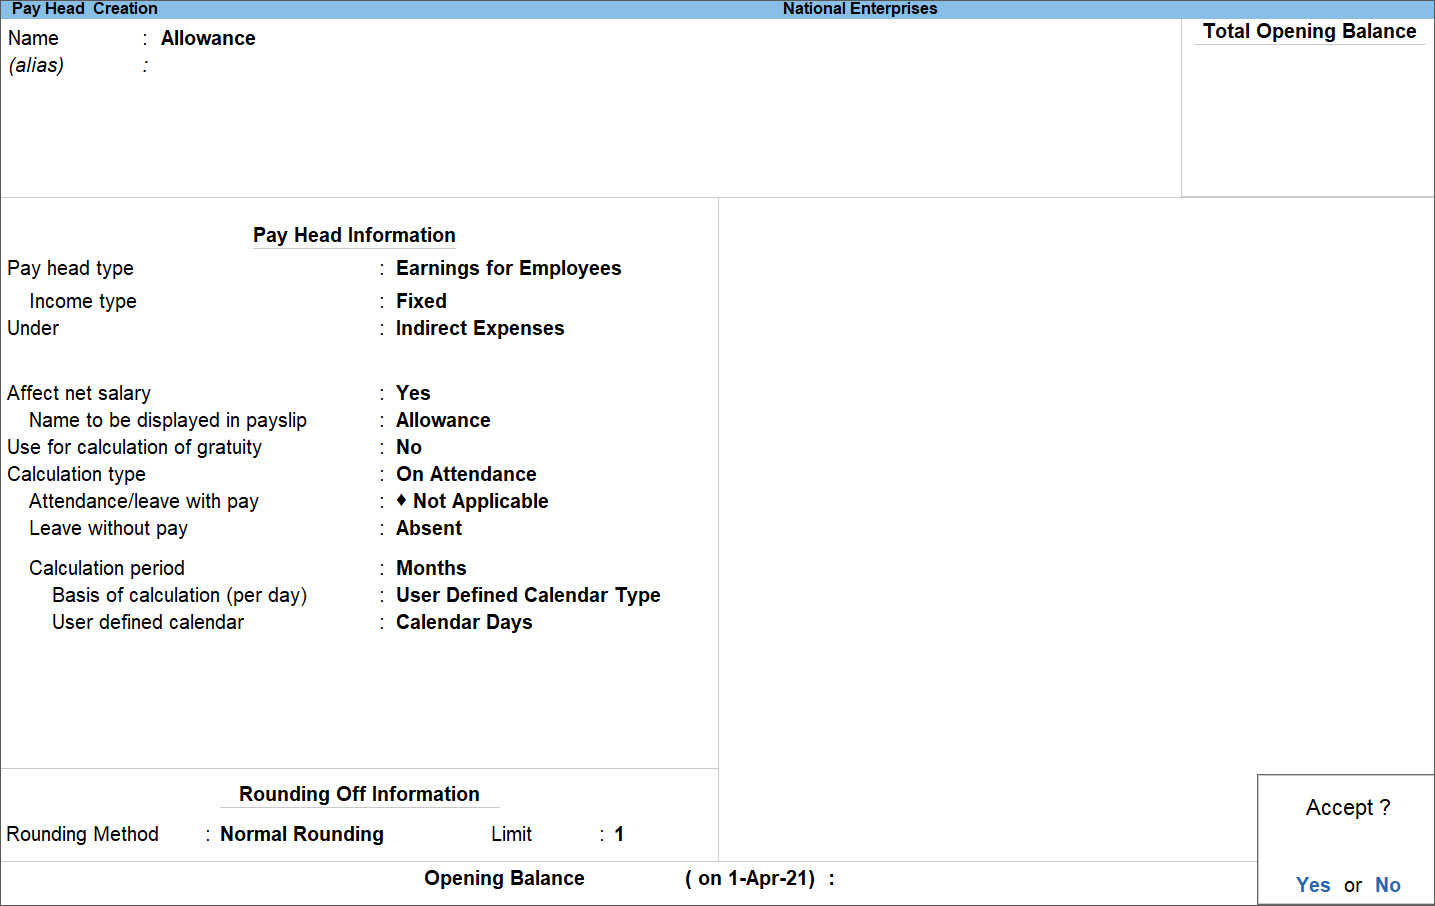
Overtime Pay Head
- In the Pay Head Creation screen, select the appropriate options for the following fields:
- Pay head type: Earnings for Employees
- Calculation type: On Attendance
- Attendance/leave with pay: Overtime
- Calculation period: Months
- Basic of calculation (per day): User Defined Calendar Type
- User defined calendar: Calendar Days
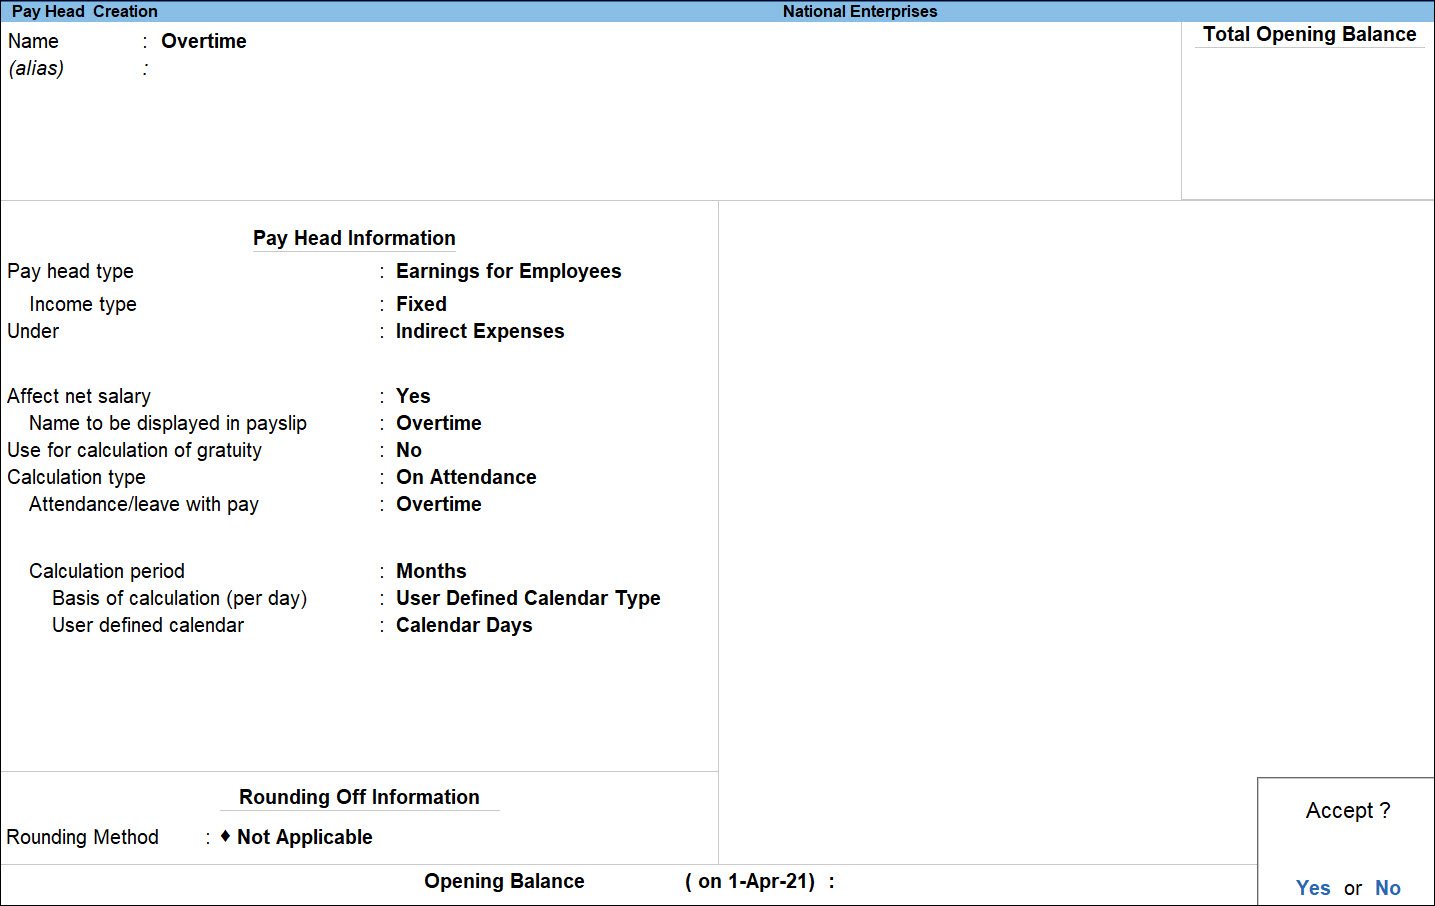
- Press Y to accept the screen. As always, you can press Ctrl+A to save.
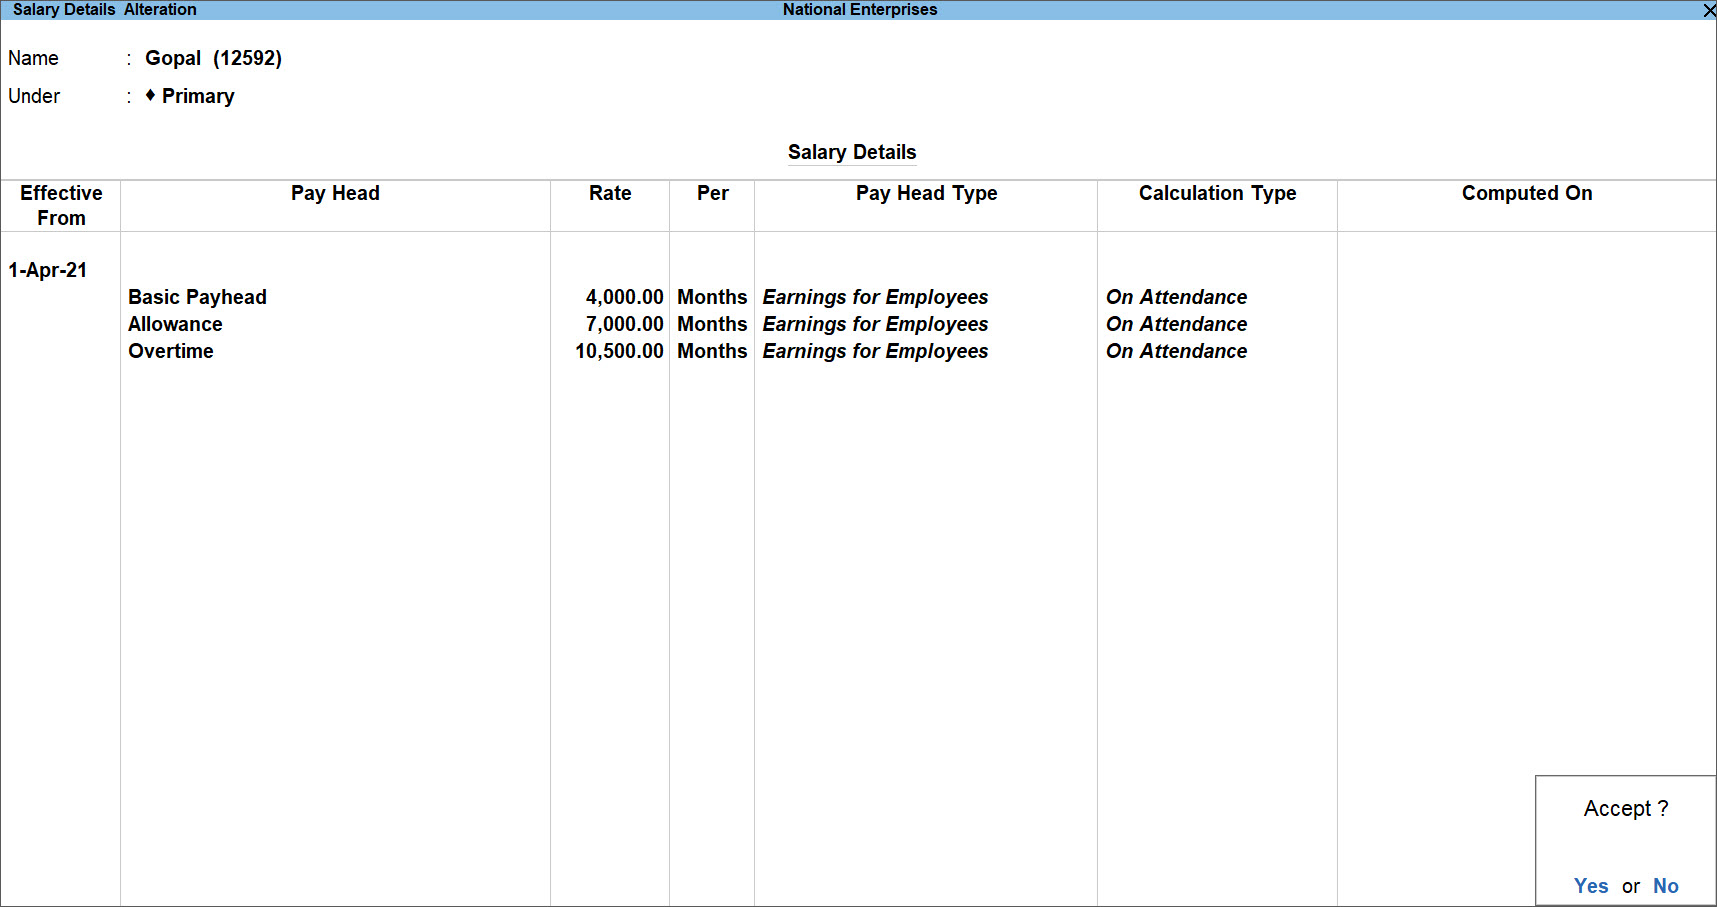
Define Basic, Allowance and Overtime in the Salary details of Mr. Gopal
| Pay Heads | Per Month |
| Basic | 4000/- |
| Allowance | 7000/- |
| Overtime | 10500/- |
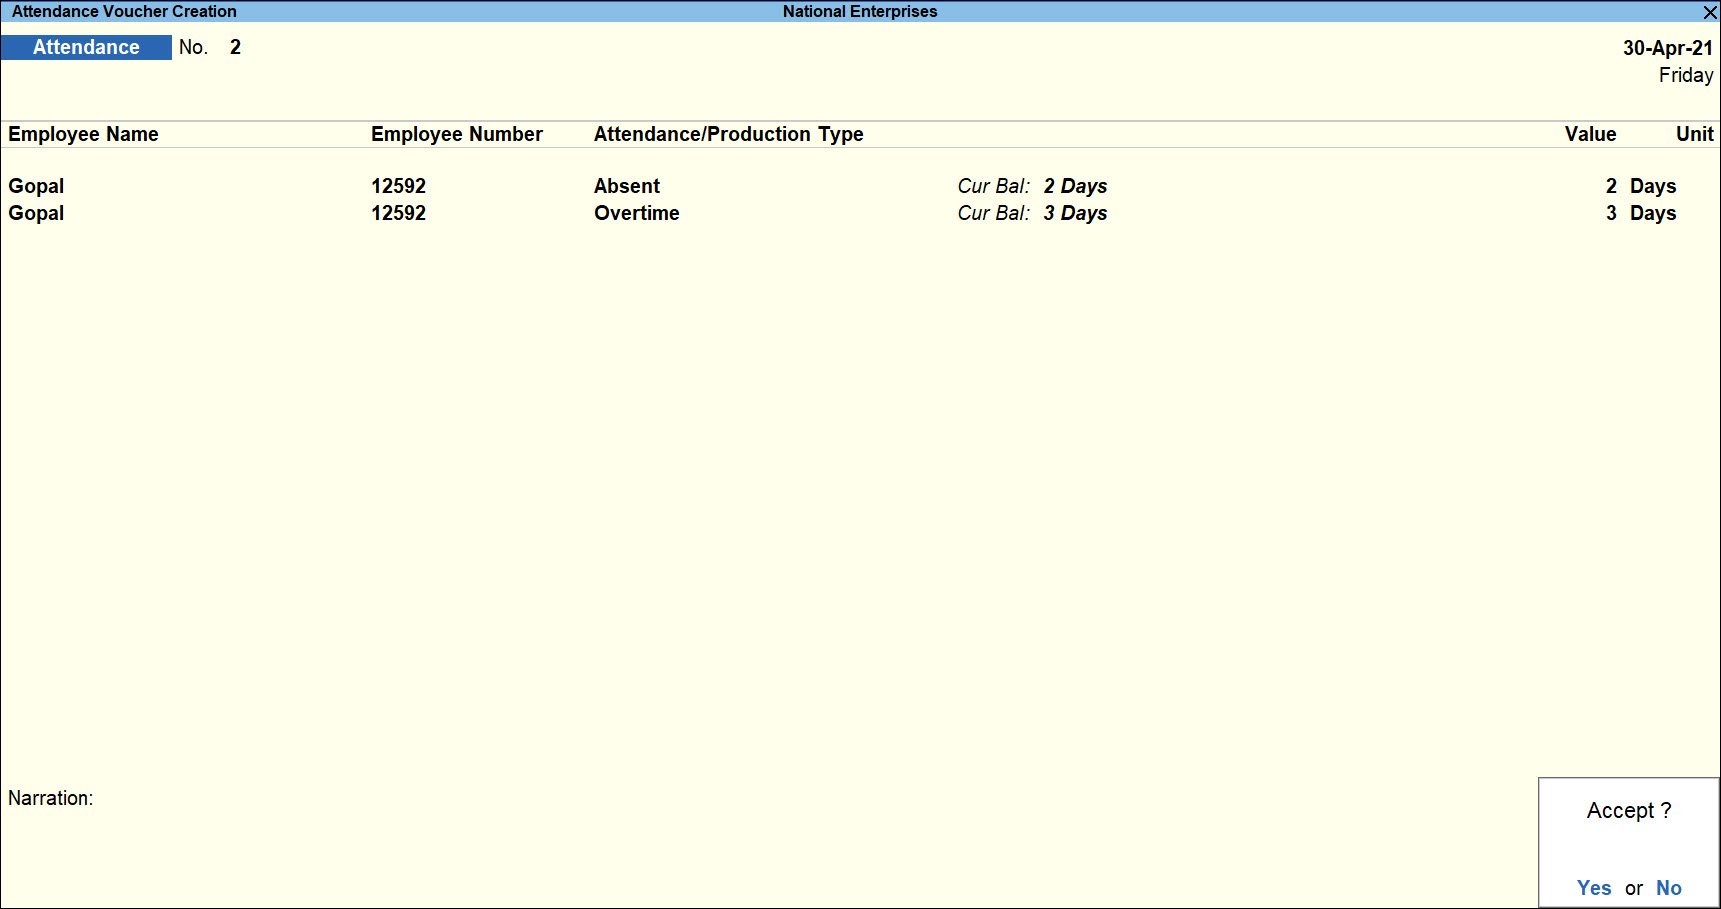
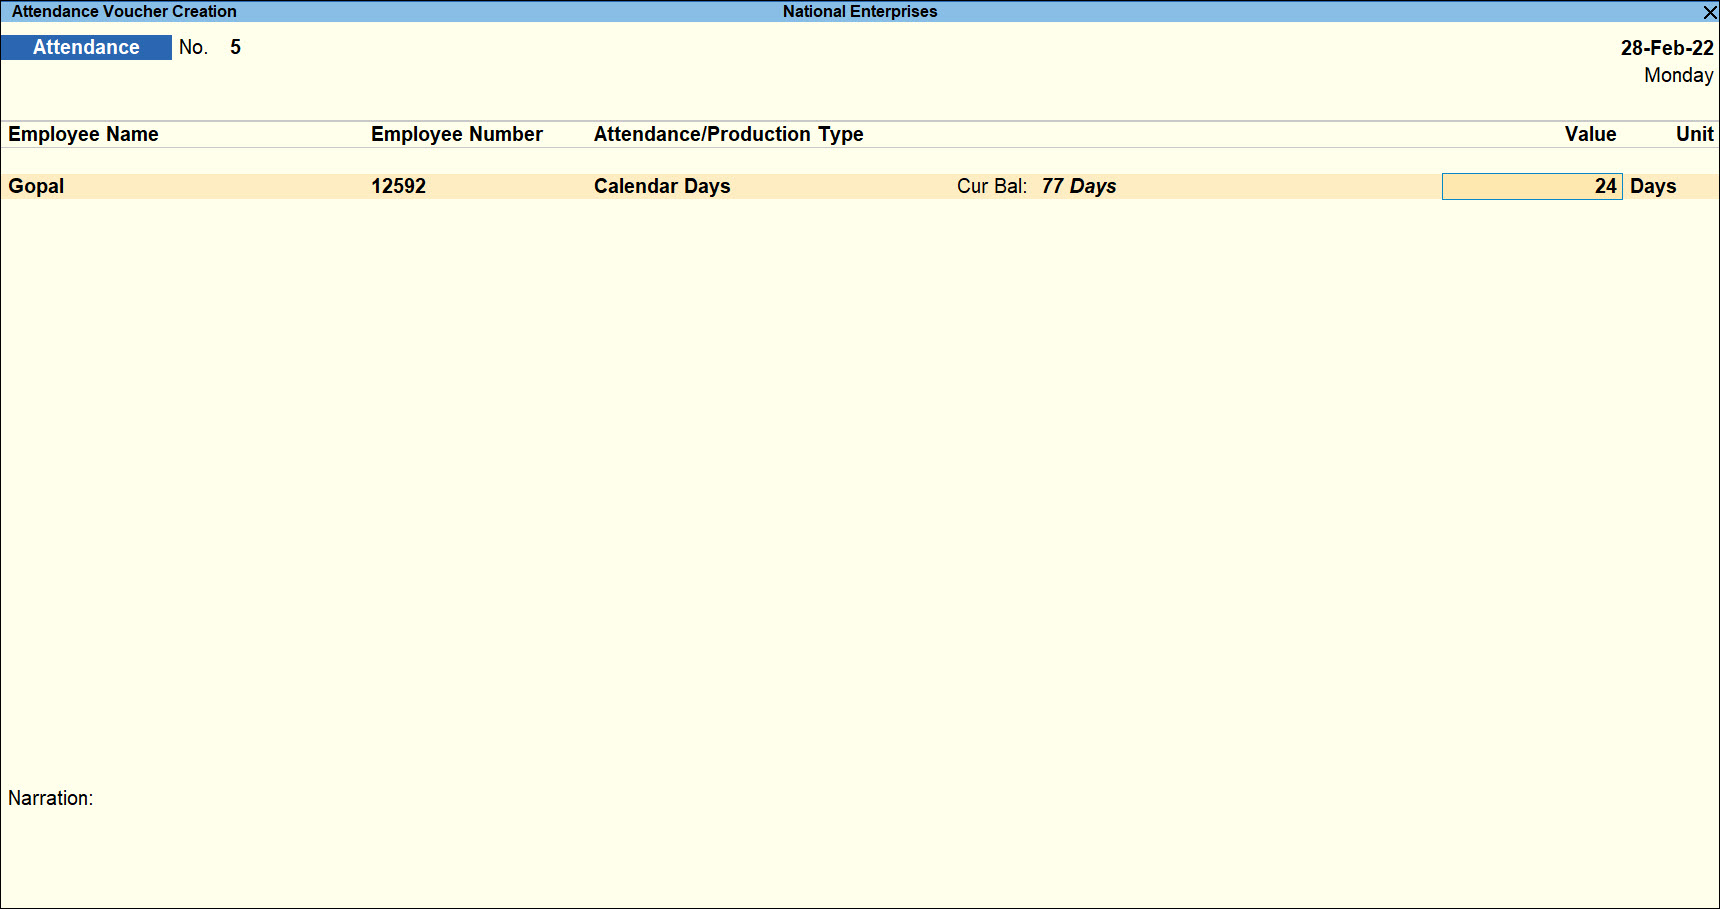
Process Attendance voucher for the month of April
| Particulars | April |
| Calendar Days * (No. of days in a month – No. of Sundays’) | 26 (30-4) |
| Absent (Calendar Days – No. of days Present) | 2 (26-24) |
| Overtime | 3 |
Note: Calendar Days (Number of days to be considered every month excluding Sundays) need to be entered every month for all employees.
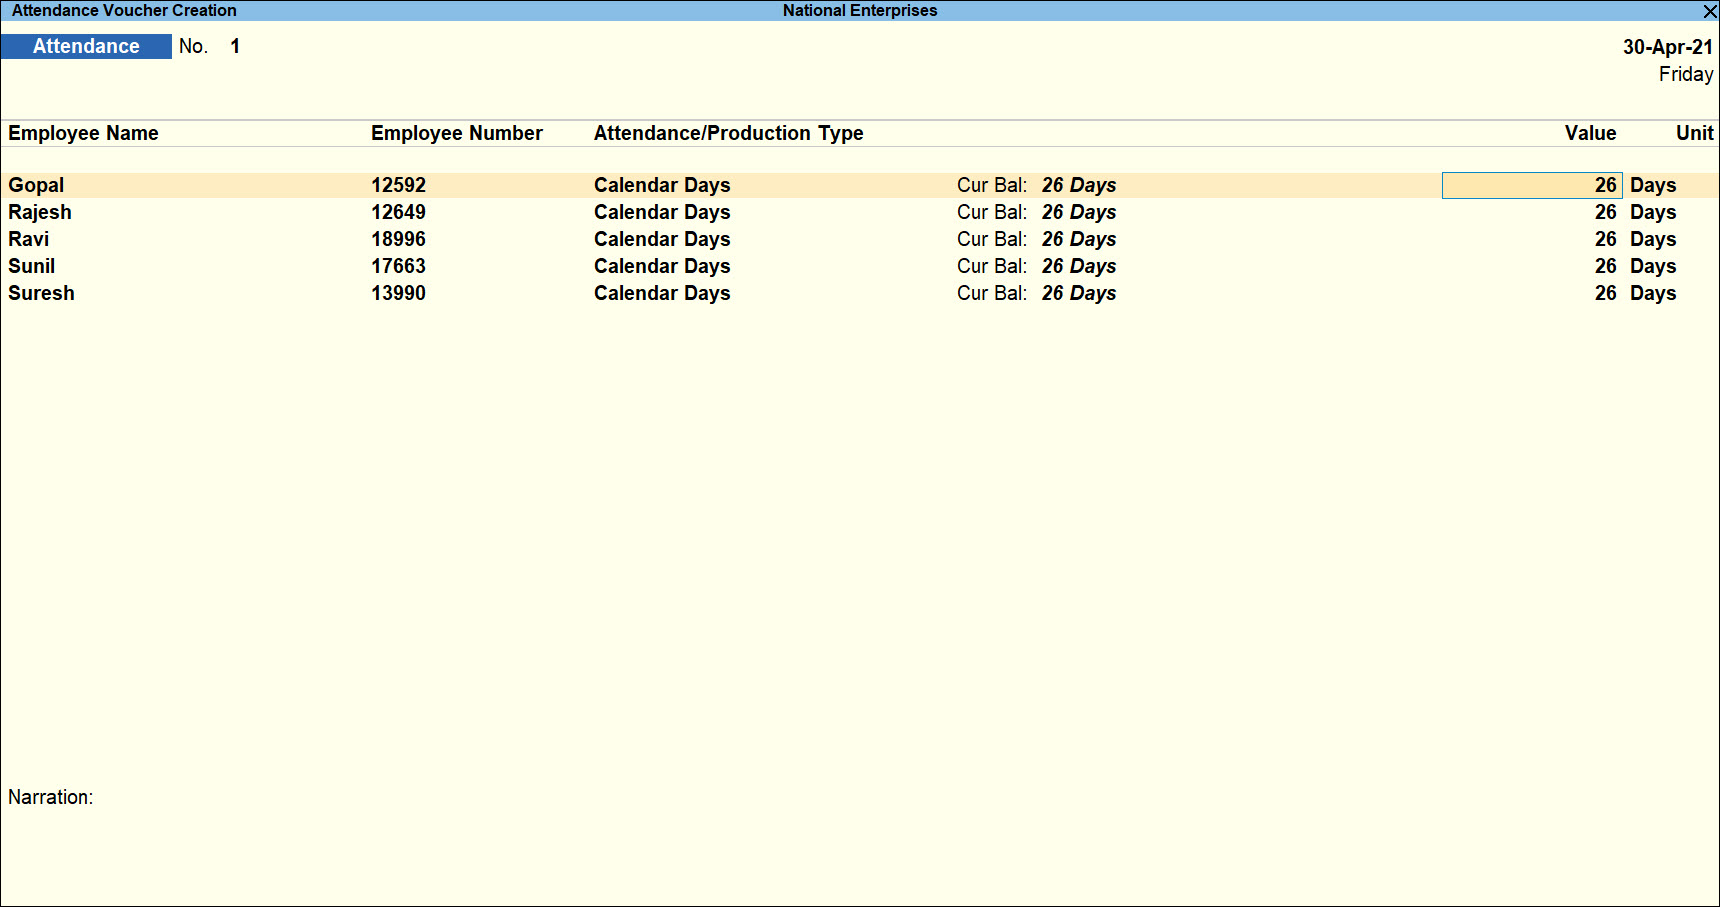
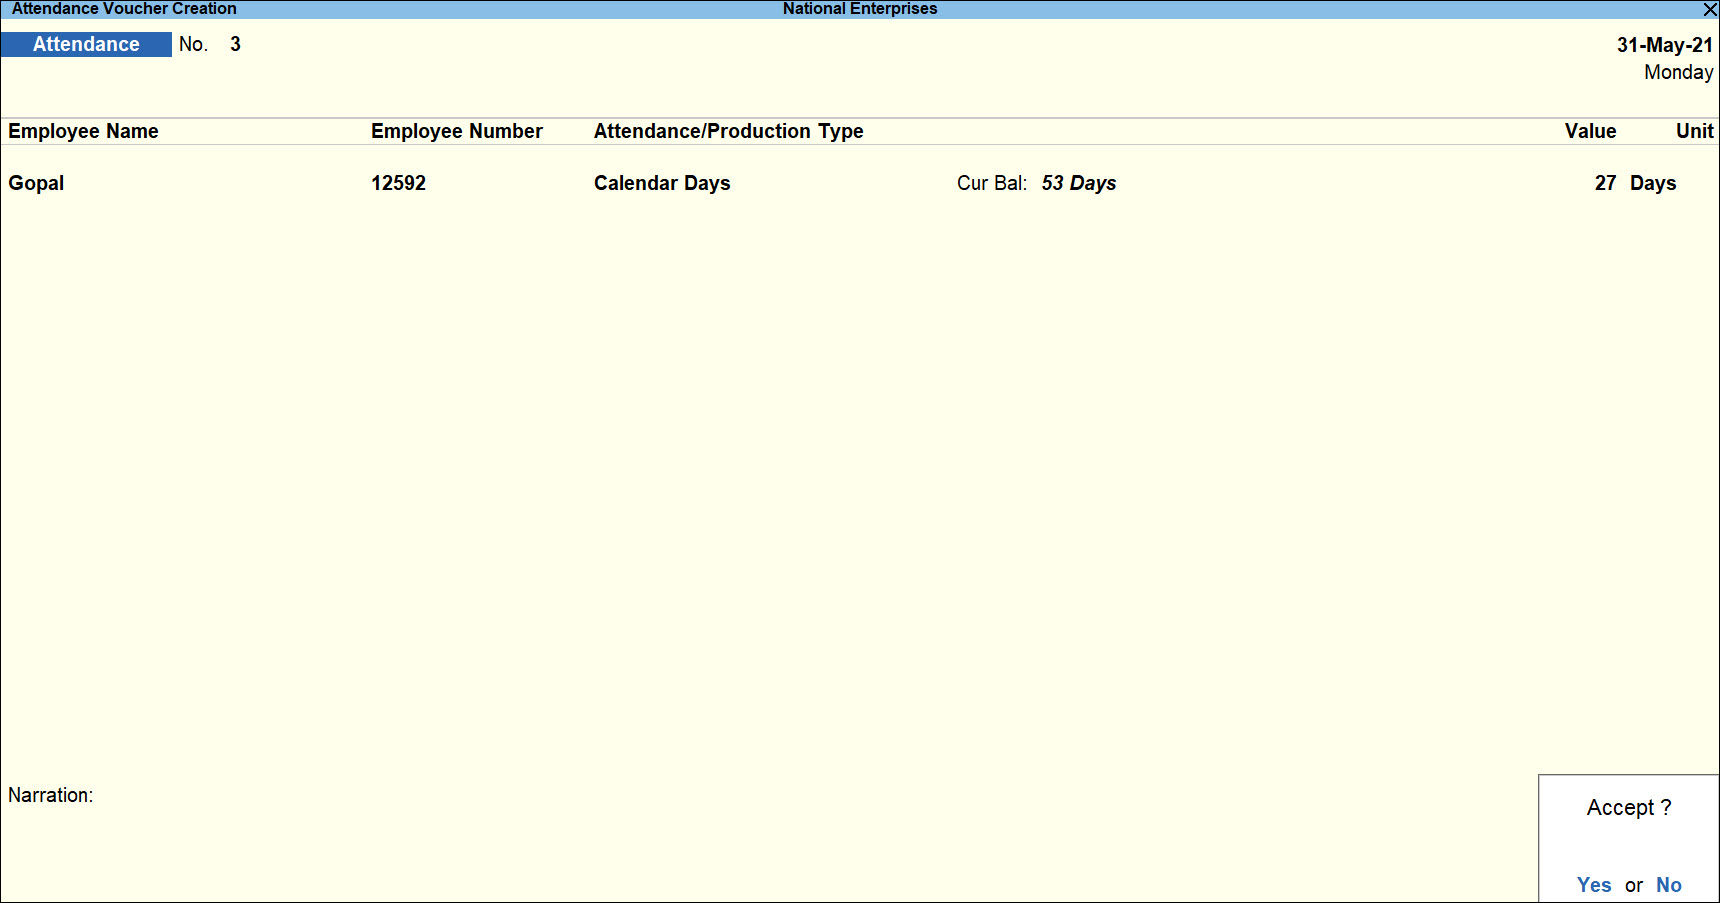
Passing Attendance voucher for Calendar days
- Gateway of Tally > Voucher > press F10 (Other Vouchers) > select Attendance voucher > press Enter.
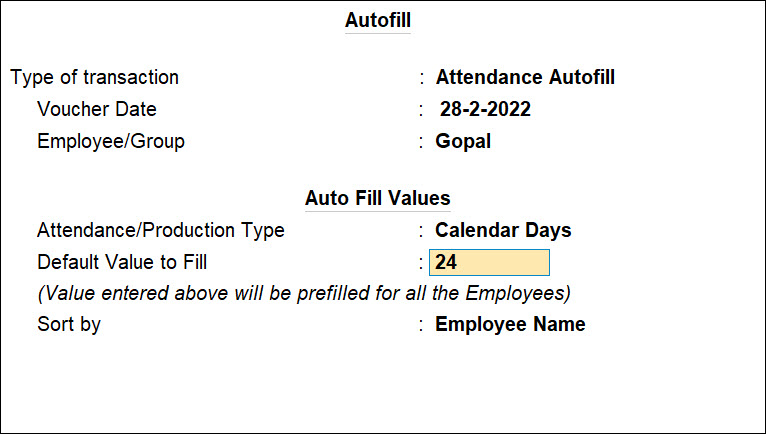
Alternatively, Alt+G (Go To) > Create Voucher > press F10 (Other Vouchers) > select Attendance voucher > press Enter. - Press Ctrl+F (Autofill) and enter the required details as shown.
- Enter the value (Working days i.e. No. of days in a month excluding Sundays) in Default Value to Fill field.


- Press Y to accept the Attendance Voucher Creation As always, you can press Ctrl+A to save.
In case of multiple employees, the Default Value to Fill field gets against all the employees.
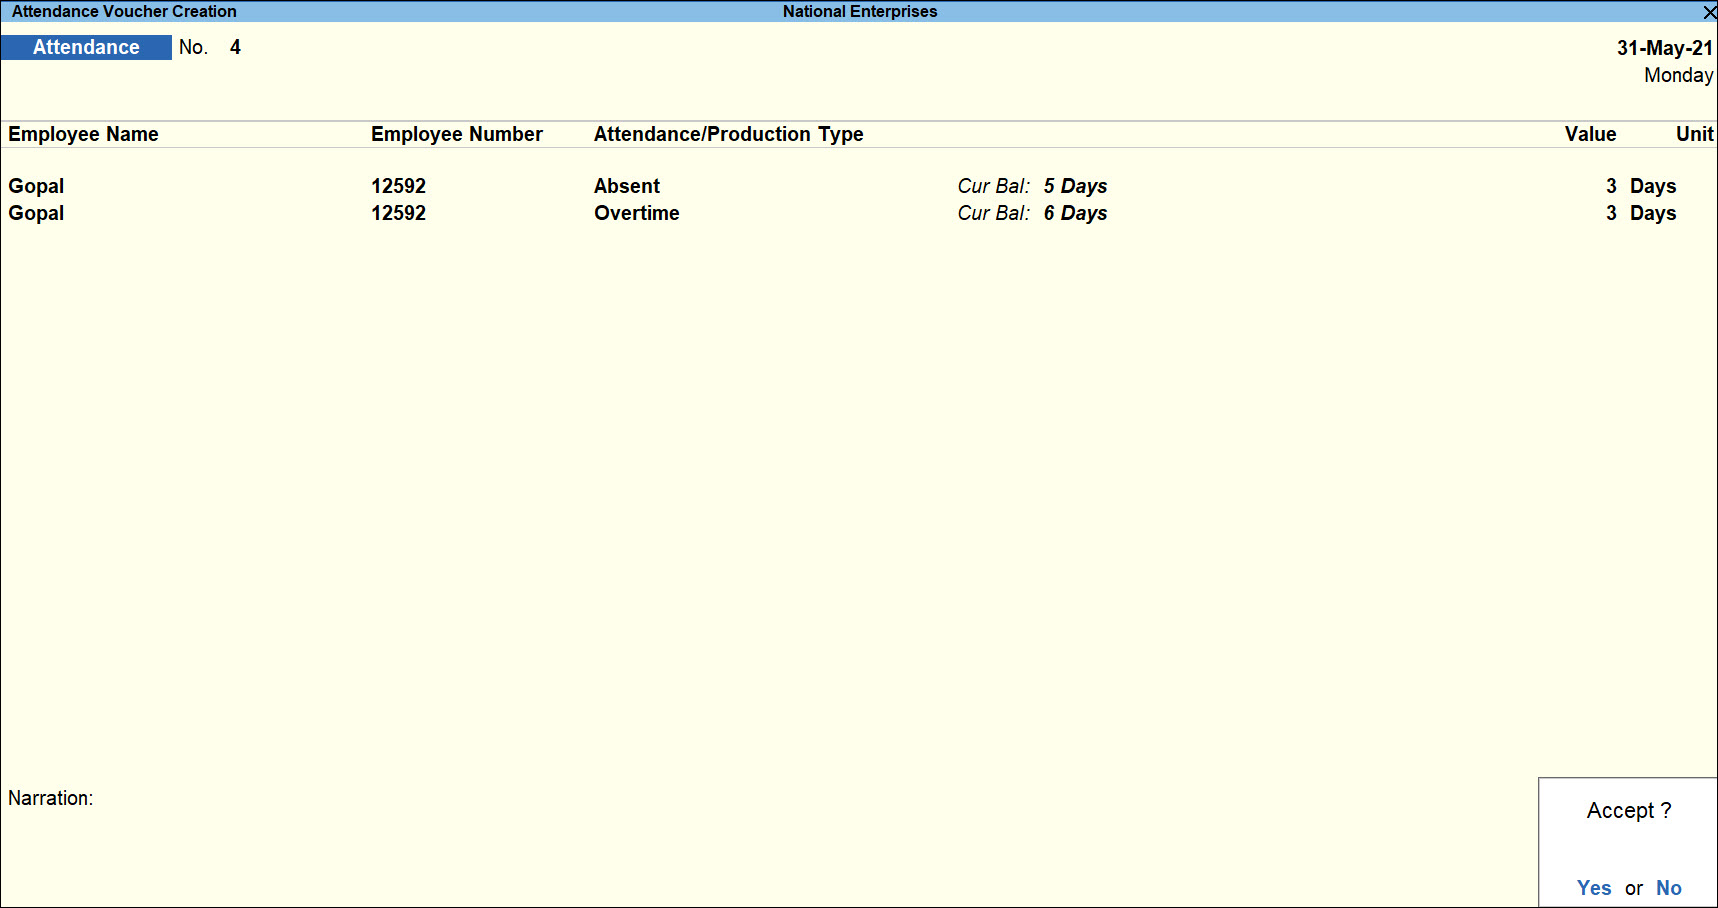
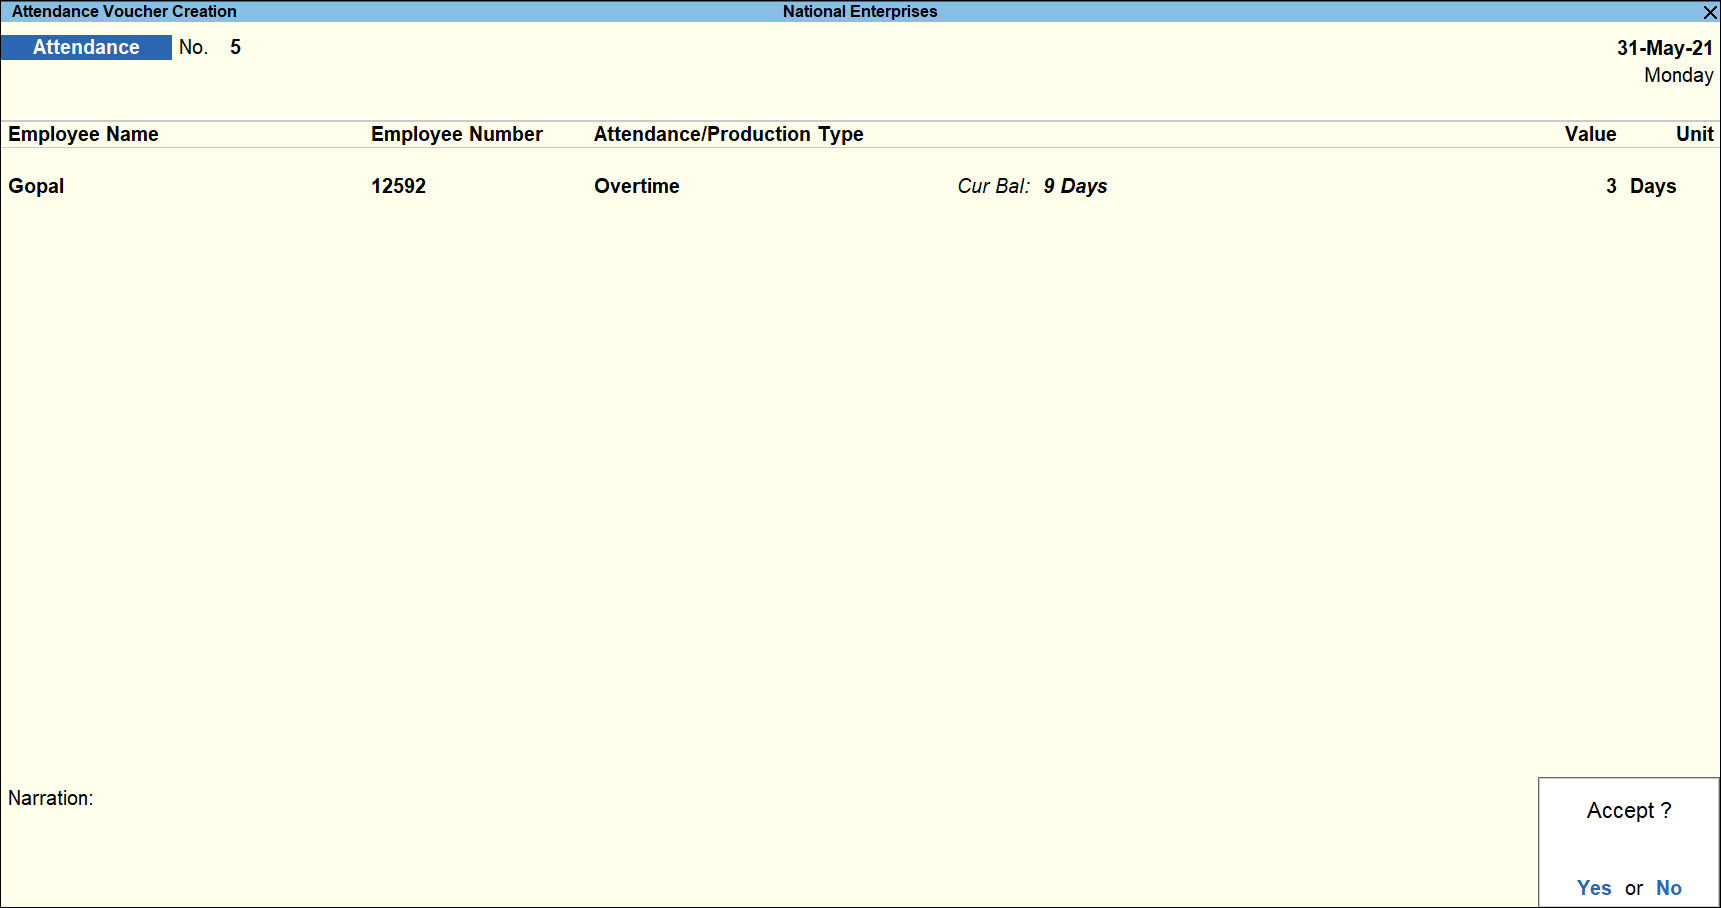
Passing Attendance Voucher for Absent and Overtime
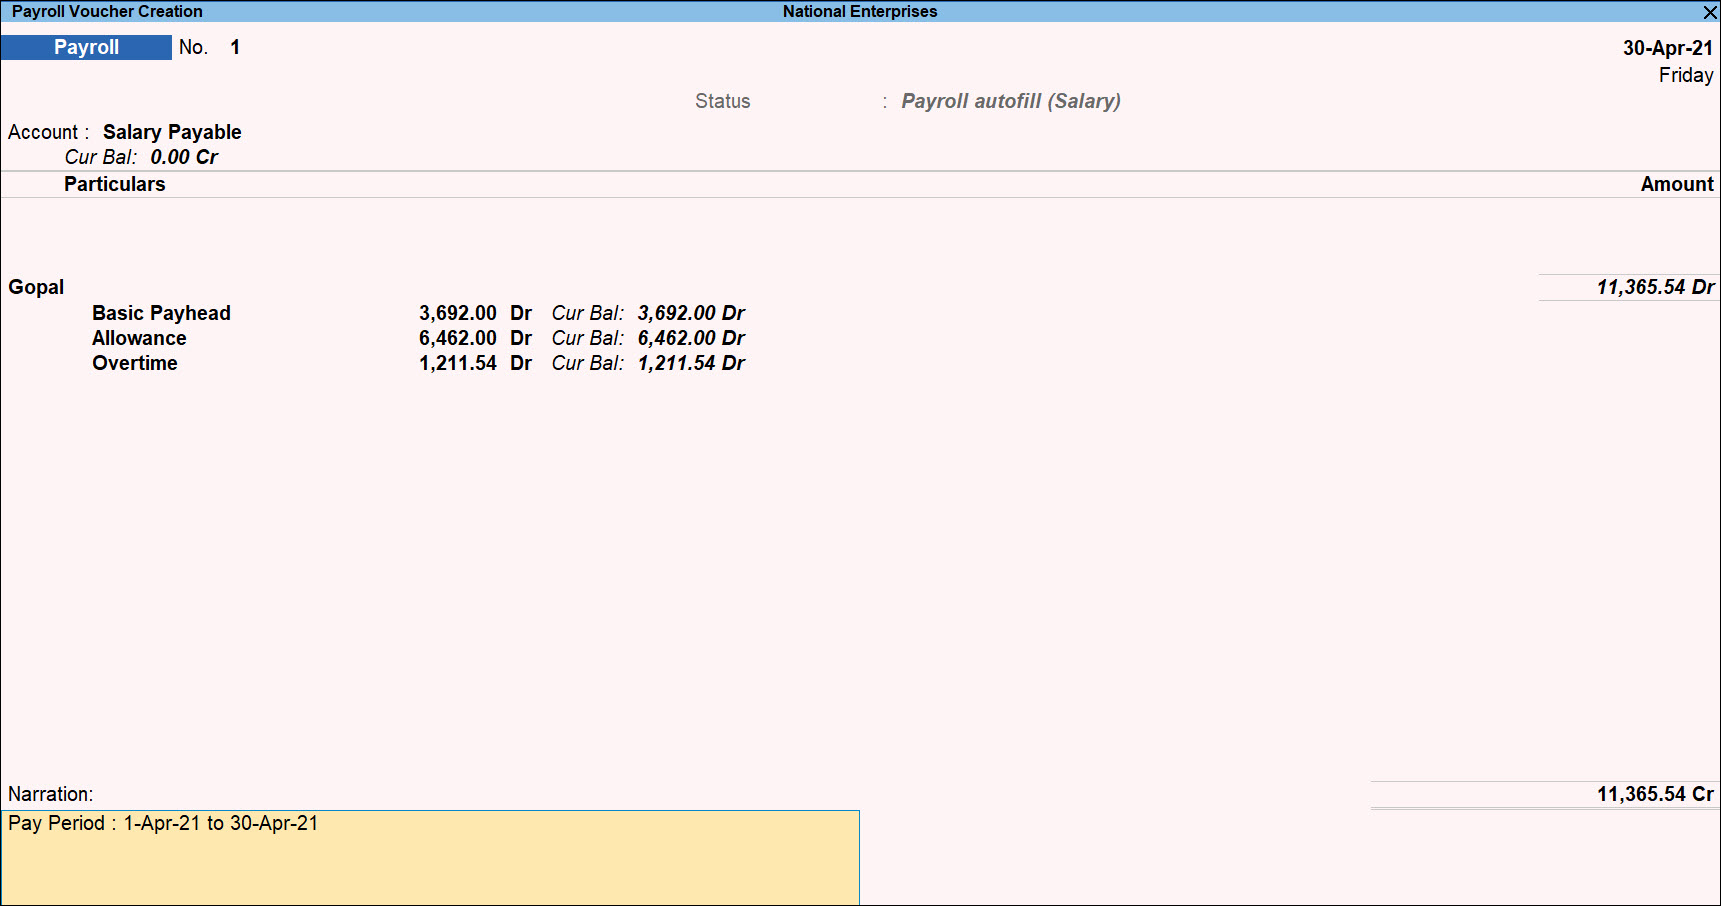
Process Payroll Voucher for the month of April
| Particulars | Calculation | Amount |
| Basic | 4000 / 26 * 24 | 3692 |
| Allowance | 7000 / 26 * 24 | 6462 |
| Overtime | 10500 /26 * 24 | 1212 |
| Total | 11366 | |
Similarly, process the Attendance voucher for the month of May.
| Particulars | May |
| Calendar Days * (No. of days in a month – No. of Sundays’) | 27 (31-4) |
| Absent (Calendar Days – No. of days Present) | 3 (27-24) |
| Overtime | 3 |
Note: Calendar Days (Number of days to be considered every month excluding Sundays’) need to be entered every month for all employees.
Passing Attendance Voucher for Calendar days

Payroll Voucher for the month of May
| Particulars | Calculation | Amount |
| Basic | 4000 / 27* 24 | 3356 |
| Allowance | 7000 / 27 * 24 | 6222 |
| Overtime | 10500 / 27 * 3 | 1167 |
| Total | 10945 | |

Attendance Voucher for the month of February
| Particulars | February |
| Calendar Days * (No. of days in a month – No. of Sundays’) | 24 (28-4) |
| Absent (Calendar Days – No. of days Present) | 0 (24-24) |
| Overtime | 3 |
Note: Separate voucher can be passed for the “No. of days” to be considered for all employees.
Payroll for the month of February
| Particulars | Calculation | Amount |
| Basic | 4000 / 24 * 24 | 4000 |
| Allowance | 7000 / 24 * 24 | 7000 |
| Overtime | 10500 / 24 * 3 | 1313 |
| Total | 12313 | |

You can export the Pay Slips for all Employees with the click of a button.
- To view the Multi Pay Slip
- Gateway of Tally > Display More Reports > Payroll Reports > Pay Slip.
Alternatively, press Alt+G (Go To) > Multi-Employee Pay Slips. - Select the required Name of Employee/Group and press Enter.
The Multi Pay Slip screen appears.
- Gateway of Tally > Display More Reports > Payroll Reports > Pay Slip.
- To export the Multi Pay Slip
- Click Alt+E (Export) from the Multi Pay Slip report > press Enter on Current.
- Press C (Configure) to set the required details to export Pay Slip in the Export Configuration
- Press E (Send) to export the Pay Slip.
- Click Alt+E (Export) from the Multi Pay Slip report > press Enter on Current.
While creating the Professional Tax Pay Heads, you can select the Computation Period as either Months or Period.
- Months: For regular professional tax computation and payments with the frequency of deduction and payment as Monthly.
- Period: For professional tax computation and payments on a periodic basis; for example, once in six months as in the case of Tamil Nadu.
For Employees more than 58 years the entire Employer Contribution goes into the PF A/c no. 1 as there is no contribution towards the EPS A/c.
In Tally.ERP 9, it was necessary to create a separate Employer PF Contribution Pay Head with 12% as slab. With TallyPrime, it is not required to create a separate Employer PF Pay Head for Employees more than 58 years.
Note: For Employees, more than 58 Years the EPS Pay Head should not be included in the Salary Details as the contribution towards EPS is zero for these employees.
The method of computing the total income has been changed in the budget for the current year by allowing a deduction under Section 80C. However, the present Form No. 24Q shows a column for rebate under Sections 88, 88B, 88C, and 88D.
In the process of filling up Form No. 24Q, the columns relevant to Sections 88, 88B, 88C, and 88D may be left blank. Regarding the deductions under Section 80C, the same can be shown in column 342 of ‘Amount deductible under any other provision of Chapter VI-A’.
No, it is not required to create a Voucher Class for using PF, ESI and PT. TallyPrime provides the default processes for the processing of Employer’s PF Contribution, Employer’s ESI Contribution and Salary Computation. The payment processes for Salary, PF, ESI and PT are also available separately for a faster and accurate processing of the Payroll.
Yes. You can create the PF Pay Heads based on any of the formulae as required.
The number of employees in the A/c. No-1, A/c. No-10, A/c. No-21 is captured automatically in the PF combined Challan based on the following:
- A/c. No 1 – based on the EPF number specified for the Employees in the Employee Master
- A/c. No 10 – based on the EPS number specified for the Employees in the Employee Master
- A/c. No 21 – based on the EPF number specified for the Employees in the Employee Master
The Challan will display the total count based on the number of employees for which the above numbers are specified in the Employee Master.
For new employees if the PF number is not known, you can mention Applied for and generate the Challan successfully.
Note: The print configuration screen provides the option to modify these numbers when printing the challan.
Yes, you can allow/disallow a particular Pay head/component from appearing in the Payslip while the salary components are being created.
You cannot alter the decimals or remove Pay Heads in Pay Sheet. However, you can alter the pay sheet’s format or value by exporting the Pay Sheet to Excel.
- To view the Pay Sheet
- Gateway of Tally > Display More Reports > Payroll Reports > Pay Sheet.
Alternatively, press Alt+G (Go To) > type or select Salary Pay Sheet. - Select the required Name of Employee/Group and press Enter.
The Pay Sheet screen appears.
- Gateway of Tally > Display More Reports > Payroll Reports > Pay Sheet.
- To export the Pay Sheet
- Click Alt+E (Export) from the Pay Sheet report > press Enter on Current.
- Press C (Configure) and select Excel (Spreadsheet) in the File Format field in the Export Configuration
- Press Backspace to return to the Export screen.
- Press E (Send) to export the Pay Sheet in Excel format.
- Click Alt+E (Export) from the Pay Sheet report > press Enter on Current.
In Excel, the decimal values can be altered, and the unwanted Pay Head columns can be deleted from the Pay Sheet.
Using the Payroll feature in TallyPrime, you can have different working days for each month. In addition, you can have a different number of working days for a Payroll Category or Employee Group for each employee.
You have to create a User-Defined Calendar Type and enter the required number of days before capturing attendance.
No, you cannot take a printout of Salary Details for all the employees on a single sheet.
In some scenarios there would be a necessity to generate payment advice for previous month salary paid in the current month.
For example: On 30th April, ABC Company accounted Salary Payable for the month of April, but later realised that balance in bank is not sufficient for salary payment and withheld the payment. For Payroll transfer on 15th May, company wants to generate Payment Advice by clearly indicating the Salary/Payroll period (as April month’s salary).
- Go to Gateway of Tally > Display More Reports > Payroll Reports > Payment Advice > press Enter.
Alternatively, Alt+G (Go To) > type Payment Advice > press Enter.
The Printing Payment Advice screen is displayed. - Press C (Configure) to enter the details to be printed on the Payment Advice.
- Payment Voucher Period: Enter the period during which the salary payment transaction is recorded. Here, it is the current month i.e.,1-5-2021 to 31-5-2021.
- Employees/Employee Group: Select a specific employee or group to generate the Payment Advice.
Note: In Employees/Employee Group TallyPrime will display only the employees/groups created under the Employee category selected in Employee Category field.
- Bank Ledger: Select the Bank for which the Payment Advice is to be generated.
- Salary Period: Specify the period for which salary is being paid, here National Enterprises is making the payment for the month of April (1-4-2021 to 30-4-2021).
- Date: The date on which the Payment Advice is being printed has to be specified here. National Enterprises is printing the Payment Advice on 15-5-2021.
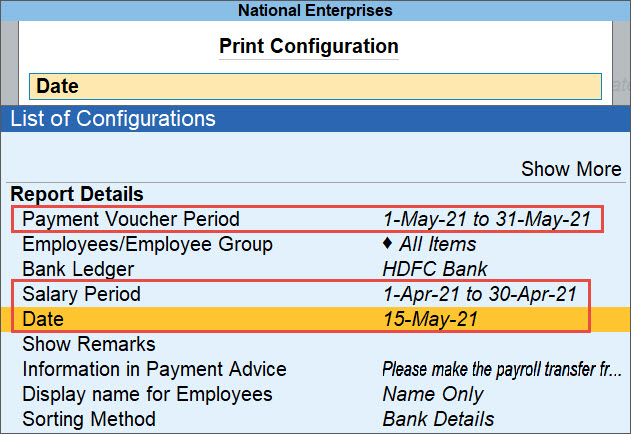
- Press Enter to get a print preview of the Payment Advice. The Payment Advice appears as shown.

Payment Advice contains a statement that the salary is being paid for the previous month (here, April), the date of printing, and the details of the employees such as account number and salary amount.
When the salary is being processed for certain employees, the warning message Some Employee(s) has Negative Values gets displayed.
Reason:
This Warning Message appears when:
- Only Deduction Pay Heads are processed for the This occurs when User Defined Process in Payroll is used for deduction entries alone.
- Total Earnings of the Employee is lesser than the Total Deductions. E.g.: Loss of Pay, deduction of salary against any loans & advances made to the Employee, etc.
- Professional Tax is being processed, as it is a Deduction Entry, for certain States, say, Tamil Nadu.
Checklist:
When this Warning Message is displayed:
- Press Alt+P (Print) or click on P: Print, and in the Print Preview, check for the Employees with Negative Values.
- If salary calculation is based On Attendance, and Attendance Type is Present, ensure that Attendance Voucher has been recorded for all Employees.
After verifying the above-mentioned checklist, if you are certain about the negative values press enter and save the voucher.
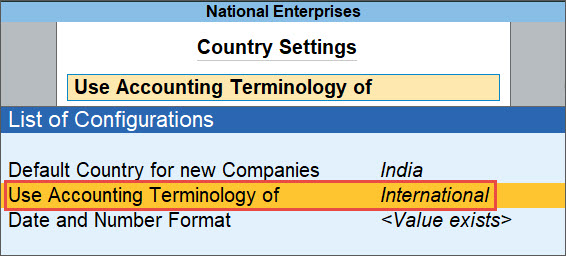
In Employee Master Creation/Alteration, under Statutory Details section NI Number will be displayed instead of PAN if you have changed the Country to International.
- Go to F1 (Help) > Settings > Country > press Enter.
- Set Use Accounting Terminology of to International.
You can print the Professional Tax Form for your state. TallyPrime displays all the required information to fill the professional Tax Form for all the states.
Alteration of the rounding method in PF Other Charges Pay Head is not allowed. The PF value will be automatically calculated with rounded value on the total value of other charges in Journal Voucher Autofill Calculation.
Yes. If the employees are located in different states, you may have to create separate Professional Tax Pay Heads for each state.
Yes, the statutory information for each employee can be recorded during Employee master Creation/Alteration.
You can record the contract details of an employee in the employee master. Contract details of an employee include the start and expiry date of the contract.
- Press Alt+G (Go To) > Alter Master > Employee > type or enter the name of the master, and press Enter.
Alternatively, Gateway of Tally > Alter > Employee > type or enter the name of the master, and press Enter. - Press F12 (Configure) and set Show Contract Details to Yes.
- Enter the contract details.
- Work permit number: As the employee signs a contact, a permit number is assigned authorising the employee to work for the organisation as per the policy.
- Contract Start Date and Contract End Date: Enter the contract period in the respective fields as agreed and accepted by the employee on contract.
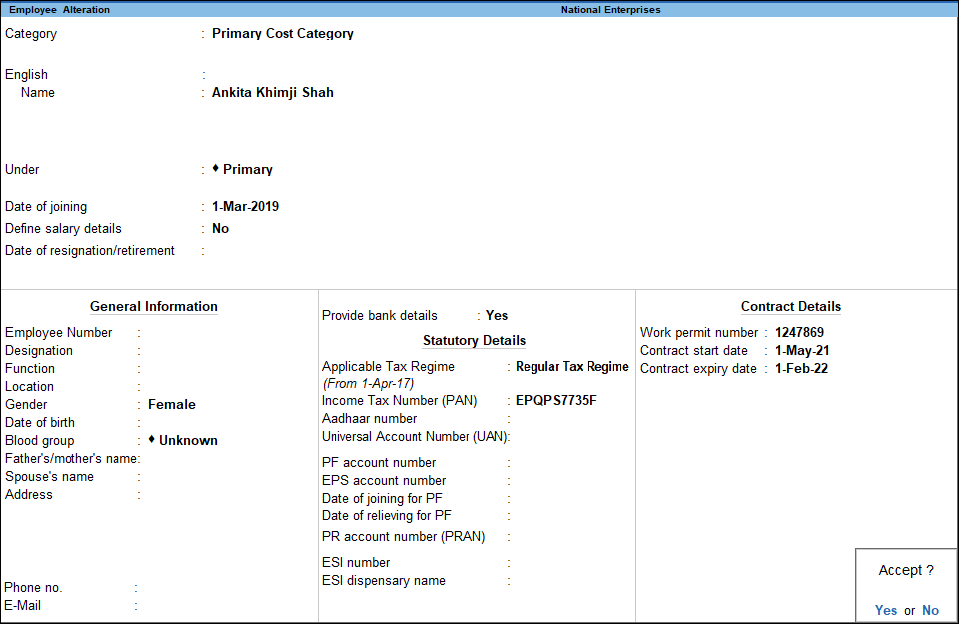
- Accept the employee master. As always, press Ctrl+A to save.
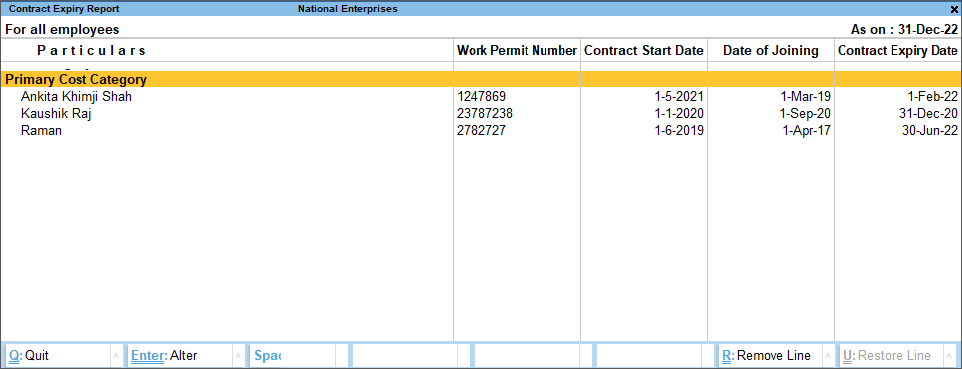
Once you enter the contract details for an employee, you can also view the details using the Contract Expiry Report.
- Press Alt+G (Go To) > Contract Expiry Report > press Enter.
Alternatively, Gateway of Tally > Display More Reports > Payroll Reports > Expat Reports > Contract Expiry.
TallyPrime takes care of the ESI Computation automatically when moving from one Contribution Period to another.
In TallyPrime, you can set the period for which you need the print the pay slips for one or more employees.
- Press Alt+G (Go To) > Single Pay Slip or Multi-Employee Pay Slips > Enter.
Alternatively, Gateway of Tally > Display More Reports > Payroll Reports > Statements of Payroll > Pay Slip. - Select the Employee as needed.
If you have chosen Multi-Employee Pay Slips, select the Employee Category and Employee/Group. - In the Pay Slip report, press F2 (Period) and specify the From and To dates.
- Press Ctrl+P (Print) > Configure (if needed) > Print.
If PF (Provident Fund) is withdrawn before 5 years of continuous employment, then it is taxable.
Points to remember:
- An individual has to pay tax on the withdrawal of PF accumulations if the same has been withdrawn from a recognized PF account without rendering continuous services for five years or more with the employer.
- On the change in employment in the past, if the accumulated PF balance has been transferred to the PF account of the new employer, then the period of previous employment will be considered as part of continuous service, and accordingly, the five years is computed.
- The aggregate of the employer’s contribution to PF and interest earned thereon will be taxable as a salary.
- Deduction claimed will be under section 80C of the Income-Tax Act, 1961, on your own contribution to the recognized PF shall be taxed as salary.
- Interest earned on own contribution to PF shall be taxed as “income from other sources”. The tax rate would depend on employees’ applicable income slab in each of the FY (s) during which the PF contributions were made.
- You are entitled to avail relief under section 89.
- Tax will be deducted at source at 10% if the taxable PF amount is more than Rs.30,000 and provided the Permanent Account Number (PAN) of the individual is available.
Yes, it is possible to print Form 16 and e-form and annexures from TallyPrime.
To print the forms:
- Gateway of Tally > Display More Reports > Statutory Reports > TDS Reports.
Alternatively, press Alt+G (Go To) > type or select TDS Reports. - Select the required form and press Enter.
- Press Ctrl+P to the print the required form.
Alternatively, press Alt+P (Print) > and press on Enter.- Press I (Preview) to verify the details before printing the e-form.
- Press C (Configure) to set the required details to print in the Print Configuration screen.
- Press Backspace to return to the Print screen.
- Press P (Print) to print the required Form.
The exemption amount can be altered using Override Exemption Value. Also, using this option employee’s medical bill amount for the year can be entered.
- Press Alt+G (Go To) > Alter Master > Income Tax Exempt > press Enter.
Alternatively, Gateway of Tally > Alter Master > Income Tax Exempt > press Enter. - Select the Name of Employee for which you need to alter the exemption amount for medical reimbursement.
- In the Override screen, provide the details for the exempt amount.
- Select Income Tax Component as Medical Reimbursement.
- Enter the date the modification is effective from.
- Select Medical Reimbursement as the Ledger Name.
- Select Exempt to specify that the alteration is for exemption in Income Tax.
- Enter the Exemption amount for the year.
If you need to specific different exemption amount for different period, you can repeat the same for a different Effective From date.
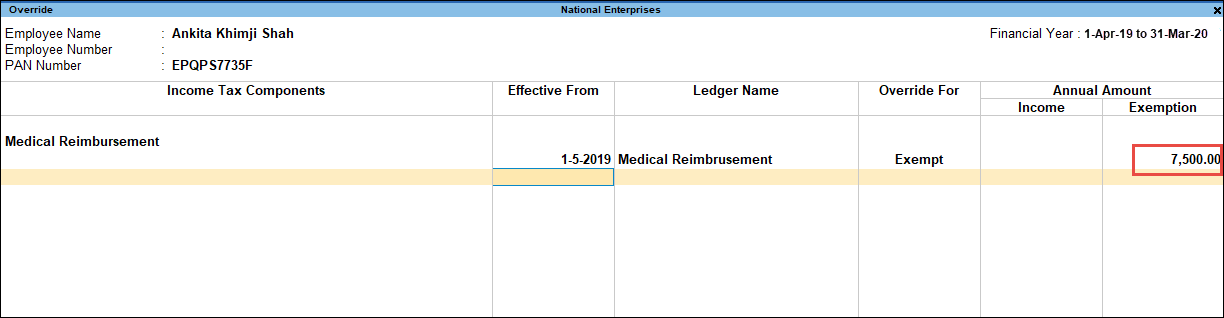
Note: Annual amount should not exceed Rs. 15,000.00.
The amount you specify will be considered for the IT calculation from the effective date and the same will be printed in all IT-related reports.
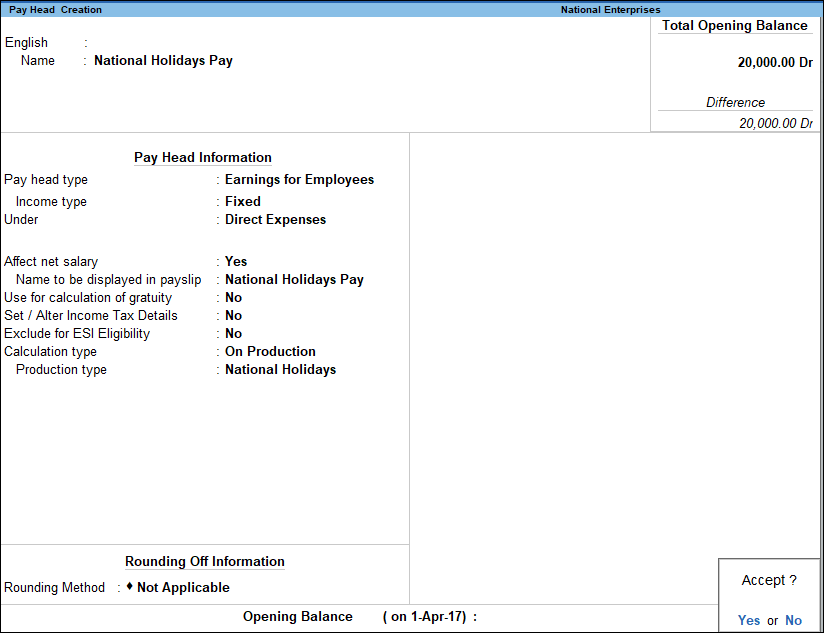
In TallyPrime, you can create masters for paid holidays and also record payment of double the amount on National days.
- Create the Attendance Type.
- Create the Pay Head to account the payment on National Holiday (Double Pay).
- In Salary Details, include the Holiday pay head, as shown.
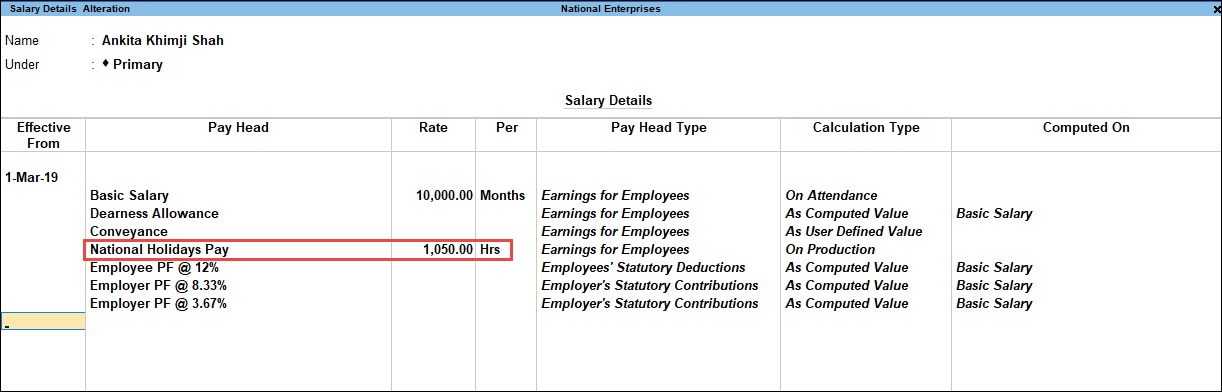
Note: You can access the Salary Details Creation/Alteration screen can also be accessed from Employee/Employee Group Master.
- Record an Attendance Voucher to account the Number of national Holidays for which Double pay to be paid.
- Process the Salary for the selected employee.
- Process the Salary for the selected employee.
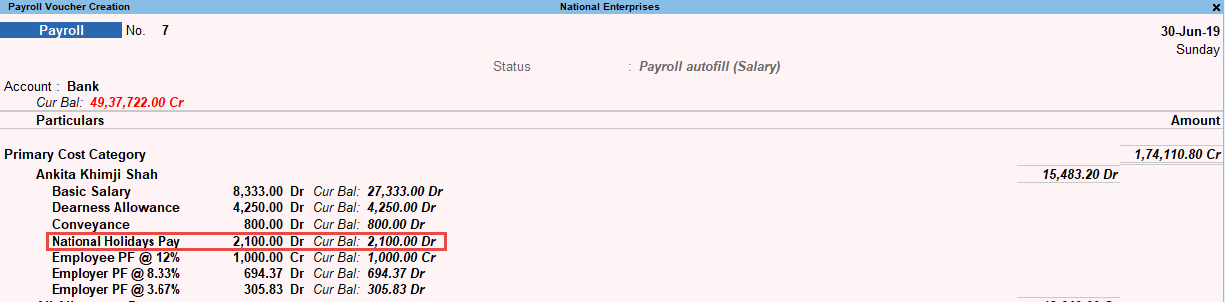
- Process the Salary for the selected employee.
Yes. You can start using the payroll data for the current financial period and simultaneously update the old/historical payroll information too.
A certificate of lower deduction or no deduction of tax from salary is given by the Assessing Officer on the basis of an application made by the deductee. In cases where the Assessing Officer has issued such a certificate to an employee, the deductor has to only mention whether no tax has been deducted or tax has been deducted at a lower rate on the basis of such a certificate.
When an employee has worked with a deductor for part of the financial year only, the deductor should deduct tax at source from the employee’s salary and report it in the quarterly Form No. 24Q of the respective quarter(s) up to the employee’s date of employment. Further, while submitting Form No. 24Q for the last quarter, the deductor should include particulars of that employee in Annexures II and III irrespective of the fact that the employee was not employed with the same company on the last day of the year.
Similarly, when an employee joins employment with the deductor during the financial year, the TDS particulars should be reported by the current deductor in Form No. 24Q of the relevant quarter. Further, while submitting Form No. 24Q for the last quarter, the deductor should include particulars of TDS for these employees for the actual period of employment in Annexures II and III.
Those employees whose estimated income for the entire year is above the threshold limit are required to provide their particulars from the first quarter onwards in Form No. 24Q.
- In case the estimated income for the entire year of an employee after allowing a deduction for various savings like PPF, GPF, NSC, etc. falls below the taxable limit, the particulars need not be included in Form No. 24Q.
- In case, due to some reason, the estimated annual income of an employee exceeds the exemption limit during the year, tax should be deducted in that quarter and the particulars reported in Form No. 24Q from that quarter onwards.
For the Employees more than 58 Years, the entire Employer Contribution goes into the PF A/c no. 1 as there is no contribution towards the EPS A/c.
Yes, TallyPrime supports accounting the entire Employers contribution under PF Account no .1.
TallyPrime provides you with the flexibility of creating user-definable PF rates and slabs. Based on your company’s HR requirements, you can create the PF-related Pay Heads with uniform slabs (rates) for all the employees or with separate slabs (rates) for different employees.
The Total Number of employees should match the number of employees who contributed the PF for the current month. As the current month’s resigned employees have also contributed towards PF for the current month, they cannot be excluded.
Hence, the Number of Subscribers left service (vide Form 10) shows the previous month left so that the total number of employees will match with the current month’s Net Total Number of Subscribers.
TallyPrime allows you to process payroll even from the middle of the month, for example, from the 26th to the 25th of each month. To process the payroll in the middle of the month, you need to:
- Create the attendance-based pay heads on User defined Calendar Type.
- You need to pass two Attendance Vouchers one for calendar days and another for actual attendance.
After following the above steps, the salary will be processed correctly from the middle of the month.
Scenario: The ABC Company started operations from 1-4-2021 and wants to process the Payroll on the 25th of each month. The payroll is processed on 25.4.2021 and 25.5.2021 and so on. For illustration, let’s assume that Mr. Rakesh is the employee who joined the company on 1.4.2021. There is only one Pay Component Basic Pay.
Create/Alter – User Defined Calendar Type
- Gateway of Tally > Create > Attendance/Production Type.
Alternatively, Alt+G (Go To) > Create Master > Attendance/Production Type. - Select User Defined Calendar Type in the Attendance type field and enter the details as shown:
- Press Y to accept the screen. You can also press Enter to save.
Create/Alter – Basic Pay Head
- Gateway of Tally > Create > Pay Heads.
Alternatively, Alt+G (Go To) > Create Master > Pay Heads. - Specify the details as shown below:
- Press Y to accept the screen. As always, you can press Ctrl+A to save.
Similarly, create the Employee and Salary Details for the Employee.
Create Attendance Vouchers for recording the number of working days
- Gateway of Tally > Vouchers > press F10 (Other Vouchers) > type or select Attendance Voucher.
Alternatively, Alt+G (Go To) > Create Voucher > press F10 (Other Vouchers) > type or select Attendance Voucher.
The Attendance Voucher Creation screen appears. - Press Ctrl+F (Autofill) for Attendance Autofill.
- Specify the below details in Attendance Autofill screen:
- Specify Voucher Date as 25-04-2021 and select the required option for Employee/Group field.
- Select My Calendar (user defined calendar type created earlier) as Attendance/Production Type.
- You can specify 30 in the Default Value to Fill which will be prefilled for all Employees.
The completed Attendance Voucher for number of working days appears as shown below:
- Press Y to accept the voucher. As always, you can press Ctrl+A to save.
Create Attendance Voucher to record the actual days present
Similarly, pass the attendance Voucher for the number of days the Employee is present on 25-04-2021. Since there are only 25 days, you will have to specify the days the Employee is present out of 25 days.
Note: The present days is captured as the Basic Pay Head is created on Present days.
Process Payroll
- Gateway of Tally > Vouchers > press Ctrl+F4 for Payroll Voucher.
Alternatively, Alt+G (Go To) > Create Voucher > press Ctrl+F4 for Payroll Voucher. - Enter the required details in the Payroll Autofill as shown.
The completed Payroll Voucher appears as shown below:
- Press Y to accept the screen. As always, you can press Ctrl+A to save.
In the month of May, you will have to consider the number of working days as 30 (ie. Remaining 5 days of April 2021 and initial 25 days of May 2021).
To process the Payroll successfully, you will have to pass three Attendance Vouchers, one Attendance Voucher for April from 25th to 30th April 2021 and two for the month of May on 25-05-2021.
Attendance Voucher for April 2021 for pay period from 26th to 30th April 2021
The above Voucher has to be passed to compute the salary for the last 5 days of April 2021. The total salary will be divided by the user defined days and multiplied by 5 or actual attendance.
Attendance Voucher for 1st to 25th May 2021 for user defined Calendar Type
 The above Voucher is passed to record the user defined days from 1-05-2021 to 25-05-2021.
Actual Attendance from 26th April to 25th May 2021
The above Voucher records the actual number of days the Employee was present in the office from 26-04-2021 to 25-05-2021.
Process Payroll for period 26th April to 25th May 2021

Note: In the Payroll Auto Fill, you will have to select Payroll period as 26-04-2021 to 25-05-2021.
Similarly, you can pass the Attendance and Payroll Vouchers for all the months.
Follow the above process for salary computation for remaining months too.
The PF admin charges will not come automatically while making the PF payment. The following are the pre-requisites for the PF admin expenses to be computed and display the PF Payment Voucher and PF Challan.
- The PF admin Pay Heads should have been created:
- PF Admin Charges @0.5%
- EDLI Contribution @0.5%
- PF Admin Expenses Ledger should have been created under Indirect Expenses.
- PF Admin Charges Liability should have been created using a Journal Voucher and Employer Other Charges Autofill process.
- After the above three are completed, pass the PF Payment Voucher using the Autofill feature to automatically bring the values.
The PF Challan when printed after the above will display the PF Admin charges along with EDLI charges in the PF Challan. For more information on creating the above process, refer to the Help file (TallyPrime Reference Manual).
Payment Advice will display details only when:
- The payroll payment voucher is processed by selecting a bank ledger.
- Payment voucher date should be within the period mentioned in the Payment Voucher Period field in Print Configuration screen for Payment Advice.
Note: Before generating Bank Payment Advice, ensure in Employee Masters, the payment details line Bank Name, A/c No., etc. are specified.
Pay Head will not appear in the Salary Pay Slip of Employee unless and until it is configured in the Employee’s Salary Details screen.
Let us understand this better with the help of an example:
- Create a new Pay Head Loan to Employee under the head Loans and Advances.
- Create a new Employee and configure the Salary Details as shown below:
Note: Salary Details Creation/Alteration screen can be accessed from Employee/Employee Group Master screen.
- Record a Payment Voucher manually, without using the Autofill option as shown below:
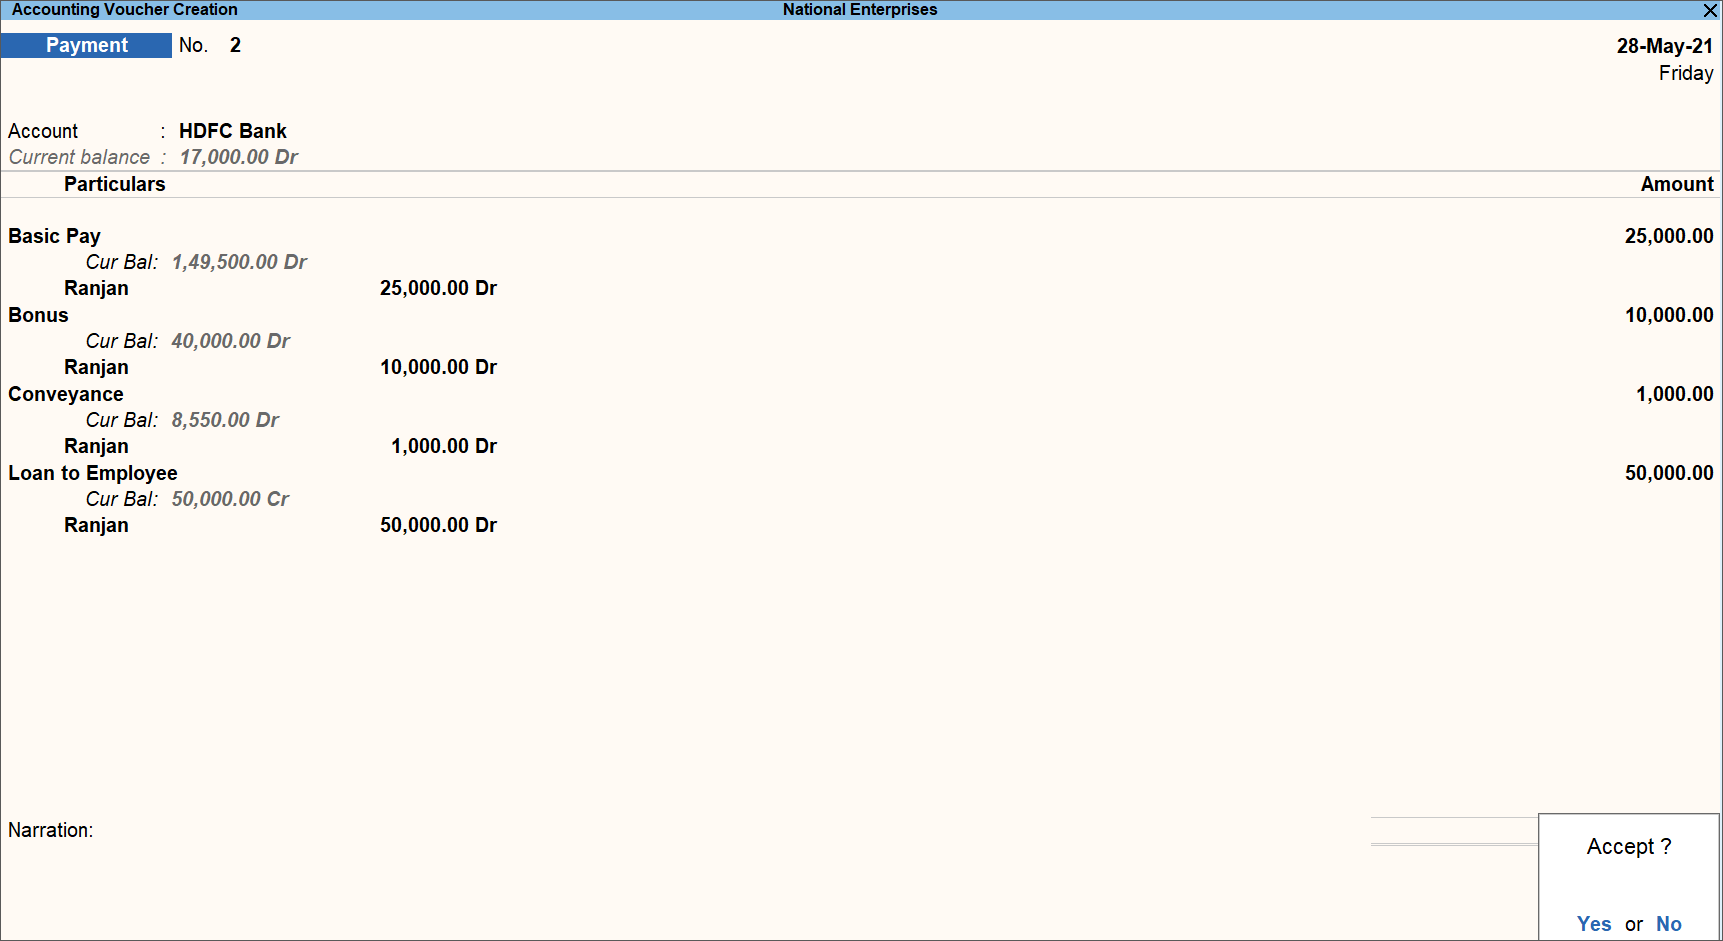
- Record a Payroll Voucher manually, without using the Autofill option and provide the necessary details. The Payroll Voucher Creation screen appears as shown below:
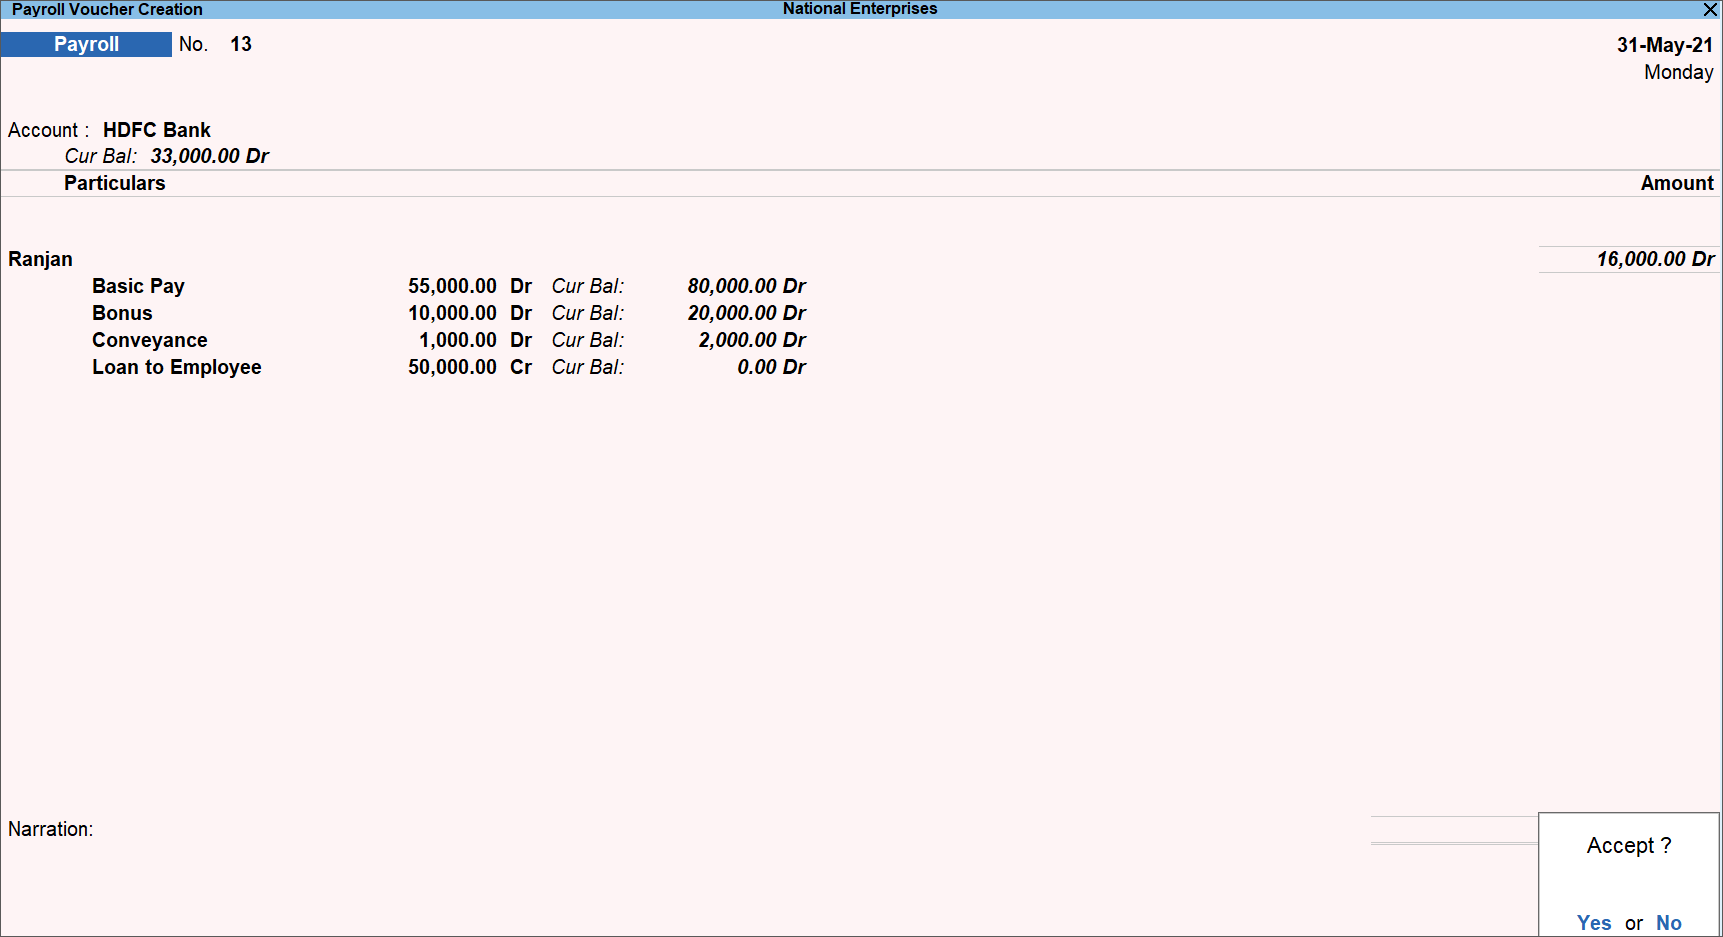
- Go to Gateway of Tally > Display More Reports > Payroll Reports > Pay Slip > select the Employee from the List of Employees/Group.
Alternatively, Alt+G (Go To) > type or select Payroll > Employee Pay Slip > select the Employee from the List of Employees/Group.
The Employee Pay Slip screen appears as shown below:
 We can see that the Pay Head Loan to Employee is not displayed in the Pay Slip even though both Payment and Payroll Vouchers have been recorded, only since it has not been configured in the Salary Details screen of the Employee.Hence for the New Pay Head to be displayed in the Pay Slip, it needs to be configured in the Employee Salary Details first as shown below:
- Record the Payment and Payroll transactions with the respective ledgers. Now, the Pay Slip will display the Pay Head Loan to Employee.
TallyPrime supports the deduction of specific Pay Heads which are user defined in nature and the respective employee’s salary is updated with these deductions while processing the Payroll. For example, deductions like electricity, home loan, insurance, etc.
- Create a new Group Recoveries (for example), Loans can be Grouped under Loans and Advances (Assets).
- Create/Alter the Pay Heads which are required to be recorded before processing the actual payroll for the month.
- Create Voucher Classes for Recoveries.
- Process the Payroll Voucher using the Voucher Class Recoveries.
- Process the regular Payroll Voucher for other Pay components.
Create a new Group Recoveries
- Gateway of Tally > Create > Group > and press Enter.
Alternatively, Alt+G (Go To) > Create Master > Group > and press Enter. - Specify the details as shown:
- Press Y to accept the screen. You can also press Enter to accept and save.
Create/Alter the Pay Heads
Alter all the required Pay Heads or create new Pay Heads (for which the amount needs to be recorded first) for recoveries and Group them under Recoveries Group. These Pay Heads should be created with Calculation Type as As User Defined Value.
- Electricity Deduction
- Sample Insurance Deduction

- Employee Loan Deduction must be grouped under Loans and Advances (Asset) Group as shown.
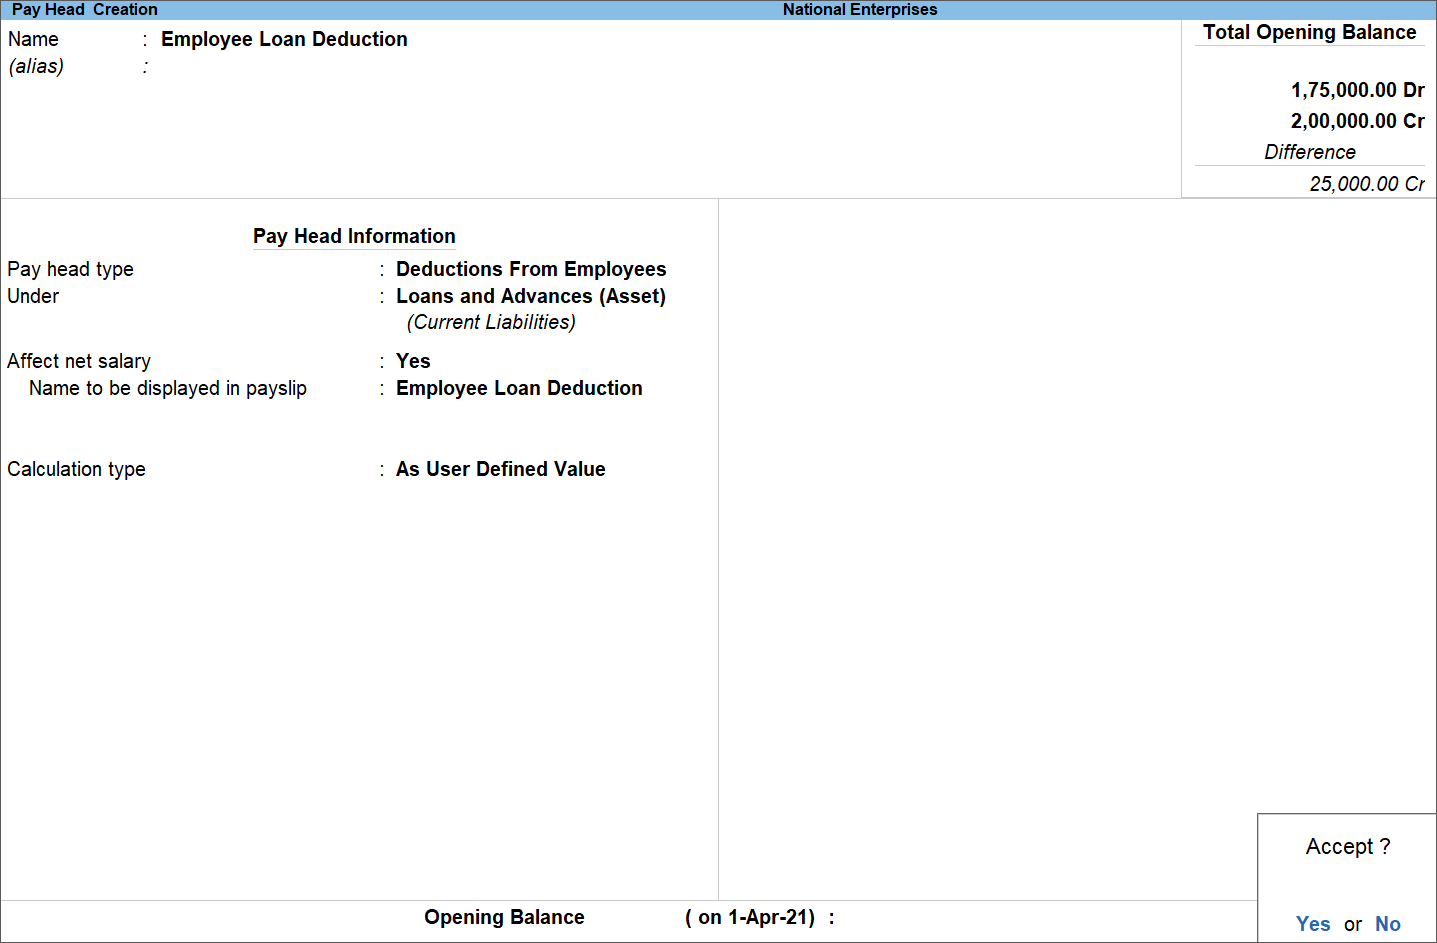
Create Voucher Classes for Recoveries
- Gateway of Tally > Alter > Voucher Type > Payroll.
Alternatively, press Alt+G (Go To) > Alter Master > Voucher Type > Payroll. - Select the parameters as shown.
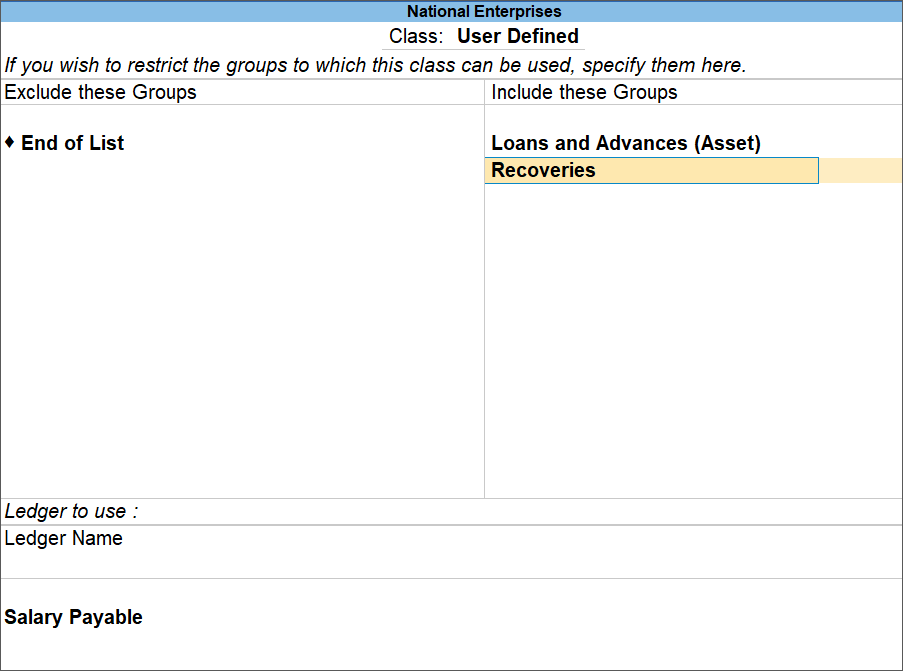
- Press Enter twice to save the new Voucher Class created.
Note: Ensure that the new Pay Heads are also specified in the Salary Details for the required Employees.
Process the Payroll Voucher using the Voucher Class Recoveries
- Gateway of Tally > Vouchers > press Ctrl+F4 for Payroll Vouchers.
Alternatively, press Alt+G (Go To) > Create Voucher > press Ctrl+F4 for Payroll Vouchers.Note: You need to press Ctrl + F4 to see Voucher Type screen when you are already in the Payroll Voucher Creation screen.
- Select the required Voucher Type which is created to record the User Defined Pay Values which needs to be deducted from Salaries.
- Press Ctrl+F (Autofill) for Payroll Autofill and specify the required parameters as shown.
- Press Enter to save the voucher.
Process the regular Payroll Voucher for other Pay components
- Press Ctrl+F4 again and select Not Applicable as the voucher type and press Enter.
- Press Ctrl+F (Autofill) for Payroll Autofill and specify the required parameters.
- Specify the value for earning components which are created with Computation Method as User Defined.
- Press Y to accept the screen. As always, you can press Ctrl+A to save the Payroll voucher.
Other Payroll Vouchers will be passed as per the usual process.
You can computing of House Rent Allowance configuring separate pay heads for HRA exemption under Income Tax.
? House Rent Allowance Pay Head should be configured for Income Tax
? Basic and Dearness Allowance (DA) Pay Heads should be configured for Income Tax
Configure HRA for Income Tax
Declare your HRA details
- Press Alt+G (Go To) > Alter Master > Income Tax Declaration > Enter.
- Select House Rent Allowance > select Employee Name or Group.
- Enter the Rental details as needed. A sample image is shown below:

Configure HRA pay head
- Press Alt+G (Go To) > Alter Master > Income Tax Pay Head Details > Enter.
Alternatively, Gateway of Tally > Alter > Income Tax Pay Head Details > Enter. - Select House Rent Allowance > Enter to display the Income Tax Configuration screen.
- Configure the screen to display the details as shown:
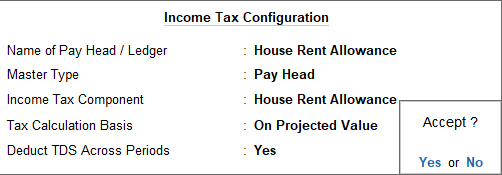
- Accept the screen. As always, press Ctrl+A to save.
Similar to House Rent Allowance, configure the Basic and Dearness Allowance pay heads for the Income Tax, as shown:
Configure the Basic pay head

Configure Dearness Allowance pay head
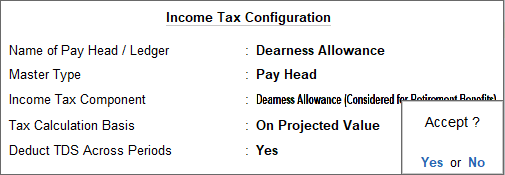
Once the HRA, Basic and DA Pay Heads are correctly configured, you will have to enter the Rent Declaration/proof details provided by the Employees.
Compute HRA Exemption
- Press Alt+G (Go To) > Alter Master > Income Tax Computation > Enter.
- Select the Employee and press Enter. The Income Tax Computation screen displays as follows, with the house rent allowance computed as exemption from Income Tax.
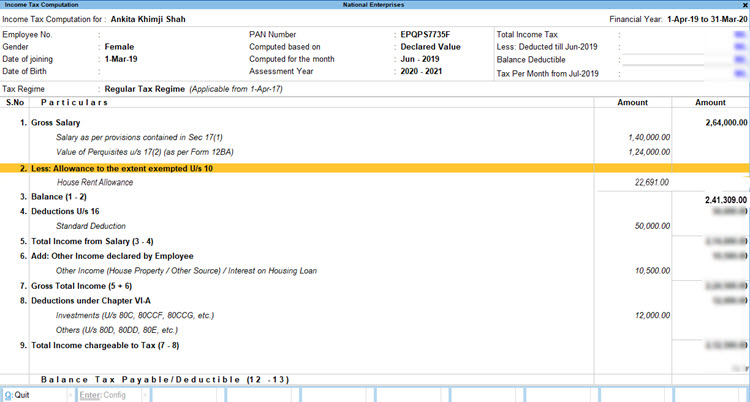
Only one Employee Category can be processed in a Single Autofill in the Payroll Voucher.
By default, the Pay Slip displays the Net Amount for all the Pay components.
- Press Alt+G (Go To) > type or select Single Pay Slip.
Alternatively, Gateway of Tally > Display More Reports > Payroll Reports > Pay Slip > select the required Employee from the List of Employees/Group.
The default Pay Slip for the selected Employee appears as shown below:
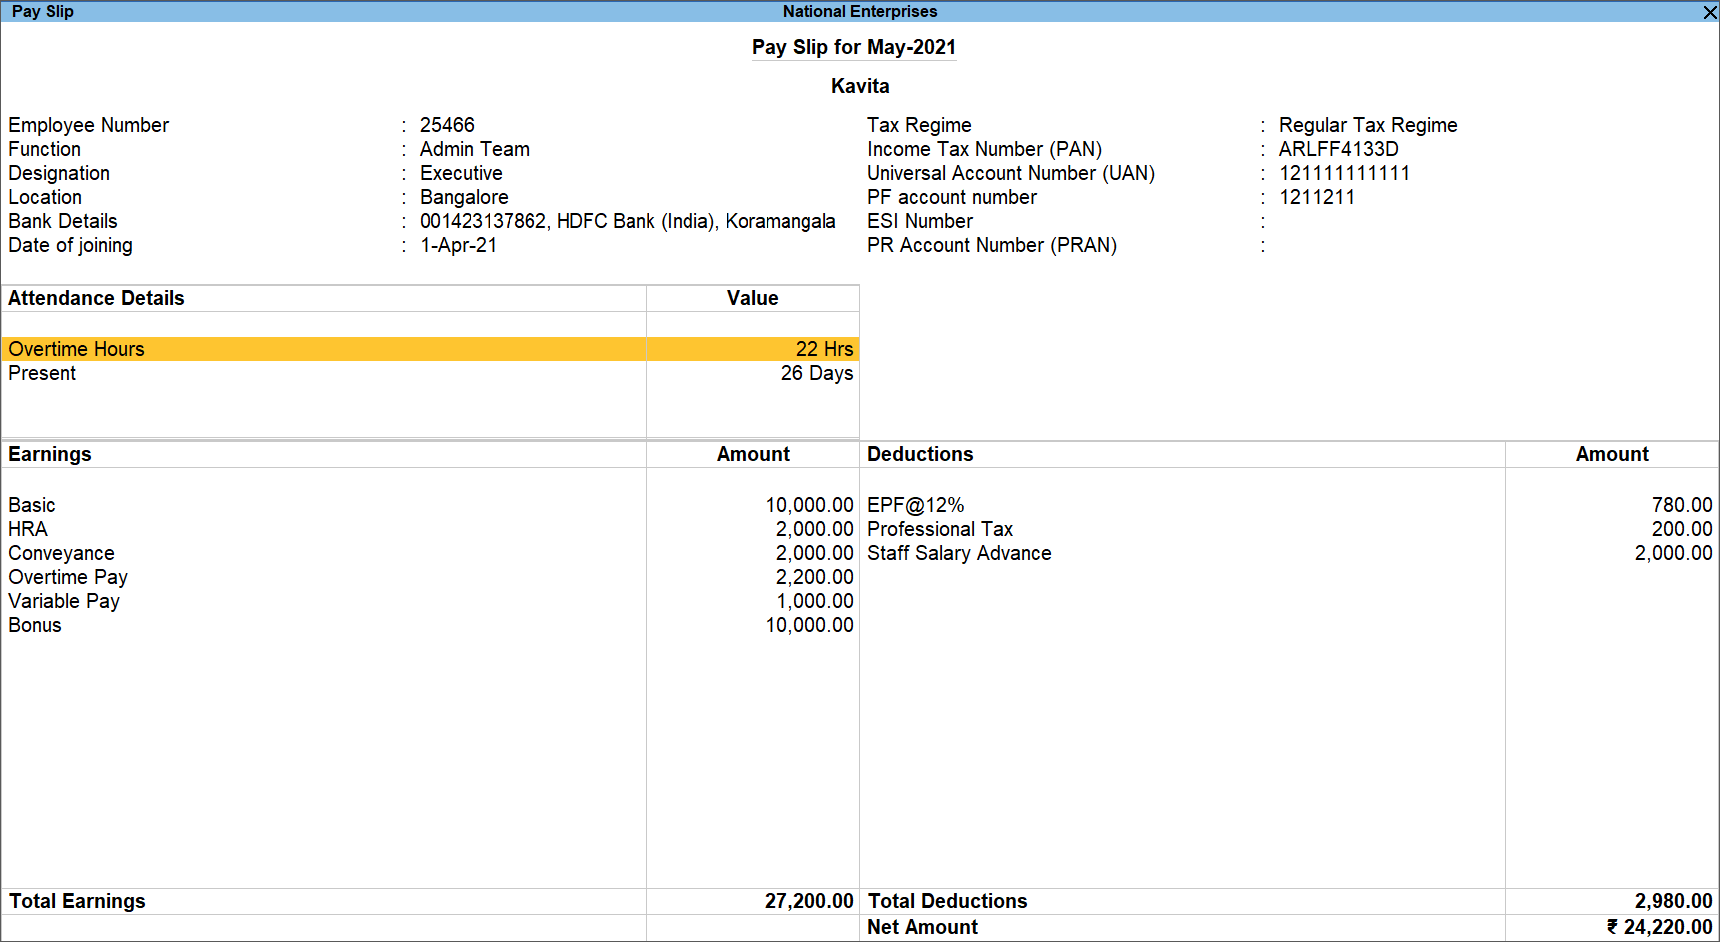
- To change the default display, set the Configuration options as per the requirement.
- Press F12 (Configure) from the Pay Slip screen.
- Set the option Show Gross Salary to Yes.
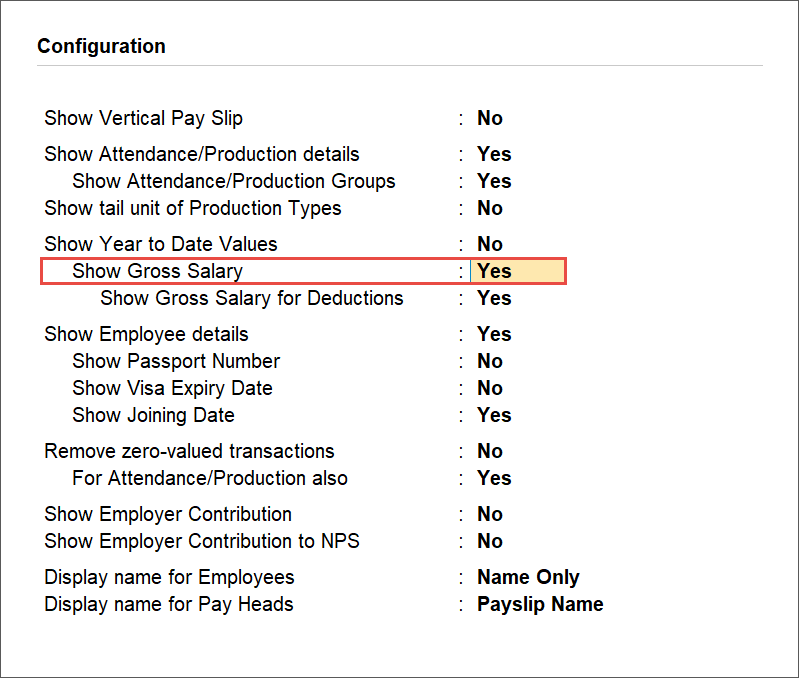
- Press Ctrl+A to save. The Pay Slip with Gross Salary appears as shown below:
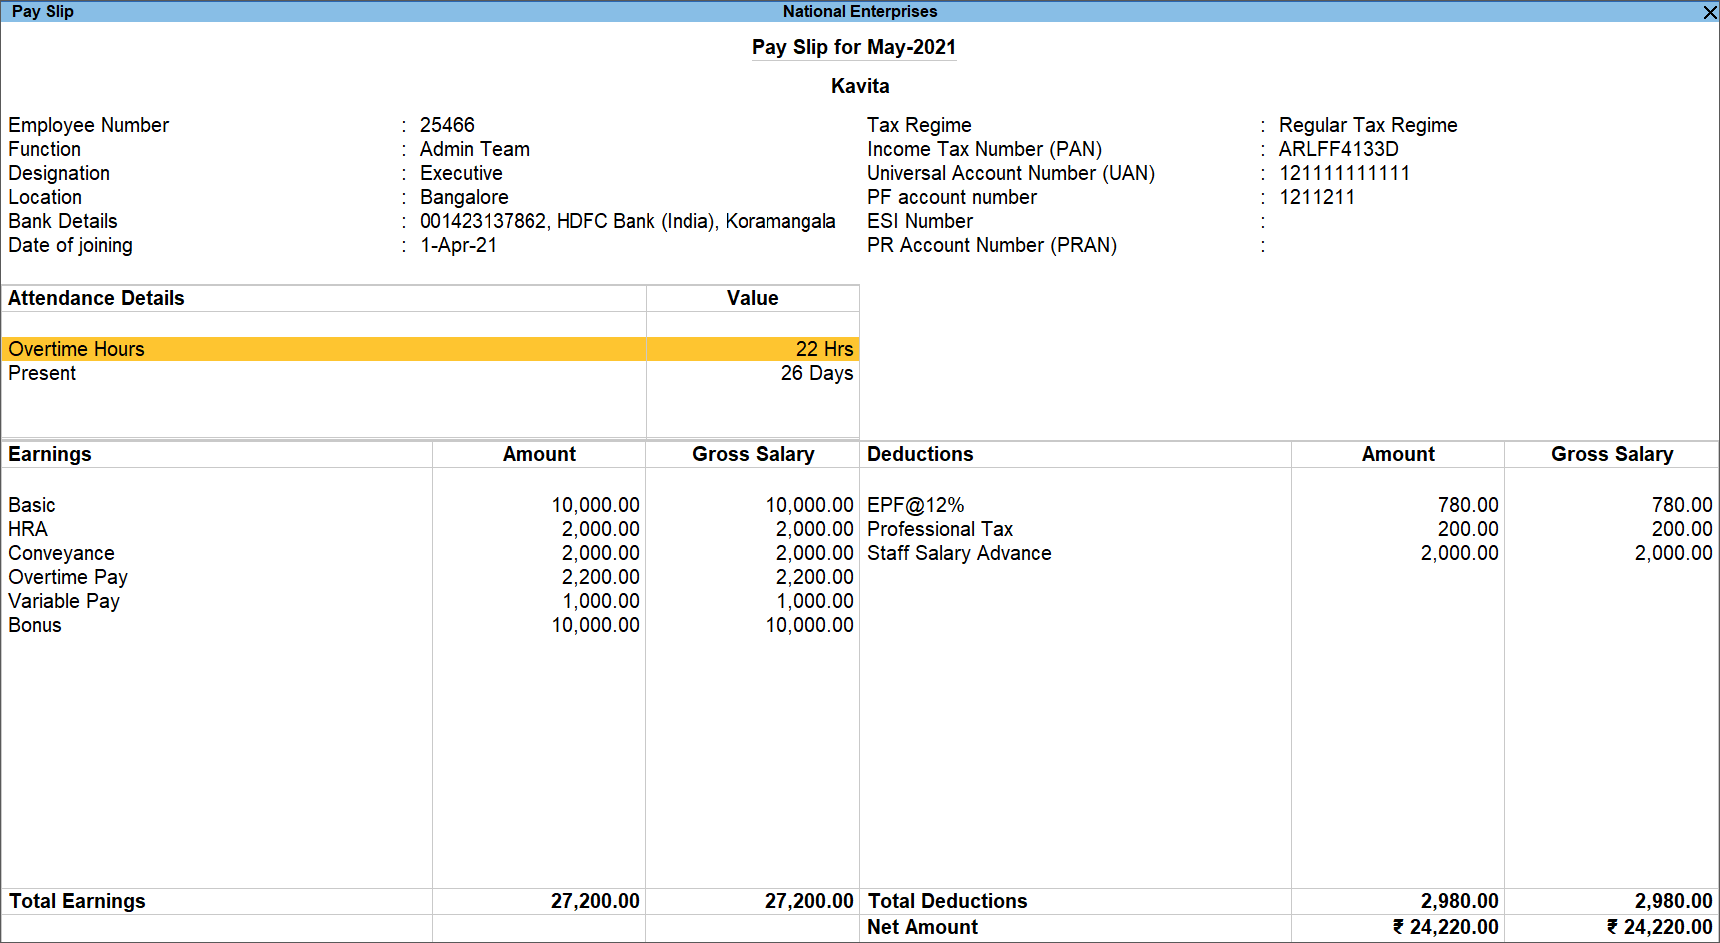
Note: Once the Gross values appears in the Pay Slip display, the same will also be available while printing the Pay Slip.
Whether the computed value for the ESI will be different with and without the option Exclude for ESI Eligibility checked for some of the Pay Heads?
Solution:
Yes, the ESI computation will be different when the option Exclude for ESI Eligibility is checked for a Pay Head. In Tally.ERP9, the Pay Heads considered for ESI amount computation and ESI Eligibility were same. Now in TallyPrime, you have additional Pay Heads for ESI amount computation while the same is not considered for the ESI Eligibility computation.
To understand the above let’s assume that Ms. Riya was getting paid as per the following components:
- Basic: Rs. 12,000
- Sales Allowance: Rs. 2,500
- Over time allowance: Rs. 100 per hour
- Overtime for May 2021: 10 Hours = Rs. 100*10 = Rs 1,000
The ESI Pay Heads will be created as shown:
- Employee ESI Deduction:

- Employer ESI Contribution:
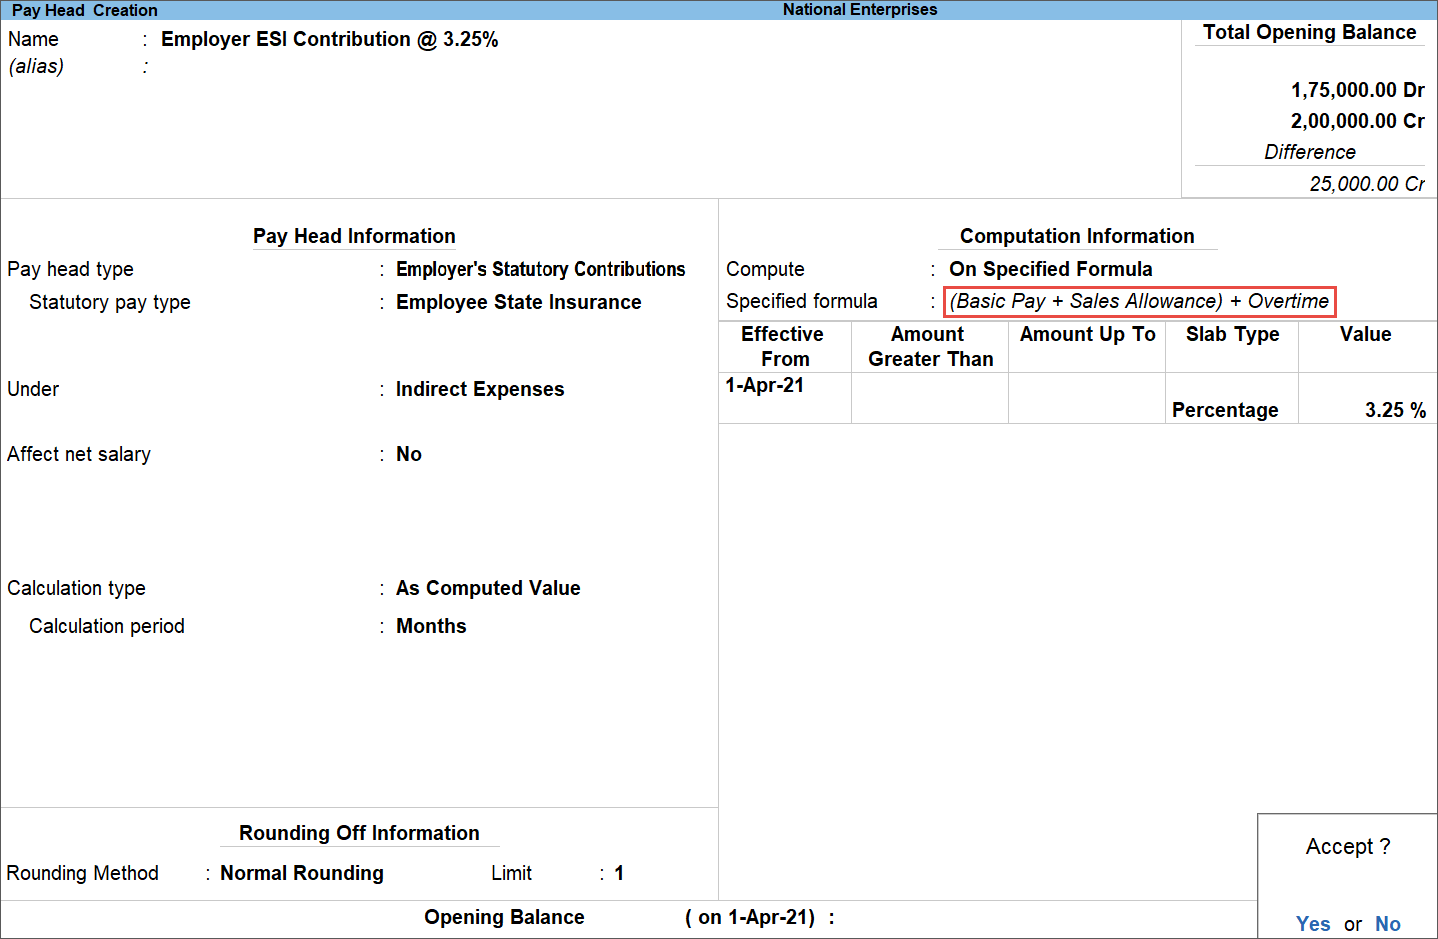
Earlier, there was no option to Exclude any Pay Head (e.g. Overtime) from ESI Eligibility. Hence, if the Overtime is included in the Specified Formula while creating the ESI Pay Heads, then the total Pay Value for Ramesh will be Rs. 15,500 (12000 + 2500 + 1000). Hence there will be no ESI Deduction or Contribution for Ms. Riya for the month of May.
In case if Overtime is not included in the Specified Formula as shown in the screenshots above, the ESI will be computed and the values for deduction and contribution will be as shown:
- Employee ESI Deduction @ 0.75% = Rs. 108.75
- Employer ESI Contribution @ 3.25% = Rs. 471.25
Note: The above values are calculated without considering the earnings for the Overtime Pay Heads.
But as per the ESI rule, once an Employee falls under ESI, then the Amount is computed on all the earning components whether they are regular in nature or not. Hence, Overtime should also be considered for Computation purpose.
TallyPrime provides the flexibility to exclude a Pay Head from the Eligibility criteria while considering it for the ESI Computation by using it in Specified Formula as shown in the above screenshots.
The Overtime Pay Head should be altered (created) with the option Exclude for ESI Eligibility set to Yes.
- Gateway of Tally > Alter > type or select Pay Heads > select the Overtime Pay Head from the list > and press Enter.
Alternatively, press Alt+G (Go To) > Alter Master > type or select Pay Heads > select the Overtime Pay Head from the list > and press Enter. - Press F12 (Configure) in the Pay Head Creation/Alteration screen.
- Set the option Exclude Pay Head for ESI eligibility to Yes, as shown below:
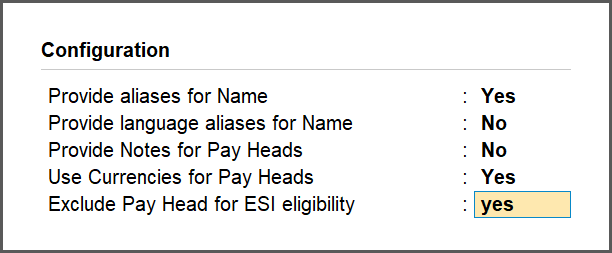
The Exclude for ESI Eligibility option will be set to Yes automatically, as shown:
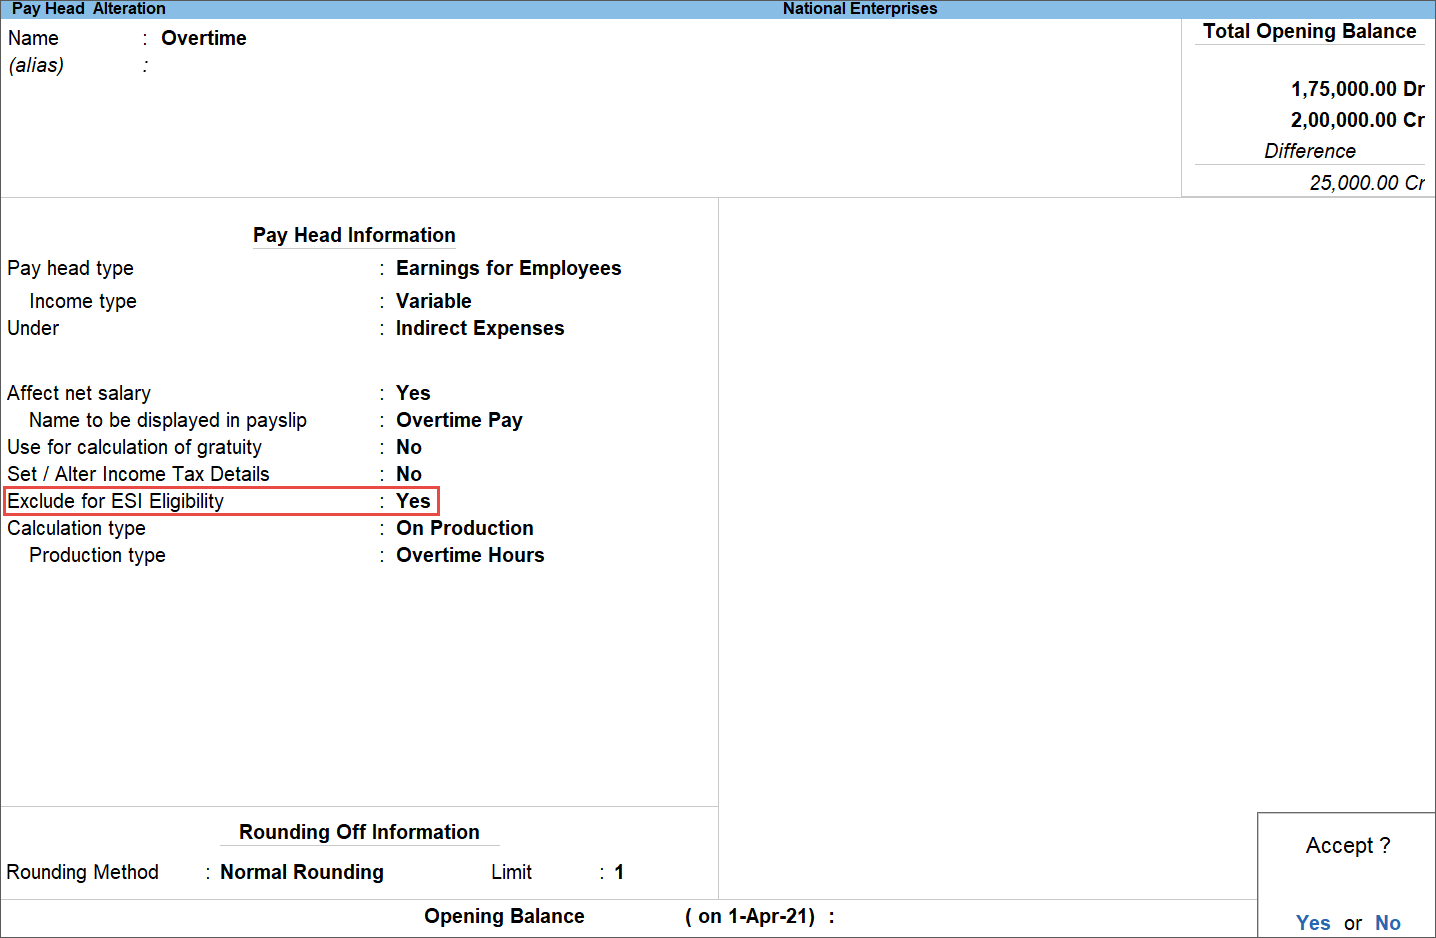
- Press Y to accept the screen. As always, you can press Ctrl+A to save.
Process Payroll for the month of May for Ms. Riya
- Salary Process:
- Gateway of Tally > Vouchers > press Ctrl+F4 (Payroll).
Alternatively, press Alt+G (Go To) > Create Voucher > press Ctrl+F4 (Payroll). - Press Ctrl+F (Autofill) for Payroll Autofill.
- Select the required details.
- Press Enter. The complete Payroll voucher appears as shown below:
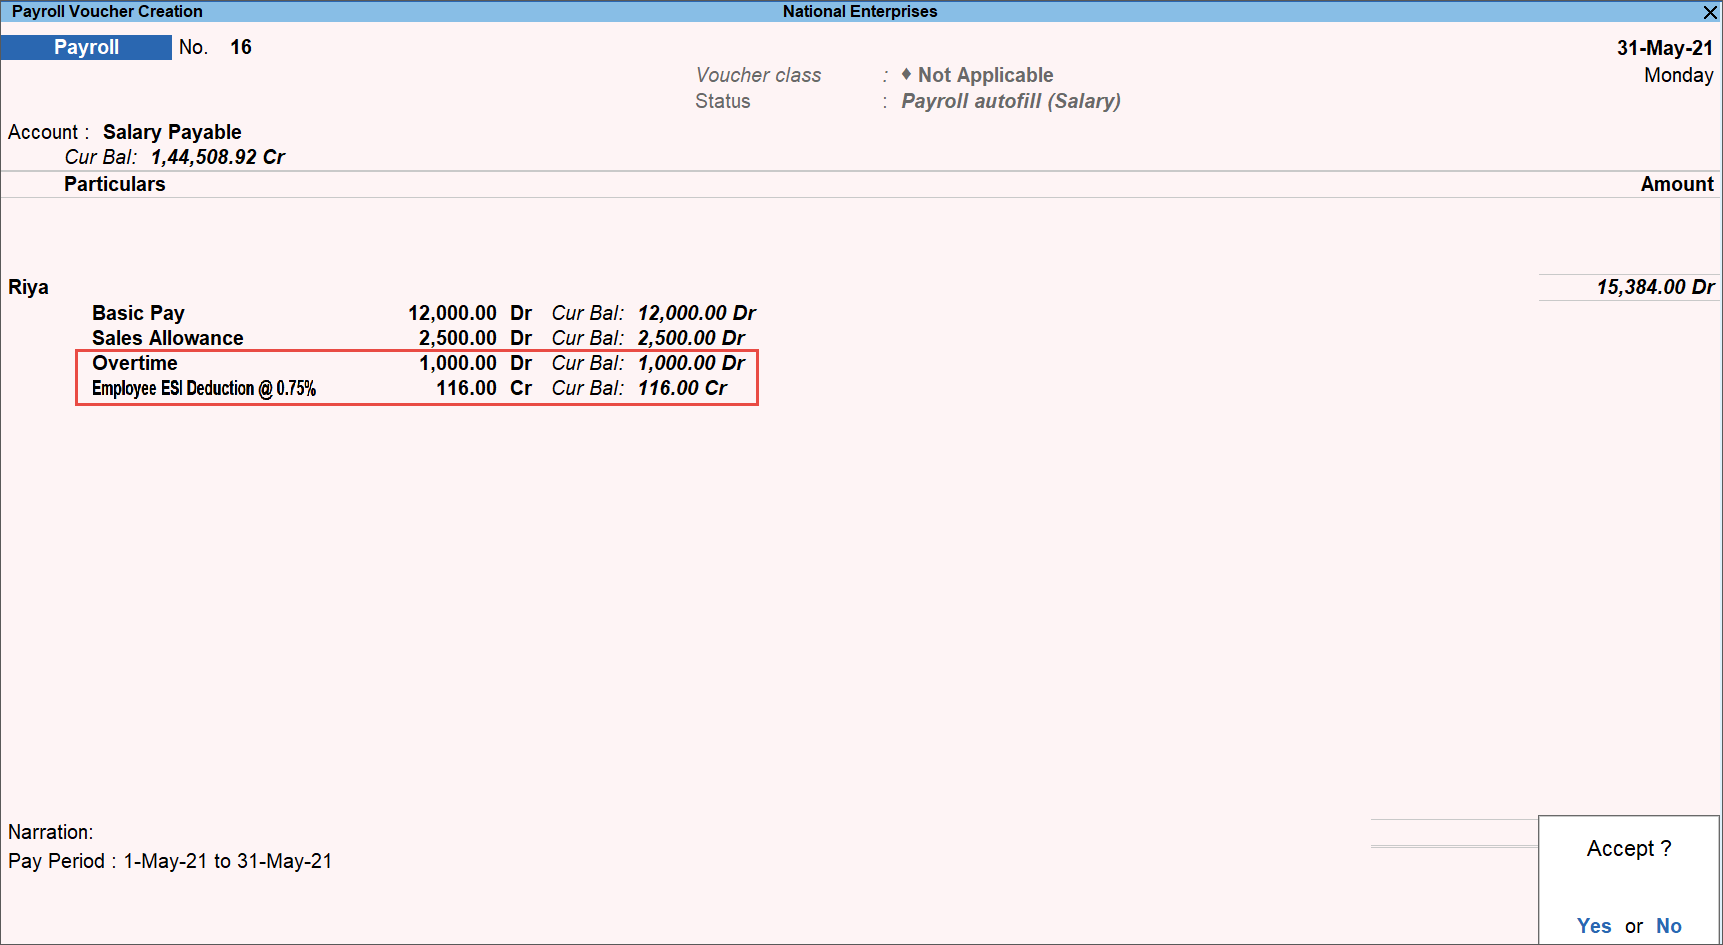
The Payroll Voucher clearly shows that the ESI is computed though the total earnings are 15,500 as Overtime is considered for the eligibility and hence eligibility amount is 14,500 only. But while computing the value for ESI Rs. 15,500 has been considered i.e. including Overtime amount.
- Gateway of Tally > Vouchers > press Ctrl+F4 (Payroll).
- Employer ESI Contribution Process:
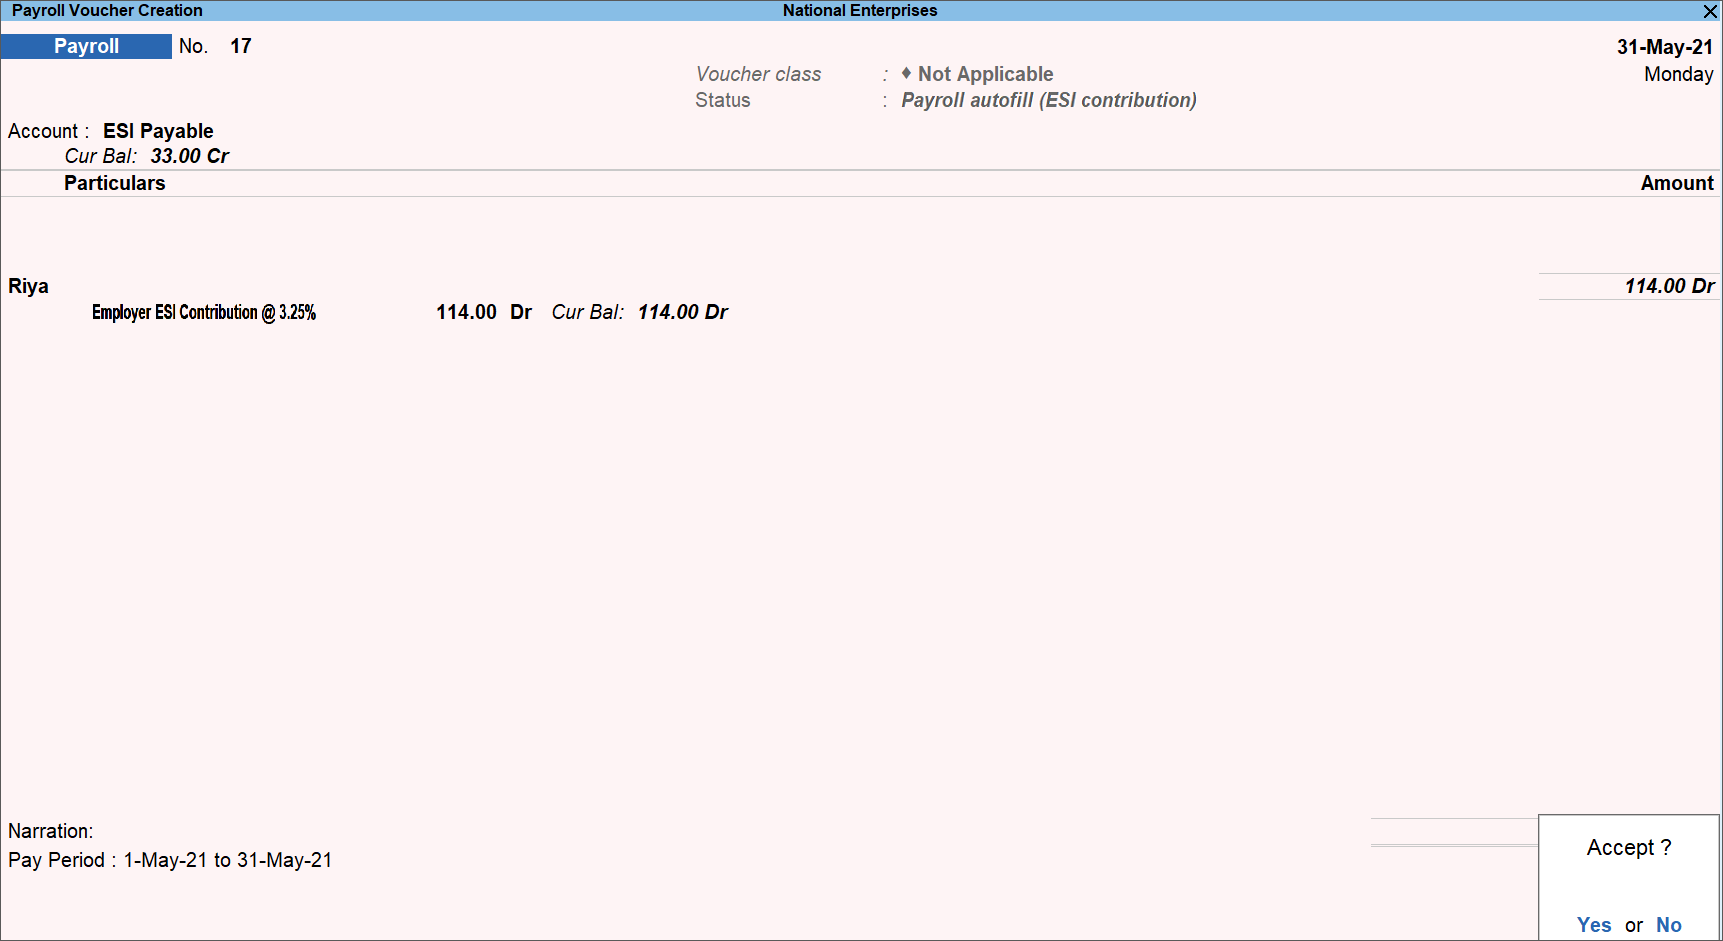
Even the ESI amount is computed on the total value i.e. Rs. 15,500 as shown in the above screenshot.The above illustration clearly shows that the Overtime Pay Head has been included while computing the Deduction or Contribution values for ESI but is ignored while checking Eligibility Amount i.e. Rs. 15,000.
TallyPrime Release 4.0 onwards, you can seamlessly import Attendance Details from MS Excel into TallyPrime.
To know more about importing Attendance Details to TallyPrime, refer to Create Mapping Templates for Attendance Details.
- Press Alt+G (Go To) > Alter Master > Payroll Income Tax Configuration > Enter.
Alternatively, Gateway of Tally > Alter > Payroll Income Tax Configuration > Enter.
The Tax Configuration screen appears:
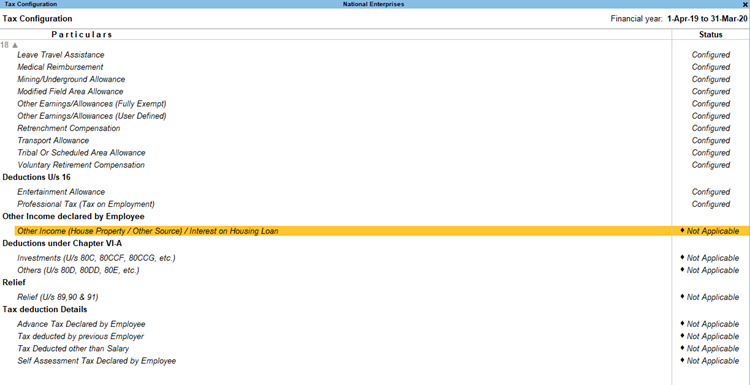
- Select Other Income (House Property/Other Source)/ Interest on Housing Loan > select the employee name > press Enter.
- Provide necessary details under Other Income declared by Employee.
- Select Income From House Property.
- Specify the date from when the Interest on House Loan is applicable in Effective From date.
- Specify the Annual Amount and select End of List.

- Accept the screen. As always, press Ctrl+A to save.
Once you have configured the Interest on Housing Loan, the same will be automatically considered for Income Tax Computation.
Note: Ensure to enter the values as Negative (-) if its the Interest paid on the House/Home Loan.
You cannot track the details of the pending leaves from the Payroll. But you can manage the details of the leaves taken by Employees by creating different Leave types.
Tracking of Leaves and option to enter the Leave Opening balance will be provided in the future releases of TallyPrime.
You can visit our website https://tallysolutions.com/ for the detailed product roadmap.
Yes, the Payroll module in TallyPrime is completely integrated with Accounts. As a result, the user does not need to pass separate accounting entries to record the details of the Expenses towards employees’ salaries.
Prerequisites:
Enable cheque printing and configure cheque format. Refer to the Cheque Printing topic for more details.
In the Payment voucher:
- Select the Bank for which you have enabled cheque printing.
- Enter all necessary payment details, such as Salary, HRA and so on for a particular ledger account.
A sample screen is shown for reference:
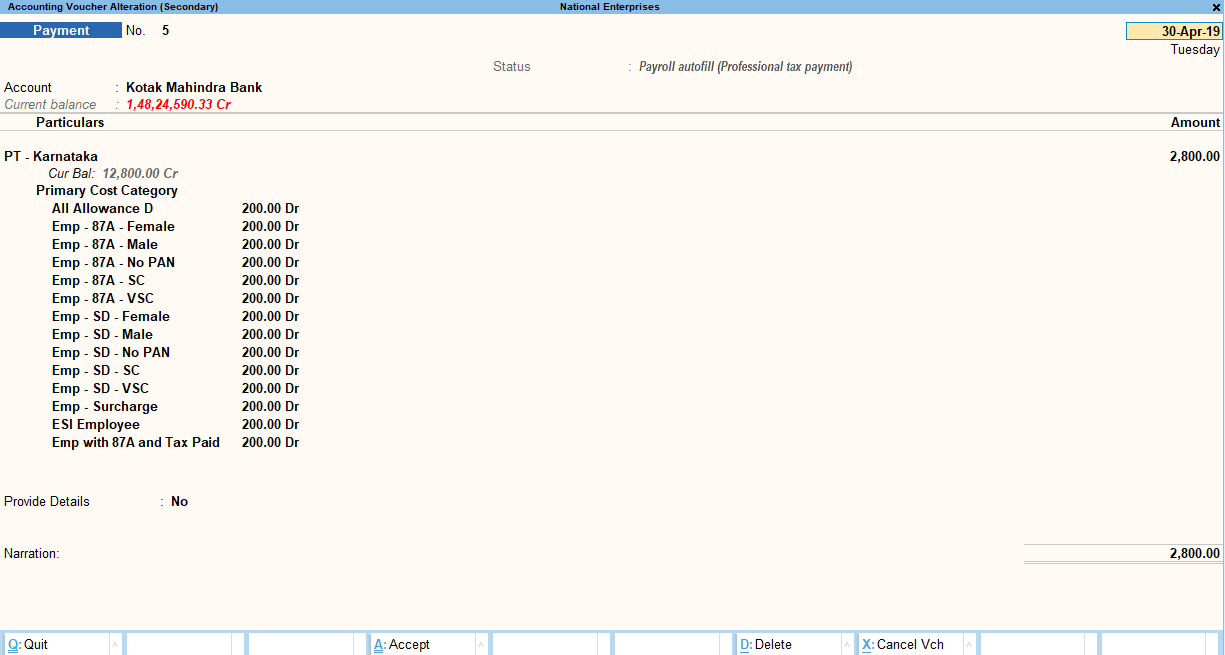
- Enter Narration, if any, and press Enter.
- In the Bank Allocations screen, select Transaction Type as Cheque, and provide the cheque details in the respective fields.
On accepting the Payment Voucher, you will automatically be taken to the Cheque Printing screen.
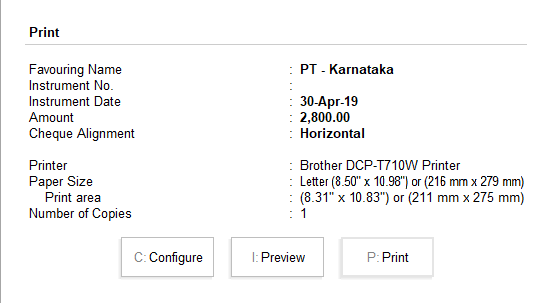
- Select Configure, is needed, and Print.
- The cheques will get printed as per the cheque format you had set in the bank ledger.
The details of Salary Paid and Balance Salary can be viewed from Employee Head Count report.
- Go to Gateway of Tally > Display More Reports > Payroll Reports > Employee Head Count.
Alternatively, press Alt+G (Go To) > Display More Reports > Payroll Reports > Employee Head Count.
The Salary/Wages Payments screen appears. - Press F12 (Configure) and set the option Show Salary paid & Balance Amount as Yes.

The Employee Head Count report displays the details of Salary Paid and Balance Salary as shown:

Note: If Employee has any remaining salary to get paid, it will display under Balance Salary, otherwise it will show blank.
- To view Employee wise Salary/Wage Payment Summary, scroll and move the cursor to Earnings field and press Enter.
- The Employee wise Salary/Wages Payment Summary for the month will appear as shown below:

While creating the House Rent Allowance Pay Head, if you define the Calculation Type as Flat Rate, the House Rent Allowance will get calculated even if the Employee has been absent for the entire Pay Period. In such cases, to ensure the HRA does not get added to the salary, you can use any of the following methods.
Method 1: Define Salary Details of the Employee A
- Go to Gateway of Tally > Alter > type or select Define Salary > and press Enter.
Alternatively, press Alt+G (Go To) > Alter Master > type or select Define Salary > and press Enter. - Select the Employee from the List of Groups/Employees for whom HRA has to be altered, i.e, made NIL.
- In the Salary Details Alteration screen that appears, tab down to the HRA field defined in the Salary Details with effective date being from 1-May-2021, and make the amount zero, as shown below:
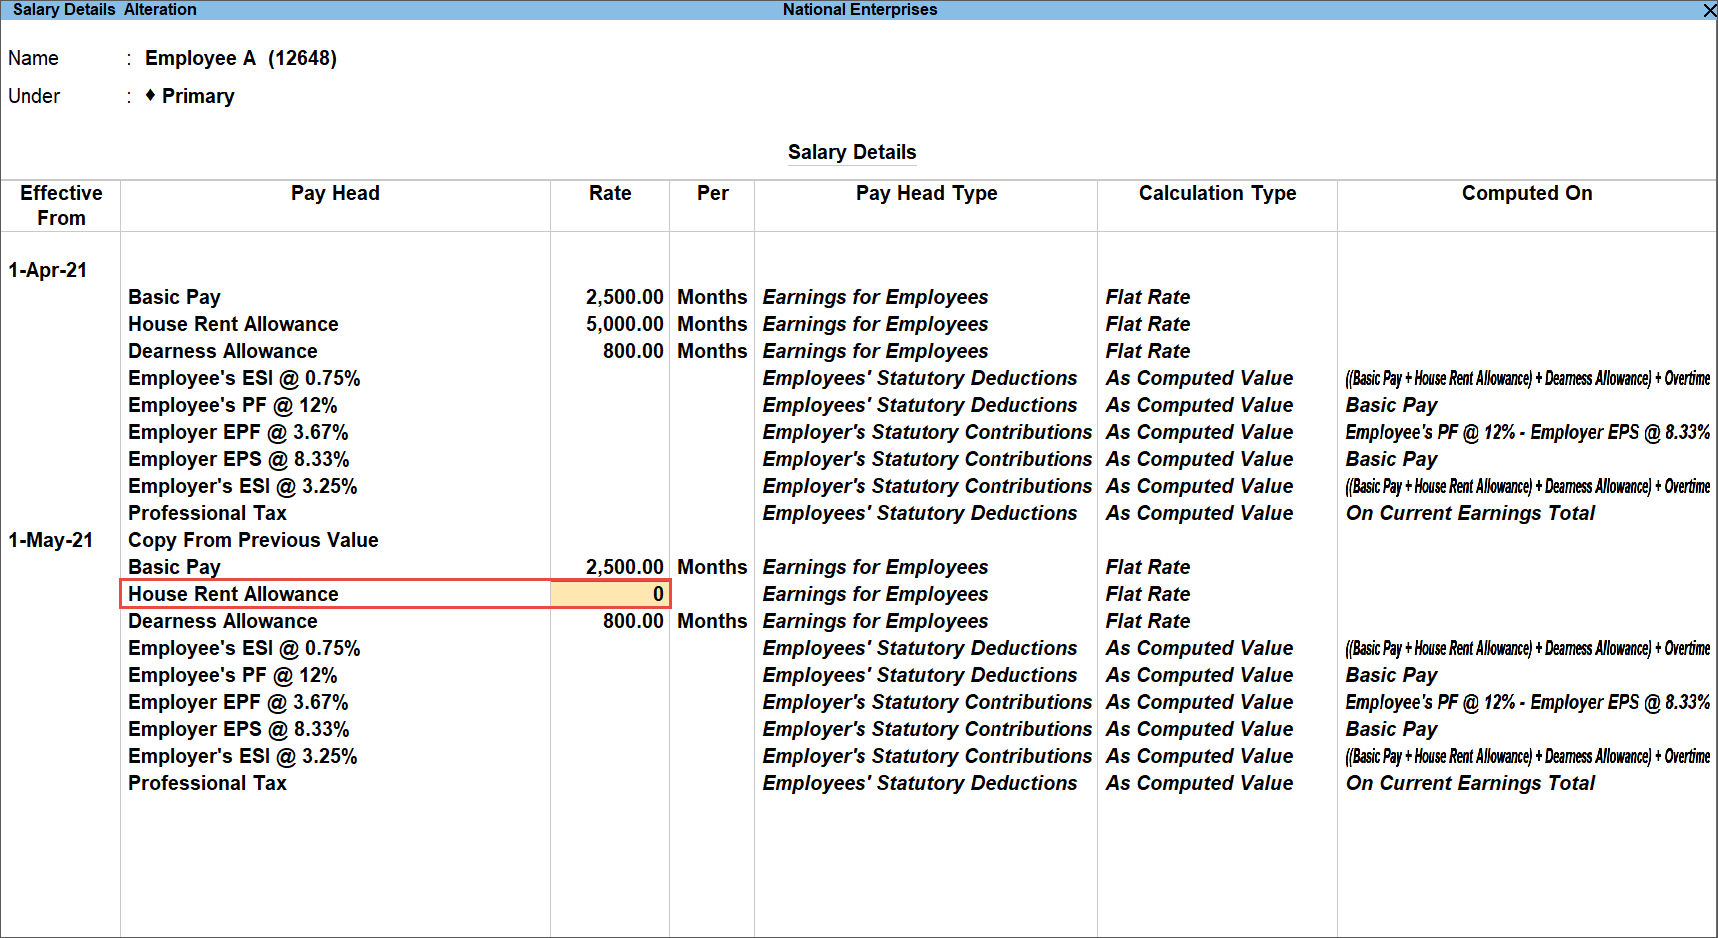
- Press Y to accept the screen. You can also press Enter to save the details.
Note: Salary Details can also be altered from Employee/Employee Group master.
- Now create a Payroll voucher for Employee A for the month of May, 2021.
- Press Alt+G (Go To) > Create Voucher > Ctrl+F4 (Payroll) > Ctrl+F (Autofill) > and process Employee A’s salary for the month of May 2021.
Alternatively, go to Gateway of Tally > Vouchers > Ctrl+F4 (Payroll) > Ctrl+F (Autofill) > and press Employee A’ s salary for the month of May 2021.
The Payroll voucher appears with HRA as NIL.
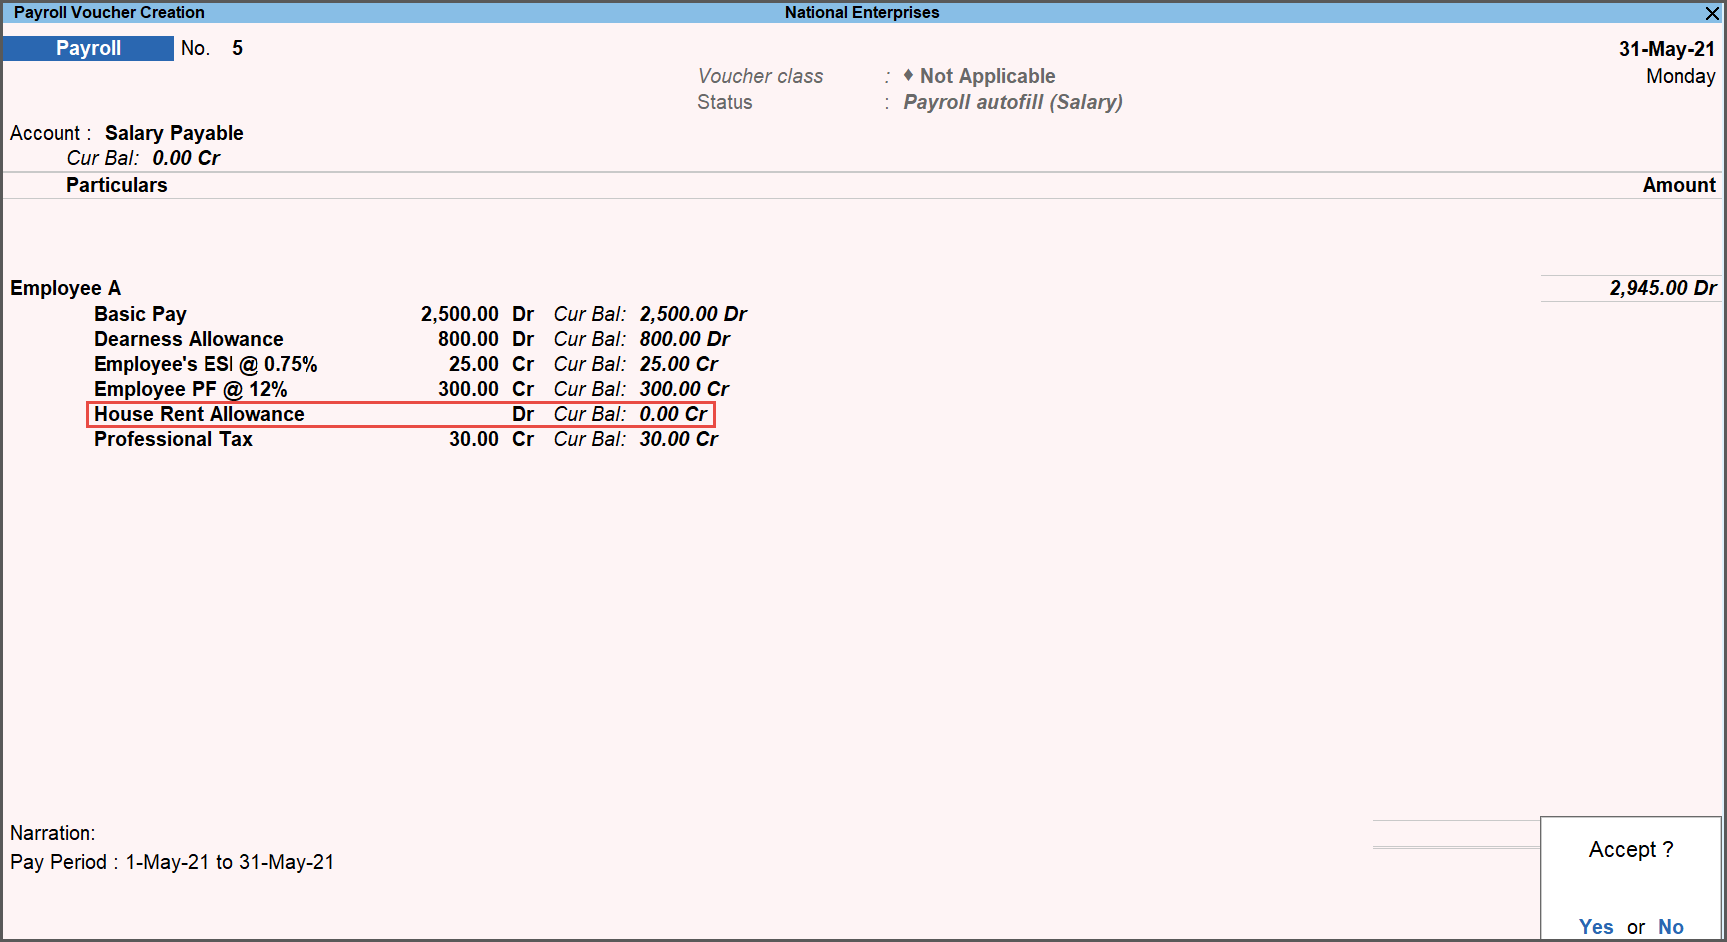
- Press Y to accept the screen. As always, you can press Ctrl+A to save.
- Press Alt+G (Go To) > Create Voucher > Ctrl+F4 (Payroll) > Ctrl+F (Autofill) > and process Employee A’s salary for the month of May 2021.
Note: For the month of May 2021, HRA has been altered and set to NIL. If the same Salary Details are retained to process salary for the subsequent months, HRA will not be calculated. Hence, ensure that the Salary Details are altered appropriately with the applicable Effective Date to include HRA, if the same has to be paid to the employee.
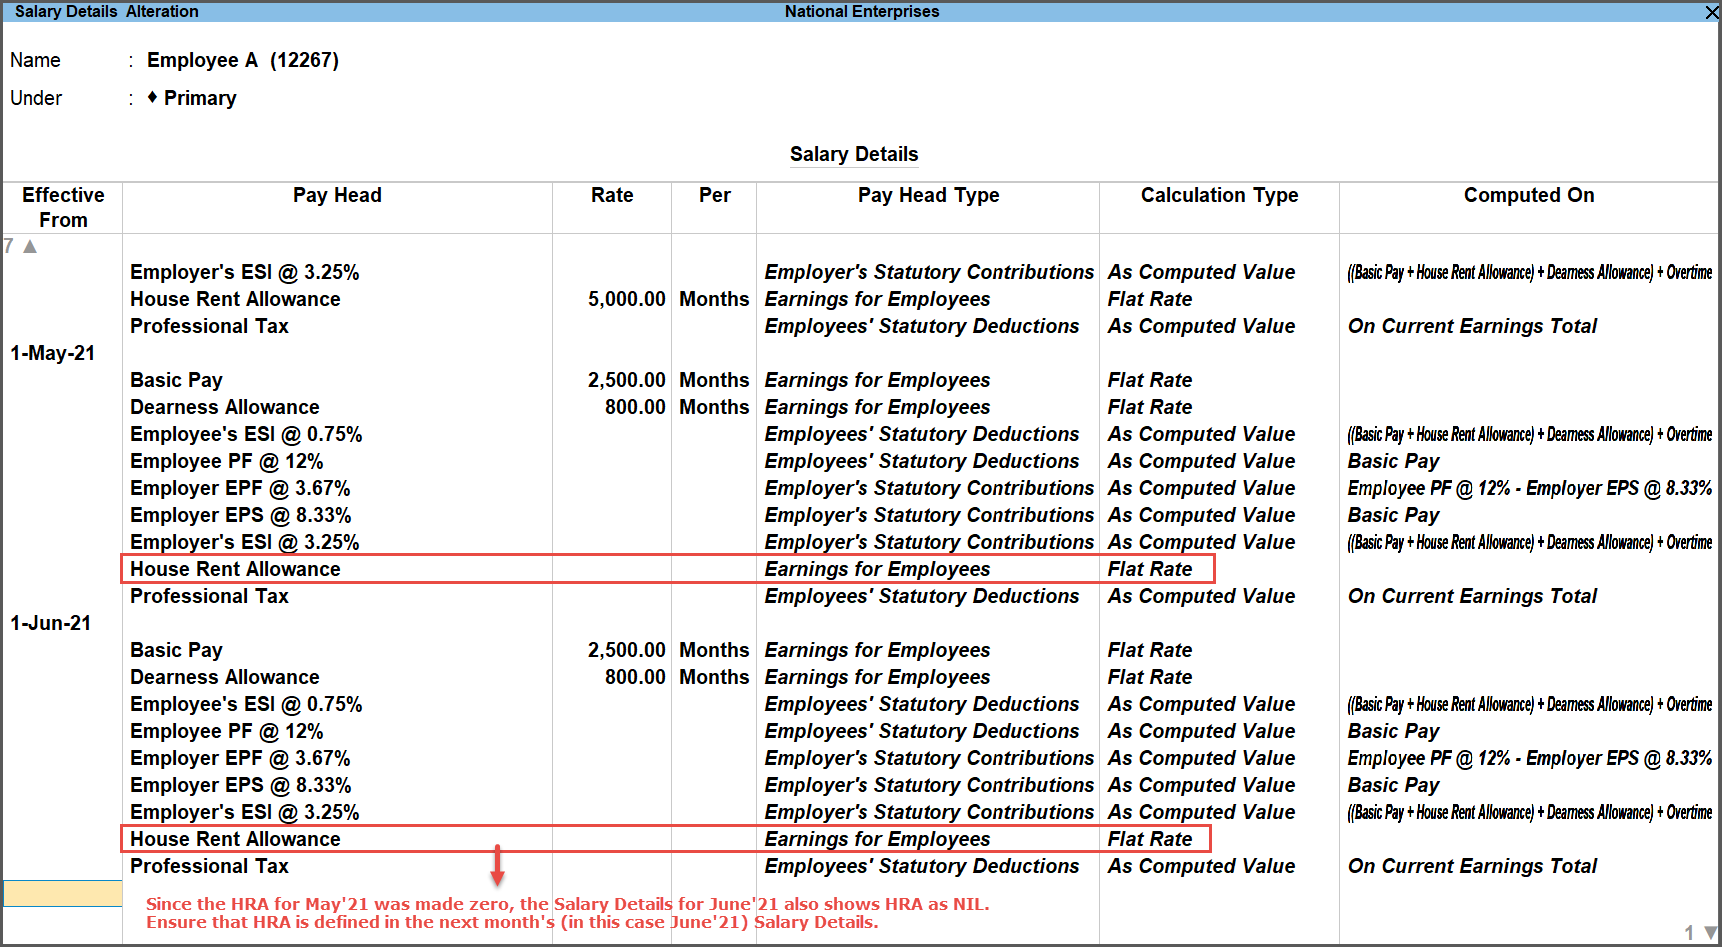
Method 2: Alter Calculation Type for HRA Pay Head
- Gateway of Tally > Alter > type or select Pay Heads > select HRA Pay Head from the List of Pay Heads > and press Enter.
Alternatively, press Alt+G (Go To) > Alter Master > type or select Pay Heads > select HRA Pay Head from the List of Pay Heads > and press Enter. - In the Pay Head Alteration screen, change the Calculation type to On Attendance from Flat Rate.
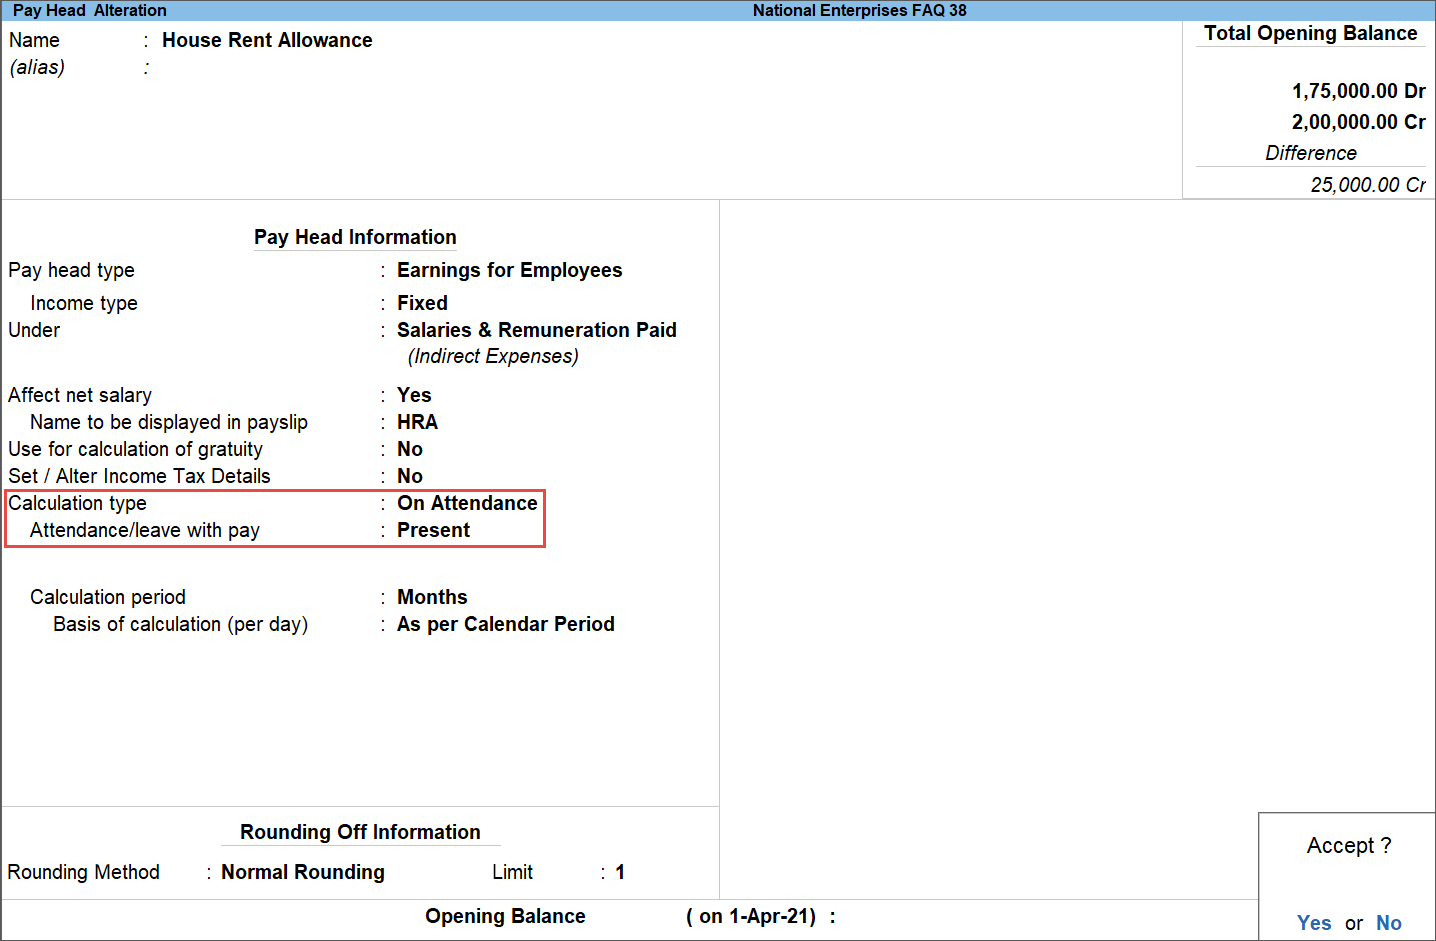
- Press Y to accept the screen. You can also press Enter to save the alteration details.
- Now create an Attendance voucher to record Employee A’s attendance as Absent.
- Press Alt+G (Go To) > Create Voucher > press F10 (Other Vouchers) > and select Attendance voucher from the List of Voucher Types.
Alternatively, go to Gateway of Tally > Create > press F10 (Other Vouchers) > and select Attendance voucher from the List of Voucher Types. - Record Employee A’s Attendance as Absent for the entire month (usually, 26 days).
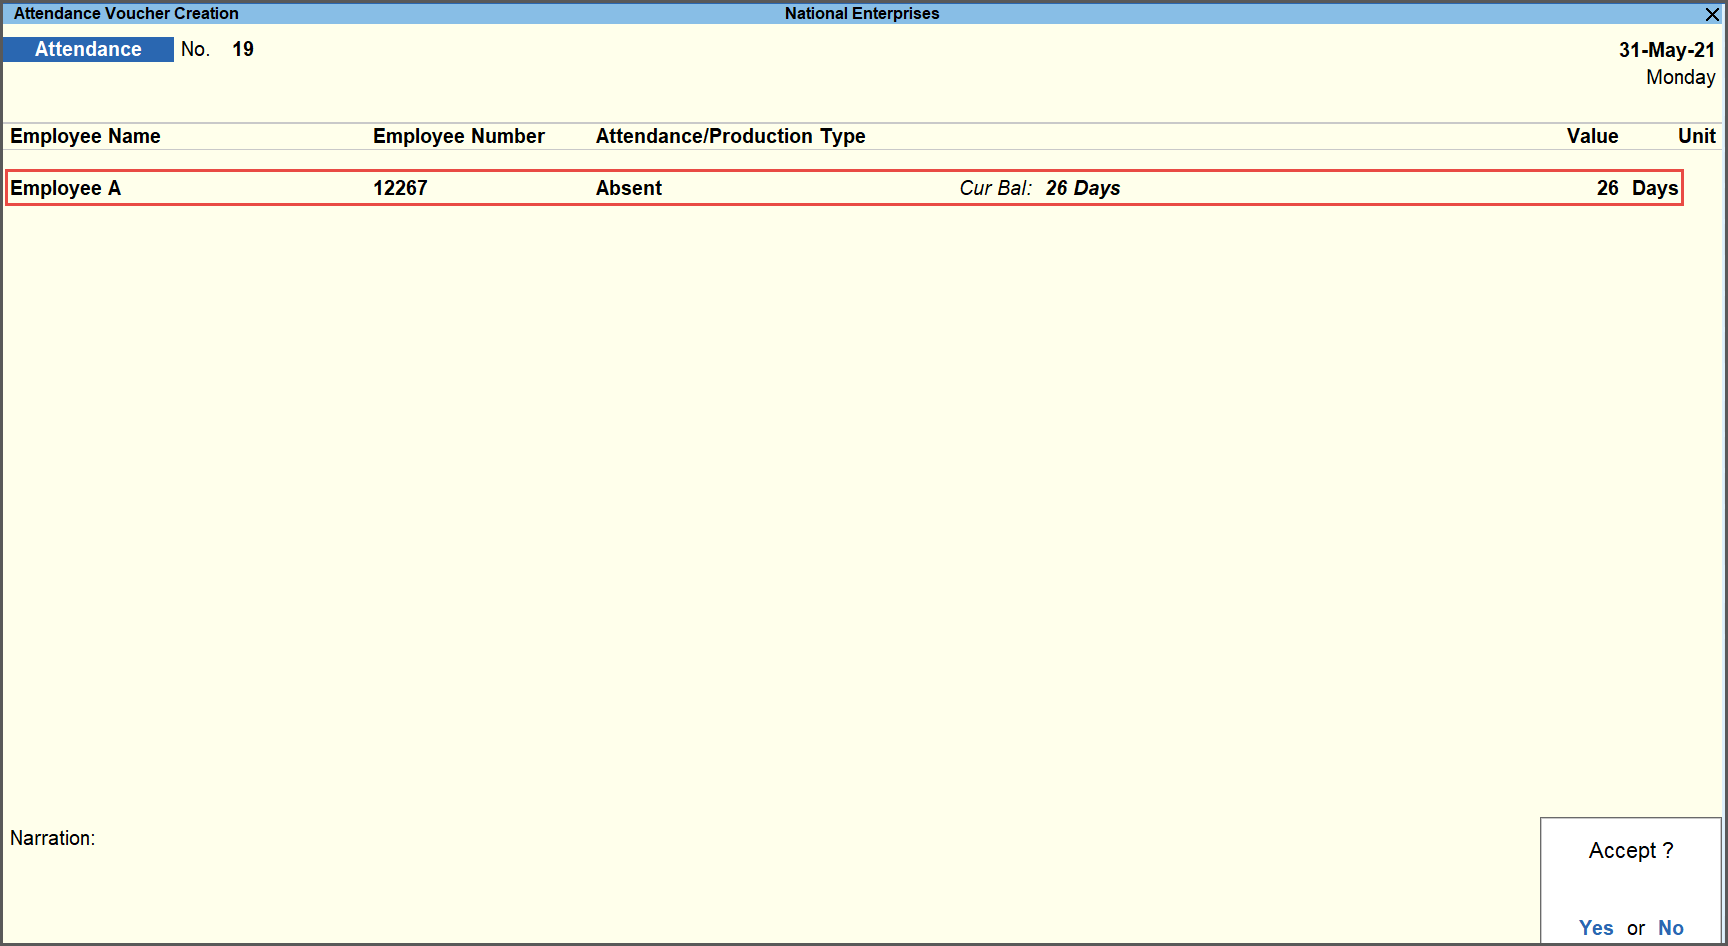
- Press Y to accept the screen. You can also press Enter to save the voucher.
- Press Alt+G (Go To) > Create Voucher > press F10 (Other Vouchers) > and select Attendance voucher from the List of Voucher Types.
- Press Ctrl+F4 (Payroll) for Payroll voucher.
- Process Employee A’s salary for the month of May 2021.
The HRA appears on the Payroll voucher again, as shown below:
No. Only those salary or wages payment vouchers that were recorded by enabling the Payroll features will be displayed/considered in the Salary/Wages Payments report for auditing.
In the Pay Slip for each month, you want to display the values of Basic, HRA and other pay components unchanged (flat rate) and the Loss of Pay during each month due to absenteeism should be displayed separately as a Deduction component in the Pay Slip.
Follow the steps given to calculate salaries as per the above criteria:
- Create/Alter Attendance Type to record Total days in a month and Absent days.
- Create/Alter required Pay head including Pay Head to calculate Salary Deduction for Absent days.
- Create Earnings Pay Heads
- Create Total Earnings Pay Head
- Create Deduction Pay Head
- Create Voucher Class to eliminate the Calculation Group from regular Salary Calculation
- Create/Alter Salary Details for the employees.
- Record Attendance (Number of days Absent and Total number of days in the month).
- Record total number of working days
- Record total Attendance (days absent)
- Process Payroll Voucher
- Generate Pay Slip
Detailed Steps:
Step 1: Create/Alter Attendance Type to record Total days in a month and Absent days
- Gateway of Tally > Create > select Attendance/Production Type > and press Enter.
Alternatively, press Alt+G (Go To) > Create Master > select Attendance/Production Type > and press Enter. - Enter the details in the Attendance/Production Type Pay Head.
- Enter the Name as Total Days.
- Select Attendance/Leave with Pay in Attendance type field.
The complete Attendance Type for Total Days is shown below:
Similarly create the Absent days with Leave without Pay as Attendance type.
Step 2: Create/Alter required Pay head including Pay Head to calculate Salary Deduction for Absent days
- Create Earnings Pay Heads
- Gateway of Tally > Create > type or select Pay Heads > and press Enter.
Alternatively, press Alt+G (Go To) > Create Master > type or select Pay Heads > and press Enter. - Enter the detail in the Pay Head Creation screen.
- Create Basic Pay pay head with the Calculation type as Flat Rate.
- Select other parameters as shown below.
Similarly, create other Earnings Pay Head like DA, HRA, Conveyance etc.
- Create Total Earnings Pay Head
The total earnings Pay Head should be created for calculation purpose under a dummy group (Calculation Group) which should be eliminated using a Voucher Class during the Salary processing.
The completed Pay Head for Total Earnings is as shown: - Create Deduction Pay Head
The Deduction Pay Head is created to record the Loss of Pay due to the absenteeism.
- Create Voucher Class to eliminate the Calculation Group from regular Salary Calculation
- Gateway of Tally > Alter > Voucher Type > select Payroll > and press Enter.
Alternatively, press Alt+G (Go To) > Alter Master > Voucher Type > select Payroll > and press Enter. - In the Payroll Voucher Type Alteration screen, specify the required Voucher Class name.
- Exclude the Calculation Group as shown:
- Gateway of Tally > Alter > Voucher Type > select Payroll > and press Enter.
Step 3: Define Salary Details for the employees
The created Pay Heads should be included in the Employee Salary Details as shown:
Note: Salary Details can be defined from Employee/Employee Group master.
Step 4: Record Attendance (Number of days Absent and Total number of days in the month)
- Record total number of working days
- Gateway of Tally > Vouchers > press F10 (Other Vouchers) > select Attendance voucher from the List of Voucher Types > and press Enter.
Alternatively, press Alt+G (Go To) > Create Voucher > press F10 (Other Vouchers) > select Attendance voucher from the List of Voucher Types > and press Enter. - Press Ctrl+F (Autofill) for Attendance Autofill and enter the below details:
- Enter the Voucher Date.
- Select the required Employee/Group.
- Select Total Days in the Attendance/Production Type field.
- Press Y to accept the screen. As always, you can press Ctrl+A to save the voucher.
- Gateway of Tally > Vouchers > press F10 (Other Vouchers) > select Attendance voucher from the List of Voucher Types > and press Enter.
- Record total Attendance (days absent)
Similarly, to the above, record the days each employee was absent using the Attendance Autofill.
Step 5: Process Payroll voucher
- Gateway of Tally > Vouchers > press Ctrl+F5 (Payroll) for Payroll vouchers.
Alternatively, press Alt+G (Go To) > Create Voucher > press Ctrl+F5 (Payroll) for Payroll vouchers. - Select Eliminate in Class field in the Voucher Type screen.
- Press Ctrl+F (Autofill) for Payroll Autofill.
- Select the required period.
- Select the required Employee/Group.
The complete Payroll voucher appears as shown:
Step 6: Generate Pay Slip
- Gateway of Tally > Display More Reports > Payroll Reports > Pay Slip > select the required Employee > and press Enter.
Alternatively, press Alt+G (Go To) > type Employee Pay Slip > select the required Employee > and press Enter.
The Pay Slip for the employee will appear as shown:
In Bank Reconciliation Statement the transactions are listed based on the details updated in Bank Allocations.
The Salary Payment transactions recorded through Payroll Vouchers by selecting Bank Ledger are not displayed in Bank Reconciliation Statement, because Bank Allocation screen is not displayed to update the Bank Details.
To display Salary payment transactions in BRS, now users have to first record Payroll Voucher to account the Salary Payable and for making salary payment separate Payment Voucher has to be recorded by defining the Bank details in Bank Allocations.
- Create a salary payable ledger.
- Record a Payroll voucher to account the salary payable ledger.
- Record salary payment using a payment voucher.
- View the Bank Reconciliation report for the bank through which the salary payment was processed.
- Press Alt+G (Go To) > type or select Bank Reconciliation > Enter.
- Select the bank and press Enter.
The Bank Reconciliation report will display the salary payments made for the selected period. A sample image is shown:
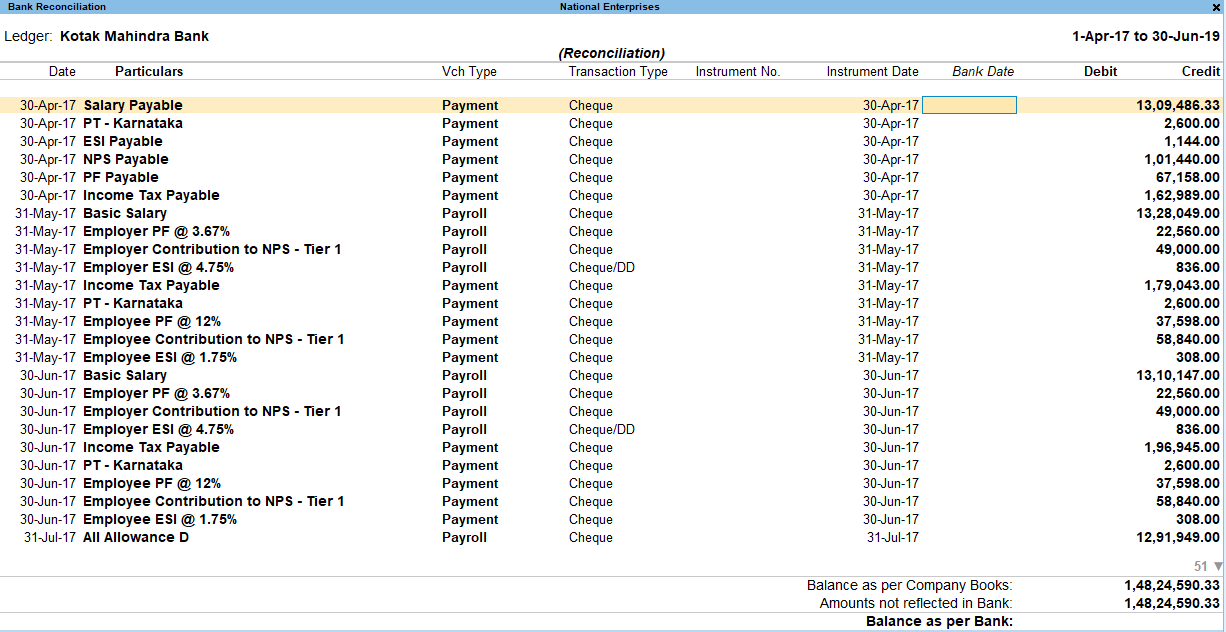
Alternatively, you can follow the steps mentioned below:
- Record the Payroll Voucher using Autofill and save the voucher.
- Alter the voucher to provide Bank details.
- Press Ctrl+H, and select As Voucher.
- Select Bank as the Account, and provide the Bank details.
- View the voucher in Bank Reconciliation report.
Note: On altering the payroll voucher format (to Voucher) do not change it back to the Payslip format. If you change the format, the Bank Details entered will not be stored and the voucher will not be displayed in Bank Reconciliation report.
Scenario: The basic salary of an employee was Rs. 10,000 per month. On the 16th of April, his basic salary was revised to Rs. 15,000 per month, effective from that date. During the Payroll process, TallyPrime calculates salary based only on the current salary rate of Rs. 15,000 per month and does not consider the previous rate of Rs. 10,000 per month.
Solution:
If such a situation arises, Payroll can be processed based on two types of configurations:
- Present days
- Absent days
Present days
When you want to process the payroll based on the number of Present days, you can follow the steps given below:
- Configure Basic Salary Pay Head
- Record Attendance Vouchers
- Process Payroll
Configure Basic Salary Pay Head
From the Pay Head Alternation/Creation screen, follow the steps given below:
- Set Attendance/leave with pay as Present.

- Press Y to accept the screen. As always, you can press Ctrl+A to save.
Record Attendance Vouchers
For recording the Attendance voucher, you will have to split the voucher into two parts. One Attendance voucher with the number of Present days at the previous salary rate (from 1st Apr – 15th Apr), while the other with the number of Present days at the current salary rate (from 16th Apr – 30th Apr). While processing the Payroll, TallyPrime checks the Attendance voucher for the total number of Present days in the month. During that time, if there is any salary revision, it will also take that into account.
- Record Attendance voucher with the number of days Present from 1st Apr – 15th Apr 2021
- Gateway of Tally > Vouchers > press F10 (Other Vouchers) > type or select Attendance voucher > press Enter.
Alternatively, press Alt+G (Go To) > Create Voucher > press F10 (Other Vouchers) > type or select Attendance voucher > press Enter. - Press F2 (Date) to change the Voucher Date on which the previous salary rate ends (in this case, 15th Apr).
- Enter the employee details.
- Select the employee from the List of Employees.
- Select Present as Attendance/Production Type.
- Enter the Value as 15 as you are counting the number of present days from 1st Apr – 15th Apr.
- Provide the Narration, if needed.
The Attendance voucher appears as shown below:
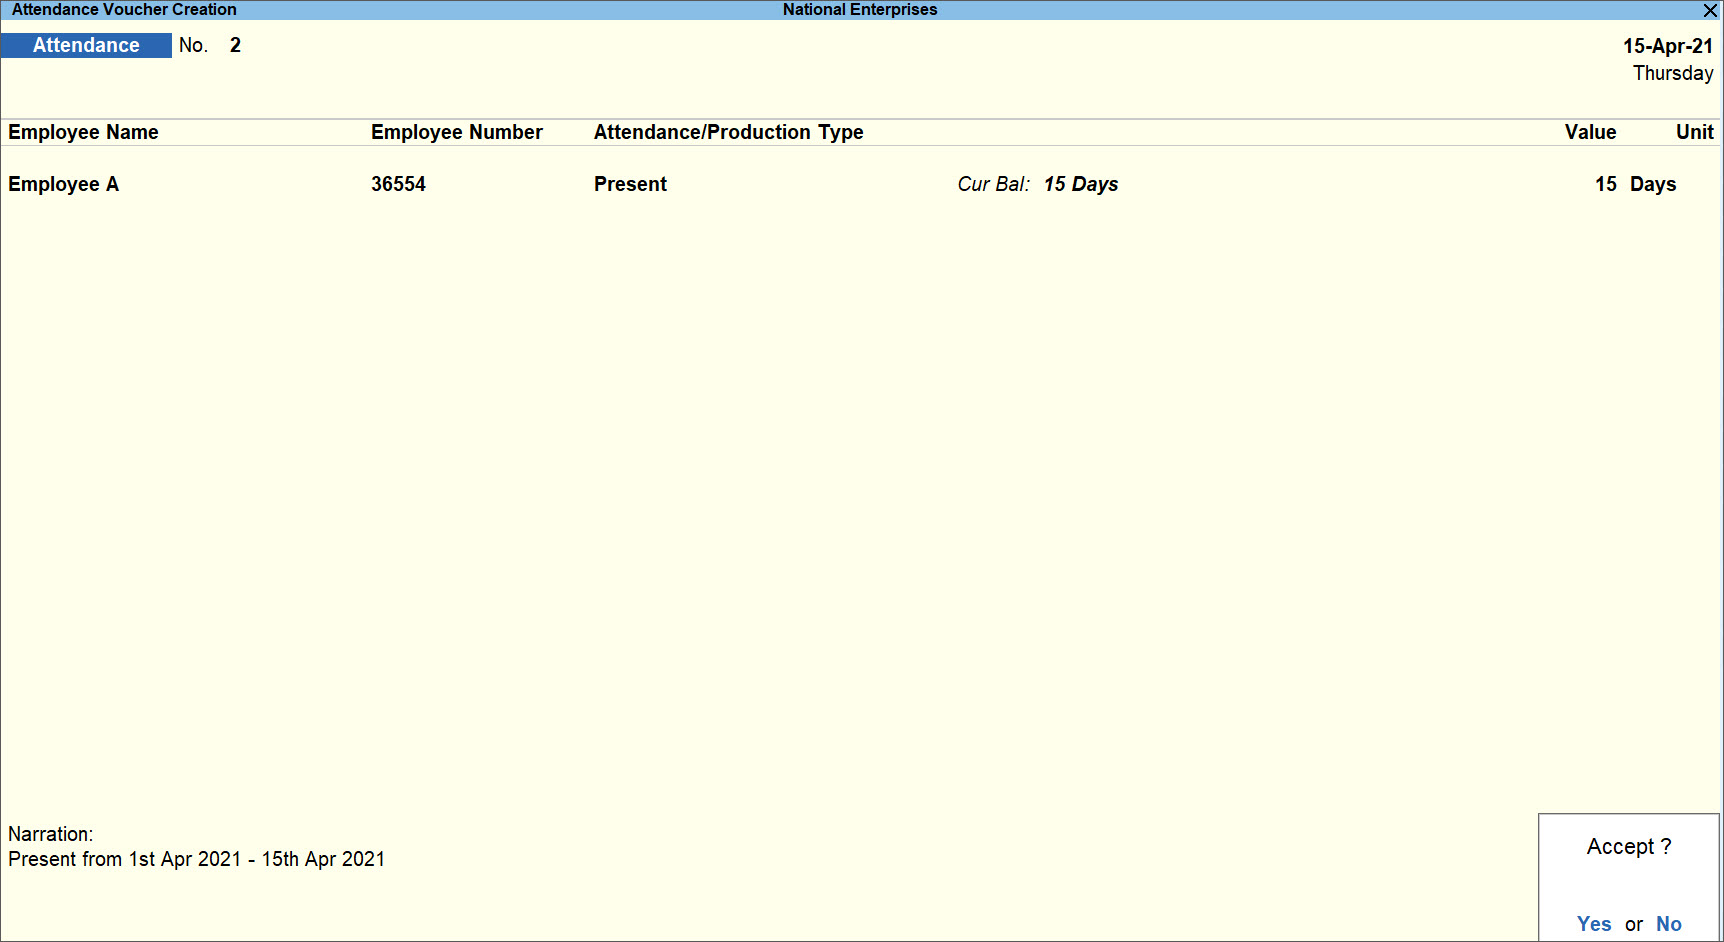
- Press Y to accept the screen. As always, you can press Ctrl+A to save.
- Gateway of Tally > Vouchers > press F10 (Other Vouchers) > type or select Attendance voucher > press Enter.
- Record Attendance voucher with number of days Present from 16th Apr – 30th Apr 2021
Similarly, record another Attendance voucher for the number of days the employee was present from 16th Apr – 30th Apr.
The Attendance voucher appears as shown below:
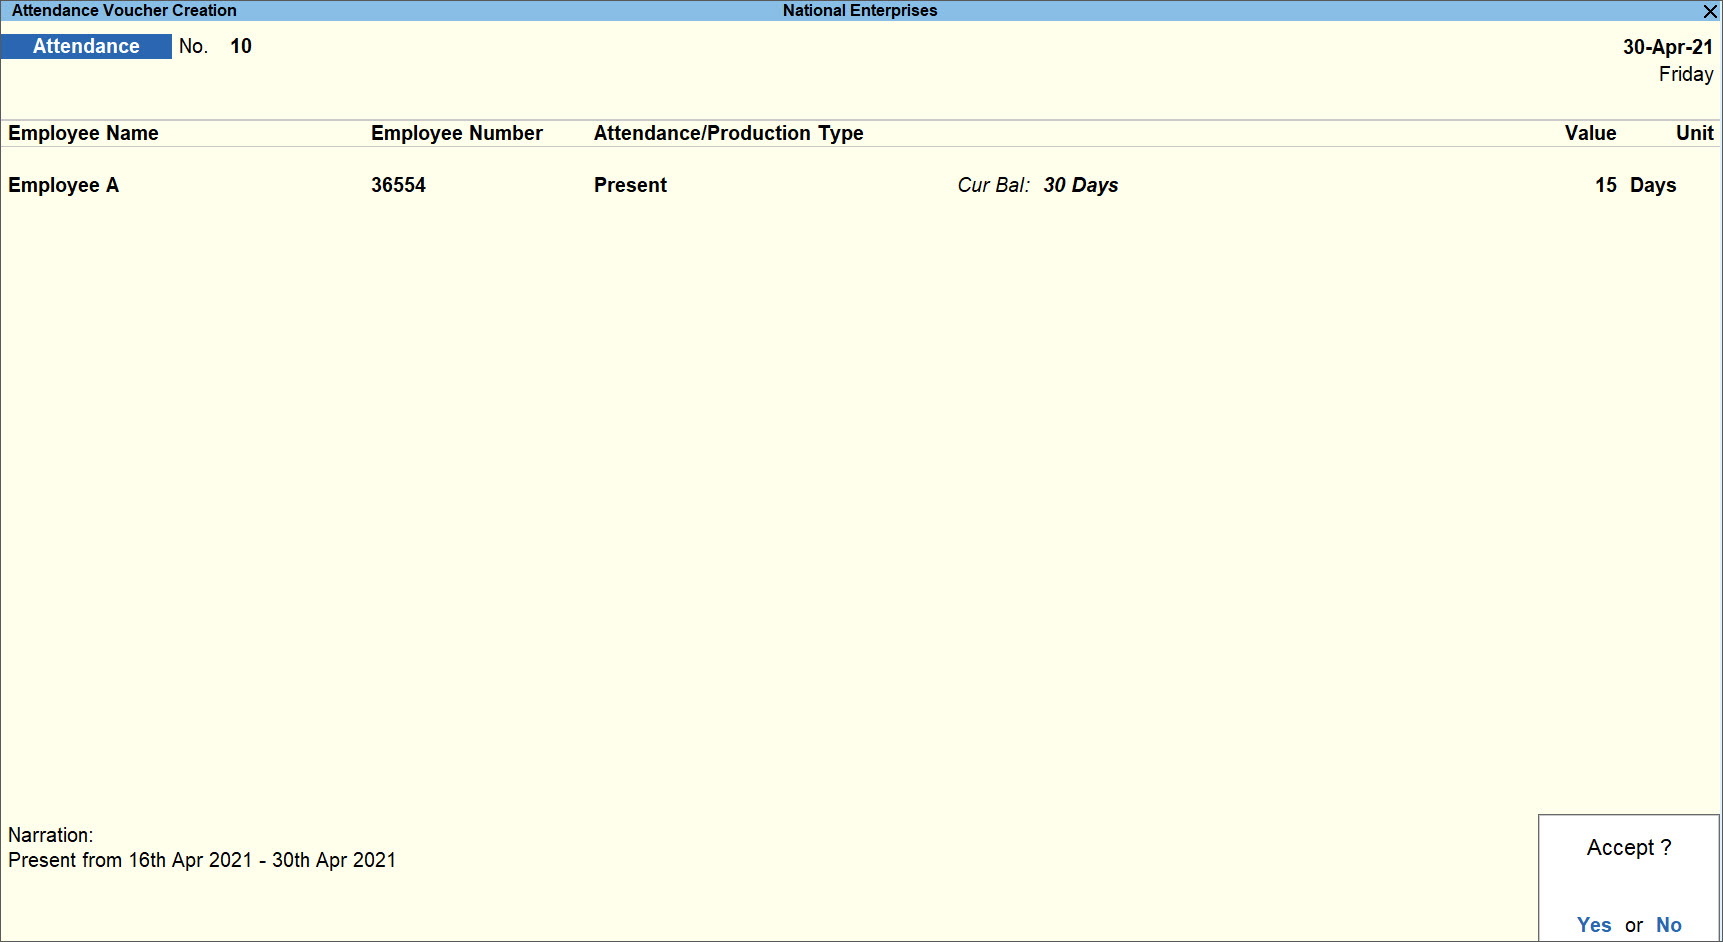
Process Payroll
- Gateway of Tally > Vouchers > press Ctrl+F4 for the Payroll voucher.
Alternatively, press Alt+G (Go To) > Create Voucher > press Ctrl+F4 for the Payroll voucher. - Press Ctrl+F (Autofill) on the Payroll Voucher Creation screen to open the Autofill screen.
- Enter the required details in the Autofill screen.
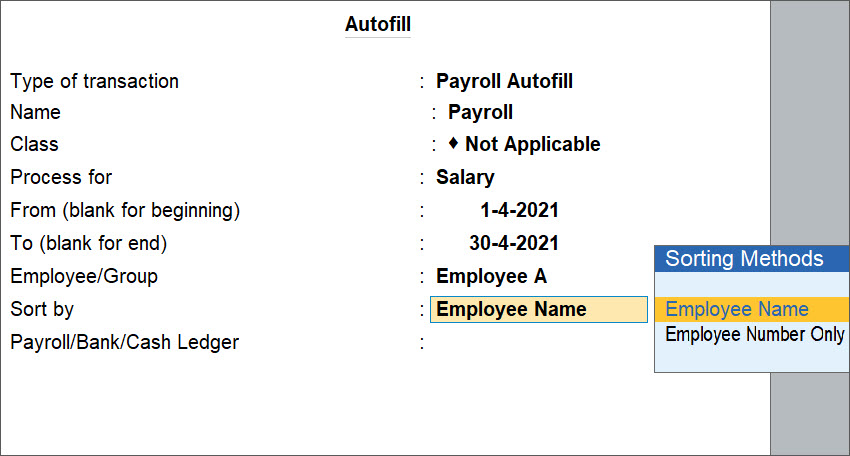
Note: You can use the Autofill feature to process the payroll either for an individual employee or for all employees at the end of the month in one go.
Following the Autofill screen, the completed Payroll voucher appears as shown below:
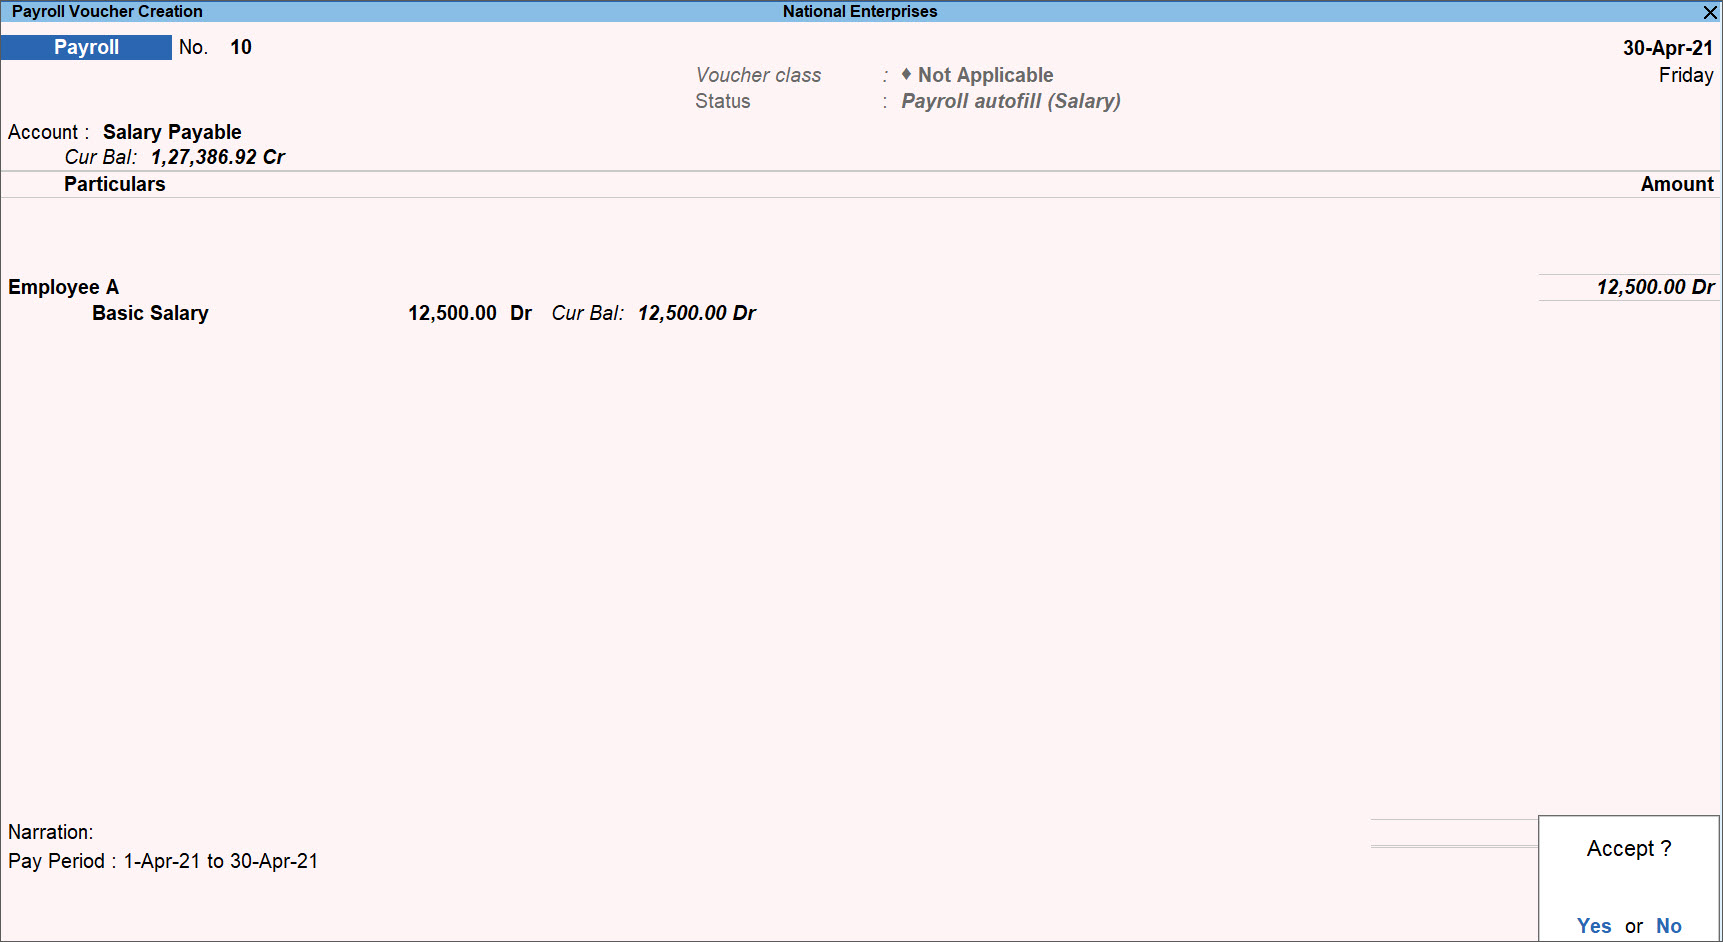
While processing the payroll at the end of the month, it has considered both the previous rate and the revised rate of basic salary. - Press Y to accept the screen. As always, you can press Ctrl+A to save.
Absent days
When you want to process the payroll based on the number of Absent days, you can follow the steps given below:
- Configure Basic Salary Pay Head
- Process Payroll
Configure Basic Salary Pay Head
When you set the Attendance Type as Absent while configuring the Basic Salary pay head, you will no longer need to record any Attendance vouchers.
Note: Whenever an employee is absent on a particular day, you should mark the Attendance voucher as Absent for that day. For example, if the employee is absent on 14th Apr during the period of 1st - 15th Apr, you should record a voucher marking 14th Apr as Absent. At the end of the month, TallyPrime will deduct the salary based on the number of absences and the basic salary rate applicable to your absence period.
From the Pay Head Alternation/Creation screen, follow the steps given below:
- Set the options:
- Attendance/leave with pay: Not Applicable
- Leave without pay: Absent
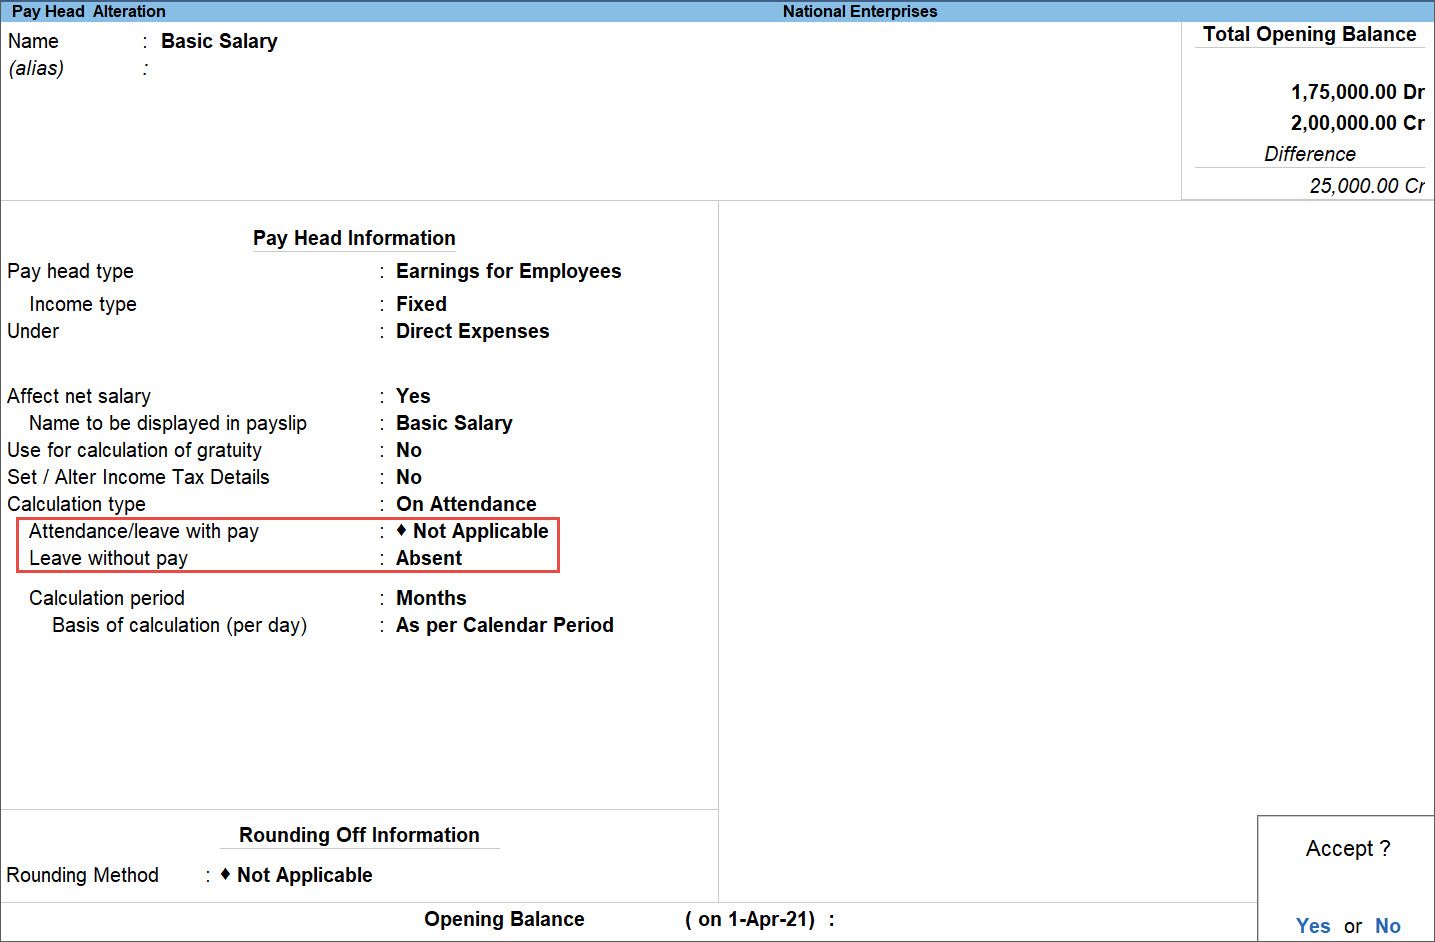
- Press Y to accept the screen. As always, you can press Ctrl+A to save.
Note: Once the Basic Salary pay head has been configured, TallyPrime first checks the Attendance voucher during the month-end payroll process. If none is found, it will then check for the salary structure that was defined for the employee for the period 1st Apr - 30th Apr and then calculate the salary accordingly.
Process Payroll
- Gateway of Tally > Vouchers > press Ctrl+F4 for the Payroll voucher.
Alternatively, press Alt+G (Go To) > Create Voucher > press Ctrl+F4 for the Payroll voucher. - Press Ctrl+F (Autofill) on the Payroll Voucher Creation screen to open the Autofill screen.
- Enter the required details in the Autofill screen.
Note: You can use the Autofill feature to process the payroll either for an individual employee or for all employees at the end of the month in one go.
Following the Autofill screen, the completed Payroll voucher appears as shown below:
While processing the payroll at the end of the month, it has considered both the previous rate and the revised rate of basic salary. - Press Y to accept the screen. As always, you can press Ctrl+A to save.
While processing salary, from Gross salary, Employee’s PF Contribution amount will be deducted (withheld) along with other deductions (if any) and Net Salary will be paid to the employee. Later the deducted Employee’s PF contribution along with Employer’s Contribution will be paid to the PF department. The procedure of withholding employees PF contribution to arrive at NET Salary is the same, even when salary is paid in Cash. PF payment is not made during salary payment. PF payment is made separately.
- Process Salary for the Employees using Payroll Voucher.
- Gateway of Tally > Vouchers > Ctrl+F (Autofill).
Alternatively, Alt+G (Go To) > Create Voucher > Ctrl+F (Autofill). - Press Enter on Payroll Autofill.
- Select Salary from the Process List.
- Choose the employee from the List of Employees/Group.
- When salary is processed, Employees’ PF Contribution will be deducted from the gross salary, as shown:
- Press Y to accept the screen. As always, you can press Ctrl+A to save.
- Gateway of Tally > Vouchers > Ctrl+F (Autofill).
- Record Employer’s PF Contribution using Payroll Voucher.
- Gateway of Tally > Vouchers > Ctrl+F (Autofill).
Alternatively, Alt+G (Go To) > Create Voucher > Ctrl+F (Autofill). - Press Enter on Payroll Autofill.
- Select PF Contribution from the Process List.
- Fill appropriate details in From (blank for beginning) and To (blank for end) date fields, and Employee/Group
- Choose PF Payable as the Payroll Ledger, as shown below:
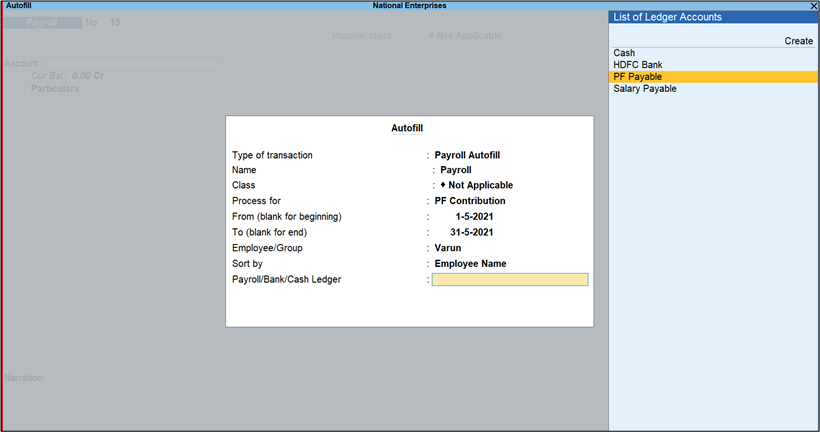
- Press Enter to automatically process the PF Contribution of the Employer for the Employees. The auto filled Payroll voucher appears as shown below:
- Press Y to accept the screen. As always, you can press Ctrl+A to save.
- Gateway of Tally > Vouchers > Ctrl+F (Autofill).
- Record PF Payment in Payment Voucher.
- Gateway of Tally > Vouchers > F5 > Ctrl+F (Autofill).
Alternatively, Alt+G (Go To) > Create Voucher > F5 > Ctrl+F (Autofill). - Press Enter on Payroll Autofill.
- Select PF Challan from the Process List.
- Fill appropriate details in From (blank for beginning) and To (blank for end) date fields, and Employee/Group
- Choose PF Payable as the Payroll Ledger, as shown below:
- Select the Bank from the Bank/Cash Ledger field and press Enter.
- Choose Provide Details as Yes and fill the PF Challan Details.
- Press Enter and the Auto Filled Payment Voucher appears as shown below:
- Press Y to accept the screen. As always, you can press Ctrl+A to save.
- Gateway of Tally > Vouchers > F5 > Ctrl+F (Autofill).
Let us consider Canteen deduction as an example. To account for Canteen deduction on per day basis for an employee:
- Create a Group under Indirect Expenses
- Create Canteen deduction (Earnings) Pay Head
- Create Canteen deduction (Actual) Pay Head
- Create Voucher Class for Payroll Voucher Type
- Define Salary Details
- Process Payroll voucher using Voucher Class
- Canteen Expenses Group.
- Gateway of Tally > Create > Group.
Alternatively, Alt+G (Go To) > Create Master > Group.
The Group Creation screen appears as shown below:

- Press Y to accept the screen. As always, you can press Ctrl+A to save.
- Gateway of Tally > Create > Group.
- Create Canteen Deduction (Earnings) Pay Head.
- Gateway of Tally > Create > Pay Head.
Alternatively, Alt+G (Go To) > Create Master > Pay Head.
The Pay Head Creation screen appears. - Select Earnings for Employees as the Pay head type.
- Select the newly created group – Canteen Expenses in the Under field.
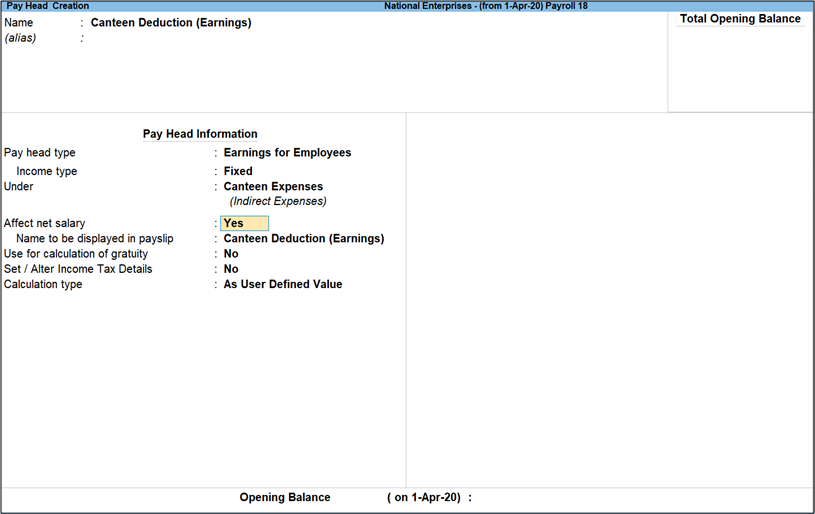
Note: Two different pay heads for Canteen Deduction (one categorised under Earnings for Employees and the other under Deduction from Employees) are created here. This is because, if only the Deduction pay head is created, then the deduction value is not computed properly in the Payroll Voucher.
- Set the option Affect net salary to No.
- Select Calculation Type as On Attendance and select the relevant Attendance Type (as followed for Basic Pay).
Note: If Absent days are considered for salary computation, then select Not Applicable in the field Attendance/Leave without Pay and select Absent in the field Leave without Pay. - Select Days as the Calculation period to calculate Canteen deduction on per day basis.
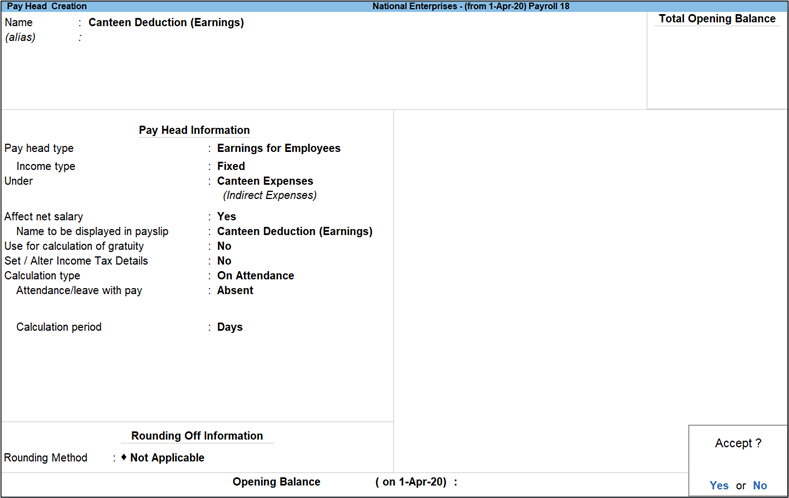
- Press Y to accept the screen. As always, you can press Ctrl+A to save.
- Gateway of Tally > Create > Pay Head.
- Create Canteen Deduction (Actual) Pay Head.
- Gateway of Tally > Create > Pay Head.
Alternatively, Alt+G (Go To) > Create Master > Pay Head.
The Pay Head Creation screen appears. - Select Deductions From Employees as the Pay Head type.
- Select As Computed Value in the field Calculation type.
- Select On Specified Formula in the Compute.
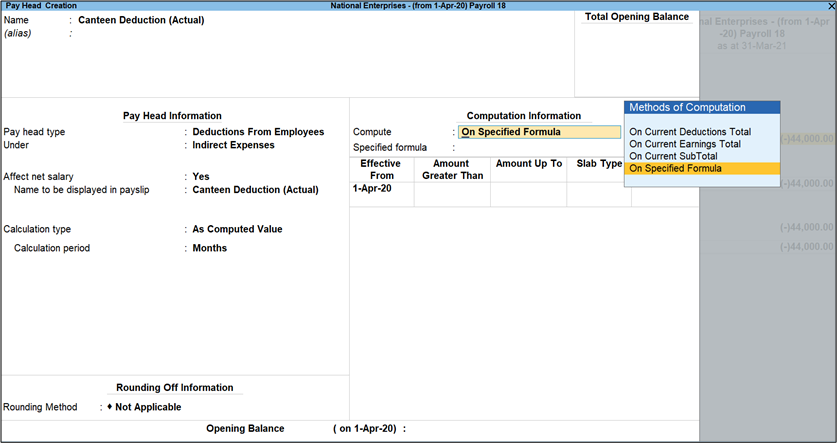
- Select the pay head Canteen Deduction (Earnings) against Add Pay Head.
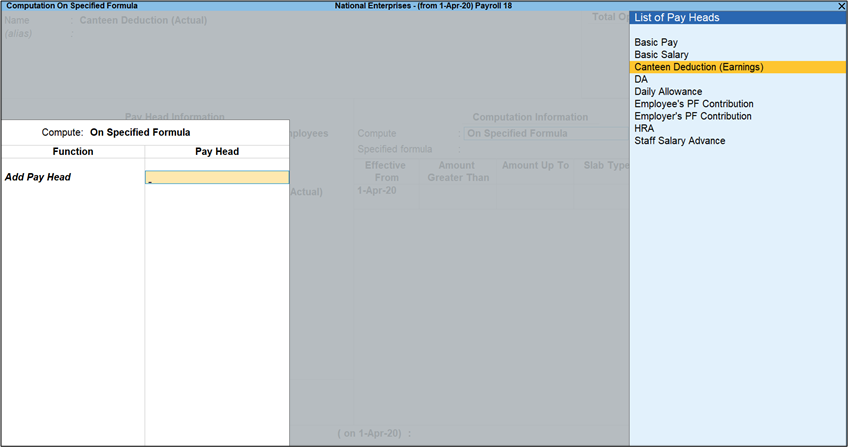
- Select End of List.
- Select Percentage in the Slab Type
- Specify 100% in the Value.

- Press Y to accept the screen. As always, you can press Ctrl+A to save.
- Gateway of Tally > Create > Pay Head.
- Voucher Class for Payroll Voucher Type.
- Gateway of Tally > Alter > Voucher Type > select Payroll.
Alternatively, Alt+G (Go To) > Alter Master > Voucher Type > select Payroll.
The Voucher Type Alteration screen appears. - Create a Voucher Class by specifying a name (such as Exclusion of Groups) in the Name of Class field and press Enter.
- In the Exclude these Groups section, select Canteen Expenses. This will prevent the Canteen Expenses from appearing in the Payroll voucher.
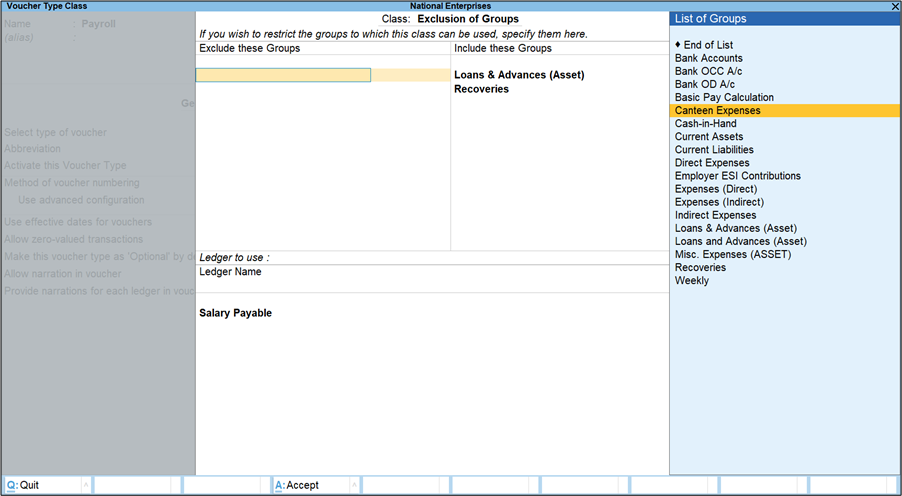
- In the Ledger Name section, select Cash or Bank or Salary Payable ledger so that the same will be used by default in the Payroll Voucher.

- Gateway of Tally > Alter > Voucher Type > select Payroll.
- Define Salary details.
- Gateway of Tally > Alter > Define Salary > select Employee.
Alternatively, Alt+G (Go To) > Alter Master > Define Salary > select Employee.
The Salary Details Alteration screen appears. - Select the newly created Canteen Deduction pay heads as shown below:
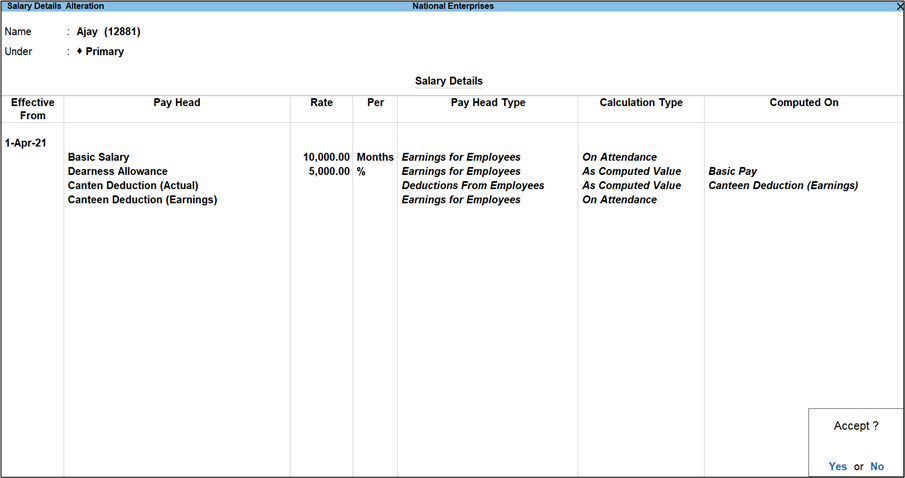
- Press Y to accept the screen. As always, you can press Ctrl+A to save.
- Gateway of Tally > Alter > Define Salary > select Employee.
- Process Payroll Voucher using Voucher Class.
- Gateway of Tally > Vouchers > press Ctrl+F4 (Payroll).
- Select the created Voucher Class (Exclusion of Groups) as shown below:
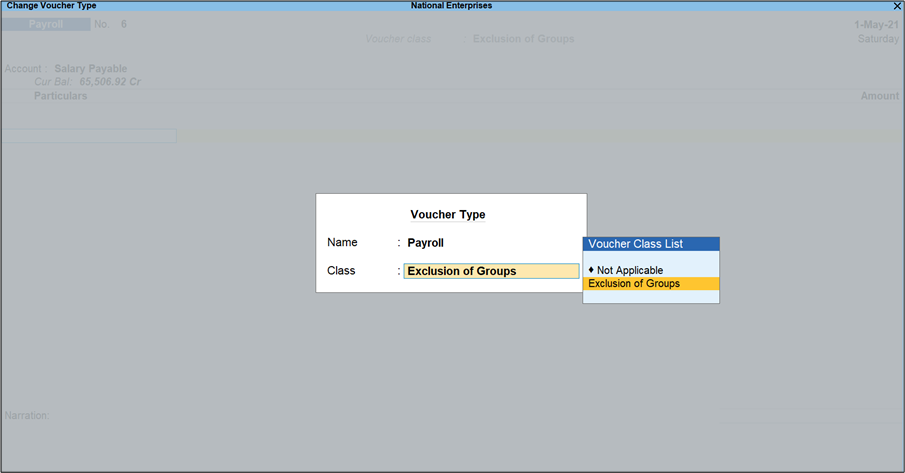
- Press Ctrl+F or click F: Autofill button > Enter.
- Specify the required details in the Autofill The completed Payroll Voucher with the Canteen Deduction (Actuals) pay head appears as shown below:
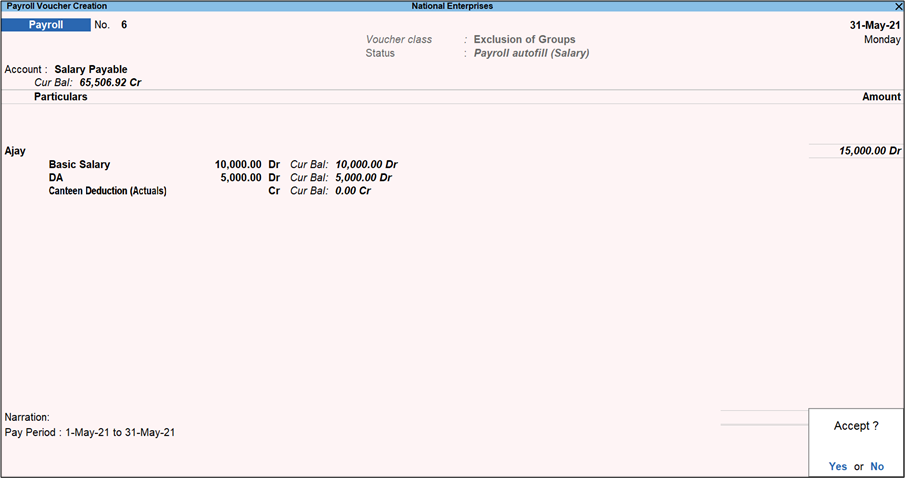
- Press Y to accept the screen. As always, you can press Ctrl+A to save.
It is possible to maintain the Salary Details history in TallyPrime for the previous financial years also.
Scenario 1: If you are entering the Present year’s data in TallyPrime which contains the data for previous years also without splitting the company, then the History for Salary Details will be automatically available.
Scenario 2: If you started using TallyPrime only now, but want to maintain the data for the Previous Financial Years also. In this case, you need to enter the Salary details (and transactions) for the previous financial years first and then for the recent Financial years.
Alter/Create Salary Details
- Gateway of Tally > Alter > type or select Define Salary.
Alternatively, press Alt+G (Go To) > Alter Master > type or select Define Salary. - Select the Employee and mention the Effective Date, Pay heads (As applicable for the employees), Rate (As applicable for different period).
Note: Create the Pay Heads according to your requirement. - You can see the Salary Details of the employee for four different years.
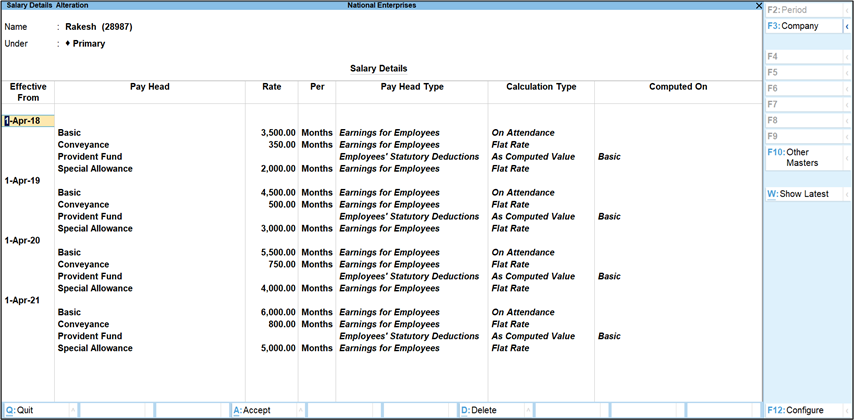
View the Salary Details for the Current Period
Click Show Latest (Alt+W) as shown below:
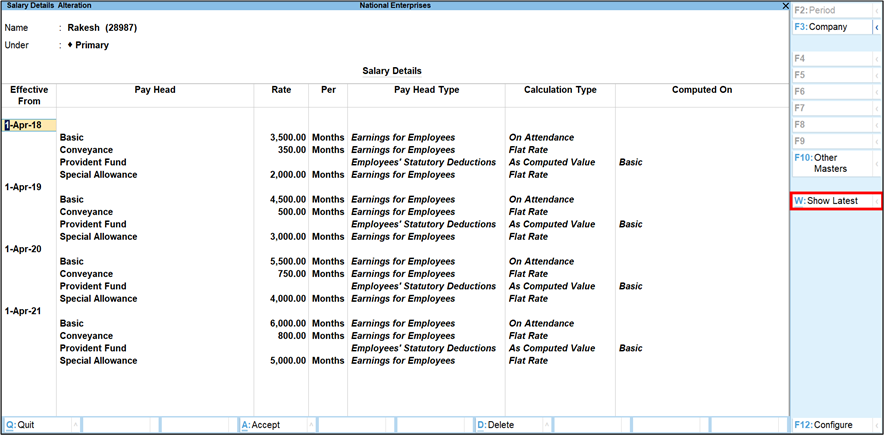
View the Salary Details of Previous Years
Click Show All Periods (Alt +W). This will show you the first screenshot containing all the details.
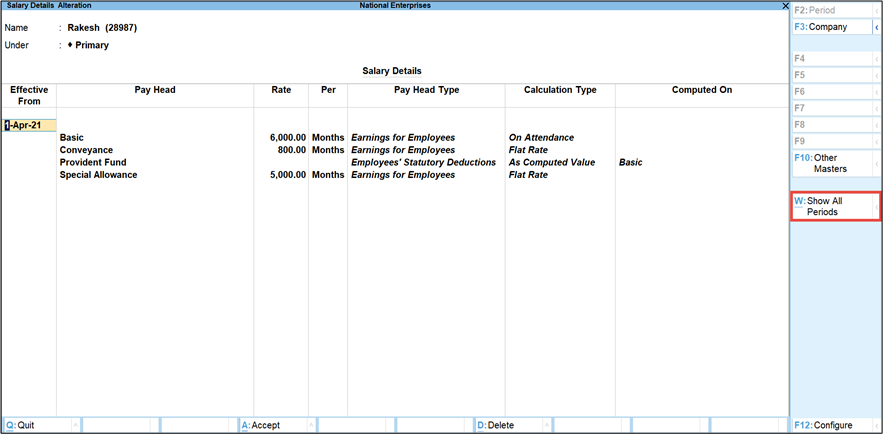
While processing the Salary the employer may want to stop/hold salary for some employees who have either resigned or are absent for a long period or as notice pay deductions. In this case, employer would just want to stop/hold the employee’s salary but the statutory contributions should be paid for PF, ESI, and PT as required.
The employer may stop/hold employee’s salary in the following scenarios:
- Employee resigned. Salary to be stopped and PF, ESI & PT should be paid to department.
- Employee absent for 20 days out of 30 due to long absent employer want to pay his along with next month but statutory should go as per worked days.
- Full and Final settlement for resigned employee after deducting notice pay.
To Hold/Stop Salary
- Create separate ledger to hold/stop salary.
- Gateway of Tally > Create > Pay Heads > press Enter.
Alternatively, Alt+G (Go To) > Create Master > Pay Heads > press Enter. - Create a Pay head under Current Liabilities as Hold/Stop Salary as shown below:
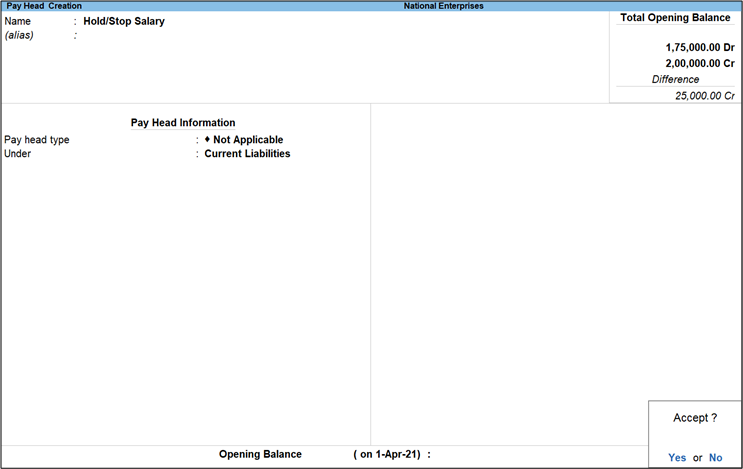
- Press Y to accept the screen. As always, you can press Ctrl+A to save.
- Gateway of Tally > Create > Pay Heads > press Enter.
- Process for hold/stop salary.
- Gateway of Tally > Vouchers > Ctrl + F4 (Other Vouchers)> Ctrl+F (Autofill).
Alternatively, Alt+G (Go To) > Create Voucher > Ctrl + F4 (Other Vouchers) > Ctrl+F (Autofill). - Press Enter on Payroll Autofill.
- Select Salary from the Process List.
- Choose the employee from the List of Employees/Group.
- Select Hold/Stop Salary ledger (created as Payroll ledger) as shown below:
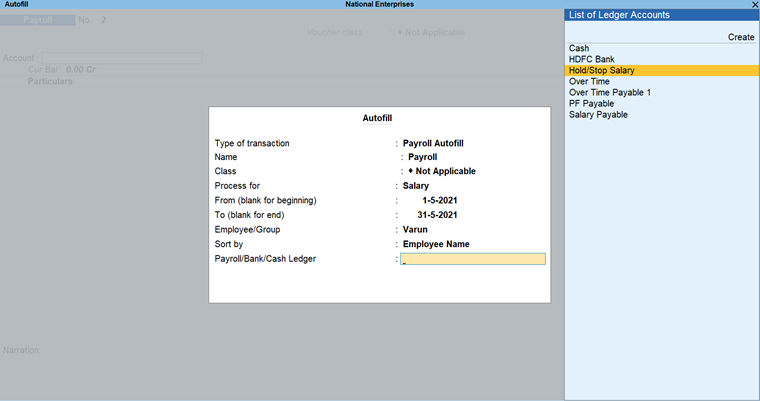
- The voucher will be processed with the selected employee’s salary and payable amount will be passed on to Hold/Stop Salary ledger.
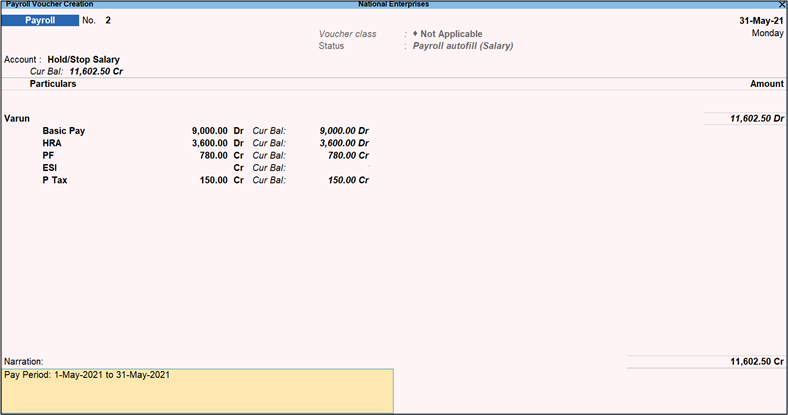
- Press Y to accept the screen. As always, you can press Ctrl+A to save.
- Gateway of Tally > Vouchers > Ctrl + F4 (Other Vouchers)> Ctrl+F (Autofill).
- Payment for Hold/Stop Salary.
- Gateway of Tally > Vouchers > F5 (Payment)> Ctrl+F (Autofill).
Alternatively, Alt+G (Go To) > Create Voucher > F5 (Payment) > Ctrl+F (Autofill). - Press Enter on Payroll Autofill.
- Select Salary Payment from the Process List.
- Choose the employee from the List of Employees/Group.
- Select Hold/Stop Salary ledger as shown below:
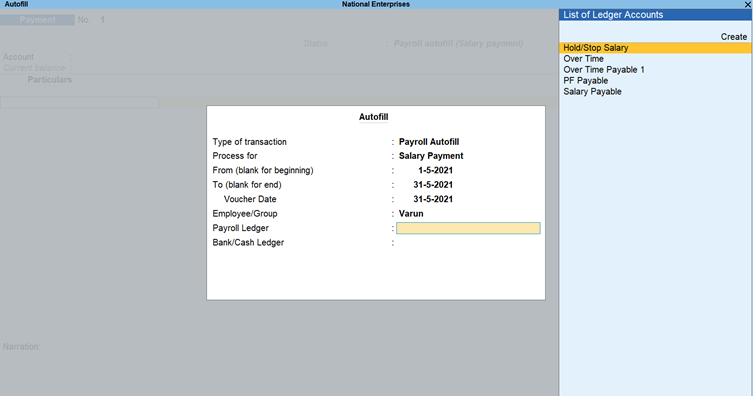
- Select the Bank and press Enter.
The Payment voucher screen appears as shown below:
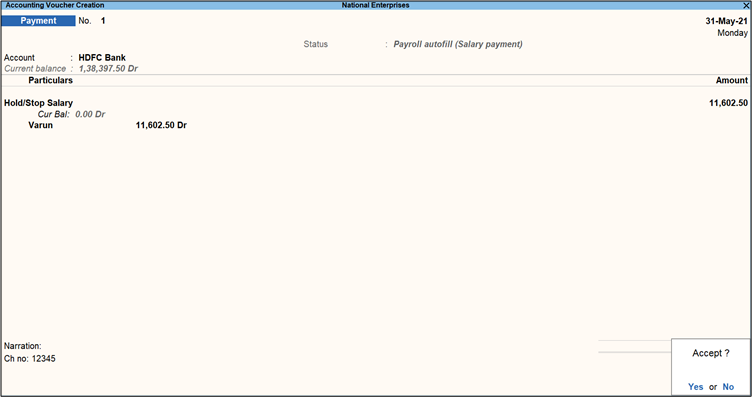
- Press Y to accept the screen. As always, you can press Ctrl+A to save.
- Gateway of Tally > Vouchers > F5 (Payment)> Ctrl+F (Autofill).
- Hold/Stop Salary Report
Using Employee Pay Head Break-up report you are able to list the Hold/Stop Salary Payable/Paid List.- Gateway of Tally > Display More Reports > Payroll Reports > Employee Pay Head Breakup.
Alternatively, Alt+G (Go To) > Employee Pay Head Breakup. - Select the Hold/Stop Salary Pay Head from the List of Pay Heads, the Employee Pay Head Breakup screen appears as shown below:
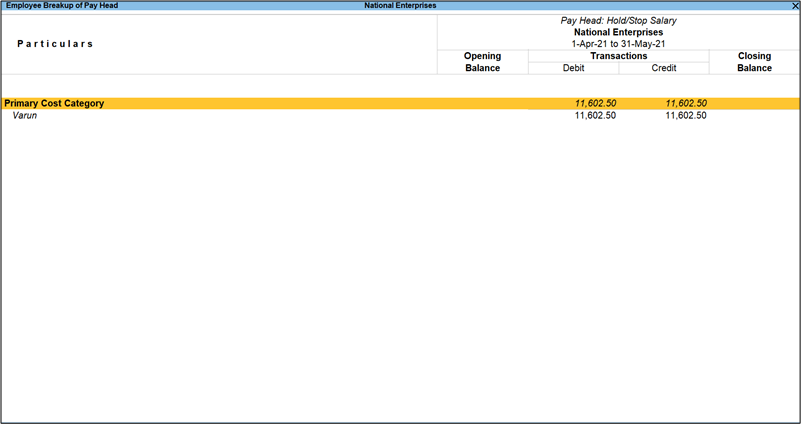
- Gateway of Tally > Display More Reports > Payroll Reports > Employee Pay Head Breakup.
You can configure your professional tax pay head with the new slabs that are applicable with effect from 1-4-2015, if you were using the old slabs that existed prior to 31-3-2015.
Note: Professional tax has to be paid and returns must be filed before the 15th of the subsequent month.
The new slab rate with effect from 1-4-2015 is shown below:
| Monthly Salary | Professional Tax Rate Per Month |
| Up to Rs 14,999 | Nil |
| Above Rs 14,999 | Rs. 200/- |
The old slab rate prior to 31-3-2015 is shown below:
| Monthly Salary | Professional Tax Rate Per Month |
| Up to Rs. 9,999 | Nil |
| From Rs. 9,999 – 14,999 | Rs. 150/- |
| Above Rs. 14,999 | Rs. 200/- |
If the Professional Tax pay head is already created with the existing slab, then you need to alter the details with the new rate.
- Gateway of Tally > Alter > type or select Pay Heads.
Alternatively, press Alt+G (Go To) > Alter Master > type or select Pay Heads. - Select Professional Tax from the List of Pay Heads and mention the Computation Information as you required.
- Specify the Effective From date (1-Apr-2015).
- Enter the Amount Up To as 14,999/-.
- Enter zero in Value.
- Enter 14,999/- in the Amount Greater Than column.
- Leave the column Amount Up To blank.
- Enter 200/ – in Value.

- Press Y to accept the screen. As always, you can press Ctrl+A to save.
Employees’ master details can be viewed or printed.
View and Print Contact Number and E-mail ID of the Employees
- Gateway of Tally > Display More Reports > Payroll reports > Employees WIthout E-mail IDs > press F8 (All Employees).
- Press Ctrl+P and click Print.
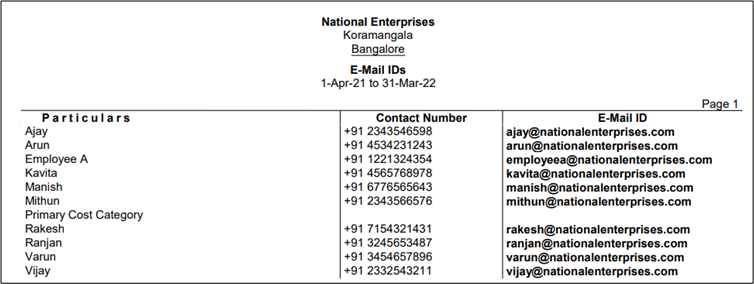
View and Print Employee Profile
- Gateway of Tally > Display More Reports > Payroll Reports > Employee Profile > select the Employee.
- Press Ctrl+P and click Print.
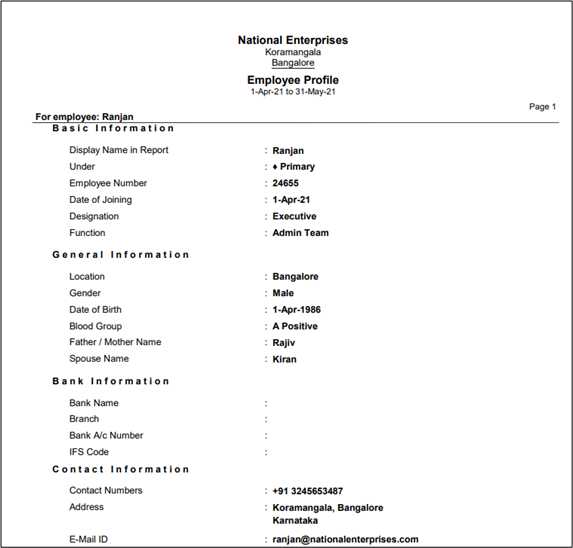
Note: Press F12, to enable the required options to display the information on the Employee Profile screen.
View and Print Payroll Statement
- Gateway of Tally > Display More Reports > Payroll reports >PaYroll Statement.
- Select the pay head from the List of Pay Heads.
- Press Ctrl+P and click Print.
Note: Press F12, to enable the required options to display the information on the Payroll Statement screen.
To print the details of the Amount paid as Inspection Charges, Penal Damages, Interests and Arrears in the Combined PF Challan the following needs to be done apart from the normal PF processing.
- Create PF Penalty as an Expense Ledger
- Select the PF Penalty Ledger at the end while passing PF Payment Voucher
For illustration purpose, we will consider that the Penal Damages needs to be paid along with the regular monthly PF payment.
- Create PF Penalty as an Expense Ledger.
- Gateway of Tally > Create > Ledgers > press Enter.
Alternatively, Alt+G (Go To) > Create Master > Ledgers > press Enter.
The Ledger Creation screen appears as shown below:
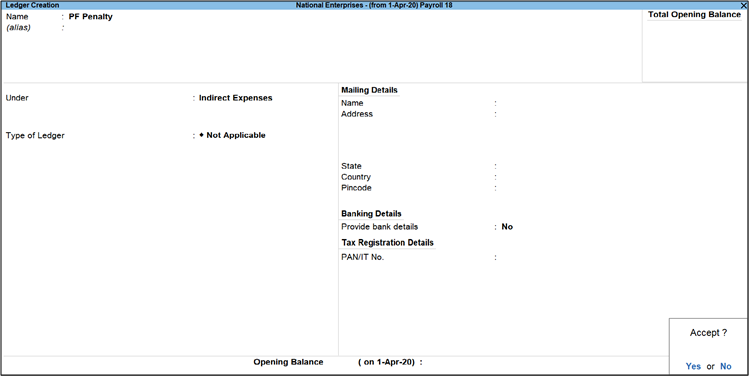
Note: Though TallyPrime allows to use the same expense ledger for recording all types of additional expenses incurred. It is recommended to create separate ledgers for Inspection Charges, Penal Damages, Interests and Arrears.
- Press Y to accept the screen. As always, you can press Ctrl+A to save.
- Gateway of Tally > Create > Ledgers > press Enter.
- Select the PF Penalty Ledger at the end while passing PF Payment Voucher.
Note: Before passing the PF Payment Voucher, ensure that the required Payroll, Employer Contribution and Employer Other Charges are processed.
- Gateway of Tally > Vouchers > press F5 (Payment Voucher).
Alternatively, Alt+G (Go To) > Create Voucher > press F5 (Payment Voucher).
The Accounting Voucher Creation (Payment) screen appears. - Select the required details in the Payment Voucher.

- Select the PF Penalty Ledger from the list and press Enter. The Payment Type screen will appear as shown below:
Note: Select the required Pament Type from the list (in this case Damages).
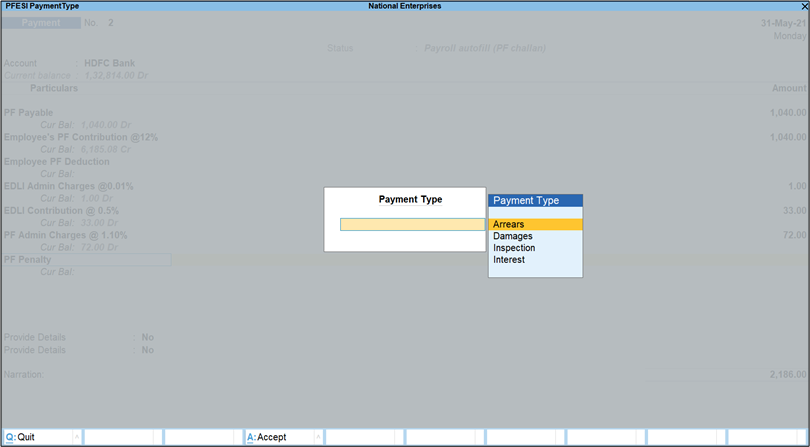
- Specify the Value of the Damages against the PF Penalty Ledger name.
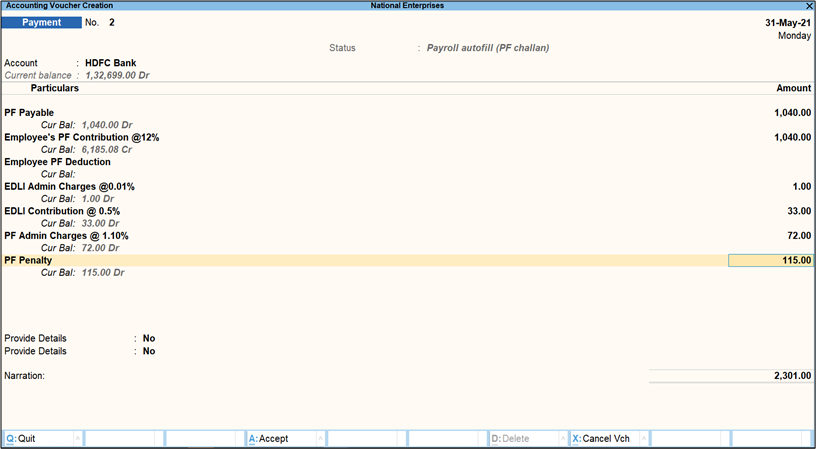
Note: For Illustration only Penal Damages is explained, the process for other kind of expenses is same except for the Payment Type selection.
- Specify the Challan details in the Provide Details section. The completed PF Payment Voucher is as shown below:

- Press Y to accept the screen. As always, you can press Ctrl+A to save the Payment Voucher.
- To print the challan, press Page Up and Ctrl+P.
- Gateway of Tally > Vouchers > press F5 (Payment Voucher).
Error message
T-FV-4040 ‘Total Taxable Income (355-366)’ not equal to the Difference of ‘Gross Total Income(338+352)’ – ‘Gross Total of ‘Amount deductible under provisions of chapter VI-A under associated Salary Details-Chapter VIA Detail’
Cause
This error appears while validating the text file of Form 24Q for the 4th quarter in the File Validation Utility (FVU) tool. This occurs when the amount in 8. Deductions under Chapter VI-A is higher than 7. Gross Total Income of Income Tax Computation.

Solution
You can avoid this error by ensuring the amount in 8. Deductions under Chapter VI-A is less than or equal to 7. Gross Total Income. You can correct this by navigating to any of the following:
Income Tax Computation
- Gateway of Tally > Display More Reports > Payroll Statutory Reports > Income Tax > Computation.
- Select the Employee and press Enter.
- Under Deductions under Chapter VI-A
-
- Press Ctrl+Enter on Investments (U/s 80C, 80CCF, 80CCG, etc.) and make the required changes.
- Press Ctrl+Enter on Others (U/s 80D, 80DD, 80E etc.) and make the required changes.
Or,
Income Tax Declarations
- Gateway of Tally > Alter > type Income Tax Declaration on the search field > press Enter.
- Under Deductions Under Chapter VI-A > Investments (U/s 80C, 80CCF, 80CCG, etc.).

- Select Single Employee Multiple Components > select the Employee > make the required changes.
- Select Multiple Employees Single Component > select the Employee Name/Group > make the required changes.
- Under Deductions Under Chapter VI-A > Others (U/s 80D, 80DD, 80E, etc.).
- Select Single Employee Multiple Components > select the Employee > make the required changes.
- Select Multiple Employees Single Component > select the Employee Name/Group > make the required changes.
Or,
Tax Configuration
- Gateway of Tally > Alter > type Payroll Income Tax Configuration on the search field > press Enter.
- Under Deductions Under Chapter VI-A > Investments (U/s 80C, 80CCF, 80CCG, etc.).
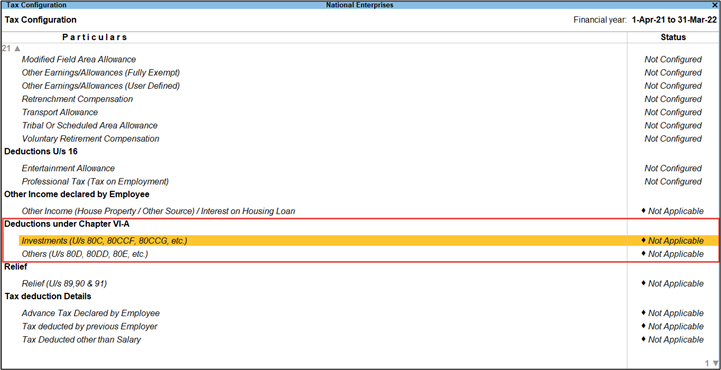
- Select Single Employee Multiple Components > select the Employee > make the required changes.
- Select Multiple Employees Single Component > select the Employee Name/Group > make the required changes.
- Under Deductions Under Chapter VI-A > Others (U/s 80D, 80DD, 80E, etc.).
- Select Single Employee Multiple Components > select the Employee > make the required changes.
- Select Multiple Employees Single Component > select the Employee Name/Group > make the required changes.
You can update the relieving date of an Employee.
- Gateway of Tally > Alter > select the Employee.
- Select the Employee and mention the Date of resignation/retirement as shown below:

The employer may, at his option, pay income tax on the whole or part of perquisite provided by way of non-monetary payments. Such payment of tax is not taxable as a perquisite in the hands of the employee.
Determination of tax payable by employer:
Step 1
Average Rate of Income Tax = Tax on Income under “Salaries” (including non-monetary benefits) x 100
Income under the head Salaries
Step 2
Tax payable on Non-Monetary benefits = Average Rate of Income Tax (Step 1) x Value of Non-Monetary Benefits
Follow the given procedure to create and record the payroll vouchers to account the tax paid on non-monetary benefits by the employer:
- Create Tax Paid by Employer Pay head as shown:
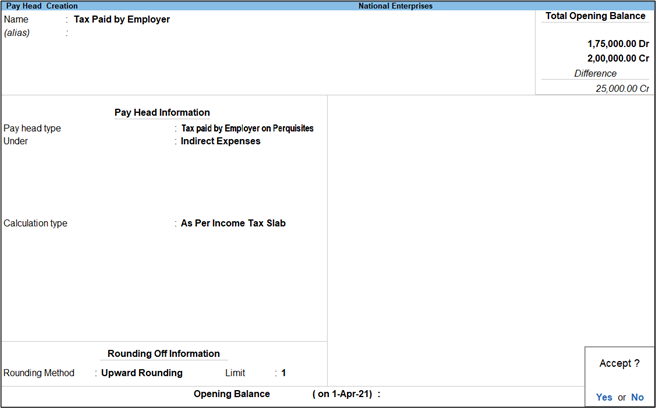
- Define the Pay Head in Salary Details of the Employee.
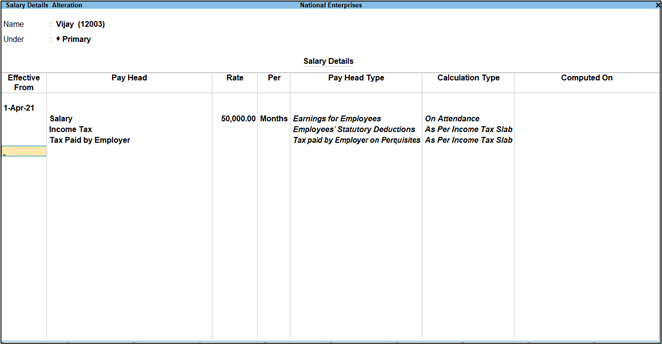
- Specify the Amount on which Tax is paid by Employer.
- Gateway of Tally > Alter > Payroll Income Tax Configuration > select Value of Perquisites u/s 17(2)(as per FORM 12BA).

- Select the Employee and the Nature of Perquisite.
- Fill the required details as shown below:
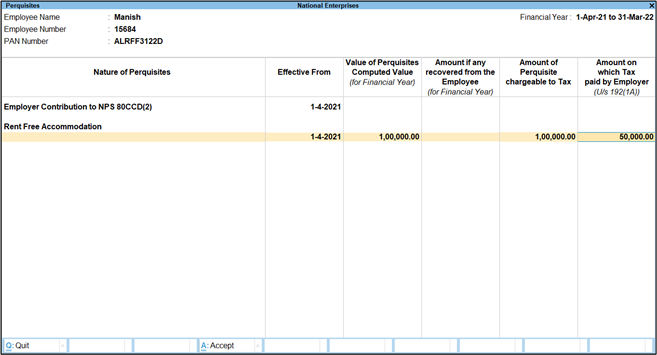
- Gateway of Tally > Alter > Payroll Income Tax Configuration > select Value of Perquisites u/s 17(2)(as per FORM 12BA).
- Computing Income Tax of an Employee.
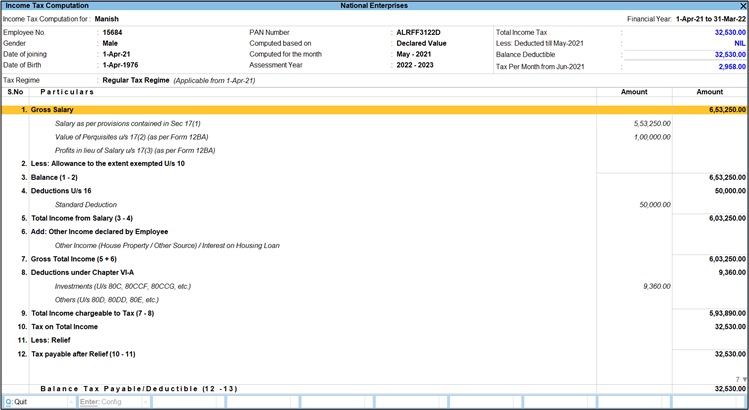
Tax on Income under “Salaries” (including non-monetary benefits) = Rs. 32,530/-
Income under the head Salaries = 5,53,250 + 1,00,000 = Rs. 6,53,250/-
= Tax on Income under “Salaries” (including non-monetary benefits) x 100Income under the head Salaries:
= (32530 x 100) / 6,53,250
= 5.05%Tax payable on Non-Monetary benefits:
= Average Rate of Income Tax (Step 1) x Value of Non-Monetary Benefits
= 5.05% x 50,000
= 2,525/-Monthly Tax Payable on Non-Monetary benefits:
= 2,525 / 12
= 210/- - Processing Payroll Voucher.
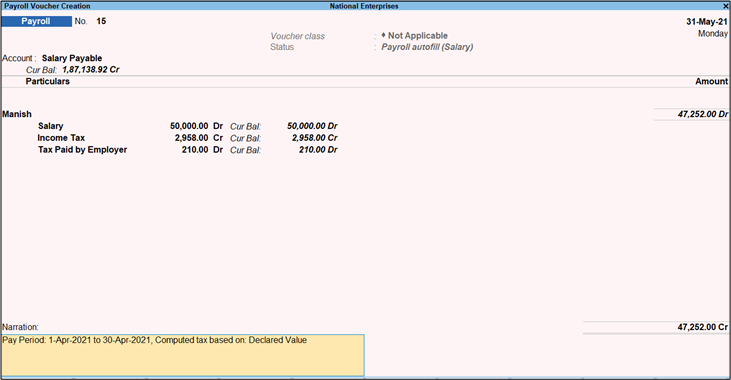
- Computing IT after Processing Payroll Voucher.
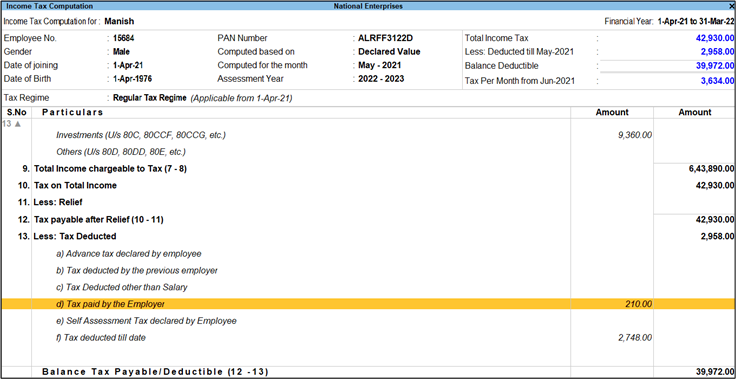
If you are entering the Present Year’s Salary Details in TallyPrime which contains the data for previous years also without splitting the company, then the History for Salary Details will be automatically available.
If you started using TallyPrime only now, but want to maintain the Salary Details for the Previous Financial Years also. In this case you need to enter the Salary Details (and transactions) for the previous financial years first and then for the current Financial Year.
- Gateway of Tally > Alter > Define Salary and select the employee.
- Mention the Effective From date, Pay Head, and Rate as shown below:
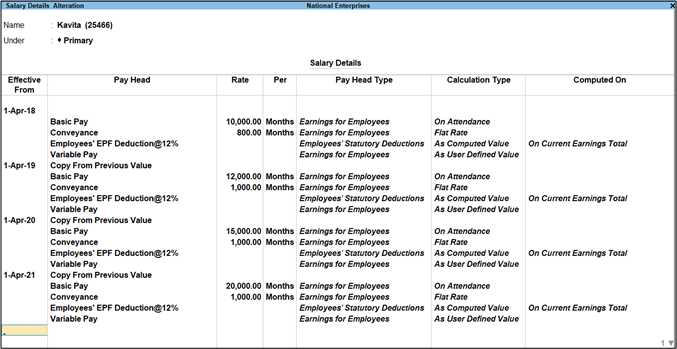
In the above screen, you can see the salary details of the employee for four different years. - To view the salary details of the current period, press Alt+W (Show Latest).

- To view the details of previous years, press Alt+W (Show All Periods). This will take you back to the first screenshot which contains all the details.
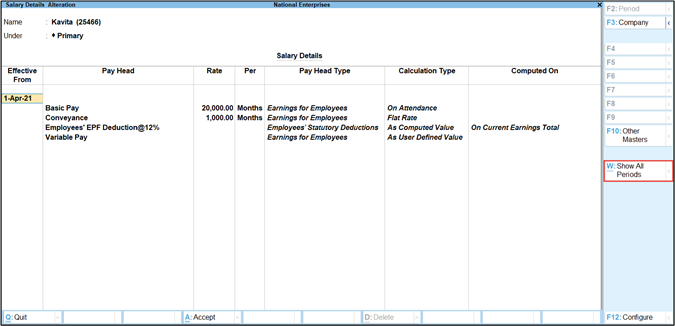
Note: Salary Details can also be altered from Employee master/Employee Group Master.
The steps involved for successful computation of Conveyance Exemption in TallyPrime are:
- Conveyance Pay Head should be configured for Income Tax
- Declaration of conveyance allowance paid and the Employee Status (Physically challenged or Others)
Configuring Conveyance Pay Head
- Gateway of Tally > Alter > Show More > Income Tax Pay Head Details.
- Select Conveyance and the Income Tax Configuration screen appears.
- Select the required details on the Income Tax Configuration screen.
- Income Tax Component as Other Earnings/Allowances (Fully Taxable) as shown below:

- Tax Calculation Basis as On Projected Value.
- Income Tax Component as Other Earnings/Allowances (Fully Taxable) as shown below:
- Press Enter or as always, you can press Ctrl+A to save.
Declaration of Conveyance (capturing Employee Status)
Once the Conveyance Pay Head is correctly configured for Income Tax, you will have to specify the status of the Employees as Physically Challenged or Others.
- Gateway of Tally > Alter > Show More > Income Tax Declaration.
- Select Transport Allowance and press Enter.

- Fill the required details on Transport Allowance
- Select the Employee Name/Group from the List of Employees / Group.
- Specify the date in the Effective From
- Select required Employee Status as Physically Challenged or Others and press Enter.
- Specify these details for all the Employees.
- The completed Transport Allowance screen appears as shown below:
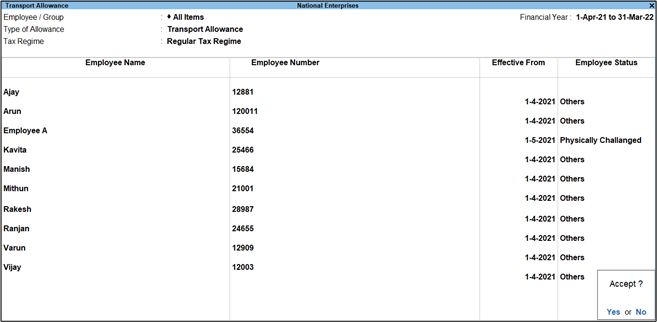
- Press Enter or as always, you can press Ctrl+A to save.
The Pay Heads appear in the Pay Slip as per the order mentioned in the Salary Details. But in Pay Sheet, they appear in alphabetical order.
Create the Pay Heads with a Specific Position Index
- Gateway of Tally > Create > Pay Heads > press Enter.
Alternatively, Alt+G (Go To) > Create Master > Pay Heads > press Enter.

- Press Y to accept the screen. As always, you can press Ctrl+A to save.
- Similarly, create HRA and Conveyance Pay Heads.
Alter Pay heads to Specify the Position Index
The position indexes for sorting of Pay Heads in the reports is available only in the alteration mode. To alter Basic Pay Head,
- Gateway of Tally > Alter > Pay Heads and select Basic from the List of Pay Heads.
Alternatively, Alt+G (Go To) > Alter > Pay Heads and select Basic from the List of Pay Heads. - On the Basic Pay Head Alteration screen, set Position Index in Reports as 1.

- For HRA Pay Head, set Position Index in Reports as 2 as shown below:

- For Conveyance Pay Head, set Position Index in Reports as 2 as shown below:

Define Salary Details
- Gateway of Tally > Alter > Define Salary.
- Select the employee from the List of groups / Employees.

Note:
The order in which Pay Heads are defined in Salary Details will only determine the order of the Pay Heads in Pay Slip. The order of Pay heads in Pay Sheet will be as per the order of position index specified in each Pay Head.
Salary Details can be defined from Employee/Employee Group masters.
Record Payroll Voucher
- Gateway of Tally > Voucher > press Ctrl+F4 (Payroll Voucher).
- The Payroll voucher is shown below:
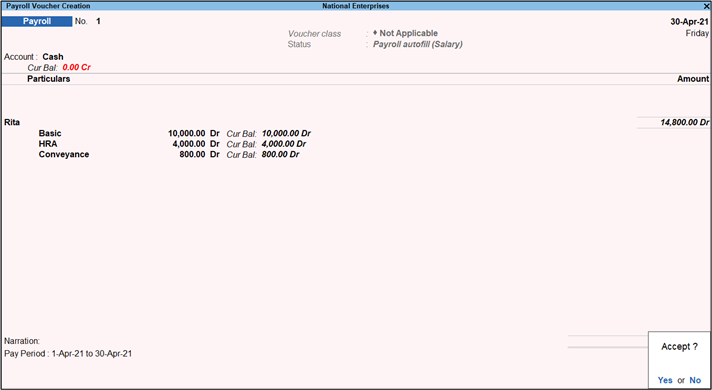
Note: The Attendance Voucher should be passed before the Payroll Voucher.
Check the Pay Sheet
- Gateway of Tally > Display More Reports > Payroll reports > Pay Sheet.
- Select the employee from List of Employees / Groups.
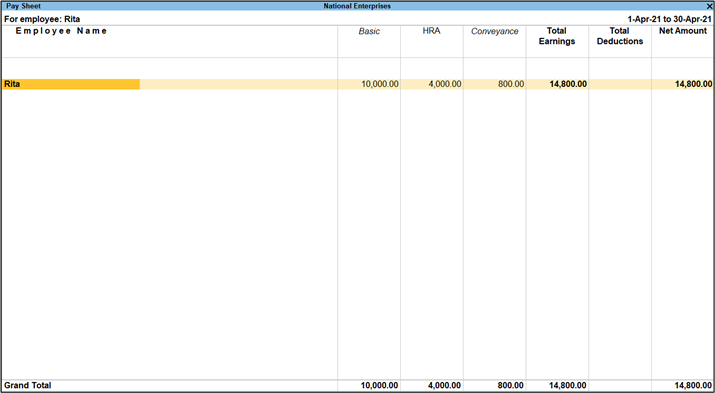
Note: Conveyance should have come before HRA (in alphabetical order) if the position index for the Pay Heads was not specified.
Cause:
The error occurs when you export a pay slip to PDF from the Multi Pay Slip report of TallyPrime, if there are one or more special characters (that may not be readable) in the name of an employee.
This usual happens when you had copied the name of the employee from a different application such as MS Excel to TallyPrime.
In such cases, a special character gets added at the end of the name.
Resolution:
Alter the Employee master to remove the special character from the name.
- Press Alt+G (Go To) > Alter Master > Employee > type or select name of the Employee and press Enter.
Alternatively, Gateway of Tally > Alter > Employee > type or select name of the Employee and press Enter. - In the Name field, re-enter the name to ensure that the special characters are removed.
- Press Ctrl+A to save the master.
Thereafter, you can export the pay slip for the employee.
As per the Deduction u/s, Section 57(iia), the exemption must be one-third of the family pension amount or Rs. 15,000, whichever is less. For instance, if a family member receives a pension of Rs. 60,000, then the exemption value would be either one-third of the family pension income, which is Rs. 20,000 or Rs. 15,000. In this case, the exemption value would be Rs. 15,000.
Currently, the department has not notified about the field in which the marginal tax relief value has to be shown in Form 16, Annexure II to 24Q, and the E-24Q text file. We are waiting for the department to declare the format, as per the the latest forms and FVU tool changes, before we go on to incorporate the changes in the product.
If you are using TallyPrime Release 3.0 or TallyPrime Release 3.0.1, then you must be facing the issue about the calculation of incorrect Income Tax Amount for the employees under Regular Tax Regime with Total Taxable Income between Rs. 7,00,000 and Rs. 7,80,000.
When you record a Payroll voucher using Autofill, the calculated Income Tax Amount is lesser than the actual Income Tax Amount as shown in the below voucher.
This happens because the Marginal Tax Relief is considered for the employees with the Regular Tax Regime, while it is applicable only to the employees with the New Tax Regime that have taxable income between Rs. 7,00,000 and Rs. 7,27,777.
While this will get corrected in the upcoming TallyPrime Release, to ensure that the correct Income Tax amount appears for the employees with the Regular Tax Regime, you can follow one of the following two methods:
Method 1 – Calculate Correct Income Tax Amount Manually and Enter it in While Creating or Altering Payroll Vouchers
If the Income Tax Amount of an employee is consistent across the year, then you can calculate the correct Income Tax Amount Manually and enter it in the vouchers each time you create the voucher. In this case, you can perform either of the following:
- Do not use Autofill and enter the Salary and Income Tax Amount manually.
The actual Income Tax Amount gets displayed in all the reports. - Use Autofill in the voucher.
If you do so, then you will need to change the Income Tax Amount, as per the actual Income Tax Amount in the Voucher Alteration screen
The following image has a manually calculated Income Tax Amount:
Method 2 – Override Income Tax Amount Master to Specify the Known Fixed Income Tax Amount
If you know that an employee’s Income Tax Amount is fixed, then you can alter the Income Tax Amount master to specify the Income Tax Amount for a specific Period.
Consider that the employee’s Income Tax Amount is going to remain constant from 1-Apr-23 to 1-Mar-24. In such a case, you can alter the master.
- Press Alt+G (Go To) > Alter Master > Show More > type or select Income Tax Amount and press Enter.
Alternatively, Gateway of Tally > Alter > Show More > type or select Income Tax Amount and press Enter. - Employee Name/Group: Select the employee with a fixed Income Tax Amount across a particular period.
The Override Tax screen appears. - Enter the Effective From and Effective To dates.
- Enter the Tax Amount manually.
- Press Ctrl+A to save.
Henceforth, for the specified Period, the specified Income Tax Amount will get prefilled in the Payroll vouchers created for the employee.
This issue/problem exists only when the user has moved from TallyPrime Release 3.0 Beta version to Gold a Release. It does not exist when the data is upgraded directly from the previous Gold Release to TallyPrime Rel 3.0 onward releases.
Follow the below steps to get it corrected:
- Take data backup of the existing company.
- Export statutory masters from the new company.
- Create a new company.
- In the Company Features Alteration screen, activate the two payroll options, Maintain Payroll & Enable Payroll Statutory, and save the settings.
- From Gateway of Tally, press Alt+E (Export) > Masters.
- Press C (Configure), and choose Type of Master as All Statutory Masters and export all statutory masters in XML format.
- Import statutory masters from the new company to the problematic company
- Load the problematic company to resolve the latest Income Tax Slab issue.
- From Gateway of Tally, press Alt+O (Import) > Masters.
- Import the XML file by choosing the Modify with New Data option.
- Navigate to Income Tax Computation Report and select New Tax Regime opted employee.
It loads the Income Tax computation Report.
- Select S.No.10 : Tax on Total Income and the drill down screen will be updated with the latest Income Tax slab.
This issue/problem exists only when the user has moved from TallyPrime Release 6.0 BETA version to the Gold Release. It does not exist when the data is upgraded directly from the previous Gold Release to TallyPrime Release 6.0 onward releases.
Follow the below steps to get it corrected:
- Take data backup of the existing company.
- Export statutory masters from the new company created in TallyPrime Release 6.0
- Create a new company.
- In the Company Features Alteration (F11) screen, activate the two payroll options, Maintain Payroll & Enable Payroll Statutory, and save the settings.
- From Gateway of Tally, press Alt+E (Export) > Masters.
- Press C (Configure), and choose Type of Master as All Statutory Masters and export all statutory masters in XML format.
- Import statutory masters from the new company to the problematic company
- Load the problematic company to resolve the latest Income Tax Slab issue.
- From Gateway of Tally, press Alt+O (Import) > Masters.
- Import the XML file by choosing the Modify with New Data option.
- Navigate to Income Tax Computation Report and select New Tax Regime opted employee.
It loads the Income Tax computation Report.
- Select S.No.10 : Tax on Total Income and the drill down screen will be updated with the latest Income Tax slab.
Currently, TallyPrime does not have an option to provide the breakup of opening balance to the cost centres. However, you can provide the opening balance as per the example demonstrated below.
Consider that Salary Advance ledger has an Opening Balance of Rs. 5,000 and has Cost Centres namely Employee A (Rs 3,000) and Employee B (Rs. 2,000).
- Alter the Salary Advance ledger to remove the Opening Balance.
- Press Alt+G (Go To) > Alter Master > Ledger > type of select ledger name and press Enter.
- Bring the cursor to Opening Balance and press spacebar to remove it.
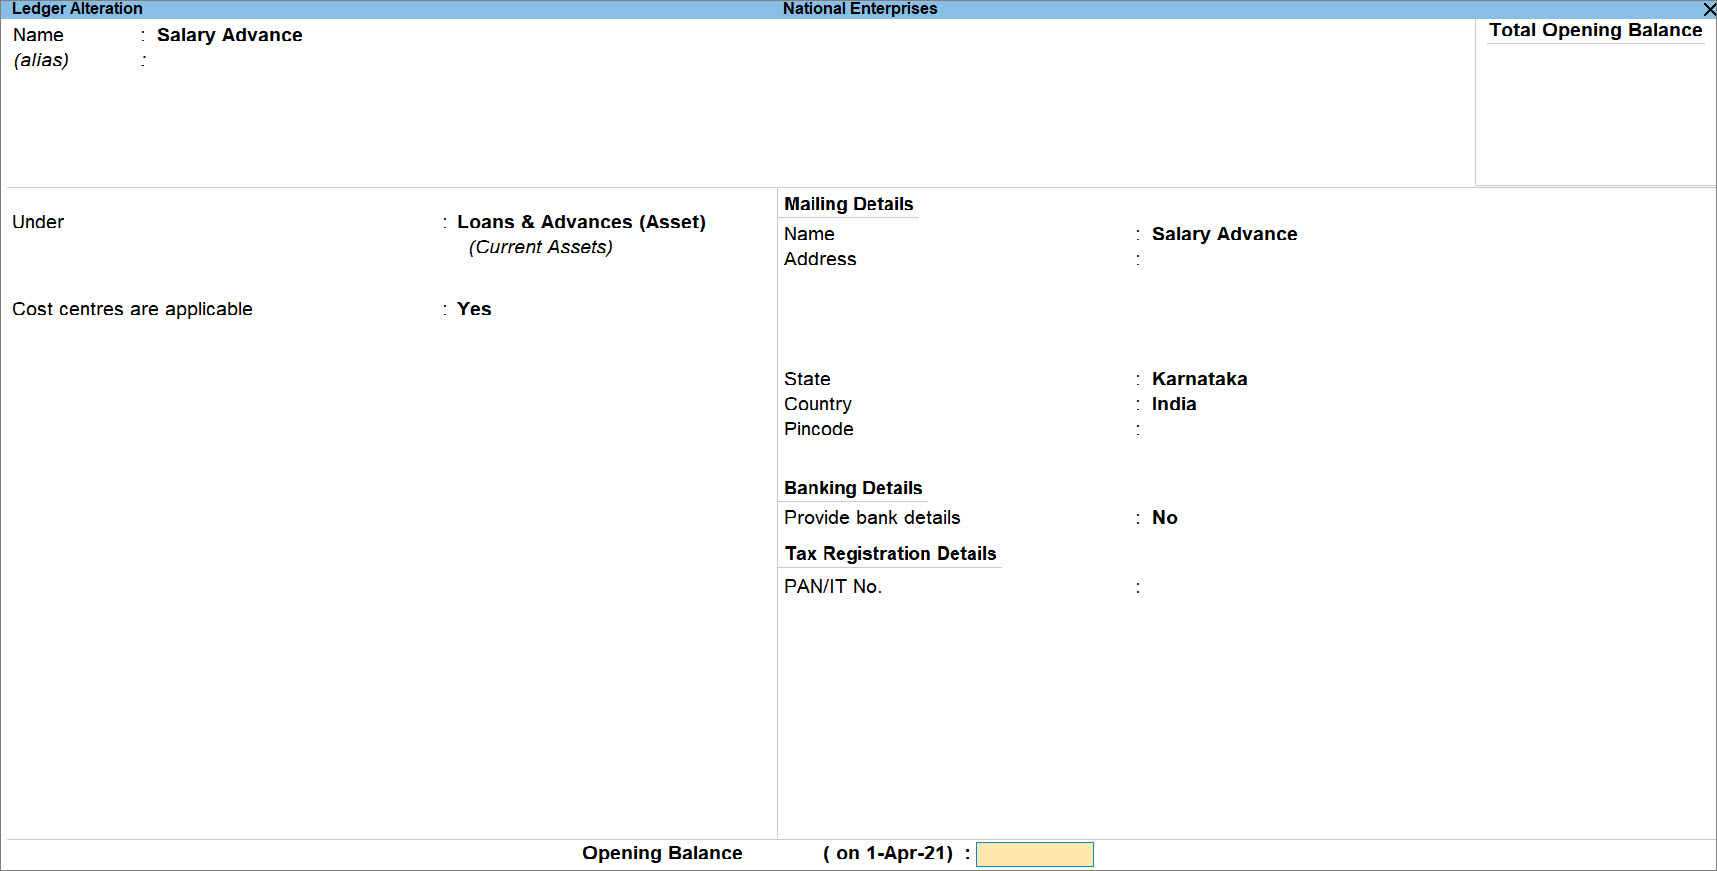
- Press Ctrl+A to save the ledger.
- Create a ledger for salary advance adjustment under Loans and Advances (Assets) with an opening balance of Rs. 5,000 and cost centres not applicable.
- Press Alt+G (Go To) > Create Master > type or select ledger and press Enter.
- Enter Name.
- Under : Loans and Advances (Assets).
- Cost Centres are applicable : No.
- Opening Balance : 5,000.
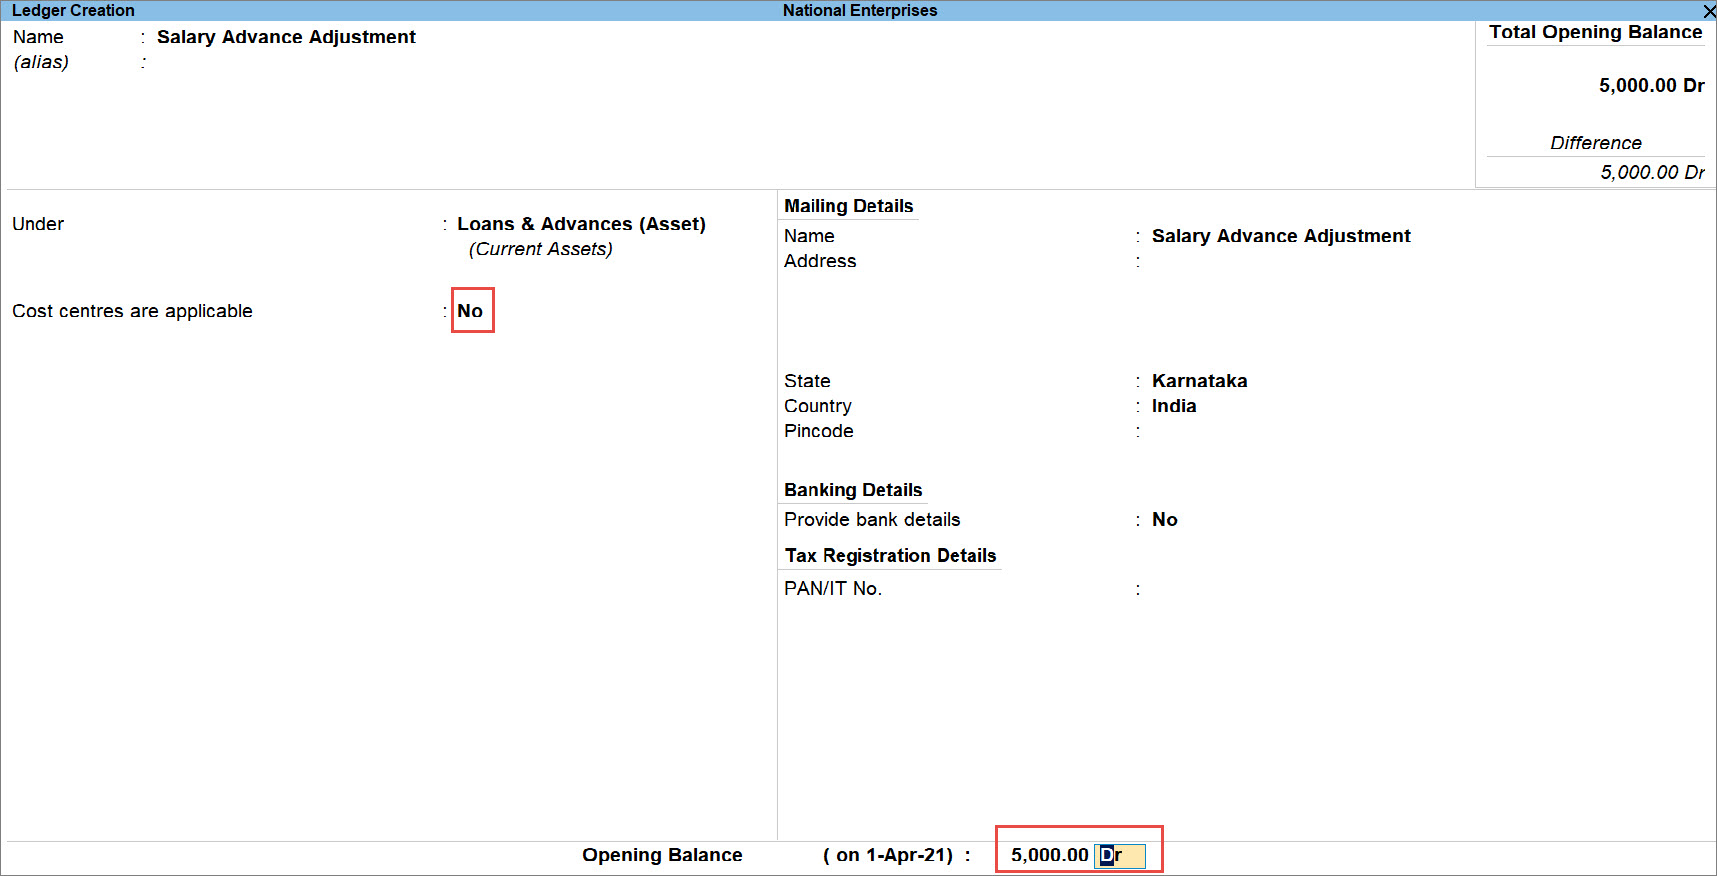
- Press Ctrl+A to save the ledger.
- Record a Journal Voucher with Salary Advance and Salary Advance Adjustment ledgers.
- Press Alt+G (Go To) > Create Voucher > press F7.
- Under By (Debit), select the Salary Advance ledger.
The Cost Allocations for the ledger screen appears. - In the Cost Allocations screen, select:
- Employee A and enter Rs. 3,000.
- Employee B and enter Rs. 2,000.
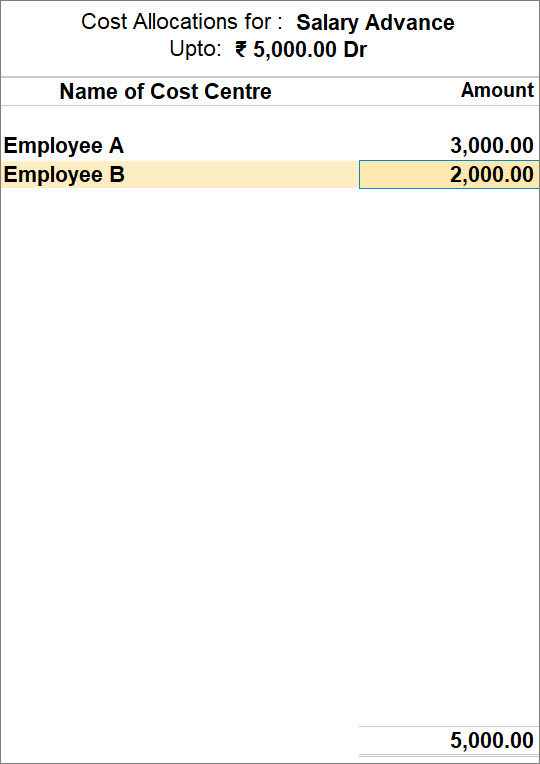
Press Ctrl+A to accept the screen.
- Under To (Credit), select the Salary Advance Adjustment ledger.
- Enter the narration, if needed.
The Journal Voucher appears as shown below.
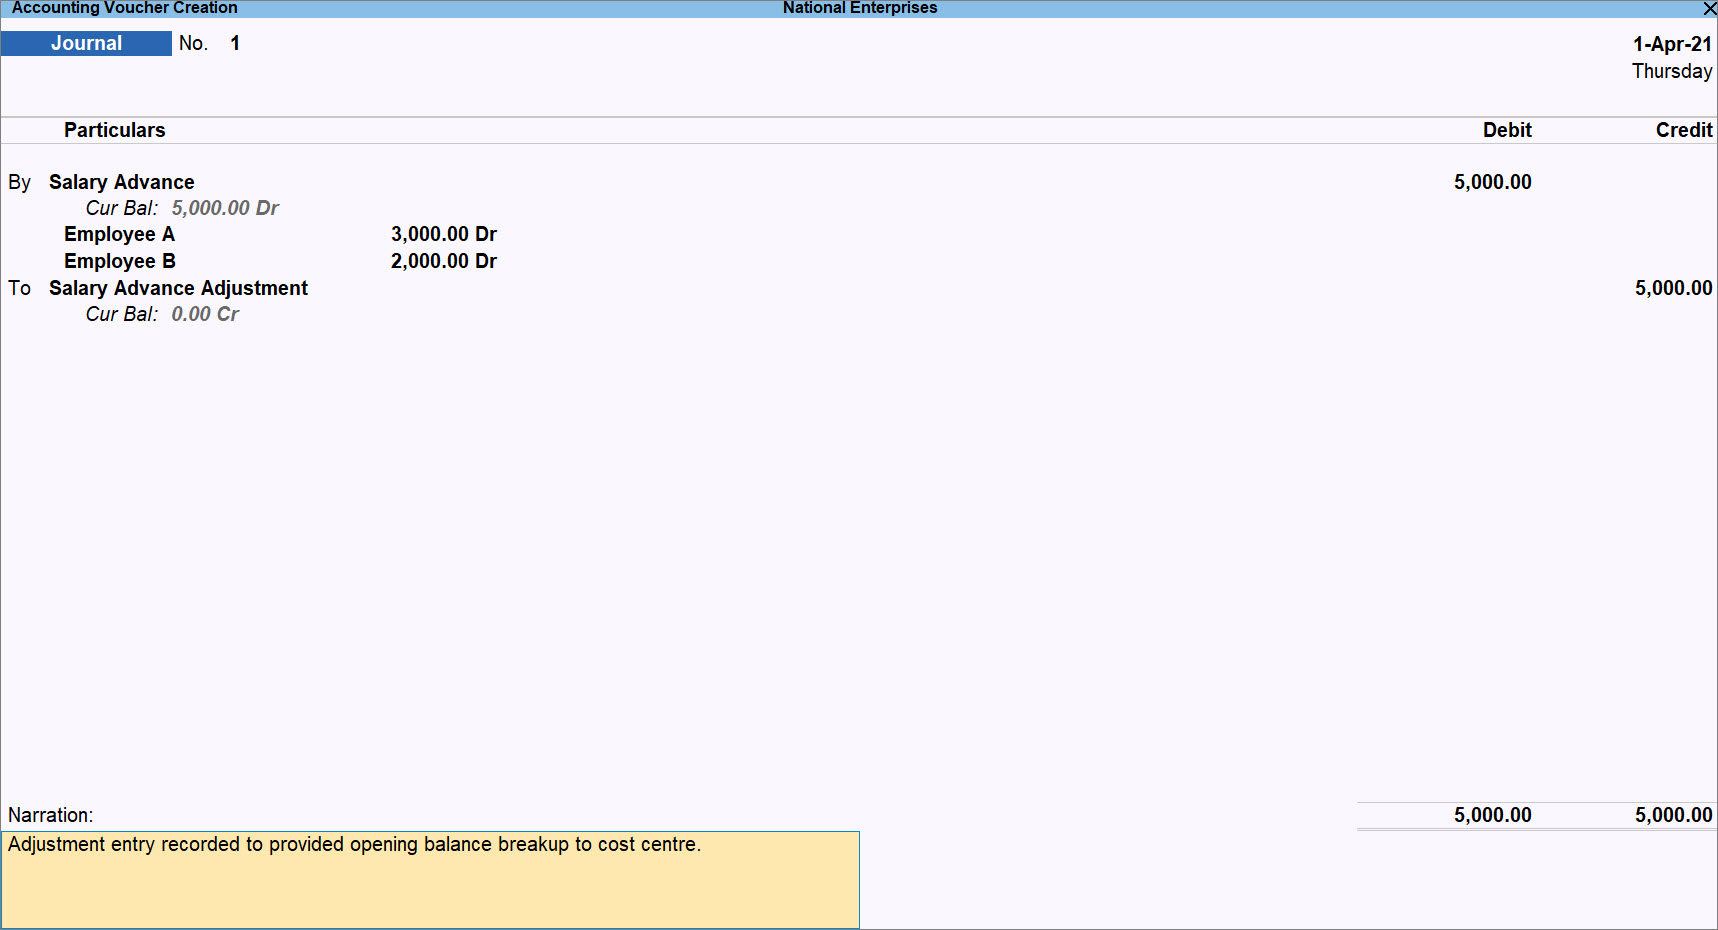
- Press Ctrl+A to save.
- Press Alt+G (Go To) > type or select Cost Centre Summary and press Enter.
The Cost Centre Summary with opening balance breakup for cost centres appears as shown below.