
Sales Under Kenya VAT
You can record and print different kind of sales transactions based on buyer type, location of the buyer, and other conditional sales such as discount and so on.
Taxable Sales Invoice
Enable the ledger for VAT applicability, to record a taxable sales invoice.
- Open the sales voucher screen.
- Gateway of Tally > Vouchers > F8 (Sales).
Alternatively, press Alt+G (Go To) > Create Voucher > press F8 (Sales). - Ensure that the voucher mode is set to Item Invoice by pressing Ctrl+H (Change Mode), or you can also confirm the same if you see Name of Item in the voucher screen.
- Enter the Reference No. and Date for the invoice, if needed.
If you do not see this field, then press F12 (Configure) and set Show more configurations to Yes. Later, set the option Provide Reference No. and Date to Yes.
- Gateway of Tally > Vouchers > F8 (Sales).
- Specify the buyer details.
- Party A/c name: Select Cash or Bank for cash sales. For credit sales, select the party name.
The Dispatch Details screen appears.
If you do not see the Dispatch Details screen, then press F12 (Configure) and set Provide Dispatch, Order, and Export details to Yes. - Enter the required field in the Dispatch Details screen, as applicable and press Enter.
The Party Details screen appears.
If you do not see the Party Details screen, then press F12 (Configure) and Provide Buyer details to Yes. - In the Party Details screen, the Buyer (Bill to), Mailing Name, Address, County, Country, VAT Number and PIN No. will be prefilled from the Party ledger.
However, in the case of Cash sales, you can specify the buyer’s details as needed in the printed invoice.
If you do not see Mailing Name, VAT Number and PIN No., then press F12 (Configure) and set:- Provide Mailing Name to Yes.
- Provide Tax Registration details to Yes.
If you want to know how to create a Party ledger, then click here.
- Press Enter to save, as always you can press Ctrl+A to save and proceed.
- Party A/c name: Select Cash or Bank for cash sales. For credit sales, select the party name.
- Select the common Sales ledger in which:
- Is VAT applicable is set to Applicable.
- Set/Alter VAT Details is set to No.
If you do not see this field on the screen, then press F12 (Configure) and set Select common Ledger Account for Item Allocation to Yes.
- Provide the stock item details.
As in other transactions, you can create the item on the fly by pressing Alt+C.- Select the stock items whose VAT rates are specified either at the Stock Group or Stock Item level.
- Enter the Quantity and Rate for each stock item. The Rate will be auto filled, if available for the stock item. However, you may choose to enter the Rate or Amount.
- Select the common VAT ledger grouped under Duties & Taxes, in which:
- Type of duty/tax is set to VAT.
- Percentage of calculation (0% for common ledger) is set to 0.
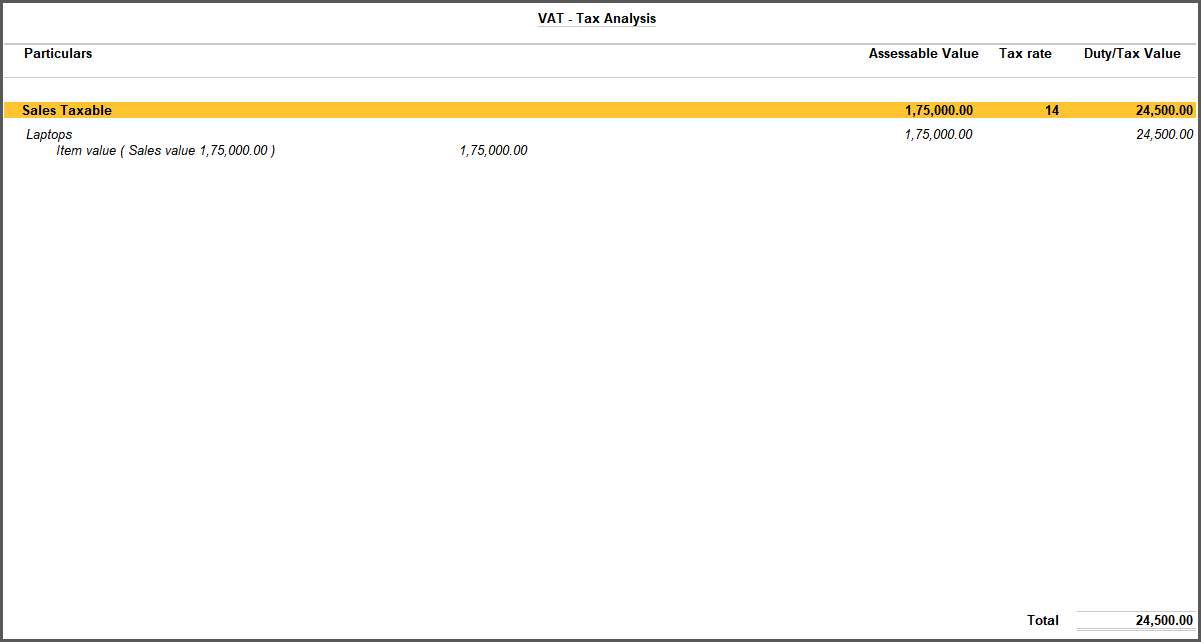
You can view Tax Analysis to check the details of the taxes.
Press Ctrl+O (Related Reports) > type or select VAT – Tax Analysis to view the tax details. Press Alt+F5 (Detailed) to view the detailed break-up of tax, if needed.
If you are on TallyPrime Release 1.1.3 or earlier, follow the step:
Press Ctrl+I (More Details) > type or select VAT – Tax Analysis to view the tax details. Press Alt+F5 (Detailed) to view the detailed break-up of tax, if needed.
- Press Esc to return to sales invoice. The sales invoice appears as shown below:
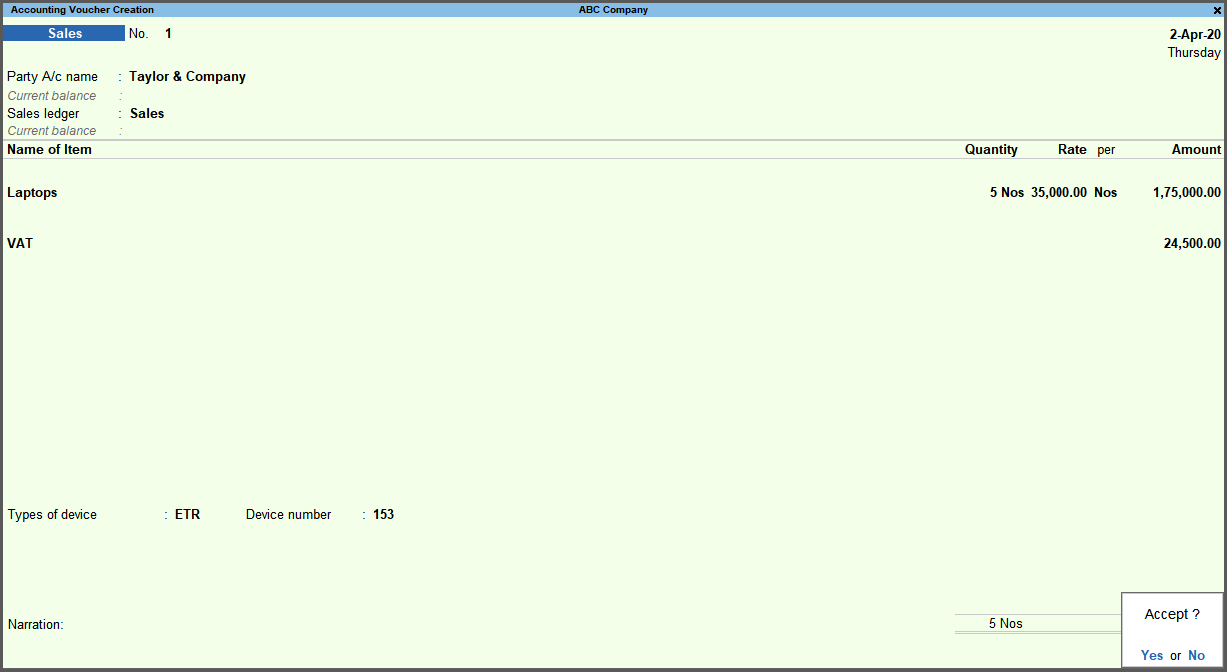
What you see on the screen can vary based on your choices. Press F12 (Configure) to change the options and F11 (Features) to enable or disable features. - Print the invoice.
- Press Ctrl+P.
Alternatively, Alt+P (Print) > press Enter on Current.- Press C (Configure) and configure the options, if needed.
- Press I (Preview) to check the invoice before printing, if needed.
The print preview of sales invoice appears as shown:
- Press P (Print).
- Press Ctrl+P.
- Accept the screen. As always, you can press Ctrl+A to save the voucher.
Sales with Multiple Tax Rates
When you do sale with multiple tax rates, the tax amount for each stock item is calculated based on the tax rate mentioned in the stock item master.
- To record a sales voucher with multiple tax rates, select multiple stock items with different tax rates.
- For example, select a stock item with a VAT rate of 12% and another stock item with a VAT rate of 8%. Enter the Quantity and Rate for each stock item in the sales voucher.
If you want to know how to record a sales voucher, then click here.You can view the VAT-Tax Analysis, to check the details of the taxes for the stock items. Press Ctrl+O (Related Reports). Press Alt+F5 (Detailed) to view the detailed break-up of tax, if needed.
If you are on TallyPrime Release 1.1.3 or earlier, you can view the VAT-Tax Analysis, to check the details of the taxes for the stock items. Press Ctrl+I (More Details). Press Alt+F5 (Detailed) to view the detailed break-up of tax, if needed.
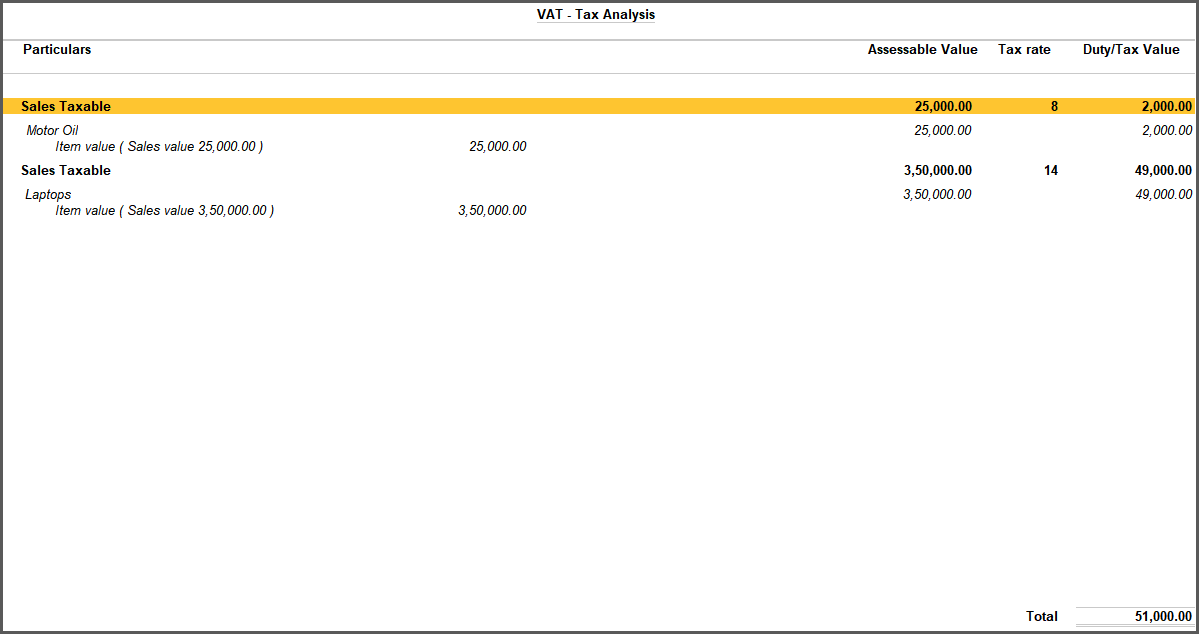
The sales invoice with multiple items attracting different tax rates appears as shown below:
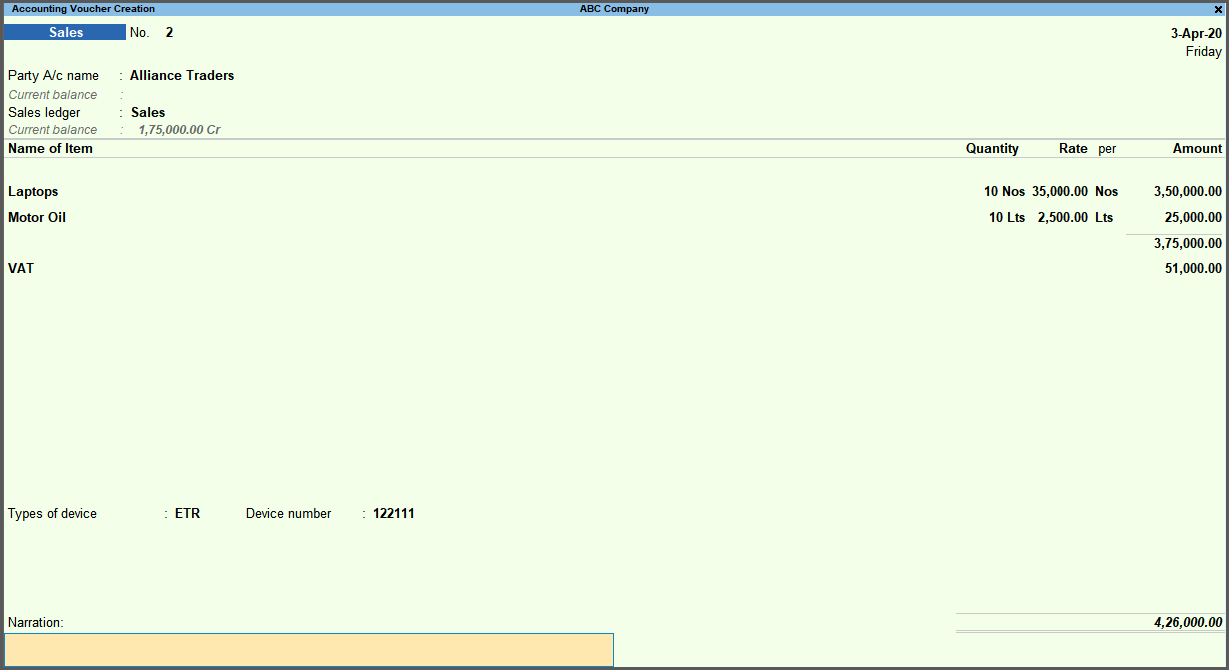
What you see on the screen can vary based on your choices. Press F12 (Configure) to change the options and F11 (Features) to enable or disable features.
- For example, select a stock item with a VAT rate of 12% and another stock item with a VAT rate of 8%. Enter the Quantity and Rate for each stock item in the sales voucher.
- Press Enter to save. As always, you can press Ctrl+A to save.
POS Invoice
Point of Sale transaction may take place at a retail shop, a check-out counter in a shop or any similar location. The various POS equipment used in retail outlets are cash registers, card readers, and barcode scanners. In TallyPrime, you can record a POS invoice in single or multiple payment modes, print it using a POS invoice printing device, and view the list of POS transactions in reports.
In this section
Create a POS invoice voucher type
In TallyPrime, you can create a POS invoice voucher type, which can be used to quickly record the transactions.
- Open the sales voucher screen and select the type of voucher.
- Gateway of Tally > Create > type or select Voucher Type > and press Enter.
Alternatively, press Alt+G (Go To) > Create Master > Voucher Type > and press Enter. - Enter the Name for the voucher type, for example, POS Invoice.
- Set Sales in the Select type of voucher field.
- Provide the voucher numbering details as needed, in the Method of voucher numbering field.
- Gateway of Tally > Create > type or select Voucher Type > and press Enter.
- Enable the voucher type for POS transactions.
- Set the option Use for POS invoicing to Yes.
- Enter Message to print (1) and Message to print (2), as required, to be printed at the bottom of the POS invoice.
- Enter the Default title to print, as required.
If you do not see the Printing field in the Voucher Type Creation screen, then press F12 (Configure) and set Set Printing options to Yes.
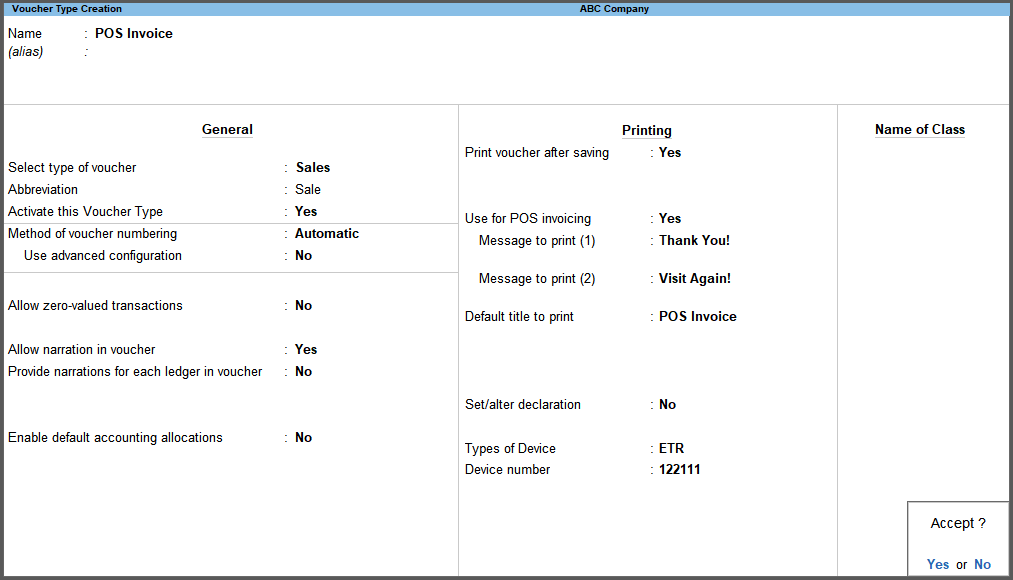
- Accept the screen. As always, you can press Ctrl+A to save.
Record a POS Invoice
When you need to raise a bill for a POS transaction, you need to create a POS invoice voucher type in TallyPrime and use it to record transactions.
Use the procedure for recording sales invoice with the following changes.
- Gateway of Tally> Vouchers > F8 (Sales) > select POS Invoice.
Alternatively, press Alt+G (Go To) > Create Voucher > press F8 (Sales) > select POS Invoice. - You can set the Party A/c Name to Not Applicable when the buyer details are not known. However, if you know the buyer details, you can select the same.
- After selecting the Sales ledger, select the stock item. By default, the Quantity appears as 1. You can press Backspace and change it, if needed.
- Once you select the common VAT ledger, specify the payment details.
By default, Cash appears as the mode of payment. When you receive cash, enter the Cash tendered. The Balance amount, if any, will appear.
The POS invoice appears as shown below:
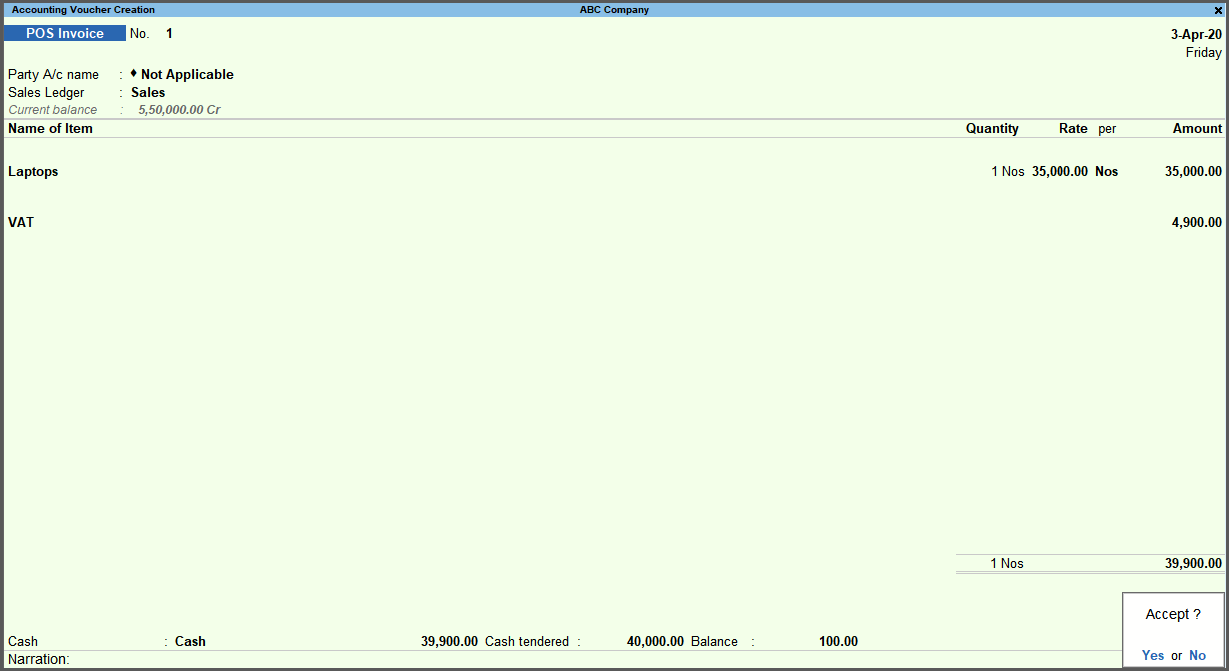
What you see on the screen can vary based on your choices. Press F12 (Configure) to change the options and F11 (Features) to enable or disable features. - Print the POS invoice.
- Press Ctrl+P.
Alternatively, Alt+P (Print) > press Enter on Current.- Press C (Configure) and configure the options, if needed.
- Press I (Preview) to check the invoice before printing, if needed.
The print preview of POS invoice appears as shown below:
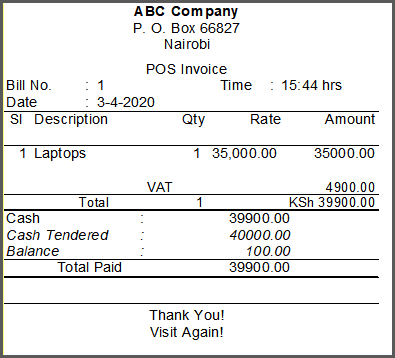
- Press P (Print).
- Press Ctrl+P.
- Accept the screen. As always, you can press Ctrl+A to save.
Taxable Sales with Additional Ledgers
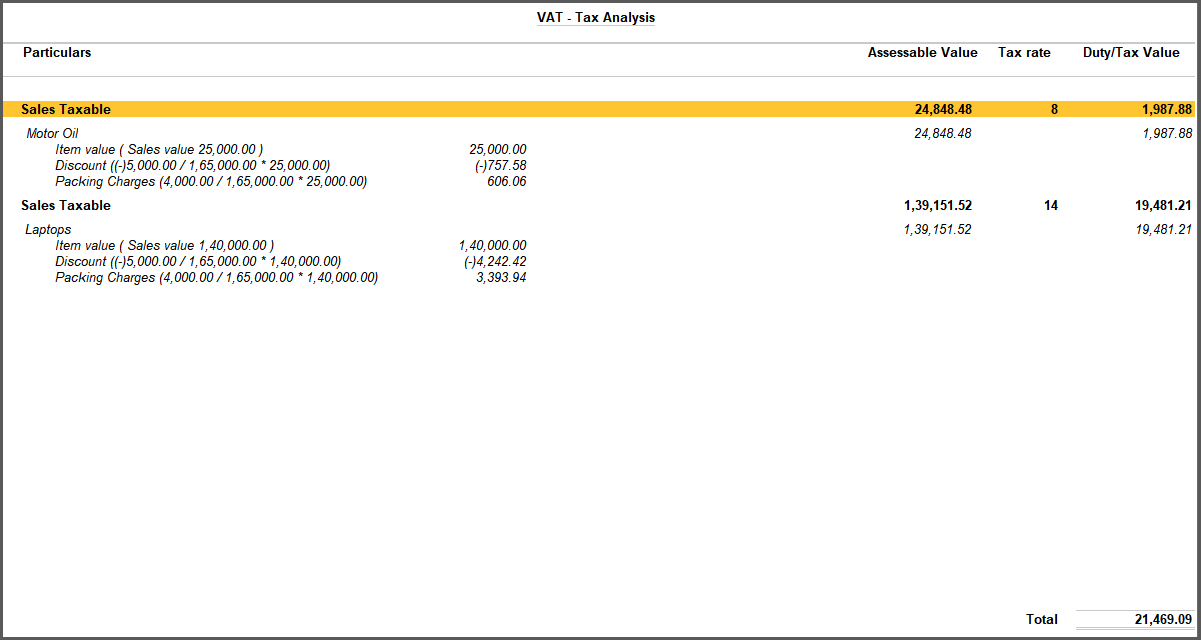
While carrying on business it is common that discounts are given on goods sold and provide charged services like packing material, transportation, and so on. In this scenario, VAT is calculated on the assessable value which is arrived at by deducting the discount given and adding the packing charges.
- In the sales invoice (Item Invoice, in this case), select Discount ledger created under Direct/Indirect Expenses in which:
- Include in assessable value calculation for is set to VAT.
- Enter the discount amount with negative sign.
You can also enter the discount percentage (%) under Rate as a negative number (in minus, for example, -10%). TallyPrime applies the discount on the total item amount and displays the discount amount against the selected Discount ledger.
- Select the Packing Charges ledger created under Indirect Expenses in which:
- Include in assessable value calculation for to VAT.
- Enter the packing charges in the Amount field.
You can view Tax Analysis to check the details of the taxes.
Press Ctrl+O (Related Reports) > type or select VAT – Tax Analysis to view the tax details. Press Alt+F5 (Detailed) to view the detailed break-up of tax, if needed.
If you are on TallyPrime Release 1.1.3 or earlier, follow the step:
Press Ctrl+I (More Details) > type or select VAT – Tax Analysis to view the tax details. Press Alt+F5 (Detailed) to view the detailed break-up of tax, if needed.
- Press Esc to return to sales invoice. The sales invoice appears as shown below:

What you see on the screen can vary based on your choices. Press F12 (Configure) to change the options and F11 (Features) to enable or disable features. - Press Enter to save. As always, you can press Ctrl+A to save.
Sales Inclusive of Tax
- In the sales invoice, select the stock item in which Is inclusive of duties and taxes is set to Yes.
If you want to know how to create a stock item with VAT details and inclusive of duties and taxes configured in it, then click here. - Enter the Quantity of the stock item. The Rate (Inclusive of Tax) screen appears.
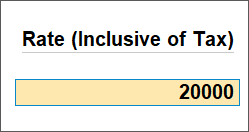
- Enter the rate in Rate (Inclusive of Tax).
The rate inclusive of tax will appear in the Rate field in the invoice.
Once you enter the common VAT ledger, based on the VAT rate set for the stock item, amount appears automatically.
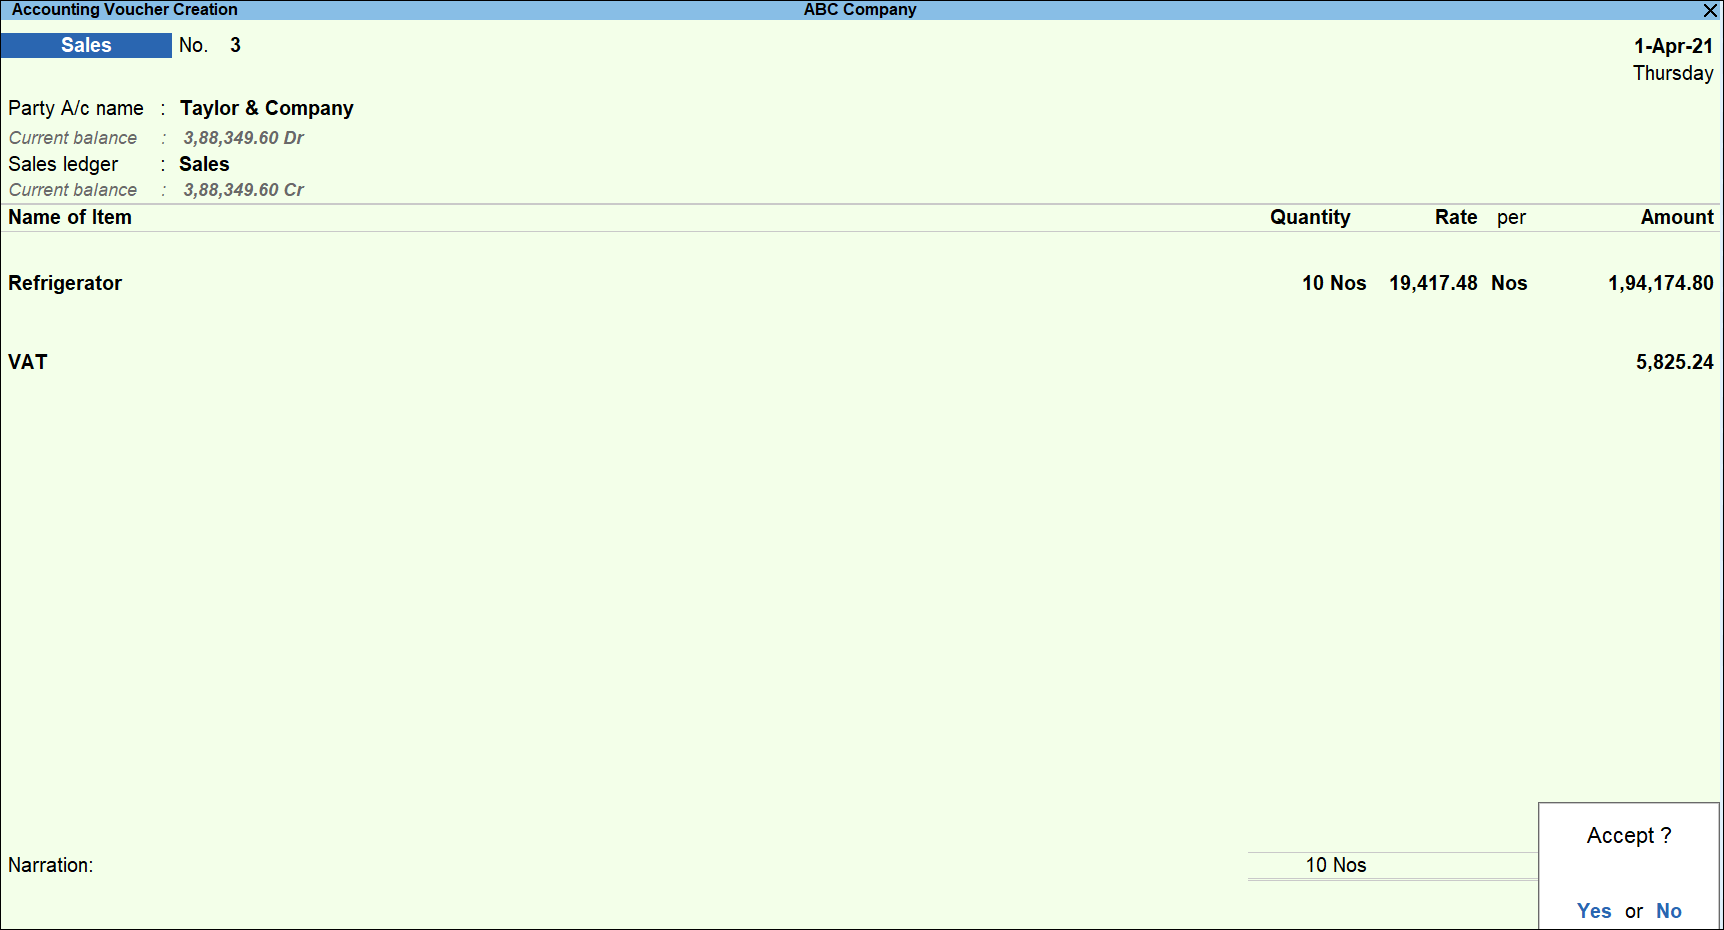
What you see on the screen can vary based on your choices. Press F12 (Configure) to change the options and F11 (Features) to enable or disable features. - Accept the screen. As always, you can press Ctrl+A to save.
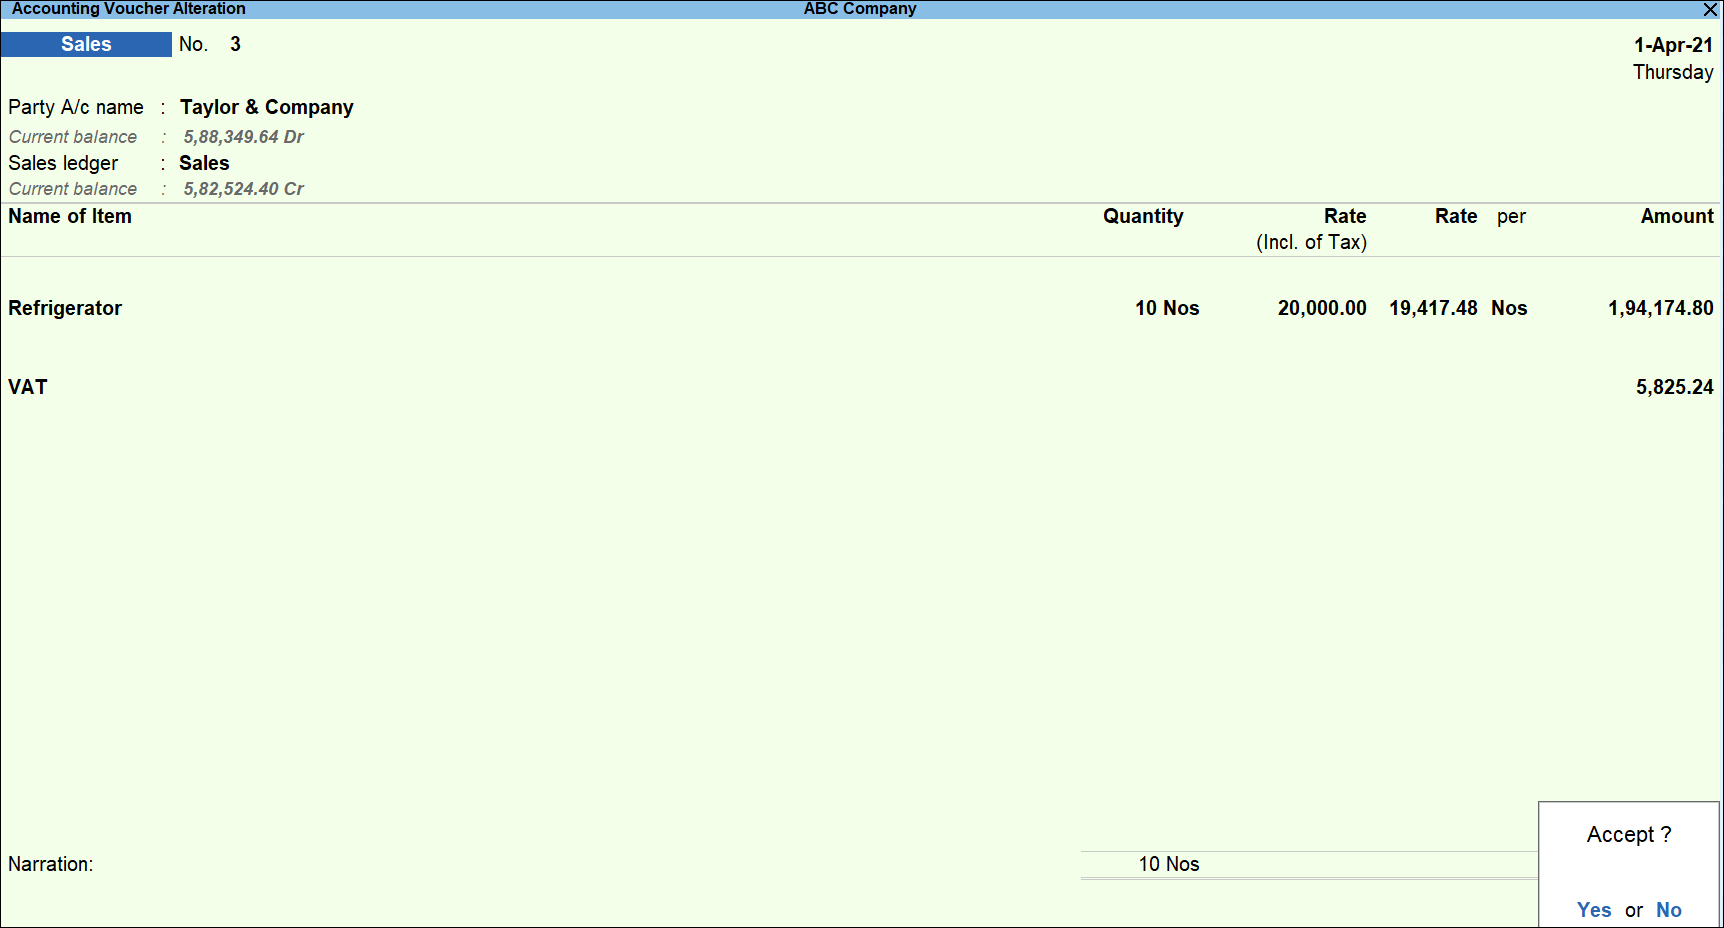
After saving the invoice, if you want to check the rate entered inclusive of tax, then press PgUp key to open the sales invoice in the alteration mode. Press F12 (Configure) and set Provide Rate Inclusive of Tax for Stock Items to Yes.
The rate appears in the Rate (Incl. of Tax) column.
Zero Rated Sales
You can create vouchers for zero rated sales.
- In the sales invoice, select the sales ledger in which the option Nature of transaction is set to Sales Zero Rated.
- Once you enter the Quantity and Rate for the required stock item, the Amount appears automatically.
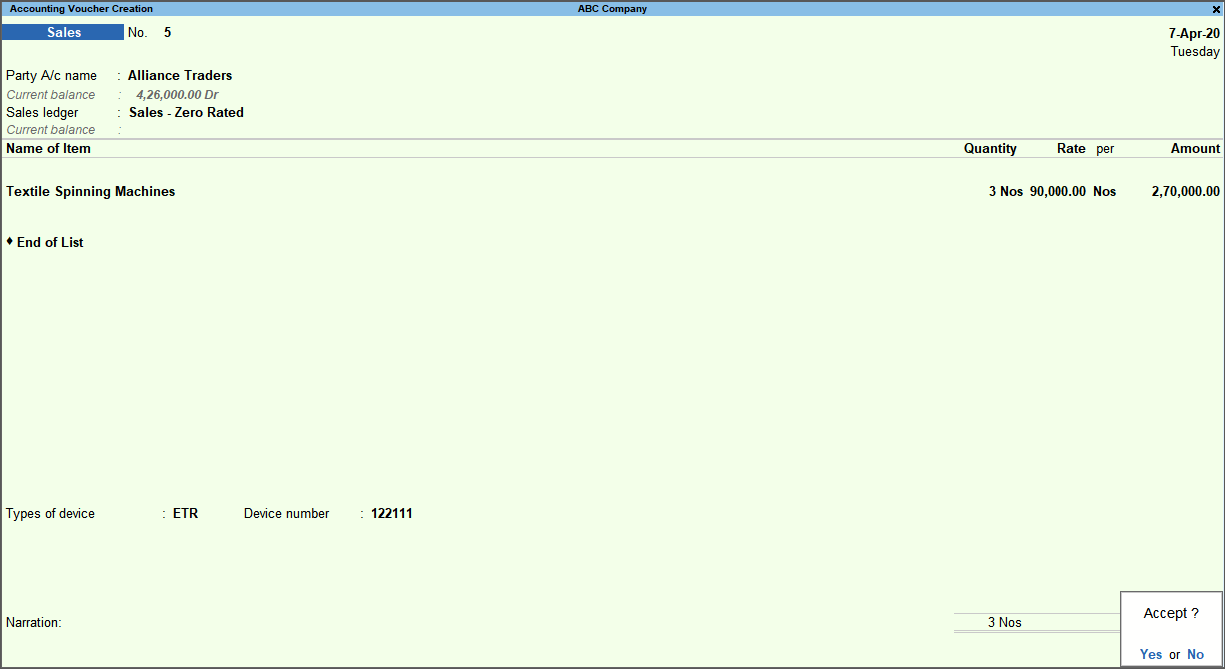
- Accept the screen. As always, you can press Ctrl+A to save.
Sales Exempt
- In the sales invoice, select the sales ledger in which the option Nature of transaction is set to Sales Exempt.
- Once you enter the Quantity and Rate for the required stock item, the Amount appears automatically.
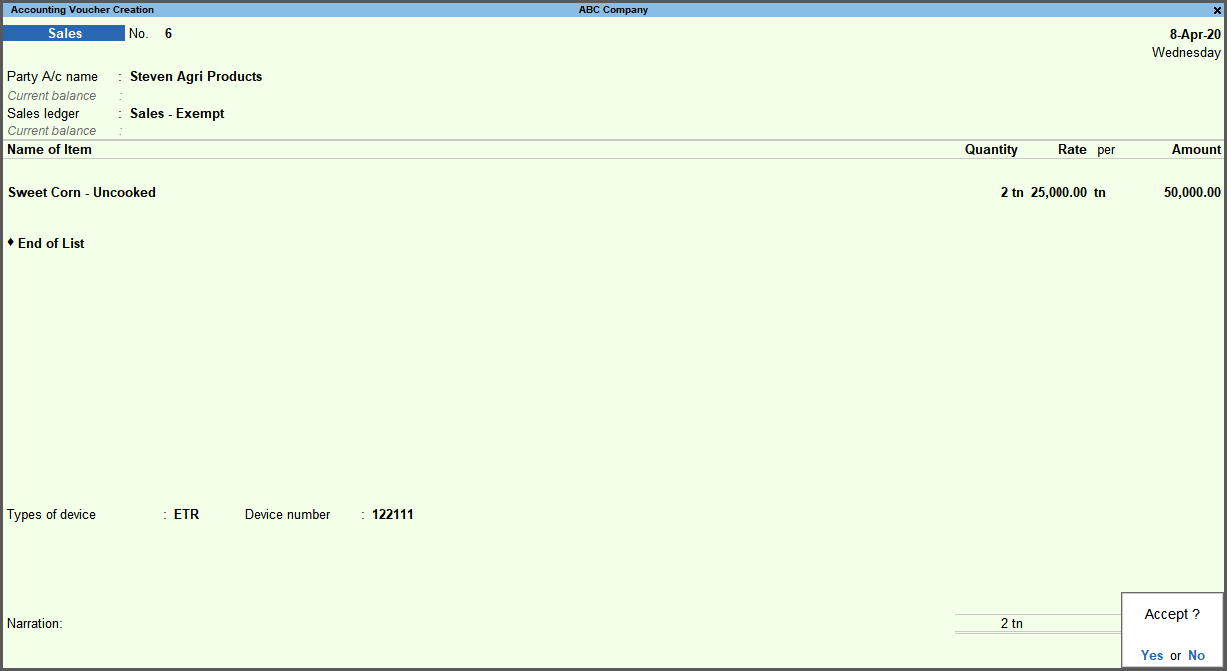
- Accept the screen. As always, you can press Ctrl+A to save.
Exports
Under VAT Act, export of taxable goods and services are exempted from payment of VAT.
- In the sales invoice, select the sales ledger in which the option Nature of transaction is set to Exports.
This is because you are selling your items to the party based in another country. - Enter the Quantity and Rate (in foreign currency, for example, 250$) of the stock item.
This will be the currency of the country you are shipping your items to. If you want to know how to create a foreign currency, then click here.
A screen appears in which you can specify the Rate of Exchange. - Enter the Rate of Exchange in foreign currency. The Rate in Ksh is calculated automatically.
If you want to know how to define rate of exchange between multiple currencies, then click here.

- Set the option Provide VAT details to Yes.
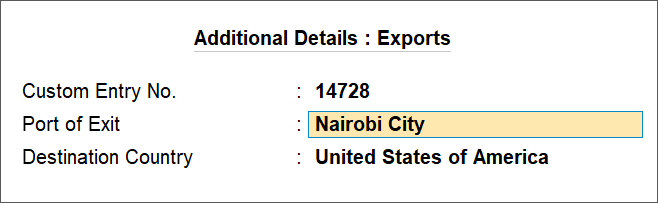
This is because you are shipping your items to the foreign party. - In the Additional Details : Exports screen, enter the Custom Entry No., and Port of Exit.
The Destination Country of the party ledger appears automatically.
The sales invoice appears as shown below: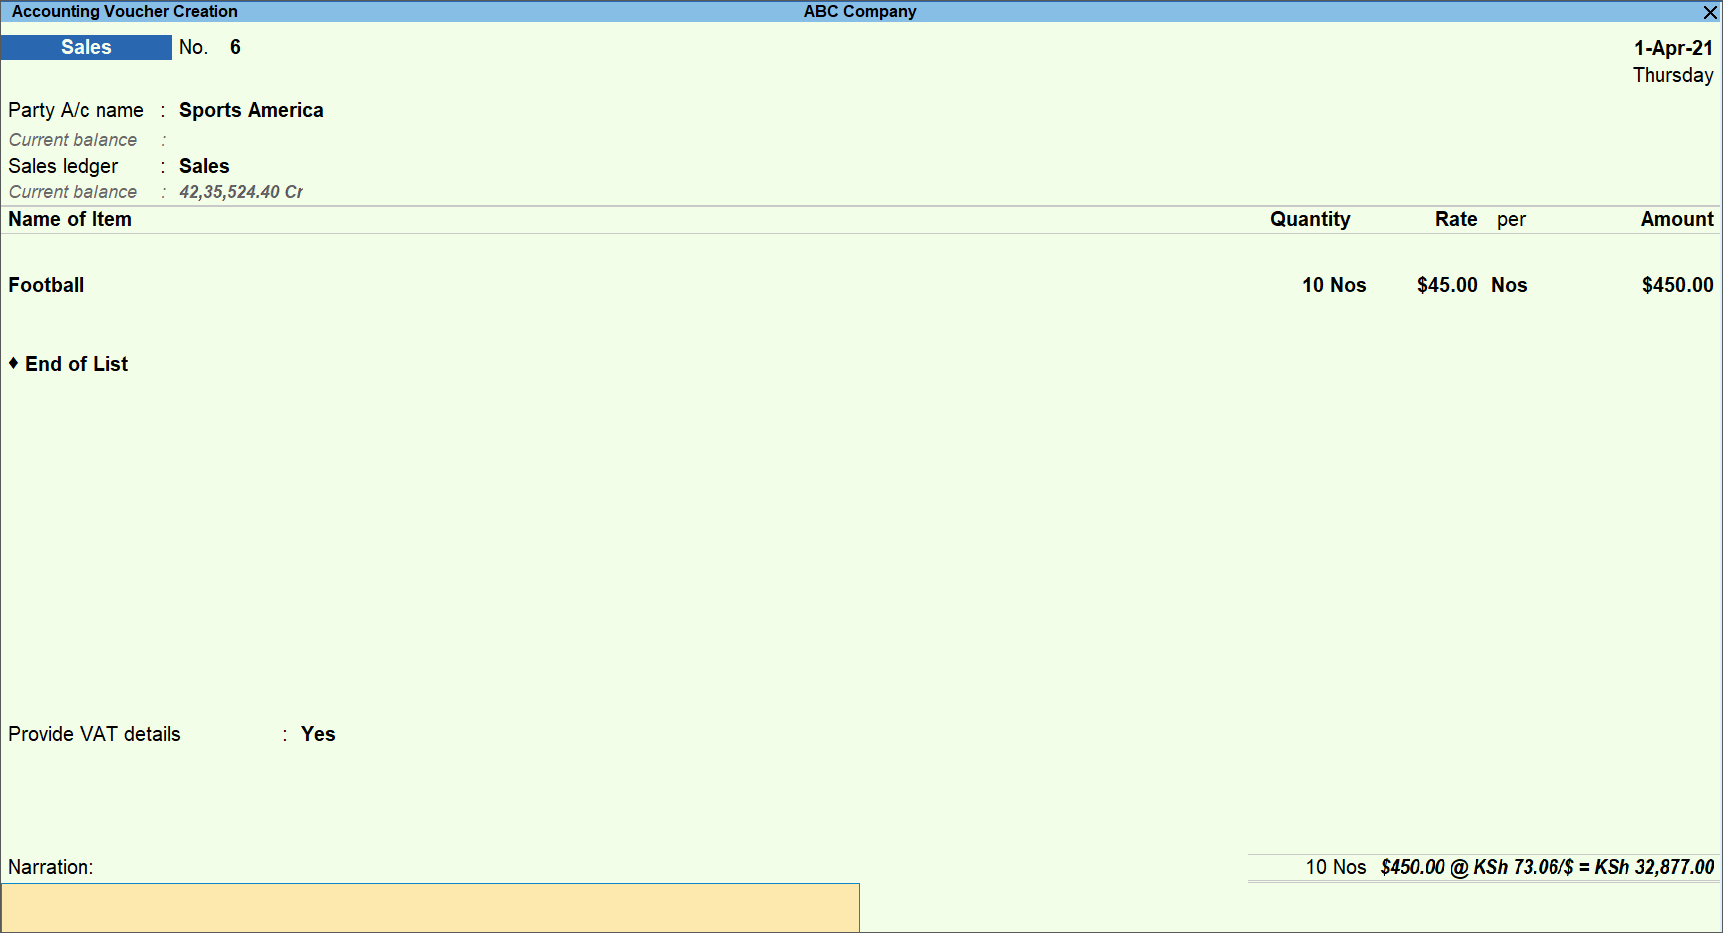
- Accept the screen. As always, you can press Ctrl+A to save.
Override Assessable Value and Tax in Invoice
To record transaction by overriding Assessable Value and Tax, you have to configure the sales invoice for overriding tax details using F12 (Configure).
- In the sales invoice, press F12 (Configure) and set the options as given below to override the tax details.
- Select common Ledger Account for Item Allocation to No.
- Modify Tax Rate details for VAT to Yes.
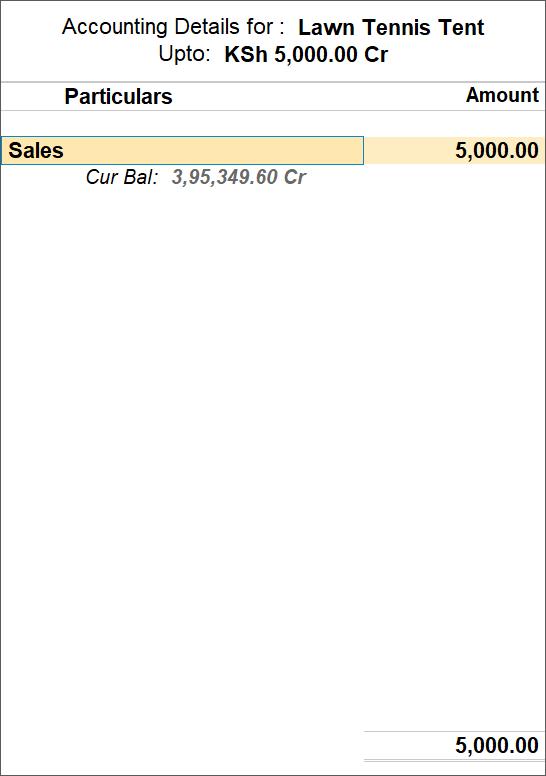
Once you enter the Quantity and Rate for the stock item, the Accounting Details screen appears.
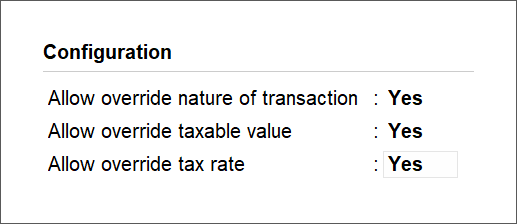
- After selecting the common sales ledger, press F12 (Configure) in the Tax Classification details screen, and set the options:
- Allow override nature of transaction to Yes, as per your business needs.
- Allow override taxable value to Yes.
- Allow override tax rate to Yes.
- Select the relevant Nature of Transaction to override in the Classification/Nature field.
- Enter the required Tax rate.
- Enter the Assessable Value.

- Press Enter to return to sales invoice. The sales invoice appears as shown below:
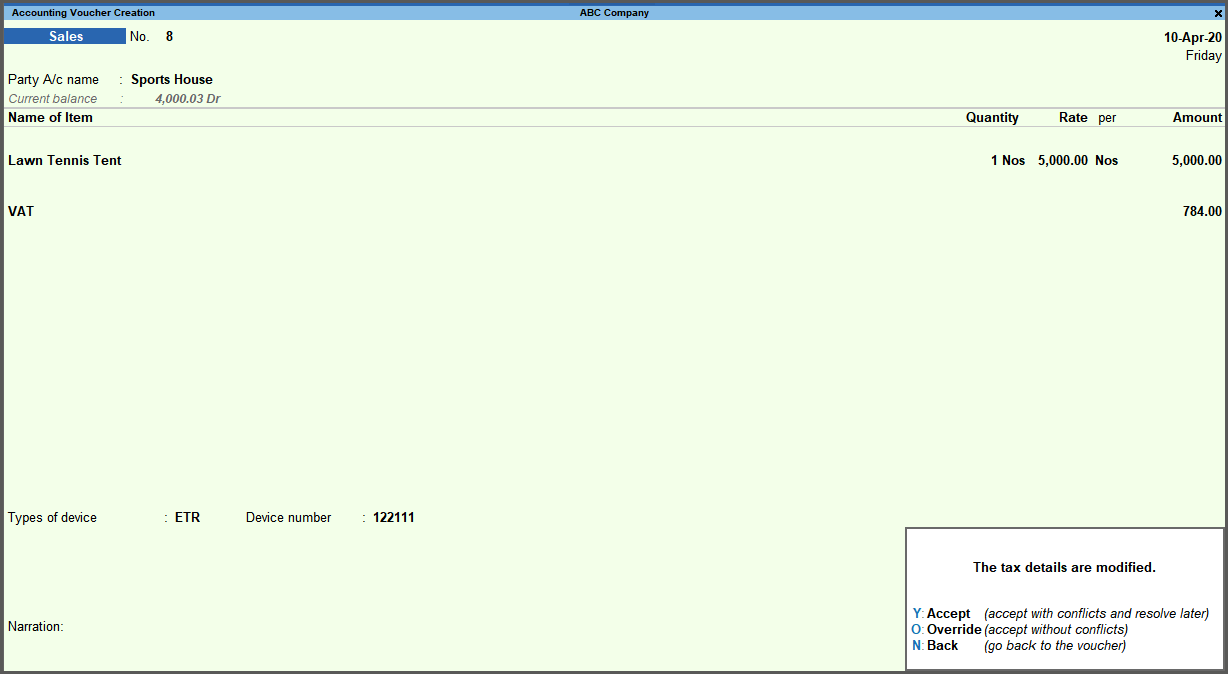
What you see on the screen can vary based on your choices. Press F12 (Configure) to change the options and F11 (Features) to enable or disable features. - Press O (Override) (accept without conflicts) to override the default tax details and save invoice with the changed tax rate and assessable value. This will ensure that the transaction does not appear under Uncertain Transactions (Corrections Needed) in VAT Form-3.
However, you can also choose in between Y (Accept) (accept with conflicts and resolve later) to accept the voucher with conflicts and will appear under Uncertain Transactions (Corrections Needed) in VAT Form-3 and can be resolved later and N (Back) (go back to the voucher), if you wish to make changes to the transaction before overriding without conflicts or accepting with conflicts.
Sales Returns
You can record accounting entries for sales returns by using a credit note voucher type.
- Open the credit note voucher screen and specify the buyer details.
- Gateway of Tally > Vouchers > press F10 (Other Vouchers) type or select Credit Note > and press Enter.
Alternatively, press Alt+G (Go To) > Create Voucher > press F10 (Other Vouchers) > type or select Credit Note > and press Enter. - Press Ctrl+H (Change Mode) and select the invoice mode as per your business needs.
- Gateway of Tally > Vouchers > press F10 (Other Vouchers) type or select Credit Note > and press Enter.
- Specify the buyer details:
- Party A/c name: Select the party name.
The Receipt Details screen appears.
If you do not see Receipt Details screen, then press F12 (Configure), and set Provide Receipt, Order, and Export/Import details to Yes. - Provide the Receipt Details as per your invoice requirements. You can also enter the Original Invoice No. and Date against which this sales return is being recorded.
The Party Details screen appears.
If you do not see the Party Details screen, then press F12 (Configure) and Provide Buyer details to Yes. - In the Party Details screen, the Buyer (Bill to), Mailing Name, Address, County, Country, VAT Number and PIN No., details will be prefilled based on the Party ledger.
If you want to know how to create a Party ledger, then click here.
- Party A/c name: Select the party name.
- Select the common Sales ledger to allocate the stock item in which:
- Is VAT applicable is set to Applicable.
- Set/Alter VAT Details is set to No.
If you do not see this field on the screen, then press F12 (Configure) and set Select common Ledger Account for Item Allocation to Yes.
- Provide details of the stock item that was returned from your buyer.
- Select the required stock items.
- Enter the Quantity. The Rate will be auto filled, based on the rate entered in the previous transaction. However, you may choose to enter the Rate. The Amount appears automatically.
- Select the common VAT ledger grouped under Duties & Taxes, in which:
- Type of duty/tax is set to VAT.
- Percentage of calculation (0% for common ledger) is set to 0.
- Set the option Provide VAT details to Yes.
The Additional Detail: Sales Taxable screen appears. - Select Not Applicable in the Nature of Return field.

- In the Bill-wise Details screen, select the bill against which the goods are returned.
If you do not see the Bill-wise Details screen, then press F12 (Configure) and set the option Use default Bill-wise details for Bill Allocation to No.
The Credit Note appears as shown below:
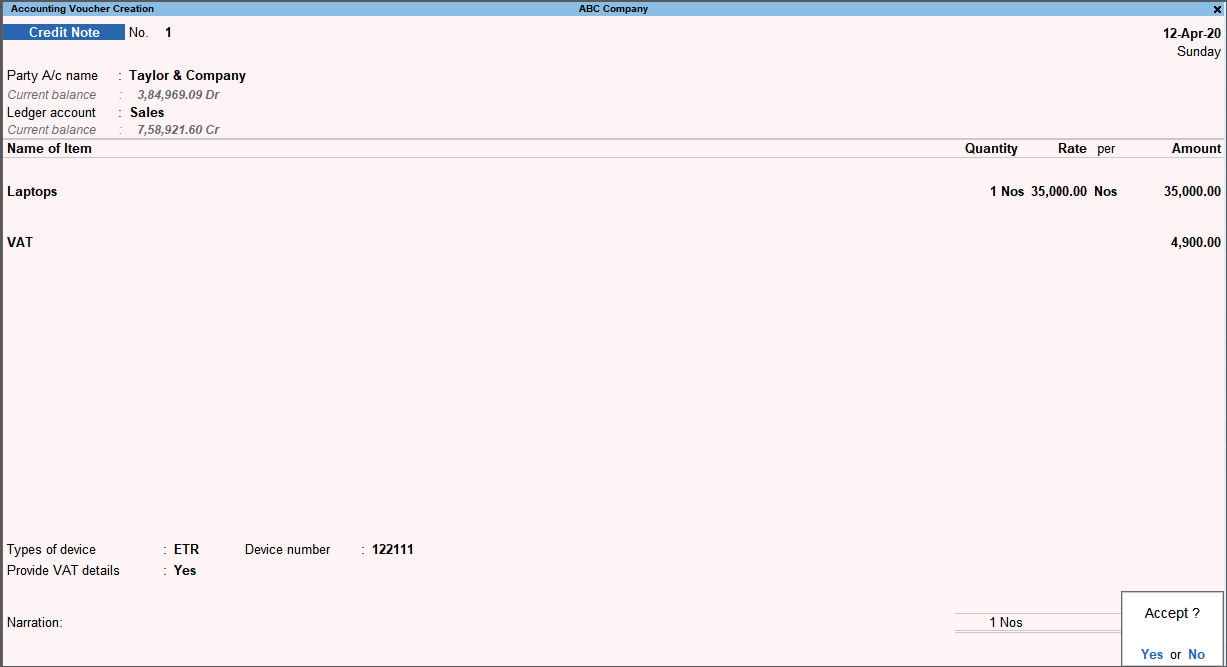
What you see on the screen can vary based on your choices. Press F12 (Configure) to change the options and F11 (Features) to enable or disable features. - Accept the screen. As always, you can press Ctrl+A to save.


