Migrate Company Data
Migrating your company data to the latest release of TallyPrime is seamless. Being on the latest release of TallyPrime enables you to use a host of features, like enhanced experience of defining GST Rates at different levels, creating multiple GST registrations for your company, handling data exceptions, and so on. Whether you want to migrate your company data from TallyPrime releases (such as TallyPrime 2.1 or earlier), Tally.ERP 9 releases, or Tally releases to TallyPrime Release 3.0 or later, all your transactions, along with your company features, masters, security settings, and so on, will be carried forward seamlessly. When you migrate to the latest release of TallyPrime:
- Your company data is seamlessly moved to the latest release of TallyPrime, while keeping a copy of the data of your earlier release safe.
- After migration, the company is available with a 6-digit Company Number.
- A summary of the migration is displayed with before and after migration statistics, as all the masters and vouchers are safely migrated with or without any data exception.
In case you are using TDL customisations, contact your Partner to understand its compatibility with TallyPrime Release 3.0.
Recommendations for Data Migration
To facilitate the slew of new features in TallyPrime Release 3.0 like faster GST reports, revamped GST Reconciliation, Multi-GSTIN companies and so on, we have made a few changes to the way the data will be migrated. Migration to Release 3.0 will result in creation of a new 6-digit company that is compatible with the latest release of TallyPrime. However, because of this change, the migrated data might take up a slightly larger disk space than your existing 5-digit company data.
Moreover, the time taken for migrating the company data depends on various factors, such as number of vouchers and masters, the RAM capacity, other applications running simultaneously during migration, and so on. The following is an estimation of the migration time per voucher. This is compiled based on our observations in performing migration of different company data of India-based businesses, which have GST feature enabled.
| Scenario | Time for Migration per Vouchers (in minutes) |
| Best | ~ 0.00167 |
| Average | ~ 0.00333 |
| Worst | ~ 0.00583 |
You can use this estimation to calculate the approximate time that TallyPrime will take for migrating the company data. For example, if you have 1,00,000 vouchers, in the best scenario, migrating the vouchers will take approximately (0.00167 x 100000) 167 minutes.
The migration performance for International companies and companies where GST is disabled, are expected to be better than the figures above.
Considering the different scenarios such as volume of data and time for migration, and to avoid any interruptions in your business operations, refer to the following recommendations.
Recommendations before migration
Migrating the company data to TallyPrime Release 3.0 might take time depending on your data size.
RAM Capacity
For a seamless migration, ensure there is minimum 4-GB RAM in your computer.
There can be a performance boost while using a computer with a higher RAM capacity and a hard disk that uses an SSD storage.
We have performed migration performance testing on different Company datasets successfully in an environment with the following system configuration
- Intel(R) Core(TM) i5 / 4.0 GB RAM / Windows 7 (64-bit OS) with HDD storage.
- A company with the maximum of 2.5 lakh vouchers and 1 lakh masters have been tested successfully in this configuration.
Disk Space
During migration, in case the application encounters less space for the data, you will be prompted about the low disk space for migration. Ensure to free up disk space accordingly and migrate.
If you are using Group Companies, note that you will need to have sufficient free disk space available, migrating multiple member companies in a single action will require good amount of space.
Other recommendations
- Verify the Company GST details: Ensure that the GSTIN, State, and Registration type are correct in the F11 (Features) of the source company.
- Take a backup of the data: Before migration, it is highly recommended to take a back up of the company data.
- Split Company Data: If you have large volume of data – more than 1 lakh transactions per year across multiple financial years, split the data.
- Split the parent company (for example P1) into two:
- Company for the current financial period where you need to continue data entry (for example, C1).
- Company for the previous financial years, for which you have closed the books of account (for example, C2).
- Migrate the data of C1 to TallyPrime Release 3.0 and continue to record your transactions as usual.
- You can consider migrating the parent company (P1) at a later stage, as per your convenience.
- Split the parent company (for example P1) into two:
- Migrate during non-working hours or over the weekends: This helps eliminate any disruptions to your business operations during the working hours as migration may slow down other applications depending on the data size.
- Close other applications if not needed at that point to optimise system resources
Recommendations during migration
If you need to record transactions during migration
Migration of the company data to TallyPrime Release 3.0 might take time. Meanwhile, you may want to continue your business operations using the backed up data. Such transactions can be easily imported to the migrated data. To know more, refer to the Import masters and transactions section.
- Avoid making changes to the existing transactions. In case you must make changes, keep a note of the changes so that you can easily identify such transactions, import them post migration and verify.
- Importing the vouchers or masters will not import the corresponding Edit Log information.
- Some of the imported vouchers might move into Uncertain transactions category, which will import the GST reports. Press Alt+G (Go To) > GSTR-1/GSTR-3B/CMP-08/GSTR-4 > Uncertain Transactions, and resolve any uncertain transactions before starting to work on the migrated company data.
- Avoid creating or altering any masters and deleting or marking any voucher as Optional in the data that you are migrating. Such changes will need to be done separately again in the latest release.
- If you have created new vouchers in the backed up company, ensure to keep a track of the voucher numbers, so that you can validate them after importing to the latest release.
During migration, you will not be able to make any changes to the data in migration, as you will not be able to open the company being migrated.
If you are using TallyPrime on AWS, click here. Using TallyPrime from your virtual computer enables you to seamlessly upgrade to the latest release of TallyPrime from the Self Service Portal. Once you have upgraded, you can migrate the company data: You may also reach out to your Partner to help you with migrating the company data. For more details, refer to Migrating company data on TallyPrime Powered by AWS. If you are accessing data in a LAN environment, click here. Technically, there is no impact on computer performance in the case that different computers in a LAN environment are accessing a common company data. Since LAN is a collection of connected computers locally, the migration performance will only be applicable for the computer in which the data is being migrated. Once migration is initialized, other Tally instances across the LAN environment will be blocked from accessing the company which is undergoing migration. If you are using TallyPrime Server, click here. We have observed that using activities like Migration and Repair take more time to complete when using TPS. Hence, instead of accessing the company and migrating the data from TPS, we recommend that you migrate the data in a local computer. You can later move the data back to TallyPrime Server for the regular day-to-day activities. Additionally, refer to the section on After Data Migration. TallyPrime ensure to take care of your business data in the best possible way after migration. To make your after migration experience smooth and simple, we recommend the following: Licensing Handle exceptions and differences in data If you data had any aberrations in the previous release, there might be some data loss. Therefore: Import transactions and masters In case you have created any data in the backed up company, during the migration process: Step 1: Identify the newly created transactions. Click here. The Day Book displays the newly added transactions based on the condition that you have entered for filtering. Similarly, you can also import the masters created in the backed up data. For more information, refer to Import Data. Step 2: Export the newly added transactions. Click here. This exports all the delta transactions as XML files. Note that depending on the filter option, you might have to export multiple XML files. Step 3: Import the transactions back to the company in TallyPrime Release 3.0. Click here. If there are any exceptions in the transactions, drill-down and resolve the data exceptions. It is recommended to import the transactions/masters before you start using the migrated data in TallyPrime Release 3.0, to ensure that the vouchers numbers are intact as expected. If you are downgrading from Release 4.0, and then need to view the saved views of your reports Migration of your company data involves a few simple steps. TallyPrime ensures that the migration is smooth without any data loss. Whether you have one company or multiple companies, you can migrate all of them as per your business needs. In TallyPrime, you can migrate a company by selecting a company from the earlier TallyPrime release or use the migrate feature from F1 (Help) or Alt+Y (Data) and select the company to migrate. If you are migrating the company data from TallyPrime Release 2.1 or earlier, TallyPrime migrates the data to a new company with a 6-digit Company Number. A copy of the company with 5-digit Company Number from the previous release is retained as is in case you need to use the data in the previous release of TallyPrime. In this section Migrating your company data from a 5-digit company will recreate the company data with a 6-digit company. At the same time, the process will retain the existing 5-digit company data. You can continue to use the company data same in their respective releases. You can also press F3 (Company) and select the company showing Migration Required status. Once you migrate to TallyPrime Release 3.0, a copy of the 5-digit company is retained and renamed to a folder. For example, if you migrate the company 10000, the company is retained as a folder and renamed to 10000-migrated-to-3.0. The new company after migration is renumbered as 010000. The company data in the latest release of TallyPrime will be available as a 6-digit company number. For your easy reference the, the company number of the source data is prefixed with a zero (0) so that you can easily identify which company was migrated. In addition, the 5-digit source company is retained in the same data location and renamed as a folder. For example, if you migrate the company National Enterprises (10000) to TallyPrime Release 3.0, the migrated company data is numbered as National Enterprises (010000), and the source company is retained but renamed as ‘10000-migrated-to-3.0’. Renaming the source company helps in identifying the the company data has already been migrated. The renaming will occur only when the source company is closed or shut in the earlier release of TallyPrime while you migrate the company data. To successfully migrate the company data and to take a backup of the data, you need to have the recommended disk space in your computer. If there is low disk space that is not sufficient either for migration or backup, TallyPrime prompts you with the corresponding information: If you still attempt to migrate or backup, TallyPrime displays the following error message: Ensure to free up the disk space in your computer and then migrate the company data. If you are migrating data from earlier versions to Release 2.1, with Edit Log enabled, the voucher numbering method is updated from Automatic to Automatic (Manual Override). For Releases before TallyPrime Rel 5.1, Click here. For voucher types with Automatic or Multi-user Auto numbering method, the option Numbering behaviour on insertion/deletion is set to Retain Original Voucher No. You can change it to Renumber Vouchers, if needed, by altering the relevant voucher types. The impact on Edit Log will depend on the version your data belonged to and the version that you are migrating to. TallyPrime 2.1 – Edit Log disabled TallyPrime 3.0 TallyPrime 2.1 – Edit Log enabled TallyPrime 3.0 TallyPrime Edit Log 3.0 TallyPrime 3.0 – Edit Log enabled or disabled TallyPrime Edit Log 3.0 or later TallyPrime Edit Log 3.0 TallyPrime 3.0 or later TallyPrime 2.0 or earlier TallyPrime 3.0 or later TallyPrime 2.0 or earlier TallyPrime Edit Log 3.0 or later If your company data is damaged or corrupt while using in the earlier release, and you want to attempt using the same data now in the latest release, TallyPrime makes it hassle-free for you. You can migrate the damaged data to the latest release where migration will first attempt to recover the damaged data and then migrates all the data successfully. However, if any data is damaged beyond recovery, TallyPrime does not migrate such data. Once migration is complete, TallyPrime displays the result of the migrated data in a summary report. Depending on the level of damage in your data, the report displays the number of vouchers and masters before and after migration. If you are on TallyPrime Release 2.1 and migrating your Company Data from any of the earlier TallyPrime releases, click here. After migration is complete, your company data is ready to be used in TallyPrime. If there are any issues in the company data, it is recommended that you repair the data before migrating. Once you have migrated the company data to Release 3.0 or later, TallyPrime displays the statistics of the voucher and master count before and after migration. This enables you verify the results of migration and take necessary actions on your data, if any, before you start using it. If you have migrated data that was already corrupt in your previous release, any damaged data that could not be recovered is not considered for migration and therefore not included in the summary report post migration. Once the migration is complete, you will see the following details on the migration summary screen. If you are using Release 2.1 or earlier, you will not see any summary report. On successful migration, you can continue to use the migrated data as usual. If migration gets completed with exceptions in data, you will need to repair your company data in the earlier release and migrate again. In this section On successful migration, the following Statistics report is displayed and your company data is ready for use. During migration, if TallyPrime identifies any exception in your data, on completion of migration the following screen appears: You can resolve the exceptions easily. In the Summary screen, press Alt+X (Repair/Migrate Exception). Refer to the Data Exceptions & Resolutions topic for more information. TallyPrime ensures that all your data is migrated safely to the latest release. However, depending on your data and settings for your company and transactions, you may encounter certain exceptions and mismatches. In this section While migrating the data, any data (vouchers and masters) that is found to have an exception is moved into an exception report. TallyPrime allows you to view all those exceptions and resolve them, as appropriate. In case you have closed the Summary report after migration, you can still open the report. For more information, refer to the Data Exceptions & Resolutions topic. If you are on the TallyPrime 2.1 or earlier, this is not applicable. You may experience a successful migration where the Summary report displays equal count of masters and vouchers post migration. However, the Statistics report might display a different count of masters and vouchers compared with the post-migration Summary report. After migration, you may notice that that details entered in certain vouchers or masters before migration are different after migration. You may observe the following mismatches: Solution In all the above-mentioned cases, you can do the following: Additionally, a mismatch may occur when TallyPrime displays any Inventory/Accounting allocations in a voucher in the migrated data. In this case: The latest release of TallyPrime can detect if your data is from earlier releases (such as Tally 9 to Tally.ERP 9), and guide you in the migration process. All your transactions, along with your company features, masters, security settings, and so on, will be carried forward seamlessly. Migrating the Tally 5.4, 6.3, and 7.2 data to the latest TallyPrime release is a 2-step process. In this section If you are using older releases of Tally (such as 5.4, 6.3, and 7.2), you cannot migrate your data directly to TallyPrime. You will have to first migrate your data to Tally.ERP 9, and then migrate to TallyPrime. To migrate data from releases below Tally.ERP 9, you need the migration tool tally72migration.exe that is available in Tally.ERP 9 installation folder. Before migrating data, it is recommended that you backup your data. The migrated company number is prefixed with an additional 0 and appears in five digits. When you open the data in the latest release, you will be will prompted to migrate to Release 6.x. Press Enter to migrate. Once you have migrated your company data to Tally.ERP 9, now migrating from Tally.ERP 9 to the latest release of TallyPrime is seamless. Refer to Migrate Company Data to the Latest Release of TallyPrime. Migrating your company data to the latest release of TallyPrime provides you the flexibility to use the latest features seamlessly. Migration helps in making your old data compatible with the latest release, so that you can continue to work on your data without any hassles. For more information on the Release Highlights and Feature enhancements, refer to Release Notes for TallyPrime Release 3.0.
Recommendations after data migration
Have a hassle-free experience of using the latest TallyPrime Release 3.0 with your existing license.
In case there is any difference, repair the data in the latest release to validate if any data was lost due to data corruption.
Repair your 5-digit company data prior to migration and ensure that such inconsistencies do not exist.
In case any of your data is under exceptions, refer to Data Exceptions in TallyPrime.
If there are any uncertain transactions, update them with the appropriate details.Downgrade from TallyPrime. 4.0 to TallyPrime 3.0.1 through to TallyPrime 2.0
Migrate Company Data to the Latest Release of TallyPrime
Migrate data to the latest TallyPrime release
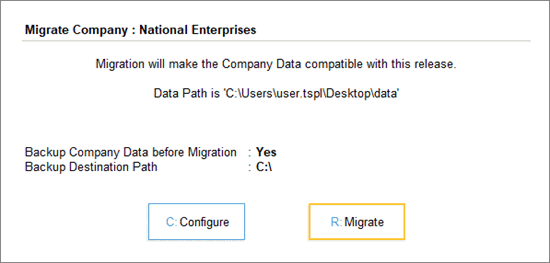
Alternatively, press Alt+Y (Data) > Migrate > select a company.
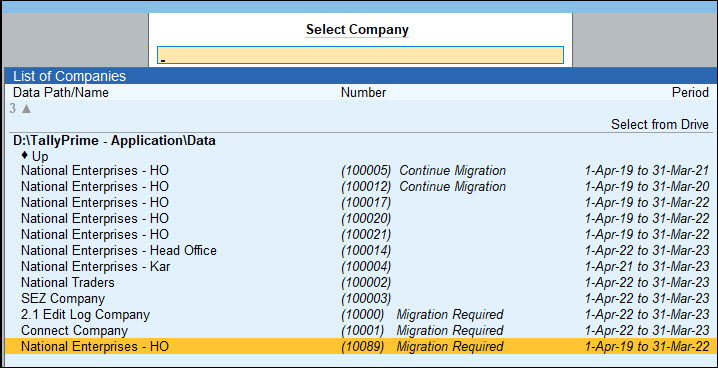
It is recommended to backup the company before you migrate.
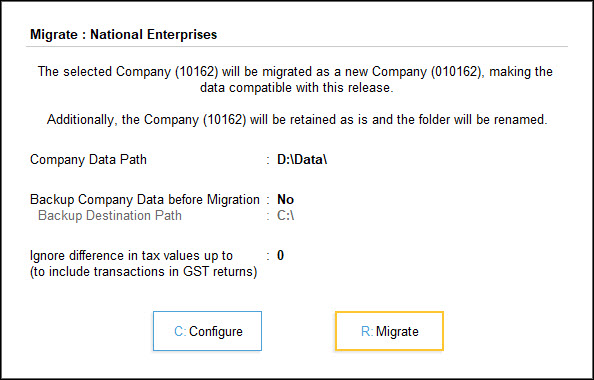
This is a one-time change while migrating from Release 2.1 to Release 3.0 and later. Retaining this field as is during migration might move your transaction into Uncertain category in your Returns. After migration, you can set the difference in tax value value from F11 (Company Features). This configuration is applicable only if you had:
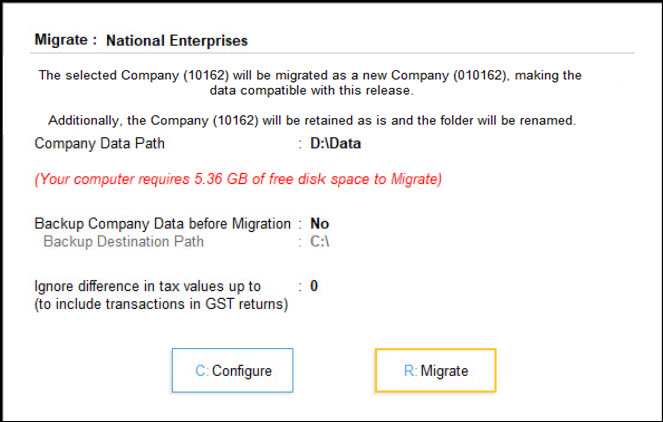
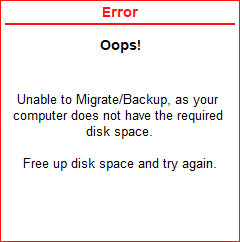
Migration may take a while, according to the size of your company data. Low disk space during migration and backup
Outcome of migration – Statistics & Company Data
If you are migrating data from the earlier versions to Release 2.1, there is no change in the Company Number.
From TallyPrime Release 5.1, you can choose the voucher numbering method in the Migrate Company Data screen during migration.
The Migrate Configuration screen appears.
From TallyPrime Release 5.1, you can choose to create HSN/SAC Summary in the Migrate Company Data screen during migration.
The Migrate Configuration screen appears.
Impact of migration on Edit Log
Migrate from…
Migrate to…
Impact on Edit Log
TallyPrime Edit Log 2.1
Migrate damaged data from an earlier release to the latest TallyPrime release
If you are on Release 2.1 or earlier, this is not applicable. In this case, after a successful migration, TallyPrime directly opens the company.

Alternatively, you can also migrate your data from by pressing F1 (Help) > Troubleshooting > Migrate.Statistics of Company Data after Migration | Summary of Migrated Data
View Statistics post migration
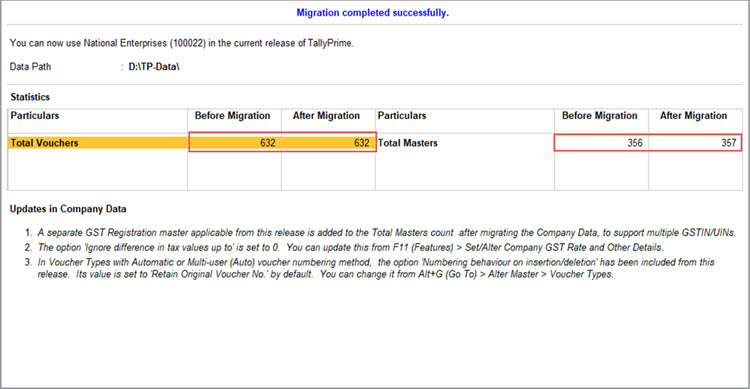
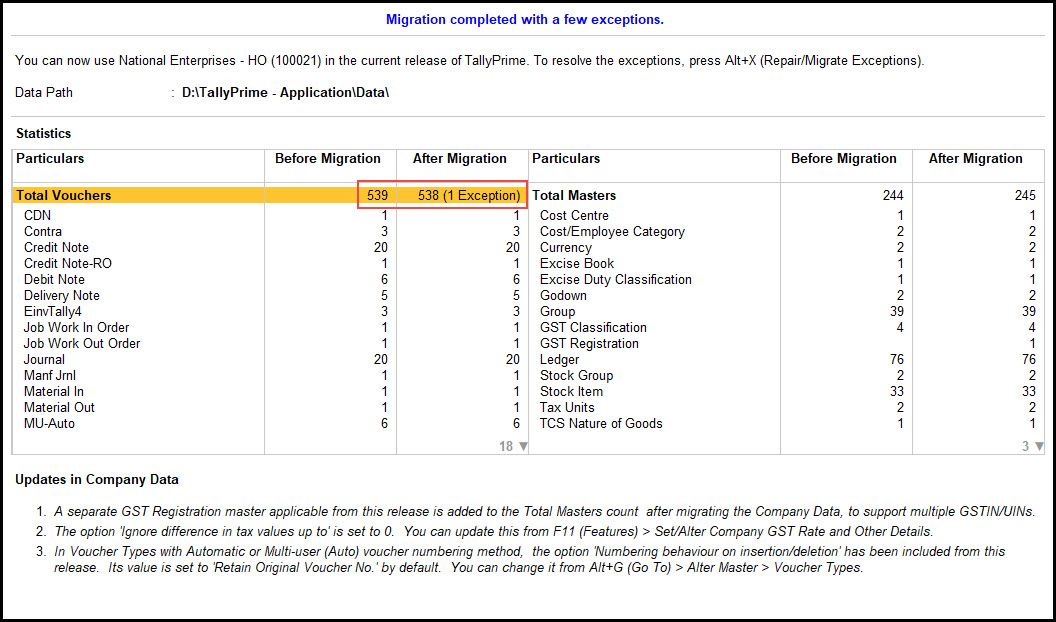
Press Alt+F5 to view the Statistics in detailed format.
Press Alt+F5 to view the Statistics in condensed format.Data exceptions found during migration
Vouchers and masters with exceptions
The Migrate/Repair Exceptions report appears.
Alternatively, Alt+Y (Data) > All Exceptions > Migrate/Repair Exceptions.
The Migrate/Repair Exceptions report appears. Mismatch in count of masters and vouchers
It is possible that you are not able to open them or the data is damaged.Mismatch in voucher and master details before and after migration
Causes of mismatch
Migrate Company Data from Tally 5.4, 6.3 and 7.2 to TallyPrime
Step 1: Migrate from Tally 5.4, 6.3 and 7.2 to Tally.ERP 9

On successful migration, the message Migration Completed, Check Statistics appears. Compare the statistics and ensure that data migration is complete.
Step 2: Migrate from Tally.ERP 9 to the Latest TallyPrime Release

