
Record and Track Post-Dated Cheques
With the post-dated cheque management feature, you can:
- Manage all the receivables/payables considering the impact of receipt/issue of post-dated cheques.
- Eliminate the need for additional transactions at the time of realisation.
- Avoid delay in revenue realisation by presenting the PDCs on time.
- Record such entries under Notional Bank, which works as a suspense account.
Record Post-Dated Voucher with Cheque Details
![]()
- Press Alt+G (Go To) > Create Voucher > press F5 (Payment).
Alternatively, Gateway of Tally > Vouchers > press F5 (Payment). - Press F2 (Date) to change the Voucher Date and update the date as mentioned in the post-dated cheque.
- In the Payment Voucher screen, press Ctrl+T (Post-Dated).
The voucher will be marked with the status as Post-Dated as shown below:

- Select a bank ledger in the Account field.
- Under Particulars, select the party ledger to whom the post-dated cheque has been issued.
- Provide the Amount and Bill-wise Details for the payment.
The Bank Allocations screen appears.
The fields PDC issue date and PDC note will be available on the screen. These fields are available for post-dated transactions only and to mention the post-dated notes. - Fill in the date on which the post-dated cheque was issued to the party and fill in the PDC note.
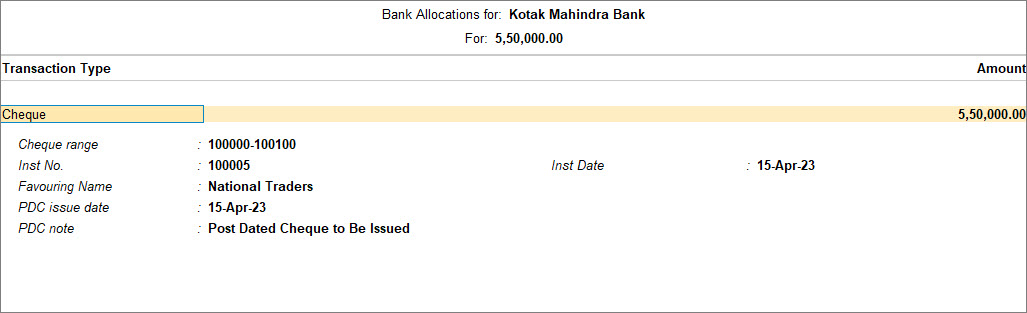
- As always, press Ctrl+A to save the Bank Allocations screen details.
- Accept the voucher. As always, you can press Ctrl+A to save.
You can also record Receipt and Contra entries for post-dated cheques.
The transaction affects the books on the post-dated cheque date. You can:
- Use the Post-Dated Summary report for a comprehensive summary.
- Include post-dated transactions in the accounting reports like:
- Ledger Vouchers
- Group Summary
- Ledger Outstandings
View current and final balances of a party ledger
While recording the post-dated transaction, you can configure the Payment Voucher to view the balances of party ledgers. This option will help you to view the final balance of each bill that is due and also the final party ledger balance.
![]()
- In the Payment Voucher, press F12 (Configure).
- Show Final Balances for each Bill: Yes.
This displays the amount that remains due, if any post allocation, in the Bill-wise Details screen. - Show Final Ledger Balance: Yes.
This displays the party ledger’s balance after including the post-dated transactions for the party ledger, in the Payment Voucher.
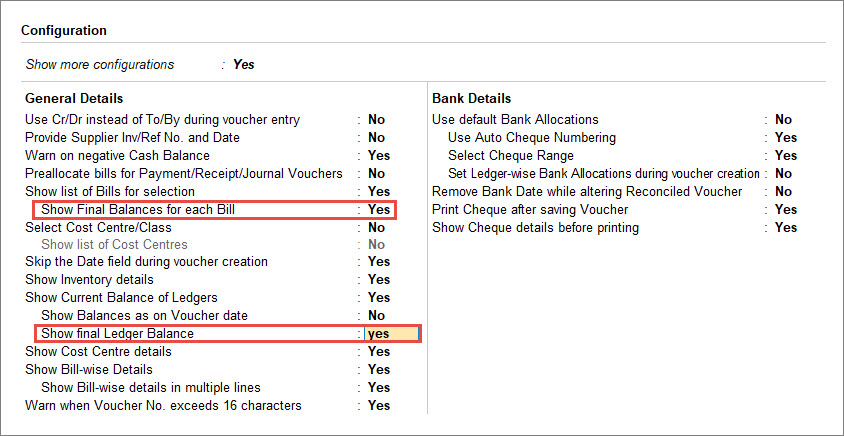
- Press Ctrl+A to save the screen.
You can view the current balances of the party ledgers in the vouchers.
View ledger balance including post-dated transaction
After recording the post-dated transactions, you can observe the final balance of ledgers, which incorporates the post-dated transactions, enabling you to determine the projected balance of your ledger.
![]()
- Press Alt+G (Go To) > type or select Ledger Voucher > and press Enter.
Alternatively, Gateway of Tally > Display More Reports > Accounts Book > Ledger. - Select Party A/c (it displays the Party A/c balance based on the Date of Last Entry).
- Press Alt+F8 (Incl Post-dated) to see the final balance of the ledger.
The balances including post-dated cheque transactions.
View Post-dated Transactions Report
The Post-dated Transactions report helps you:
- View vouchers with post-dated cheques.
- Alter the details in the vouchers.
- Know the number of post-dated cheques received and issued each month.
In this section
- Post-dated transactions monthly summary
- Post-dated transactions report
- View post-dated cheques issued
- View post-dated cheques received
Post-dated transactions monthly summary
![]()
- Press Alt+G (Go To) > type or select Post-Dated Summary > and press Enter.
Alternatively, Gateway of Tally > Banking > Post-Dated Summary > and press Enter. - Select the required bank from the List of Banks.
The Post-Dated Transactions Monthly Summary report appears as shown below:
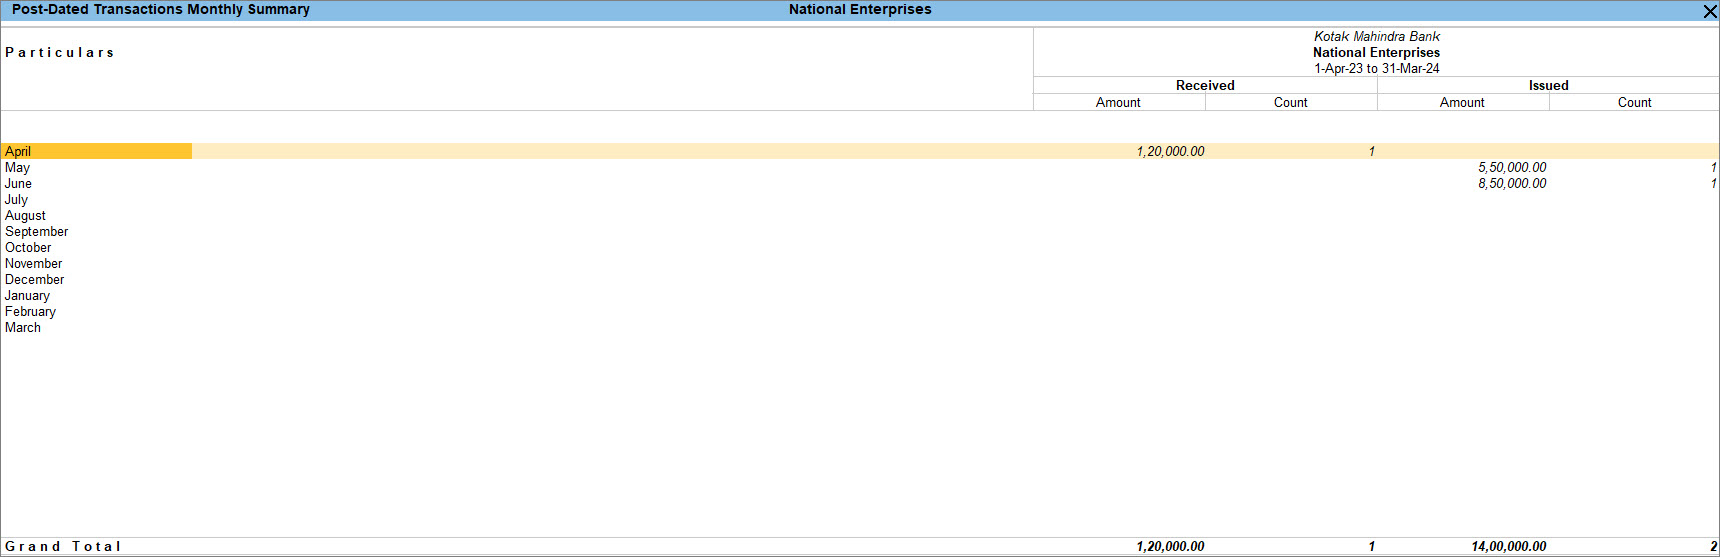
The report displays the below columns:
- Particulars: The list of months for the given financial year.
- Received and Issued:
- Amount: Total value of the post-dated cheques received.
- Count: Total number of post-dated cheques received.
View post-dated transactions
![]()

The report displays information as follows:
- Date: Voucher date of the post-dated transaction.
- Type: Cheque issued or received.
- Bank: Bank ledger in the transaction.
- Particulars: Party ledger in the transaction.
- Instrument no.: Instrument number entered in the Bank Allocations screen.
- Instrument Date: Cheque date entered as Instrument date in the Bank Allocations screen.
- Status: Three types of cheque status –
- Pending: Post-dated transaction.
- Unlinked: Transaction with Notional Bank.
- Regularized: The status Pending or Unlinked changes to Regularized when:
- The post-dated cheque date is equal to or more than the Date of Last Entry on the Gateway of Tally.
- Notional Bank transaction is moved to a regular bank.
- Amount: Value on the cheque issued/received.
You can also customise the report to view it as per your requirements.
- F4 (Ledger): Switch to other ledgers.
- Ctrl+F4 (Bank): Switch to another Bank from this option.
- F8 (Show All): View all the transactions/Pending line items, as needed.
- Ctrl+H (Change View): View the Related Reports such as Post-dated Issued and Post-dated Received.
- Ctrl+J (Exception Reports): View Optional Vouchers.
- Alt+B (Alter Bank): Move the transaction to the other Bank.
- Alt+H (Alter Date): Alter the voucher date.
- Alt+Q (Quick Search): Search the details of any cheque from the List of Transactions.
- Alt+R (Enter Note): Alter the note mentioned for PDC.
You can further configure your report from F12 (Configure).
- Show Favouring Name/Received From: Displays the name to whom the cheque is issued or from whom the cheque is received.
- Show Issue/Receipt Date: Displays the Issue or Receipt Date of the post-dated cheque.
- Show Notes for Post-dated Cheques: Displays the note mentioned in the Bank Allocations screen.
You can include or exclude post-dated transactions in other reports such as:
- Cash Flow Statement
- Funds Flow Statement
- Ledger Vouchers
- Group Summary
- Ledger Outstandings
View Post-dated Issued Report
![]()
- Press Alt+G (Go To) > type or select Post-Dated Summary > and press Enter.
Alternatively, Gateway of Tally > Banking > Post-Dated Summary > and press Enter. - Select the required Bank from the List of Banks, and press Enter.
- Place the cursor on the Amount and Count values displayed under the Issued column, and press Enter.
The Post-Dated Issued report appears, as shown:
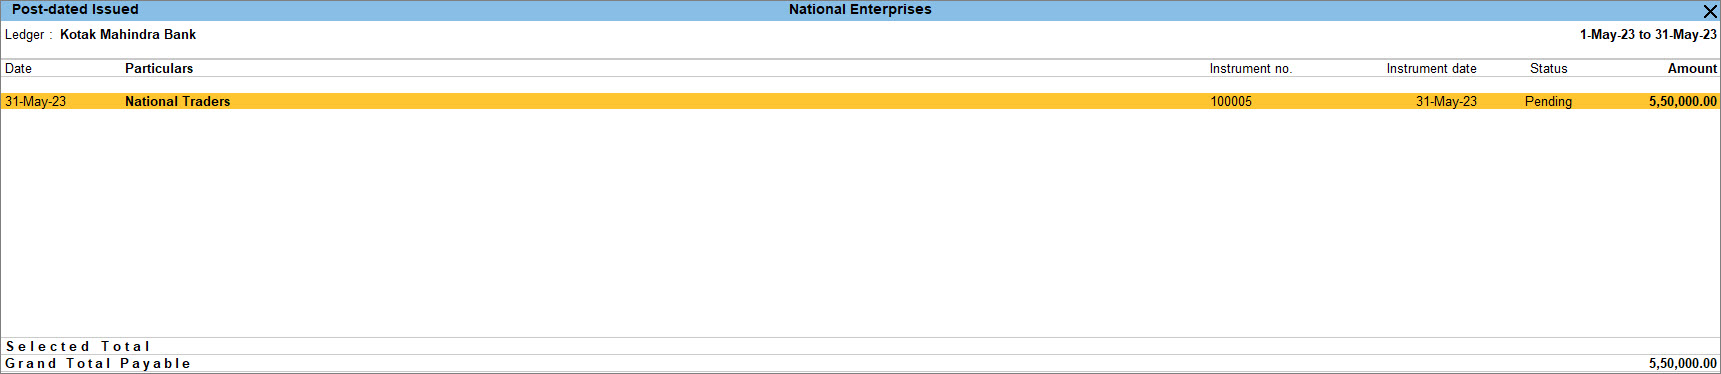
You can also customise the report to view it as per your requirements.
- F4 (Ledger): Switch to other ledgers.
- Ctrl+F4 (Bank): Switch to another Bank from this option.
- F8 (Show All): View all the transactions/Pending line items, as needed.
- Ctrl+H (Change View): View the Related Reports such as Post-Dated Issued and Post-Dated Received.
- Ctrl+J (Exception Reports): View Optional Vouchers.
- Alt+B (Alter Bank): Move the transaction to the other Bank.
- Alt+H (Alter Date): Alter the voucher date.
- Alt+Q (Quick Search): Search the details of any cheque from the List of Transactions.
- Alt+R (Enter Note): Alter the note mentioned for PDC.
- Alt+J (Create Voucher): Go to the Payment Voucher screen from this report.
You can further configure your report from F12 (Configure).
View Post-Dated Received Report
![]()
- Press Alt+G (Go To) > type or select Post-Dated Summary > and press Enter.
Alternatively, Gateway of Tally > Banking > Post-Dated Summary > and press Enter. - Select the required Bank from the List of Banks, and press Enter.
- Place the cursor on the Amount and Count values displayed under the Received column, and press Enter.
The Post-Dated Received report appears, as shown below:
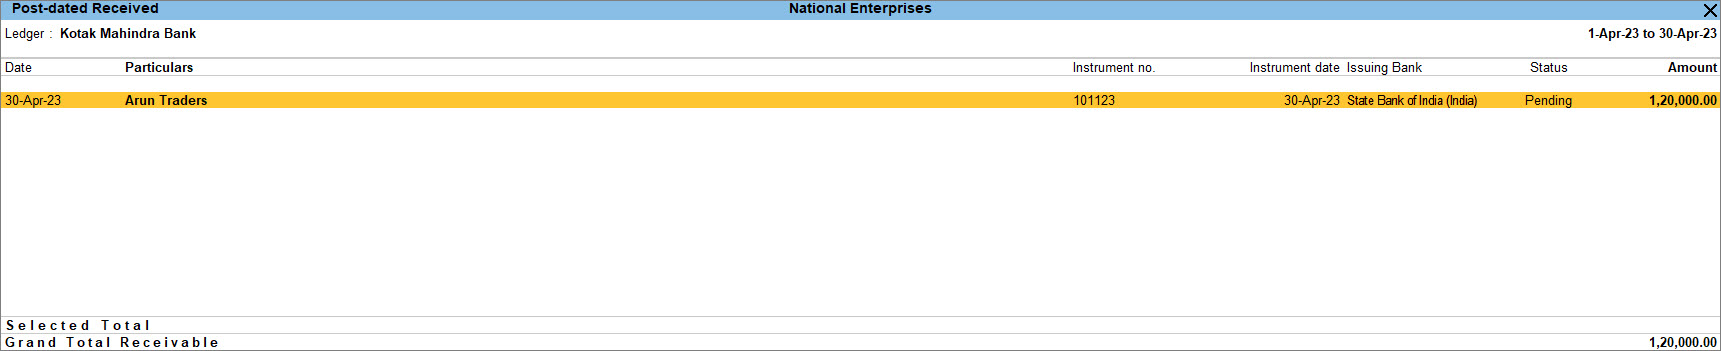
You can also customise the report to view it as per your requirements.
- F4 (Ledger): Switch to other ledgers.
- Ctrl+F4 (Bank): Switch to another Bank from this option.
- F8 (Show All): View all the transactions/Pending line items, as needed.
- Ctrl+H (Change View): View the Related Reports such as Post-Dated Issued and Post-Dated Received.
- Ctrl+J (Exception Reports): View Optional Vouchers.
- Alt+B (Alter Bank): Move the transaction to the other Bank.
- Alt+H (Alter Date): Alter the voucher date.
- Alt+Q (Quick Search): Search the details of any cheque from the List of Transactions.
- Alt+R (Enter Note): Alter the note mentioned for PDC.
- Alt+J (Create Voucher): Go to the Receipt Voucher screen from this report.
You can further configure your report from F12 (Configure).
Record Receipts with Notional Bank Account
You can use Notional Bank – a suspense account, when not sure about the bank in which you want to deposit the cheque or money.
Configure bank ledger as Notional Bank account
![]()
- Enable Notional Bank for all bank ledgers.
- In the Ledger Creation/Alteration screen for Bank Ledger, press F12 (Configure).
- Enable Set Bank Ledgers as Notional Bank Ledgers (for Post-Dated Vouchers).
- Press Ctrl+A to accept the screen.
- Under Bank Configuration, Use as Notional Bank for Post-Dated Vouchers to Yes.
If you need to use this option only for the current bank ledger, press Ctrl+I (More Details) > type or select Notional Bank and press Enter > set the option Use as Notional Bank for Post-Dated Vouchers to Yes.
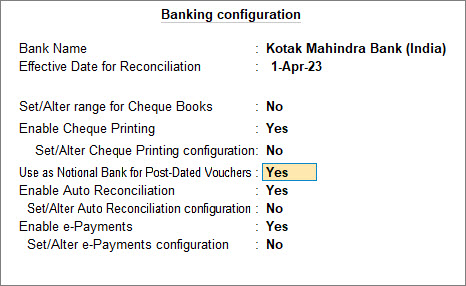
- As always, press Ctrl+A to accept the screen.
Record post-dated cheque transactions with Notional Bank account
![]()
- Press Alt+G (Go To) > Create Voucher > press F6 (Receipt).
Alternatively, Gateway of Tally > Vouchers > press F6 (Receipt). - Press F2 (Date) to change the Voucher Date and update the date as mentioned in the post-dated cheque.
- Mark the voucher as Post-dated by Ctrl+T (Post-Dated) as shown below:

- Select Notional Bank Ledger in the Account field.
- Under Particulars, select the party ledger from whom the post-dated cheque was received.
- Provide the Amount and Bill-wise Details for the payment.
The Bank Allocations screen appears.
The fields PDC receipt date and PDC note will be available on the screen. These fields are available for post-dated transactions only and to mention the post-dated notes.
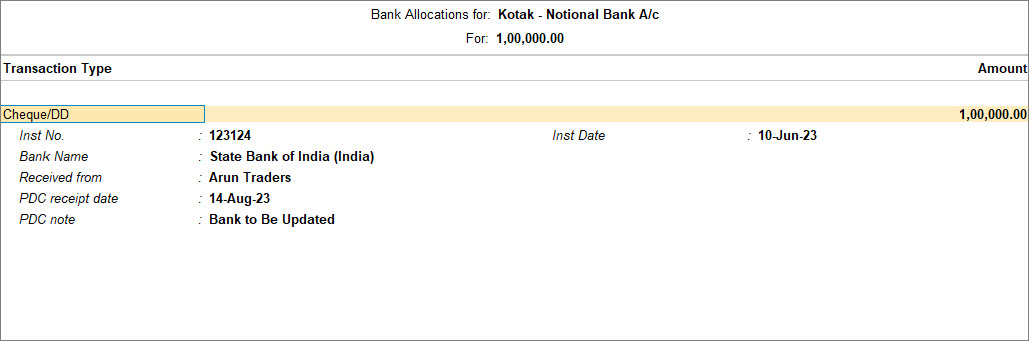
- Accept the screen. Press Ctrl+A to save the receipt voucher.
Transfer Notional Bank transactions to regular bank
![]()
- Press Alt+G (Go To) > type or select Post-Dated Summary > and press Enter.
Alternatively, Gateway of Tally > Banking > Post-Dated Summary > and press Enter. - Select the required bank from the List of Banks.
The Post-Dated Transactions Monthly Summary report appears. - Press Enter from any month to view the Post-Dated Transactions.
- Select the transaction and press Alt+B (Alter Bank) as shown below:
The New Bank Name screen appears.
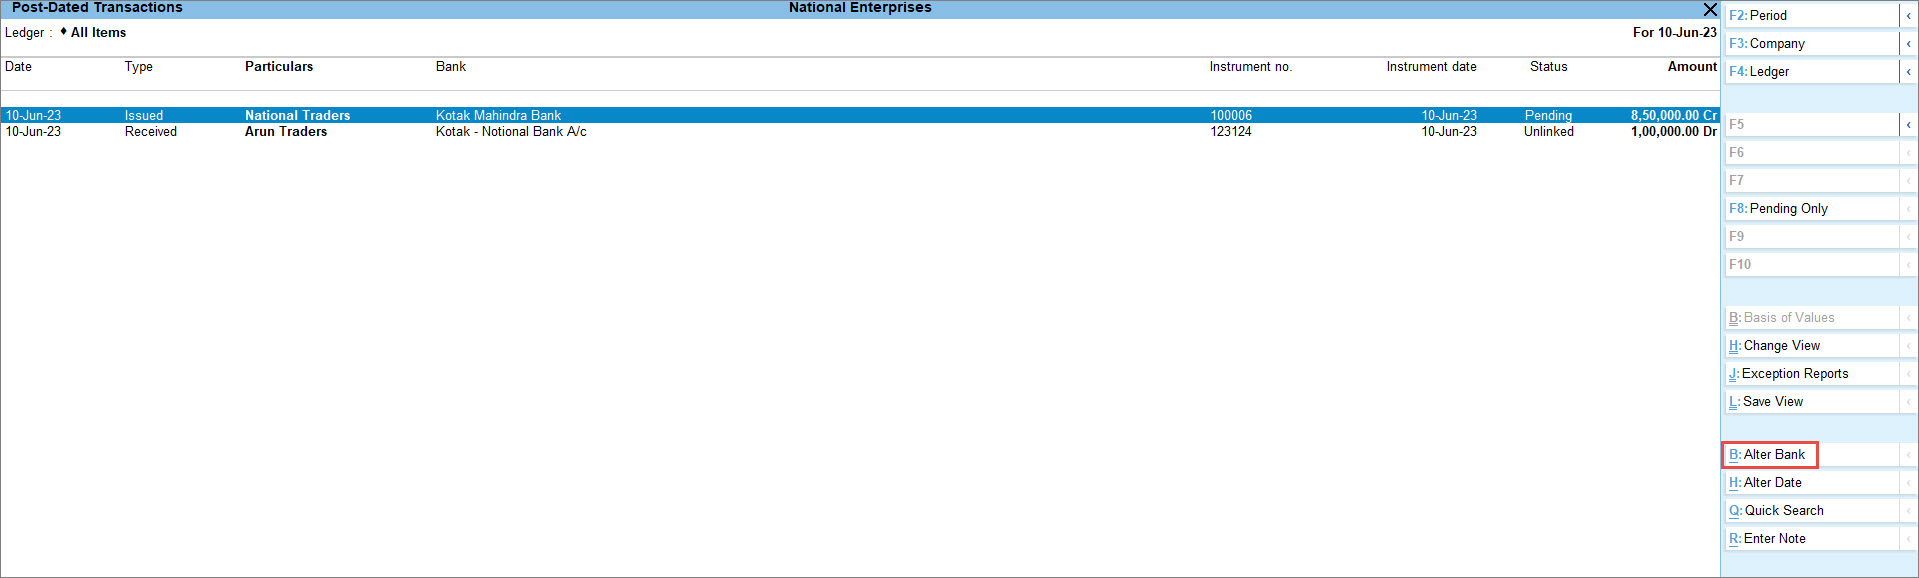
- Select the regular bank from the list of banks and press Enter.
- Press Ctrl+A to accept the screen.
For a specific date, view the PDC report from Day Book:
- Press Ctrl+H (Change View) > Post-Dated Transactions.

The cheque status gets displayed as
- Pending: Post-dated transaction.
- Unlinked: Transaction with Notional Bank.
- Regularized: The status Pending or Unlinked changes to Regularized when:
- The post-dated cheque date is equal to or more than the Date of Last Entry on the Gateway of Tally.
- Notional Bank transaction is moved to a regular bank.


