
Set Up TallyPrime for Payments and Receipts Through Bank
A one-time setup in TallyPrime helps you record payments and receipts through a bank. TallyPrime provides you with the facility to have all your and your parties’ bank accounts, as a part of your Company data. This allows you to record payments and receipts through Bank along with the necessary bank details, such as account number and mode of transaction like cheque, DD, or e-Payments, as needed.
If you are using the Connected Banking feature in TallyPrime, then you will need a quick setup to log in to Connected Banking and connect your bank accounts to TallyPrime.
Maintain Your Bank Account Details | Create/Alter Bank Ledgers
While you can update the bank details during ledger creation, you can alter the ledger any time in case any updates are required.
![]()
- Create the Bank Ledger.
- Press Alt+G (Go To) > Create Master > type or select Ledger > and press Enter.
Alternatively, Gateway of Tally > Create > type or select Ledger > and press Enter. - Enter the Name of the bank for the bank ledger.
- Select Bank Accounts from the List of Groups, in the Under if you are creating the Bank Ledger for Savings/Current account.
- Press Alt+G (Go To) > Create Master > type or select Ledger > and press Enter.
- Update Bank Account Details.
- A/c Holder’s Name: It prefills the company name; however, you can alter this name by pressing Backspace.
- A/c No.: Provide the account number of your bank.
- IFS Code: Provide the IFS code for your bank.
An IFS code follows a unique format prescribed by each bank. Therefore, you will need to enter the code in that specific format. If not, you will be prompted with a warning message, with the correct format of the code. - SWIFT Code: Applicable for international bank payments.
- Bank Name: Select the bank name from the List of Banks.
The List of Banks is displayed only when TSS and internet connectivity are available. Additionally, the bank configurations depend on the bank you select.
- Branch: Provide the Branch name of the bank.
- BSR Code: Provide the BSR code for your bank.
BSR code is applicable for bank transactions related to TDS. Therefore, you will see this option only if you have enabled TDS for your company in Company Features.
- Client Code: This is a unique code given by the bank to their customer as an identifier.
Client Code will be displayed only when Bank Name is selected as Kotak Mahindra Bank (India), Bank of Baroda (India) or Yes Bank and its a mandatory field in payment instruction file.
In case of Yes Bank this is mandatory field in payment instruction file in Delimited (|) format.
- Update Bank Configuration if you want to change the configuration for cheque printing. To know more, click here.
- Set/Alter Bank configuration: Yes.
If you are using TallyPrime Release 5.1 or earlier, then this step is not required. - Set/Alter range for Cheque Books: If you want to set the range for chequebooks for one or more cheque books you can enable this option.
- Enable Cheque Printing: You can print the cheques issued for the payment to your party once you enable this option.
- Set/Alter Cheque Printing configuration: This option once enabled allows you to configure the cheque format depending on which bank the cheques belong to.
- Set/Alter Bank configuration: Yes.
- Provide other details as required.

- Accept the ledger screen. As always, press Ctrl+A to save.
After you create the Bank ledger, you can record the bank transactions. You can further configure the Bank Ledger to include more options if required.
Configure Bank Ledgers for Business Needs
A Bank ledger has a variety of configurations that help you handle your business scenarios.
To know about the scenarios, refer to Setting Up Ledgers for Banking in TallyPrime.
Tracking of payments and receipts from various cost centres
While making a payment, you can allocate amounts to specific cost centres for tracking. Enable the Cost Centre feature and configure the Bank Ledger to enable Cost Centres, if not already done.
- Enable the Cost Centre feature.
- Press F11 (Features) > set Enable Cost Centres to Yes.
- Enable Cost Centres for Ledger.
- In the Ledger Creation/Alteration screen for Bank Ledger, press F12 (Configure).
- Enable Apply Cost Centres for Ledgers.
- Press Ctrl+A to accept the configuration.
- As always, press Ctrl+A to accept the screen.
If you need to apply a cost centre for one specific ledger, press Ctrl+I (More Details) > set Cost centre applicability to Yes.
After you enable the cost centre feature for your bank ledger, you can allocate the payments and receipts to the respective cost centres and track them.
Configure Bank Reconciliation
TallyPrime provides a wide range of configurations for reconciliation, be it opening BRS or reconciliation using the imported bank statement.
Set Reconciliation Beginning date
In the Ledger Creation/Alteration screen, you can specify a date from which you want to start reconciling your transactions.
- Set/Alter Bank configuration: Yes.
- Reconciliation Beginning date: Enter the date.
Reconciliation will be applicable from the date specified here.
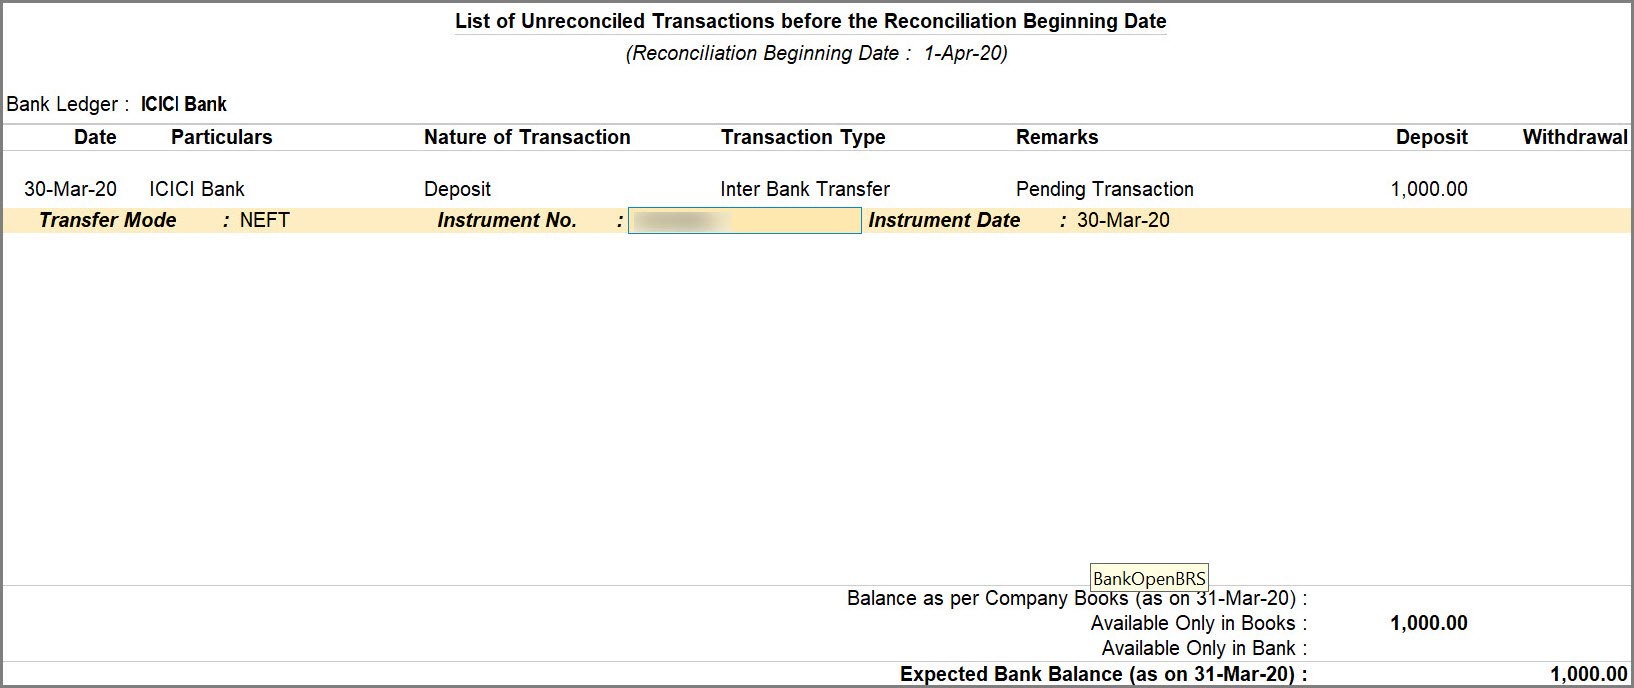
Set/Alter Opening BRS
In the Ledger Creation/Alteration screen, you can view transactions that are a part of your opening BRS. Moreover, while altering a ledger, you can add a transaction to the opening BRS, or even alter a transaction that is a part of the opening BRS.
- Set/Alter Bank configuration: Yes.
- Set/Alter Opening BRS: Yes.
This option is available only during ledger alteration. - Press Alt+L (Update Opening BRS).
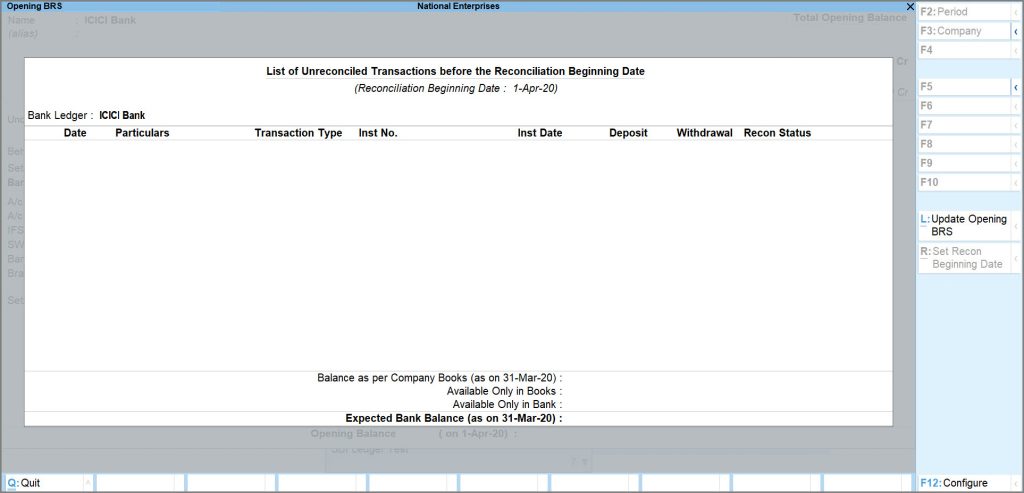
- Enter the details of the transaction.
- Date: Enter the date of transaction.
This date should be before the Reconciliation Beginning date. - Particulars: Enter the ledger name.
- Nature of Transaction: Select Deposit or Withdrawal, as applicable.
- Transaction Type: Select from the list of transaction types.
- Remarks: Enter the remark, if needed.
- Deposit/Withdrawal: Enter the Amount.
- Instrument No.: Enter the Instrument No., as applicable.
- Instrument Date: By default, this is prefilled, based on the entered Date.
- Date: Enter the date of transaction.
- Press Ctrl+A to save the configuration.
Auto-reconciliation of transactions
If you create vouchers from bank statement, then you can specify the default voucher types and voucher numbering series for deposits and withdrawals.
What’s more, you can choose to find exact matches to your book transaction at the time of importing the statement and even saving the voucher.
You can do so in the Ledger Creation/Alteration screen.
- Set/Alter Bank configuration: Yes.
- In the Bank Configuration screen, set/Alter Auto Reconciliation configuration: Yes.
- Deposits: Receipt.
- Withdrawals: Payment.
- Voucher numbering series: Specify the voucher number series that should be used for recording payment transactions, if needed.
To know more, refer to Voucher Numbering. - Use a different Voucher Type for Interbank/Cash transactions: Yes, if you want to use the Contra or Journal voucher type for such transactions.
- Interbank/Cash Transactions: Contra or Journal as applicable.
- Identify Exact Matches for Reconciliation:
- While Importing statement: Yes.
TallyPrime identifies a voucher in the Books, which exactly matches the transaction in the Bank Statement, at the time of import. - While Importing statement as well as Saving Voucher: Yes.
TallyPrime also identifies a transaction in the bank statement that exactly matches the voucher when you save it.
- While Importing statement: Yes.
- Automatically Reconcile Exact Matches found: Yes.

Henceforth, if there are any exact matches found while importing statements and saving vouchers, then they will get automatically reconciled with the transactions available in the books. - Press Ctrl+A to save the configuration.
Configurations for e-Payments
In the Ledger Creation/Alteration screen, you can easily set up e-Payments for selected banks. Moreover, you can configure the amounts for e-Fund transfer. Note that e-Payments can only be set up for selected banks. Moreover, you can configure amounts for e-Fund transfer.
Configure Transfer Mode details for e-Fund transfer
- Set/Alter Bank configuration: Yes.
- In the Bank Configuration screen, set/Alter Transfer Mode details for e-Fund Transfer: Yes
- Enter the From and To amounts against each mode.
Based on the entered amounts, the transfer mode will get applicable when you record e-Payments. - Preferred Mode: Select the preferred transfer mode.
This option is useful in case of overlap in the From and To amounts entered against the transfer modes.
So, when more than one transfer modes are applicable to a specific amount, then the preferred transfer mode gets selected.
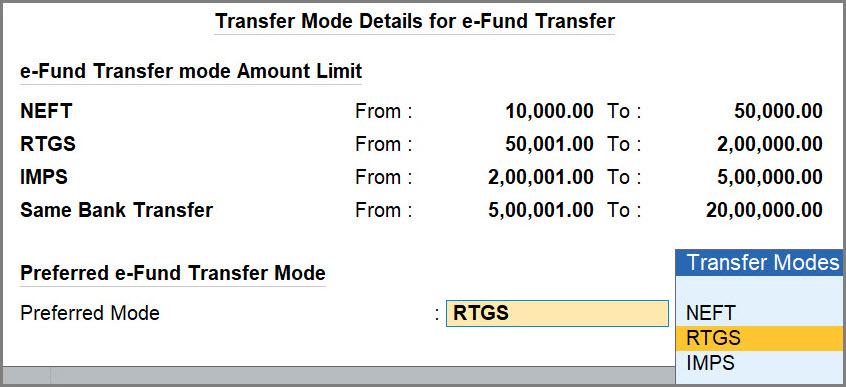
- Press Ctrl+A to save the configuration.
Bank-specific configurations for e-Payments
In the Ledger Creation/Alteration screen, you can set e-Payments configuration for specific banks. These configurations are based on the payment instructions required by the bank to process e-Payments.
- Set/Alter Bank configuration: Yes.
- In the Bank Configuration screen, Enable e-Payments: Yes
The configurations are applicable based on the bank that you select under Bank Name.
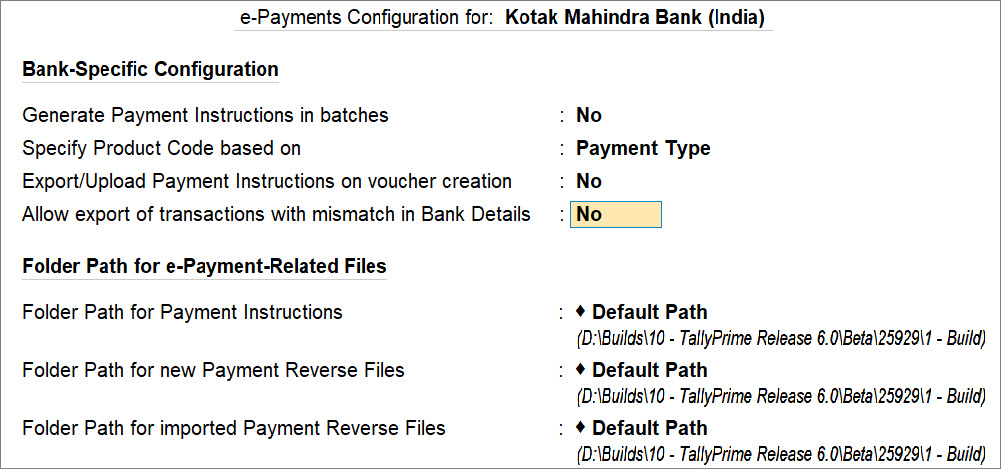
- Update the configuration, as required.
- Export/Upload Payment Instructions on voucher creation: Yes.
You will be able to export the Payment Instructions when you save the voucher. - Allow export of transactions with mismatch in Bank Details: Yes.
Even if there is a mismatch in the Bank Details such as Account No. and IFSC compared to details in the master, you will be able to export the Payment Instruction. - Update other configurations, based on the bank, as needed.
- Export/Upload Payment Instructions on voucher creation: Yes.
- Press Ctrl+A to save.
Record Receipts with uncertain bank details | Notional Bank
Notional Bank has the same features as a normal bank account. You can create a Notional bank when you are unable to decide the bank in which the post-dated cheques are to be deposited. Later you can manually convert the post-dated cheques received to regular receipts and move to regular banks.
To know more, refer to Receipts with uncertain bank details.
If you’re using TallyPrime Release 5.1 or earlier versions, then click here
Configure Bank Ledgers
When you make payments through cheques or online payments irrespective of the payment mode, you can configure your Bank ledger for both cheques and e-payments. However, you can also choose to create separate Bank ledgers based on the payment mode if you wish to maintain the bank ledger separately for easy tracking. To perform the reconciliation of your Bank statements, you can configure your Bank ledger accordingly and provide the effective date of the reconciliation. E-payments and Bank reconciliation are only available for those banks that TallyPrime supports.
If you are not sure where to deposit your post-dated cheques, you can create bank ledgers as Notional Bank and record the initial entry in the Notional Bank ledger. Later once you are sure where to deposit your cheque you can record the entry to the respective bank account. Apart from these, you can configure your bank ledger to apply cost centres and allocate all the expenses to the respective cost centres and you can view the same in the report.
You can perform all these configurations while creating the Bank ledger. You can also alter the ledger later and configure your ledger as per your business needs.
In this section:
- Configure bank ledgers for Cost Centres
- Configure bank ledgers for Auto Reconciliation
- Configure bank ledgers for e-Payments
- Configure bank ledgers as Notional Bank
Configure bank ledgers for Cost Centres
While making the payment, you may want to allocate the amount to specific cost centres for tracking the payments and receipts. In such a case, you can enable the Cost Centre feature for your company and configure the Bank Ledger to apply Cost Centres if it is not enabled earlier.
![]()
- Enable the Cost Centre feature if not already enabled.
- Press F11 (Features) > set Enable Cost Centres to Yes.
- Enable Cost Centres for Ledger.
- In the Ledger Creation/Alteration screen for Bank Ledger, press F12 (Configure).
- Enable Apply Cost Centres for Ledgers.
- Press Ctrl+A to accept the screen.
- As always, press Ctrl+A to accept the screen.
If you need to apply a cost centre for one specific ledger, you can apply a cost centre through Ctrl+I (More Details) > set Cost centre applicability to Yes.
After you enable the cost centre feature for your bank ledger, you can allocate the payments and receipts to respective cost centres and track the same.
Configure bank ledgers for Auto Reconciliation
You can configure your bank ledgers with auto reconciliation to perform your bank reconciliation without any error and hassle. This requires you to download the bank statement and import the same to perform the reconciliation.
To know more, refer to Configure bank ledger to perform auto reconciliation.
Configure bank ledgers for e-Payments
If you are making payments to parties through an e-fund transfer then in TallyPrime you can configure the Bank Ledger with e-Payments. You can configure your Bank ledger for e-payments only for selected banks. The options that you can configure will also depend on the bank in which you have enabled the e-Payments facility. You can also activate a bulk upload/payment facility, for which you need to reach out to your Bank Relationship Manager. In TallyPrime, you can view the contact details.
To know more, refer to Configure bank ledger for e-Payments.
Configure bank ledgers as Notional Bank
Notional Bank has the same features as a normal bank account. You can create a Notional bank when you are unable to decide the bank in which the post-dated cheques are to be deposited. Later you can manually convert the post-dated cheques received to regular receipts and move to regular banks.
To know more, refer to Configure Bank Ledger to Record Receipts for Uncertain Banks
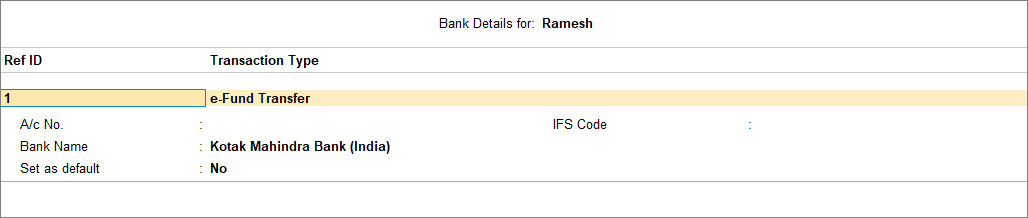
Configure Party Ledgers
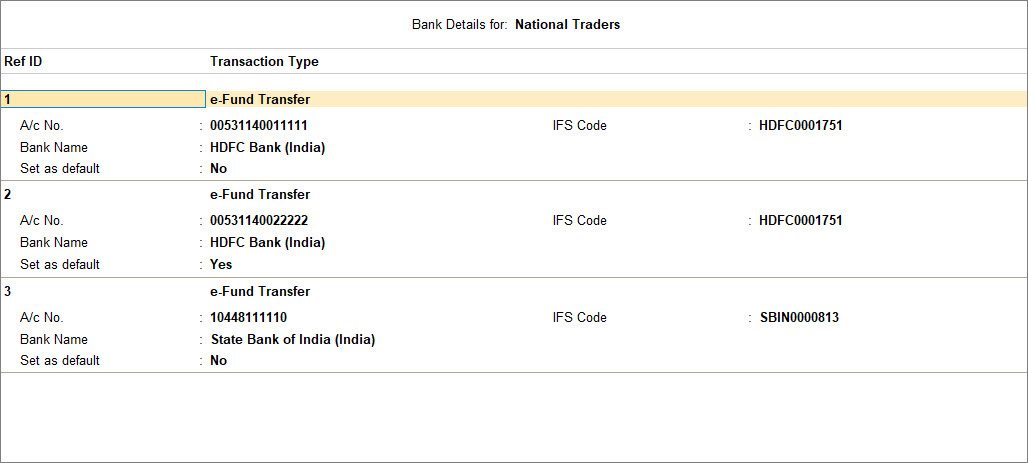
You can make payments to your party through cash, cheque or online transfer. If you want to pay your party through an e-fund transfer, you need to update the party ledger with their bank details. You can update the bank details at the time of creating the party ledger or even at a later point by altering the party ledger. You can add multiple bank details for a party to the ledger. In TallyPrime, you can add the bank details or import from MS Excel in bulk. This helps in generating the payment instructions in the format supported by the respective banks.
![]()
- Open the Ledger Creation/Alteration screen to create or alter the party ledger.
- Press Alt+G (Go To) > Create/Alter Master > type or select Ledger > and press Enter.
Alternatively, Gateway of Tally > Create/Alter > type or select Ledger > and press Enter. - Enter the Name of the Party and create it under Sundry Creditors.
- Provide other details such as Mailing Details.
- Press Alt+G (Go To) > Create/Alter Master > type or select Ledger > and press Enter.
- Update Banking Details.
- Under Banking Details, enable Provide bank details. The Bank Details screen appears.
- In the Bank Details > Transaction Type screen, select e-Fund Transfer and provide the necessary details:
- A/c No: Valid account number of the party.
- IFS Code of the party’s bank.
- Bank Name from the List of Banks
- Set as default: Enable this option to set the bank as a default option.
Depending on the transaction type or the bank you select, the fields change accordingly.
- Press Ctrl+A to accept the screen.
- As always, press Ctrl+A to save the ledger creation screen.
To add multiple bank details manually to a party ledger, press F12 (Configure) > enable Allow multiple beneficiary details.
You can import bank details in bulk for your party from MS Excel which reduces the time and effort to update the details manually.
Import Bank Statements
You might need to import Bank Details for reconciliation with your payment records. Before importing the Bank Statements, you can configure their data paths without having to choose the path every time you need to import the bank statements.
- Folder Path for new Bank Statements
- Folder Path for imported Bank Statements
- Folder Path for new Intermediate Files
- Folder Path for imported Intermediate Files
Once you have configured the data paths, you can import the Bank Details into TallyPrime.
- Press Alt+O (Import) > select Bank Details.
- Enter the File Path and File to Import details.

On successful import, the TallyPrime displays a success message with the details of import.
For more information on importing bank details and bank reconciliation, refer to the Bank Reconciliation topic.
Import of Beneficiary Details in Bulk
The feature to import in bulk in TallyPrime provides you with a great experience with banking, especially for e-payments. You can save the required bank details of your vendors or employees in one place, and easily import them to TallyPrime as a one-time activity.
In this section
Update beneficiary details in MS Excel
TallyPrime provides you with a sample MS Excel with the columns required to update the details of the beneficiaries. You can download the sample file from the import menu and update the details in .xlsx format.
![]()
- Press Alt+O (Import) > Bank Details.
- Press Alt+B (Payee Sample file), if you want to download the Payee Sample file. Alternatively, if you want to download the Employee Sample file, then press Alt+H (Emp. Sample file).
The Exporting Sample File screen appears:
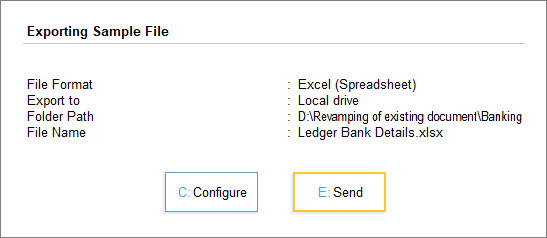
- Press E (Send) to save the sample file in your desired folder. If you want to change the folder path or other settings, then press C (Configure) before saving the file.
The sample file will open. - Enter the details of your beneficiaries and ensure that the Ledger Name in the Excel sheet matches the name of the ledger in TallyPrime.
A filled-in Payee Sample file will appear as shown below. You can add multiple bank details of the same party and provide Ref ID for each account detail.

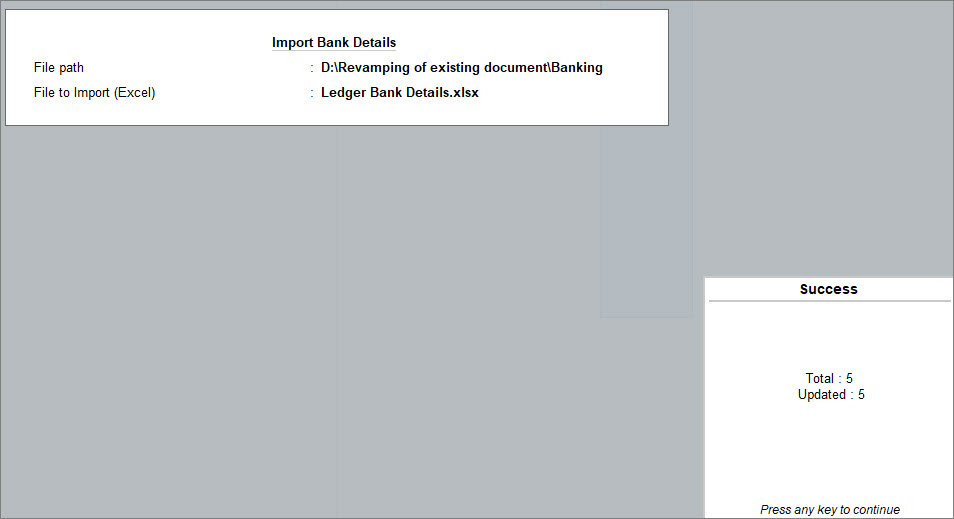
Import beneficiary details to TallyPrime
Once the MS Excel file is ready with the beneficiary details, you can import it to TallyPrime.
![]()
- Press Alt+O (Import)> Bank Details. The Import Bank Details screen opens.
- Specify the File path and the File to Import (Excel).

- Press Enter to import the beneficiary details. The following success message will appear after import:
You can open the respective party/employee ledger if you want to verify the details:
- Press Alt+G (Go To) > Alter Master > type or select Ledger > press Enter.
Alternatively, Gateway of Tally > Alter > type or select Ledger > press Enter. - Set the option Provide bank details to Yes.
The following screen appears:
After the import of details in bulk, all the bank details maintained in Excel are updated in the party ledger. You can manually verify if the details are updated correctly.
Allow or Restrict Users from Performing Bank-Related Tasks | Security Controls
You can allow or restrict users from performing specific tasks related to banking.
Security for e-Payments
You can provide additional security for your banking details and e-payments by creating users with special rights and authorising them for specific operations. You can use the Security Control feature to set up the required security levels. For example, if you want your data entry operator to have access only for e-Payments related reports, then you can allow full access or access to alter for the List of Reports related to e-Payments.
To know more, refer to Security for e-Payments.
Security for Connected Banking
You can restrict certain users from accessing the Connected Banking facilities. For instance, you might not want a certain set of users to get the latest Bank Balance. You can restrict the users from doing so.
For instance, you may want to disallow data entry operators from viewing balance as per bank in Dashboard.
- Press Alt+K (Company) > User Roles > Data Entry.
- Under Disallow the Following Facilities, select Balance as per Bank – Connected Banking (Tile) and press Enter.


