
Virtual Office Operations | Connect, Disconnect, Restart, Shutdown & Manage Passwords
Your Virtual Office lets you access TallyPrime from anywhere, anytime. This topic helps you connect to your Virtual Computer, restart or shut it down, and manage your Tally.NET credentials and Secure PIN. Whether you use a browser or the TPCA client, follow these steps to ensure smooth and secure access to your Virtual Office.
Connect to Virtual Computer
You can connect to your Virtual Computer in two ways:
Connect via Browser (Web-Client)
-
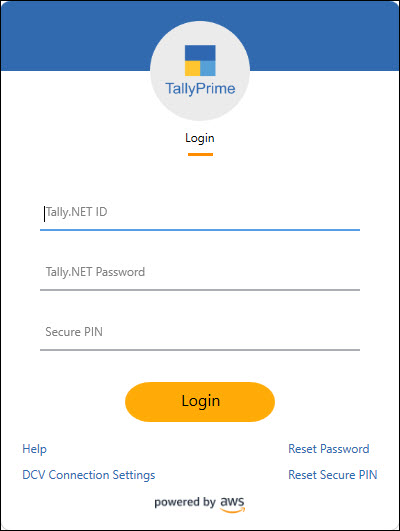
Log in to TallyPrime Cloud Access.
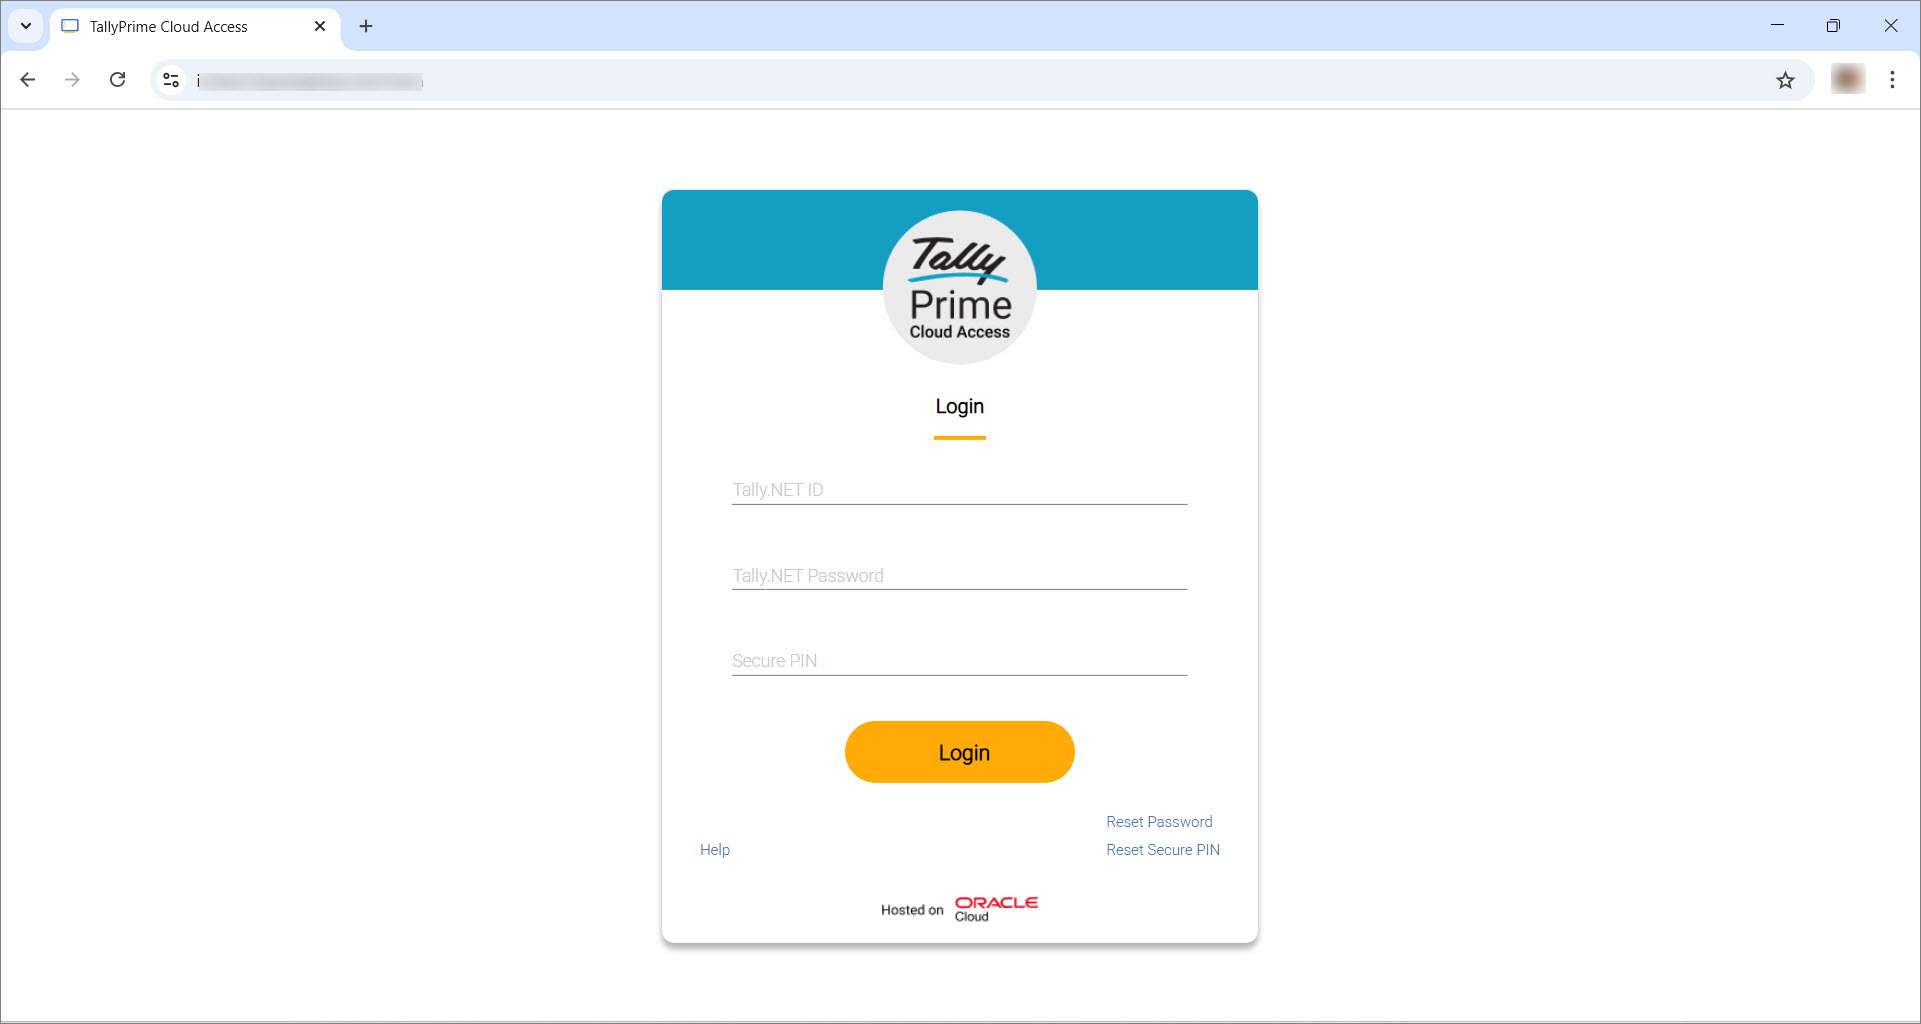
- Enter your login credentials: Tally.NET ID, Tally.NET Password and Secure PIN.
For first login, a temporary Secure PIN will be generated. You must set a new PIN.
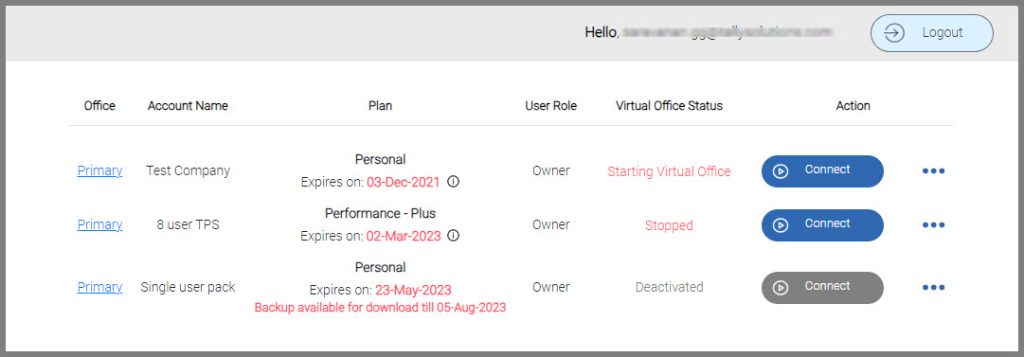
After logging in successfully, the Computer & User Management dashboard appears, displaying your virtual machine (s).
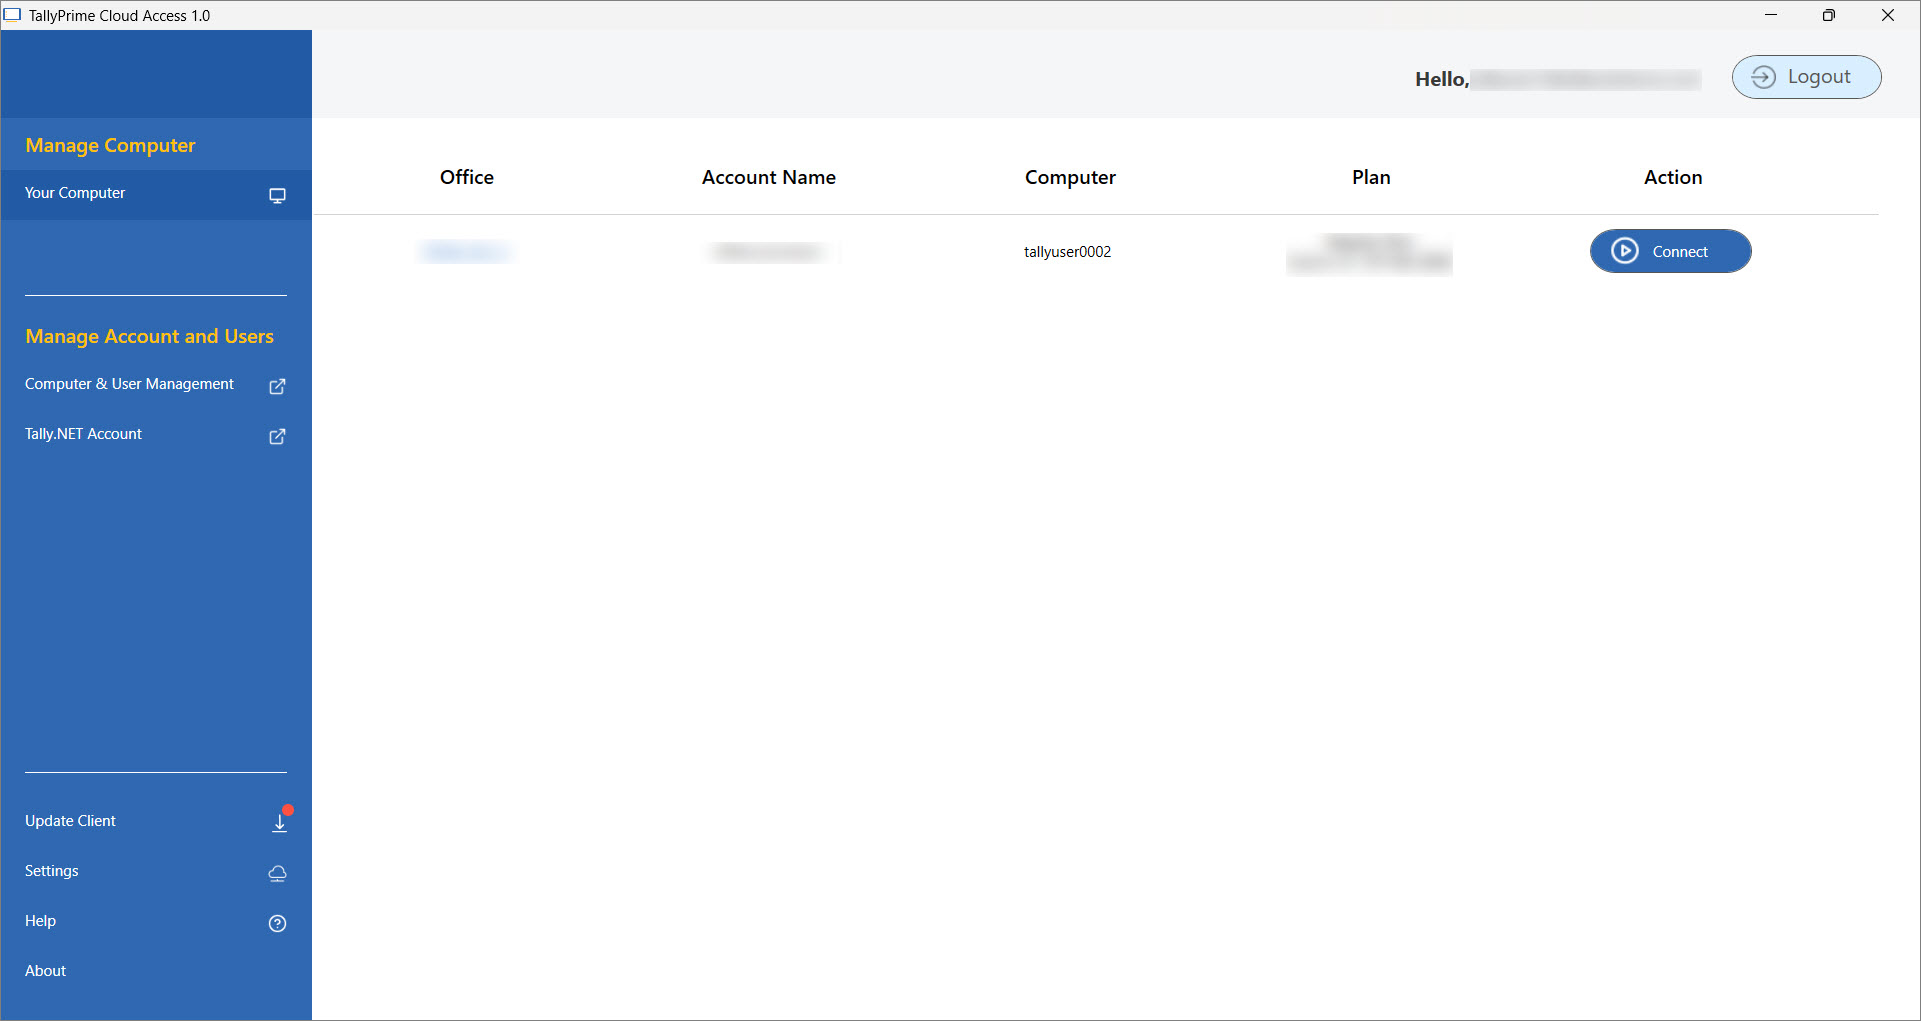
- Click Connect to start your virtual office.
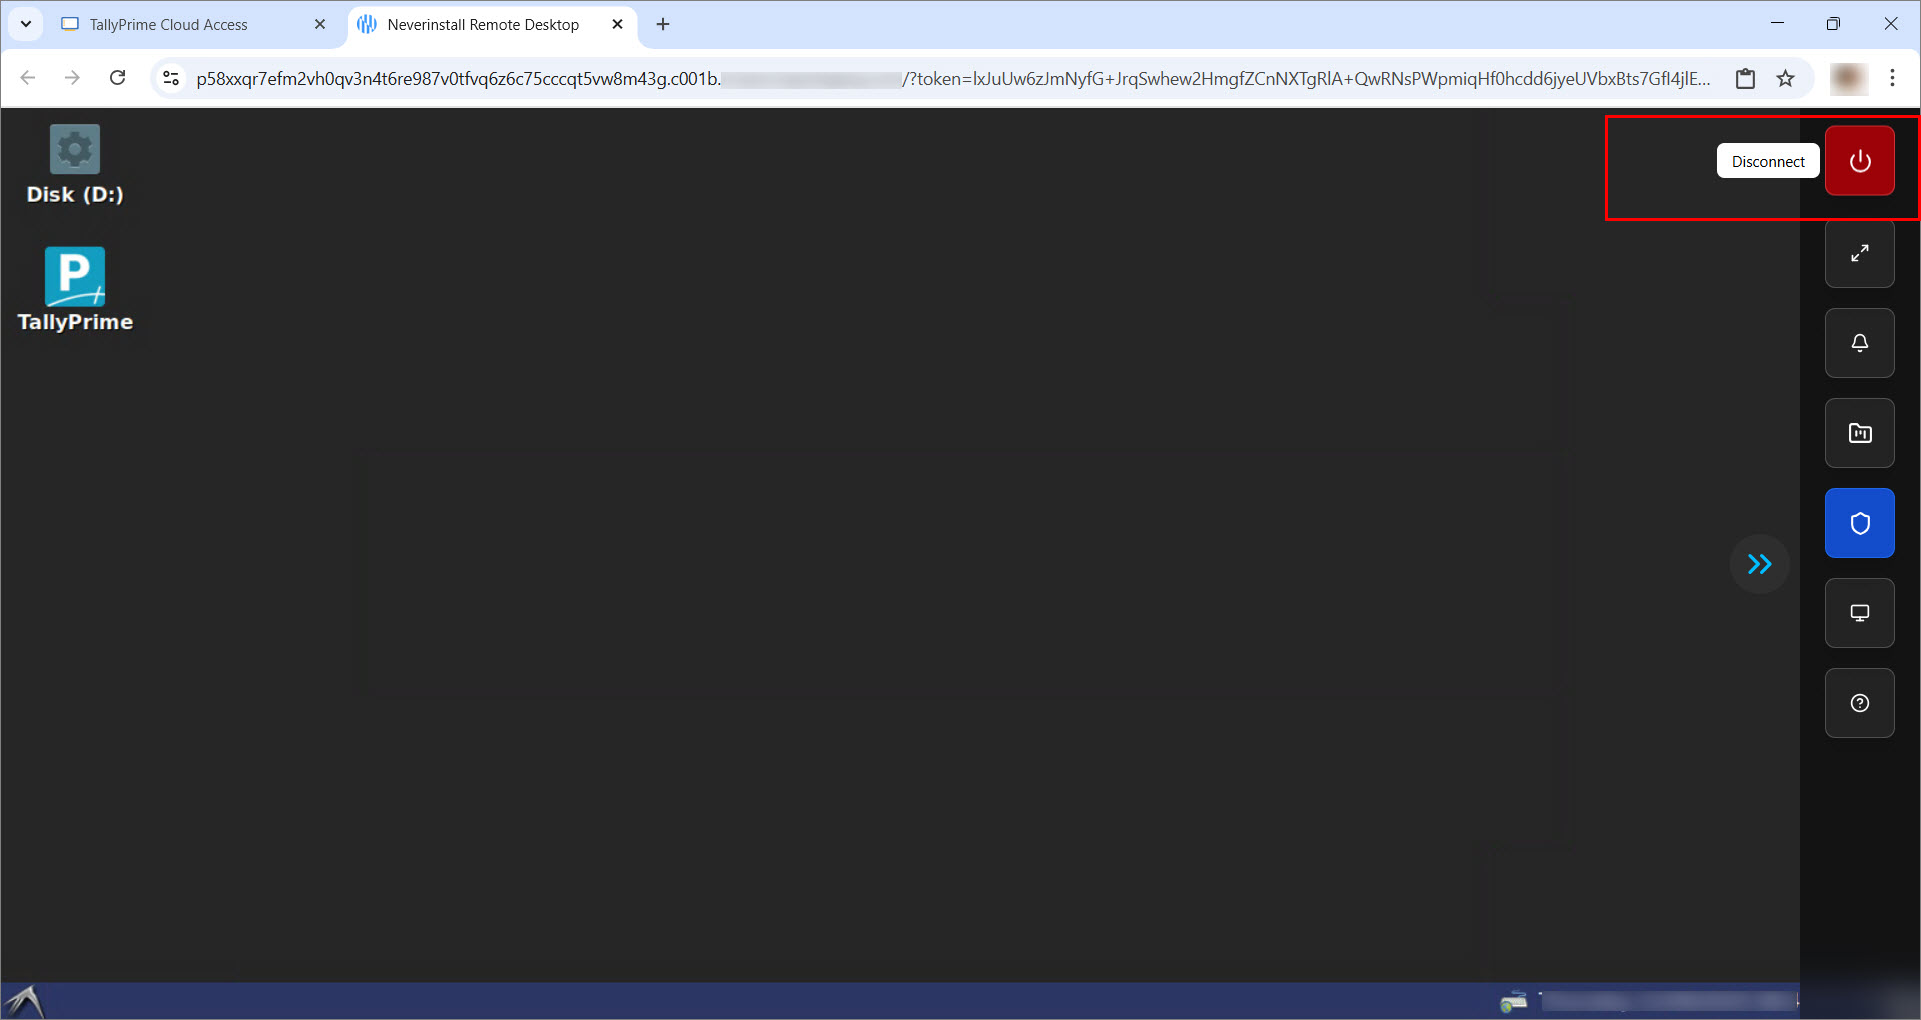
This opens your Virtual Computer.

It has the following components:
-
Disk (D:) Drive: Your cloud storage space where you can store company data and backups.
-
TallyPrime Icon: Depending on your plan, you will see one or more TallyPrime icons on your desktop.
-
Collapsible Control Panel: Located on the right corner of the screen, this gives you quick access to various features.
-
The Home menu at the bottom-left corner provides quick access to useful tools and accessories, making it easier to perform day-to-day tasks within your Virtual Computer.
These features are designed to provide seamless access to your work, making your experience with TallyPrime efficient and hassle-free.
-
- You can now start using TallyPrime as you normally would on your desktop.
Connect via TPCA Client
-
Download and install the TPCA Client.
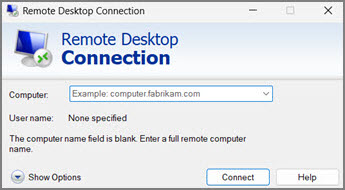
The TPCA Client uses the Remote Desktop Connection (RDP) application to establish a secure connection with your Virtual Computer, ensuring an enhanced experience. -
Ensure RDP is available:
-
Press Windows + R, type RDP, and press Enter.
-
If not, download and install the RDP application on your computer.
-
- Open the TPCA Client and log in with your Tally.NET ID, Tally.NET Password, and Secure PIN.
After logging in successfully, the Computer & User Management dashboard appears, displaying your virtual machine (s).
- Click Connect to start the virtual office.
The Remote Desktop Connection security warning screen appears.
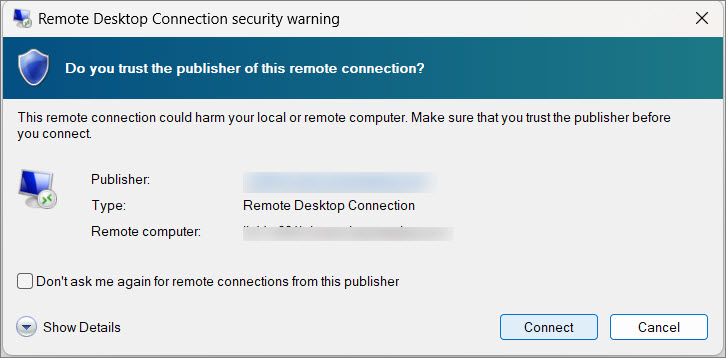
- Click Connect to establish a connection.
This will open your Virtual Computer.

The Control Panel will not be available if you have accessed the Virtual Computer via the TPCA Client.
- Start using TallyPrime as you normally would on your desktop.
Disconnect from Virtual Computer
You can disconnect from your Virtual Computer in two ways:
Disconnect Via Browser
Disconnect your computer from the browser or close the Virtual Computer window, when you are away.
-
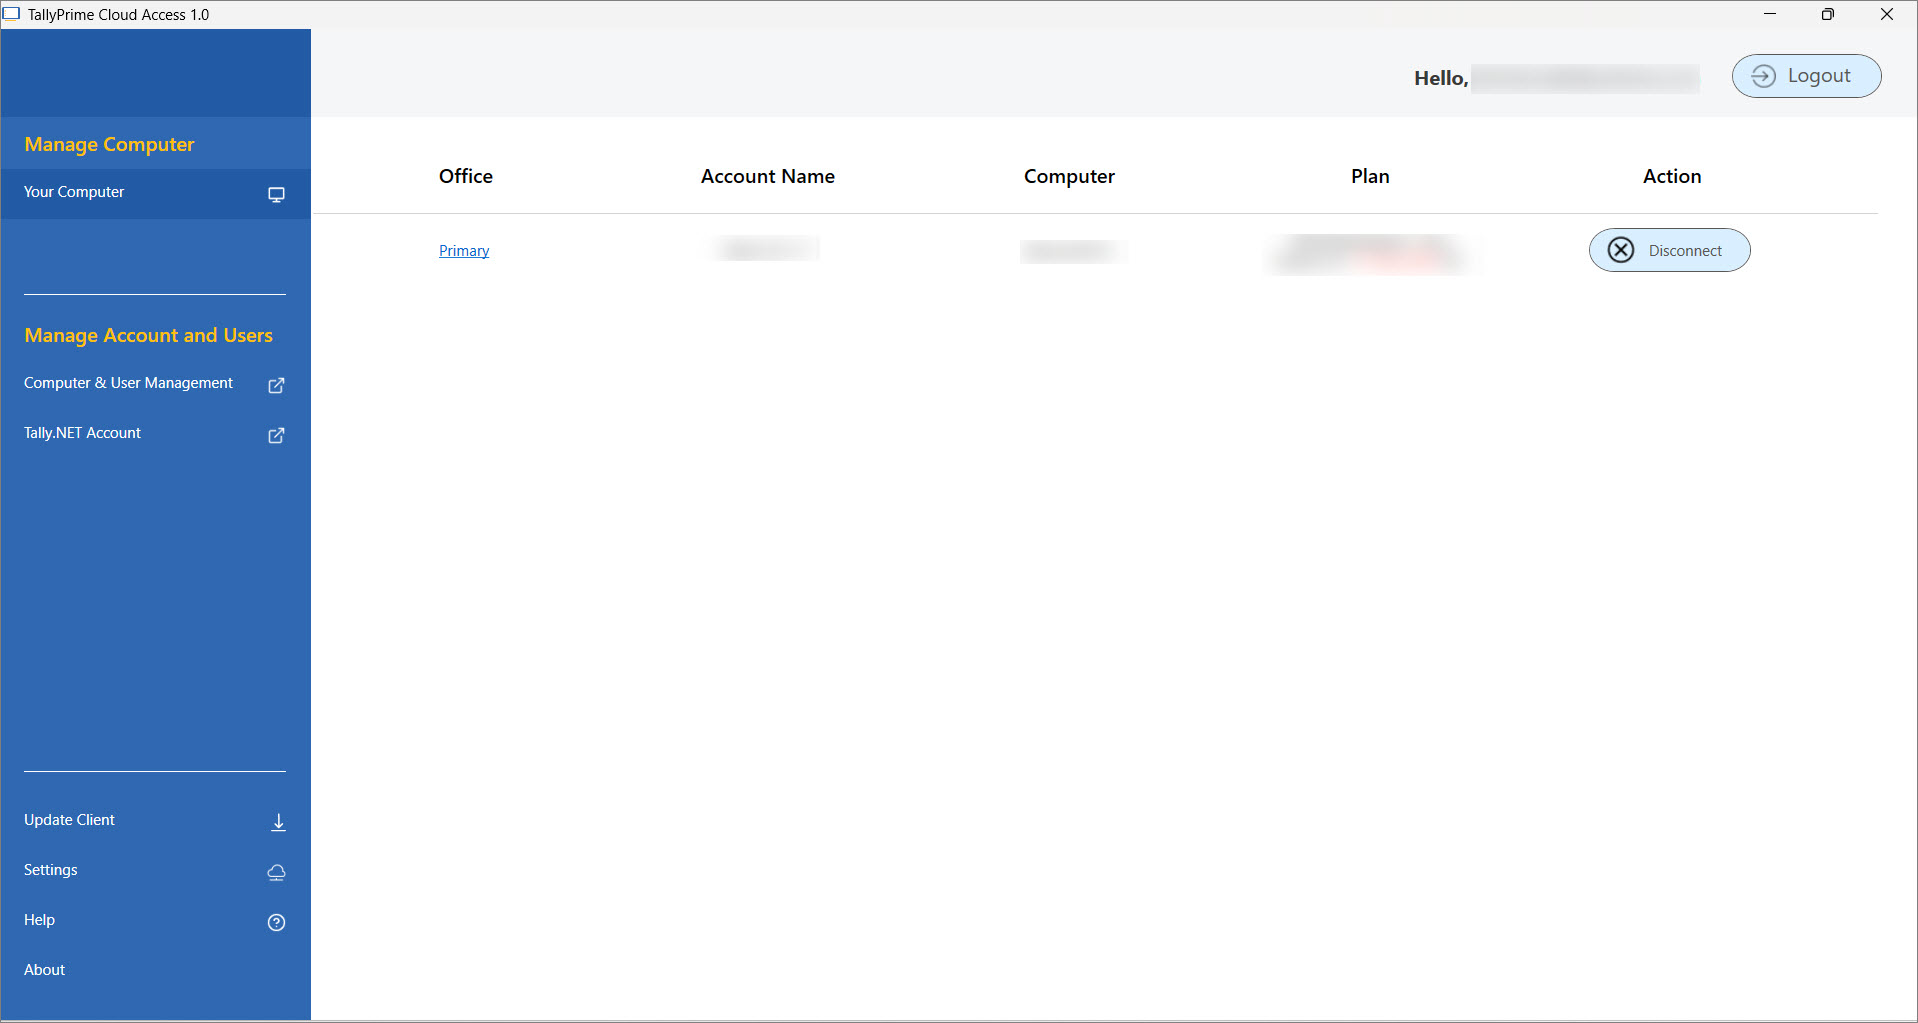
Open the Control Panel > click Disconnect.
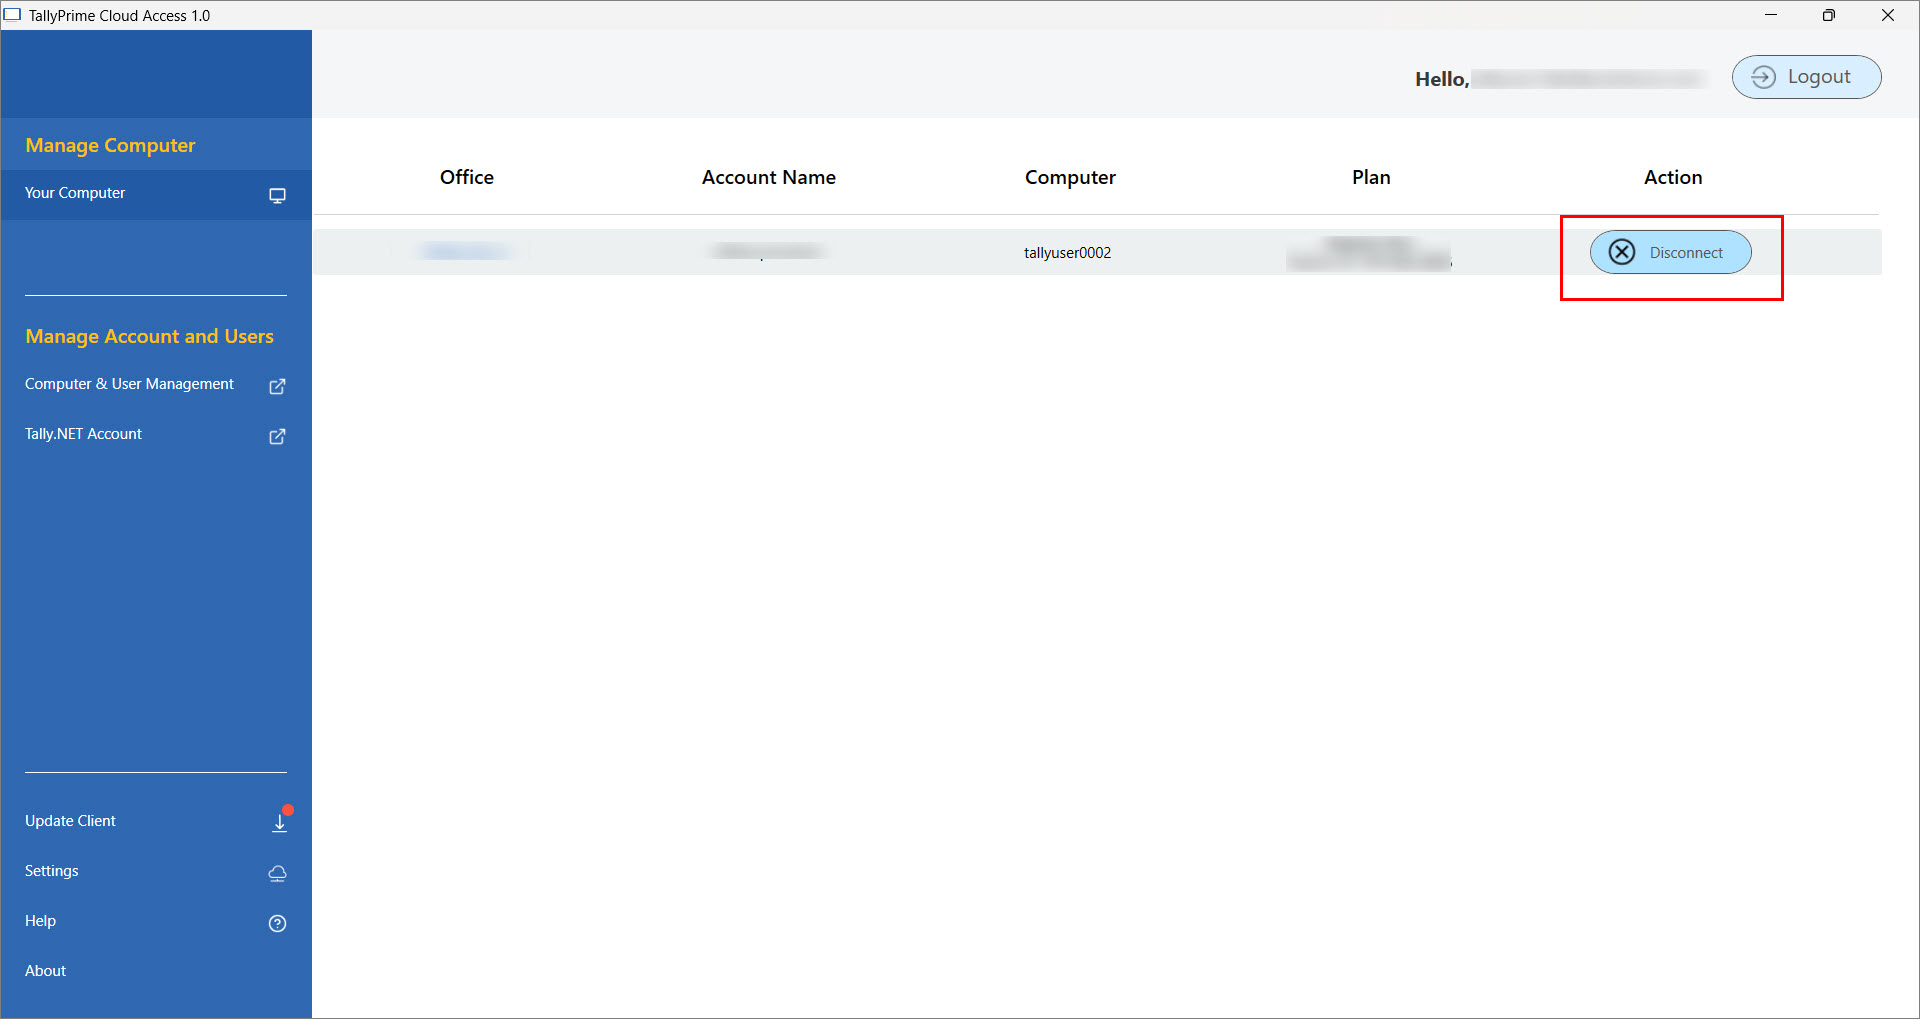
Disconnect Via TPCA Client
Disconnect your computer using the client or close the Virtual Computer window, when you are away.
-
Under Action > click Disconnect.
-
Or click the cross (X) on the connection bar in the Remote Desktop Connection.
Restart Your Virtual Computer
You can restart your Virtual Computer in two ways:
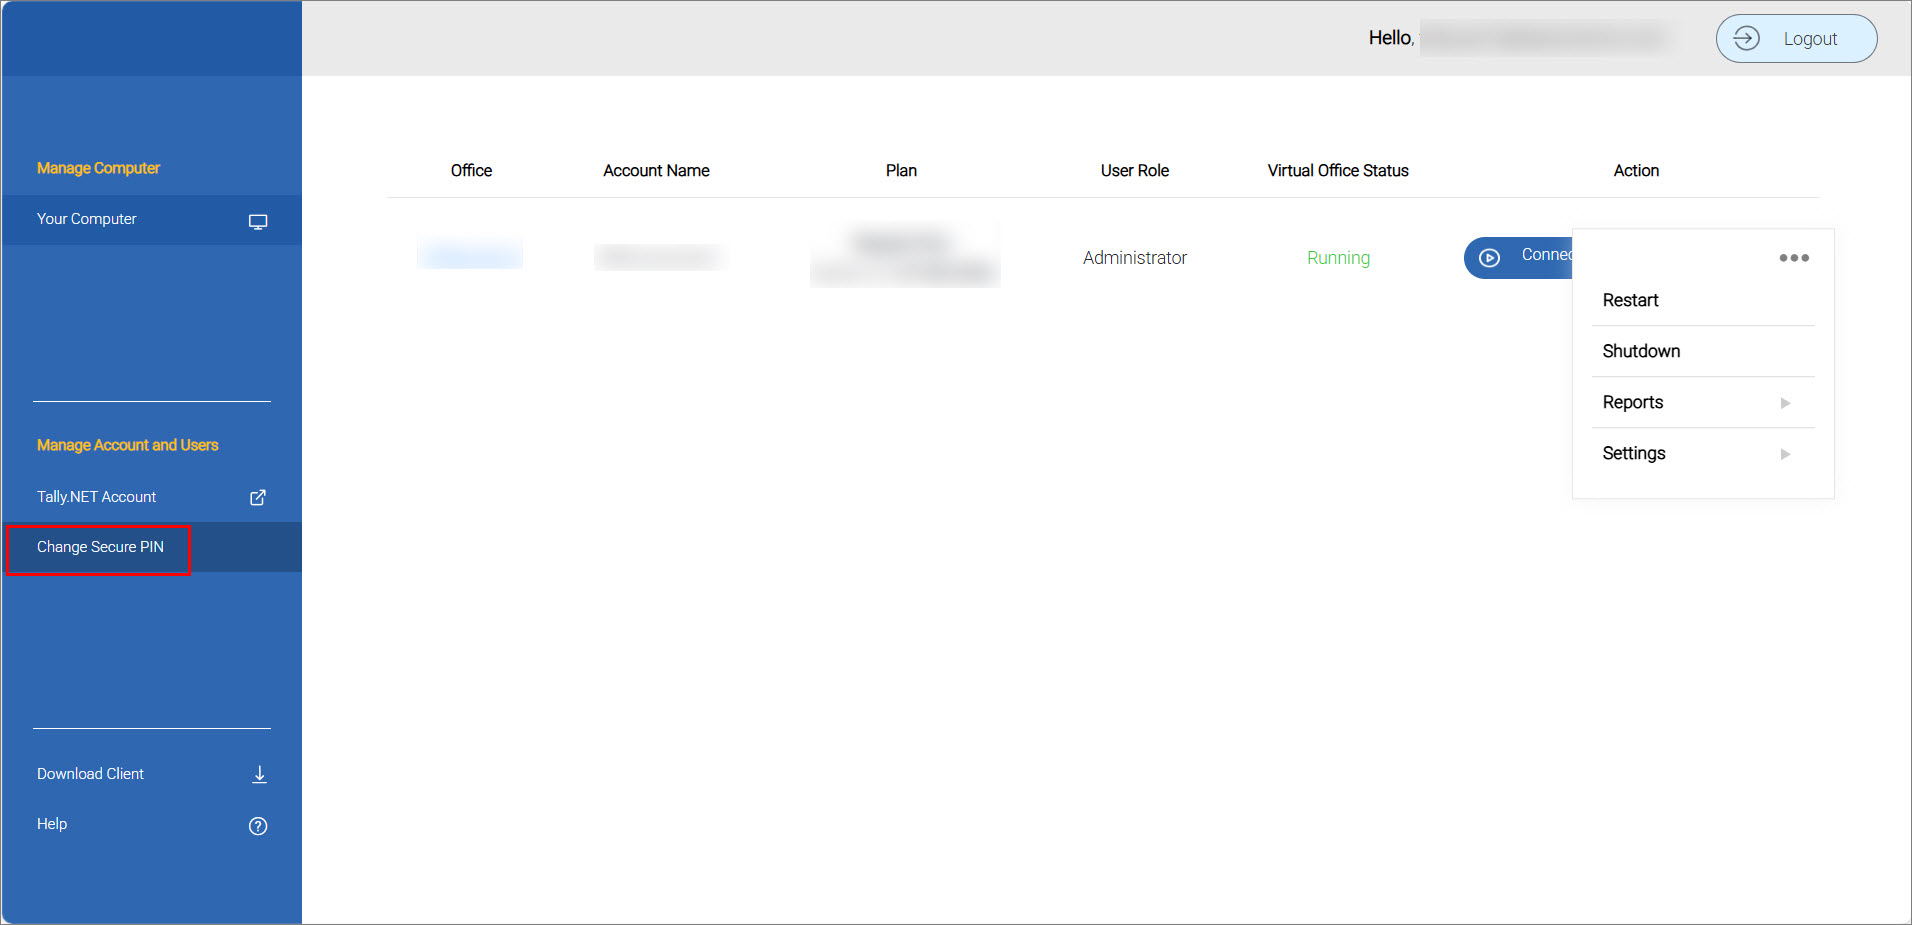
Restart Via Computer & User Management Dashboard
-
Under Action, click the three dots (…) > select Restart.
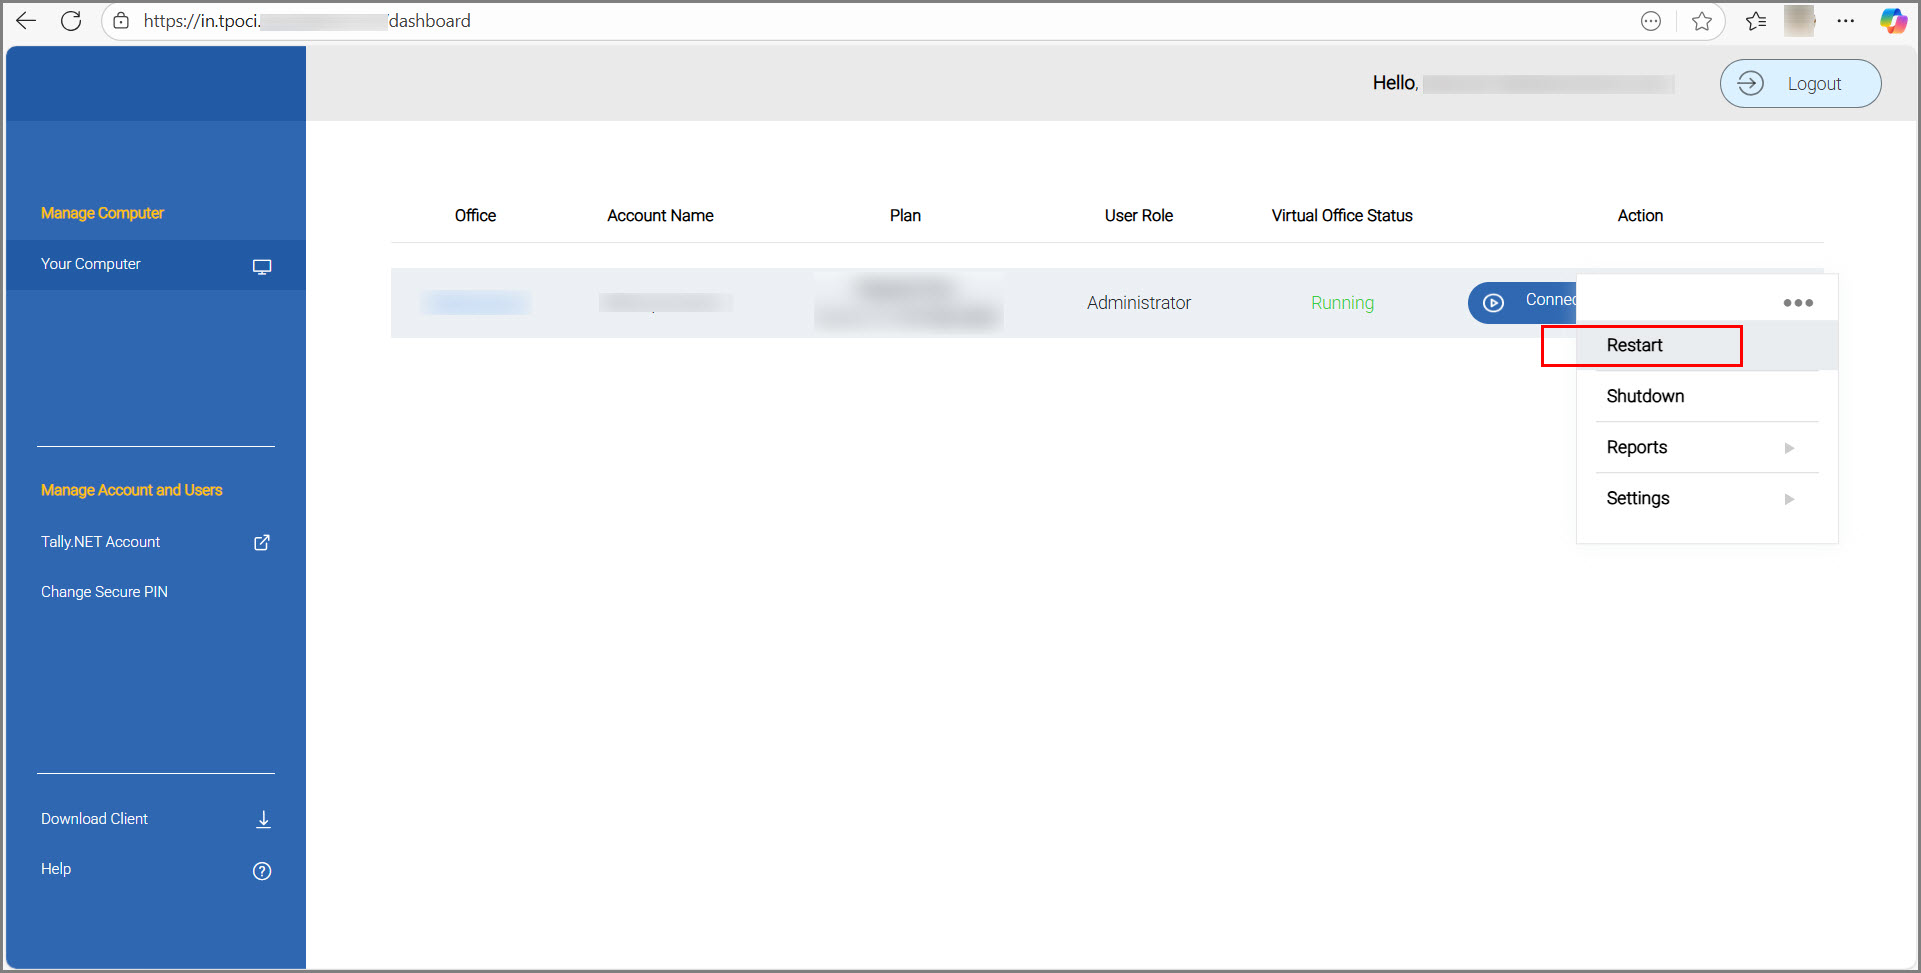
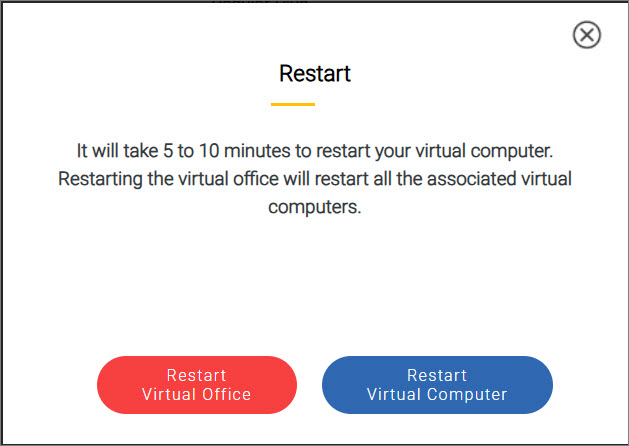
A message appears to confirm if you want to restart your Virtual Computer.
-
Click Restart Virtual Computer if you want to restart the Virtual Computer.
-
Click Restart Virtual Office to restart all the associated virtual computers.
Restart Via Virtual Computer
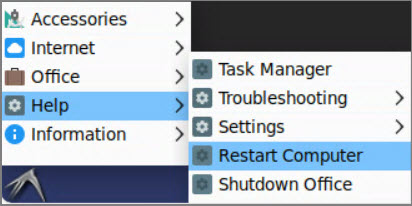
You can restart the Virtual Computer from the bottom-left Home menu in the Virtual Computer itself.
-
Click Help > select Restart Computer.
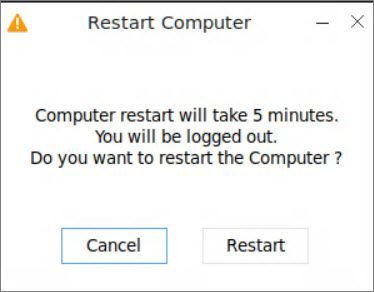
A message appears to confirm if you want to restart the Virtual Computer.
-
Click Restart to confirm.
-
Or click Cancel to go back.
Shutdown Virtual Office
You can shut down the Virtual Office in two ways:
Shutdown Via Computer & User Management Dashboard
- Under Action, click the three dots (…) > select Shutdown.
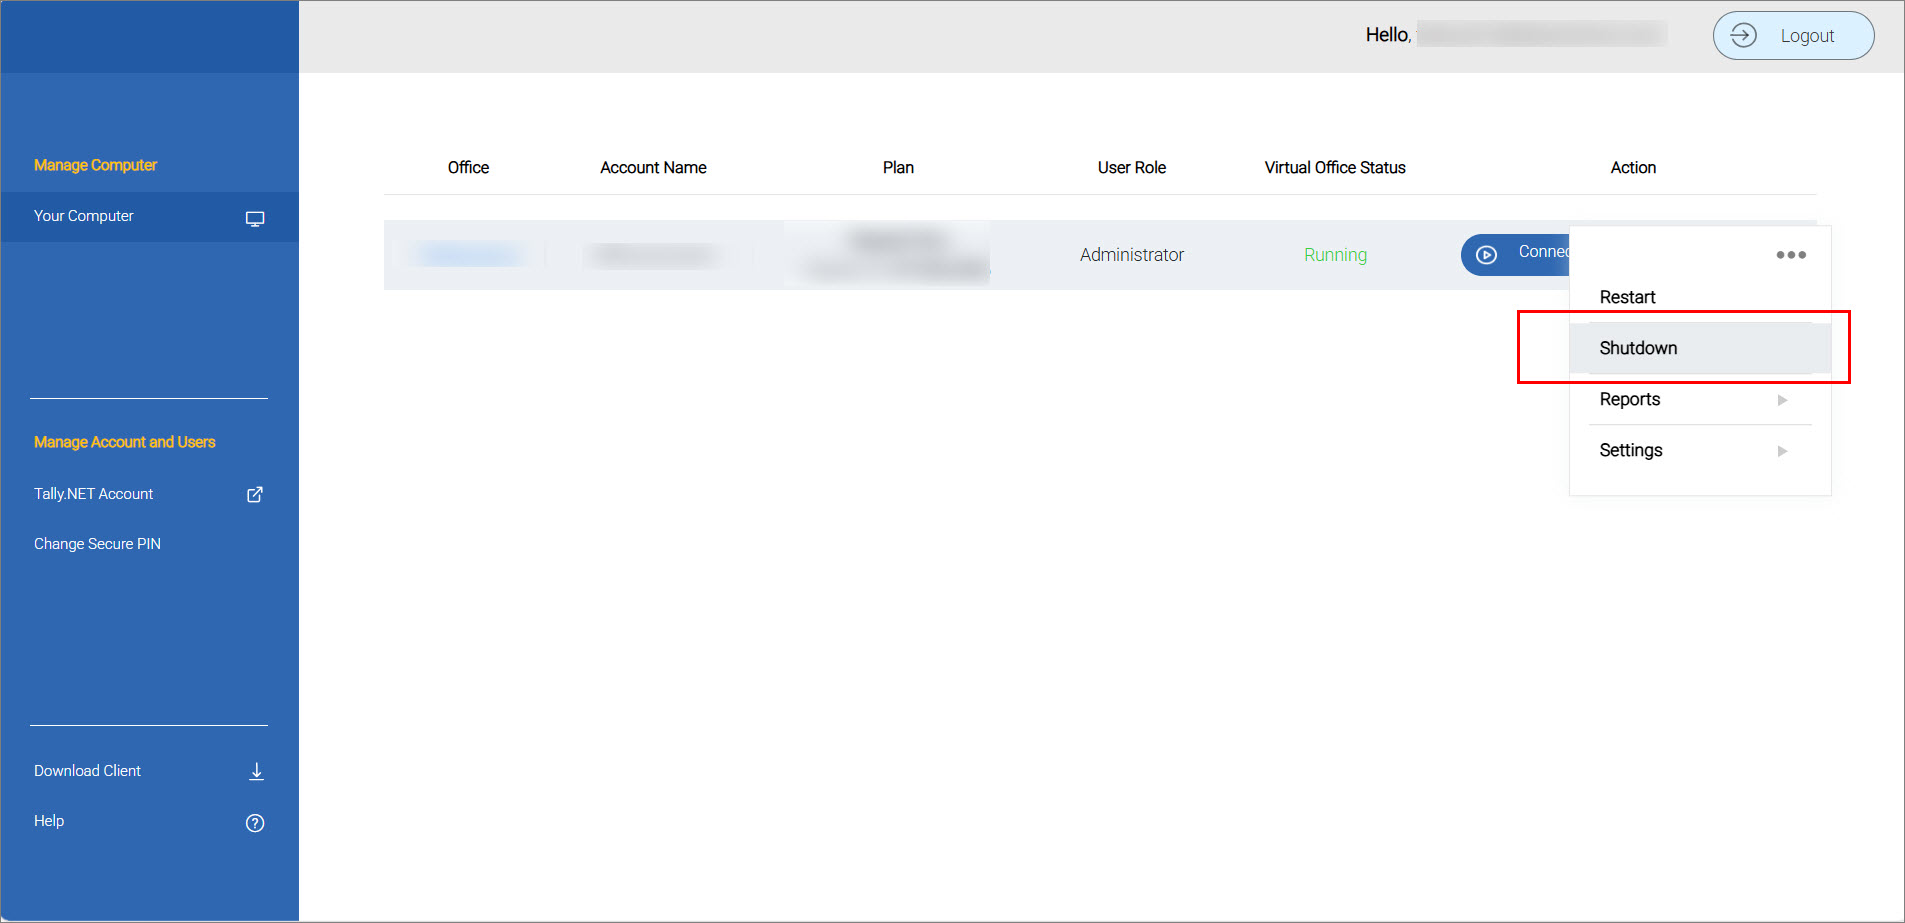
A message appears to confirm if you want to shut down the Virtual Computer and end the session for all active users.
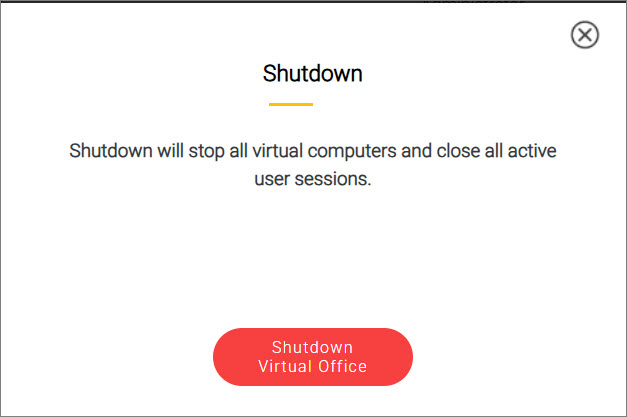
- Click Shutdown Virtual Office.
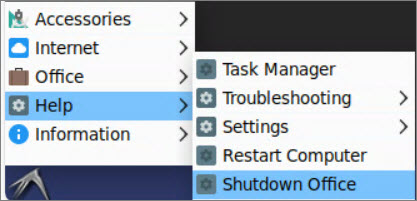
Shutdown via Virtual Computer
You can shut down the Virtual Office from the bottom-left Home menu in the Virtual Computer itself.
- Click Help > Shutdown Office.
A message appears to confirm if you want to shut down the Virtual Computer and end the session for all active users.
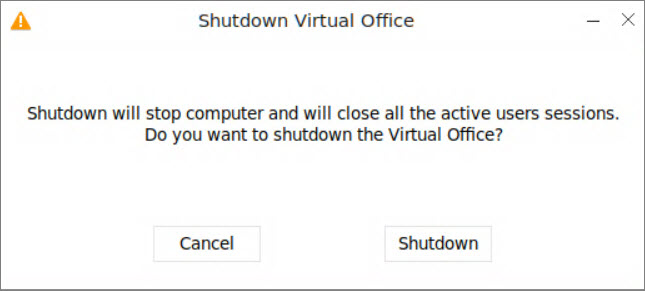
-
Click Shutdown to confirm.
-
Or click Cancel to go back.
Reset Your Tally.NET Password
If you have forgotten your Tally.NET password, resetting it is simple.
- In the Login screen, click Reset Password.
This opens the Control Centre. - Reset your Tally.NET Password from Control Centre.
You can use the new Tally.NET Password next time to login to the client or portal.
Reset Your Secure PIN
Similarly, if you have forgotten your Secure PIN, resetting it is easy.
- In the Login screen, click Reset Secure PIN.
- Provide your Tally.NET ID and Tally.NET Password and click Reset Secure PIN.
A one-time PIN will be sent to your registered e-mail ID.

- Click Go to Login > enter the Tally.NET ID, Password and the one-time Secure PIN.
The Change Secure PIN window appears. - Provide New Secure PIN and Confirm Secure PIN > click Change PIN.
The Change Secure PIN message box appears. You can use the new Secure PIN next time you login to the client.
Change Secure PIN
You can change your Secure PIN at any given time.
- In the Computer & User Management dashboard, click Change Secure PIN.
- In the Change Secure PIN screen, enter the Current Secure PIN and the New Secure PIN.
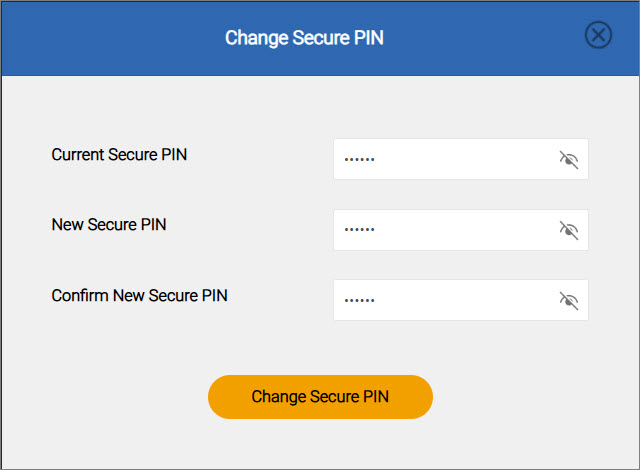
- Click Change Secure PIN.
A message appears to confirm that the Secure PIN has been changed successfully.
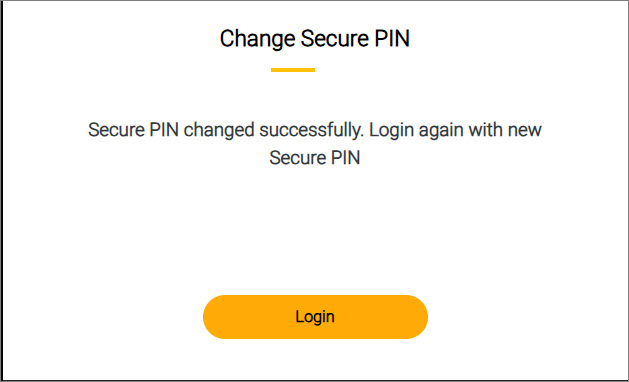
- Click Login to log in with the new Secure PIN.
Still Using TallyPrime on AWS?
To know more about how to continue using the Virtual Computer, click here.
Whether you’re working remotely, traveling, or collaborating with a distributed team, TallyPrime Cloud Access ensures secure access to your business data from anywhere, at any time.
You can use two access methods to connect to your TallyPrime instance on the cloud:
-
Virtual Computer Connection (VCC): A cloud-hosted virtual computer that functions just like your local system, allowing you to run TallyPrime, manage user access, and back up data.
-
Self-Service Portal (SSP): A browser-based portal that provides additional actions, such as resetting the virtual computer, changing the administrator password, or viewing usage stats—features not available through the client app.
This topic helps you get started with both access methods—VCC (via client application) and SSP (via web browser)—so you can seamlessly manage and use TallyPrime Cloud Access with confidence.
If you’re working remotely, on the move, or collaborating with a team, TallyPrime Cloud Access lets you access your business data securely—anytime, anywhere. The Virtual Computer Connection (VCC) acts as your gateway to a cloud-hosted virtual computer. You can manage user access, back up data.
This topic helps you get started with both the browser-based and client-based access methods.
Ways to Access the Virtual Environment
You can connect to your virtual computer in two ways:
-
Browser Access – Log in directly via the Self Service Portal (no installation required).
-
Client Access – Install the Virtual Computer Connection application on your Windows system for a desktop-like experience.
System Requirements
To ensure a smooth experience, make sure your system meets the following requirements:
|
Component |
Requirement |
|---|---|
|
Operating System |
Windows 7 SP 1 and above |
|
Processor |
Dual-core, 1 GHz or higher |
|
Memory (RAM) |
Minimum 4 GB |
|
Disk Space |
110 MB (VCC client) + 4.5 GB (.NET Framework) Microsoft. Net and VC++ |
|
Internet |
Minimum 10 Mbps |
TallyPrime Client requires additional Microsoft components on Windows 7. Refer to the installation section below.
Browser Access Compatibility
|
Platform |
Supported Browsers |
Notes |
|---|---|---|
|
Windows |
Chrome, Edge (latest) |
Windows 7 SP1 or later supported |
|
macOS |
Chrome, Safari |
Version 10.12 or later |
|
Linux |
Chrome (under testing) |
|
To access your business data and application on the move, you will require to install the Virtual Computer Connection (VCC) client on your local computer. Through the virtual connection, you can open the virtual computer and use TallyPrime to record your transactions.
Alternatively, you can also access the virtual computer through a web browser from the Self Service portal without having to install a client on your system and use TallyPrime.
- Download the Installer.
- Click the download link from the e-mail sent to you on purchasing the plan. This will download the installer to your local computer.
Alternatively, download the client from the Download Virtual Computer Connection Client screen.
- Click the download link from the e-mail sent to you on purchasing the plan. This will download the installer to your local computer.
- Install the Application.
- Double-click the Setup.exe file to open the Virtual Computer Connection Setup window.
By default, the installation path is set to C:\Program Files (x86)\Virtual Computer Connection. You will not be able to change this path.
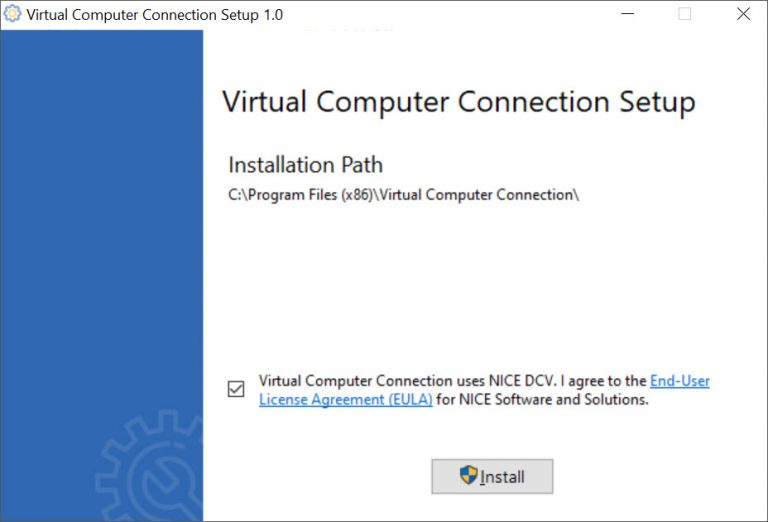
- Accept the End-User License Agreement (EULA), and click Install.
Upon successful installation, a shortcut to Virtual Computer Connection is created on your computer desktop.
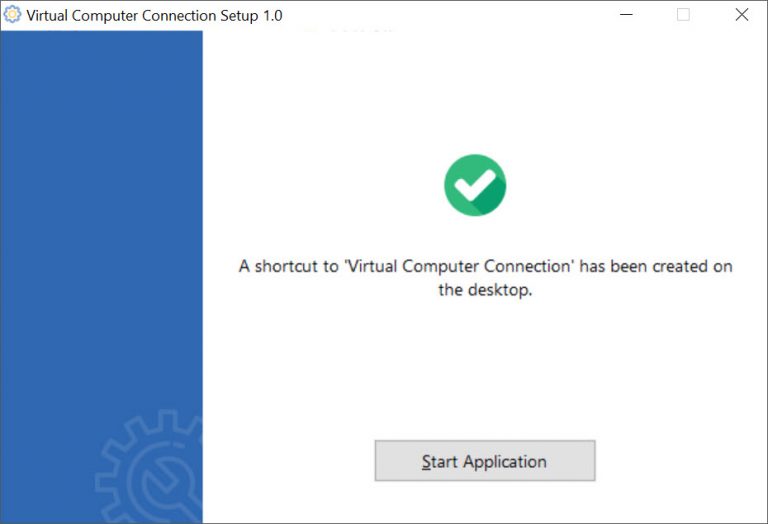
- Click Start Application on the setup window to open the Virtual Computer Connection client.
You can also double-click the shortcut on your desktop to open the client.
- Double-click the Setup.exe file to open the Virtual Computer Connection Setup window.
If you encounter installation issues, use the following links to manually download and install the required Microsoft components:
The Virtual Computer Connection (VCC) is the gateway to open your virtual computer that keeps your data and applications. Therefore, you will need to log in to access the virtual connection window. On successful login, connect your virtual computer and access the TallyPrime application.
To start using TallyPrime, you will need to activate your license on TallyPrime on the virtual computer, without the need to use TallyPrime separately on your local computer. At any given point, you can use your license either on your local computer or on the virtual environment.
- Ensure the following:
- You have installed the Virtual Computer Connection on your local computer.
- You have valid credentials to log in to the application.
- Double-click the application icon on your local computer to open login screen of Virtual Computer Connection.
- On the Login screen, enter your credentials – Tally.NET ID, Tally.NET Password, and Secure PIN.
The following screen appears:

If you have forgotten your Password or Secure PIN, you can reset the same from the Login screen. - From the Virtual Computer Connection window, click Connect to open your virtual computer.
- If account is configured to a single computer: On successfully logging into the application, you directly get access to the computer assigned to your user role.
- If account is configured to multiple computers: In the Virtual Computer Connection window, click Connect against the computer name to connect to the respective virtual computer.
When you do not want to use the Virtual Computer Connection window, you can simply log out of the application:
- Click Logout, available on the top-right corner of the window.
You can connect to your Virtual Computer through the Computer and User Management portal and access your data in TallyPrime without having to install a client on your local system.
- Open the login screen of the portal.
- Enter your Tally.NET ID, Password, and Secure PIN to login.
If you are logging in for the first time to the portal, you will be prompted to set up a new Secure PIN. - On the Computer and User Management portal, under Action click on the Connect button and start your Virtual Computer.
This will open your Virtual Computer in a new tab.

If the Virtual Computer is in shutdown state, it will take around 5 minutes for the first user to connect to it since the system will start and connect. Following this, subsequent users will have direct access to the Virtual Computer and can connect to it immediately since the machine is already running.
However, you can start your Virtual Machine by clicking Start under the Action column. This will start your Virtual Machine in around 5 mins and selecting Open Virtual Computer afterwards will connect you to the Virtual Computer immediately.
The Start option will be displayed on the portal only when the Virtual Computer is in shutdown state. Whenever you receive a connection error while connecting to the Virtual Computer, clicking on the Close Tab button closes the tab and allows you to connect from the Self Service portal. The existing DCV features will remain unchanged in the browser as well.
Disconnect the Virtual Computer
Once you have completed your work, you can save your data, disconnect, and shut down the Virtual Computer from the Self Service portal to ensure that your data remains secure. There are two ways to disconnect your Virtual Computer from the Self Service portal.
- Close the tab manually to disconnect your Virtual Computer.
- Click the computer name that appears on the top-right corner and select Disconnect.
You can close the tab manually after you have disconnected your Virtual Computer.
If your Virtual Computer is idle for 45 minutes due to inactivity, it will be disconnected automatically. You can close the tab manually and reconnect to continue your work when required.
Update VCC to the latest version
When a new update of the client is available, a red dot appears next to the down arrow against the Download Client option. You can upgrade the client to the latest version, if needed.
- Click the Download Client.
The latest installer for the Virtual Computer Connection is downloaded to your local computer. - Browse to the folder where the installer is downloaded, and double-click the Setup.exe file to update.
The client, including the virtual computer, is updated to the latest version on successful completion of the process.There is no impact on your data due to the update.
Uninstall or Repair the VCC
If you need to uninstall or repair Virtual Computer Connection
- Browse to the folder where you downloaded the Setup.exe file – the installer.
- Double-click the file to open the Virtual Computer Connection Setup window.
- Click Repair or Uninstall, as needed.


