
Apply Filter in Reports | Basic Filter, Multi-Filter, Advanced Filter
In your business, you would certainly be keeping a track of all your day-to-day transactions, like sales, purchases, transfer of stock items, and so on. Depending on your business requirements, you might need to view transactions of a common nature, like transactions made to a specific party, payments done above a certain amount, or cash transactions.
Let’s consider some business scenarios.
- As a Charted Accountant, you might want to see all the cash transactions made over a given period. Similarly, you might want to view transactions that have been recorded on any non-working day, and update the dates, if needed.
- If you manage stock items in your store or godown, you might want to view the details of stock items under a specific HSN/SAC for taxation purpose. Similarly, for auditing purpose, you might need to see if there are party ledgers with missing GSTIN/UIN details.
- You might want to view the Profit & Loss statement showing values based on certain vouchers – say vouchers recorded for a specific party or with a specific amount.
The Filter feature in TallyPrime enables you to apply filter in reports by entering any value or text used in the masters and vouchers. This feature helps you to avoid the hassle of manually going through the exhaustive list of transactions in reports.
Refer to our FAQ page if you have specific questions on applying Filters in reports.
If you are in Release 2.1 or earlier, you can use the Range or Value options to apply the filter. For more information, refer to the Range & Value Filter in Release 2.1 and Earlier section.
Overview of Filter in Reports
In your business, generating reports that include specific details related to your transactions might be a regular activity. Say you saw a surge or increase in the total sales with a particular party and therefore want to view all transactions done with a party in a given period. Your Inventory Manager might want to see the outward stock items or the number of items that were sold to a specific party. There could be other similar reporting needs.
The Filter feature in TallyPrime Release 3.0 onwards – an enhancement to the Range and Value features used in TallyPrime Release 2.1 and earlier – enables you to apply filter with the click of a button and view the required details. In the voucher reports and registers, you can apply filter on the details displayed on the report. On the other hand, you can apply filter in the financial reports and summary reports not only on the details displayed, but also on the masters and vouchers that contribute to the values in the report. This flexibility makes your filter results much more precise and effective. To understand this better, refer to the scenarios mentioned for each filter mode under the Use Filter Modes in Reports section.
In this section
Filter modes
TallyPrime supports three different filter modes that enable you to view specific details as per your reporting needs.
- Basic Filter: If you are looking for all vouchers, stock items, or groups that share a single, common condition, you can use this filter mode. Say you want to view all vouchers where the a party AVN Traders has been used in any field. You can also apply filter on vouchers where AVN Traders has been used in a specific field, like Ledger Name.
- Multi-Filter: At times, you might want to apply the filter with more than one common input and view the results. Say you need to view transactions where you sold LG washing machines sold to AVN Traders or total sales transactions recorded on a non-working day. In such cases, the Multi-Filter mode provides the flexibility to add more than one input condition. Depending on your requirements, you also have the flexibility to apply filter either by matching all the input values, or one of them.
- Advanced Filter: In certain scenarios, your reporting needs can be very specific, like generating a report displaying the total quantity of a stock item sold to your party AVN Traders. In such cases, you will need advanced capabilities to apply filter in your reports – and TallyPrime has it all! In addition, You can apply filter on vouchers or masters by providing details entered in the hierarchy of any related master – like the Parent Group, Stock Category and so on.
Features of filter in Reports
The Filter feature in reports provides certain features that make your experience hassle-free and convenient.
Filter Applied: Every time you apply filter in a report, the report displays the Filter Applied label on the top-right corner, for your convenience. You can perform all the report-related activities, such as Save View, Add Column, set up configurations, and so on, in the filtered report. If you have saved the report after filter, you can refer to the real-time data in the saved reports, without having to apply the filter every time.

Default Filter mode: If you want to use one of the filter modes frequently, you can set that filter mode as the default for your reports. Refer to the Set Default Filter Mode in Reports section for more information.
Filter Details
In TallyPrime Release 3.0, when you apply filter on details of a report, you can also view the details of the match found in the data. It means, for each filtered result, you can view which field of the master or voucher has the input that you used for applying the filter.
Refer to
- Use Filter Modes, to understand how to use Filter Details in each Filter mode
- View Filter Details, to learn about using Filter Details in different contexts of the filter results
Use Filter Modes in Reports | Basic Filter, Multi-Filter, Advanced Filter
Let’s consider a business scenario to understand how to use the different filter modes in TallyPrime.
You have a business that deals with washing machines from different brands, including LG, Whirlpool, and Samsung. You transact with a few parties like AVN Traders, Krishna Enterprises, and Soham Stores to whom you deliver the goods from time to time. While you generally receive payments via bank transfer from these parties, some cash transactions are recorded on a case-to-case basis. There are certain cash transactions that are more than Rs. 50,000. In addition, as per your business practices, you generally ensure that your stocks are available in sufficient quantities to meet the market needs.
You will certainly want to keep a better tab on your stocks from time to time, view transactions made to specific parties, track high-value/cash transactions, and so on.
To handle these needs, let’s see how to use the Filter feature in TallyPrime and generate the required reports.
In this section
Basic Filter
In the Basic Filter mode, you can use any single value or text as the condition to apply filter in the report.
Let’s consider Day Book for illustration purpose.
![]()
Scenario 1: Say, you have recorded certain transactions where there are references of “Cash”. At the end of the quarter, you want get a list of all such transactions so that you can verify their accuracy.
- Open Day Book for the selected period, press Ctrl+F (Apply Filter) > F5 (Basic Filter).
The Basic Filter screen appears. The Apply Filter on is set to Voucher, by default. - Look for: Enter Cash.
This is the value TallyPrime will use to match in all vouchers.
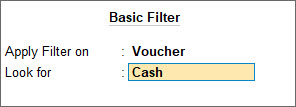
- Press Enter to apply the filter.
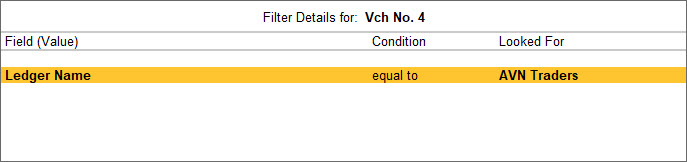
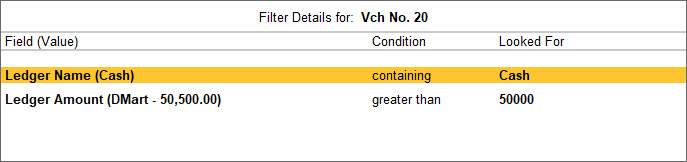
All vouchers that have Cash mentioned in any of the fields will be listed in the filtered report. You can open any of the transactions now and verify, if needed. - In the list of vouchers after you applied the filter, you may want to know in which field of the voucher, the match was found. For example:
- To view the matching details for Vch No. 1, select the voucher, and press Ctrl+Alt+F (Filter Details).
If you are in Rel 6.2 or below, press Alt+F (Filter Details).

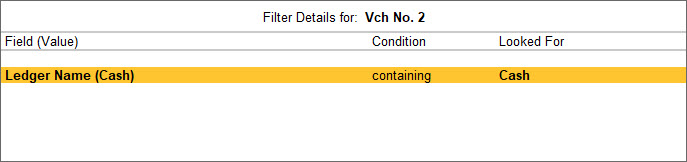
In this case, the matching value Cash was found as part of the Ledger Name that is used in the payment voucher. - To view the matching details for Vch No. 2, select the vocuher, and press Ctrl+Alt+F (Filter Details).
If you are in Rel 6.2 or below, press Alt+F (Filter Details).
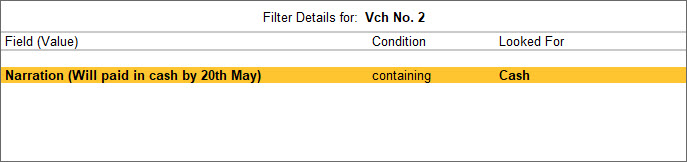
The matching value was found in the Narration field of the voucher.
- To view the matching details for Vch No. 1, select the voucher, and press Ctrl+Alt+F (Filter Details).
Scenario 2: Say, your sales team packs and ships goods to the parties at regular intervals. You want to validate if you have cleared all the orders raised by AVN Traders in a specific period, and therefore need a report showing all the transactions recorded for AVN Traders for that period.
![]()
You can use the Basic Filter mode to apply filter by looking for AVN Traders used in the Ledger Name field. TallyPrime enables you to configure your filter mode and look for any value or text used in specific fields in the vouchers and masters.
- Open Day Book for the selected period, press Ctrl+F (Apply Filter) > F5 (Basic Filter).
- In the Basic Filter screen, press F12 (Configure) > set Select specific field to apply Filter to Yes.
This displays the Field and Condition options on the Basic Filter screen.
- Select the Field and Condition that you need for filtering.
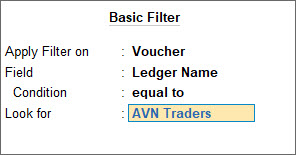
- Field: Select Ledger Name. This will enable you to look for the party name entered in the Name field of the ledger.
- Condition:
- Select containing if the AVN Traders is only part of the party name.
- Select equal to if you are looking for an exact match of the party name.
For this condition, you can also choose to view the existing list of masters in your company.- Press F1 (Help) > Settings > Display > set Show masters under Look for, where applicable to apply Filter to Yes.
This will list all the masters under Look for. You can select from the list or enter the party name.
- Press F1 (Help) > Settings > Display > set Show masters under Look for, where applicable to apply Filter to Yes.
- Look for: Enter AVN Traders or select from the list of party names.
- Press Enter to apply the filter.
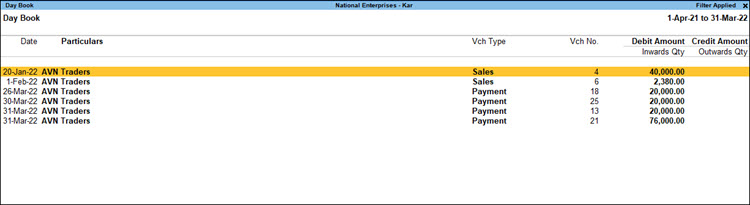
All the transactions done with AVN Traders in the selected period gets listed in the filtered report.
Certain reports such as Sales Register, Day Book, and so on, list only vouchers. Therefore, you can apply filter only on the vouchers shown in these reports. You can apply filter in different reports based on the report details and business needs of that report. For example, in Balance Sheet, you can apply filters for Group, Ledger/Group, Ledger.
Now, to view the matching details, select the voucher entry from the filtered report, and press Ctrl+Alt+F (Filter Details).
If you are in Rel 6.2 or below, press Alt+F (Filter Details).
Multi-Filter
![]()
There are situations when you need to see details in a report according to the masters or vouchers matching more than one condition. It can be a combination of conditions, such as Ledger Name and Voucher Date, or Voucher Date, Effective Date, and Name of Tax Ledger, and so on. The Multi-Filter mode in TallyPrime comes in handy in such situations. This filter mode enables you to apply filter by entering multiple conditions in one go.
In addition, in Multi-Filter, you can apply filter to match a combination of two or more conditions or one among a set of conditions, by using the and and or options. That means:
- Using the option and between two conditions ensures that the results are displayed only when the data meets both the conditions.
- Using the option or between two conditions ensures that the results are displayed when the data meets either of the condition.
You can also use a combination of the and and or options, depending on your business needs.
Now, let’s consider the following scenarios.
Scenario 1: At the end of the quarter, when your business data is sent for auditing purpose, or to the CA for any business-specific needs, your auditor or CA might want to view all the cash transactions of more than Rs. 50,000.
In this scenario, you will need to enter both the conditions to apply filter. Let’s consider Day Book for illustration purpose.
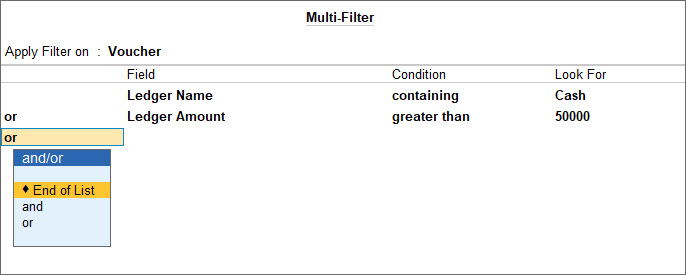
- Open Day Book for the selected period, press Ctrl+F (Apply Filter) > F6 (Multi-Filter).
Apply Filter on is set to Voucher by default. - Provide the conditions to look for Cash transactions.
- Field: Ledger Name
- Condition: containing
- Look For: Cash
- Press Enter and select and.
Selecting and will apply the filter by including the next condition as well. - Provide the conditions to look for transactions of value more than Rs. 20,000.
- Field: Amount
- Condition: greater than
- Look for: 50000
- Press Enter and select End of List.
The Day Book with the Filter Applied status displays the list of all transactions matching both sets of conditions – cash transactions that are of more than Rs. 50,000.
Notice that the report is labelled as Filter Applied on the top-right corner. The vouchers listed are cash transactions of more than Rs 20,000.
To view the matching details, you can select the transaction entry, and press Ctrl+Alt+F (Filter Details).
If you are in Rel 6.2 or below, press Alt+F (Filter Details).
Here, as you had applied filter based on the combination of two conditions – Ledger Name and Ledger Amount, the Filter Details screen displays the exact matches found in the selected voucher (Vch No. 16, in this case).
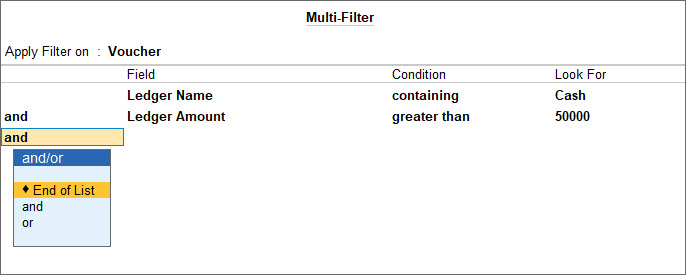
Now, in the above scenario, consider that your CA has asked for a report displaying list of transactions where the cash ledger is used or transactions of value more than Rs. 20,000. In this case, the filtered report should show all transactions that match each of the conditions independently.
To do so, you can use the or option between the conditions in the Multi-Filter mode. This will apply filter on the vouchers upon meeting one of the following conditions:
- All cash transactions, irrespective of the amount
- Transactions recorded with a value more than Rs. 50,000
In Day Book, under Multi-Filter, enter the conditions as shown below:
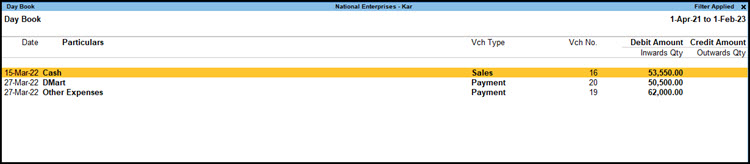
The filter results will be displayed as in the sample image below:
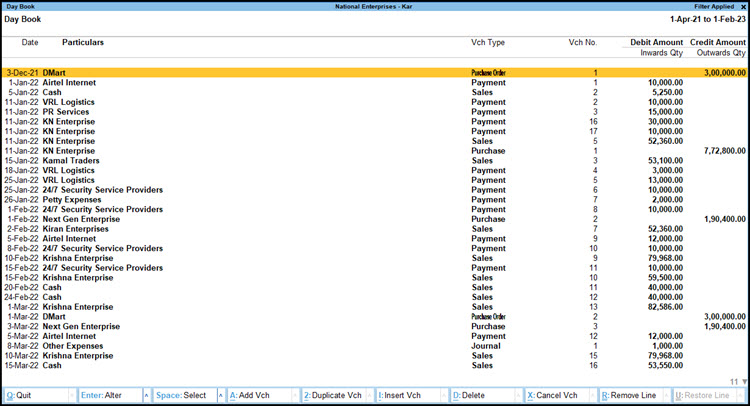
Notice that the filtered report displays cash transactions as well as transactions of values more than Rs. 20,000.
To view the matching details, select the transaction entry in the filtered report, and press Ctrl+Alt+F (Filter Details).
If you are in Rel 6.2 or below, press Alt+F (Filter Details).
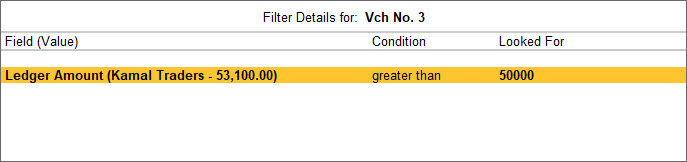
- For Vch No. 17, the match found was for Ledger Name as Cash.

- For Vch No. 3, the match found was the amount for Kamal Traders, which is greater than Rs. 20,000.
Scenario 2: Depending on your business practices, your company generally places an order for stock items that have closing quantity less than 10. Therefore, your Inventory Manager will certainly need a report displaying a list of washing machines that have closing quantity less than 10. Let’s consider Stock Summary for illustration purpose.
- Open Stock Summary for the selected period, and press F5 (Stock Item-wise).
This displays the Stock Summary report stock item-wise. - Open the Multi-Filter screen.
- Press Ctrl+F (Filter) > F6 (Multi-Filter).
- Ensure that the Apply Filter on option is set to Stock Item.
- Provide the set of conditions to look for washing machines among all the categories.
- Field: Stock Category Name
- Condition: Equal to
- Look for: Washing Machine
- Press Enter and select and.
The and/or field enables you to add multiple conditions, until you select End of List. - Provide the set of conditions to look for items having quantity less than 10.
- Field: Closing Qty
- Condition: lesser than
- Look for: 10
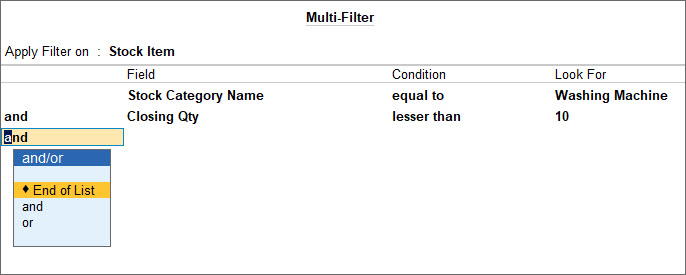
- Press Enter and select End of List.

Applying this filter displays the Stock Summary report with a list of the washing machines where the closing quantity is less than 10. You can share the report with the Inventory Manager to place an order for refilling the stock items, if needed.
Advanced Filter
![]()
In your business, there might be situations when your reporting needs are very specific for analysing your business at depth. Say your business made good profit in a particular month. You would want to know the parties with whom you have transacted with high-volume sales. While looking for such details, you will want to view the values in your report based on the vouchers that match one or more specific conditions.
Scenario: You need to submit a report that displays the total quantity of Samsung products sold to Krishna Enterprises, out of the total sold items. In this case, you will need to filter for items with the name Samsung, and look for vouchers where the party is Krishna Enterprises.
Let’s consider the Stock Group Summary report for illustration purpose.
- Open the Stock Group Summary report for the selected period, and press Ctrl+F (Apply Filter) > F7 (Advanced Filter).
The Advanced Filter screen appears, displaying Stock Item selected under Filter Rows and Voucher selected under Calculate Values.- The Filter Row section allows you to provide conditions specific to the details displayed on the report.
- The Calculate Value section allows you to provide filter conditions specific to the vouchers that contributed to the values in the report.
- Under Filter Rows, provide the set of conditions to look for stock items that have name as Samsung.
- Select Name from List of Fields.
- Select containing from List of Conditions.
- Enter Samsung > End of List.
You can use the and or or option and provide any additional conditions, if needed.
- Under Calculate Values, provide the set of conditions to look for transactions recorded for Krishna Enterprises to whom the Samsung stock items were sold.
- Select Ledger Name from List of Fields.
- Select equal to from List of Conditions.
- Enter Krishna Enterprises > End of List.
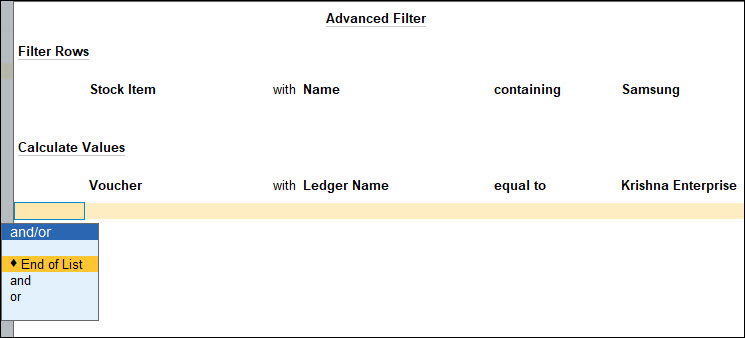
The filtered Stock Group Summary report displays the stock items where the name contains Samsung and the values are based on transactions recorded for Krishna Enterprise.
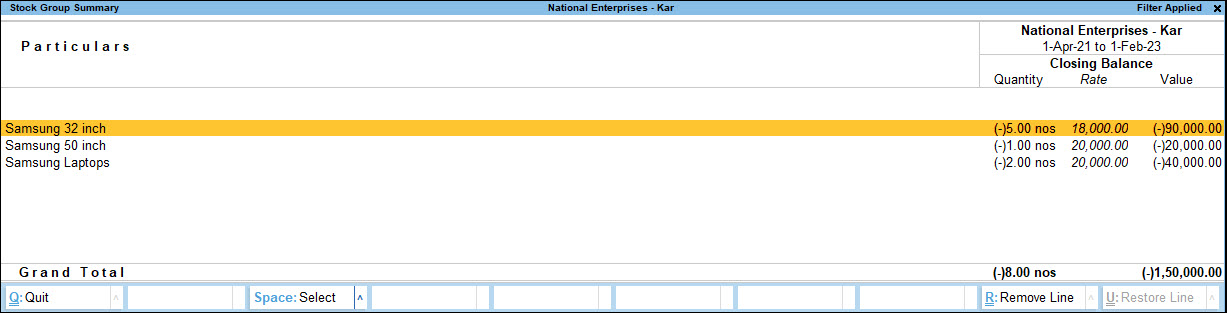
As the filter applied is based on conditions provided for details displayed in the report and the contributing vouchers, you can view the Filter Details separately at different levels.
- To view the details matching the condition you entered under Filter Rows, press Ctrl+Alt+F (Filter Details) directly from the filtered report.
If you are in Rel 6.2 or below, press Alt+F (Filter Details).

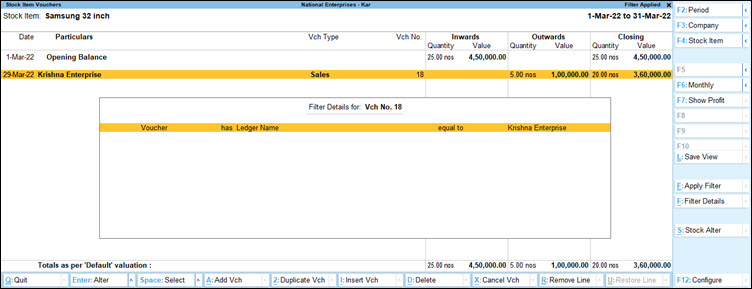
- To view the details matching the conditions that you entered under Calculate Values, drill down from the report to the voucher level, and then press Ctrl+Alt+F (Filter Details).
If you are in Rel 6.2 or below, press Alt+F (Filter Details).
Similarly, before tax filing, you would certainly want to ensure all the invoices are correct. So, you would want to view a list of all parties for which the GSTIN/UIN information is missing and fix them in a go. The Advanced Filter mode in TallyPrime handles all such in-depth requirements seamlessly. Using this filter mode, you can apply filter with details available on the report as well as details entered inside the master that is used within any master or transaction. For example, you can apply filter on stock items, using details provided inside the parent group of the items.
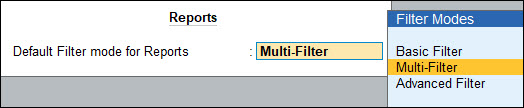
Set Default Filter Mode in Reports
If you have already learnt how to use the different filter modes in TallyPrime, depending on your business needs, you might want to use a specific filter mode frequently. Therefore you can set the desired filter mode to appear by default every time you open your reports.
To set a filter mode as default in your report:
- Press F1 (Help) > Settings > Display.
- Under Reports, select Default Filter mode for Reports, and select one of the Filter Modes.
For example, if you have selected Multi-Filter, the next time you press Ctrl+F (Apply Filter) in a report, the Multi-Filter screen will appear by default.
View Filter Details
Once you apply filter in a report, you can open the Filter Details screen to see which field in the voucher or master matched the condition you had entered for filter. When you apply filter, TallyPrime logs the matching details as soon as it finds the first match in a voucher or master on which the filter is being applied. For example, you might have used Cash as part of the Party Name as well as Narration in a voucher. Now, while filtering the vouchers where Cash is mentioned, TallyPrime identifies the details of the first match in the voucher and then moves on to look for a match in the next available voucher.
On a filtered report, press Ctrl+Alt+F (Filter Details) to see the Filter Details screen.
If you are in Rel 6.2 or below, press Alt+F (Filter Details).
- Let’s say you applied Basic Filter in Day Book to view all transactions that have Cash mentioned. If Cash was found matching in the Ledger Name first, the Filter Details screen will appear as follows:
- Similarly, say you had applied Multi-Filter to view all cash transactions recorded for AVN Traders. In this case, Filter Details will show the fields that matched with the set of conditions you had entered for filter, as in the sample image below:

- If you had applied Advanced Filter in reports like Voucher Registers (Day Book, for example) to view the results based on details provided in a hierarchy, the Filter Details screen would display the hierarchal information and the fields with the matching details, as shown below:

- If you had applied the filter on both the Filter Rows and Calculate Values sections in reports like Balance Sheet, P&L, Stock Summary, and so on, you can view the matching details for Filter Rows and vouchers that were matched as per conditions provided under Calculate Values, separately.
- To view the details matching the condition you entered under Filter Rows, press Ctrl+Alt+F (Filter Details) directly from the filtered report.
If you are in Rel 6.2 or below, press Alt+F (Filter Details).

- To view the details matching the conditions you entered under Calculate Values, drill down from the report to the voucher level, and press Ctrl+Alt+F (Filter Details).
If you are in Rel 6.2 or below, press Alt+F (Filter Details).

- To view the details matching the condition you entered under Filter Rows, press Ctrl+Alt+F (Filter Details) directly from the filtered report.
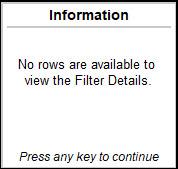
- Filter Details when no results are displayed: When you apply filter on a report with specific conditions, the filtered report will appear blank if there are no matching details. In such cases, if you attempt to view the Filter Details, the following information is displayed:
- Filter Details for default details in reports:
- Irrespective of the filter you apply, certain reports display information that is default in nature. For example, if you had applied filter on Balance Sheet to see only groups where the Opening Balance is more than Rs. 50,000, you will get the following filtered report:
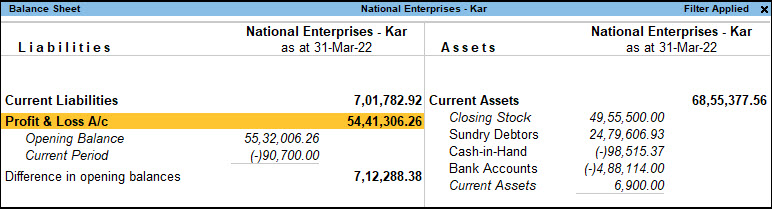
Notice that Difference in opening balances is a default field that appears, irrespective of the filter condition. In such cases, you will not be able to select the row to view Filter Details.
- Similarly, when you apply filter in Ratio Analysis, along with the filtered results, you will view certain default rows that allow you to drill down, as in the sample image below:
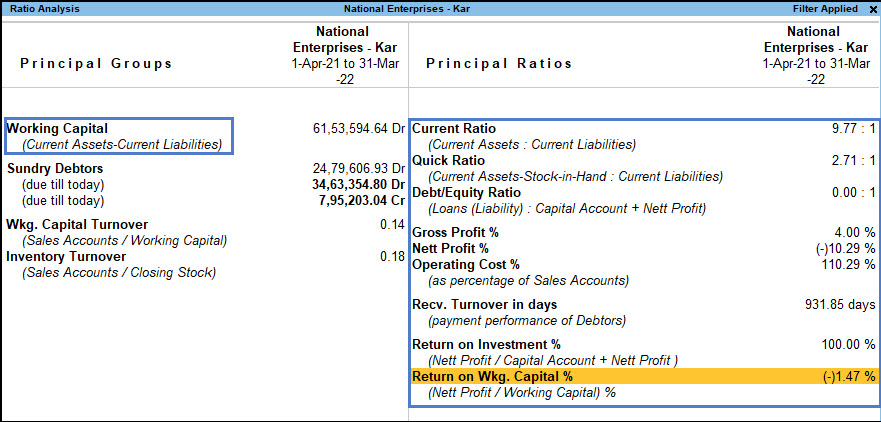
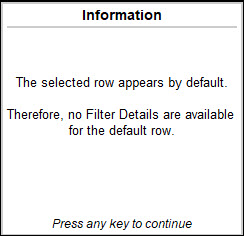
In this case the rows such as Working Capital, Current Ratio, Quick Ratio and so on are default. In such cases, if you attempt the view the Filter Details on selecting any of the default rows, the following information is displayed:
- Irrespective of the filter you apply, certain reports display information that is default in nature. For example, if you had applied filter on Balance Sheet to see only groups where the Opening Balance is more than Rs. 50,000, you will get the following filtered report:
- Filter Details when viewing a report in Detailed format: If you have applied filter on a report, while viewing it in Detailed format, the filter is applied only on the primary rows of the report. Let’s consider applying filter in Stock Summary.
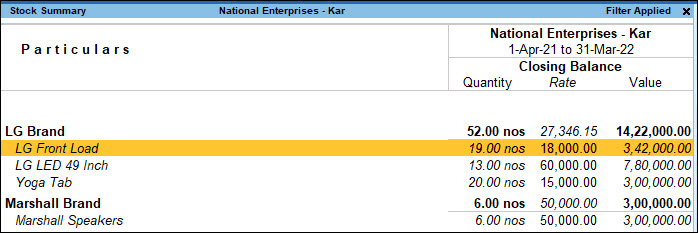
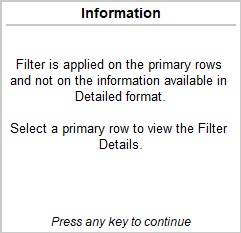
Here, the Stock Groups are the primary row information and the corresponding Stock Items are secondary. If you select any of the secondary row and attempt to view Filter Details, the following information is displayed:
Filter Details provides you the information about the exact match in the vouchers and masters based on the filter conditions. At the same time, it informs you of all the specific cases where Filter Details does not apply so that you get a smooth and seamless Filter experience.
Range and Value Filters in TallyPrime Release 2.1 and Earlier
If you are on TallyPrime Release 2.1 or earlier, click here.
You can filter for vouchers in voucher registers using the Range filter. In summary reports, you can apply the Value filter to view the reports showing values based on the contributing vouchers as per the filter conditions.
In this section
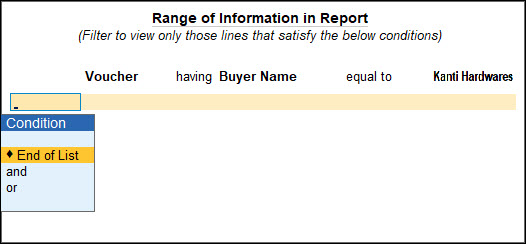
Alt+F12 (Range)
Let’s consider Day Book for illustration purpose.
- Open Day Book > press F2 (Date) to set the date if needed.
- Press Alt+F12 (Range).
- Provide the relevant filter values in the Range of Information in Report screen.
- Select Voucher from Type of Information.
- Select the required field name under Particulars, say Buyer Name.
- Select the condition as containing or equal to under Range of Information.
- Enter the Buyer Name, say Kanti Hardwares,
You can provide more than one set of conditions to apply the Range filter, by selecting the and option under Conditions. - Once you have provided all the information select End of List and press Enter.
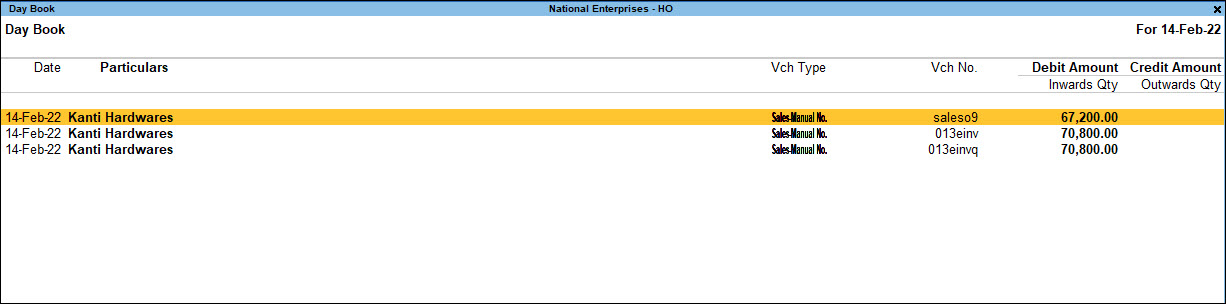
Day Book will display all the voucher entries where the Buyer Name or Party Name was found as Kanti Hardwares.
Ctrl+F12 (Value)
TallyPrime provides summary reports where the values are represented based on your transactions or vouchers. You might need to view the reports based on vouchers that meet specific conditions. In such cases, you can use the Value filter on your summary reports.
Let’s consider Balance Sheet for illustration purpose.
- Open Balance Sheet > press F2 (Period) to set the period, if needed.
- Press Ctrl+F12 (Value).
- Provide the relevant filter values in the Value to Calculate in Report screen.
- Select the required field name under Particulars, say Date.
Note the in Balance Sheet, Voucher is prefilled by default. - Select the condition as containing or equal to under Range of Information.
- Enter the date, say 15-Feb-22,
You can provide more than one set of conditions to apply the Value filter, by selecting the and option under Conditions. - Once you have provided all the information select End of List and press Enter.
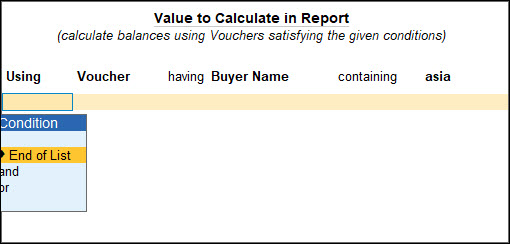
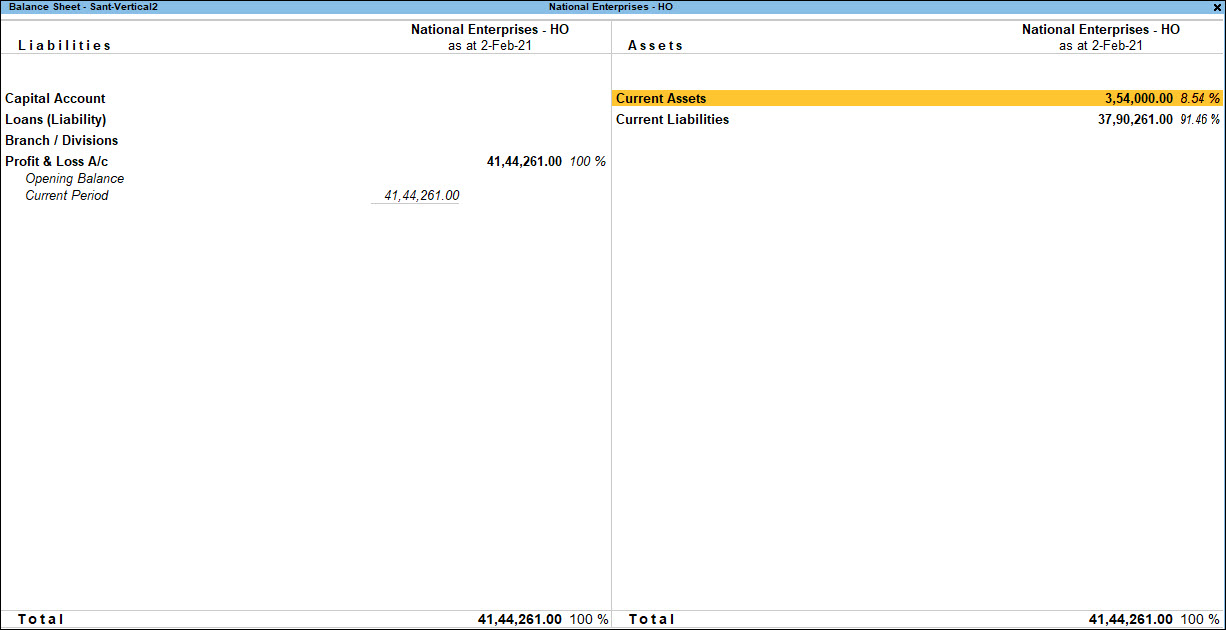
Balance Sheet will display the values based on calculated the values of the vouchers of that particular date that you entered.
- Select the required field name under Particulars, say Date.
In TallyPrime Release 2.1, you can use Range and Value filters options in different reports depending on your business requirements.


