
Export Data in TallyPrime
TallyPrime allows flexible export of company data, including masters, transactions, vouchers, reports, GST returns, and dashboard tiles, supporting formats like ASCII (.txt), Excel (.xlsx), HTML (.html), JPEG (.jpg), PDF (.pdf), XML (.xml), and JSON (.json). You can export accounting and inventory masters (with ledger balances), specific or all vouchers (with dependent masters), individual reports, multi-account documents like reminder letters, and GST returns in portal-ready formats.
Exports are fully configurable, you can choose the file format, destination, and name. PDF exports support digital signatures, and multi-currency data can retain base currency symbols.
Before you begin
- Save and close any open documents – masters, transactions, or reports.
- Take a backup of your company data.
Configure Export | Set Up TallyPrime for Data Export
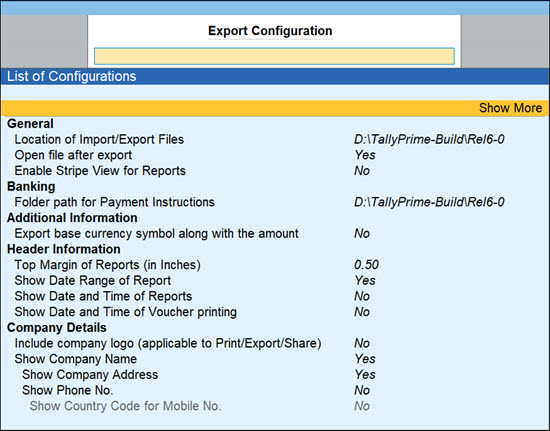
- Press Alt+E (Export) > Configuration.
-
Enable or disable export configurations, depending on your needs.
-
Location of Import/Export Files: Set the folder path to save the exported or imported file.
-
Open file after export: Set this to Yes, to automatically open the exported file after export. This saves time and removes the need to manually locate it.
-
Folder path for Payment Instructions: Set the folder path to which the payment instructions need to be exported.
-
Show payment instruction details before Export: Enable this option to ensure that TallyPrime displays the payment instruction details for review before exporting.
-
Export base currency symbol along with the amount: Set it to Yes if you are maintaining multiple currencies and want to capture the currency symbol along with the amount.
-
-
Similarly, you can configure the options under Header Information and Company Details for the Export process.
Export Single Voucher/Invoice or Report
Export any invoice or report one at a time, as and when you need, with ease.
- Open any voucher or report and press Ctrl+E (Current).
- Press C (Configure) to enable or disable the document-specific configurations.
- Configure Voucher Details or Report Details: The configurations might vary depending on the document selected for export.
- Configure Export Settings, as needed.
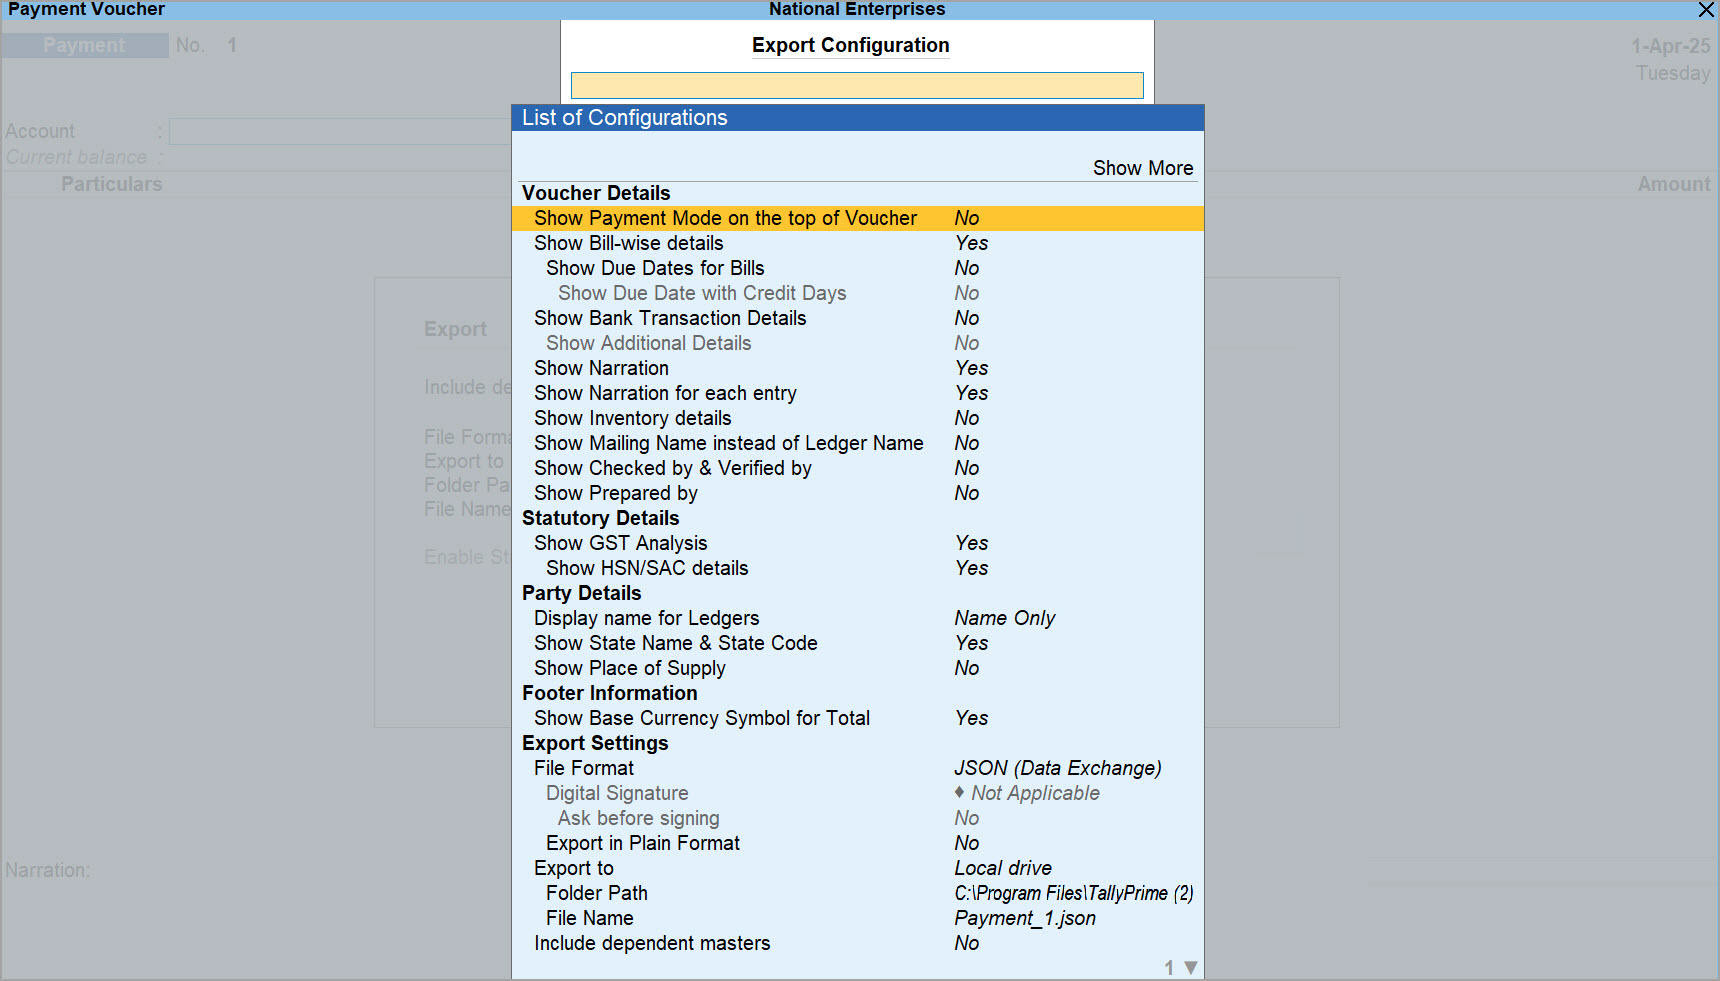
- Press E (Export) to export the voucher or report in the selected file format and export location.
Export Multi-Account Reports
Export Reminder Letters
You can export and send reminder letters to debtors about outstanding amounts using reports such as Bills Receivable, All Ledger Outstandings, Ledger Outstandings, Group of Account Outstandings, and Group Outstandings.
- Press Alt+E (Export) > Others > and select any of the report listed above.
- Press C (Configure) and configure for Reminder Letter.

- Select Report Type as Reminder Letter.
- Enter the ageing range for which the bills have been overdue. Specify the range as per the credit policies of your business.
- Press Ctrl+A to save.
- Select Reminder Letter information > press Enter > and update the information, as needed.
- Set the options Show Due On and Show Overdue Days to Yes, to view these details in separate columns of the exported file.
- Specify the Designation of Signing Authority to display the same in the footer of the exported file.

- Configure any other Report Details, as needed.
- Configure Export Settings, as needed.
- Press E (Export) to export the report as Reminder Letter in the selected file format and export location.
Export Confirmation of Accounts
You can export and send confirmation of accounts to the concerned parties for verifying account details as on a specific date using reports such as Cash Book, Bank Book, All Ledger Accounts, One Ledger Account, and Group of Accounts.
- Press Alt+E (Export) > Others > and select any of the reports listed above.
- Press C (Configure) to set up Confirmation of Accounts.

- Select Report Type as Confirmation of Accounts.
- Select Provide Confirmation Statement > press Enter > and update the information, if needed.
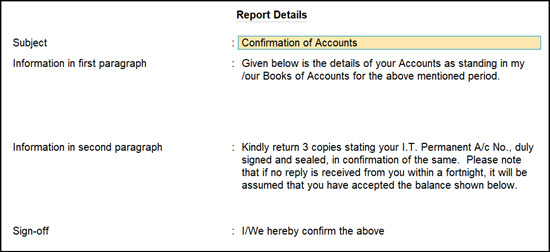
- Specify the Designation of Signing Authority to display the same in the footer of the exported file.
- Configure Export Settings, as needed.
- Press E (Export) to export the report as Confirmation of Accounts in the selected file format and export location.
Export All Masters or Transactions

- Press Alt+E (Export) > select Masters or Transactions.
- Press C (Configure) to configure master/transaction specific options. For example:
- Masters
- Set the Type of Master to Accounting Masters, Inventory Masters, or others from the drop-down list.
- Include dependent masters: Enable this option if you want to export the masters dependent on the masters being exported.
- Export closing balance as opening balance: Enable this option to use the closing balance in the masters as the opening balance value.
- Transactions
- Set the Type of Voucher entries to All Vouchers, Accounting Vouchers, or Inventory Vouchers, as needed
- Include dependent masters: Enable this option if you want to export the masters dependent on the vouchers being exported.
- Set the period from which the vouchers should be considered for export.
- Masters
- Configure Export Settings, as needed.
- Press E (Export) to export the masters or transactions in the selected file format and export location.
Export All Tiles or Specific Tiles in Dashboard
You can export one or more dashboard tiles in TallyPrime for quick information sharing. Simply select the tiles you want and configure the export as needed.
To know more, refer to Export a Single Tile or All Tiles from Dashboard.
Errors & Resolutions
- Unable to export the Excel file, as the File Path does not exist, or the file is already open. Set the correct File Path or close the file and try again.
Cause:
This occurs when the destination file is already open on your system or the specified location is inaccessible.
Solution:- If the file is already open, close it and retry export.
- Ensure that you have write access in the file location and retry export.
-
Failed to Create File
Cause: The tally.imp is open, or the destination folder to which you are trying to export the data is in read-only mode.
Solution:-
Use a different file name and retry export.
-
Close the file and retry export.
-
Provide permission to write in the folder and retry export.
-
Right-click on the folder icon and select Properties.
-
Unselect Read Only and click OK.
-
-


