
Enable Excise for Dealers and Configure the Options as Needed
To get started, you have to enable the excise module in TallyPrime and enter your company’s excise registration details.
Enable the Dealer Excise feature
- Press F11 (Features) > set Enable Excise to Yes.
If you do not see this option:- Set Show more configurations to Yes.
- Set Show all configurations to Yes.
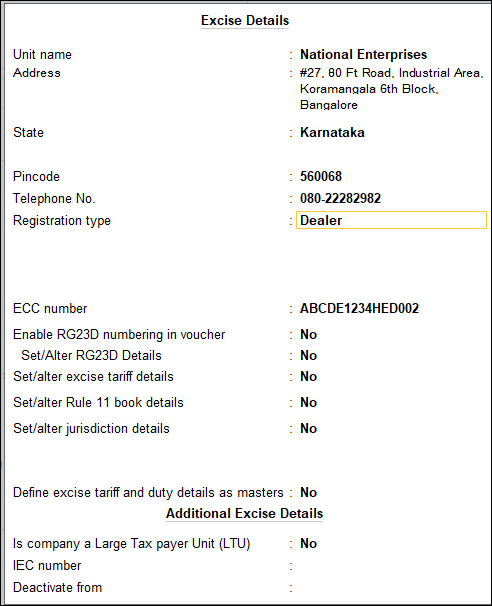
The Excise Registration Details screen appears as shown below:

In the Excise Registration screen, excise details like Unit name, Address, State, Pincoode and, Telephone No. will be displayed as entered in the Company Creation screen. These details can be altered, if required.
- Select Dealer as the Registration type.
- Enter ECC number ECC number is PAN based, and has 15 digits. The format of ECC no. is ABCDE1234HXM001.
- Enable the option Set/alter excise tariff details to Yes, to record tariff details.
To define the Excise Tariff Details-
- Enter the Tariff name, HSN code and Rate.
- Select the Reporting unit of measure and Valuation type.
- A table of Excise Tariff Details can be created or revised details can be provided from a particular date in Excise Tariff Details screen.
To create a table of Excise Classifications
-
Press Alt+W (Details) button.
Note: On clicking Alt+W (Details) button, additional columns are displayed for configuring the tariff details, excise duty classification, rate of excise duty and so on. Click here for procedure on defining these details.
- Provide the relevant details with the date of applicability.
Enable the option Define excise tariff and duty details as masters to create multiple Excise Classifications predefined with tariff and duty details. These classifications can be applied to the required stock items or stock groups.
The Excise Registration Details screen displays the options required to enable excise feature for dealer registration. For providing additional information, the relevant options can be enabled through
- Press Enter to save Excise Registration Details screen.
- Press Enter to save the details and view the Company Operations Alteration screen.
- Enter the PAN/Income Tax Number and Corporate Identity Number (CIN).
-
- Accept the Company Operations Alteration screen.
Configuration Options
To provide additional details click F12 (Configure) and set the following options to Yes
- Enable IEC number to enter the importer exporter code.
- Enable Rule 11 Book details to create Rule 11 book and define the numbering format.
- Enable jurisdiction details to enter the Code, Name and Address of Range, Division and Commissionerate
- Enable RG23D numbering to use RG23D automated numbering feature while invoicing
- Enable multi excise unit to create multiple tax units by defining the registration types.
Additional Options in Excise Registration Details Screen
Based on the configurations set in the above section, the relevant option appears in Excise Registration Details screen.
- Set the option Enable RG23D numbering in voucher to Yes. Then enable the option Set/Alter RG23D Details. In the RG23D Details screen enter the Prefix and Suffix.
- Enter the importer exporter code in the IEC number field.
- Enable the option Set/alter Rule 11 book details. Enter the Excise Book name in the Excise Book screen and press Enter. Provide the required details in Serial Number Creation screen. Click here for detailed procedure on creating Excise Serial Number.
- Enable the option Set/alter jurisdiction details. In the Other Details screen enter the Code, Name and Address of Range, Division and Commissionerate. In case where jurisdiction details have to be altered from a particular date:
- Press Alt+W (Details) button.
- Enter the date from which the new jurisdiction details are applicable in the Applicable From column.
- Enter the Code, Name and Address.
- Set the option Enable Multiple Excise Units to Yes to create multiple tax units as excise units. On enabling this option, the feature Maintain multiple Godowns/ Excise Units gets automatically enabled in Inventory Features.
Note: Every unit has to be registered under Excise and books of accounts have to be maintained separately for each unit. The company data created in TallyPrime will be considered as the primary excise unit and hence, this option will be set to No. However, the provision is made available to:
-
Create multiple excise units by providing the registration details.
-
Maintain data and generate reports for each excise unit.
-
- Set the option Is Company a Large Tax Payer Unit (LTU) to Yes if it is a manufacturing unit identified as large tax payer. Retain it as No if the Registration Type is selected as Dealer.
- Accept the Excise Registration Details screen.


