
TallyPrime Flexibilities for Accuracy and Ease of Data Entry under GST
The latest release of TallyPrime provides you with several flexibilities to assist you in ensuring accuracy of the data. Appropriate GST details are crucial for a seamless returns filing experience. Therefore, TallyPrime provide you with the flexibility to easily set up the GST details in masters, such as GST rates and HSN/SAC, in the right hierarchy that suits your business practices. In addition, TallyPrime takes care of impact on the GST status of your vouchers due to any changes that you might make to the GST details in masters at a later time. It recomputes the GST status of the vouchers, without any manual intervention.
In TallyPrime, you can verify the tax break up for your sales and purchase transaction on the fly, using the GST – Tax Analysis report. In addition, the report also helps you to know the source from which the tax rate is considered in the transaction. Getting a clear understanding of the applicable tax right when you are recording a transaction is a better way to verify that the data entry is correct as per the GST norms.
TallyPrime does not stop you from making any alterations to the GST details in your data in advance. This means, once you make any changes to your masters, you can specify the date when those changes should be effective. The effective date concept in TallyPrime is not limited to masters, but it is extended to vouchers and even the returns to ensure that you have the flexibility to setup the GST Returns effective date as per your business norms.
Make Your Masters Transaction-Ready with GST Details | Set Up GST Details
As mentioned earlier, you can specify the GST details like HSN/SAC and tax rate of items and services in the voucher. Considering the effort of repeating these details, and possibility of making mistakes during data entry, you can choose to specify the GST details like HSN/SAC and tax rate in the Stock Items and Service Ledgers. This will help in using the GST details specified in the masters whenever these masters are selected in vouchers. This helps reduce the efforts and avoid the data entry errors that can creep in when providing GST details during voucher creation. But, what if you deal with hundreds of items? This approach will also become effort-heavy. Don’t worry, you have other options! You can specify these details at the group-level, ledger-level or at the Company-level.
Before you proceed, make a note that HSN/SAC and tax rate need not be considered as a unit. This implies that HSN/SAC and tax rates can be specified at different levels, if your business needs. To know more, refer to the GST Rate Setup in TallyPrime topic.
To understand where to specify the HSN/SAC and tax rates, consider three extreme cases:
- If all the items/services that you deal with have the same HSN/SAC and therefore the same tax rate, define GST details at the Company level.
- If every item/service that you deal with has different HSN/SAC and tax rate, define GST details in the Stock Item and Service Ledger.
- If all the items/services that you deal with have the same HSN/SAC and therefore the same tax rate, define GST details at the Company level.
Refer to the table below to learn more about choosing where to define HSN/SAC and tax rate.
| Item/Service | HSN/SAC | Tax Rate | Setup GST Details At | |
|---|---|---|---|---|
| HSN/SAC | Tax Rate | |||
| All items/services | Same | Same | Company | Company |
| All items/services | Different | Different | Stock Item/Service Ledger | Stock Item/Service Ledger |
| All items/services | Same | Different | Company | Stock Item/Service Ledger |
| All items/services | Different | Same |
Stock Item/Service Ledger |
Company |
| Groups of items/services | Same | Same | Stock Group/Ledger Group | Stock Group/Ledger Group |
| Groups of items/services | Different | Same | Stock Item/Service Ledger | Stock Group/Ledger Group |
Choose the source of GST details in transactions
What’s more, TallyPrime allows you to set the preferred source from which GST details should be picked up during transaction recording.
GST information can be defined at different levels — Ledger, Group, Stock Item, Stock Group, or Company. Depending on your business type and configuration, you can tell TallyPrime which source to prioritise for HSN/SAC and tax rate while recording transactions.
For example, you run a business where groups of stock items share a common tax rate, but each item or group has a unique HSN/SAC.
In such a case, it is practical to define the tax rate at the group level, and the HSN/SAC at the item level.
To ensure GST details are fetched correctly in transactions, you can configure:
-
Tax Rate Source as Ledger
-
HSN/SAC Source as Stock Item
-
Press F11 > and enable the option Set/Alter Company GST Rate and Other Details > Set Source of GST Details in Transactions.
-
Press F12 (Configure) > and enable the options Set Source of GST details in transactions and Set Source of HSN/SAC details in transactions.
-
Select the Source from the List of Sources.
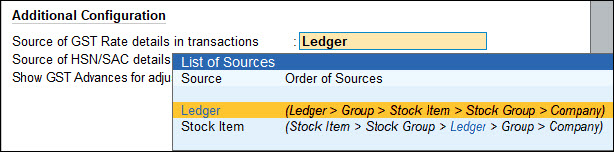
If a GST detail is not found at the selected source, TallyPrime automatically moves up the relevant hierarchy until it finds the value.
Hierarchy for Tax Rate
Ledger > Ledger Group > Stock Item > Stock Group > Company
Hierarchy for HSN/SAC
Stock Item > Stock Group > Ledger > Ledger Group > Company
This ensures that even if you miss configuring GST details at the selected source, TallyPrime will still attempt to pick up correct values from the next level in the chain.
Example Use Cases
-
If you manage GST at the Stock Item level, choose Stock Item as the source for both tax rate and HSN/SAC.
-
If you’re in a service-oriented business, it is ideal to set Ledger as the source for both tax rate and HSN/SAC.
-
If GST is configured only at Group level, TallyPrime will still work as expected by referring to the hierarchy, ensuring no interruptions during transaction entry.

Updating GST Status of Vouchers | Re-computing GST Status of Voucher
TallyPrime ensures that your GST transactions stay up-to-date so that the details are GST compliant. This makes your GST filing journey smoother and seamless. There are times when you might have already recorded a transaction, but need to make changes to some of the GST-specific information in the related masters. In such situations, TallyPrime keeps the GST status of all the corresponding vouchers updated as per your choice. Any change to the GST details in your masters will have an impact on the corresponding vouchers. Based on the changes you make, the status of the voucher for return filing needs re-computation, which will be reflected in the GST reports.
GST Status update as per Effective Date: Depending on your business priorities, you may also want the changes in the GST details to be effective from a specific date. This will ensure that the updates to the GST Status of the dependent transactions are applicable as per the specified date and they start reflecting in the GST Reports accordingly.
GST Status update on saving the master: TallyPrime provides you the flexibility to choose whether you want to update the GST Status of the vouchers when you save the master or whenever you open the Returns next. This means, any GST-related changes in the masters recomputes the status of vouchers to ensure that the vouchers are considered in the appropriate categories/sections in your GST returns.
- Press F11 > Enable Goods and Services Tax (GST) > Yes, and then enable the option Set/Alter Company GST Rate and Other Details.
By default, the option Update GST Status of Vouchers after Master Alteration is set to No. - Set the option to Yes if you want to update the GST status of the vouchers during master alteration.
This option is available from TallyPrime Release 5.0 onwards.
The re-computation of vouchers in TallyPrime is applicable based on the following changes:
- Company GST Details – GST Registration details, e-Invoice or e-Way Bill details, and so on
- GST-specific details in party masters, duties and taxes ledgers, sales/purchase account ledgers, and so on
Prevention of Errors in Transactions Through Related Reports On the Fly
TallyPrime takes the required steps to help you prevent any inadvertent errors that may occur when recording business transactions. Especially when you are recording a GST transaction, you might want to validate and analyse the tax break-up and details. TallyPrime provides you with the flexibility to open the GST Tax Analysis report on the fly.
While recording your sales or purchase transactions, once you have selected the require ledgers that are applicable for tax calculations, you can simply press Alt+A or Ctrl+O (Related Reports) > GST Tax Analysis and refer to the tax breakup. This enables you to verify the taxes applicable and be assured that the tax calculation details are correct. To know more on how to view the GST tax analysis report in different transaction scenarios, the following:
These are only a few scenarios for your quick reference.
Effective Date for Changes to GST Details in Masters
There are situations when you will need to update the GST details in your masters and those updates may have an impact on your vouchers and returns overall. We also understand that you may want such changes to take effect from a specific date onwards, and therefore TallyPrime prompts you to enter the effective date when you alter the GST details in masters, including at the company level.

Enter the Effective Date and you are all set. TallyPrime will track of the date you specify and ensure that those changes are effective from that date.
GST Return Effective Date in TallyPrime
In your business, there may be situations in which you will need a transaction to appear in a different Return period for reasons such as:
- The supplier has uploaded the invoice in a Return period, while in your books, the corresponding voucher appears in a different Return period.
For example, a transaction happens on 30-Nov-2022, and you create a purchase voucher on 1-Dec-2022 in TallyPrime.
However, since your supplier is uploading the transaction in the Return period of Nov 2022, you will need to change the Return Effective Date to 30-Nov-2022. - You could not upload the voucher on the GST portal in the same month as the voucher creation.
For example, a transaction takes place on 30-Nov-2022, and you could not update your books on the date but updated later.
In such scenarios, you can ensure that the Return Effective Date is in the month of Dec-22.
In a different business scenario, you signed the return in TallyPrime. However, there is some error in the voucher or supplier’s invoice. So, you need to amend the transaction with the correct values to a future Return period. In such a case, you need to change the Return Effective Date in TallyPrime, in alignment with the Return period applicable to the invoice.
In TallyPrime, the facility to provide GST Return Effective Date takes care of all such scenarios.
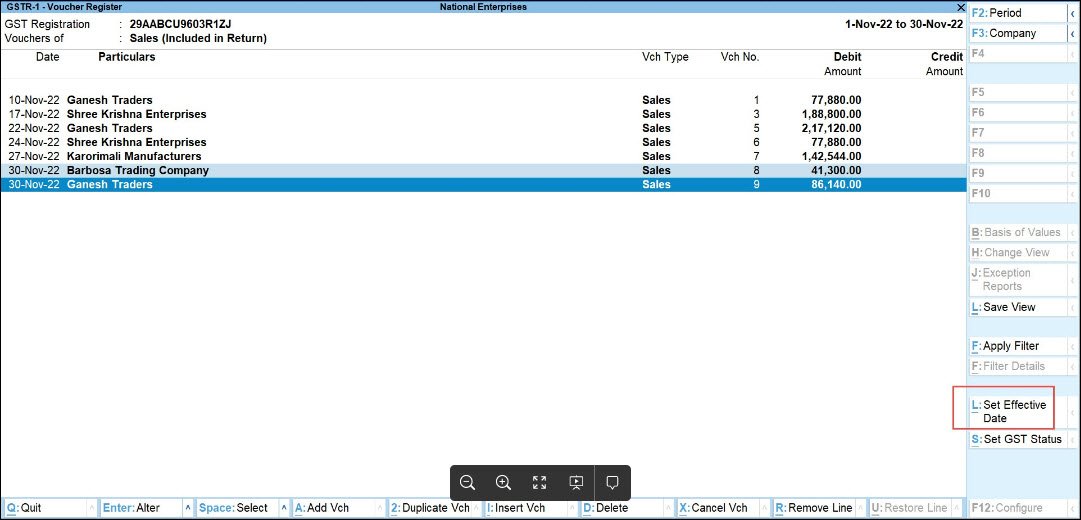
GST Return Effective Date for Vouchers
GST Return Effective Date decides the period of return for a specific voucher. It can be done for any GST transaction – be it Sales, Purchase, Credit Note, Debit Note, Journal Voucher, Payment, Receipt, and others. In TallyPrime, you can update the GST Return Effective Date for all returns together, or selectively for specific returns such as GSTR-1, GSTR-2A, GSTR-2B, and GSTR-3B.
Specify GST Return Effective Date in a Voucher
You can specify Return Effective Date in a voucher either while creating the voucher or during alteration.
-
Press Alt+L (Set Effective Date).
-
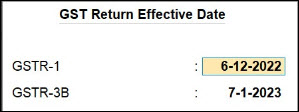
Set the effective date, as needed:
-
Enter a single effective date for all selected returns.
-
Enter different effective dates for each Return Type (for example, one date for GSTR-1 and another for GSTR-3B).
-
- Accept the screen. As always, you can press Ctrl+A to save.
If you are using TallyPrime 7.0 or earlier.
Know more...- In the Accounting Voucher Alteration screen, press Ctrl+I (More Details) > type GST Return Effective Date and press Enter.
The GST Return Effective Date screen appears. - Enter the Return Effective Date and press Ctrl+A to save.
- As always, press Ctrl+A to save the voucher.
As per the date entered in the GST Return Effective Date screen, the voucher moves to the respective Return period in the GST Return such as GSTR-1, GSTR-3B, GSTR-3, and CMP-08.
Specify GST Return Effective Date for Multiple Vouchers
There are situations in which you will need to include multiple transactions in a different Return period. In such a case, you can set Return Effective Date for multiple vouchers in TallyPrime.
This facility is especially useful when:
- There are multiple vouchers to move to a subsequent Return period.
- There are multiple vouchers in which you had made changes for amendment.
However, you did not specify the Return Effective Date at the time of making the changes, and therefore, the vouchers have moved to the Uncertain Transactions (Corrections needed) section of the respective GST Return report.
- Press Alt+G (Go To) > type or select the GST Return such as GSTR-1 or GSTR-3B, as applicable, and press Enter.
- Drill down to the section that contains the vouchers in which you need to specify Return Effective Date.
- Press Spacebar to select multiple vouchers.
Or press Ctrl+Spacebar to select all the vouchers. - Specify the Return Effective Date for the selected vouchers.
- Press Alt+L (Set Effective Date).
- Enter the date and press Ctrl+A to save.
- Press Alt+L (Set Effective Date).
As a result, the vouchers will start appearing in the Return period, based on the date entered in the GST Return Effective Date screen.
Specify Different GST Return Effective Date for GSTR-1 and GSTR-3B
You may want a specific voucher to appear in GSTR-1 of a specific Return period, while it should appear in a different Return period of GSTR-3B. You can provide different Effective Dates for GSTR-1 and GSTR-3B.
Consider that you filed GSTR-3B and later realised that one of the vouchers was missing.
In such cases, you record the invoice and report it in GSTR-1 in the same period, while you can report the corresponding voucher in GSTR-3B of the subsequent period.
-
Open the relevant GST report.
-
Press Alt+L (Set Effective Date).
-
Set the effective date, as needed:
-
Enter a single effective date for all selected returns.
-
Enter different effective dates for each Return Type (for example, one date for GSTR-1 and another for GSTR-3B).
-
-
Accept the screen. As always, you can press Ctrl+A to save.
If you are using TallyPrime 7.0 or earlier.
Click here...- In the Accounting Voucher Alteration screen, press Ctrl+I (More Details) > type GST Return Effective Date and press Enter.
The GST Return Effective Date screen appears. - Change the Effective Date for Returns separately.
- Press F12 (Configure), set Change Effective Date for Returns separately to Yes, and press Ctrl+A to save.

- Enter the dates as per the Return periods of GSTR-1 and GSTR-3B, applicable to the voucher.
- As always, press Ctrl+A to save the voucher.
- Press F12 (Configure), set Change Effective Date for Returns separately to Yes, and press Ctrl+A to save.
TallyPrime Release 3.0 brings a host of flexibilities considering the varied business needs of today in mind. Features like voucher- numbering series, GST details setup at master level, capabilities to manage multiple GSTINs, various improvements in the Returns area, including inclusion of reconciliation features, and many more are designed to provide a seamless experience in your business. To know more about the key features in the latest release of TallyPrime, refer to the Release Notes for TallyPrime Release 3.0.
Configure Default Return Types for Download
For TallyPrime 5.0 & later
You can specify the default return type for download, so whenever you start downloading GST returns, that return type will be selected automatically. You can switch to a different return type anytime.
- Press Alt+Z (Exchange) > Configure.
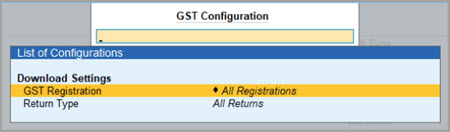
- GST Return Type for Download: Select the required Return Type, such as GSTR-3B.
You also have the flexibility to select All Returns.
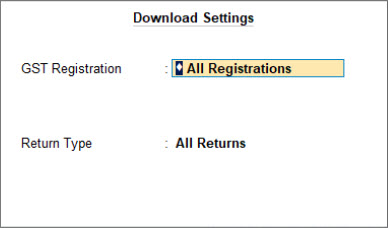
- Press Ctrl+A to save the configuration.
The selected Return Type or All Returns will be considered as the default in subsequent downloads.


