
Extract Data Using ODBC in TallyPrime
You may need to share data of ledgers, stock items, or any other master with your customers or internal stakeholders to keep the record of those masters. You can share the data in MS Excel or MS Word format by extracting from TallyPrime. All you need to do is to enable ODBC in TallyPrime and follow the steps in MS Excel or MS Word to share data using ODBC. While in MS Excel, you can extract data with the From Microsoft Query option, in MS Word, you can do so by label printing with Mail Merge Wizard.
Enable ODBC in TallyPrime
- Start TallyPrime.
- Press Alt+Z (Exchange) > Data Synchronisation and press Enter.
The Data Synchronisation Configuration screen appears. - Under List of Configurations, select Client/Server configuration and press Enter.
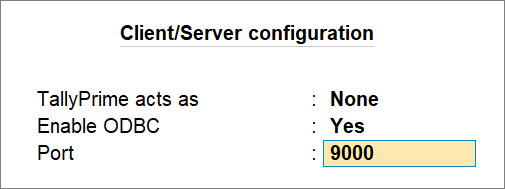
The Client/Server configuration screen appears. - Select options under the labels as follows:
- TallyPrime acts as: None.
- Enable ODBC: Yes.
- Select the Port as applicable to your license server.
Seamlessly integrate your TallyPrime data with other applications and databases by utilising this feature and enhance your workflow efficiency.
Extract Data to MS Excel Using ODBC in TallyPrime
When you have to share data with your clients or superiors using Excel, you can extract data from ledgers and stock items using the ODBC feature.
In this section
Master Data using ODBC
Using ODBC, you can extract ledger data to Microsoft Excel and generate the required reports.
Microsoft Excel Version 2410 has been used to record the below procedure.
After enabling ODBC in TallyPrime, follow the steps given below in MS Excel to extract the required data.
- Ensure that TallyPrime is open on your computer and then open Microsoft Excel.
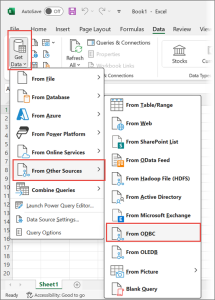
- Click Data > Get Data > From Other Sources > From ODBC.
- Select TallyODBC64_9000* from the list of Data Source name, and click OK.
- Click the company name loaded in TallyPrime, and type or select the data you want to extract from the list.
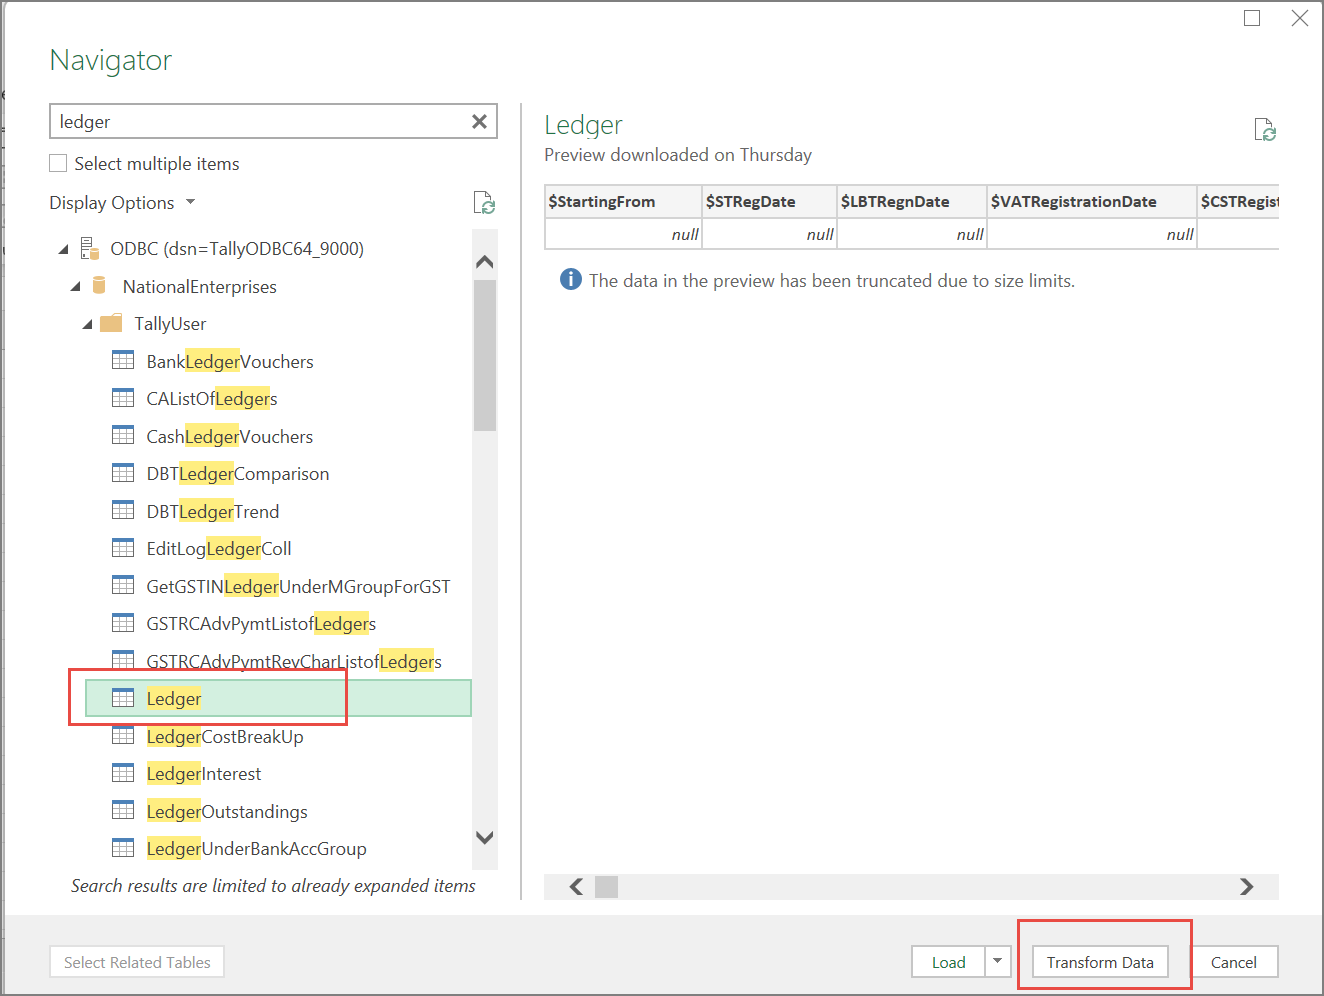
In this case, we are extracting the Ledgers. You can also select multiple items by clicking the Select multiple items checkbox.
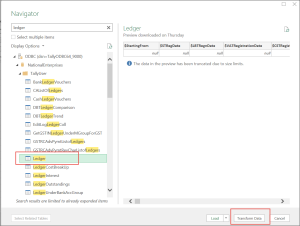
- Click Ledger > Transform Data.
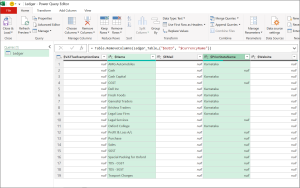
The Ledger – Power Query Editor screen with the column names appears:
- Press Ctrl and select the rows from which you want to extract the data.
- Right-click on the heading of any of the selected rows and click Remove other columns.
All the unrequired columns which were not selected will be removed. - Click Close & Load > Close & Load To and select Existing Worksheet on the Import Data form.
The Microsoft Excel sheet with the imported data appears as shown below:
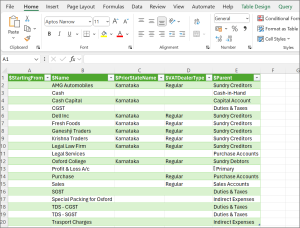

By using ODBC for data extraction, you can seamlessly integrate the data between TallyPrime and Microsoft Excel. This simplifies data extraction and also ensures real-time synchronization. Any updates made in TallyPrime are instantly reflected in Excel. With this dynamic capability, you can design customized reports and keep them up-to-date with the latest data from Tally.
Extracting Stock Item Data to Microsoft Excel using ODBC
Using ODBC, you can extract stock item data to Microsoft Excel and generate the required reports.
Microsoft Excel Version 2410 has been used to record the below procedure.
To extract stock item data to Microsoft Excel
- Ensure that TallyPrime is open on your computer and then open Microsoft Excel.
- Click Data > Get Data > From Other Sources > From ODBC.
- Select TallyODBC64_9000* from the list of Data Source name, and click OK.
- Click the company name loaded in TallyPrime, and type or select the data you want to extract from the list.
In this case, we are extracting the Ledgers. You can also select multiple items by clicking the Select multiple items checkbox.
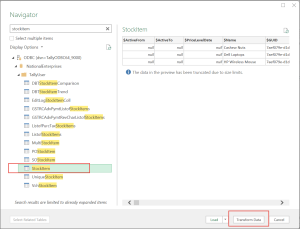
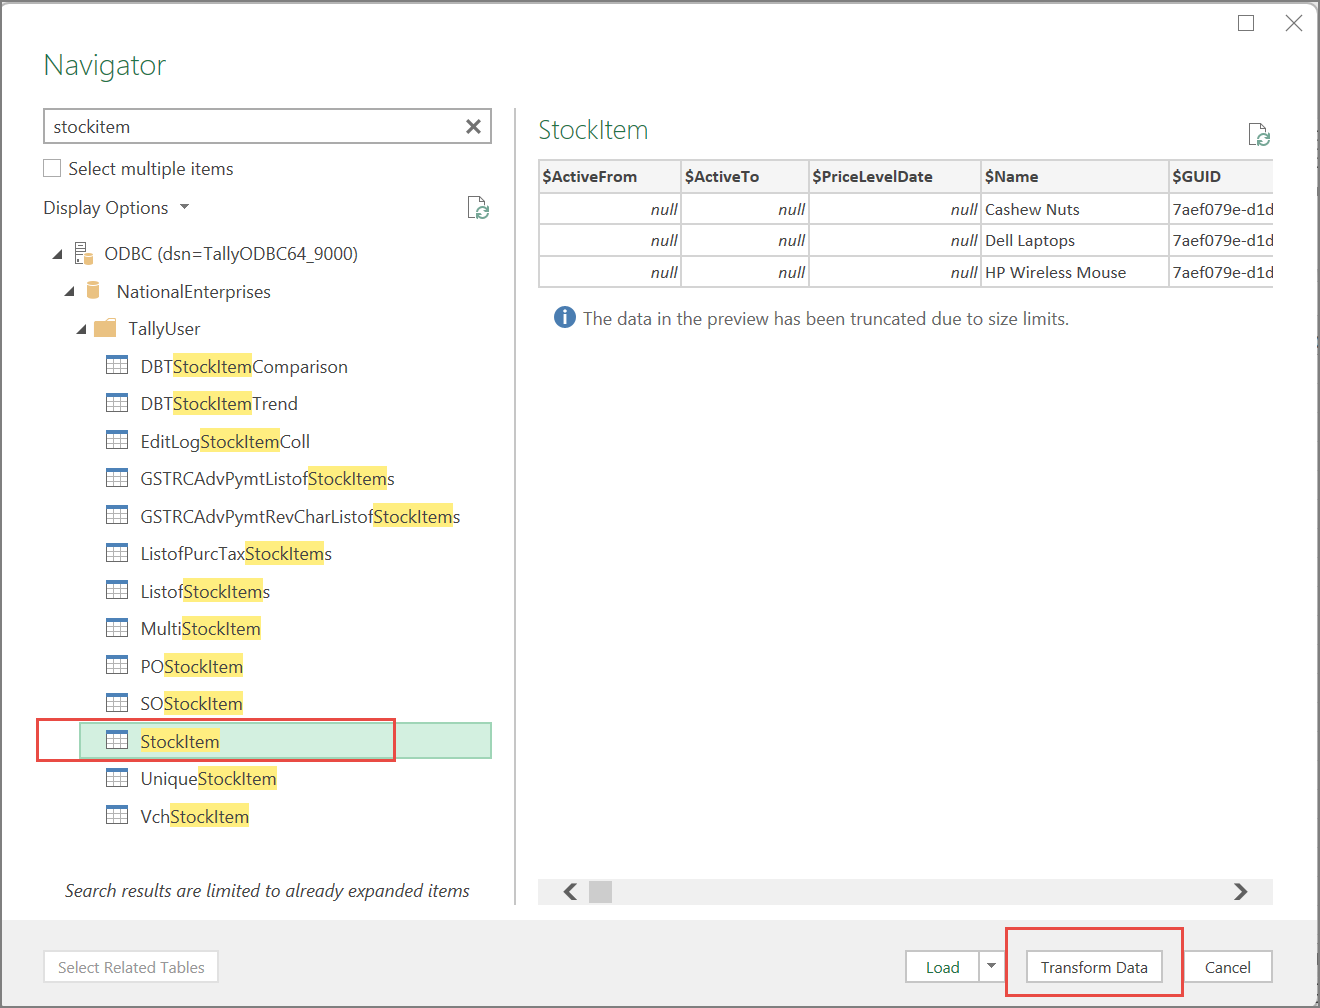
- Click Stock Item > Transform Data.
The StockItem – Power Query Editor screen with the column names appears:
- Press Ctrl and select the rows from which you want to extract the data.
- Right-click on the heading of any of the selected rows and click Remove other columns.
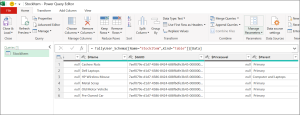
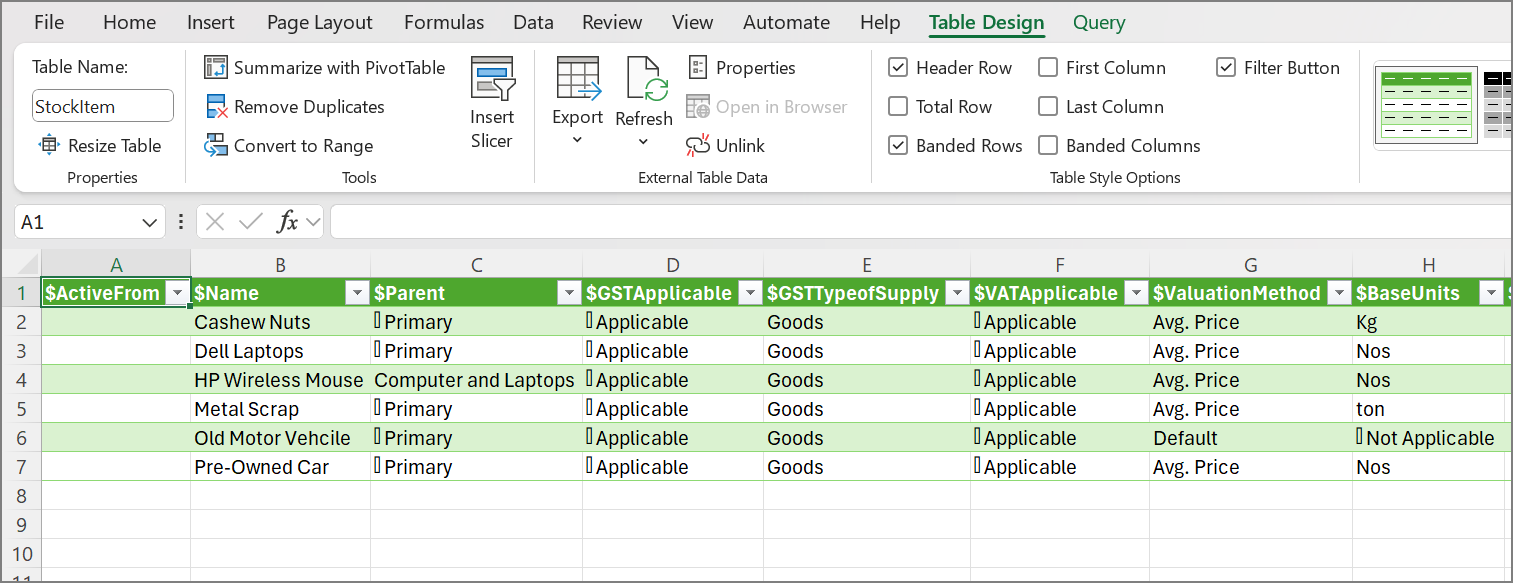
All the unrequired columns which were not selected will be removed. - Click Close & Load > Close & Load To and select Existing Worksheet on the Import Data form.
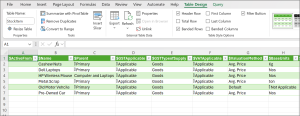
The Microsoft Excel sheet with the imported data appears as shown below:

Extract Data to MS Word Using ODBC by Label Printing with Mail Merge Wizard
You may need to share TallyPrime data in an MS Word document so that your customers or stakeholders can view. Based on the version of MS Word installed in your system, the process of extracting data to MS Word using ODBC varies. In both the cases, you will first need to enable ODBC in TallyPrime.
In this section
Extract Data to MS Word 2007/2010 Using ODBC
After enabling ODBC in TallyPrime, follow the steps given below in MS Word 2007 or 2010 to extract the required data.
- Initiate document creation.
- Click Mailings > Start Mail Merge > Step by Step Mail Merge Wizard.
The Mail Merge appears on the right-hand side. - Select document type: Labels.
- Click Next: Starting document.
- Click Mailings > Start Mail Merge > Step by Step Mail Merge Wizard.
- Apply formatting options, as applicable.
- Click Next: Select recipients.
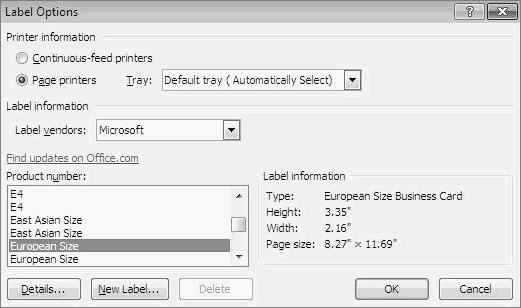
The Label Options window appears. - Select Product number:
- In MS Word 7, select Business Card and click OK.
- In MS Word 10, select based on your preference, for instance, European Size, and click OK.
- In MS Word 7, select Business Card and click OK.
- Click Next: Select recipients.
- Select the source of data.
- Click Next: Arrange your labels.
The Select Data Source window appears. - Click New Source.
The Data Connection Wizard window appears. - Select ODBC DSN and click Next.
The Data Connection Wizard window starts displaying the list of ODBC data sources as shown below. - Select the Tally ODBC data source with the appropriate port number.
Note: If multiple data sources of Tally are listed, then you can check the appropriate port number in TallyPrime.

In TallyPrime, press F1 (Help) > Settings > License > Manage License.

The License Information screen appears, and you can identify the port number mentioned under the label Tally Gateway Server.
- Click Next: Arrange your labels.
- Select data that needs to be extracted.
- Select the master, for instance, Ledger, StockItem, CostCategory, as applicable and click Next.
The Data Connection Wizard window with File Name appears as shown below.

- Click Finish.
The Data Link Properties window appears.
- Select the master, for instance, Ledger, StockItem, CostCategory, as applicable and click Next.
- Test the connection.
- Click Connection.
- Specify the source of data: Use data source name.
- From the list, select TallyODBC with the appropriate port number.
- Click Test Connection.
A test connection success message appears as shown below.
- Click OK on the Test connection succeeded message sub-screen.
- Click OK to save the Data Link Properties
The Mail Merge Recipients Window appears.
- Filter and sort the data, as required.
- Click Sort.
The Filter and Sort window appears. - Click Filter Records.
- Field: $Parent.
- Comparison: Equal to.
- Compare to: type Sundry Debtors.
- In the next row, select the Or option to add more filters.
- Select appropriate options under Field and Comparison and under Compare to: type Sundry Creditors.
- Click OK and the filters will be applied.
- Click Sort.
- Select options for label printing, as applicable.
- In the Mailings tab of the MS Word file, click Insert Merge Field and select MailingName from the dropdown list.
- The MailingName field will appear in the first line of the first label as shown below.
- Press Enter to bring the cursor to the next line.
- Select other fields such as M_Address1, M_Address2, M_Address3, M_Address4, PinCode, and StateName, as applicable.
- Click Next: Arrange your labels.
- In the Mail Merge Wizard, under Replicate labels, click Update all labels.
The updated screen after label printing appears as shown below.
- In the Mailings tab of the MS Word file, click Insert Merge Field and select MailingName from the dropdown list.
- Save the document after label printing with mail merger.
- Click Next: Preview your labels.
The preview of the labels appears as shown below.
- Click Next: Complete the Merge
- Click Previous: Preview your labels, only if you want to preview the labels again.
- Press Ctrl+S to save the document.
- Click Next: Preview your labels.
Follow the above-mentioned steps to extract the required data with ease and use the data effectively for various purposes such as mailing lists, address labels, or business correspondence.
Extract Data to MS Word 2003 Using ODBC
After enabling ODBC in TallyPrime, follow the steps given below in MS Word 2003.
- Initiate document creation.
- Click Tools > Letters and Mailings > Mail Merge.
The Mail Merge task pane appears as shown below.
- Select document type: Labels.
- Click Next: Starting document.
- Click Tools > Letters and Mailings > Mail Merge.
- Apply formatting options, as applicable.
- Under Change document layout, click Label options.
The Label Options screen appears. - Under Product number, select the product number with the text Label, as required and click OK.
Subsequently, Use the current document gets selected.
- Under Change document layout, click Label options.
- Select the source of data.
- Click Next: Select Recipients.
Use an existing list is selected by default. Retain the selection. - Click Browse.
The Select Data Source window appears. - Click New Source.
The Data Connection Wizard appears. - Select the required data source as shown below and click Next.
The Connect to ODBC Data Source appears. - Under ODBC data sources, select the appropriate ODBC data source as shown below and click Next.
- Click Next: Select Recipients.
- Select data that needs to be extracted.
- Select the required master – Ledger, StockGroup, StockCategory, or any other, as per your requirement and click Next.
- Click Finish.
The Select Data Source window appears. - Select the required data source from the list of data sources displayed.
- Click the Connection tab.
- Click the Use data source name checkbox.
- Click the dropdown list and select the required data source.
The name of the catalog is displayed in Enter the initial catalog to use as shown below.
- Select the required master – Ledger, StockGroup, StockCategory, or any other, as per your requirement and click Next.
- Test the connection.
- Click Test Connection.
A test connection success message appears. - Click OK on the success message.
- Click OK in Data Link Connection.
The Mail Merge Recipients appears.
- Click Test Connection.
- Filter and sort data, as required.
- Click the dropdown list box.
The list displaying the Filters appears. - Select Advanced.
The Filter and Sort screen appears. - Click the Filter Records tab.
- Click the Field drop-down list and select $Parent.
- Click Comparison and select Equal To.
- In Compare To, enter Sundry Creditors or Sundry Debtors, as required.
- Click OK.
A sample Mail Merge Recipients window with the filtered and sorted data appears as shown below.
- Click OK.
- Click the dropdown list box.
- Select options for label printing, as applicable.
- Click Insert Merge Fields.

The Insert Merge Fields window with the Database Fields checked by default appears. - From the list of Fields displayed, select the required field.
- Select other fields from the list, as per your requirement.
The address fields will start appearing as labels. - Arrange the address fields, as per your requirement.
- Click Next: Arrange your labels.
- Under the section Replicate labels, click Update all labels.
A sample image with the updated labels will appear as shown below.
- Click Insert Merge Fields.
- Save the document after label printing with mail merger.
- Click Preview your labels.
The preview of the labels with The Company Name along with the Address in each slot appears.
- Click >> to move to the next set of records or click << to move to the previous set of records.
- Click Next: Complete the Merge.
- Click Print.
The Merge to Printer dialog box appears.
- Click Preview your labels.
By default, you can print all the available records or provide the record number if you want to print the label of a selected party in the Current Record field. You may also print a subset of the available records by providing the starting record number in the From field and the ending record number in the To field.
FAQs
- How do I get online data from TallyPrime to MS Excel?
It is possible to update Excel with the changes made to TallyPrime in real-time. This is possible only when ODBC connectivity is available.
The online update can be done automatically by setting the duration of auto-refresh rate in Excel by following the steps shown:
- Click Data.
- Click Refresh All.
- Select Connection Properties.
- By default, Refresh every is checked.
- Enter the duration in minutes in Refresh every field. TallyPrime will automatically send the data to excel at the specified duration.

- Click OK.
- How to export TallyPrime data to Microsoft Excel, when the bitness of the two applications are not the same?
With Open Database Connectivity (ODBC), you can exchange data between TallyPrime and any other application.
The bitness of the following three important elements determines Export of data via ODBC.
- TallyPrime
- Operating System
- Microsoft Office
For seamless functioning of this ODBC feature, it is essential that these three elements are of the same bitness.
Consider the scenario where the Operating System is 64-bit, TallyPrime is 64-bit and MS Office is 32-bit. Then, by default, Microsoft Excel will not be able to communicate to TallyPrime as it is of a different bitness. To enable data export, installation of the required drivers is needed.
To install the required drivers to enable export of data via ODBC,
- Open the TallyPrime application folder.
- This folder will contain the files – regodbc32.exe and tallywin32.dat.
- Right click the regodbc32.exe and select the option Run as Administrator to install 32-bit ODBC drivers.
Errors & Resolutions
- Client without ODBC
This error might be displayed even after configuring the port number for ODBC, in the About page of TallyPrime.
Cause
The port number specified may already be in use.Solution
- Press Alt+F1 (Help) > About > select Client/Server and ODBC Services and press Enter.
- Enter a different Port number.
- Press Enter to restart TallyPrime.
- Data Source Name not found
For computer in which the operating system installed is Windows XP or a higher version:
- Right-click the TallyPrime icon, and select Run as administrator.
- The Select Company screen appears. Select the required company from which you want to extract the data. The About page displays the Client/Server with ODBC Services. If the port number is not configured, you can configure it by following the steps given below:
- Press Alt+F1 (Help) > About > select Client/Server and ODBC Services and press Enter.
- Enter the Port number. By default, the port is set to 9000, as shown below:
In case the port number mentioned is occupied by another application, you need to provide another port number.
- Right-click the TallyPrime icon, and select Run as administrator.


