
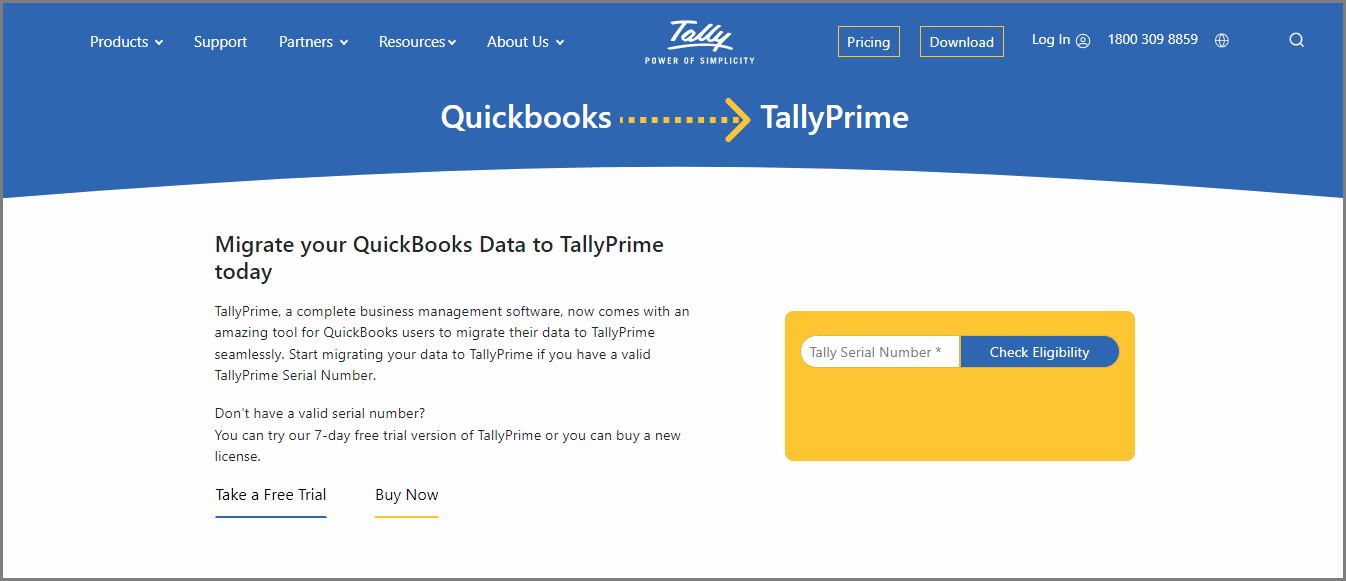
Migrate QuickBooks Data to TallyPrime
In a few clicks you can easily migrate data from QuickBooks to TallyPrime. After migration, you can use the specially built reports to verify accuracy of the migrated data.
Intuit has announced discontinuation of QuickBooks in India from April 2023. Current users of QuickBooks are looking for another business solution to run their daily business. As many users have reached out to Tally Solutions for seamless migration of data in QuickBooks to TallyPrime, a tool is made available to reliably migrate your company data to make it compatible with TallyPrime.
The migration tool is provided as an account TDL that can be linked to your TallyPrime. You just need to check eligibility of your Serial Number to use the TDL and update your license. Once your license is updated, the migration tool-specific options are included in TallyPrime.
Migration of QuickBooks data to TallyPrime is a three-step process.
- Download QuickBooks data.
- Extract the downloaded data.
- Import the data to a new Company in TallyPrime.
After migrating the data, verify your data by checking the migration-related reports in TallyPrime. Once the data is verified and accepted, rest assured your journey with TallyPrime is smooth. You can start recording your transactions in TallyPrime.
Prerequisites to Migrate QuickBooks Data
- The only prerequisite to migrate QuickBooks data is that you need TallyPrime Release 1.0/TallyPrime Edit Log Release 2.1, or later.
If you already have a license, but not the required version of Tally, you need to upgrade. Refer to Upgrade to TallyPrime and TallyPrime Edit Log for the steps. In case your TSS has expired, refer to Renew TSS for the steps to renew the subscription.
Planning to buy a new license of TallyPrime, click here to buy. If you want to try TallyPrime, before taking a decision to move, click to get a 7-days free trial version.
What’s New
The following changes have been made in the updated QuickBooks migration solution:
- While importing the data from QuickBooks to TallyPrime, now you can see the Sales Orders and Purchase Orders are also getting imported seamlessly with other vouchers and masters.
- There were a few issues related to Deposit vouchers and Credit Note.
This issue is resolved. - When users were importing the data, duplicate master names were getting created in TallyPrime with suffix value. Now we have handled the import of identical Ledger names.
- While importing the data, all Units of Measures were taken as Nos. only. This issue is resolved.
If the user wants to change the UOM, then user can change the UOM after importing the masters, and then user can import the transactions.
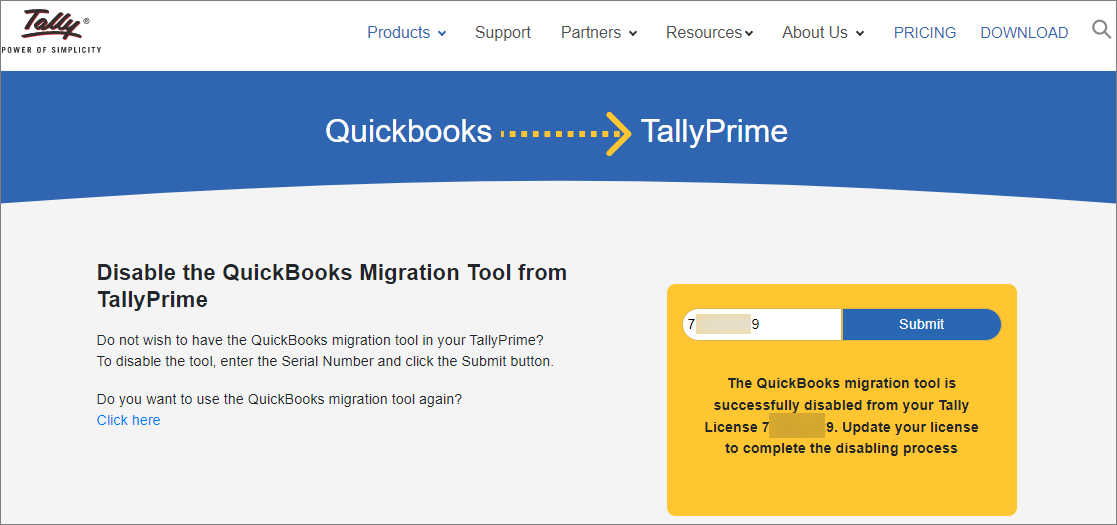
Update Your TallyPrime License to Use QuickBooks Data Migration Tool
- Check eligibility of your License Serial Number and link the migration tool.
- Click here to check the eligibility of your Tally Serial Number.
- Enter your Tally Serial Number, and click Check Eligibility.
- If your license is eligible for migration of QuickBooks data, you will get a confirmation message.
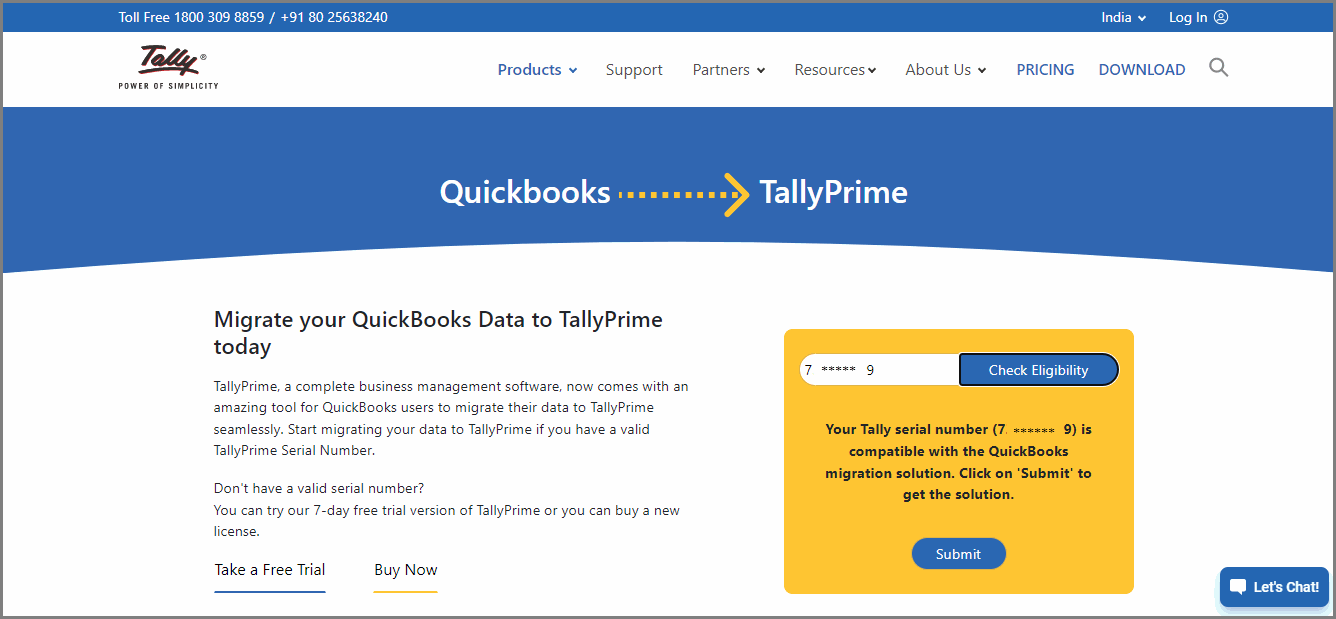
If the Tally Serial Number is not eligible to link the QuickBooks migration tool, you will get appropriate messages and act accordingly.
- Click here to check the eligibility of your Tally Serial Number.
-
- Click Submit.
You will get a success message.
- Click Submit.
2. Update your TallyPrime license.
- Start TallyPrime.
- Press F1 (Help) > Settings > License > Manage License > F5 (Update).
- In the Update License screen, enter the administrator e-mail ID and Tally.NET password.
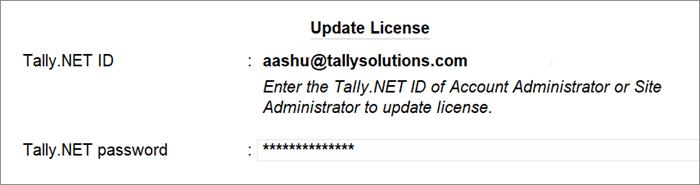
- In the Update License screen, enter the administrator e-mail ID and Tally.NET password.
- Press Enter to update your license.
The migration tool gets integrated, and you will get the required options in TallyPrime to migrate the data from QuickBooks.
Download Your QuickBooks Data
Once the migration tool is enabled in TallyPrime, you can start downloading the data from your QuickBooks account.
By default, the download option in TallyPrime downloads QuickBooks data from 01-Apr-2015 till today. All the data will be downloaded together and can be imported to a single TallyPrime Company.
In case your data is big, you can apply the period filter in the TallyPrime download option to download data for a specific period. This period can be each financial year if the data is very big, or a set of years depending on the volume of data. When you are using a specific period, you can also download data prior to 01-Apr-2015.
- Open TallyPrime.
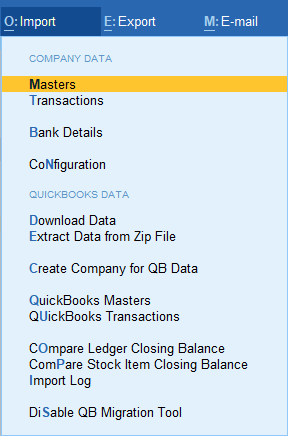
- Go to Import > Download Data.
- To download complete data, or for a specific period.
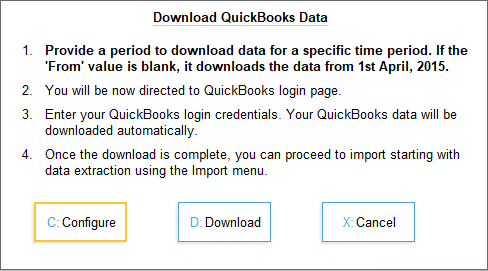
- Click Download to get all the data in the QuickBooks company.
OR
Click Configure to download the data for a specific period.
Enter the beginning and end date for which the data is to be downloaded. Press Enter.
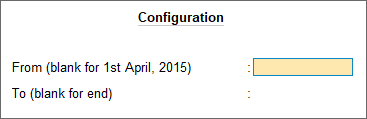
Click Download. - Refer to the below table to understand the behaviour of this configuration.
Sl. No. From To Result 1 Blank Blank Downloads the data from 1st April 2015 to today. Even if the data is available prior to 1st April 2015, it downloads only from 1st April 2015. 2 Blank 12th December 2022 Downloads the data from 1st April 2015 to 12th December 2022. 3 1st January 2014 Blank Downloads the data from 1st January 2014 to today. 4 1st January 2014 12th December 2022 Downloads the data from 1st January 2014 to 12th December 2022.
- If you are logging in to QuickBooks for the first time from TallyPrime, you will get the following message.
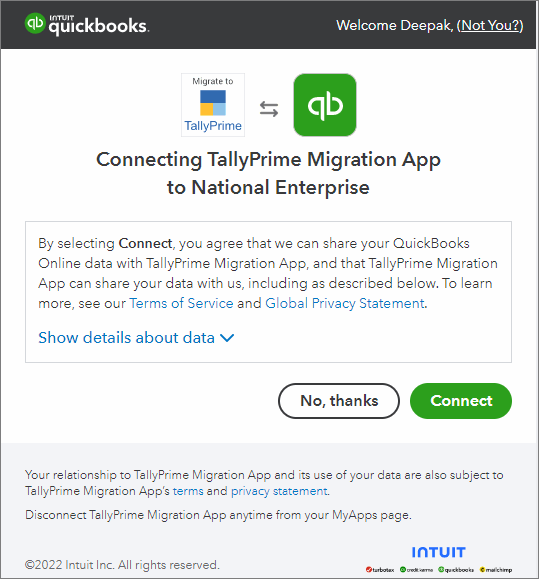
- Click Connect to get the connection with Intuit and displays the login page.
- Enter your QuickBooks User ID or E-mail and Password.
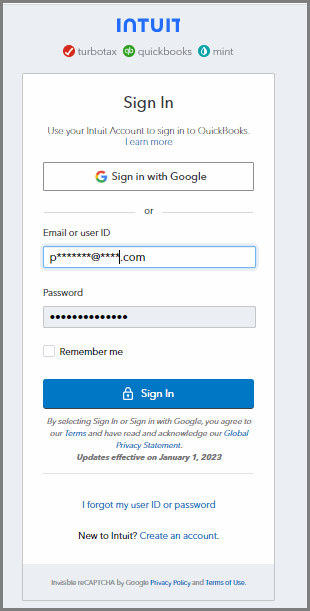
- Click Sign In.
- If you have a single company, download will start directly.
- If you have multiple companies, it displays the company selection screen. Select the company which you need to download.
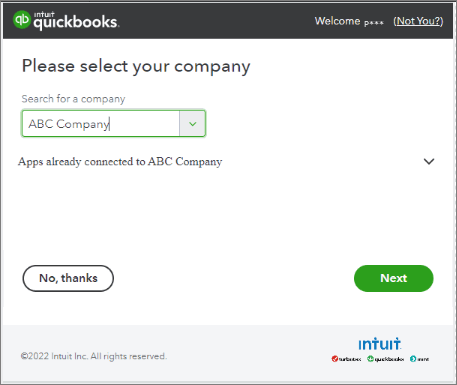
- Click Next to start the data download as per the configuration. Once the download is completed you will get a success message.
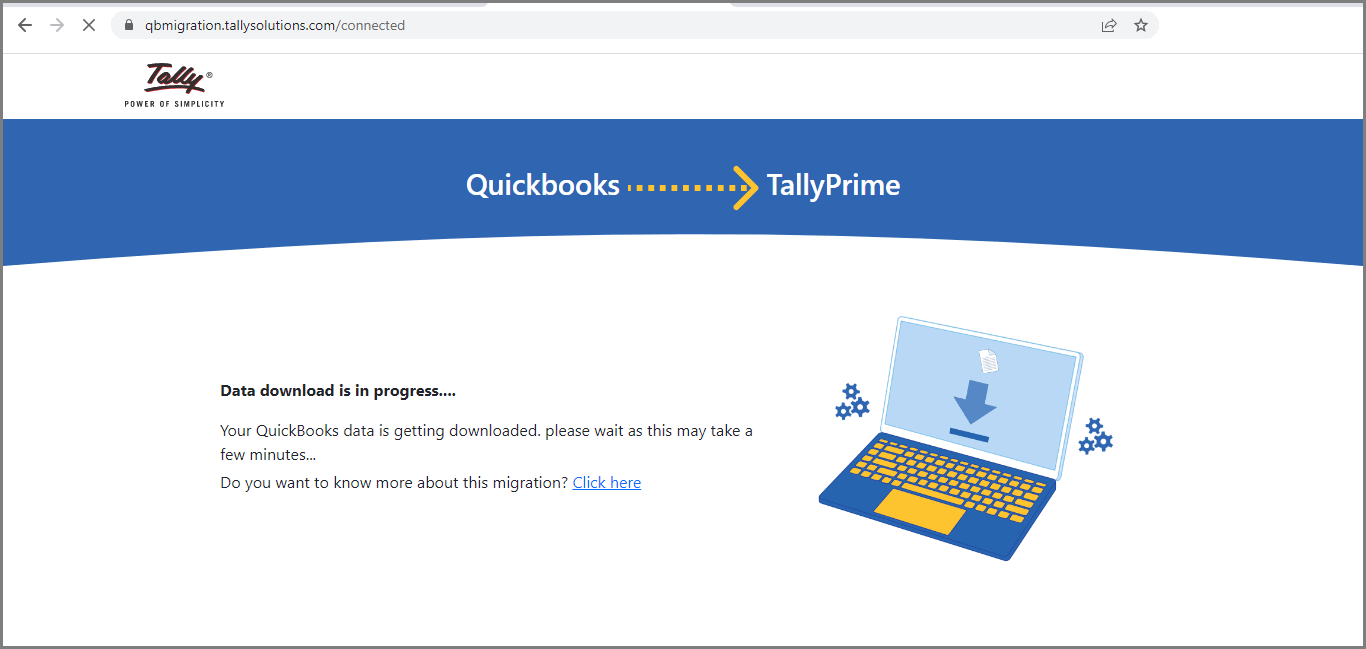
Based on the browser settings, QuickBooks data gets downloaded to a folder on your computer. Time taken to download depends on the volume of data.
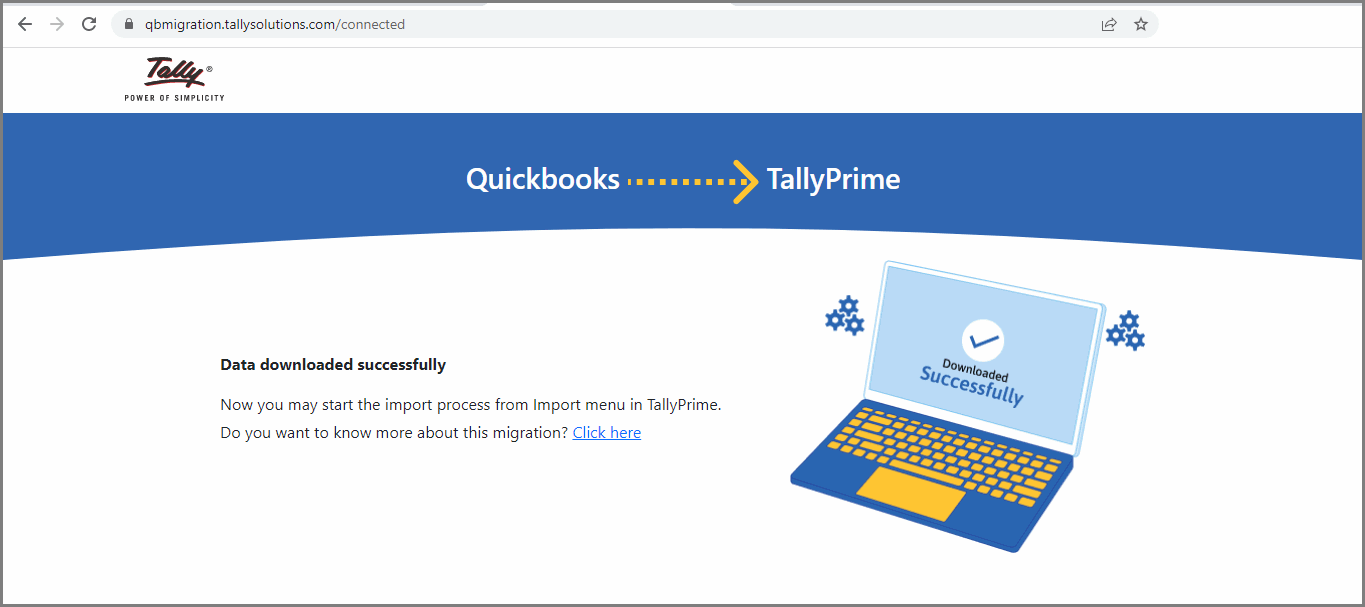
Once the download is completed you will get a success message.
Extract Downloaded QuickBooks Data
- Open TallyPrime.
- Go to Import > Extract Data from Zip File.
- Select the zipped file from the folder the data is downloaded in the field Zip File Name.
- The field Path of the downloaded zip file and filename gets copied.
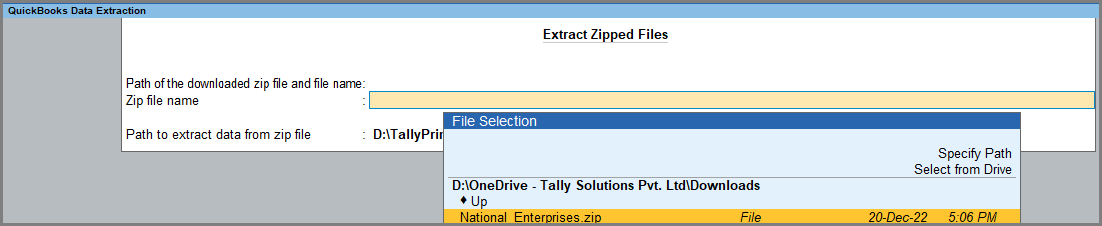
- Browse and select the Path to extract data from zip file.
By default it selects the TallyPrime application path.
- Press Enter.
All the extracted files are stored in the specified folder.
Import QuickBooks Data to a New Company in TallyPrime
Since you are importing the data from QuickBooks to TallyPrime, it is recommended to use a new Company in TallyPrime. This helps in retaining the masters from QuickBooks and verifying your data for accuracy.
You can complete the data import using one of the following methods:
- Create a new Company by importing the Company from QuickBooks, and import masters and transactions.
This helps in transferring the data completely and validating it before recording new transactions in TallyPrime. - Create a new company. Import masters and transactions from the QuickBooks data as and when required using the options QuickBooks Masters and QuickBooks Transactions from Import menu.
This helps in validating the imported data step-by-step. However, this method takes longer to complete data migration.
One-click Import
- Go to Import > Create Company for QB Data.

- Click Yes to create the company and click No to skip this step.
All the company information is transferred to TallyPrime.
If you want to configure any of the Company information, refer to the topic Set Up Your Company and configure.
You can do F11 configurations later, if needed.
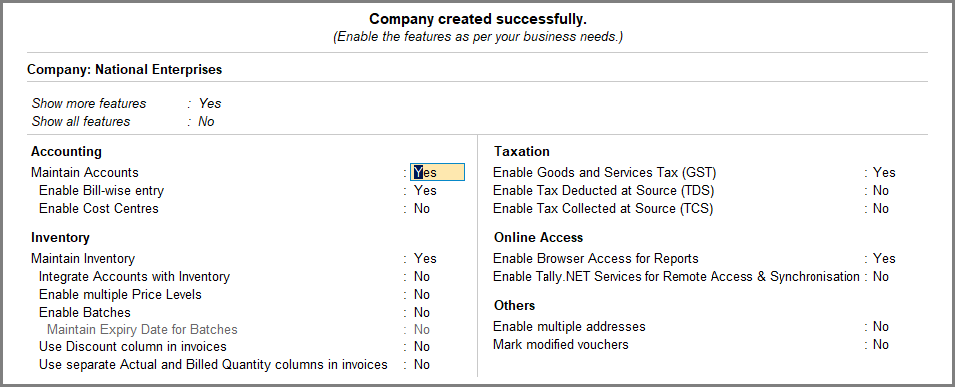
Configure the required features and accept the Company configuration screen. It prompts for the confirmation to import masters. Once it is confirmed, the following screen appears.

- Select Yes to import masters.
Once the masters are created, you will be prompted to import transactions. - Select Yes to import transactions.
![]()
A new Company is created in TallyPrime, and masters and transactions are imported.
You can also create the Company separately and import the masters and transactions as and when required. This helps in validating the imported data in each step.
Import Data for a Specific Period
- Go to Import > QuickBooks Transactions.
- Select QB Data Folder from the folder where you have extracted the data.
- Enter the From and To values to mention the required period.
On accepting, TallyPrime imports transactions based for the specified period.
To import foreign currency transactions, user has to ensure that the currency exists in QuickBooks. Alternatively, manually create the currency before importing the transactions
By default, the download option in TallyPrime downloads QuickBooks data from 01-Apr-2015 till today. All the data will be downloaded together and can be imported to a single TallyPrime Company.
In case your data is big, you can apply the period filter in the TallyPrime download option to download data for a specific period. This period can be each financial year if the data is very big, or a set of years depending on the volume of data. When you are using a specific period, you can also download data prior to 01-Apr-2015.
Verify Imported Data Using Reports
Once the import process is completed, you can check and confirm whether all the data is imported to TallyPrime or not, using the reports of QuickBooks data migration.
Do not re-accept any imported transactions as there will be mismatches. If you want to make any changes in the imported transactions, create reversal transactions and then make the changes in the imported transactions.
Ledger Closing Balance
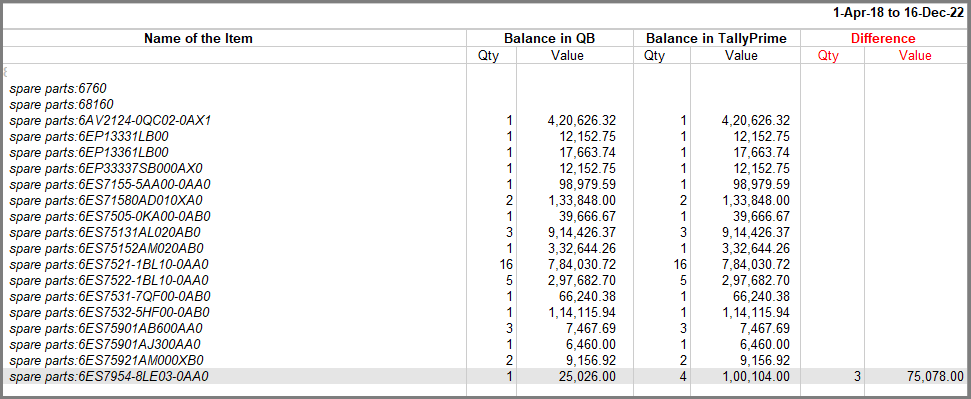
You can use the report Compare Ledger Closing Balance to validate the account details for reconciliation purposes. This report shows the differences between QuickBooks Ledger Balance (Chart of Accounts) and TallyPrime Ledger Balance.
- Go to Import > Compare Ledger Closing Balance.
The report Ledger Closing Balance Comparison displays the data as in QuickBooks, data in TallyPrime and the differences between these two, if any.
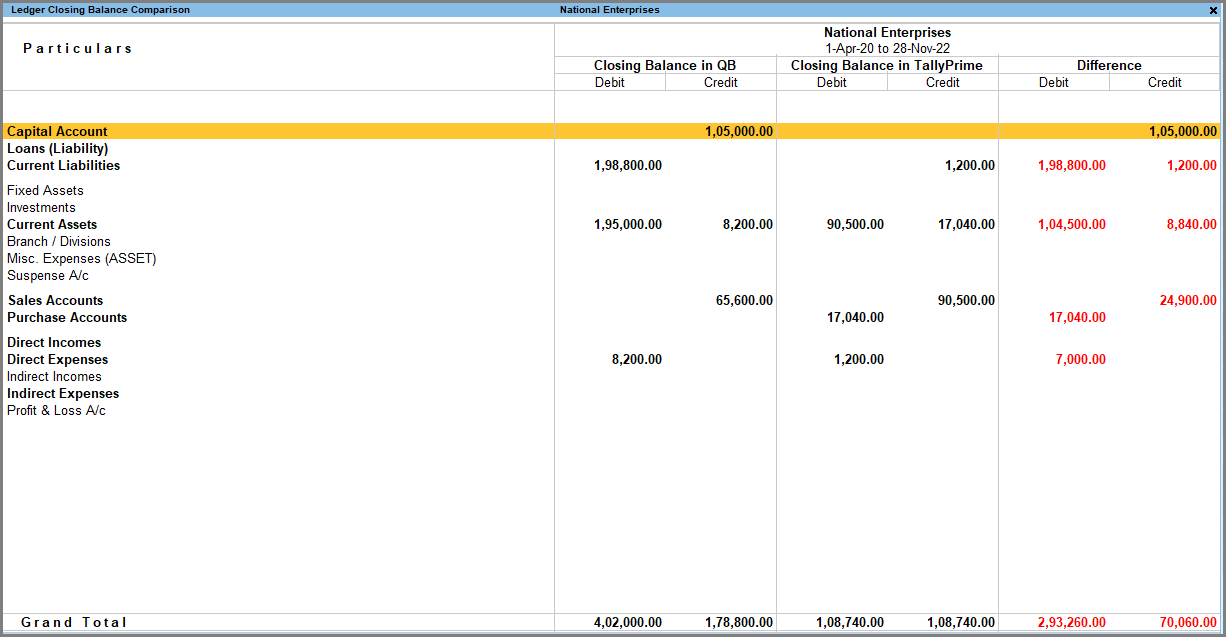
- Under the column Difference, you can select any line and drill down to view the differences in transactions between QuickBooks and TallyPrime.
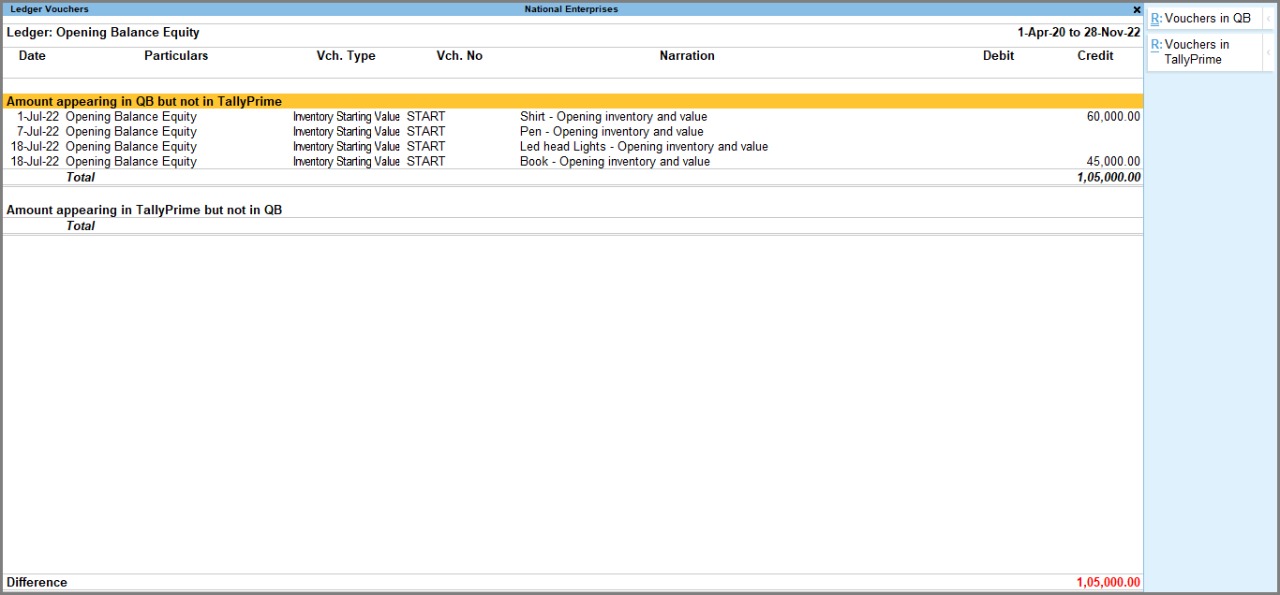
From the same report, you can view the number of vouchers in TallyPrime and QuickBooks using the buttons Vouchers in QB and Vouchers in TallyPrime.
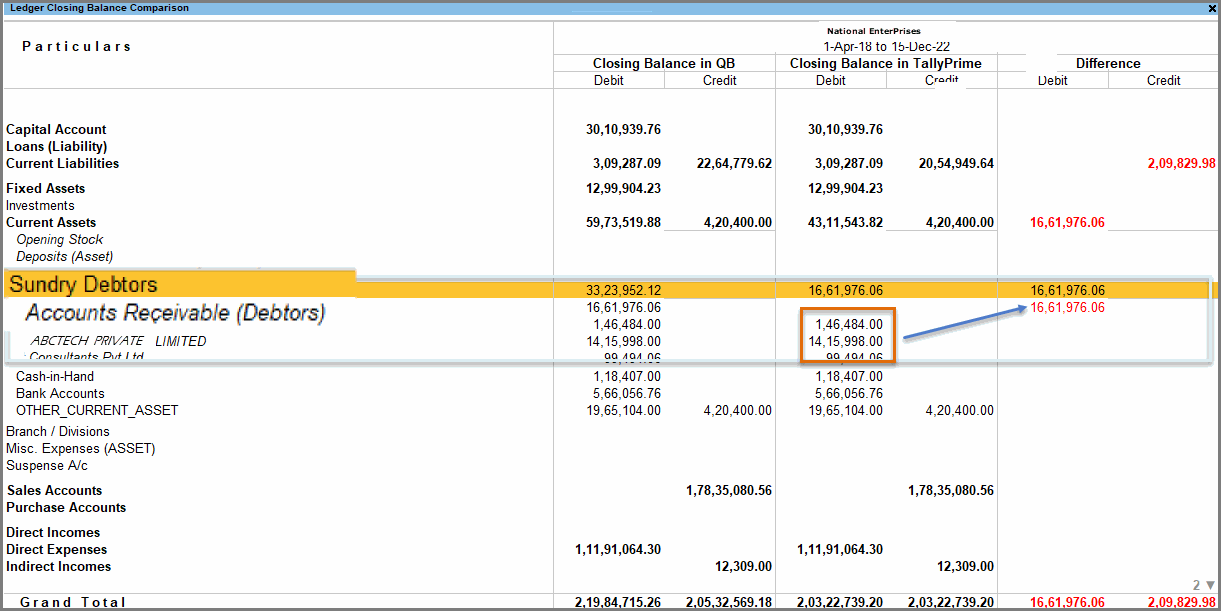
When there is a difference in the report under Current Assets and Current Liabilities, in the drill down report you can see the actual difference under Sundry Creditors and Sundry Debtors. This is happening due to the difference of entering transactions in QuickBooks versus TallyPrime. For example, Accounts Receivable in QuickBooks and Sundry Debtors in TallyPrime as shown in the below image.
Refer to Mappings of QuickBooks Data with TallyPrime.
Stock Item Closing Balance
You can use the report Compare Stock Item Closing Balance to validate the stock items for reconciliation purposes.
- Go to Import > Compare Stock Item Closing Balance.
The report of Stock Item Closing Balance Comparison stock balances as in QuickBooks, stock balance as in TallyPrime and the differences between these two, if any.
Closing balance comparison reports can be compared only after importing the entire data. Partial data import cannot be compared as the Trial Balance/Stock Balance repot always show the final closing balance.
Import Log
The report Import Log shows the total number of accounts and vouchers in QuickBooks and the number of accounts and vouchers imported and not imported to TallyPrime.
- Go to Import > Import Log.
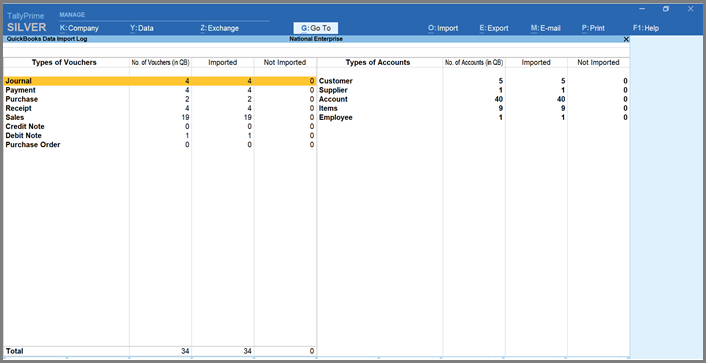
To understand details of the error drill down to the not imported accounts or vouchers .
Statistics
You can check the statistics using the TallyPrime default reports.
- Press Alt+G (Go To) > Statistics.
Alternatively, go to Gateway of Tally > Display More Reports > Statements of Accounts > Statistics.
In this report you will be able to see all the Vouchers and Ledgers from your Company.
You may start working on TallyPrime only after the complete verification of the migrated data from QuickBooks.
Disable the QuickBooks Migration Tool
- Go to Import > Disable QB Migration Tool
or
Click Disable Add-On from here. - Enter the your Tally Serial Number and click Submit.
- Open TallyPrime and update your license.
Mappings of QuickBooks Data with TallyPrime
QuickBooks have different types of masters and voucher types. To support all types of masters and voucher types from QuickBooks, we have segregated and added the terms in the below table with equivalent terms used in TallyPrime.
Masters
|
#
|
QuickBooks
|
TallyPrime
|
|---|---|---|
| 1 | Accounts, Customers, Vendors | Ledgers |
| 2 | Bank | Bank Accounts |
| 3 | Accounts Receivables | Sundry Debtors |
| 4 | Accounts Payables | Sundry Creditors |
| 5 | Fixed Asset | Fixed Assets |
| 6 | Income | Direct Incomes |
| 7 | Expense | Direct Expenses |
| 8 | Other Income | Indirect Incomes |
| 9 | Other Expense | Indirect Expenses |
| 10 | Supplies Materials | Purchase Accounts |
| 11 | Global Tax Payable | Duties & Taxes |
| 12 | Long Term Liability | Loans (Liability) |
| 13 | Cost of Goods Sold | Purchase Accounts |
| 14 | Equity | Capital Account |
| 15 | Other Current Liability | Current Liabilities |
| 16 | Other Current Asset | Current Assets |
| 17 | Other Asset | Deposits (Assets) |
Voucher Types
| # | QuickBooks | TallyPrime |
| 1 | Journal Entry, Inventory Qty Adjust, Inventory Starting Value, Expense, Payroll Check, Payroll Adjustment, Transfer | Journal |
| 2 | Invoice | Sales |
| 3 | Bill | Purchase |
| 4 | Vendor Credit, Supplier Credit | Debit Note |
| 5 | Receive Payments, Sales Receipt, Deposit | Receipt |
| 6 | Bill Payment, Advance Payment, Pay Bills, Expense, Refund Receipt, Credit Card Expense, Credit Card Payment, Cash/Other Expense, Check | Payment |
| 7 | Credit Note, Credit Memo | Credit Note |
| 8 | Estimate | Sales Order |
| 9 | Purchase Order | Purchase Order |


