
Payment Request in TallyPrime
Payment Request – FAQ | Payment Request – Error Messages
TallyPrime now comes with the Payment Request feature that will help you generate and share payment links and QR codes (using Payment Gateway or UPI) in a jiffy. This will also empower your parties to settle the payments with you, instantly and conveniently.
Digital payments have been making waves in the market, because of the quick and easy way in which you can share in which you can share payment instructions with your customers and settle the payments. More and more businesses are embracing payments via links and QR codes, and accordingly, TallyPrime is here to empower you in your digital payment journey, all in the regular course of your business.
Here’s how TallyPrime provides you with a delightful experience in Payment Request:
One-time, hassle-free setup
Getting started with Payment Request is easy. Once you have registered with the Payment Gateway or UPI service provider of your convenience, you can set up the relevant details in TallyPrime.
Once you enable the Payment Request feature in TallyPrime, you can create a Merchant Profile using the same details, such as the Merchant ID and e-mail ID or phone number, which you had entered while registering on the Payment Gateway. Similarly, you can create a Merchant Profile for UPIs by providing the registered UPI ID.
Instant Payment Requests
Once you have completed the setup, TallyPrime will help you generate and send Payment Requests instantly. The best part is that you don’t have to do anything out of the ordinary. You only have to connect to your Merchant Profile using TallyPrime and record your transactions as you usually do. The payment links and QR codes will be generated and shared instantly with your customers, when you save the transactions.
There is no need to go the Payment Gateway portal and generate a link from the portal based on your transactions. Everything will happen directly in TallyPrime!
Simplified payment experience for your customers
The Payment Request feature will also make the life of your customers easier. Your customers no longer have to add the bank details like the name of the beneficiary, the bank account number, IFSC, and so on. They can simply scan the QR code or click the link generated by you in TallyPrime, and make the payment instantly or at their convenience. Thereby, the Payment Request feature will greatly enhance your business experience by facilitating smooth and timely payments between you and your customers.
Range of flexibilities
We understand that your business might have special requirements with respect to payment, and accordingly, TallyPrime provides you with numerous flexibilities in the Payment Request feature to cater to your needs.
Link generation at your own convenience: We understand that you may not want to instantly generate and send all your payment links or QR codes while recording the transactions. Accordingly, TallyPrime will provide you the flexibility to generate links or QR codes later, at your own convenience, for one or more of your transactions or customers. The beauty of this flexibility is that even when you are selecting multiple parties for generating the link or QR code, TallyPrime will send unique links to your parties with the relevant amount to be paid.
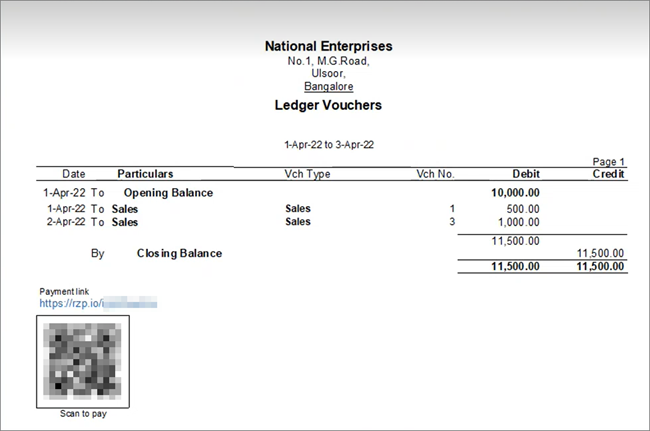
Link generation for a transaction or an entire report: Based on your business needs, you can generate and share a payment link for either for one or more transactions, or for an entire report. For example, while generating the printout of the Ledger Voucher report for a particular party, you can also generate the payment link or QR code for the entire report. Subsequently, when you share a PDF file (or printout) of the report with your party, the payment link or QR code will be attached in the report. In this way, it will become greatly convenient for your party to make the relevant payments, and for you to settle the payments with many of your parties. Similarly, you can generate the link or QR code for other reports such as Ledger Outstandings and Reminder Letter.
Link generation for full or partial payment: TallyPrime also have provides you with the flexibility to generate Payment Requests for either full or partial payment against a bill, depending on your convenience and understanding with your customers. You can also request payment for multiple outstanding bills, or even the entire outstanding bills, as needed.
Seamless reconciliation of payments
TallyPrime provides the icing on the cake by facilitating a smooth reconciliation of all your Payment Requests. The Payment Reconciliation report will provide you with a neat summary of the unreconciled as well as reconciled transactions.
What’s more, the Payment Reconciliation report will help you figure out if the relevant transactions have been recorded in your books. If any transactions have not been recorded, then the report will help you in recording Receipt entries against the bill and settling the accounts with the customer. Moreover, you can also easily record the settlements and refunds that had occurred during the course of your business.
Data security
We understand that the safety and security of your financial data would be paramount for your business, and it is only natural for you to have doubts about the evolving financial trends. However, TallyPrime takes the utmost measures to ensure that your financial data remains absolutely protected. We have partnered with prominent Payment Gateways, such as Razorpay and PayU, to provide you with the best-in-class security policies, and we want you to rest assured that your payments are in safe hands.
One-Time, Hassle-free Setup
The Payment Request feature in TallyPrime comes with an easy setup that caters to both methods of payment, that is, Payment Gateway and UPI.
In this section
Create Merchant Profile using Payment Gateway
Once you have registered on the Payment Gateway of your choice, you can easily set up your profile in TallyPrime using the same details, such as Merchant ID and registered e-mail ID or registered phone number.
However, if you are yet to register on a Payment Gateway, then you can get started with the following links:
- PayU
- Razorpay
You may also refer to the announcement by Razorpay about the integration with TallyPrime.
For a seamless Payment Request experience with TallyPrime, you have to make sure that you are entering the valid details while setting up your profile.
- Open TallyPrime and enable the Payment Request feature:
- Pres F11 > Show more features > Yes.
- Set the Enable Payment Request to share payment link/QR code option to Yes.
The Merchant Profile Details screen will appear, where you can set up your Merchant Profile.
- Set up the Merchant Profile:
- Under Name, enter the username with which you want to maintain this profile.
- Under Payment Method (Payment Gateway/UPI), specify the Payment Gateway with which you have registered this particular profile.
- Enter the Merchant ID, as registered on the Payment Gateway portal.
- Enter the Registered E-mail and/or Registered Mobile.
One or both of these fields will appear as per the Payment Gateway selected. - Under Payment link expires in, set the expiry period after which your payment link will be considered as invalid.
The default period will be pre-filled as per the Payment Gateway selected; for example, 180 days for Razorpay and 365 days for PayU. You can update this, if needed.The options in steps e and f will appear only if they are enabled in F12 (Configure) or Ctrl+I (More Details).
- Under Save payment link while generating from reports, select:
- Yes, to directly save the link in the voucher every time.
- No, to never save the link in the voucher during link generation.
- Ask Every Time, to select your preference every time the link is generated.

- Press Ctrl+A to save the Merchant Profile with the necessary details.
What’s more, you also have the flexibility to create or alter the Merchant Profile from Gateway of Tally > Create/Alter Master > Merchant Profile, or by pressing Alt+G (Go To) > Create/Alter Master > Merchant Profile.
Create Merchant Profile using UPI
Once you have registered with the UPI service provider of your choice, you can easily set up your profile in TallyPrime using the same details, such as the registered UPI ID and Merchant Name.
For a seamless Payment Request experience with TallyPrime, you have to make sure that you are entering the valid details while setting up your profile.
- Open TallyPrime and enable the Payment Request feature:
- Pres F11 > Show more features > Yes.
- Set the Enable Payment Request to share payment link/QR code option to Yes.
The Merchant Profile Details screen will appear, where you can set up your Merchant Profile.
- Set up the Merchant Profile:
- Under Name, enter the username with which you want to maintain this profile.
- Select UPI Under Payment Method (Payment Gateway/UPI).
- Enter the UPI ID, as registered with the UPI service provider.
You can find out the exact UPI ID by referring to your account or profile details in the UPI application.
- Under Merchant Name, the Company Name will be filled in by default. However, you have the flexibility to update this name, if needed.
- Under Save QR code while generating from reports, select:
- Yes, to directly save the QR code in the voucher every time.
- No, to never save the QR code in the voucher during link generation.
If this option is set to No, then you will not be able to generate the QR code from reports, as no voucher will be available to save the QR code details. Similarly, if Ask Every Time is selected, and if you opted not to save the QR code details during link/QR code generation, then you will not be able to generate the QR code.
- Ask Every Time, to select your preference every time the QR code is generated.

This option will appear only if it is enabled in F12 (Configure) or Ctrl+I (More Details).
- Press Ctrl+A to save the Merchant Profile with the necessary details.
What’s more, you also have the flexibility to create or alter the Merchant Profile from Gateway of Tally > Create/Alter Master > Merchant Profile, or by pressing Alt+G (Go To) > Create/Alter Master > Merchant Profile.
Generate & Share Payment Link/QR Code in TallyPrime
Once you have set up your Merchant Profiles in TallyPrime, you are all set for generating and sharing the payment links and QR codes with your customers.
You have the flexibility to either instantly generate the link or QR code while recording transactions, or to generate them later at your convenience.
Payment links/QR codes can be generated only for regular (and not Optional) vouchers.
In this section
- Generate payment link/QR code while recording transactions (Using Payment Gateway)
- Generate QR code while recording transactions (Using UPI)
- Generate payment link/QR code after recording a transaction
- Generate payment link/QR code for one or more transactions | Generate payment link/QR code from Day Book
- Generate payment link/QR code for multiple transactions of a single party | Generate payment link/QR code from Ledger Voucher/Ledger Outstandings
- Generate payment link/QR code from anywhere in TallyPrime
Generate payment link/QR code while recording transactions (Using Payment Gateway)
Once your Merchant Profile is created in TallyPrime using Payment Gateway, you can proceed to record your transactions, as usual. The payment links and QR codes will be generated and shared with your parties in the flow of your transactions.
- Enable the payment link option in the voucher type:
- Press Alt+G (Go To) > Create/Alter > Voucher Type, and select or create the required voucher type for your sales transaction.
- Set the Generate payment link/QR code after saving voucher option to Yes.
- Press Ctrl+A to save the voucher type.
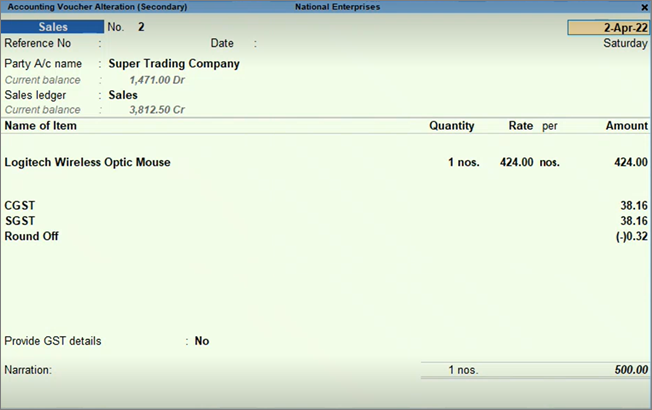
- Record your GST sales transaction, as usual
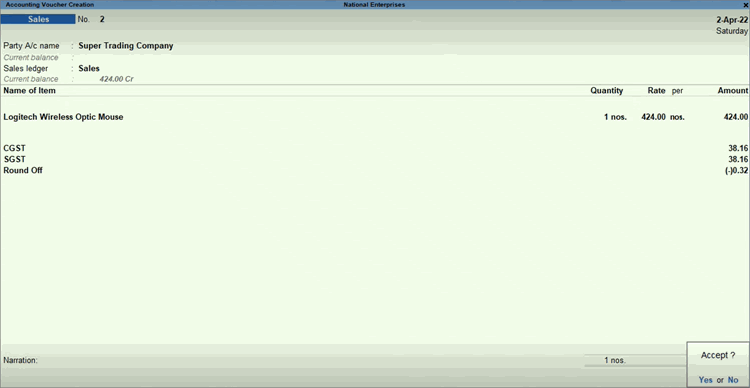
- Press Ctrl+A to save the transaction.
A following prompt for link generation appears:
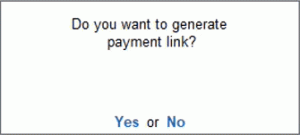
- Press Enter to proceed.
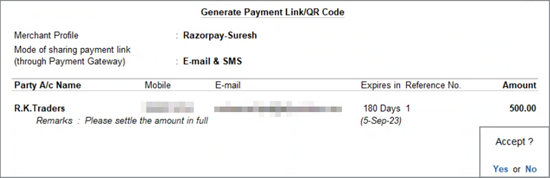
The Generate Payment Link/QR Code screen appears. - Update the details for link generation:
- Under Merchant Profile, select the relevant Payment Gateway.
Once you select a particular Merchant Profile, it will be selected as the default profile for all your subsequent transactions.
- Specify the Mode of sharing payment link, such as e-mail, SMS, or both, in which the link has to be shared with your party.
- Specify the details of the party, such as the Party A/c Name, Mobile, and E-mail.
The above party details will be filled in by default, as per the party ledger. For the Party A/c Name, you also have the option to directly enter a new party, or create a party ledger on the fly.
- Under Expires in, specify the expiry period after which your payment link will be considered as invalid.
The expiry period is filled in by default from the Merchant Profile master. However, you can update this value as per your requirements for a specific party.
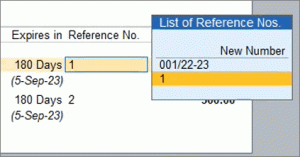
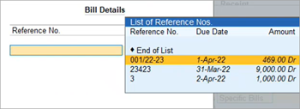
- Under Reference No., the Invoice No. will be prefilled by default. You can update this value as needed.

Based on the details available, the List of Reference Nos. may also list the voucher Reference No., the bill Reference No. (if it is different from the Invoice No.), or a New Number. You can select any of these numbers, as needed. The New Number option will automatically appear as you start entering a new Reference No.
- Enter the Amount for which you want to request the payment.
- Under Remarks, enter any message that you want to convey to the party regarding the transaction.
The options in steps d, e, and g will appear only if they are enabled in F12 (Configure).
- Under Merchant Profile, select the relevant Payment Gateway.
- Press Ctrl+A to save the details and generate the payment link.

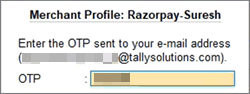
If you are not logged in to your Merchant Profile, then you will be asked to log in using the OTP sent to your registered e-mail address or mobile number. - Enter the OTP and press Enter to continue.
The details of the transaction will be exchanged with the Payment Gateway.

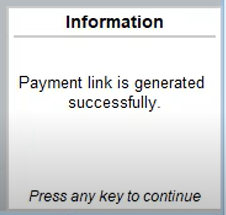
Once the payment link is generated and shared with the selected parties, you will receive the following message:
Similarly, you can also generate payment link/QR code from the relevant reports such as Day Book or Ledger Voucher/Ledger Outstandings.
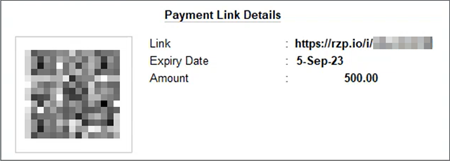
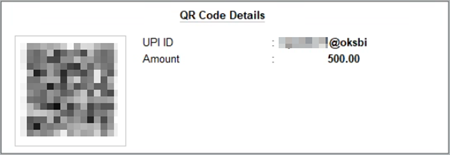
View the generated payment link/QR code details
Once you generate the payment link/QR code from the transaction or report, the details will be saved in the individual transactions. You can view the link/QR code details whenever needed, and also copy the link and share it with the relevant parties through various modes.
- Open the relevant transaction.
- Press Ctrl+O (Related Reports) > Payment Link/QR Code.
The Payment Link Details screen appears as shown below.
For UPI-based payments, the QR Code Details screen will appear as shown below:
- Press Ctrl+C (Copy Link), if you want to copy the payment link and share it directly with the relevant party through various modes.
Generate QR code while recording transactions (Using UPI)
Once your Merchant Profile is created in TallyPrime using UPI, you can proceed to record your transactions, as usual. The payment links and QR codes will be generated and shared with your parties in the flow of your transactions.
- Enable the payment link option in the voucher type:
- Press Alt+G (Go To) > Create/Alter > Voucher Type, and select or create the required voucher type for your sales transaction.
- Set the Generate payment link/QR code after saving voucher option to Yes.
- Press Ctrl+A to save the voucher type.
- Record your GST sales transaction, as usual.

- Press Ctrl+A to save the transaction.
A following prompt for link generation appears:
- Press Enter to proceed.
The Generate Payment Link/QR Code screen appears. - Update the details for link generation:
- Under Merchant Profile, select the relevant UPI username.
Once you select a particular Merchant Profile, it will be selected as the default profile for all your subsequent transactions.
- Specify the Party A/c Name.
The Party A/c Name will be filled in by default, as per the party ledger. You also have the option to directly enter a new party, or create a party ledger on the fly.
- Under Reference No., the Invoice No. will be prefilled by default. You can update this value as needed.
Based on the details available, the List of Reference Nos. may also list the voucher Reference No., the bill Reference No. (if it is different from the Invoice No.), or a New Number. You can select any of these numbers, as needed. The New Number option will automatically appear as you start entering a new Reference No.. - Enter the Amount for which you want to request the payment.
- Under Remarks, enter any message that you want to convey to the party regarding the transaction.
For UPI-based payments, ensure that the Remarks does not contain any special characters (such as &, #, and /), as they are not allowed by the UPI payment service providers.
- Under Merchant Profile, select the relevant UPI username.
- Press Ctrl+A to save the details and generate the QR code.

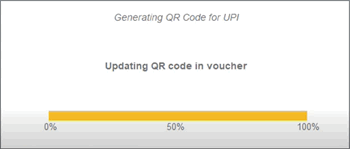
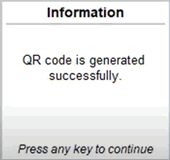
The QR code is generated and updated in the voucher, based on the details of the transaction and the Merchant Profile selected.
Once the QR code is generated and shared with the selected parties, you will receive the following message:
The QR code will be saved in the individual transactions, and you can view it at your convenience.
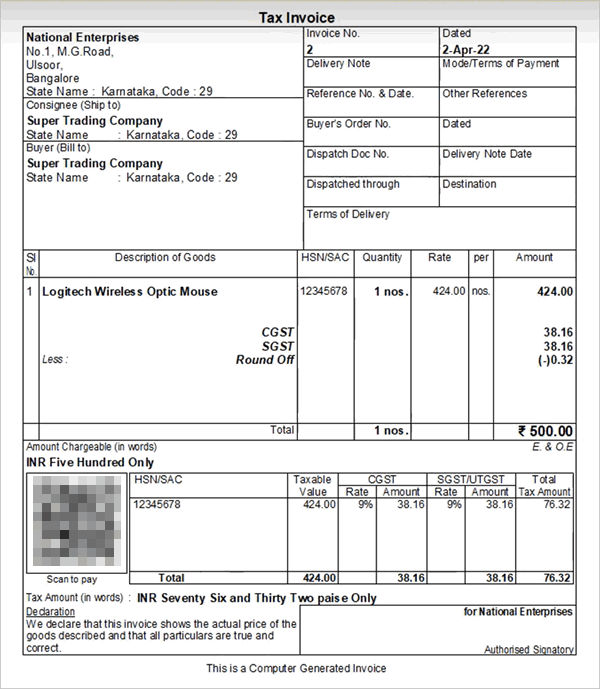
If you print or export the invoice with the QR code, then it will appear as shown below:
Similarly, you can also generate payment link/QR code from the relevant reports such as Day Book or Ledger Voucher/Ledger Outstandings.
Generate payment link/QR code after recording a transaction
If you don’t want the payment link/QR code to be directly or automatically generated, then you can also choose to generate it after recording the transaction.
- Disable the payment link option in the voucher type:
- Press Alt+G (Go To) > Create/Alter > Voucher Type, and select or create the required voucher type for your sales transaction.
- Set the Generate payment link/QR code after saving voucher option to No.
- Press Ctrl+A to save the voucher type.
- Record your GST sales transaction, as usual.

- Press Ctrl+A to save the transaction.
- Press PgUp to open the same transaction in the alteration mode.
- Press Alt+Z (Exchange) > Generate Payment Link/QR Code > Current.
The Generate Payment Link/QR code screen appears. - Update the details for link generation:
- Under Merchant Profile, select the relevant Payment Gateway or UPI user.
Once you select a particular Merchant Profile, it will be selected as the default profile for all your subsequent transactions.
- Specify the Mode of sharing payment link, such as e-mail, SMS, or both, in which the link has to be shared with your party.
- Specify the details of the party, such as the Party A/c Name, Mobile, and E-mail.
The above party details will be filled in by default, as per the party ledger. For the Party A/c Name, you also have the option to directly enter a new party, or create a party ledger on the fly.
- Under Expires in, specify the expiry period after which your payment link will be considered as invalid.
The expiry period is filled in by default from the Merchant Profile master. However, you can update this value as per your requirements for a specific party.
- Under Reference No., the Invoice No. will be prefilled by default. You can update this value as needed.
Based on the details available, the List of Reference Nos. may also list the voucher Reference No., the bill Reference No. (if it is different from the Invoice No.), or a New Number. You can select any of these numbers, as needed. The New Number option will automatically appear as you start entering a new Reference No.. - Enter the Amount for which you want to request the payment.
- Under Remarks, enter any message that you want to convey to the party regarding the transaction.
The options in steps d, e, and g will appear only if they are enabled in F12 (Configure).
- Under Merchant Profile, select the relevant Payment Gateway or UPI user.
- Press Ctrl+A to save the details and generate the payment link/QR code.
If a UPI user was selected under Merchant Profile, then a few fields, such as Mode of sharing payment link, Mobile, E-mail, and Expires in, will not appear in the Generate Payment Link/QR Code screen.
Once the payment link is generated and shared with the selected parties, you will receive the following message:
The payment link/QR code will be saved in the transaction, and you can view it at your convenience.
Similarly, you can also generate payment link/QR code from the relevant reports such as Day Book or Ledger Voucher/Ledger Outstandings.
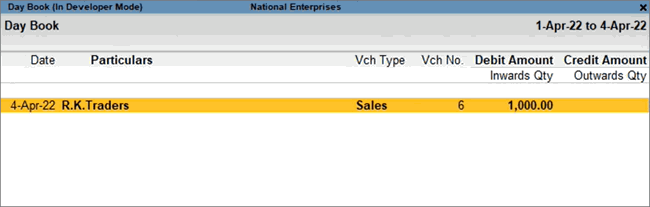
Generate payment link/QR code for one or more transactions | Generate payment link/QR code from Day Book
TallyPrime provides you with the flexibility to generate payment links and QR code at any time for one or many transactions.
You can do so by opening the Day Book, selecting the required transactions, and generating the payment link. That’s it! The payment links and QR codes will be instantly generated and shared with your parties.
- Press Alt+G (Go To) > Day Book.
- Press Spacebar and select the required transactions.

- Press Alt+Z (Exchange) > Generate Payment Link/QR Code > Current.
The Generate Payment Link/QR code screen appears. - Update the details for link generation:
- Under Merchant Profile, select the relevant Payment Gateway or UPI user.
Once you select a particular Merchant Profile, it will be selected as the default profile for all your subsequent transactions. - Specify the Mode of sharing payment link, such as e-mail, SMS, or both, in which the link has to be shared with your party.
- Specify the details of the party, such as the Party A/c Name, Mobile, and E-mail.
The above party details will be filled in by default, as per the party ledger. For the Party A/c Name, you also have the option to directly enter a new party, or create a party ledger on the fly. - Under Expires in, specify the expiry period after which your payment link will be considered as invalid.
The expiry period is filled in by default from the Merchant Profile master. However, you can update this value as per your requirements for a specific party. - Under Reference No., the Invoice No. will be prefilled by default. However, if you have selected multiple vouchers or bills, then Multiple Ref will appear. You can update this field as needed.
Based on the details available, the List of Reference Nos. may also list the bill Reference No. (if it is different from the Invoice No.) or a New Number. You can select any of these numbers, as needed.
The New Number option will automatically appear as you start entering a new Reference No.. - Enter the Amount for which you want to request the payment.
- Under Remarks, enter any message that you want to convey to the party regarding the transaction.
For UPI-based payments, ensure that the Remarks does not contain any special characters (such as &, #, and /), as they are not allowed by the UPI payment service providers.
- Under Merchant Profile, select the relevant Payment Gateway or UPI user.
- Press Ctrl+A to save the details and generate the payment link/QR code.
If a UPI user was selected under Merchant Profile, then a few fields, such as Mode of sharing payment link, Mobile, E-mail, and Expires in, will not appear in the Generate Payment Link/QR Code screen.

The following prompt will appear, if you had enabled the corresponding option in the Merchant Profile.
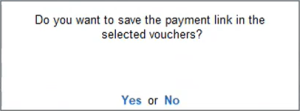
For QR code generation using UPI: If the above option is set to No, then you will not be able to generate the QR code from reports, as no voucher will be available to save the QR code details. - Press Enter, if you want to save the payment link in the respective vouchers.
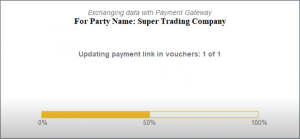
The details of the transaction will be exchanged with the Payment Gateway.
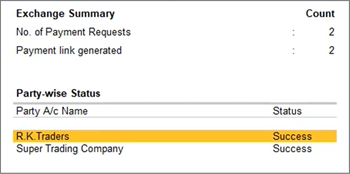
Once the payment link is generated and shared with the selected parties, the following Exchange Summary will appear, where you can see the count of payments requests and payment links generated. You can also see the status against individual parties.
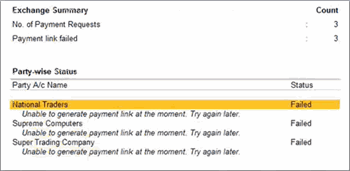
However, if the payment link generation has failed for some reason, then the following Exchange Summary will appear, where you can see the number of failed requests and the details of the issue for each party.
The payment link/QR code will be saved in the individual transactions, and you can view it at your convenience.
Similarly, you can generate a QR code by selecting UPI as the Merchant Profile in the Generate Payment Link/QR Code screen.
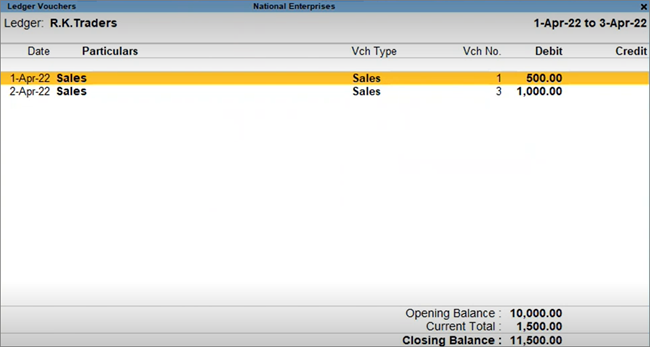
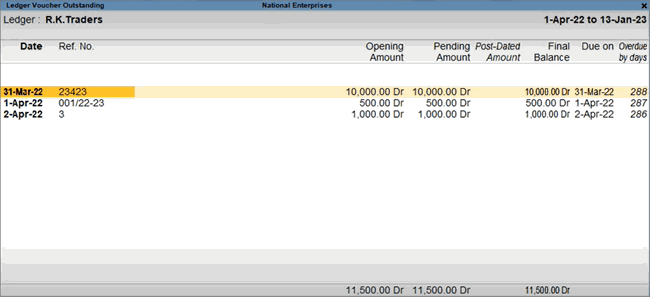
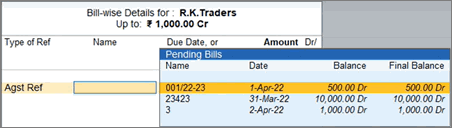
Generate payment link/QR code for multiple transactions of a single party | Generate payment link/QR code from Ledger Voucher/Ledger Outstandings
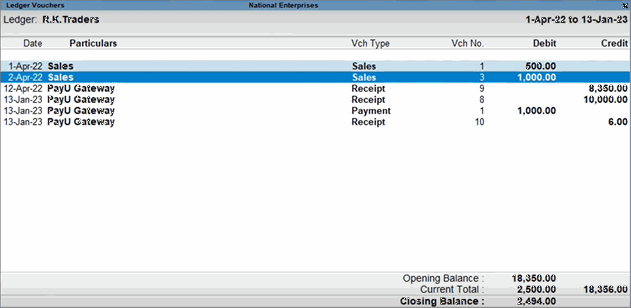
TallyPrime also provides you with the option to generate and share the payment link of the entire report for a particular party. You only have to open the Ledger Voucher or Ledger Outstandings report for the party, and then generate your payment link as usual.
- Press Alt+G (Go To) > Ledger Voucher or Ledger Outstandings, and select the party ledger.
The Ledger Voucher/Ledger Outstandings report will appear, where you can see the transaction or bill details of the selected party. - Press Spacebar and select the required transactions. Accordingly, the consolidated Amount will be considered for the selected transactions.
If you do not select any transactions, then the entire Closing Balance for the party will be considered for generating payment link or QR code.
- Press Alt+Z (Exchange) > Generate Payment Link/QR Code > Current.
The Generate Payment Link/QR code screen appears. - Update the details for link generation:
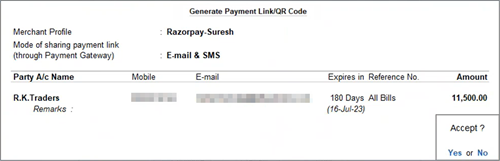
- Under Merchant Profile, select the relevant Payment Gateway or UPI user.
Once you select a particular Merchant Profile, it will be selected as the default profile for all your subsequent transactions. - Specify the Mode of sharing payment link, such as e-mail, SMS, or both, in which the link has to be shared with your party.
- Specify the details of the party, such as the Party A/c Name, Mobile, and E-mail.
The above party details will be filled in by default, as per the party ledger. For the Party A/c Name, you also have the option to directly enter a new party, or create a party ledger on the fly. - Under Expires in, specify the expiry period after which your payment link will be considered as invalid.
The expiry period is filled in by default from the Merchant Profile master. However, you can update this value as per your requirements for a specific party. - Under Reference No., Multiple Ref will appear by default, as you have selected multiple vouchers or bills. You can update this field as needed.
All Bills will appear under Reference No., if you have not selected any vouchers or bills.
- Enter the Amount for which you want to request the payment.
If you have selected specific bills, then the Amount will appear accordingly. Otherwise, the entire Closing Balance for the party will appear in the Amount. Depending on your requirements or understanding with the party, you can update the Amount as needed. - Under Remarks, enter any message that you want to convey to the party regarding the transaction.
For UPI-based payments, ensure that the Remarks does not contain any special characters (such as &, #, and /), as they are not allowed by the UPI payment service providers.
- Under Merchant Profile, select the relevant Payment Gateway or UPI user.
- Press Ctrl+A to save the details and generate the payment link/QR code.
If a UPI user was selected under Merchant Profile, then a few fields, such as Mode of sharing payment link, Mobile, E-mail, and Expires in, will not appear in the Generate Payment Link/QR Code screen.

The following prompt will appear, if you had enabled the corresponding option in the Merchant Profile.
- Press Enter, if you want to save the payment link in the respective vouchers.
The details of the transaction will be exchanged with the Payment Gateway.
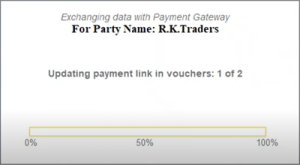
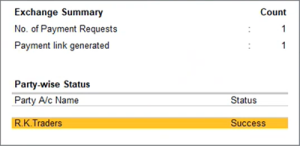
Once the payment link is generated and shared with the selected party, the following Exchange Summary will appear, where you can see the count of payments requests and payment links generated.
The payment link/QR code will be saved in the individual transactions, and you can view it at your convenience.
Similarly, you can generate a QR code by selecting UPI as the Merchant Profile in the Generate Payment Link/QR Code screen.
Generate payment link/QR code from anywhere in TallyPrime
The Payment Request feature provides you with the brilliant flexibility to generate the payment link and QR code from anywhere in TallyPrime, from the Exchange menu.
- On any screen in TallyPrime, press Alt+Z (Exchange) > Generate Payment Link/QR Code > Others.
The Generate Payment Link/QR code screen appears. - Update the details for link generation:
- Under Merchant Profile, select the relevant Payment Gateway or UPI user.
Once you select a particular Merchant Profile, it will be selected as the default profile for all your subsequent transactions. - Specify the Mode of sharing payment link, such as e-mail, SMS, or both, in which the link has to be shared with your party.
- Specify the details of the party, such as the Party A/c Name, Mobile, and E-mail.
The above party details will be filled in by default, as per the party ledger. For the Party A/c Name, you also have the option to directly enter a new party, or create a party ledger on the fly. - Under Expires in, specify the expiry period after which your payment link will be considered as invalid.
The expiry period is filled in by default from the Merchant Profile master. However, you can update this value as per your requirements for a specific party. - Reference No.: The following values will appear, based on your selection:
- All Bills: The value in Reference No will appear as All Bills, by default, if bill-wise entries have been enabled.
- Specify Bills: If you want to generate the link for specific bills, then select Specify Bills instead of All Bills.
- Enter the Amount for which you want to request the payment.
If you have selected specific bills, then the Amount will appear accordingly. Otherwise, the entire Closing Balance for the party will appear in the Amount. Depending on your requirements or understanding with the party, you can update the Amount as needed.
- Under Remarks, enter any message that you want to convey to the party regarding the transaction.
For UPI-based payments, ensure that the Remarks does not contain any special characters (such as &, #, and /), as they are not allowed by the UPI payment service providers.
- Under Merchant Profile, select the relevant Payment Gateway or UPI user.
- Press Ctrl+A to save the details and generate the payment link/QR code.
If a UPI user was selected under Merchant Profile, then a few fields, such as Mode of sharing payment link, Mobile, E-mail, and Expires in, will not appear in the Generate Payment Link/QR Code screen.

The following prompt will appear, if you had enabled the corresponding option in the Merchant Profile.

- Press Enter, if you want to save the payment link in the respective vouchers.
The details of the transaction will be exchanged with the Payment Gateway.
Once the payment link is generated and shared with the selected party, the following Exchange Summary will appear, where you can see the count of payments requests and payment links generated.
The payment link/QR code will be saved in the individual transactions, and you can view it at your convenience.
Similarly, you can generate a QR code by selecting UPI as the Merchant Profile in the Generate Payment Link/QR Code screen.
Print Invoices & Reports with Payment Link/QR Code
TallyPrime provides you with the brilliant flexibility to print your invoices and reports along with the payment link/QR code, so that your parties can easily refer to the transaction details and make the necessary payment.
In this section
- Print invoice with payment link/QR code
- Print Ledger Accounts with payment link/QR code
- Print Ledger Outstandings/Reminder Letter with payment link/QR code
Print invoice with payment link/QR code
TallyPrime also provides you with the flexibility to print the payment link/QR code in the invoice. This will help your parties to refer to the details in the invoice and conveniently make the payment by clicking the link or scanning the QR code.
- Record your GST sales transaction, as usual.
If you want to print an existing transaction, then you can open it from a report such as Day Book or Ledger Voucher. - Press Ctrl+P to print the current transaction.
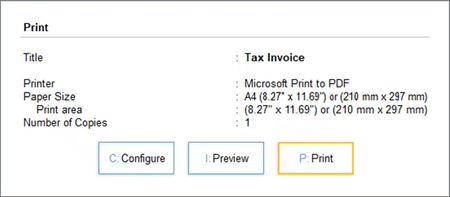
The Print screen appears. - Configure the details for printing by pressing C (Configure):
- Set the Printer as Microsoft Print to PDF, if you want to save a PDF file of your invoice, or select the required printer, if you want to print a hard copy.
- Update other print options, as needed.
- Under Payment Request Details, set the Method of Payment Request as either Link, QR Code, or Link & QR Code, as per your business needs.
For UPI-based payments, set the Method of Payment Request as QR Code.
- Press Ctrl+A to save and return to the Print screen.
- Press P (Print) to continue printing.
Depending on your configuration, the printout will appear as shown below, along with the payment link/QR code.

Now, as per your preference, you can share the PDF or printout with your party, and they can conveniently make the payment.
Print Ledger Accounts with payment link/QR code
TallyPrime also provides you with the flexibility to print the payment link/QR code directly in your Ledger Accounts. This will help your parties to refer to the details in the PDF file or printout and conveniently make the payment by clicking the link or scanning the QR code.
- Press Alt+G (Go To) > Ledger Voucher, and select the party ledger.
The Ledger Voucher report will appear, where you can see the transaction details of the selected party.
- Press Ctrl+P to print the current transaction.
The Print screen appears. - Configure the details for printing by pressing C (Configure):
- Set the Printer as Microsoft Print to PDF, if you want to save a PDF file of your invoice, or select the required printer, if you want to print a hard copy.
- Update other print options, as needed.
- Under Payment Request Details, set the Method of Payment Request as either Link, QR Code, or Link & QR Code, as per your business needs.
For UPI-based payments, set the Method of Payment Request as QR Code.
- Press Ctrl+A to save and return to the Print screen.
- Press P (Print) to continue printing.

The Generate Payment Link/QR code screen appears. - Update the details for link generation:
- Under Merchant Profile, select the relevant Payment Gateway or UPI user.
Once you select a particular Merchant Profile, it will be selected as the default profile for all your subsequent transactions. - Specify the Mode of sharing payment link, such as e-mail, SMS, or both, in which the link has to be shared with your party.
- Specify the details of the party, such as the Party A/c Name, Mobile, and E-mail.
The above party details will be filled in by default, as per the party ledger. For the Party A/c Name, you also have the option to directly enter a new party, or create a party ledger on the fly. - Under Expires in, specify the expiry period after which your payment link will be considered as invalid.
The expiry period is filled in by default from the Merchant Profile master. However, you can update this value as per your requirements for a specific party. - Reference No.: The following values will appear, based on your selection:
- All Bills: The value in Reference No will appear as All Bills, by default, if bill-wise entries have been enabled.
- Specify Bills: If you want to generate the link for specific bills, then select Specify Bills instead of All Bills.
The Bill Details sub-screen will appear, where you can select the required bills from the list.

- Enter the Amount for which you want to request the payment.
If you have selected specific bills, then the Amount will appear accordingly. Otherwise, the entire Closing Balance for the party will appear in the Amount. Depending on your requirements or understanding with the party, you can update the Amount as needed.
- Under Remarks, enter any message that you want to convey to the party regarding the transaction.
For UPI-based payments, ensure that the Remarks does not contain any special characters (such as &, #, and /), as they are not allowed by the UPI payment service providers.
- Under Merchant Profile, select the relevant Payment Gateway or UPI user.
- Press Ctrl+A to save the details and generate the payment link/QR code.
If a UPI user was selected under Merchant Profile, then a few fields, such as Mode of sharing payment link, Mobile, E-mail, and Expires in, will not appear in the Generate Payment Link/QR Code screen.
The following prompt will appear, if you had enabled the corresponding option in the Merchant Profile.
- Press Enter, if you want to save the payment link in the respective vouchers.
The details of the transaction will be exchanged with the Payment Gateway.
Once the payment link is generated and shared with the selected party, the following Exchange Summary will appear, where you can see the count of payments requests and payment links generated.
Depending on your configuration, the printout will appear as shown below, along with the payment link/QR code.
Now, as per your preference, you can share the PDF or printout with your party, and they can conveniently make the payment.
Similarly, you can generate a QR code by selecting UPI as the Merchant Profile in the Generate Payment Link/QR Code screen.
Print Ledger Outstandings/Reminder Letter with payment link/QR code
TallyPrime also provides you with the flexibility to print the payment link/QR code directly in your Ledger Outstandings. This will help your parties to refer to the details in the PDF file or printout and conveniently make the payment by clicking the link or scanning the QR code.
You also have the added advantage of printing your Ledger Outstandings as a Reminder Letter, along with the Payment link and QR code.
- Press Alt+G (Go To) > Ledger Outstandings, and select the party ledger.
The Ledger Voucher Outstandings report will appear, where you can see the transaction details of the selected party.
- Press Ctrl+P to print the current transaction.
The Print screen appears. - Configure the details for printing by pressing C (Configure):
- Set the Report Type as Ledger Outstandings or Reminder Letter, depending on your requirement.
- Set the Printer as Microsoft Print to PDF, if you want to save a PDF file of your invoice, or select the required printer, if you want to print a hard copy.
- Under Payment Request Details, set the Method of Payment Request as either Link, QR Code, or Link & QR Code, as per your business needs.
For UPI-based payments, set the Method of Payment Request as QR Code.
- Set the Include Post-dated Vouchers option to Yes, if you want to print the details of post-dated cheques in the invoice.
- Update other print options, as needed.
- Press Ctrl+A to save and return to the Print screen.
- Press P (Print) to continue printing.

The Generate Payment Link/QR code screen appears. - Update the details for link generation:
- Under Merchant Profile, select the relevant Payment Gateway or UPI user.
Once you select a particular Merchant Profile, it will be selected as the default profile for all your subsequent transactions. - Specify the Mode of sharing payment link, such as e-mail, SMS, or both, in which the link has to be shared with your party.
- Specify the details of the party, such as the Party A/c Name, Mobile, and E-mail.
The above party details will be filled in by default, as per the party ledger. For the Party A/c Name, you also have the option to directly enter a new party, or create a party ledger on the fly. - Under Expires in, specify the expiry period after which your payment link will be considered as invalid.
The expiry period is filled in by default from the Merchant Profile master. However, you can update this value as per your requirements for a specific party. - Reference No.: The following values will appear, based on your selection.
- All Bills: The value in Reference No will appear as All Bills, by default, if bill-wise entries have been enabled.
- Specify Bills: If you want to generate the link for specific bills, then select Specify Bills instead of All Bills.

The Bill Details sub-screen will appear, where you can select the required bills from the list.
- Enter the Amount for which you want to request the payment.
If you have selected specific bills, then the Amount will appear accordingly. Otherwise, the entire Closing Balance for the party will appear in the Amount. Depending on your requirements or understanding with the party, you can update the Amount as needed.
- Under Remarks, enter any message that you want to convey to the party regarding the transaction.
For UPI-based payments, ensure that the Remarks does not contain any special characters (such as &, #, and /), as they are not allowed by the UPI payment service providers.
- Under Merchant Profile, select the relevant Payment Gateway or UPI user.
- Press Ctrl+A to save the details and generate the payment link/QR code.
If a UPI user was selected under Merchant Profile, then a few fields, such as Mode of sharing payment link, Mobile, E-mail, and Expires in, will not appear in the Generate Payment Link/QR Code screen.
The following prompt will appear, if you had enabled the corresponding option in the Merchant Profile.
- Press Enter, if you want to save the payment link in the respective vouchers.
The details of the transaction will be exchanged with the Payment Gateway.
Once the payment link is generated and shared with the selected party, the following Exchange Summary will appear, where you can see the count of payments requests and payment links generated.
Depending on your configuration, the printout will appear as shown below, along with the payment link/QR code.

If you had selected Reminder Letter, then the printout will appear as shown below:

The details for post-dated cheques will appear if you had enabled the Include Post-dated Vouchers option in print configuration.
Now you can share the PDF or printout with your party, and they can conveniently make the payment. You can also export or e-mail the printout, as per your convenience.
Similarly, you can generate a QR code by selecting UPI as the Merchant Profile in the Generate Payment Link/QR Code screen.
Export/E-mail Invoices & Reports with Payment Link/QR Code
If you do not want to print your invoices and generate only a soft copy, then TallyPrime provides you with the flexibility to export or e-mail your invoice as a PDF or JPEG file, by adding the payment link/QR code. Your parties can refer to the details in the invoice and conveniently make the payment by clicking the link or scanning the QR code.
What’s more, TallyPrime provides you with the flexibility to export or e-mail the following three reports: Ledger Voucher, Ledger Outstandings, and Reminder Letter.
In this section
Export invoices/reports with payment link/QR code
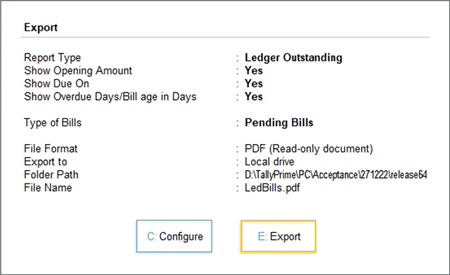
- Press Ctrl+E to export the transaction or report (Ledger Voucher, Ledger Outstandings, or Reminder Letter).
The Export screen appears. - Configure the details for export by pressing C (Configure):
- Set the File Format as JPEG (Image) or PDF (Read-only document).
The payment link will be clickable only in the PDF file, so you have to select the File Format accordingly. - Under Payment Request Details, set the Method of Payment Request as either Link, QR Code, or Link & QR Code, as per your business needs.
For UPI-based payments, set the Method of Payment Request as QR Code.
- Update other export options, as needed.
- Press Ctrl+A to save and return to the Export screen.
- Set the File Format as JPEG (Image) or PDF (Read-only document).
- Press E (Send) to continue exporting.
The Generate Payment Link/QR code screen appears. - Update the details for link generation:
- Under Merchant Profile, select the relevant Payment Gateway or UPI user.
Once you select a particular Merchant Profile, it will be selected as the default profile for all your subsequent transactions. - Specify the Mode of sharing payment link, such as e-mail, SMS, or both, in which the link has to be shared with your party.
- Specify the details of the party, such as the Party A/c Name, Mobile, and E-mail.
The above party details will be filled in by default, as per the party ledger. For the Party A/c Name, you also have the option to directly enter a new party, or create a party ledger on the fly. - Under Expires in, specify the expiry period after which your payment link will be considered as invalid.
The expiry period is filled in by default from the Merchant Profile master. However, you can update this value as per your requirements for a specific party. - Reference No.: The following values will appear, based on your selection.
- All Bills: The value in Reference No will appear as All Bills, by default, if bill-wise entries have been enabled.
- Specify Bills: If you want to generate the link for specific bills, then select Specify Bills instead of All Bills.
The Bill Details sub-screen will appear, where you can select the required bills from the list.
- Enter the Amount for which you want to request the payment.
If you have selected specific bills, then the Amount will appear accordingly. Otherwise, the entire Closing Balance for the party will appear in the Amount. Depending on your requirements or understanding with the party, you can update the Amount as needed.
- Under Remarks, enter any message that you want to convey to the party regarding the transaction.
For UPI-based payments, ensure that the Remarks does not contain any special characters (such as &, #, and /), as they are not allowed by the UPI payment service providers.
- Under Merchant Profile, select the relevant Payment Gateway or UPI user.
- Press Ctrl+A to save the details and generate the payment link/QR code.
If a UPI user was selected under Merchant Profile, then a few fields, such as Mode of sharing payment link, Mobile, E-mail, and Expires in, will not appear in the Generate Payment Link/QR Code screen.
The following prompt will appear, if you had enabled the corresponding option in the Merchant Profile.
- Press Enter, if you want to save the payment link in the respective vouchers.
The details of the transaction will be exchanged with the Payment Gateway.
Once the payment link is generated and shared with the selected party, the following Exchange Summary will appear, where you can see the count of payments requests and payment links generated.
Depending on your configuration, the exported file will appear as shown below, along with the payment link/QR code.
Now, as per your preference, you can share the JPEG or PDF file with your party, and they can conveniently make the payment.
Similarly, you can generate a QR code by selecting UPI as the Merchant Profile in the Generate Payment Link/QR Code screen.
E-mail invoices/reports with payment link/QR code
- Press Ctrl+M to e-mail the transaction or report (Ledger Voucher, Ledger Outstandings, or Reminder Letter).
The E-mail screen appears. - Specify the E-mail from and E-mail to addresses and other options, as needed.
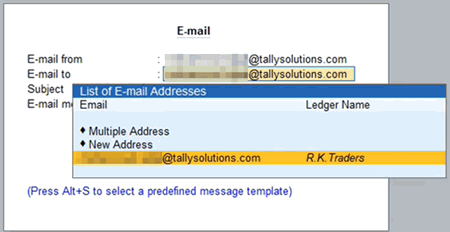
- Press Ctrl+A to save the details.
The E-mail screen appears, where you can further explore the e-mail options. - Configure the details by pressing C (Configure):
- Set the File Format as JPEG (Image) or PDF (Read-only document).
The payment link will be clickable only in the PDF file, so you have to select the File Format accordingly.
- Under Payment Request Details, set the Method of Payment Request as either Link, QR Code, or Link & QR Code, as per your business needs.
For UPI-based payments, set the Method of Payment Request as QR Code.
- Update other export options, as needed.
- Press Ctrl+A to save and return to the Export screen.
- Set the File Format as JPEG (Image) or PDF (Read-only document).
- Press M (E-mail) to continue.

The Generate Payment Link/QR code screen appears. - Update the details for link generation:
- Under Merchant Profile, select the relevant Payment Gateway or UPI user.
Once you select a particular Merchant Profile, it will be selected as the default profile for all your subsequent transactions. - Specify the Mode of sharing payment link, such as e-mail, SMS, or both, in which the link has to be shared with your party.
- Specify the details of the party, such as the Party A/c Name, Mobile, and E-mail.
The above party details will be filled in by default, as per the party ledger. For the Party A/c Name, you also have the option to directly enter a new party, or create a party ledger on the fly. - Under Expires in, specify the expiry period after which your payment link will be considered as invalid.
The expiry period is filled in by default from the Merchant Profile master. However, you can update this value as per your requirements for a specific party. - Reference No.: The following values will appear, based on your selection.
- All Bills: The value in Reference No will appear as All Bills, by default, if bill-wise entries have been enabled.
- Specify Bills: If you want to generate the link for specific bills, then select Specify Bills instead of All Bills.
The Bill Details sub-screen will appear, where you can select the required bills from the list.
- Enter the Amount for which you want to request the payment.
If you have selected specific bills, then the Amount will appear accordingly. Otherwise, the entire Closing Balance for the party will appear in the Amount. Depending on your requirements or understanding with the party, you can update the Amount as needed.
- Under Remarks, enter any message that you want to convey to the party regarding the transaction.
For UPI-based payments, ensure that the Remarks does not contain any special characters (such as &, #, and /), as they are not allowed by the UPI payment service providers.
- Under Merchant Profile, select the relevant Payment Gateway or UPI user.
- Press Ctrl+A to save the details and generate the payment link/QR code.
If a UPI user was selected under Merchant Profile, then a few fields, such as Mode of sharing payment link, Mobile, E-mail, and Expires in, will not appear in the Generate Payment Link/QR Code screen.
The following prompt will appear, if you had enabled the corresponding option in the Merchant Profile.
- Press Enter, if you want to save the payment link in the respective vouchers.
The details of the transaction will be exchanged with the Payment Gateway.
Once the payment link is generated and shared with the selected party, the following Exchange Summary will appear, where you can see the count of payments requests and payment links generated.
Depending on your configuration, the e-mailed file will appear as shown below, along with the payment link/QR code.
Once the e-mail is shared with your party, they can conveniently make the payment.
Similarly, you can generate a QR code by selecting UPI as the Merchant Profile in the Generate Payment Link/QR Code screen.
Track Payment Links/QR Codes (Generated & Pending to Be Generated)
With the Payment Request feature in TallyPrime, you have the benefit of tracking the transactions or bills for which the payment links and QR codes are already generated or pending to be generated. You can easily track this using the Basis of Values feature in reports such as Day Book, Ledger Voucher and Ledger Outstandings.
In this section
View transactions with payment link/QR code
- Press Alt+G (Go To) > Day Book, and set the required Date (F2) or Period (Alt+F2).
The transactions will be listed for the selected period.

- Press Ctrl+B (Basis of Values) > Status of Vouchers > With Payment Link/QR Code.

- Press Ctr+A to save the details.
You can see the transactions for which the payment links/QR codes have been generated.
Similarly, you can filter the reports to view the transactions for which the payment links/QR codes are yet to be generated.
View transactions without payment link/QR code
- Press Alt+G (Go To) > Day Book, and set the required Date (F2) or Period (Alt+F2).
The transactions will be listed for the selected period.
- Press Ctrl+B (Basis of Values) > Status of Vouchers > Without Payment Link/QR Code.

- Press Ctr+A to save the details.
You can see the transactions for which the payment links/QR codes are yet to be generated.
Now, as needed, you can easily generate payment links/QR codes for the pending transactions.
Similarly, you can view the transactions with or without payment links in other reports such as Ledger Voucher and Ledger Outstandings.
In the Outstandings reports (such as Bills Receivable and Ledger Outstandings), the option in Basis of Values appears as Status of Bills, as shown below:

Reconcile Payment Gateway Transactions
Once your parties make the payments against the payment request shared by you, then you can record the corresponding receipt entries to ensure that the accounts are settled and up to date. However, sometimes you might not be aware of a few crucial details, such as the Transaction ID or the Transaction Date, and you might have recorded your receipt entries without these details.
Now you might be worried about keeping a track of all such transactions related to your payment requests. The Payment Reconciliation report will help you in this regard by listing all such entries where the crucial details are missing, so that you can easily update the details directly in the report.
Further, if there are any transactions that are recorded on the Payment Gateway, but not on in your books, then you can easily record the corresponding transactions in your books directly from the Payment Reconciliation report. At the click of a button, all the available details of the transaction will be filled in automatically. You only have to select the party and save the transaction.
What’s more, the Payment Reconciliation report also keeps a track of all your transactions that have been reconciled already, so that you can get a holistic view of all your activities related to payment requests.
In this section
- Create Payment Gateway ledger
- Record receipts against Payment Requests using receipt voucher
- Record refund amount using payment voucher
- Record bank settlement using contra voucher
- Import Payment Gateway statement into Payment Reconciliation
- Reconcile transactions using Payment Reconciliation
- Record transactions directly from Payment Reconciliation report
- View Reconciled Transactions
- Set Unreconciled Balance
Create Payment Gateway ledger
A Payment Gateway ledger will help you in easily maintaining payment request transactions against specific Payment Gateways. Accordingly, the recorded transactions will appear in the Payment Reconciliation report as per the Payment Gateway selected, and help in easy reconciliation.
- Press Alt+G (Go To) > Create/Alter Master > Ledger.
The Ledger Creation or Ledger Alteration screen will open, depending on your earlier selection. - Enter the Name of the Payment Gateway.
- Select the group as either Bank Accounts or Current Assets.
If you select Bank Accounts, then you will be able to record the Payment Request transactions using payment, receipt, or contra vouchers, as needed. However, if you select Current Assets, then you will have to record all the Payment Request transactions using journal vouchers.
- Set the Behave as Payment Gateway option to Yes.
This will ensure that this ledger is treated as a Payment Gateway for tracking your Payment Request transactions. Moreover, it will help you in capturing the details in Transaction Allocations while recording the transactions. - Select the Payment Gateway Name from the List of Payment Gateways.
- Update the Effective Date of Reconciliation, if needed.
If this option is not visible, then press F12 (Configure) > Show more configurations, and enable Provide Effective Date of Reconciliation. You can also enable this option by pressing Ctrl+I (More Details).
If this option is already enabled, then the Effective Date of Reconciliation will be set to the Financial Year Beginning from date, by default. Accordingly, the Payment Reconciliation report will display the transactions that are recorded after the Effective Date of Reconciliation. - Specify other details, as needed.

- Press Ctrl+A to save the details.
Record receipts against Payment Requests using receipt voucher
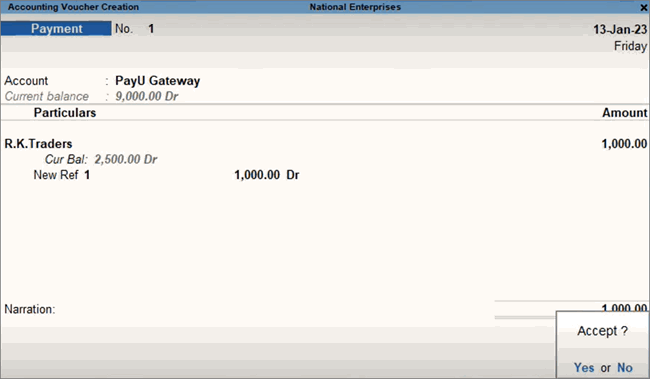
Once your parties have processed the payments against your Payment Request, you can record the corresponding entries in your books using receipt vouchers.
- Press Alt+G (Go To) > Create Voucher, and press F6 (Receipt).
The Accounting Voucher Creation appears. - Under Account, select the relevant Payment Gateway.
- Select the party under Particulars, and enter the relevant Amount.
- Specify the Bill-wise Details for the party, if applicable.
The Transaction Allocations for screen appears for the selected party.

- Specify the Transaction Allocation details, such as Mode of Payment, Transaction ID, Transaction Date, and Amount.
If the Transaction Date is provided, then the transaction will appear as Reconciled in the Payment Reconciliation report. You can view such transactions by enabling the Include Reconciled Transactions option in Basis of Values (Ctrl+B).
- Press Ctrl+A to save the details.
The Accounting Voucher Creation appears.

- Press Ctrl+A to save the voucher.
Record refund amount using payment voucher
In some cases, the Payment Gateway might have refunded the amount to your party against some of your Payment Requests. You can record the corresponding entries in your books using payment vouchers.
- Press Alt+G (Go To) > Create Voucher, and press F5 (Payment).
The Accounting Voucher Creation appears. - Under Account, select the relevant Payment Gateway.
- Select the party under Particulars, and enter the relevant Amount.
- Specify the Bill-wise Details for the party, if applicable.

The Transaction Allocations for screen appears for the selected party.

- Specify the Transaction Allocation details, such as Mode of Payment, Transaction ID, Transaction Date, and Amount.
You can specify the reference number of the refund in the Transaction ID field.
Moreover, if the Transaction Date is provided, then the transaction will appear as Reconciled in the Payment Reconciliation report. You can view such transactions by enabling the Include Reconciled Transactions option in Basis of Values (Ctrl+B).
- Press Ctrl+A to save the details.
The Accounting Voucher Creation appears.
- Press Ctrl+A to save the voucher.
Record bank settlement using contra voucher
Once the Payment Gateway processes the payment to your bank account, you can use a contra voucher to record this settlement of payment.
Based on your needs and business practices, you can track the Payment Gateway charges directly in the transactions, or record them separately using journal vouchers.
- Press Alt+G (Go To) > Create Voucher, and press F4 (Contra).
The Accounting Voucher Creation appears. - Under Account, select the relevant bank account.
- Select the Payment Gateway under Particulars, and enter the relevant Amount.
The Transaction Allocations for screen appears for the selected Payment Gateway.

- Specify the Transaction Allocation details, such as Mode of Payment, Transaction ID, Transaction Date, and Amount.
If the Transaction Date is provided, then the transaction will appear as Reconciled in the Payment Reconciliation report. You can view such transactions by enabling the Include Reconciled Transactions option in Basis of Values (Ctrl+B).
- Press Ctrl+A to save the details.
The Bank Allocations for screen appears for the selected bank account.
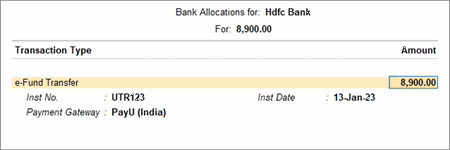
- Specify the Bank Allocation details, such as Transaction Type, Instrument No., and Instrument Date.
The Transaction ID from Transaction Allocations will be prefilled as the bank Instrument No.. - Press Ctrl+A to save the details.
The Accounting Voucher Creation appears.

- Press Ctrl+A to save the voucher.
Import Payment Gateway statement in Payment Reconciliation
To get a complete picture of the payment process with your parties, you have to first download the settlement statement from the Payment Gateway portal and then import it in the Payment Reconciliation report in TallyPrime.
The statement from the portal records the details of the payment collected from your parties as well as the details of the settlement that was done with your business. Therefore, it becomes easier for you to reconcile any differences or missing details between the transactions.
The following table lists the details of the settlement statement in different Payment Gateways.
|
|
Payment Gateway
|
Navigation to Settlement Statement
|
Details Covered in Statement
|
Format Supported
|
|---|---|---|---|---|
| 1 | PayU | Reports > Settlement > Transaction (Settlement Transaction report) | Payments | Refunds | MS Excel (xlsx) |
| 2 | Razorpay | Reports > Select Report Type > Custom Combined Report | Payments | Refunds | Settlement | MS Excel (xlsx) |
Once you have downloaded the settlement statement from the relevant Payment Gateway portal, you can proceed to import it in the Payment Reconciliation report.
- Download the relevant settlement statement from the Payment Gateway portal.
- In TallyPrime, Press Alt+G (Go To) > Payment Reconciliation, and select the Payment Gateway ledger for which you want to reconcile the payments.
- Press Alt+O (Import) > Payment Gateway Statement.
The Import Payment Gateway Statement screen appears. - Configure the required options:
- Alt+B (With View): This option provides you with a preview of the Payment Gateway settlement statement which is being imported.
- Alt+H (Hide Imported): This option hides the files that have already been imported to the Payment Reconciliation report, and displays only the fresh, non-imported files under the List of Files.
- Alt+0 (Import) > Configuration: Under Payment Request, you can set the Folder Path for new Payment Gateway Statements and Folder Path for imported Payment Gateway Statements. If needed, you can set separate paths for saving new (non-imported) and imported files, which will help in easier identification.
- Specify the File Path and the File Type.
Ensure that you have selected the File Type that is supported by the selected Payment Gateway. - Select the required file from the List of Files.

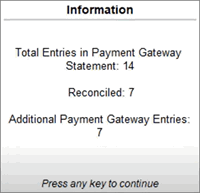
After successful import, the following summary message appears, where you can see the transaction details, such as the Total Entries in Payment Gateway Statement and the number of transactions reconciled after import.
- Press any key to load the Payment Reconciliation report with the imported data.

Reconcile transactions using Payment Reconciliation
Once you have imported the Payment Gateway statement from the portal, you can get a clear view of how all your payment requests are recorded on the portal as well as in your books. Any discrepancies or missing details will be clearly highlighted, so that you can take the necessary action.
Automatic reconciliation
The transactions from the portal and the transactions in your books will get automatically reconciled if the Transaction ID and the Debit/Credit amount are matching. Moreover, if the Transaction Date was not available in the books for the matching transactions, then it will get updated as per the dates available in the Payment Gateway statement.
Reconcile Unlinked Transactions (Manual reconciliation)
Sometimes, the transactions from the portal and the transactions in your books might not get automatically reconciled. This might happen when a detail such as the Transaction ID is missing in one of your transactions. You can easily reconcile such cases manually.
- Press Alt+G (Go To) > Payment Reconciliation, and select the Payment Gateway ledger for which you want to view the report.
- Import the Payment Gateway statement, as explained in the previous section.
The Payment Reconciliation report will appear, listing the unreconciled transactions.

- Under the Amounts not reflected in Company Books section, select the transactions that you want to reconcile, and press Alt+Q (Reconcile Unlinked).
The Unreconciled Transactions screen appears.
If there are any matching transactions in your books, then they will be listed under the Unreconciled Transactions from Company Books section.

- Select the required transaction and press Enter to proceed with reconciliation.
The transaction will be reconciled and no longer appear under Amounts not reflected in Company Books.
Reconcile All Unlinked Transactions
Sometimes, the transactions from the portal and the transactions in your books might not get automatically reconciled, due to some missing details. If you do not want to reconcile such cases manually, then you can opt for Reconcile All Unlinked. In this option, the Payment Reconciliation report will help you in finding the matching transactions from company books for all the transactions from the imported statement, one by one.
- Press Alt+G (Go To) > Payment Reconciliation, and select the Payment Gateway ledger for which you want to view the report.
- Import the Payment Gateway statement, as explained in the previous section.
The Payment Reconciliation report will appear, listing the unreconciled transactions.

- Press Alt+R (Reconcile All Unlinked), without selecting any particular entry.
The Unreconciled Transactions screen appears.
If there are any matching transactions in your books, then they will be listed under the Unreconciled Transactions from Company Books section.

- Select the required transaction and press Enter to proceed with reconciliation.
The transaction will be reconciled and no longer appear under Amounts not reflected in Company Books.
Similarly, you can press Enter to reconcile all the transactions, one by one.
Record transactions directly from Payment Reconciliation report
After importing the Payment Gateway statement, you may find that a few of your transactions are appearing on the portal but are yet to be recorded in your books. For such transactions, the Payment Reconciliation report provides you with the wonderful flexibility to record the corresponding entries in your books, at the click of a button!
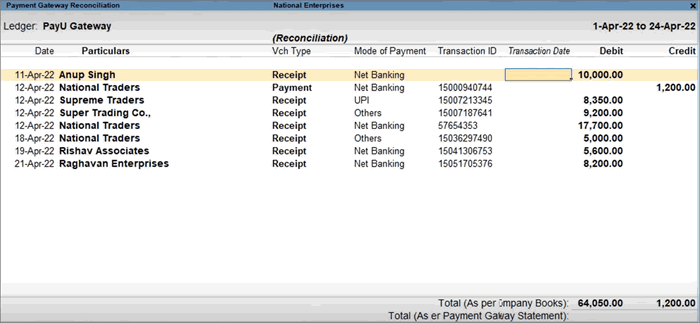
- Press Alt+G (Go To) > Payment Reconciliation, and select the Payment Gateway ledger for which you want to view the report.
- Import the Payment Gateway statement.
The Payment Reconciliation report will appear as shown below.
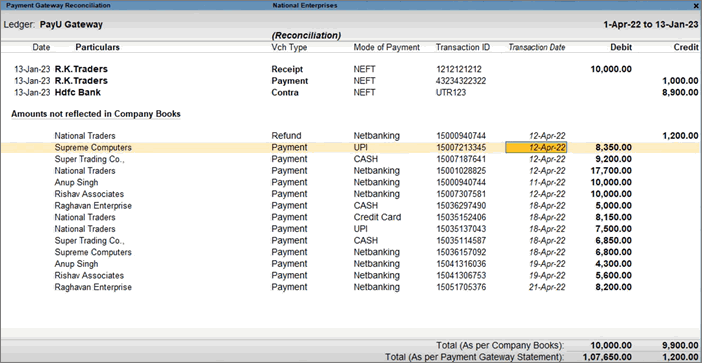
The transactions that are yet to be recorded in your books will appear under Amounts not reflected in Company Books. - Select the entry for which you want to create a corresponding voucher in your books, and press Alt+J (Create Voucher).
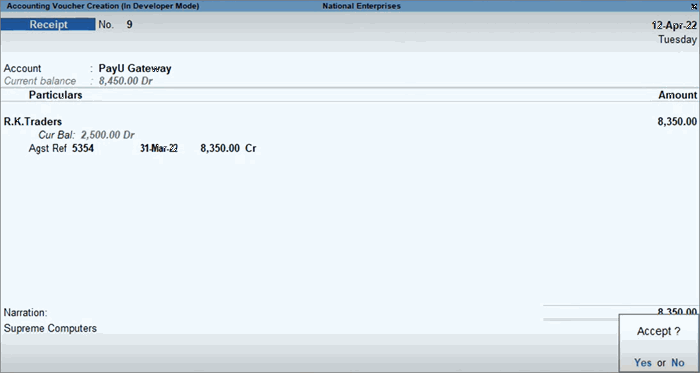
The Accounting Voucher Creation screen appears, where the details such as the Payment Gateway (under Account) and Amount will be prefilled.

- Select the relevant party under Particulars.
The relevant details, such as the Mode of Payment, Transaction ID, and Transaction Date, will be filled in automatically, as shown below.

- Check the necessary details and save the transaction.
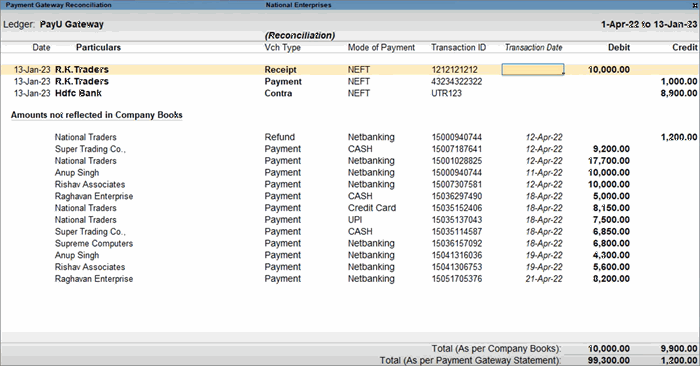
The reconciled transaction will now no longer appear under Amounts not reflected in Company Books.
Similarly, you can create the corresponding vouchers for all the entries that are not present in your books.
View Reconciled Transactions
The Payment Reconciliation report also provides you with the option to view the transactions that are already reconciled.
- Press Alt+G (Go To) > Payment Reconciliation, and select the Payment Gateway ledger for which you want to view the report.
- Press Ctrl+B (Basis of Values) > Include Reconciled Transactions > Yes.
The Payment Reconciliation report will list all the vouchers, including the reconciled ones.

Set Unreconciled Balance
Set Unreconciled Balance is a versatile feature that you can use to add any pending unreconciled transactions that were recorded before the Effective Date of Reconciliation specified in the Payment Gateway ledger.
- Press Alt+G (Go To) > Payment Reconciliation, and select the Payment Gateway ledger for which you want to view the report.
The Payment Reconciliation report appears as shown below:
- Press Alt+H (Basis of Values) > Set Unreconciled Balance > Yes.
The Unreconciled Details for screen appears for the selected Payment Gateway ledger. - Specify the following details for the transactions that you want to add.
- Under Date, specify the date of the transaction. This date must be earlier than the Effective Date of Reconciliation, which you can see below the heading of the screen.
- Enter the Party A/c Name in Particulars.
- Enter the Nature of Transaction, such as Payment, Refund, and Settlement.
- Enter the Mode of Payment, such as Net Banking, Debit or Credit Card, and so on.
- Enter the Debit or Credit amount, as relevant.

If you are splitting the company data, then the Unreconciled Details will be automatically prefilled as per the transactions. You can verify the details and update, if needed.
- Press Ctrl+A to save the details.
The Payment Gateway Reconciliation screen appears, where you can see the above transactions marked as Unreconciled Balance.
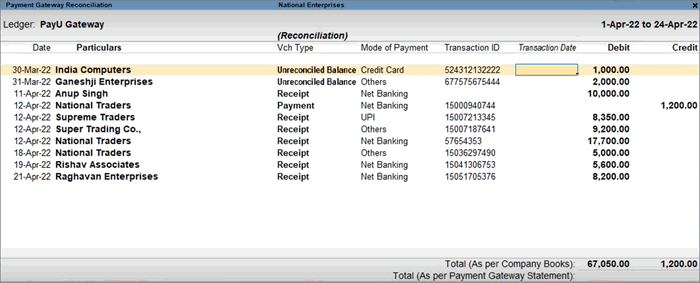
Now you can proceed to reconcile the transactions, as per your convenience.


