Print, Export, WhatsApp or E-mail Multi Account Reports
You can print multiple vouchers and the primary Books of Accounts, like the Cash and Bank Books, Account Ledgers, Sales and Purchase Registers and so on, without having to select the accounts one at a time and printing them.
Note: For illustration purpose, print-related procedure and images have been used in this topic.
Access Multi Account Reports
- Press Alt+P (Print) > Others.
- Select Show More > and press Enter to view all the reports supported for multi account printing.
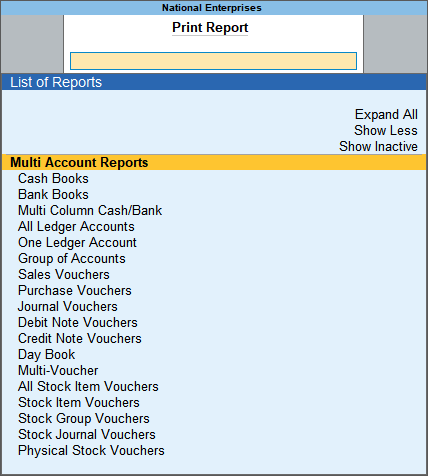
Note: The Multi Account Reports will not appear if you are working on Educational Mode. Ensure that your TallyPrime license is active to access these reports.
- Select the required report and press Enter, and then print the required reports.
Print, Export, E-mail All Accounts
Note: For illustration purpose, print related procedure and images have been used in this section.
- Press Alt+P (Print) > Others.
- In the list of Multi Account Reports, select All Ledger Accounts > and press Enter.
- In the Print sub-screen, press C (Configure), and provide the period. Based on the report selected, the options appear.
- You can select Show More and press Enter, to view all the options provided for the selected report. Set the options as needed.
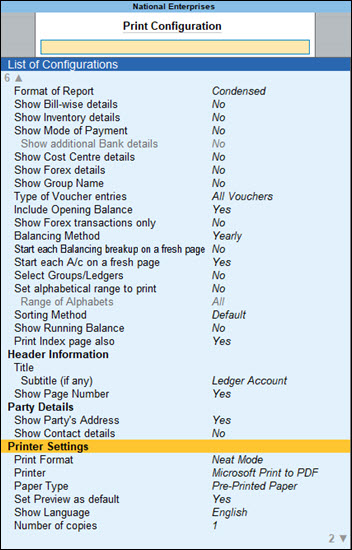
- Press Esc > press I (Preview) to preview it or press P (Print) to print.
Print, Export, E-mail Multi-Voucher/Multi-Invoice
In your business, you may need to share information that include all your sales, payment, or receipt. transactions. Such information may be needed for all parties or a selected party, depending on your requirements. In such cases, printing Multi-Vouchers in TallyPrime comes in handy. This allows you to print the transactions details for a specific voucher type in one go.
Note: For illustration purpose, print related procedure and images have been used in this section.
Multi-Voucher/Invoice for all parties
- Press Alt+P (Print) > Others.
- In the list of Multi Account Reports, select Multi-Voucher > and press Enter.
- In the Print sub-screen, press C (Configure), and provide the period. Based on the report selected, the options appear.
- You can select Show More and press Enter, to view all the options provided for the report.
- Voucher Type: Select the required voucher type.
- (If you are on Release 2.1) Ledger Name: By default All Items is selected. This configuration allows you to select if you want to print multi invoices for all ledgers or selected ledgers. Refer to the Multi-Voucher for Selected Ledger section.
- Vouchers to Print: Select Regular or Optional or All the vouchers.
- Period: Specify the date, as needed.
- Number of copies: If you select sales Voucher Type, and set this option to 2 or more copies, you can enable the option Print Transporter’s Copy.
Set the other options as needed.
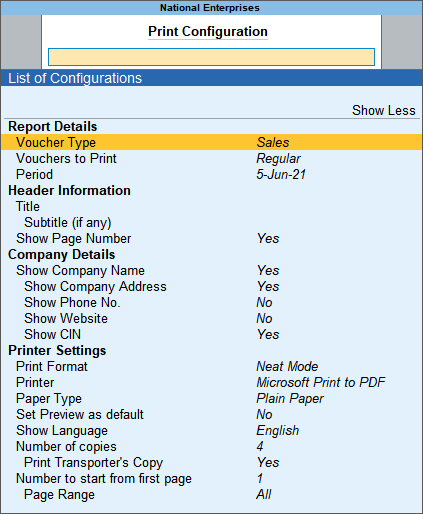
- Press Esc > press I (Preview) to preview it or press P (Print) to print.
The invoices recorded for the selected date will be printed on separate pages.
Multi-Voucher/Invoice for a selected party
If you are on TallyPrime Release 2.1, you can seamlessly print, export or e-mail multi-voucher for a selected ledger. This flexibility is available for the following voucher types:
- Sales
- POS
- Purchase
- Debit Note
- Credit Note
- Receipt
- Payment
- Contra
- Journal
- Press Alt+P (Print) > Others > select Multi-Voucher > press Enter.
- Under Configure, select the required ledger/party under report details.
- Voucher Type: Select the voucher type that you want to print.
- Ledger Name: Select the ledger for which you want to print each invoice in a separate page in one go.
- Vouchers to Print: Once you have selected a specific ledger, this option is updated to Regular automatically. Selecting a specific ledger in Ledger Name is applicable only to Regular vouchers.
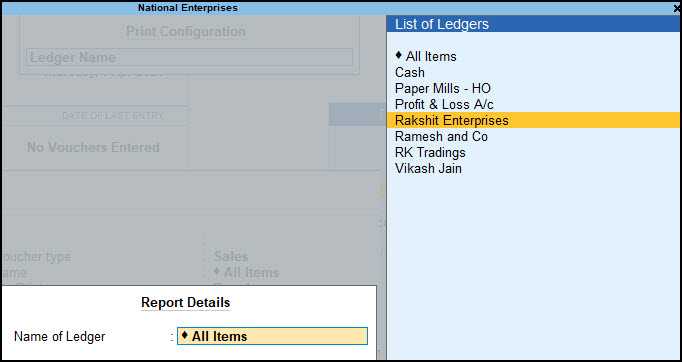
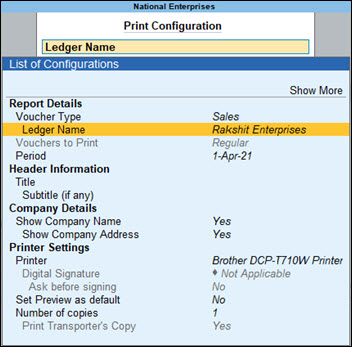
- Make changes to other configurations, as needed, and print.
- Press Esc > press I (Preview) to preview it, or press P (Print) to print.
TallyPrime prints the multi-voucher of the selected voucher type and selected ledger.
Print, Export, E-mail All Ledger Outstandings
Note: For illustration purpose, print related procedure and images have been used in this section.
- Press Alt+P (Print) > Others.
- In the list of Multi Account Reports, select All Ledger Outstandings > and press Enter.
- In the Print sub-screen, press C (Configure), and provide the period. Based on the report selected, the options appear.
- You can select Show More and press Enter, to view all the options provided for the selected report. Set the options as needed.
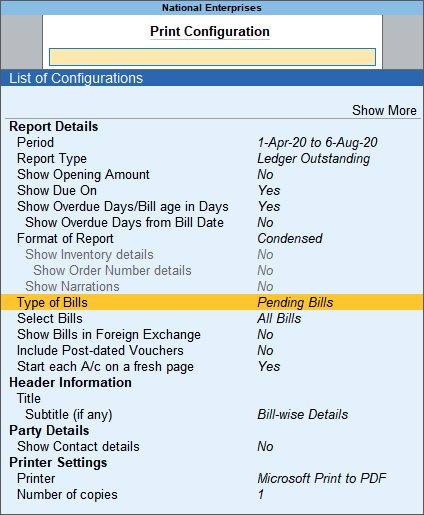
- Press Esc > press I (Preview) to preview it or press P (Print) to print.
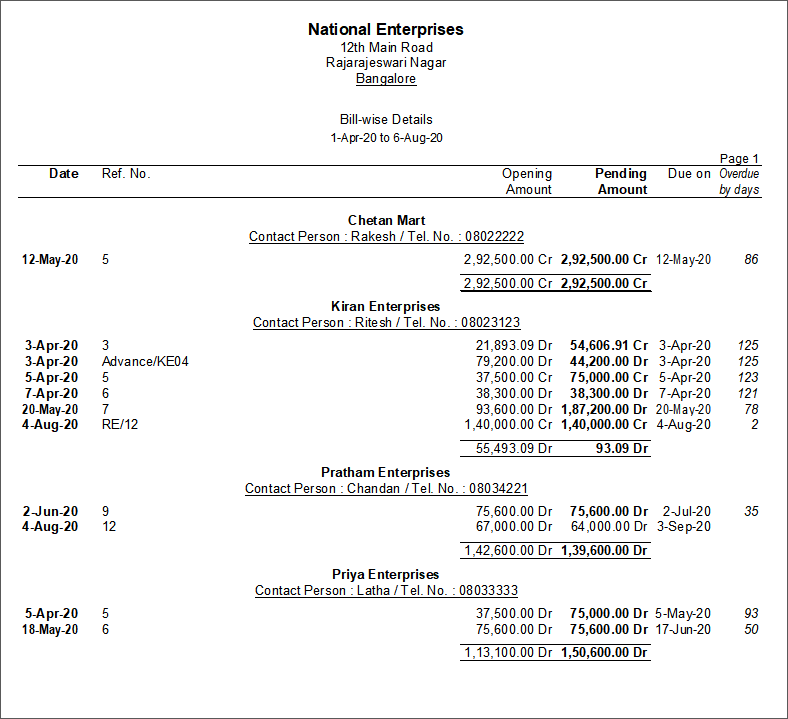
When printing the Ledger Outstanding report, if Show Contact details is set to Yes, and Start each A/c on a fresh page is set to No, the contact person’s name, telephone number and/or mobile number will be printed below each Ledger Account on the same page.
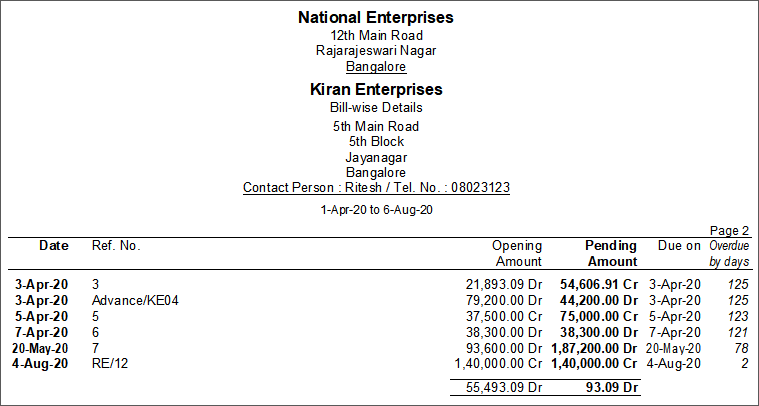
If Show Contact Details is set to Yes, and Start Fresh Page for each Account is also set to Yes, each Ledger Account is displayed in a fresh page, with the address appearing below the Ledger Name.
For the Contact Person, Tel. No. and the address to be displayed, the same should be entered in the Ledger Masters.
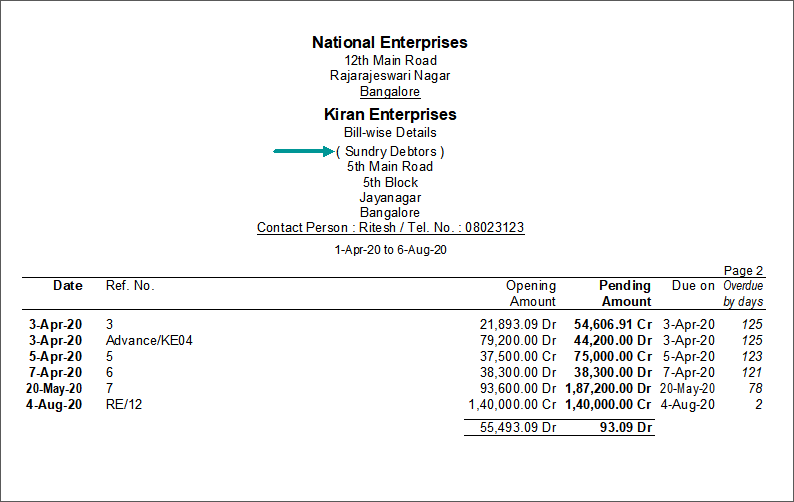
When the option Show Group Name is set to Yes, the Group name of the ledger appears under the ledger name.
Print, Export, E-mail Index Page
Note: For illustration purpose, print related procedure and images have been used in this section.
You can print the Index Page to summarise the page-wise printing of ledger accounts/items. It serves as a Table of Contents (TOC) and helps identify the required Ledger Accounts/Items without going through the entire prints, thereby reducing time and cost.
- Press Alt+P (Print) > Others.
- In the list of Multi Account Reports, select All Ledger Accounts > and press Enter.
- Set Print Index page also to Yes.
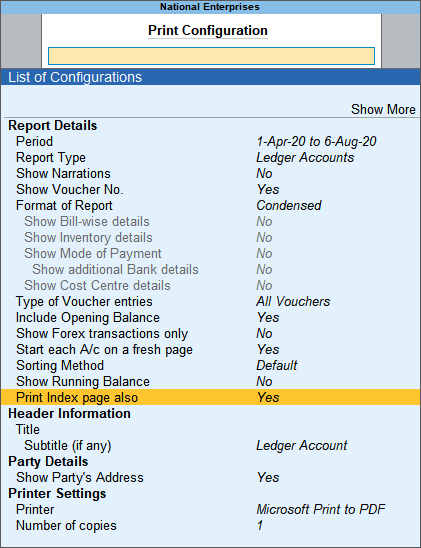
- Press Esc to save and return to the Print screen. The Index page gets printed for all the ledgers.
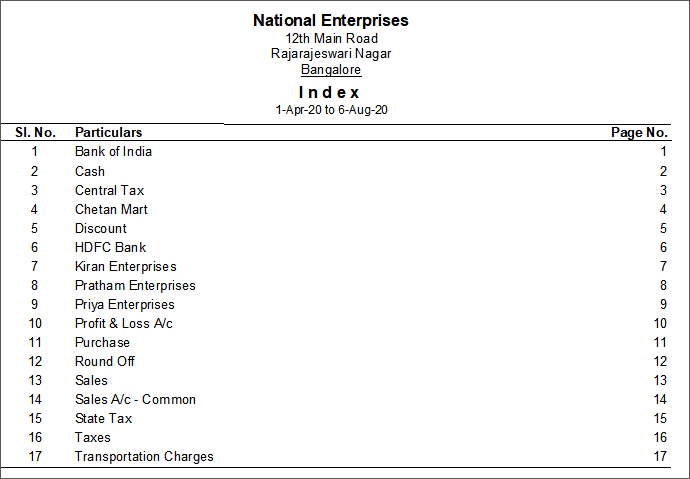
The option Print Index page also appears while Printing All Ledger Accounts/All Items and Group of Accounts/Group of Items from Multi Account Reports.
Print, Export, E-mail Day Book
Note: For illustration purpose, print related procedure and images have been used in this section.
- Press Alt+P (Print) > Others.
- In the list of Multi Account Reports, select Day Book > and press Enter.
- Set the option Show Voucher No. to Yes.
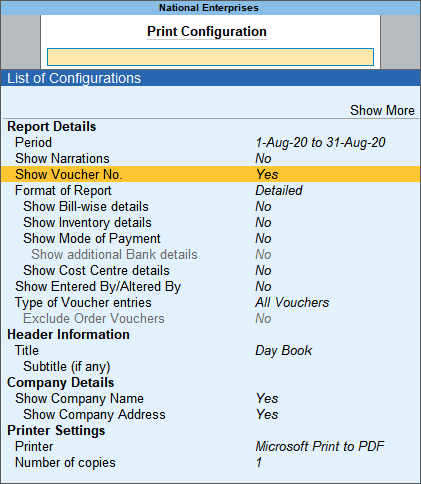
- Press Esc > press I (Preview) to preview it or press P (Print) to print.
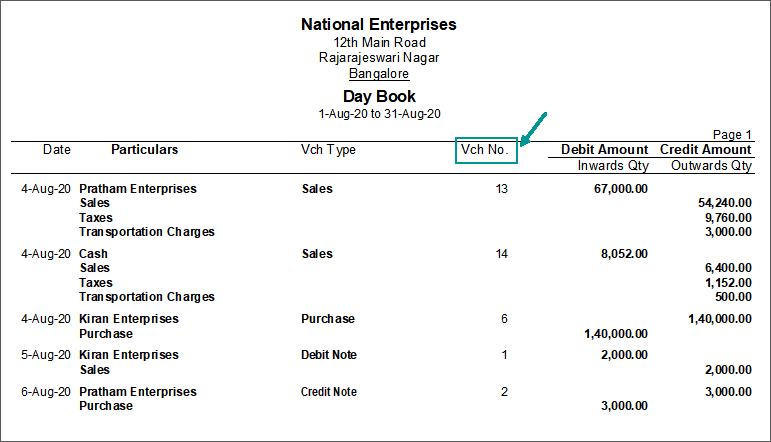
The option Show Voucher No. appears while printing Ledger Vouchers Report and Daybook.
To know more about the Printing feature and flexibilities in TallyPrime, refer to Printing Invoices and Reports topic.
Sorting Method for Printing Multi Account Reports
While printing Ledger Accounts and Group of Accounts from Multi Account Reports, you can sort the details as needed. The sorting method has the following options:
- The Default option will print Ledgers in Alphabetical order.
- The Group option will print Ledgers in Alphabetical order under respective Groups
- Press Alt+P (Print) > Others.
- In the list of Multi Account Reports, select All Ledger Accounts > and press Enter.
- Select the required Sorting Methods from the list of Sorting Methods.

Select Groups/Ledgers While Printing Multiple Accounts
You can print the required Groups/Ledgers in a sequence when printing Ledger Accounts from Multi Account Printing.
- Press Alt+P (Print) > Others.
- In the list of Multi Account Reports, select All Ledger Accounts > and press Enter.
- In the Print sub-screen, press C (Configure) > set Select Groups/Ledgers to Yes.
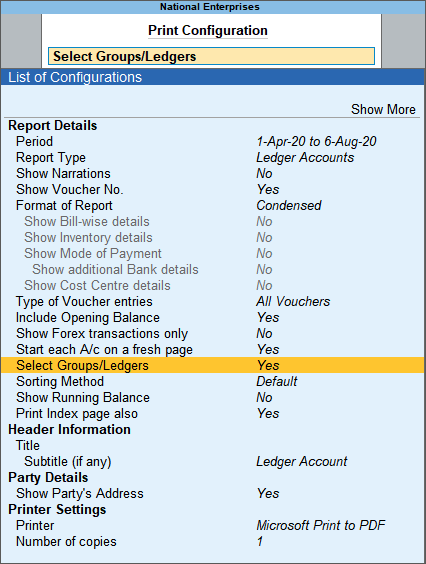
- In the Selection for Groups/Ledgers screen, select the required groups and ledgers:
- Include these Groups: Select the required group(s) from the List of Groups to include them. This will print all Ledgers belonging to the included groups, in case none of the groups/ledgers are selected in the other sections, namely, Exclude these Groups, Include these Ledgers and Exclude these Ledgers.
- Exclude these Groups: Select the required group(s) from the List of Groups to exclude them. This will print all Ledgers belonging to the included groups other than the excluded groups’ ledgers.
Note: In case any group is selected under Include these Groups, this section will list only the sub-group(s) of the Included Group(s). For example, if Current Assets and Current Liabilities are selected under Include these Groups section, the Exclude these Groups section will list the groups/sub-groups of Current Assets and Current Liabilities only, which are, Bank Accounts, Cash-in-Hand, Deposit (Assets), Provisions, Sundry Creditors, Sundry Debtors, and so on. If no group is selected under Include these Groups, this section will list all the Groups.
- Include these Ledgers: Select the required ledger(s) from the list to include for printing.
Note: In case any group is selected under Include these Groups, this section will list all the ledgers other than the ledgers of the included groups, so that the user may select the required ledgers of other groups which have not been selected under Include these Groups. In case any group is selected under Exclude these Groups, this section will list all the ledgers of the Excluded Groups, so that the user may select the required ledgers from the same.
- Exclude these Ledgers: Select the required Ledger(s) to exclude for printing.
Note: This section will list all the Ledgers belonging to the included and excluded group(s), so that user can exclude the ledgers which are not required to be printed.

- Press Esc > press I (Preview) to preview it or press P (Print) to print.
Set Alphabetical Print Range
You can print the ledgers as per alphabetical order, namely 0 to 9 and A to Z. Also, you can mention the required range to print the ledgers at one instance. For example, From A to G, From 1 to 5.
- Press Alt+P (Print) > Others.
- In the list of Multi Account Reports, select All Ledger Accounts > and press Enter.
- In the Print sub-screen, press C (Configure) > select Show More and press Enter, to view all the options.
- Enable the option Set alphabetical range to print > In the Range of Alphabets select the details for:
- Press Esc > press I (Preview) to preview it or press P (Print) to print.
This option is also available for Cash/Bank Book groups, Group of Accounts, Inventory Books – All Items and Group of Items. This option will skip in case you have set Select Groups/Ledgers to Yes, while printing.
Print Multiple Payslips
Payslip is a statement/document issued to an employee, providing the details of earnings and deductions.
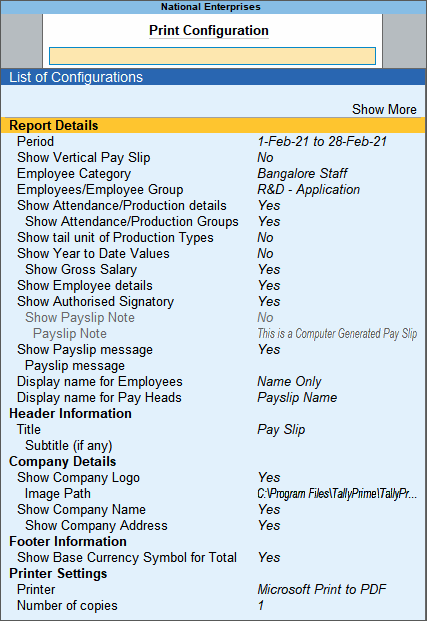
You can print payslips for all the employees in one-go.
- Press Alt+P (Print) > Others.
- In the list of Multi Account Reports, select Multi Payslip > and press Enter.
- Specify the required date range in the From and To fields respectively.
- Select the required Employee Category.
- Select the Employee/Group to print the payslips for the individual employee or all the employees belonging to the Group.
Disallow Access to Multi Account Reports
You can disallow users from using multi account reports to print reports. Use the security control to disallow access to various printing options under Multi Account Reports. You cannot disallow Multi Account Reports as a whole, as it would deprive users from printing different type of accounts in one-go. However, you can disallow access to specific reports under Multi Accounting Reports. For example, you can control access to Cash Book, Sales Register, Physical Stock Register, and so on.
You have to first create a security level in which the access to specific reports or printing options can be disallowed. You can then assign this security level to a user created under Users and Passwords. When such user logs in, the disallowed options are either hidden or available only for view.
Create security level
- Press Alt+K (Company) > User Roles.
- Enter the name for the new security level and press Enter.
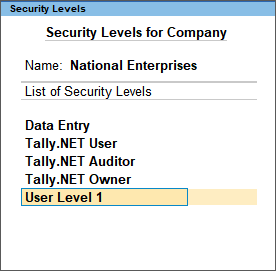
- In the Use Basic Facilities of field, select Data Entry.
- Disable the option Allow company to connect, if you don’t want the user to connect company for sync, tally.net and browser access.
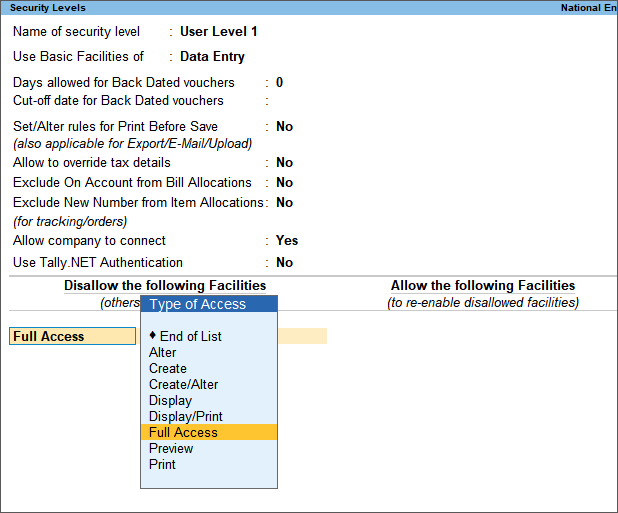
- In the Disallow the following Facilities column, select Full Access from the Type of Access list and press Enter.
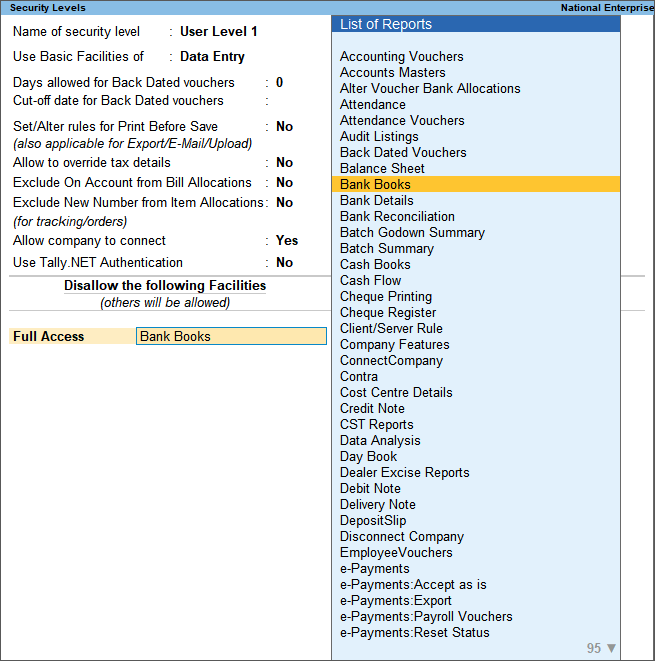
- Select the name of the report you want to disallow. For example, if you want to disallow access to Bank Books, select it and press Enter. Full access to Bank Books will be disallowed for this security level, and for all users added under this security level.
- Similarly, you can disallow access other printing of other reports by selecting the report in the Disallow the following Facilities column.
- Save the changes.
Assign the security level to users
- Press Alt+K (Company) > Users and Passwords.
- In the Users for Company screen, select the security level created to disallow access to reports under Multi Account Reports.
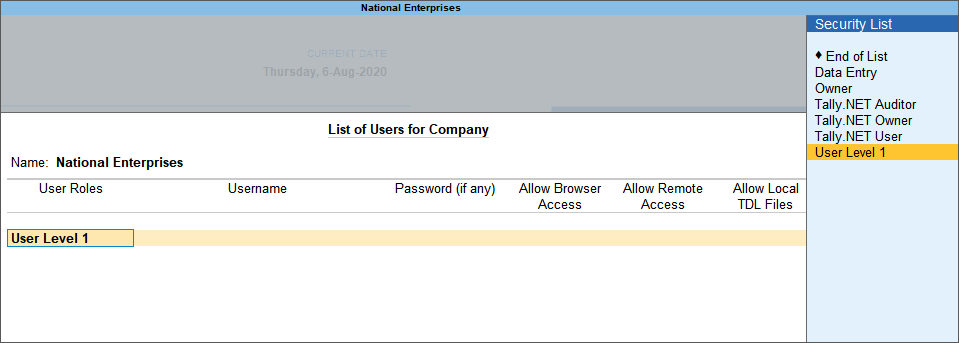
- Enter the username and password of the user in the Username/Tally.NET ID and Password (if any) fields.
- Save the changes.
The reports for which you disallow access are not shown to the user.
Print reminder letters with outstanding balances
- Press Alt+P (Print) > Others > type or select Group of Account Outstandings > and press Enter.
- Select the required group.
- In the Print sub-screen, press C (Configure).
- Change the Report Type to Reminder Letter.
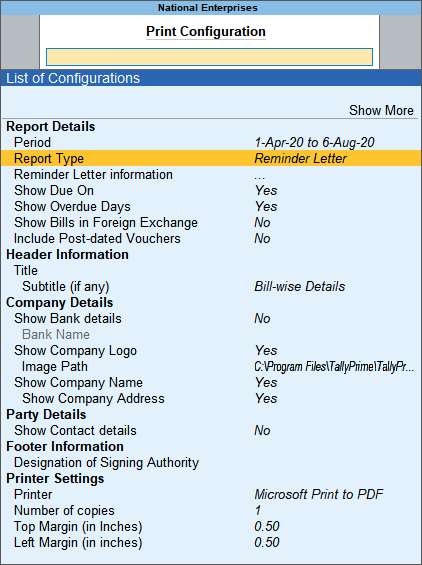
- Enter the ageing details.
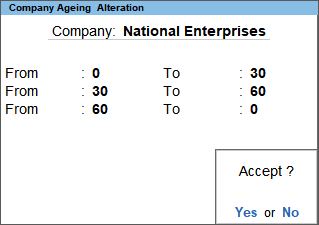
- Press Enter to accept.
- Specify the Designation of Signing Authority > set the other configuration options as needed.
- Press Esc > press I (Preview) to preview it or press P (Print) to print.
Content of a Reminder Letter
The content of a reminder letter is pre-defined in the product for printing. To add or change the content for Reminder Letter:
- Press Alt+P (Print) > Others > type or select Group of Account Outstandings > and press Enter.
- Select the required group.
- In the Print sub-screen, press C (Configure).
- Change the Report Type to Reminder Letter.
- Select Reminder Letter information and press Enter. You can change the details, or accept it as is.

- You can change the Top Margin or Left Margin as needed.
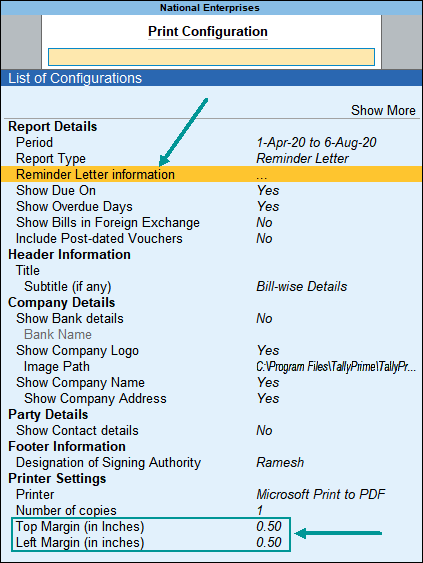
- Press Esc > press I (Preview) to preview it or press P (Print) to print.
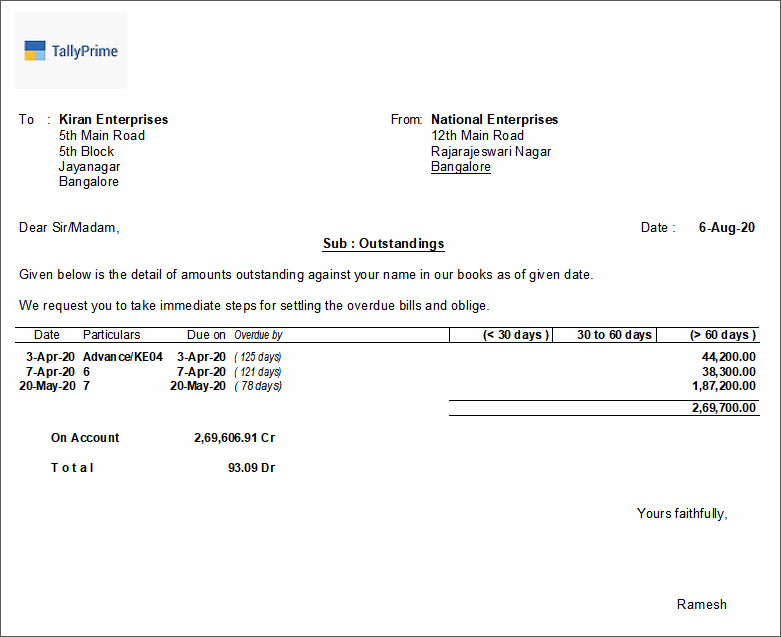
FAQ
While printing from Multi Account Reports, the ledger appears but is not printed. Why?
- Select the required report from Multi Account Reports and set the option Start each A/c on a fresh page to Yes.
- Select the required print format.
- Select the Printer and press Enter > select the required printer > In the Printer properties, and click Custom.
- Under paper size units as 0.01 inches > Width 900 > Length 1200.
Note: You can enter the paper size only when this option is available in the selected printer.
- Try printing now.
- If you have any other printer you can try printing on that and check.

