
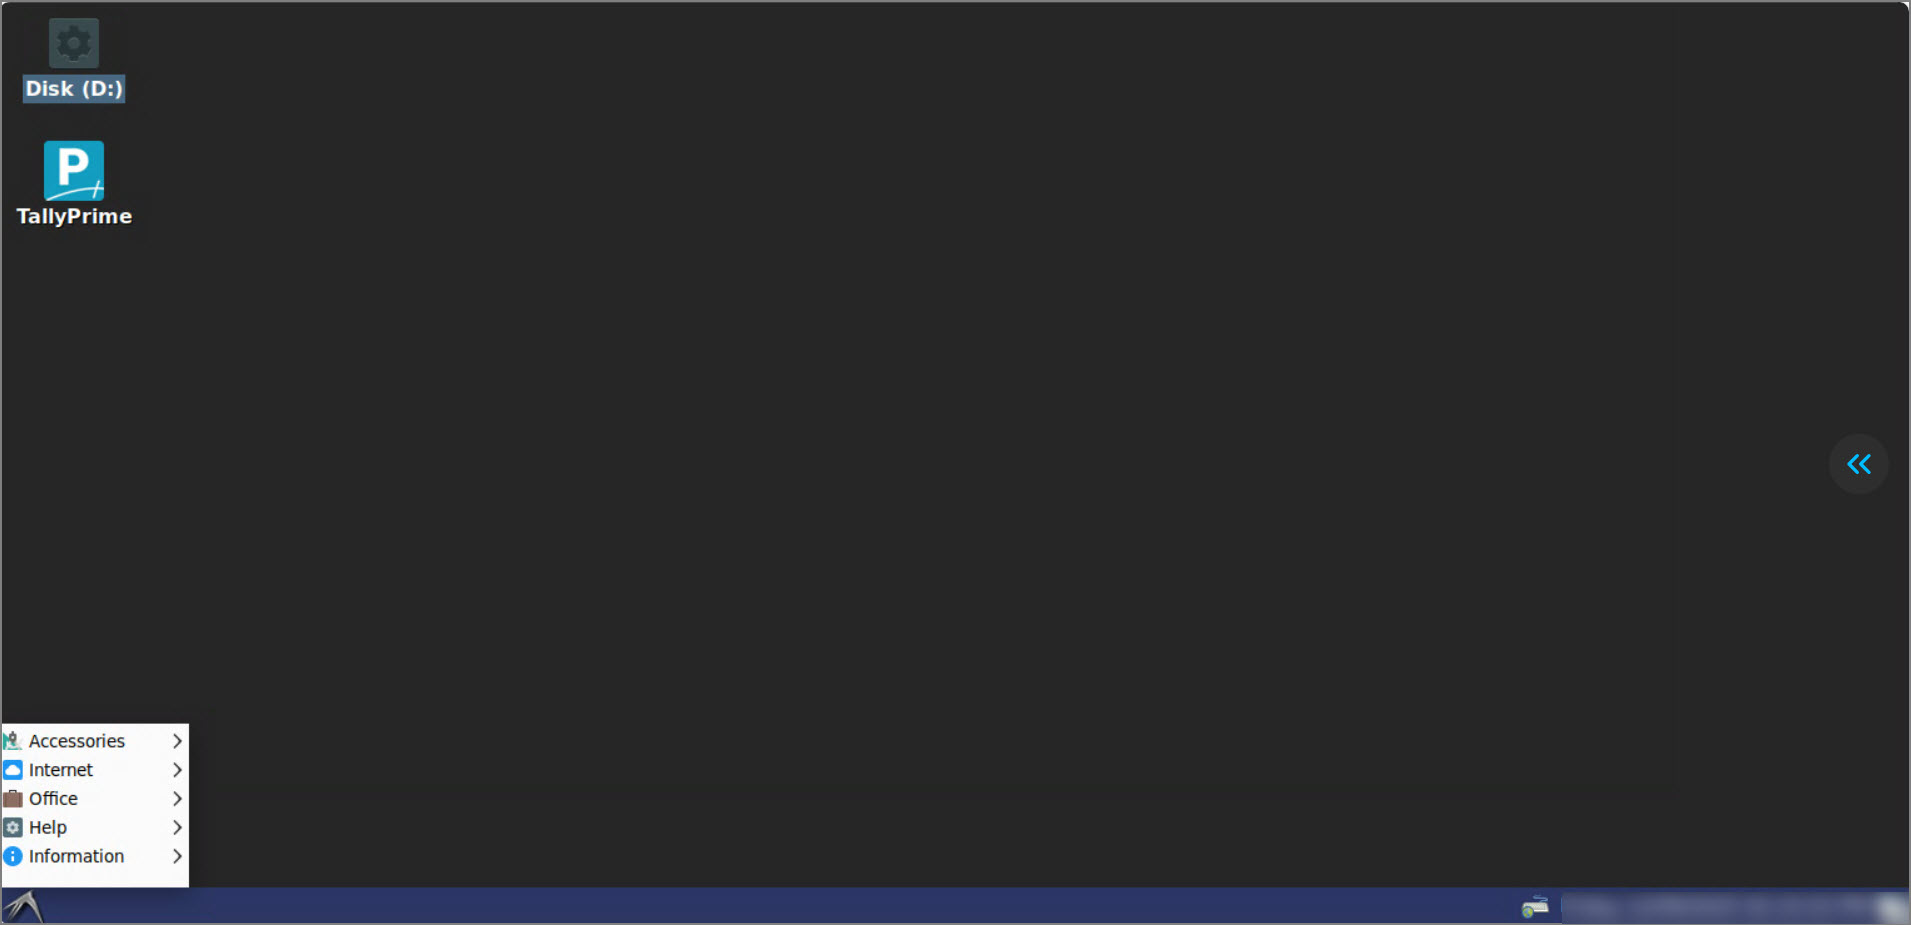
Know Your Virtual Computer
The Virtual Computer gives you a familiar desktop-like environment to work with TallyPrime and related applications from anywhere. It comes with a Control Panel that helps you manage data access, user permissions, and system settings with ease. You can also use built-in tools and accessories to handle routine tasks without needing external applications.
With options for customisation, troubleshooting, and system operations, the Virtual Computer ensures secure and uninterrupted access to your work.
If you access the Virtual Computer using the TPCA Client, the Control Panel will not be available.
Desktop View
After connecting to your Virtual Computer through the browser, the desktop screen appears as follows:
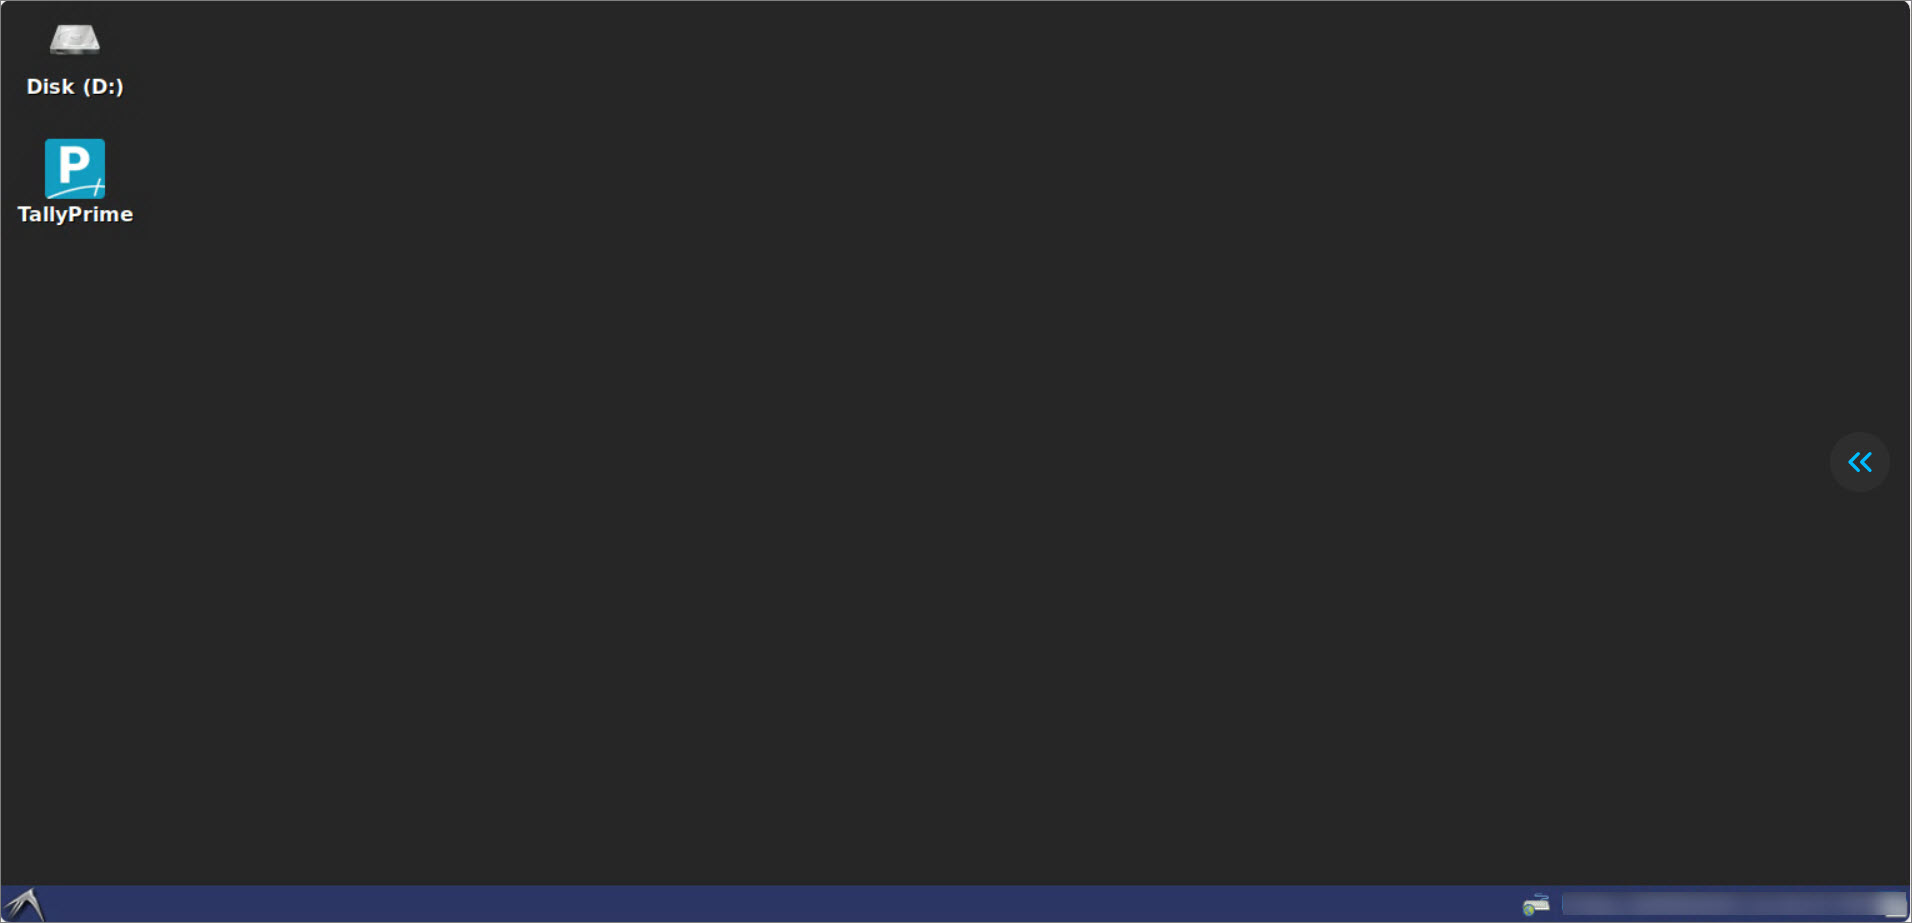
It has the following components:
-
Disk (D:) Drive: Your cloud storage space where you can store company data and backups.
-
TallyPrime Icon: Depending on your plan, you will see one or more TallyPrime icons on your desktop.
-
Collapsible Control Panel: Located on the right corner of the screen, this gives you quick access to various features.
-
The Home menu at the bottom-left corner provides quick access to useful tools and accessories, making it easier to perform day-to-day tasks within your Virtual Computer.
Virtual Computer Control Panel
In the browser-based web client, a collapsible Control Panel is available on the right-hand corner. It gives you quick access to features like Disconnect, Full Screen, Notifications, File Manager and more.
Components in the Control Panel
-
Toggle Button (>>)
-
Use this floating button to expand or collapse the Control Panel.
-
You can drag and move it along the right-side edge.
-
On reconnection, it resets to the center of the right-side edge.
-
-
Disconnect
-
Click this button to disconnect your session.
-
Alternatively, close the tab or browser to end the session.
-
-
Full Screen
-
Click to open the virtual desktop in full-screen mode.
-
When in full screen, you can still use the Esc key without exiting the browser full screen.
-
To exit full screen:
-
Move your cursor to the top edge and click the Close button, or
-
Press and hold the Esc key.
-
-
-
Notifications – Displays system and session notifications.
-
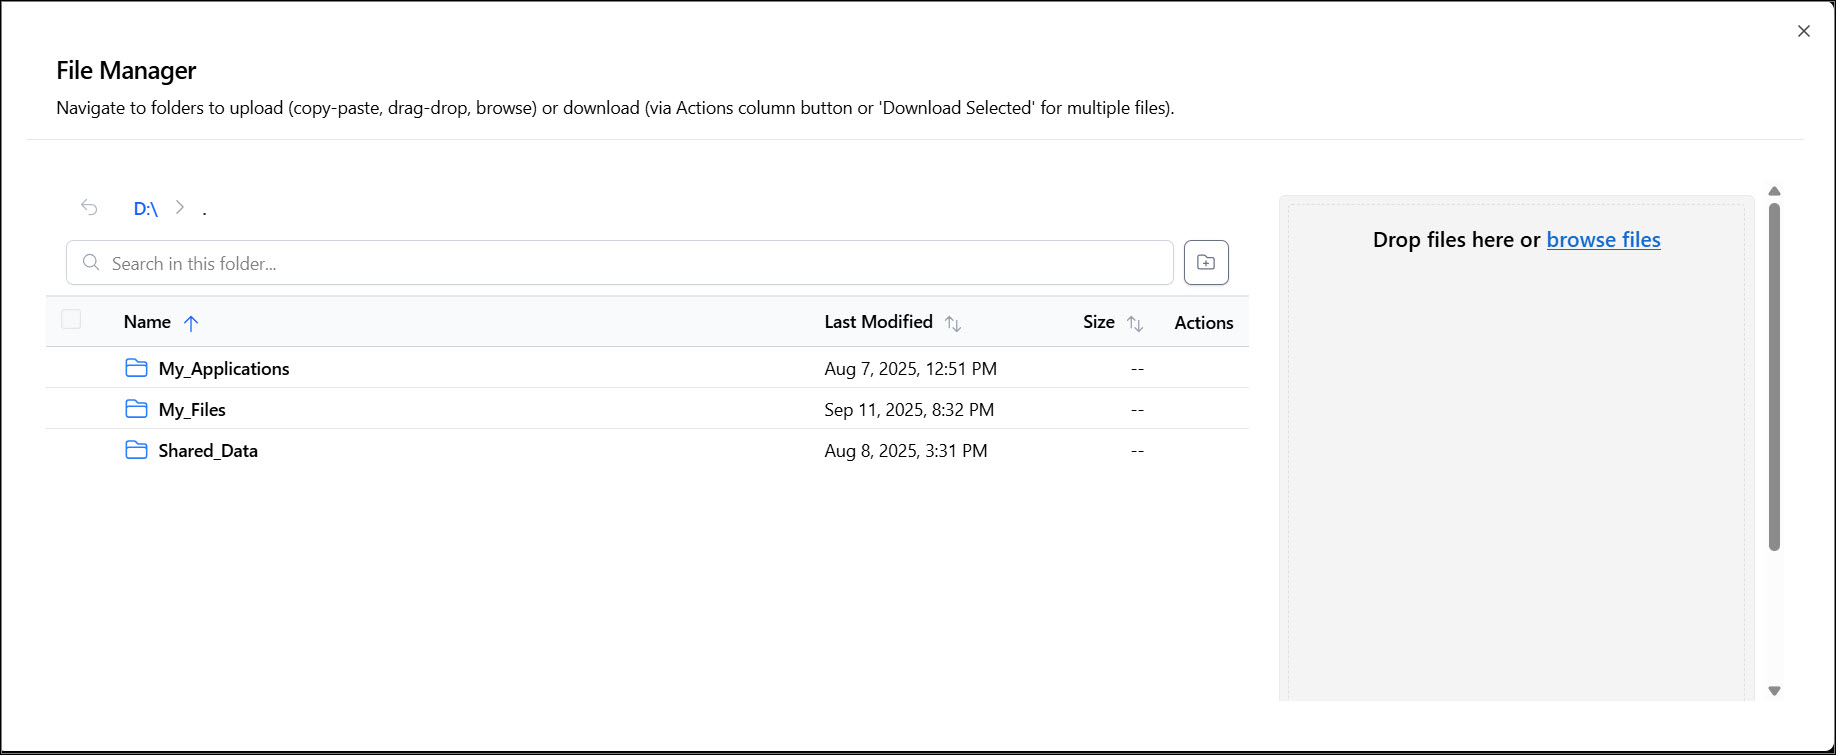
File Manager – Use copy-paste, drag-drop, or click browse files to upload, or click Download Selected to retrieve files locally.
- Permissions Manager – Grant or revoke browser-level permissions (such as access to Clipboard, Downloads, Printing) for smoother use of the Virtual Computer.

-
Resolution
-
By default, it is set to Auto, which matches your local system’s resolution.

-
You can select the required screen resolution to suit your display.
-
Folder Structure & Setup
The Virtual Computer comes with a few pre-defined folders where you can keep your data and applications, in an organised manner. However, there is no restrictions on using the folders the way you want or creating new sub-folders.
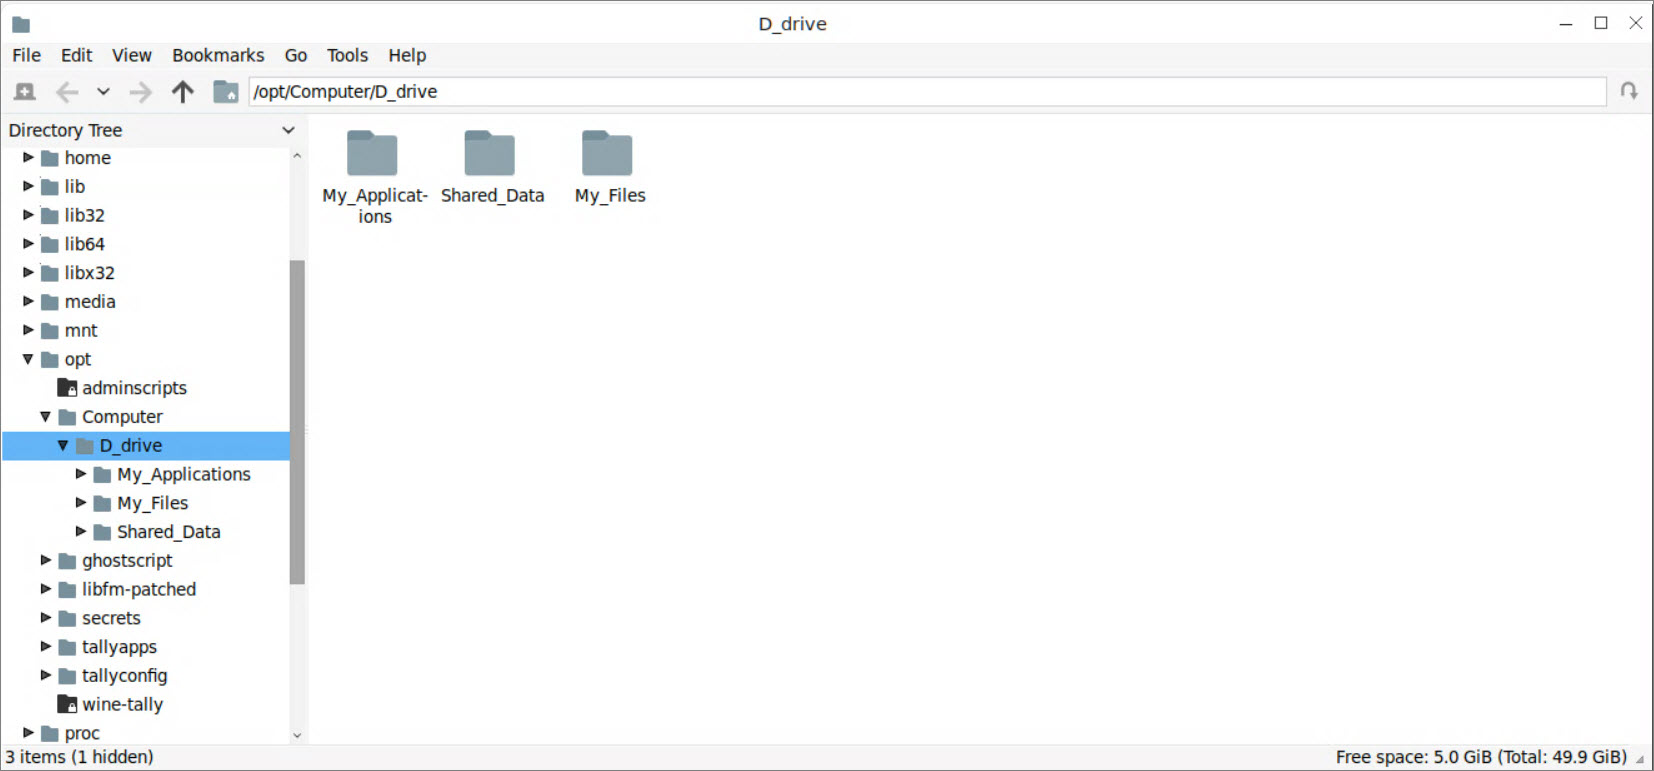
In the Virtual Computer, click Disk (D:)
The D_drive screen appears, displaying the sub-folders in the Virtual Computer.
-
My_Applications – The folder where TallyPrime and TallyPrime Server are pre-installed.
-
Shared_Data – Keep files that you want to share with other users, if multiple users are associated with your account. The folder is further classified into the following sub-folders.
-
Backup – To keep backup of your company data.
-
Files – To store any other files for common reference.
-
Data – To store your company data.
-
-
My_Files – You can keep your personal files in this folder. Additionally, if you use the Export or Import features in TallyPrime, the folder path is set to this folder, by default.
Store your important data in the folders linked to your virtual computer. You can create new folders as needed. Any files saved outside these folders will be removed when the virtual computer restarts.
Selective Folder Sharing | Folder Permissions
TallyPrime on the Virtual Computer lets you access the TallyPrime application from anywhere. By default, all users of your Virtual Office can view the folders on the Virtual Computer.
However, there may be cases where you, as the Owner or Administrator:
-
Want to fully restrict access to business-critical data stored in the Shared_Data folder.
-
Want certain data to be accessible only when users open the company in TallyPrime on the Virtual Computer for daily transactions or data entry.
With the permissions feature, you can control such access and ensure your data stays secure and available only to authorised users.
Types of Permissions for Folder Access
As an Owner or Administrator, you can set the following permissions for the standard users in TallyPrime Cloud Access. Let’s consider Shared_Data folder for example.
-
Allowed: Full access to the Shared_Data folder and ability to download the files from that folder to your local computer.
-
Disallowed: Completely restricts users from accessing or downloading files from the Virtual Computer.
-
Allowed in TallyPrime: Access to the Shared_Data folder only through TallyPrime on Virtual Computer. Users with this access cannot access the folder through File Explorer or download any files from the Virtual Computer.
You can set the permissions for the Shared_Data folder and any subfolder created under it. However, the permission you set for the parent folder Shared_Data takes prominence.
Let’s consider a few scenarios to understand the impact of setting permissions in a folder hierarchy. Say, under the Shared_Data folder, you have created two subfolders named Data_HO and Data_BLR.
|
Shared_Data (Parent Folder) |
Data_HO (Subfolder) |
Data_BLR (Subfolder) |
Description |
|---|---|---|---|
|
Allowed |
Allowed |
Disallowed |
In this case, the user can access Shared_Data and Data_HO, but cannot access Data_BLR. |
|
Disallowed |
Allowed in TallyPrime |
Allowed |
As you have set the parent folder with Disallowed access, the user will not be able to access or download the data from Data_HO and Data_BLR even if the access is set to Allowed in TallyPrime and Allowed, respectively. |
|
Allowed in TallyPrime |
Allowed in TallyPrime |
Disallowed |
The user can access Shared_Data and Data_HO through the TallyPrime application but cannot access Data_BLR. |
In addition:
-
If you create a new folder under a parent folder with permission, the new folder inherits the parent folder’s permission.
-
When you copy a folder with permission and paste it under a parent folder at a different location, the copied folder inherits the parent folder’s permission at that location.
-
If you cut and paste or move a folder with permission to a different location, that folder retains the existing permission.
Set Permissions | User Access to Data Folder
Access for standard users
-
Under D_drive, right-click the Shared_Data folder or select a subfolder under it, as per your requirement
-
Right-click the Data folder and click Set Permissions.
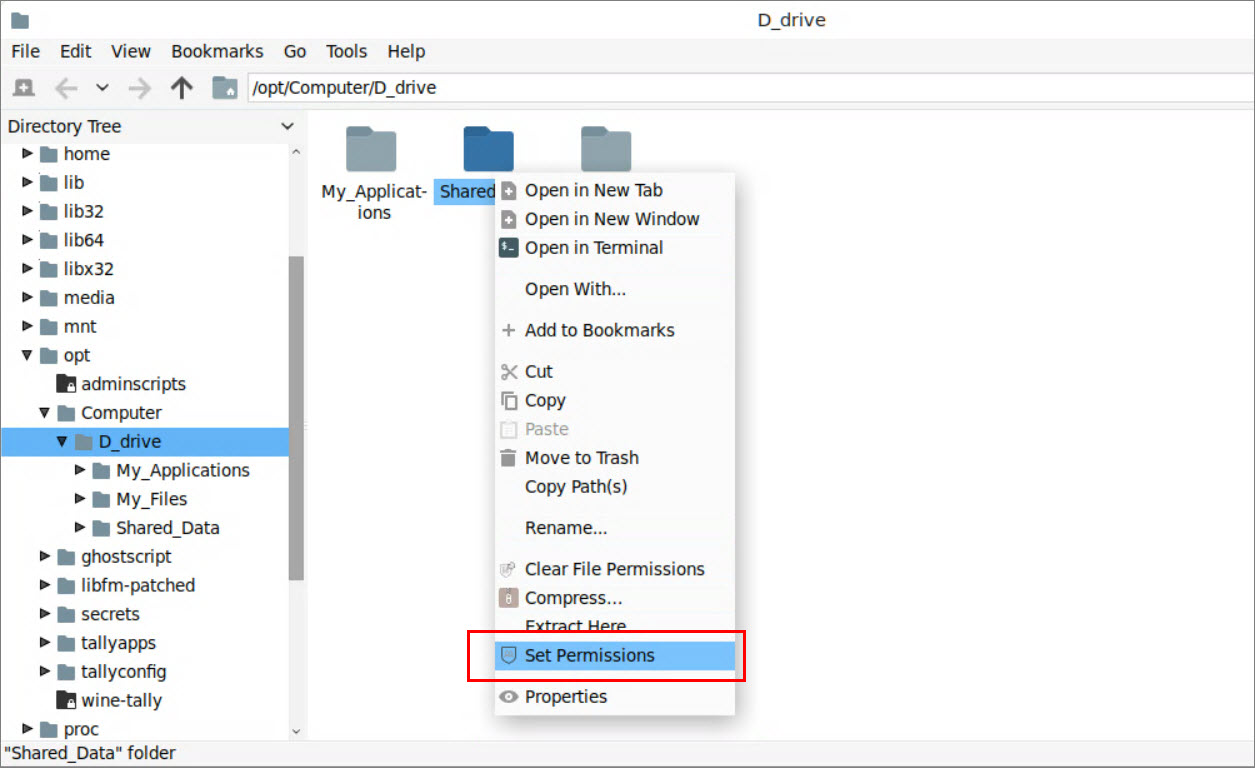
The Manage Access screen appears with the following default details:-
User: This is set as Standard User, which you can neither edit nor delete.
-
Access: This is set as Allowed.
-
Folder Path: This is set to the folder that you had selected to set permissions for the users.
-
- Select the required access for the Standard User, for example Allowed in TallyPrime.
You can alter the permissions as needed for the Standard User. However, you cannot remove Standard User from the User list.
Access for a specific user
Say you have set Allowed in TallyPrime or Disallowed access for the Standard User. There are situations when you may want a specific user among the Standard User group to be able to access the folder completely, without any restrictions. In this case you can add that user and select the required Access.
In the Manage Access screen
-
From the Select User drop-down list, select the user, and click Add.
-
From the Access drop down list, select the required permission, and click Save.
Note that unlike Standard User, you can remove this user from the User list whenever you no longer want to set any access for that user.
Error Notifications
The following errors may appear for users with Allowed in TallyPrime or Disallowed permission:
-
Accessing the folder from File Explorer: Error Opening Directory
-
Download files from the virtual computer: Failed to list files (The operation failed)
Home Menu
In the Virtual Computer, the bottom-left corner provides a quick access menu to commonly used features like Accessories, Internet, Office, Help and Information.
To know more about these features, click here.
Accessories
Access basic utilities to support day-to-day tasks.
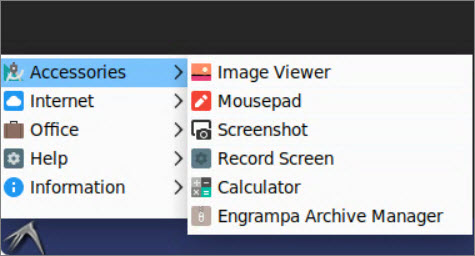
- Image Viewer – View your images easily.
- Mousepad – Simple text editor.
- Screenshot – Save images of your screen or individual windows by taking a screenshot and adding effects, as required.
- Record Screen – Record your on-screen activity as a video, useful for training or troubleshooting.
- Calculator – Perform arithmetic, scientific or financial calculations.
- Engrampa Archive Manager – Supports unzipping of zipped files.
Internet
Open Firefox browser to access the internet for downloads, references, and more.
Office
Launch office productivity tools for working with documents and spreadsheets.
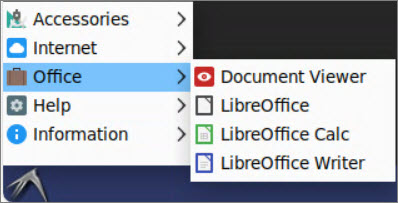
-
Document Viewer – View multiple- page documents.
-
LibreOffice – A complete office suite compatible with the open-standard ODF document format.
-
LibreOffice Calc – Perform calculations, analyse information and manage lists in spreadsheets.
-
LibreOffice Writer – Create and edit text and images in letters, reports, documents and Web Page.
Help
Find tools for troubleshooting and resolving issues.
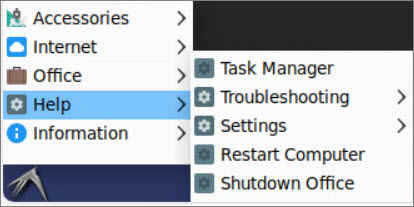
- Task Manager – View running applications and processes and end unresponsive tasks.
- Troubleshooting – Access diagnostic tools to identify and fix common issues.
- Force Quit TallyPrime – Close TallyPrime immediately if it becomes unresponsive.
- TallyPrime with Zero Command Repair – Launch TallyPrime with repair mode to fix issues without requiring command-line inputs.
- Generate Error Log – Create a log file capturing system or application errors for support and debugging.
- Restart Computer
A message appears to confirm if you want to restart the Virtual Computer.
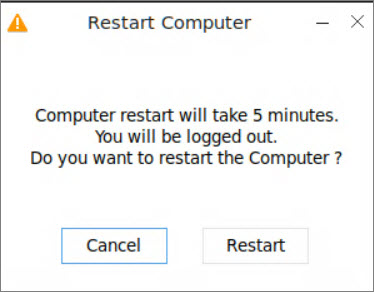
-
Click Restart to confirm.
-
Or click Cancel to go back.
-
-
Shutdown Office
A message appears to confirm if you want to shut down the Virtual Computer and end the session for all active users.
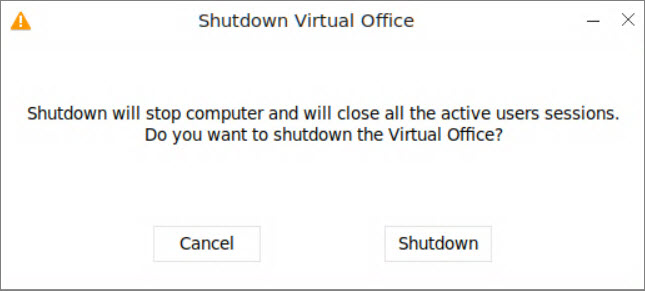
-
Click Shutdown to confirm.
-
Or click Cancel to go back.
-
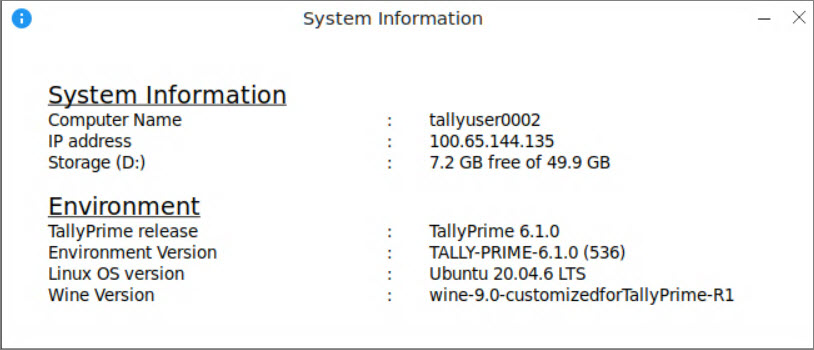
Information
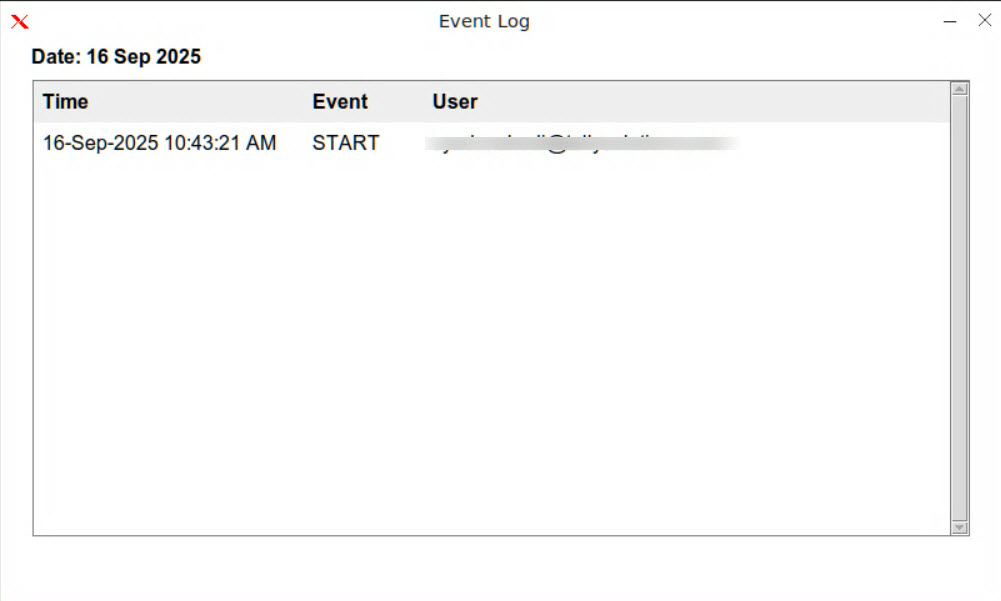
Check system details, session information, or other environment-specific data.
- System Information – View technical details of the virtual computer and environment, such as Computer Name, IP address, Storage, OS version, hardware configuration, and more.
-
Event Log – Review logged events and activities to monitor usage or identify issues.
Additional Features
You can now print documents either through the browser or the TPCA Client —whichever works best for you. Plus, adding a digital signature to PDF files is quick and easy, so you can sign and share documents securely without any extra tools.
Print via Browser or TPCA Client Application
To print any voucher or report,
-
Press Ctrl + P.
-
Press F6 (Printer) and from the List of Printers, select Web-Printer.
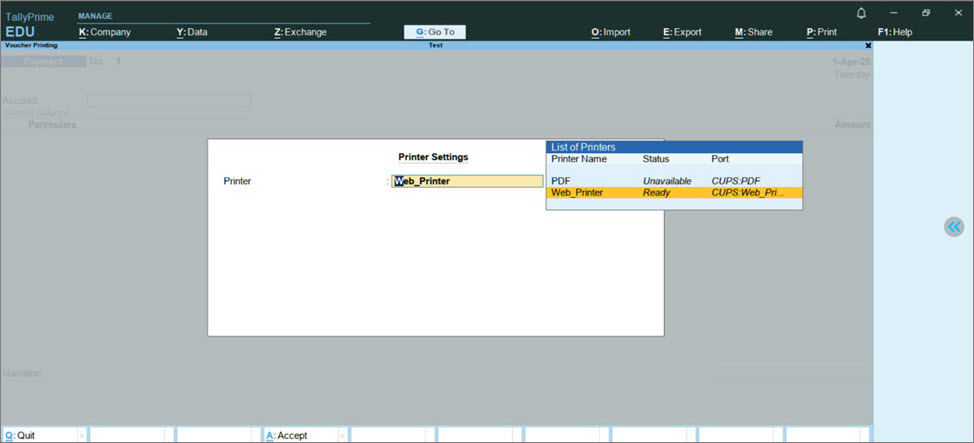
- Select the Paper Size and Orientation.
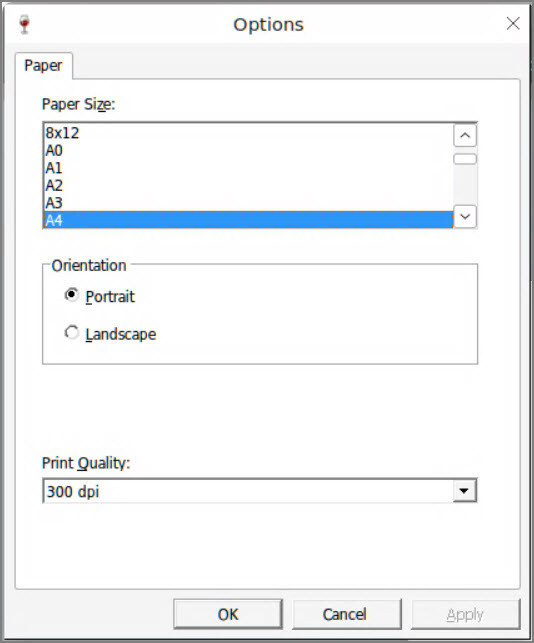
-
Click OK.
Configure other options as required. -
Press Print.
The Browser Print screen appears.
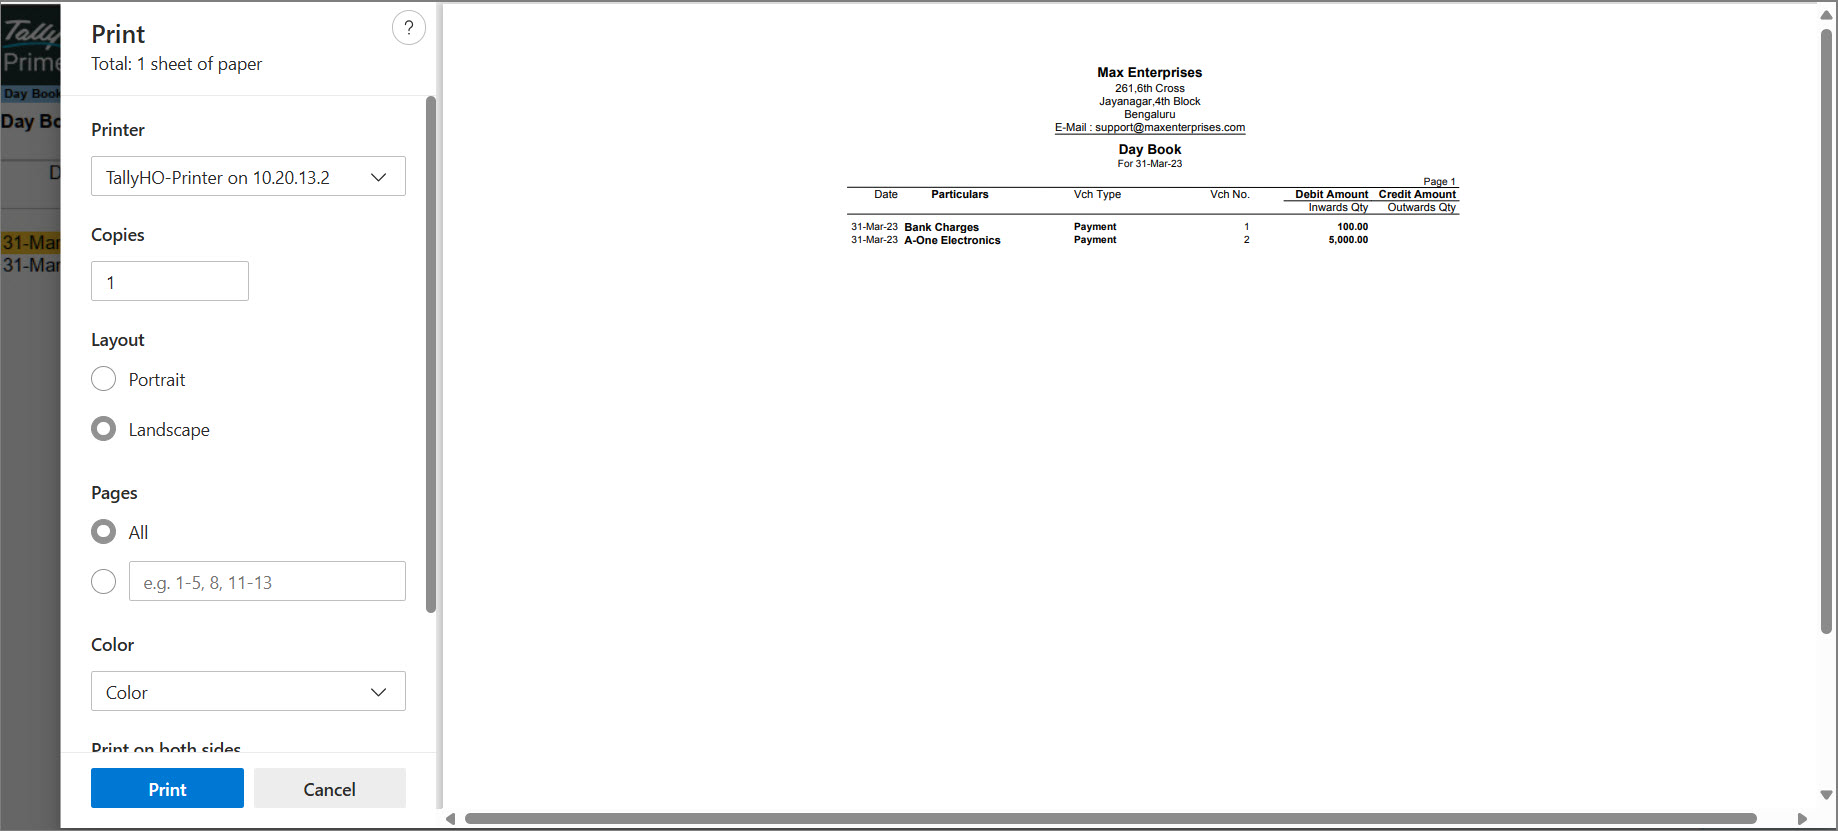
-
Click Print to print the required pages.
You can also save it as PDF, and it will be downloaded to the local system.
Paper size resets to the default A4 when the Virtual Office is shut down and restarted.
Add Digital Signature to PDF Documents
In your business, if you need to share your invoices or reports with stakeholders, auditors, or customers for different purposes, such as authentication records or audit. Similarly, you might be providing Form-16 to your employees with signature and stamp of your organization. Using digital signature in your documents will avoid the risk of tampering and ensure that the document is authentic.
Digital signature can be added to the PDF format of any document. In TallyPrime on Virtual Computer, you can generate your invoices or reports and export, print, or e-mail a document in PDF format.
For example, we will consider exporting the invoices or reports.
-
From any voucher or report, press Ctrl+E to initiate Export.
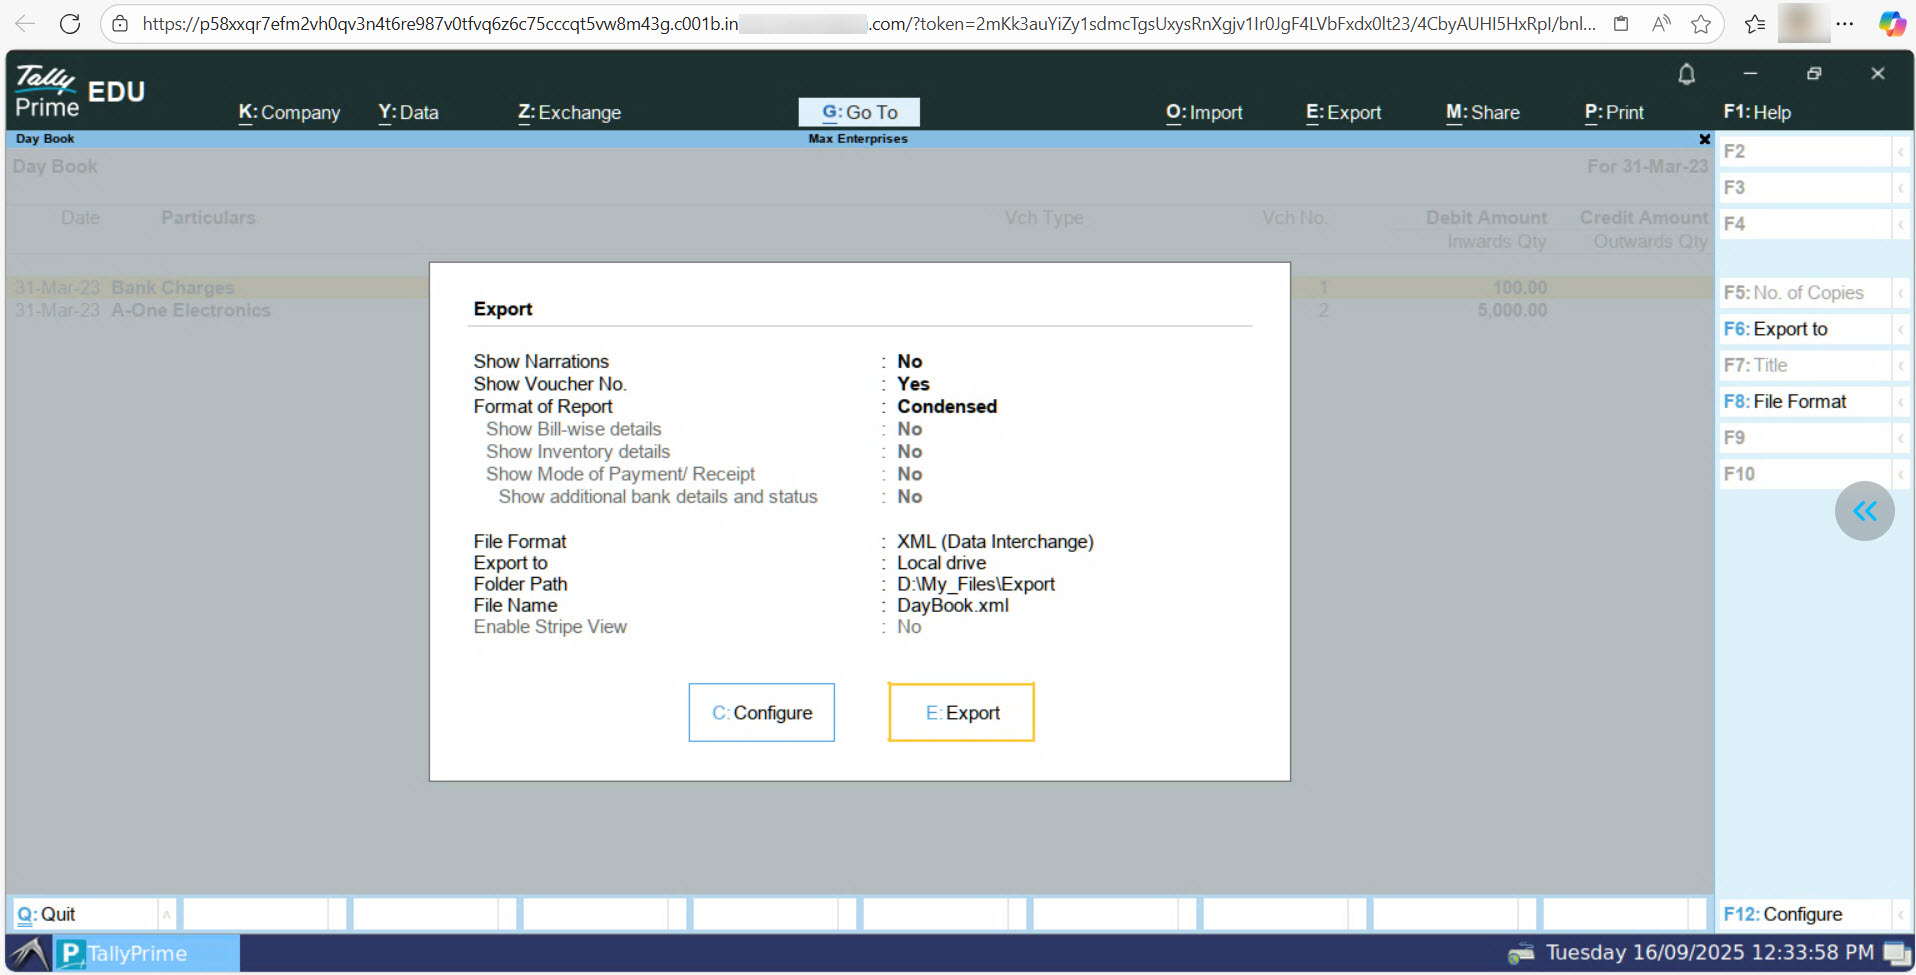
-
Press F8 (File Format) and select PDF (Read-only document).
-
File Format: select PDF (Read-only document).
-
Digital Signature: select Not Applicable.
-
-
Press E (Send) to complete the export to PDF file format.
-
To view the exported PDF file, click Storage from top-left corner.
- Go to My_Files > Export and select the PDF file to download in your local computer.
-
Open the PDF file in your PDF editor and digitally sign the document.
Refer to the Sign a PDF section on the Adobe Acrobat site. As the use of a dongle for configuring Digital Signature is not supported in TallyPrime on Virtual Computer, adding the digital signature to the invoices or reports works similar to how you would digitally sign your PDF document in your local computer.
TallyPrime Features Not Supported in Release
Data Sharing
- Synchronisation over IP from TallyPrime in your local computer to the virtual computer is not supported.
Licensing & Upgrade
- You can activate only one TallyPrime license in a connected virtual computer, unlike on your local computer where you can activate two different licenses on two instances of TallyPrime applications.
- Upgrade to the latest release from TallyPrime on the virtual computer is not supported. You can update to the latest TallyPrime release or with necessary administrator rights, from the Self Service Portal portal.
- You cannot have multiple versions of TallyPrime co-existing in the virtual machine.
Error Resolution Features
- Repair and Re-install using TallyPrime Setup Manager is not supported on the virtual computer. Similarly, troubleshooting through command prompt is not supported in this release. However, you can repair your application using Start > Troubleshooting > TallyPrime with Zero Command.
Shortcut Keys with Conflicting Behavior
Listed below are the shortcut keys that have conflicting behavior with browser features.
To know more about these features, click here.
Chrome in Windows
| Unsupported Shortcut Keys | Behavior |
| Alt+F1 | Switches between the applications open in the Virtual Computer |
| Alt+F4 | Completely closes the application you are using |
| Ctrl+F4 | Closes window or tab within a program |
| Ctrl+N | Opens a new window |
| Ctrl+T | Opens a new tab |
| Ctrl+W | Closes the window or tab |
| Ctrl+Alt+I | To invert selection of line items in a report |
| Ctrl+Alt+T | To view TDL/Add-on details |
| Esc | Exits the DCV fullscreen |
Safari in Mac
| Unsupported Shortcut Keys | Behavior |
| Alt + 2 | Duplicates Voucher |
| Alt + F1 | Shuts Company |
| Alt + E | Export |
| Alt + I | Inserts Voucher |
| Alt + N | Auto Column |
Chrome in Mac
| Unsupported Shortcut Keys | Behavior |
| Alt + 2 | Duplicates Voucher |
| Alt + F1 | Shuts Company |
| Alt + E | Export |
| Alt + I | Inserts Voucher |
| Alt + N | Auto Column |
| Ctrl + F1 | Opens Online Help |
| Ctrl + F3 | Shuts Company |
| Ctrl + F4 | Opens Payroll Voucher |
| Ctrl + F5 | Opens Rejection Out Voucher |
| Ctrl + F6 | Opens Rejection In Voucher |
| Ctrl + F7 | Opens Physical Stock Voucher |
| Ctrl + F8 | Opens Sales Order Voucher |
| Ctrl + F9 | Opens Purchase Order Voucher |
| Ctrl + Alt + B | Shows Build Details in Calculator Panel |
| Ctrl + Alt + C | Copies Text |
| Ctrl + Alt + I | Selects all vouchers in Report |
| Ctrl + Alt + R | Rewrites Data |
| Ctrl + Alt + T | Opens TDL Management Screen |
| Ctrl + Alt + V | Pastes Text |
You can resolve the conflicting behavior of the shortcut keys on the Mac system by following the below navigation: 1. System Preferences > Keyboard. 2. In Keyboard settings, select Shortcuts > Keyboard > Disable all options. You will need close and reopen your browser for the changes to take effect.
Connectivity settings and customisation
- TallyPrime application on the virtual computer does not support configuration for the proxy settings.
- The current release supports only TCP-based and TDL-based customisations.
- If the customisation involves any external API, such customisations are not supported by default. You can contact Tally Solutions to enable the API to support the associated customisations.
- If you need any exe or DLL to be deployed with TallyPrime Application folder, such integrations/customisations are not supported.
TallyPrime Server Support
- You will not be able to restrict use of TallyPrime Server through Username/Domain name or IP address. However, you can do it through the virtual computer name.
Still using TallyPrime on AWS?
You can continue to Install Custom Fonts and Manage User-Defined Paper Size.
Install Custom Fonts
TallyPrime on AWS offers the Install Custom Font feature, letting you add the exact fonts you need for barcodes, invoices, and other custom elements. This option is available for users with Owner and Administrator rights.
To install a custom font:
-
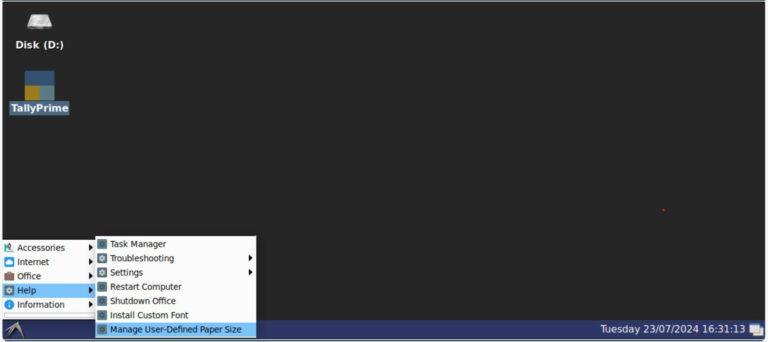
Go to Start > Help > Install Custom Font
-
Select the .TTF (TrueType Font) font file from the shared data folder.
-
Click OK.
-
Restart the Virtual Office to apply the changes for all users.
Once installed, you can check if the font is available by scanning the barcode or opening LibreOffice (or any text editor) and looking for it in the font list.
Manage User-Defined Paper Size
Need to print invoices, reports, or labels that don’t fit standard paper sizes? User-defined paper sizes let you customise your printing setup for professional, perfectly formatted documents.
With TallyPrime on AWS, Owners and Administrators can easily add, edit, or delete custom paper sizes from the Virtual Office. The default paper size cannot be edited or deleted. After making any changes, restart your Virtual Office from the Self-Service Portal to apply them for all users.
Prerequisites:
-
You must be an Owner or Administrator.
-
TallyPrime Release 4.1 or above.
Add a User-Defined Paper Size
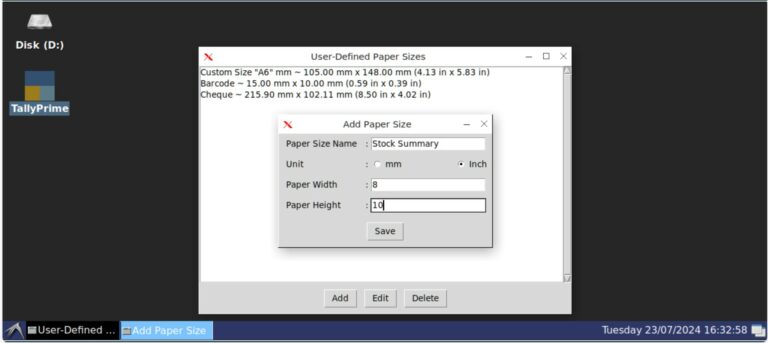
For example, to print a Stock Summary report on a custom paper size of 8 × 10 inches (203.2 × 254 mm):
-
Log in to your Virtual Computer.
-
Go to Start > Help > Manage User-Defined Paper Size.
-
In the User-Defined Paper Sizes screen, click Add.

-
Enter:
-
Paper Size Name: 2–20 characters, can include special characters (@ # $ % ^ & * () _ – + = { } [ ] | \ ‘ ” ? /)
-
Unit: mm or inch
-
Paper Width & Height: 5 mm–1189 mm (0.2–46.81 inches)
-
-
Click Save.
-
Restart your Virtual Office via the Self-Service Portal to apply changes.
You can add multiple paper sizes at once.
Use a Custom Paper Size
-
Open the report you want to print (e.g., Stock Summary).
-
Press Ctrl + P to open Print Configuration > F6: Printer.
-
Select your printer.
-
In the Setup screen, scroll to select the required user-defined paper size.
-
Click Apply > OK.
Your document will print according to the selected custom size.
Edit a User-Defined Paper Size
To change the dimensions of a paper size:
-
Go to Start > Help > Manage User-Defined Paper Size.
-
Select the paper size and click Edit.
-
Update the width and height as needed.
-
Click Save.
-
Restart your Virtual Office to apply changes.
Only user-defined paper sizes can be edited.
Delete a User-Defined Paper Size
To remove a paper size permanently:
- Go to Start > Help > Manage User-Defined Paper Size.
- Select the paper size and click Delete.
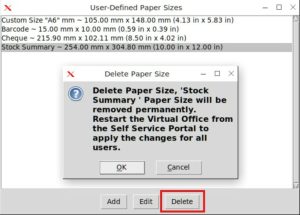
- Confirm by clicking OK.
Only user-defined paper sizes can be deleted.
With user-defined paper sizes, you can ensure every invoice, report, or specialised document prints exactly as required—accurate, professional, and perfectly formatted.


