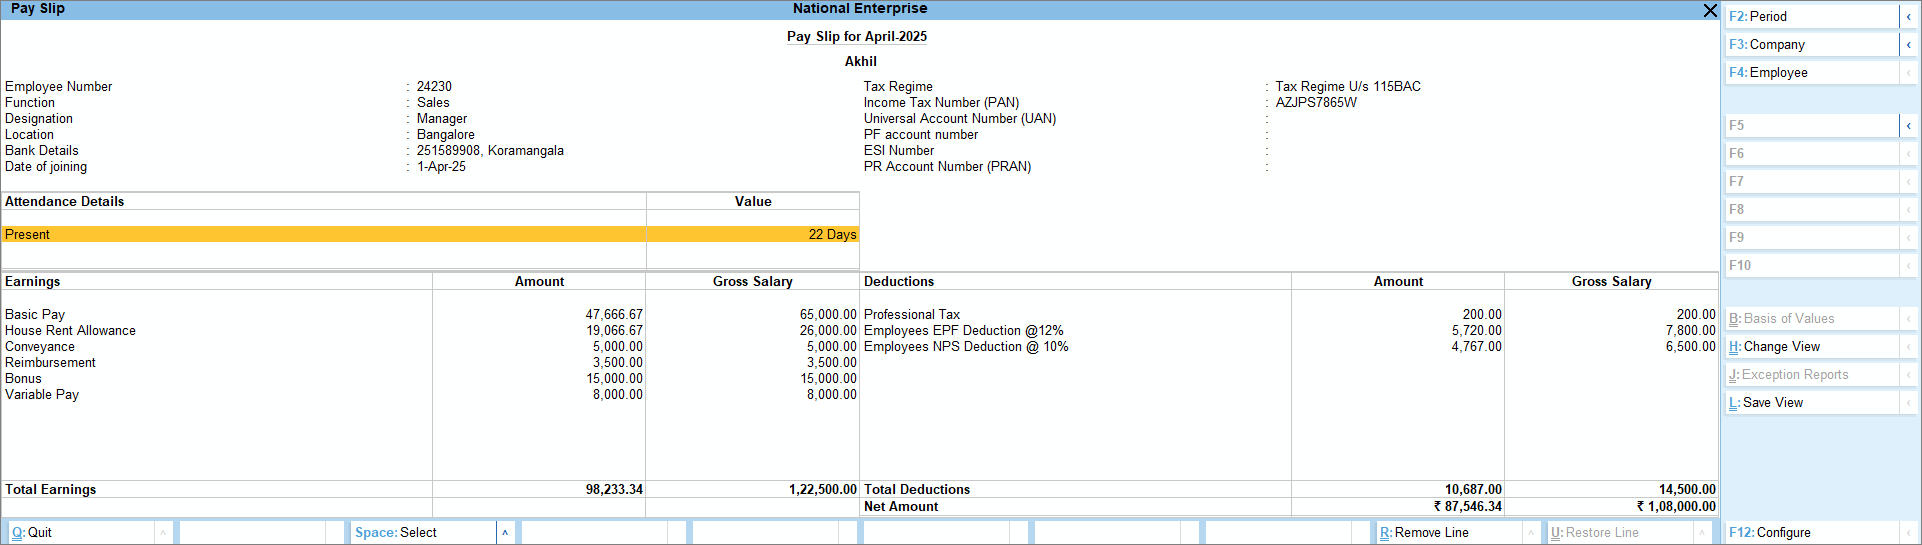
Explore Categories


 PDF

Generate Single Pay Slip in TallyPrime (Payroll)

You can use the Single Pay Slip option in TallyPrime to view the Pay Slip for individual employees, configure the content and appearance based on the requirement and then Print or E-mail the Pay Slip.


Generate Single Pay Slip

  1. Gateway of Tally > Display More Reports > Payroll Reports> Pay Slip.
    Alternatively, press Alt+G (Go To) > type or select Single Pay Slip > and press Enter.
  2. Select the Employee whose Pay Slip you want to view.


Configuration Options in Pay Slip

  • Press F12 (Configure) in the Pay Slip to display a configuration sub-form, using which the user can customise the display/printing content and appearance of the Pay Slip.
  • The default settings for the configuration options are shown above. The options, which are set to Yes, will become visible in the Pay Slip. Select No to exclude the information, which is not required to be displayed on the Pay Slip.
  • Show vertical pay slip: Set this option to Yes to align Deduction Part below the Earning. Set it to No to align them side-by-side.
  • Show Attendance/Production details: Set this option to Yes to display Attendance/Production data.
  • Show Attendance/Production Group: Set this option to Yes to display Attendance/Production groups.
  • Display tail units of Production Types: For compound units used in Attendance/Production Type, set this flag to Yes to display value of the Attendance/Production Data in Tail unit and set the same to No to display data in Main unit.
  • Show Year to Date Values: Set this option to Yes to display cumulative value of attendance/production data or Earning and Deduction data for the current Financial Year.
  • Show Gross Salary: Set this option to Yes to display the Gross Salary details for each component in the Salary Details.
    • Show Gross Salary for deductions: Set this option to Yes to display the Gross Salary Details for each Deduction component.
  • Show Employee details: Set this option to Yes to display Employee Details as entered in the employee master.
    • Show Passport Number: Set this option to Yes to display the Passport Details.
    • Show Visa Expiry Date: Set this option to Yes to display the Visa Expiry Date.
      • Show Joining Date: Set this option to Yes to display the Employee Joining Date.
  • Remove zero-valued transactions: Set this option to Yes to remove Earning/Deduction data with Zero value from the Pay Slip.
  • For Attendance/Production also: Set this option to Yes to remove Attendance data with 0 values from the Pay Slip.
  • Show Employer Contribution: Set this option to Yes to display the employer’s contribution.
  • Show Employer Contribution to NPS: Set this option to Yes to display the employer’s contribution towards the National Pension Scheme.
    • Display name for Employees: You can select the appropriate appearance of name from the Display Employee Name Style list.
    • Display names for Pay Heads: Select the appropriate name style to appear for each Pay Head in Pay Slip (such as Alias(Name), Alias only, Name(Alias), Name Only, Pay Slip Name).


Button options in Pay Slip screen

  • Alt+F5 (Detailed): press Alt+F5 to view source details of individual Attendance and Pay Head values. This view displays the Attendance or Payroll vouchers used to generate the current Pay Slip. You can also view the Voucher Number, Date and the Value of the attendance or earning or deduction value. This is useful when multiple attendance/payroll vouchers are entered during the same payroll period. You can drill down to the corresponding voucher directly from the Pay Slip screen.
  • Press Alt+F5 (Condensed) again to return to the normal mode.
  • F2 (Period): By default, when you open the Pay Slip view, the Period of Pay Slip – Attendance and Payroll Vouchers data is set to current month, and in most cases you do not need to change it. However, if required, you can change the period of data and include multiple-period payroll information to view/print a consolidated Pay Slip. As in all other TallyPrimereports, you have great flexibility in terms of Period of Payroll processing as well as in the printing of Pay Slip.
  • F4 (Employee): Using Employee Button (F4 Key), you can view another employee’s Pay Slip from the existing Pay Slip display screen.
  • Ctrl+H (Change View): You can display the details of a report in different views with additional detailsorfor a specific period. You can also view other reports related to the current report.
  • To view the Vertical view for Pay Slip, press Ctrl+H (Change View) > type or select Vertical> press Enter. Press Esc to view the default report.


Print Single Pay Slip

  • Press Ctrl+P (Print) from the Pay Slip display screen and press P (Print) to print the active Pay Slip. TallyPrime will print the Pay Slip in the format that is configured for display. The Printing Pay Slip screen appears as follows:
  • Set the options as required and press Enter to print the pay slip.


E-Mail Pay Slip

Press Ctrl+M (Mail) from the Pay Slip display screen to E-mail the Pay Slip. TallyPrime gives flexibility of selecting the formats from ASCII, EXCEL, HTML and XML for E-Mailing as an attachment or direct view.

  • E-mail server: Select User Defined
  • Server address: Specify the Outgoing E-Mail server address and port number separated by a colon (:)
Note: If the outgoing E-Mail server uses another port instead of the default port 25, you must specify the SMTP server name, followed by a colon and the port number.. For example, smtp.gmail.com:465
  • Use SSL: By default this is set to No. Change this to Yes if the E-Mail server is configured
    for secure connections.
  • From: By default, the name of the Company appears, which can be changed as needed.
  • From e-mail ID: By default, this field displays the E-Mail address entered in the Company Master. You can change this to reflect the recent E-Mail address.
  • Username for authentication and Password: Enter the required username and password if the E-mail server requires authentication.
  • Format: Select the required e-mailing format from ASCII, Excel, JPEG, HTML, PDF, XML.
  • Resolution: Select the required resolution, recommended is 1024 x 768.
  • To E-Mail Address: By default, this field displays the Employee E-Mail address entered in the Employee Master. You can changed this as needed.
  • CC To (if any): Provide an E-Mail address in case you want to send a copy of the same mail to more than one recipient.
  • Subject: By default, the Subject line is filled as Pay Slip. You can change the subject as required.
  • Additional Text if any: Enter a message that you want to send to the recipient along with the Pay Slip. The message precedes the before the Pay Slip in the E-Mail.
  • Information sent: Select whether the Pay Slip needs to be sent as an Attachment or for Direct Viewing in Mail.
  • Specify the other parameters as explained in the Pay Slips section.
  • Press Enter to send the mail.
Post a Comment

Is this information useful?
YesNo
Helpful?