
Create VAT Masters (Kenya)
Effective from 1-Jan-2021, as per the general VAT rate of 16%, you can update the VAT rate to 16% in the masters, record transactions, and export the same to the new VAT template version 14.0.0.
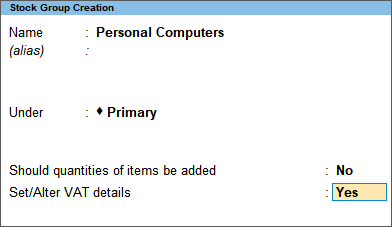
Create Stock Group with VAT Details
Stock Items are classified into stock groups to reflect their classification based on some community.
- Gateway of Tally > Create > type or select Stock Group > and press Enter.
Alternatively, press Alt+G (Go To) > Create Master > Stock Group > and press Enter. - Enter the Name of the stock group.
- Select the required group from Under.
- Set the option Set/Alter VAT Details to Yes.
- In the Stock Group Creation screen, press F12 (Configure) > Set VAT details to Yes.
- Specify the VAT rate for the stock group in the VAT Details screen. You can use a VAT classification or define the required VAT details.
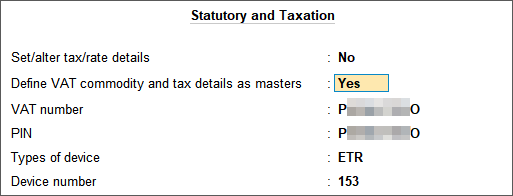
To create a user defined classification, enable the option to define tax and commodity details in masters
- Press F11 (Features) > set Enable Value added Tax (VAT) to Yes.
If you do not see this option:- Set Show more features to Yes.
- Set Show all features to Yes.
- Set the option Define VAT commodity and tax details as masters to Yes.
- Accept the screen. As always, you can press Ctrl+A to save.
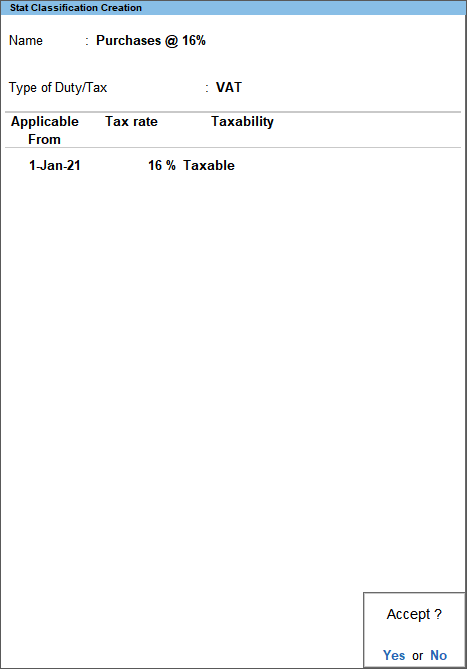
To Create VAT Classifications
- Gateway of Tally > Create > type or select VAT Classifications > and press Enter.
Alternatively, press Alt+G (Go To) > Create Master > VAT Classifications > and press Enter. - Enter the Name of the new classification.
- Enter the applicability date with the corresponding tax rates in Applicable From and Tax Rate columns. The Stat Classification Creation screen appears as shown below:
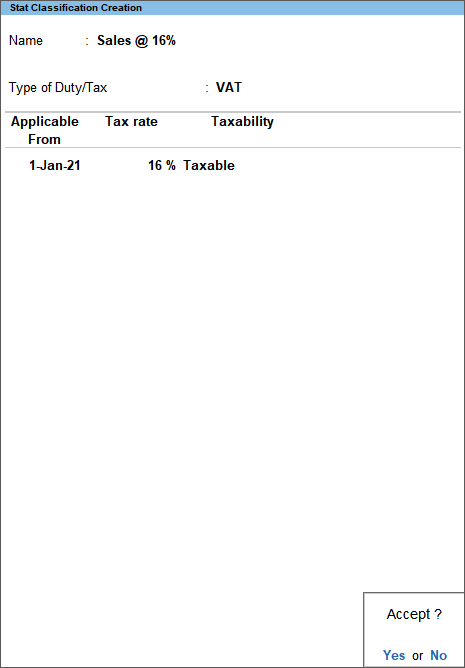
- Accept the screen. As always, you can press Ctrl+A to save.
To define Nature of Transactions and commodity details in the Stat Classification Creation screen
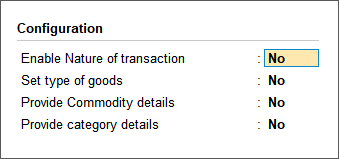
- In the Stat Classification Creation screen, press F12 (Configure) to enable commodity details. The Configuration screen appears as shown below:
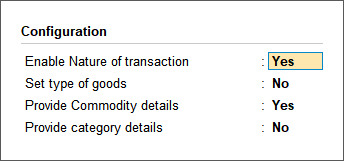
- Set the option Enable nature of transaction to Yes.
- Set the option Provide Commodity details to Yes.
- Press Ctrl+A to return to the Stat Classification Creation screen.
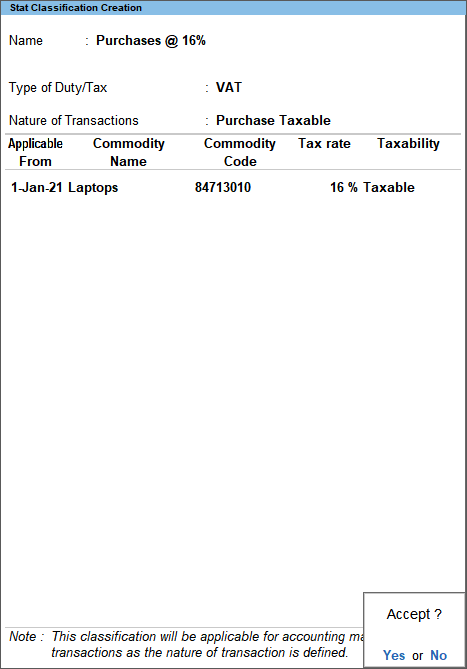
- Select the required Nature of Transaction.
- Enter the Commodity Name and Commodity Code. The Stat Classification Creation screen appears as shown below:

- Accept the screen. As always, you can press Ctrl+A to save.
To specify VAT details in stock group
- Open the stock group in alteration mode.
- In the VAT Details screen that appears on enabling the option Set/Alter VAT details in stock group, select the user defined VAT classification.
Note: The VAT Classification created by selecting Nature of Transaction will not be appear for selection in stock group.
- Specify VAT details
- Enter the Tax rate. If the Tax rate entered is above 0, the Tax type automatically appears as Taxable.
- Enter 0 as the Tax Rate, to select Exempt or Zero Rated as the taxability.
To provide commodity details
- Press F12 (Configure) to view the Configuration screen.
- Set the option Provide commodity details to Yes.
- Press Alt+W (Details) to specify different VAT rates with separate Applicable From dates.
To specify different VAT rates with separate Applicable From dates
- Press Alt+W (Details) to view VAT Rate Details screen.
- Enter Applicable From date.
- Enter Commodity Name.
- Enter Commodity Code.
- Select Type of Goods.
- Select Category.
- Enter Tax Rate. The VAT Rate Details screen appears as shown below:
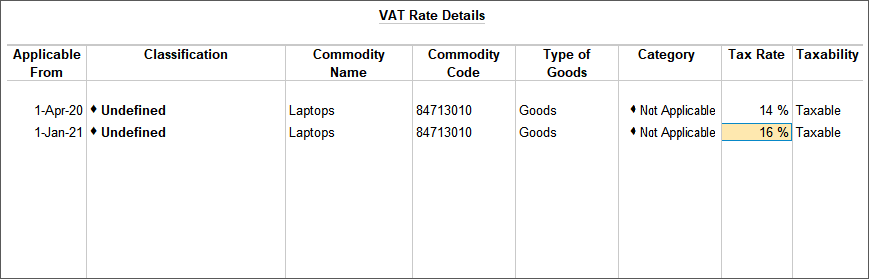
- Enter the Tax rate.
Note: Press Enter without specifying the rate to select Exempt or Zero Rated in the Taxability column.
- Accept the screen. As always, you can press Ctrl+A to save.
Create Stock Item with VAT Details
In TallyPrime, you can create a stock item and define the corresponding details like units of measurement and VAT applicability as required.
- Gateway of Tally > Create > type or select Stock Item > and press Enter.
Alternatively, press Alt+G (Go To) > Create Master > Stock Item > and press Enter. - Enter the Name of the stock item.
- Select the required group in the Under field. If the selected stock group is with tax rate and commodity details, these are applied to the stock item. If Primary is selected, the tax and commodity details specific to the stock item can be defined.
- Select the required unit of measurement in Units field.
- Set the option VAT Applicable to Applicable.
- Set the option Set/Alter VAT Details to Yes.
- In the VAT Details screen, select a user defined VAT classification, or specify the VAT rate.
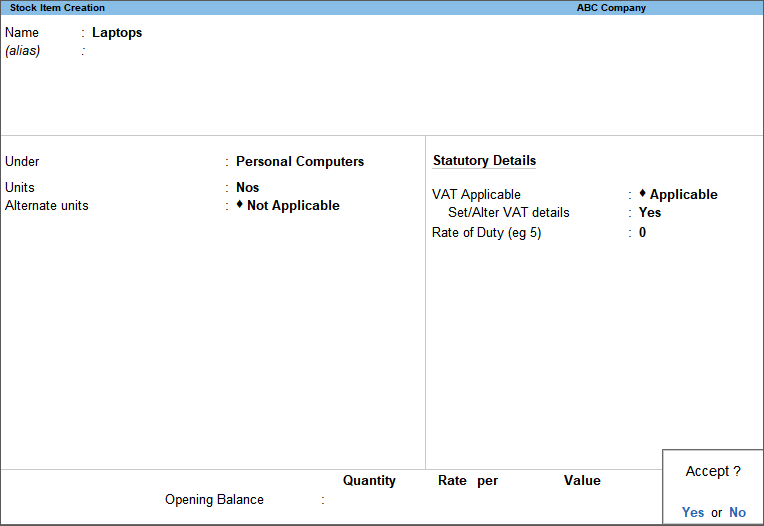
- Accept the screen. As always, you can press Ctrl+A to save.
To enable the option to define tax and commodity details in masters
- Gateway of Tally > press F11 (Features) > set Enable Value added Tax (VAT) to Yes.
- If you do not see this option:
- Set Show more features to Yes.
- Set Show all features to Yes.
- If you do not see this option:
- Set the option Define VAT commodity and tax details as masters to Yes.
- Accept the screen. As always, you can press Ctrl+A to save.
To create a user defined classification
- Gateway of Tally > Create > type or select VAT Classifications > and press Enter.
Alternatively, press Alt+G (Go To) > Create Master > VAT Classifications > and press Enter. - Enter the Name of the new classification.
- Enter the applicability date with the corresponding tax rates in Applicable From and Tax Rate columns. The Stat Classification Creation screen appears as shown below:
- Accept the screen. As always, you can press Ctrl+A to save.
To define Nature of Transactions and commodity details in the Stat Classification Creation screen
- In the Stat Classification Creation screen, press F12 (Configure) to enable commodity details.
- Set the option Enable Nature of transaction to Yes.
- Set the option Provide Commodity details to Yes. The Configuration screen appears as shown below:
- Press Ctrl+A to return to the Stat Classification Creation screen.
- Select the required Nature of Transaction.
- Enter the Commodity Name and Commodity Code. The Stat Classification Creation screen appears as shown below:
- Accept the screen. As always, you can press Ctrl+A to save.
To Specify VAT details
On selecting a user defined VAT classification, the Stock Item Creation screen is displayed.
- Enter the Tax rate. If the Tax rate entered is above 0, the Tax type automatically appears as Taxable.
- Enter 0 as the Tax Rate, to select Exempt or Zero Rated as the taxability.
To provide commodity details
- Press F12 (Configure) to view the Configuration screen.
- Set the option Provide commodity details to Yes.
- Press Alt+W (Details) to specify different VAT rates with separate Applicable From dates.
To specify different VAT rates with separate Applicable From dates
- Press Alt+W (Details) to view VAT Rate Details screen.
- Enter Applicable From date.
- Enter Commodity Name.
- Enter Commodity Code.
- Select Type of Goods.
- Select Category.
- Enter Tax Rate. The VAT Rate Details screen appears as shown below:
- Enter the Tax rate.
Note: Press Enter without specifying the rate to select Exempt or Zero Rated in the Taxability column.
- Accept the screen. As always, you can press Ctrl+A to save.
Create Party Ledgers with VAT Details
A business deals with customers, wholesalers, retailers and many such business parties on a day-to-day basis. You need to create party ledgers to record transactions that you make, which may involve receipts or payments, or supplies or receipts from these parties.
Create a Supplier Ledger
- Gateway of Tally > Create > type or select Ledger > and press Enter.
Alternatively, press Alt+G (Go To) > Create Master > Ledger > and press Enter. - Enter the Name of the supplier ledger.
- Select Sundry Creditors from the List of Groups, in the Under field.
- Set Maintain balances bill-by-bill to Yes.
- In the Ledger Creation screen, press F12 (Configure) > set Maintain balances Bill-by-Bill to Yes.
If you do not see this option, ensure that Enable Bill-wise entry is set to Yes in F11 for your company. - Enter the Default Credit Period, if any.
- Set Check for credit days during voucher entry to Yes, if required.
- Enter the Mailing Details.
- Select the required Country.
- Provide bank details, if required.
- Enter the PIN.
- Set the option Set/Alter VAT Details to Yes. To view VAT Details screen
- Select the Type of Dealer from the Type of Dealer list.
- Enter the VAT No.
The VAT Details screen appears as shown below:

- Press Enter to save.
- To enter the exemption details of the supplier:
- Press F12 (Configure) in the VAT Details screen.
- Set the option Allow exemption details to Yes.
- Press Ctrl+A to return to the VAT Details screen.
- Select the Type of Exemption.
- Enter the Exemption Certificate No., if required.
The VAT Details screen appears as shown below:

- Press Enter to return to the Ledger Creation screen.
- Provide the relevant details. The Ledger Creation screen appears as shown below:

- Accept the screen. As always, you can press Ctrl+A to save.
Create a Customer Ledger
- Gateway of Tally > Create > type or select Ledger > and press Enter.
Alternatively, press Alt+G (Go To) > Create Master > Ledger > and press Enter. - Enter the Name of the supplier ledger.
- Select Sundry Debtors from the List of Groups, in the Under field.
- Set Maintain balances bill-by-bill to Yes.
- Enter the Default Credit Period, if any.
- Set Check for credit days during voucher entry to Yes, if required.
- Enter the Mailing Details.
- Select the required Country.
- Provide bank details, if required.
- Enter the PIN.
- Set the option Set/Alter VAT Details to Yes. To view the VAT Details screen:
- Select the Type of Dealer from the Type of Dealer list.
- Enter the VAT No. The VAT Details screen appears as shown below:

- Press Enter to save.
- To enter the exemption details of the customer:
- Press F12 (Configure) in the VAT Details screen.
- Set the option Allow exemption details? to Yes.
- Press Ctrl+A to return to the VAT Details screen.
- Select the Type of Exemption.
- Enter the Exemption Certificate No., if required. The VAT Details screen appears as shown below:

- Press Enter to return to the Ledger Creation screen.
- Provide the relevant details. The Ledger Creation screen appears as shown below:
- Accept the screen. As always, you can press Ctrl+A to save.
Create Purchase and Sales Ledgers with VAT Details
You can create common ledgers for sales or purchases without specifying tax details. These can be used to record all types of purchases or sales. You have to specify tax rates in the purchase and sales ledger masters if you need separate ledgers for different tax rates.
Create a Purchase Ledger
Common purchase ledger
- Gateway of Tally > Create > type or select Ledger > and press Enter.
Alternatively, press Alt+G (Go To) > Create Master > Ledger > and press Enter. - Enter the Name of the purchase ledger.
- Select Purchase Accounts, in the Under field.
- Set Is VAT applicable to Applicable.
- Set the option Set/Alter VAT Details to No. The Ledger Creation screen is displayed as shown below:

- Accept the screen. As always, you can press Ctrl+A to save.
To create a purchase ledger with the nature of transaction, commodity details and tax rate
- Gateway of Tally > Create > type or select Ledger > and press Enter.
Alternatively, press Alt+G (Go To) > Create Master > Ledger > and press Enter. - Enter the Name of the purchase ledger.
- Select Purchase Accounts, in the Under field.
- Set Is VAT Applicable to Applicable.
- Set the option Set/alter VAT Details to Yes.
- Press F12 (Configure) to view the screen to enable commodity details. The Configuration screen appears as shown below:

- To enable commodity details:
- Enable the option Provide commodity details.
- Press Ctrl+A to return to the Tax/rate details screen.
- The VAT rate can be specified in either of the following ways:
- To create a user defined classification
- Enable the option to define tax and commodity details in masters.
To enable the option to define tax and commodity details in masters
- Press F11 (Features) > set Enable Value added Tax (VAT) to Yes.
If you do not see this option:- Set Show more features to Yes.
- Set Show all features to Yes.
- Set the option Define VAT commodity and tax details as masters to Yes.
- Accept the screen. As always, you can press Ctrl+A to save.
To create a user defined classification
- Gateway of Tally > Create > type or select VAT Classifications > and press Enter.
Alternatively, press Alt+G (Go To) > Create Master > VAT Classifications > and press Enter. - Enter the Name of the new classification.
- Enter the applicability date with the corresponding tax rates in Applicable From and Tax Rate columns. The Stat Classification Creation screen appears as shown below:
- Accept the screen. As always, you can press Ctrl+A to save.
To define Nature of Transactions and commodity details in the Stat Classification Creation screen
- In the Stat Classification Creation screen, press F12 (Configure) to enable commodity details.
The Configuration screen appears as shown below:
To enable Nature of Transactions and commodity details
- Set the option Enable nature of transaction to Yes.
- Set the option Provide commodity details to Yes.
- Press Ctrl+A to return to the Stat Classification Creation screen.
- Select the required Nature of Transaction.
- Enter the Commodity Name and Commodity Code.
The Stat Classification Creation screen appears as shown below:
- Accept the screen. As always, you can press Ctrl+A to save.
To Specify VAT details
- Open the purchase ledger in alteration mode.
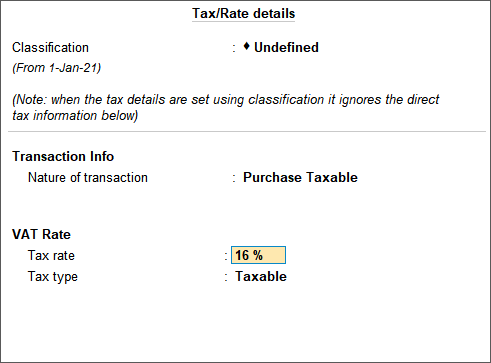
- The VAT Details screen appears on enabling the option Set/Alter VAT Details. You can either select the user defined VAT classification or specify the VAT details.
- Select the Nature of transaction.
Note: Select Purchase Exempt or Purchase - Zero Rated to choose Exempt or Zero Rated as the Tax type.
- Enter the Commodity name and Commodity code.
- Enter the Tax Rate. The Tax Type automatically appears as Taxable. The VAT Details screen appears as shown below:
- Accept the screen. As always, you can press Ctrl+A to save.
- Select the Nature of transaction.
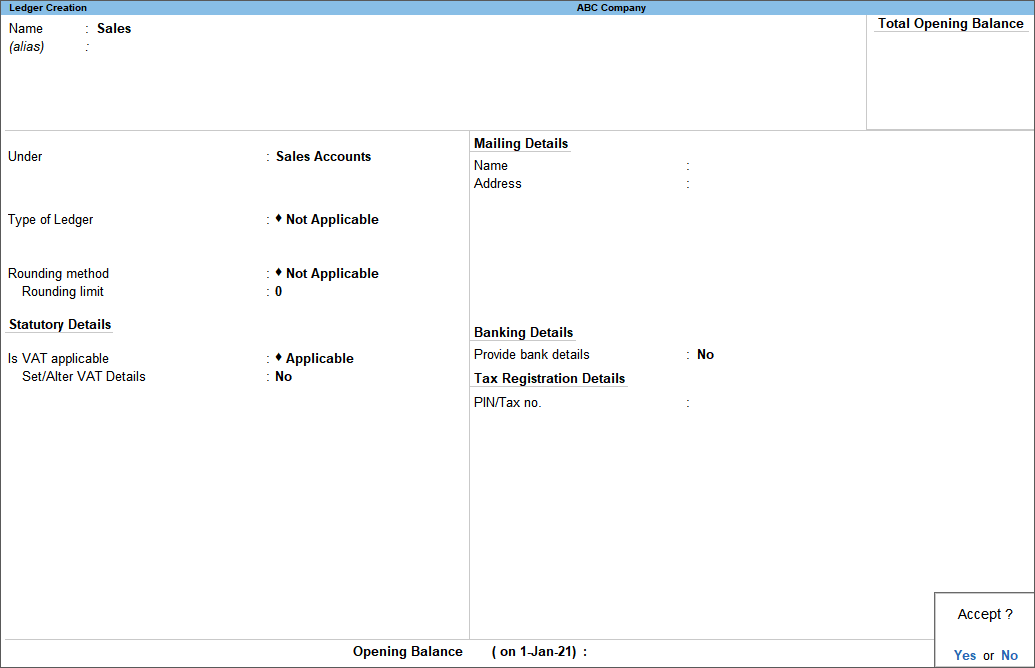
Create a Sales Ledger
Common sales ledger
- Gateway of Tally > Create > type or select Ledger > and press Enter.
Alternatively, press Alt+G (Go To) > Create Master > Ledger > and press Enter. - Enter the Name of the sales ledger.
- Select Sales Accounts, in the Under field.
- Set Is VAT applicable to Applicable.
- Set the option Set/Alter VAT Details to No. The Ledger Creation screen is displayed as shown below:
- Accept the screen. As always, you can press Ctrl+A to save.
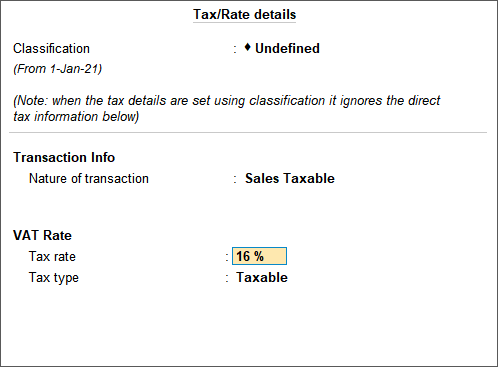
To create a sales ledger with the nature of transaction, commodity details and tax rate
- Gateway of Tally > Create > type or select Ledger > and press Enter.
Alternatively, press Alt+G (Go To) > Create Master > Ledger > and press Enter. - Enter the Name of the purchase ledger.
- Select Sales Accounts, in the Under field.
- Set Is VAT Applicable to Applicable.
- Set the option Set/alter VAT Details to Yes.
- Press F12 (Configure) to view the screen to enable commodity details:
The Configuration screen appears as shown below:
- To enable commodity details:
- Enable the option Provide commodity details?.
- Press Ctrl+A to return to the Tax/rate details screen.
The VAT rate can be specified in either of the following ways:
- To create a user defined classification
- Enable the option to define tax and commodity details in masters.
To enable the option to define tax and commodity details in masters
- Press F11 (Features) > set Enable Value added Tax (VAT) to Yes.
If you do not see this option:- Set Show more features to Yes.
- Set Show all features to Yes.
- Set the option Define VAT commodity and tax details as masters to Yes.
- Accept the screen. As always, you can press Ctrl+A to save.
To create a user defined classification
- Gateway of Tally > Create > type or select VAT Classifications > and press Enter.
Alternatively, press Alt+G (Go To) > Create Master > VAT Classifications > and press Enter. - Enter the Name of the new classification.
- Enter the applicability date with the corresponding tax rates in Applicable From and Tax Rate columns. The Stat Classification Creation screen appears as shown below:
- Accept the screen. As always, you can press Ctrl+A to save.
To define Nature of Transactions and commodity details in the Stat Classification Creation screen
- In the Stat Classification Creation screen, press F12 (Configure) to enable commodity details.
The Configuration screen appears as shown below:
To enable Nature of Transactions and commodity details
- Set the option Enable nature of transaction to Yes.
- Set the option Provide commodity details to Yes.
- Press Ctrl+A to return to the Stat Classification Creation screen.
- Select the required Nature of Transaction.
- Enter the Commodity Name and Commodity Code. The Stat Classification Creation screen appears as shown below:
- Accept the screen. As always, you can press Ctrl+A to save.
To Specify VAT details
- On selecting a user defined VAT classification, the Ledger Creation screen is displayed.
- Specify VAT details.
- Select the Nature of transaction.
Note: Select Sales Exempt or Sales - Zero Rated to choose Exempt or Zero Rated as the Tax type.
- Enter the Commodity name and Commodity code.
- Enter the Tax Rate. The Tax Type automatically appears as Taxable. The VAT Details screen appears as shown below:
- Accept the screen. As always, you can press Ctrl+A to save.
- Select the Nature of transaction.
Create a VAT Ledger
You can follow the steps given below to create a common VAT ledger. To create a VAT ledger with the rate specified, enter the tax rate in Percentage of Calculation field. Based on the tax rate entered, the tax amount is calculated in the invoice.
- Gateway of Tally > Create > type or select Ledger > and press Enter.
Alternatively, press Alt+G (Go To) > Create Master > Ledger > and press Enter. - Enter the Name of the VAT ledger.
- Select Duties & Taxes in the Under field.
- Select VAT as Type of duty/tax.
- Press Enter to skip the Percentage of Calculation field. The Ledger Creation screen appears as shown below:
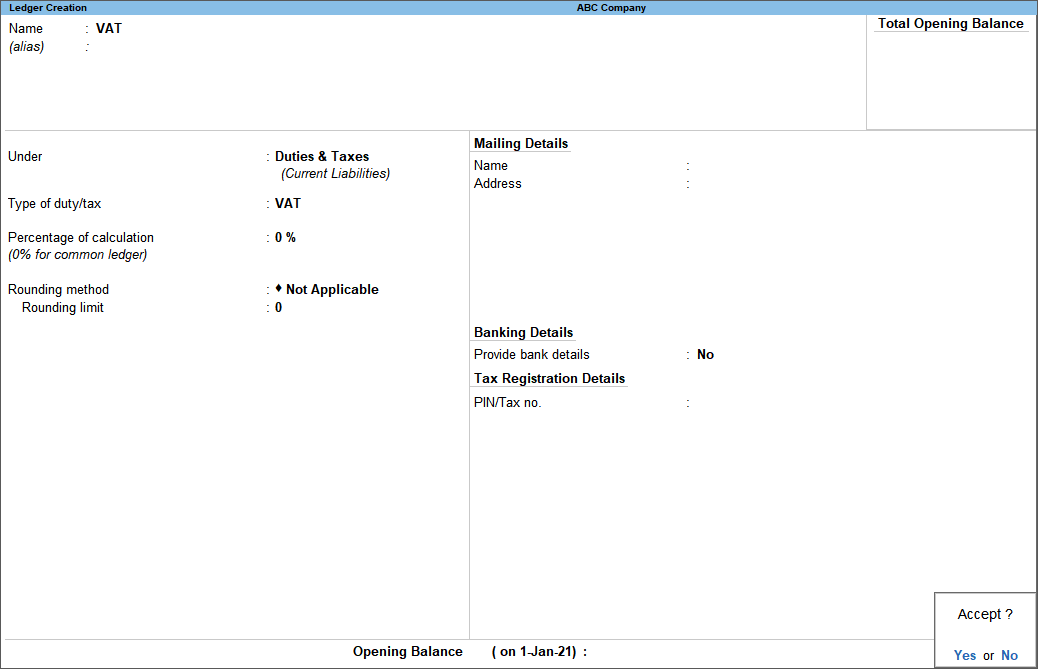
- Accept the screen. As always, you can press Ctrl+A to save.


