
Extract Data into MS Word Using ODBC in TallyPrime
You can extract the master data from TallyPrime to MS Word using ODBC and share that data with your customers and stakeholders. The steps vary slightly depending on your Word version, but the process begins by enabling ODBC in TallyPrime and then using Mail Merge to format and filter the data for printing or sharing.
Enable ODBC in TallyPrime
- Press Alt+Z (Exchange) > Configure.
- Under Data Synchronisation, select Client/Server configuration and press Enter.
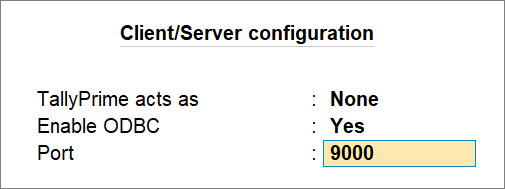
The Client/Server configuration screen appears. - Enable ODBC: Yes.
Ensure that the Port is as applicable to your license server.
Extract Data to MS Word 2007/2010 Using ODBC
Ensure that you have enabled ODBC in TallyPrime.
Step 1: Initiate document creation
- Click Mailings > Start Mail Merge > Step by Step Mail Merge Wizard.
The Mail Merge appears on the right-hand side. - Select document type: Labels.
- Click Next: Starting document.
Step 2: Apply formatting options, as applicable.
- Click Next: Select recipients.
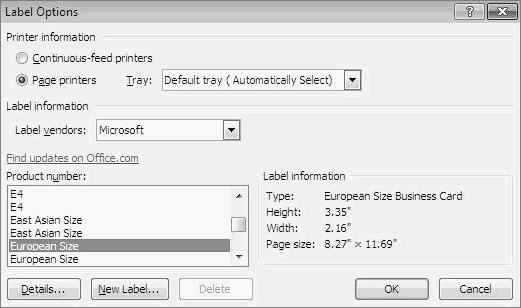
The Label Options window appears. - Select Product number:
- In MS Word 7, select Business Card and click OK.
- In MS Word 10, select based on your preference, for instance, European Size, and click OK.
- In MS Word 7, select Business Card and click OK.
Step 3: Select the source of data.
- Click Next: Arrange your labels.
The Select Data Source window appears. - Click New Source.
The Data Connection Wizard window appears. - Select ODBC DSN and click Next.
The Data Connection Wizard window starts displaying the list of ODBC data sources as shown below. - Select the Tally ODBC data source with the appropriate port number.
Note: If multiple data sources of Tally are listed, then you can check the appropriate port number in TallyPrime.

In TallyPrime, press F1 (Help) > Settings > License > Manage License.

The License Information screen appears, and you can identify the port number mentioned under the label Tally Gateway Server.
Step 4: Select data that needs to be extracted.
- Select the master, for instance, Ledger, StockItem, CostCategory, as applicable and click Next.
The Data Connection Wizard window with File Name appears as shown below.

- Click Finish.
The Data Link Properties window appears.
Step 5: Test the connection
- Click Connection.
- Specify the source of data: Use data source name.
- From the list, select TallyODBC with the appropriate port number.
- Click Test Connection.
A test connection success message appears as shown below.
- Click OK on the Test connection succeeded message sub-screen.
- Click OK to save the Data Link Properties
The Mail Merge Recipients Window appears.
Step 6: Filter and sort the data, as required
- Click Sort.
The Filter and Sort window appears. - Click Filter Records.
- Field: $Parent.
- Comparison: Equal to.
- Compare to: type Sundry Debtors.
- In the next row, select the Or option to add more filters.
- Select appropriate options under Field and Comparison and under Compare to: type Sundry Creditors.
- Click OK and the filters will be applied.
Step 7: Select options for label printing, as applicable
- In the Mailings tab of the MS Word file, click Insert Merge Field and select MailingName from the dropdown list.
- The MailingName field will appear in the first line of the first label as shown below.
- Press Enter to bring the cursor to the next line.
- Select other fields such as M_Address1, M_Address2, M_Address3, M_Address4, PinCode, and StateName, as applicable.
- Click Next: Arrange your labels.
- In the Mail Merge Wizard, under Replicate labels, click Update all labels.
The updated screen after label printing appears as shown below.
Step 8: Save the document after label printing with mail merger
- Click Next: Preview your labels.
The preview of the labels appears as shown below.
- Click Next: Complete the Merge
- Click Previous: Preview your labels, only if you want to preview the labels again.
- Press Ctrl+S to save the document.
Follow the above-mentioned steps to extract the required data with ease and use the data effectively for various purposes such as mailing lists, address labels, or business correspondence.
Extract Data to MS Word 2003 Using ODBC
Ensure that you have enabled ODBC in TallyPrime.
Step 1: Initiate document creation
- Click Tools > Letters and Mailings > Mail Merge.
The Mail Merge task pane appears as shown below.
- Select document type: Labels.
- Click Next: Starting document.
Step 2: Apply formatting options, as applicable
-
- Under Change document layout, click Label options.
The Label Options screen appears. - Under Product number, select the product number with the text Label, as required and click OK.
Subsequently, Use the current document gets selected.
- Under Change document layout, click Label options.
Step 3: Select the source of data
-
- Click Next: Select Recipients.
Use an existing list is selected by default. Retain the selection. - Click Browse.
The Select Data Source window appears. - Click New Source.
The Data Connection Wizard appears. - Select the required data source as shown below and click Next.
The Connect to ODBC Data Source appears. - Under ODBC data sources, select the appropriate ODBC data source as shown below and click Next.
- Click Next: Select Recipients.
Step 4: Select data that needs to be extracted
- Select the required master – Ledger, StockGroup, StockCategory, or any other, as per your requirement and click Next.
- Click Finish.
The Select Data Source window appears. - Select the required data source from the list of data sources displayed.
- Click the Connection tab.
- Click the Use data source name checkbox.
- Click the dropdown list and select the required data source.
The name of the catalog is displayed in Enter the initial catalog to use as shown below.
Step 5: Test the connection
- Click Test Connection.
A test connection success message appears. - Click OK on the success message.
- Click OK in Data Link Connection.
The Mail Merge Recipients appears.
Step 6: Filter and sort data, as required
- Click the dropdown list box.
The list displaying the Filters appears. - Select Advanced.
The Filter and Sort screen appears. - Click the Filter Records tab.
- Click the Field drop-down list and select $Parent.
- Click Comparison and select Equal To.
- In Compare To, enter Sundry Creditors or Sundry Debtors, as required.
- Click OK.
A sample Mail Merge Recipients window with the filtered and sorted data appears as shown below.
- Click OK.
Step 7: Select options for label printing, as applicable
- Click Insert Merge Fields.

The Insert Merge Fields window with the Database Fields checked by default appears. - From the list of Fields displayed, select the required field.
- Select other fields from the list, as per your requirement.
The address fields will start appearing as labels. - Arrange the address fields, as per your requirement.
- Click Next: Arrange your labels.
- Under the section Replicate labels, click Update all labels.
A sample image with the updated labels will appear as shown below.
Step 8: Save the document after label printing with mail merger
- Click Preview your labels.
The preview of the labels with The Company Name along with the Address in each slot appears.
- Click >> to move to the next set of records or click << to move to the previous set of records.
- Click Next: Complete the Merge.
- Click Print.
The Merge to Printer dialog box appears.
By default, you can print all the available records or provide the record number if you want to print the label of a selected party in the Current Record field. You may also print a subset of the available records by providing the starting record number in the From field and the ending record number in the To field.


