
Set Up TallyPrime for e-Payments
With the facility for a quick and one-time e-Payment setup, TallyPrime ensures that all your business needs related to offline e-Payments are covered.
Handling e-Fund Transfers: It doesn’t matter if you are paying your sellers a few thousands or lakhs, TallyPrime helps you specify the appropriate transfer modes for e-Payments. This ensures that you don’t have to worry about choosing the transfer modes during voucher creation. However, you can update the transfer mode during voucher creation.
Export Payment Instructions: You can decide if you want to export payment instructions at the time of voucher creation or later. Moreover, you can choose to allow export in case of a difference in the bank details between the ledger and transaction. So, you don’t face challenges while recording and exporting transactions in which the bank details in the voucher and master don’t match.
Bank-specific Details in e-Payments: TallyPrime also aids you in providing the right information, based on the fields required by the bank, such as the Product Code and Client Code. Once set in the ledger, you don’t have to do it again unless the bank changes the e-Payment process and the details required.
e-Payments Security: While TallyPrime ensures that all the payment instruction files exported from TallyPrime are secure, you can also specify actions that specific users can or cannot perform.
Refer to Contact Details for e-Payments to know the banks for which e-Payments feature is available in TallyPrime.
Specify Transfer Mode for e-Fund Transfer Based on Amount
- In the Ledger Creation/Alteration screen, Set/Alter Bank configuration: Yes.
- In the Bank Configuration screen, Set/Alter Transfer Mode details for e-Fund Transfer: Yes
- Enter the From and To amounts against each mode.
Based on the entered amounts, the transfer mode will get applicable when you record e-Payments. - Preferred Mode: Select the preferred e-Fund Transfer Mode.
When more than one transfer modes are applicable to a specific amount, then the preferred transfer mode gets selected.
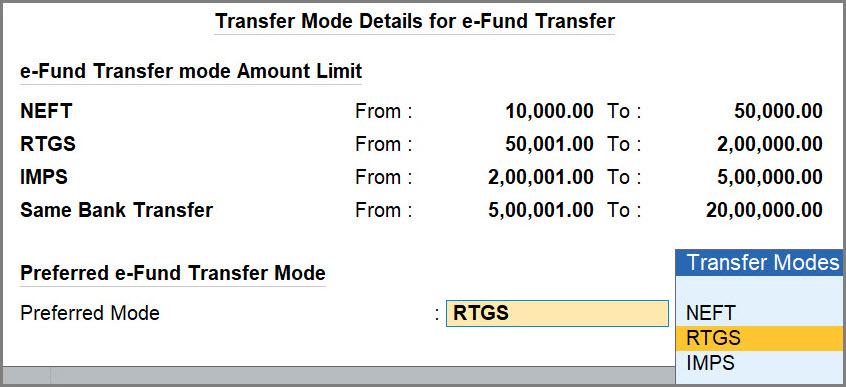
- Press Ctrl+A to save the configuration.
Configure Export of Payment Instructions
- In the Ledger Creation/Alteration screen, Set/Alter Bank configuration: Yes.
- In the Bank Configuration screen, Enable e-Payments: Yes.
- To export the Payment Instruments at the time of saving vouchers, set Export/Upload Payment Instructions on voucher creation as Yes.
You will be able to export the Payment Instructions when you save the voucher. - Allow export of transactions with mismatch in Bank Details: Yes.
Whenever you want to change the bank details during voucher creation, you can do so. For instance, you might want to send the payment to a different bank account of the user. So, even if there is a mismatch in the Bank Details such as Account No. and IFSC compared to details in the master, you will be able to export the Payment Instruction.
Bank-specific Configurations for e-Payments
You can set e-Payments configuration for specific banks. These configurations vary, based on the payment instructions required by the bank to process e-Payments.
- In the Ledger Creation/Alteration screen, Set/Alter Bank configuration: Yes.
- In the Bank Configuration screen, Enable e-Payments: Yes.
The configurations are applicable based on the bank that you select under Bank Name.
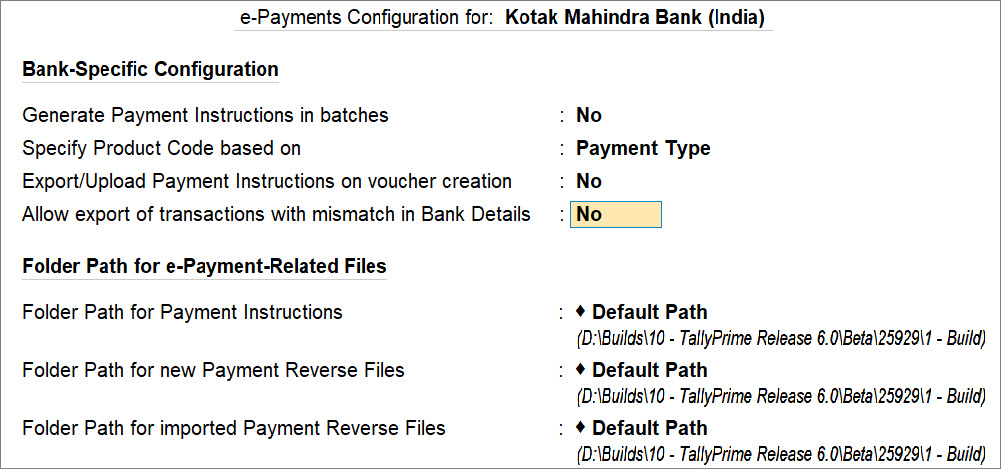
- Update the configurations, based on the details required by the bank.
In the above example, you can set up generation of Payment Instructions in batches and Specify Product Code based on either Payment Type or Voucher Type/Class. - Press Ctrl+A to save.
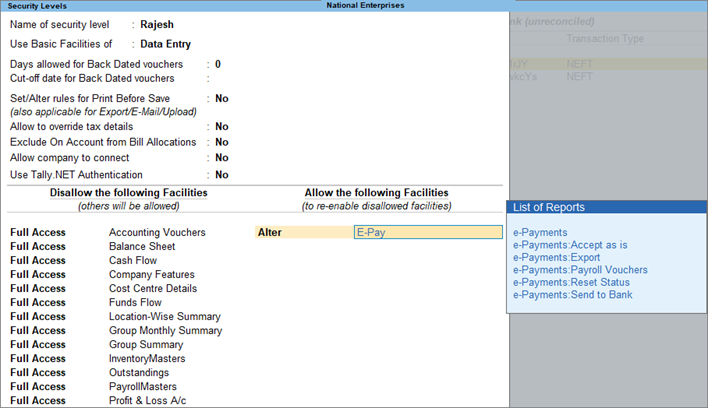
Security for e-Payments
You can use the Security Control feature to set up the required security levels. For example, you can allow full access or access to:
- e-Payments report for a data entry operator.
- All types of payments, including payroll, for an accountant.

- Press Alt+K (Company) > User Roles.
- Select the security level (for example, Data Entry) from the List of Security Levels, and press Enter.
- Under Allow the following Facilities, select e-Payments from the List of Reports.
- Under Allow the following Facilities, select e-Payments from the List of Reports.
- Accept the security settings. As always, you can press Ctrl+A to save the screen.
Refer to the Manage Users article for more information on Security Control.


