
Rules for Writing Good Code
We would have developed multiple codes for hundreds of projects. A project is decent when the codes developed are useful irrespective of whether they are small or large. A good quality code is defined by its output and the time taken for the output, i.e., the performance: lesser the time, happier the user. Further, suppose the code is easier to maintain and quick to navigate for any changes. In that case, it will lead to a happy developer.
Purpose of Writing Good Code
A good code affects two sections of the Tally ecosystem the developers and users.
- Benefits to User
- User-friendly interface
- Seamless navigation
- Optimum performance
- Benefits to Tally Developers
- Quick to navigate code
- Easy to maintain code
- Faster to fix any bug within code
- Quick to any changes in a future release as well as backward compatibility
- Faster and quicker changes to users never-ending requirements
- Lesser complaints from users
- Reduced working hours
TDL Project Creation
The codes of a project must be maintained in a folder with the sequencing of files and folders. The project folder provides complete clarity on code creation and development.
Folder Creation
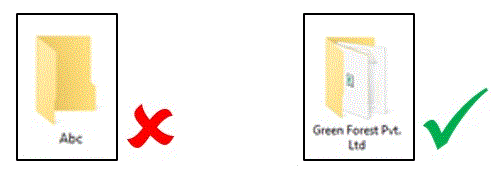
Any new project created should be created in a new folder for every customer. The folder name should be the customer name. The structured folder makes it easier to locate and maintain customer-wise code.
Project File Creation
The project name should have a development company name as a prefix. This naming convention shall avoid any conflicts with any other TDLs the customer is currently using or may use in the future from any other developer. Providing valid names ensures there would be no clash with any other future customisation as it has your company’s initials.

Additional Files
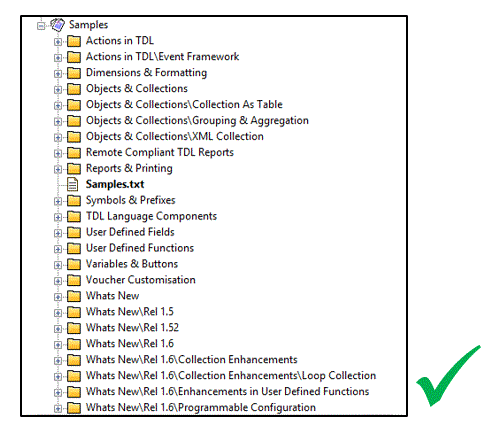
A tree-like folder structure should be maintained for the Folder, and the File and the name should suggest the activity of the code. The folder structure would make it easier for the developer to locate the code for modification rather than scanning through the entire project code. It makes it easier to find the location of the code that needs enhancement.
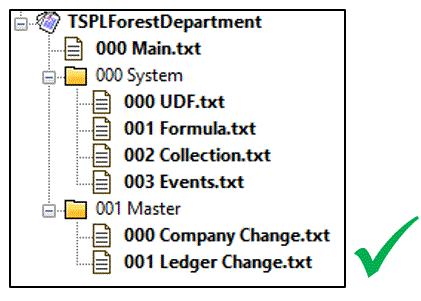
A separate file for maintaining fields should be maintained under the module’s folder of the respective capsule when many new fields are added. The file system ensures there would be no clashes with any system elements when they are roofed together under a file.
Project Properties
Build options in Developer (File > Active Project Properties > Build Options)
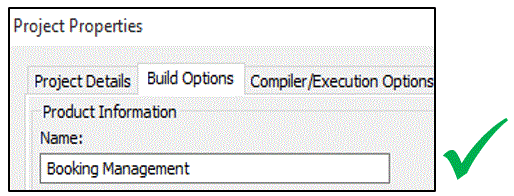
- The project’s name should be a meaningful name that would suggest the type of module developed. The name would be visible on Tally Product & Features screen. It would make it easier for the customer to understand the need/purpose of the module.
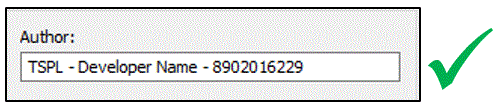
- Provide ‘Author name’ as Company Name – Contact Number; optionally, you may provide developer name. The customer would see these details in the Tally’ TDL Management’ screen (F1:Help > TDLs & Add-ons > Alt + F5: Detailed Mode). The details will make it easier for the customer to connect to you in the future.
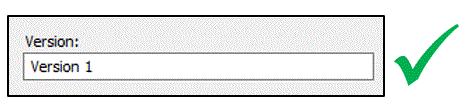
- Providing a version to a project would make it easier to identify the code version that is currently active in the customer system. The version details will help identify when the customer reports an issue or a new requirement.
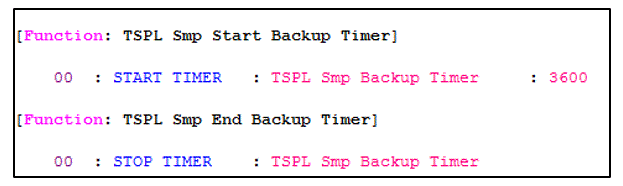
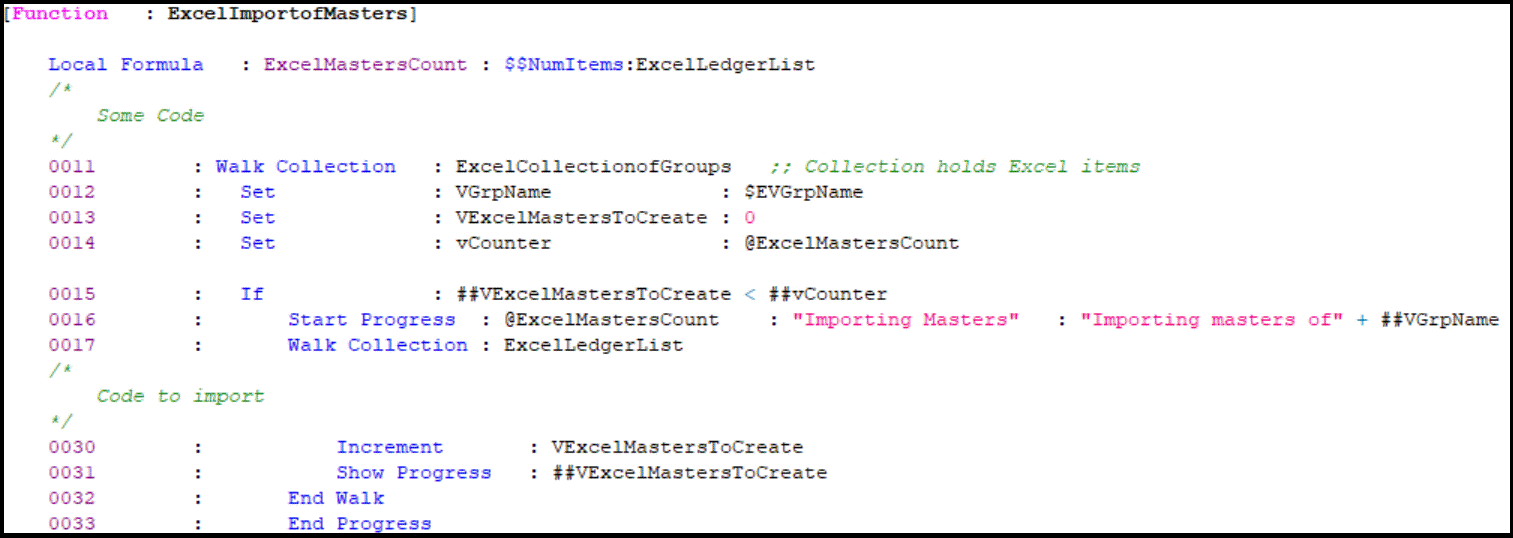
- A trial mode for the code should be provided. This facility would allow the user to validate the delivered product for a period. The number of days for trial mode should be decided based on the type of module. For smaller developments like Invoice Print or Simple reporting could be three days for more extensive projects could be 90 days. On receipt of confirmation from the work customer, you may provide a perpetual code to the customer.
![]()
- Serial numbers of the customers should be maintained under a group, making it easier for you to compile files as and when delivered.

TDL Coding Standard
Writing a code is an art that every developer should develop. The TDL developers can achieve this skill set by following the below-given rules.
Header
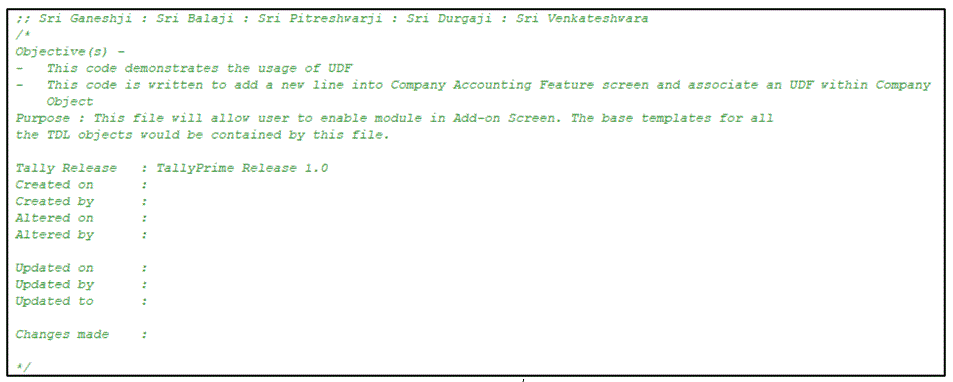
The file header should provide details of the file’s code, creation details, altered details, updated details, TallyPrime Release the code created for, later updated to and changes made. By providing details for each file, it makes it easier for any developer to understand its purpose. Other details provided would be required for future references.
Enablement of Feature / Capsule
A provision to enable the module/capsule should be provided in Add-On screen (F1:Help > TDLs & AddOns > F6:Add-On Features). Do not provide enablement options at any other location like Company Alteration Screen or Gateway of Tally. This arrangement makes it feasible to troubleshoot when the customer reports an issue. All the relevant features and functions should be hidden or inactive until the option is enabled.

Code Commenting
Proper commenting should be provided at every possible code to understand the functionality of the code. When changes are made, providing commenting makes it easier for the developer for future reference to reason out the changes made and what changes were made, and why. The commenting saves much time for the developer for validating code on a trial and error basis.
Naming Conventions
The name of the definition should suggest the functionality of the definition prefixed with your company name initials to avoid future collisions with other TDLs or Default TDLs.
Definitions & Attributes Indentation
- There should be one line spacing before and after a definition for the readability of the code.
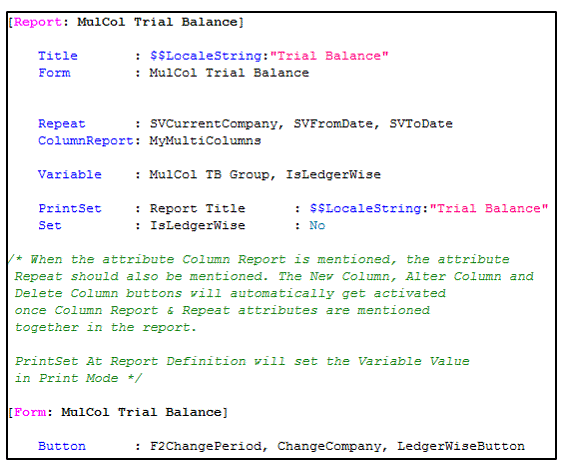
- Every primary definition like Report, Form, primary Part, Collection, Function, Border, Style, Function, Button, Menu, Name set, Resource, Query box, System, Variable, and Ruleset should be beginning from the left-most column attributes one TAB indented. This styling eases the readability of the code and simpler to debug.
- The indentation should be increased from the 2nd level of Part by one additional tab and its attributes. This indentation makes code readable.
- All the attributes within the definition should be indented to maintain the readability of the code

Letter Case
TallyPrime Developer editor or TallyPrime product does not throw any error as TallyPrime is space and case insensitive while you provide definitions or attributes. However, when the casing is not provided, it isn’t easy to scan the code at a glance, and the developer would have to read through the code while debugging.
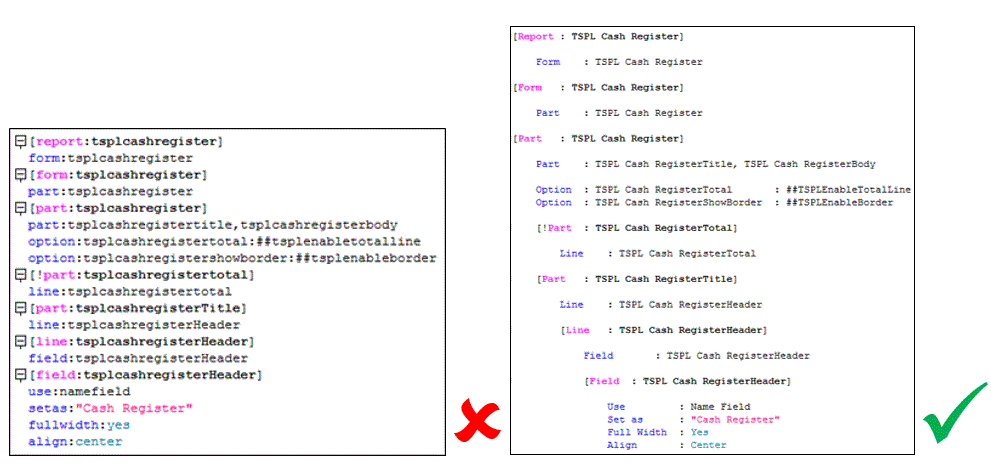
The following has been done:-
- The company initially has been made capital.
- For all the definition types and their attributes, the first letter has been capitalised.
- The definition names and attribute values have a case ‘Capitalise Each Word,’ which makes the scanning of the code very easy, quick, and straightforward.
When we apply the above-mentioned rules to the code; the code is readable. This property of the code helps to debug code easily and quickly make changes as and when required.
Sequencing Attributes
The language handles the procedural flow of attributes. However, writing the attributes in a sequence and grouping enables the developer to visualise the output without executing the code. The sequence of the attributes should be as follows :
- Use attribute
- Definition specific attributes
- Static attributes (Delete, Add, Replace)
- Dynamic attributes (Local, Option, Switch)

Appropriate Messages
Different developers are involved in customisation. They should be traversed through the solution without much effort by any developer. Appropriate messages at the right places will help in guiding any user through the customisation.
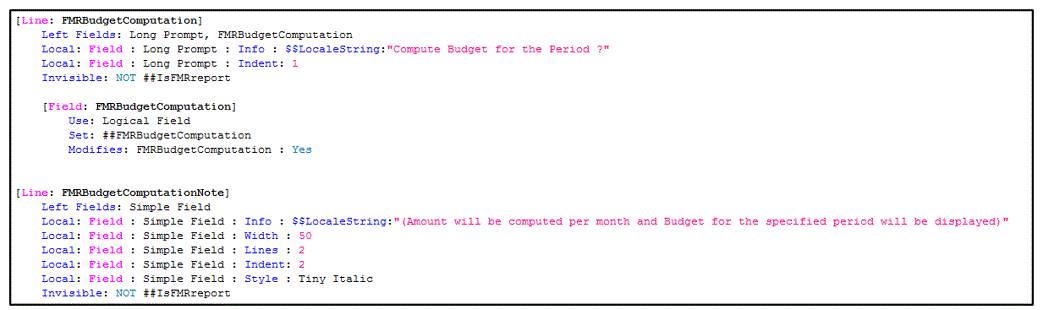
Info Messages
Some options/functionalities given in the customisation might not be straightforward. In such cases, a line explaining the same will be constructive.
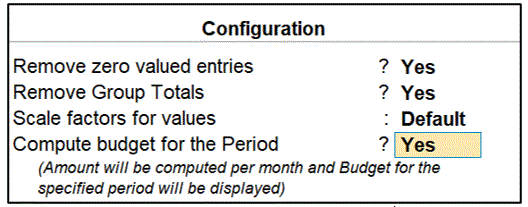
Example of an F12 configuration explaining the budget calculation
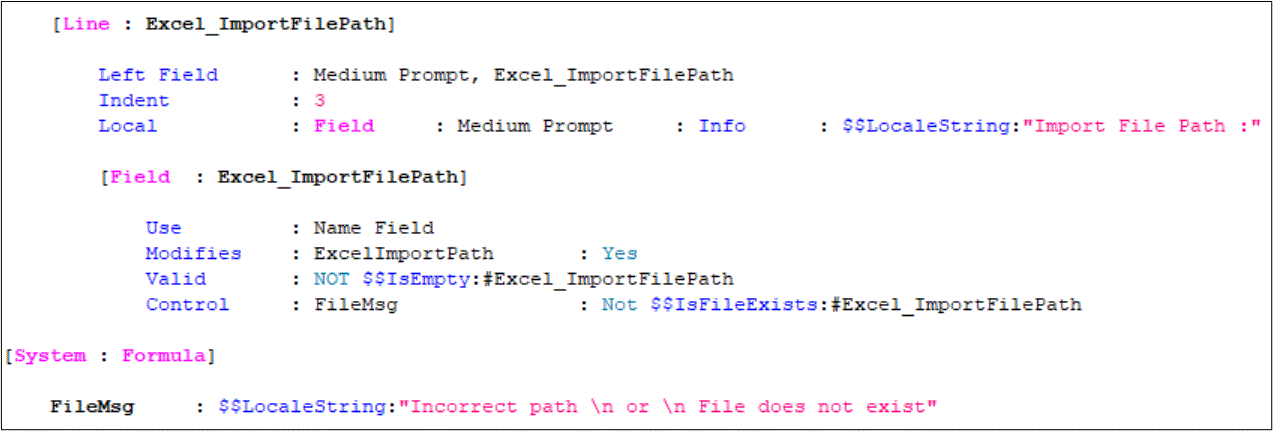
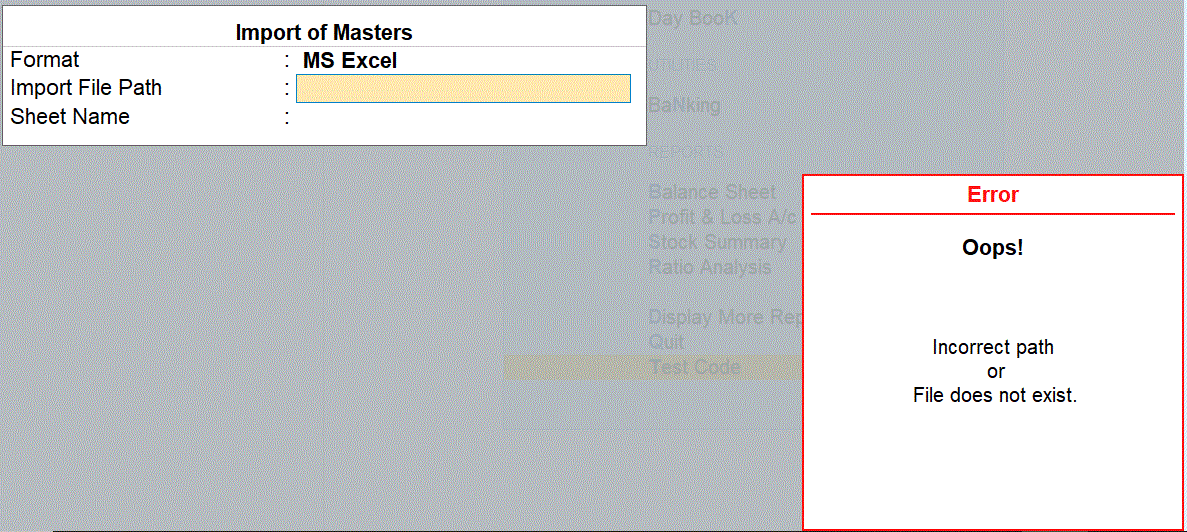
Error Messages
To ensure correct values are entered or selected by the user, proper error messages must be used.
Here, the user’s file path has to be entered, and it has to exist; only then import of excel into Tally can be completed. Without an error message, the user cannot understand why it is mandatory to enter the file path.
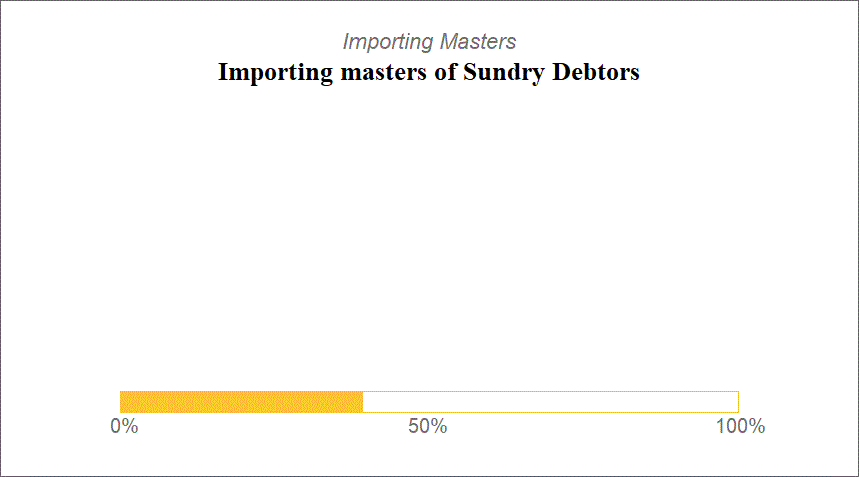
Progress Bar and Messages
When a function takes some time to complete a task, it is good to show the progress status with a progress bar and an appropriate message that indicates what is going on.
In this example, Excel data needs to be imported as a group and ledger based on their codes.
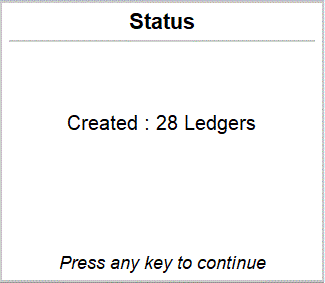
Status Messages
Once a task is completed, it is essential to show the status of task completion. The status will help the user know whether the task was completed successfully or not. Using the same example of importing excel items as groups and ledgers.
UI Related Reports
Most of the customisations have one or the other Report associated with them, be it a customized default report or a new report altogether. Here are some examples of how a report can be made look exactly like a default one.
Period
Most of the reports render data for a period. So, make sure to
- Show the period for which the Report is generated in the Report.
- Include a button to change the period.
- Make sure the data is rendered for any period selected.
Order tracking details of a selected ledger is displayed
 (Proprietary code)
Note : The proprietary code does not maintain alignment in the code.
 (Standard code)
Note : The standard code is well aligned and indented.
Mention the Selection for a Trigger Report
If the Report is rendered after a selection, make sure the selection is displayed in the Report. And also provide a provision to change the selection in the Report. The Report is rendered for a selected ledger
Example: The ledger name selected is not displayed, and there is no provision to change the ledger in the Report.
 (Proprietary code)
 (Proprietary code – Output)
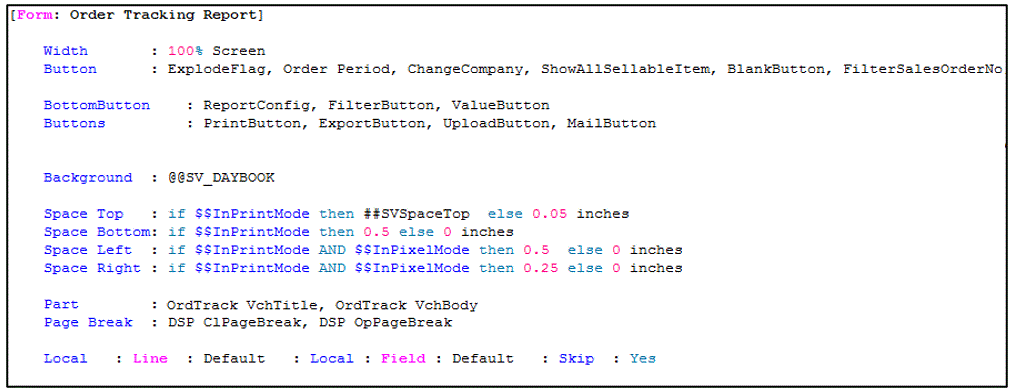
Note: The above code depicts the report shall be fixed and shall list all outstanding orders for all ledgers, every time user
enters the report.
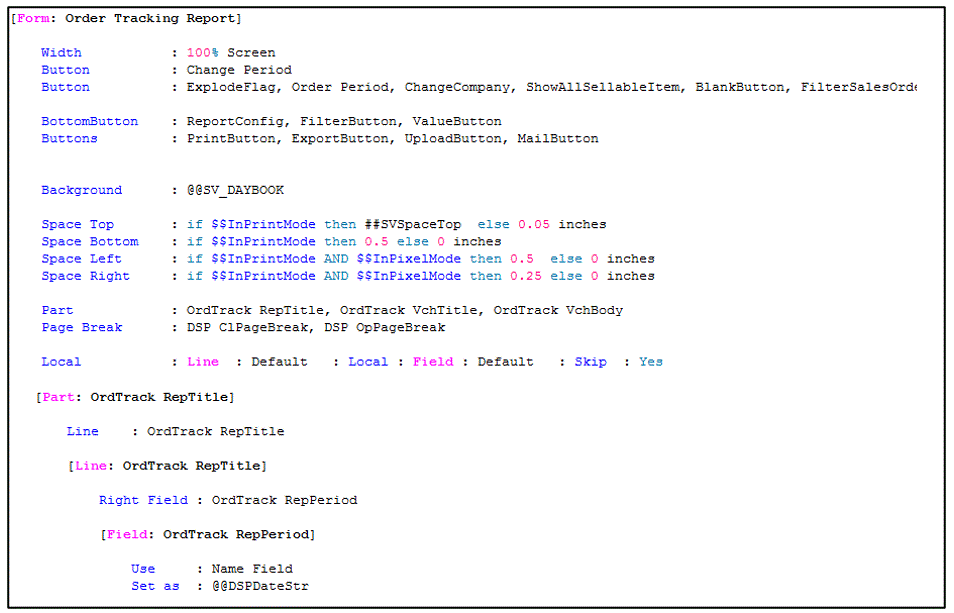
(Standard code)
 (Standard output)
Note: Buttons has been added to make report more interactive. Irrespective of whether user provides it as a requirement or
not, these kind of buttons should be added to reports.
Remove the unwanted buttons
Be mindful of the buttons used in the Report. While using a template or adding buttons, make sure it is indispensable for the Report.
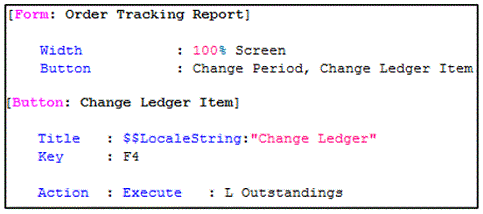
The Report Order Tracking details require buttons for changing periods and ledger and bottom buttons only. All other buttons are irrelevant and can be removed.

(Proprietary code)

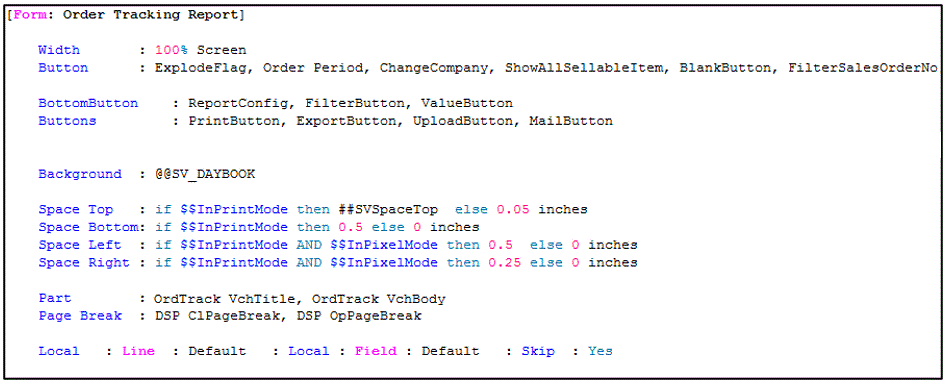
(Standard code)
As you can view, as per the standard coding rule, in standard code only those buttons are applied that are necessary / required for the report. All the unwanted buttons can be removed by using ‘Delete’ attribute.
Column Titles
Use short forms of words in the column titles only when the title doesn’t fit into 2 or 3 lines. Make sure the short form is understandable is consistent throughout the project.

(Proprietary Output)

(Standard Output)
The column titles should be
Standard for TDL Procedural
Order of Actions/ Attributes of function
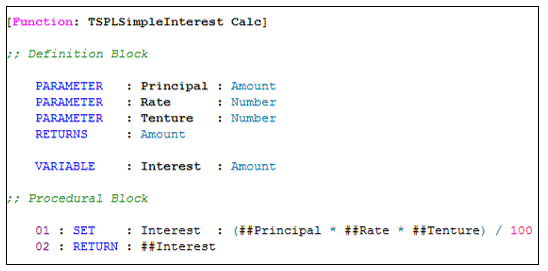
The function generally has 2 section definition blocks and a procedural block. A usual function order should be as follows
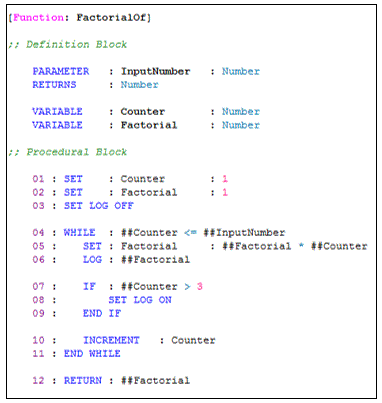
Right indenting of actions within looping
Reusing the default code Versus creating your own code
A developer can write the same solution in multiple ways applying different logic. Hence nothing is right or wrong until the output is of high quality. It is crucial to develop code keeping future implications in mind. The code’s future working depends; whether the developer uses existing language templates or develops his code has futuristic impacts.
|
Pros |
Cons |
|
Using a template allows for having the traditional look and feel. Other related attributes and elements like variables, buttons, dimensions are also fetched. This behaviour reduces the task of a developer to write every line of code. |
All the attributes and elements are fetched. This fetching may also bring in the unwanted elements, which may not be required for the current TDL objects. This task may lead to an excess of code for deletion of those elements. |
|
Any change in the template, customised TDL elements shall automatically inherit the change. |
Default templates change as and when the principal requires a change. While using a template, the developer needs to keep in mind any template change will also impact the customised code, especially for any pre-printed stationery. |
Correlating the Requirement with Default Features
Whenever a customer requirement arises, the answer to designing the feature is the default source code. The customer requires any output or functionality; a thorough study of default features should be done. This study would avoid duplication of feature/functionality. It would provide an idea of the best way to handle the requirement.
Example: 1
End-user wants a list of expense ledgers, and once selected, the ledger should not be on the list again.
Solution:
Step 1: Open TallyPrime in DevMode
Step 2: Look for functionality similar to the requirement. In Tally, similar behaviour is when we want to back up companies. Click on Data or press Alt + Y –> Select Back Up. Place your cursor on the field wherein the list of companies is provided. You will get the field name as “Back-Up Name.”
Step 3: Open TallyPrime Developer
Step 4: Press Ctrl + J to open “Jump to” window. At ‘Definition Type,’ select Field and in ‘Definition Name’ block type field name, i.e., Backup Name.
Step 5: From the field, try to find a table that may list the companies. You shall reach the collection “List of BackupCompanies.” This collection uses another collection, “Backup Collection Template,” and using the attribute “Unique.”
Example: 2
End-user wants party name in rows and item name in columns. These columns should give sale quantity.
Solution:
Step 1: Open TallyPrime in DevMode
Step 2: Look for functionality similar to the requirement. In Tally, similar behaviour is when we want to back up companies. Click on Display More Reports –> Payroll Reports –> Paysheet. Select any of the options and enter the Report. Place your cursor on the field which has names of the salary component. The name of the field is “PSheet PaidEarn.”
Step 3: Open TallyPrime Developer
Step 4: Press Ctrl + Alt + D to open the “Definition Reference” window. At ‘Definition Type,’ select Field and in ‘Definition Name’ block type field name, i.e., PSheet PaidEarn. Look for a part or a line definition where it is mentioned. There is a Part’ DSP PaySheetCatGroupWise’, which has the field as Total and the repeated Line.
Step 5: Lines are repeated in Part, and Fields are repeated in Line. Hence we need to follow the repeated Line, i.e., ‘DSP PaySheet CatDetails.’ This repeated Line has a repeated field, i.e., ‘DSP Paysheet Amount.’


