Quick Start Your TallyPrime Journey Today!
Welcome to TallyPrime and TallyPrime Edit Log—your ultimate tools for simplifying business operations with unmatched ease and efficiency.
This guide helps you get started quickly, whether you’re a new user or upgrading to the latest version of TallyPrime.
TallyPrime vs. TallyPrime Edit Log
- TallyPrime: Manage your business effortlessly with a complete suite of features.
- TallyPrime Edit Log: Includes all TallyPrime features + Edit Log to meet Audit Trail compliance.
Choose the version that fits your compliance needs!
Want to experience the power of TallyPrime in a cloud-based environment? Use TallyPrime Cloud Access to ensure secure access to TallyPrime from anywhere.
New to TallyPrime? Let’s Get You Started!
Step 1: Recommended System Configurations
Before installing, it is recommended that your system meets these specifications:
- Processor: 64-bit, 1.8 GHz or higher (e.g., Core2 Duo, i3, or above).
- RAM: 4 GB or more.
- Storage: 150 MB free (excluding company data).
- Monitor: Resolution of 1366 × 768 and not higher, 100% scale.
- OS: 64-bit Windows 7 or later.
Step 2: Download & Install TallyPrime
-
Download:
- Visit Tally Solutions website.
- Click Download, and the setup file will be saved in your Downloads folder.
-
Install:
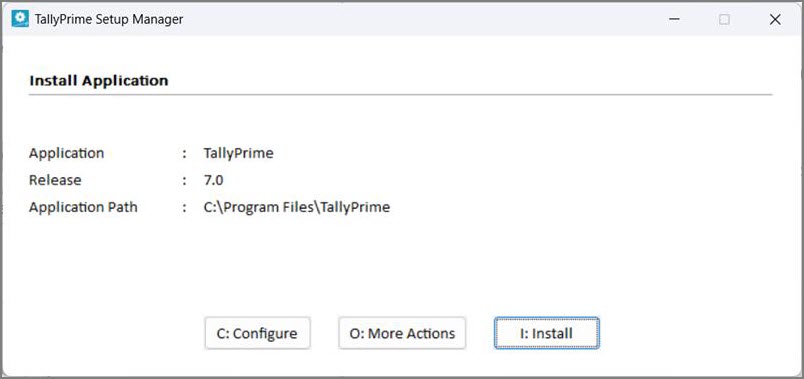
By default, both the TallyPrime application and the Tally Scheduler are installed in the C:Program FilesTallyPrime directory.
If you also want to use TallyPrime Edit Log, it is recommended that you install it in a different folder. This will allow you to use both the products simultaneously, if needed.
Step 3: Activate Your License
- Click Activate New License.
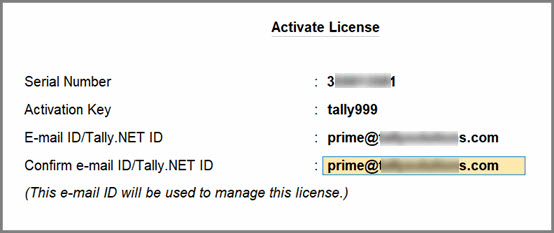
- Enter your Serial Number, Activation Key, and Administrator Email ID.
- Enter the Unlock Key sent to your e-mail ID.
If you have not received the unlock key, then press F2 (Get Unlock Key).
- Press Enter to unlock your license.

Once your license is successfully activated, you can create your first Company and start using TallyPrime for your business transactions.
Step 4: Create a Company in TallyPrime
- Launch TallyPrime and select Create Company.
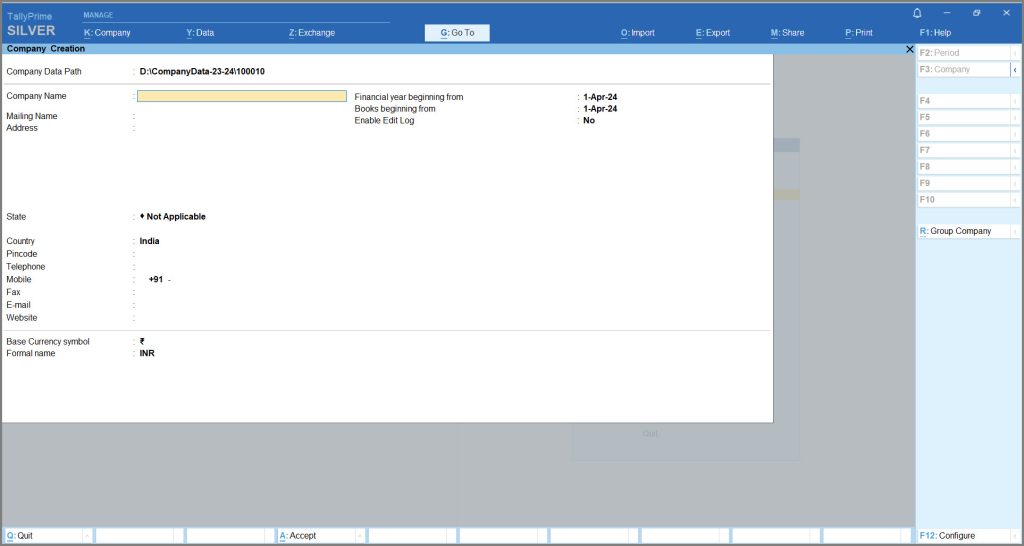
- Enter details like Name, Address, and Financial Year.
- Press Ctrl+A to save.
You can set up the remaining company details anytime later. - In F11 (Company Features) to enable features like inventory management, tax-based invoicing, and payroll as needed.
Step 5: Record Your First Payment Voucher
You can effortlessly record transactions such as payment, sales, purchases, and more within minutes.
For illustration purposes, let’s see how you can record your first payment transaction.
- Gateway of Tally > press V (Vouchers).
Alternatively, press Alt+G (Go To) > select Create Voucher. -
Record your first payment voucher.
-
Press F10 (Other Vouchers) to change your Voucher Type, as required.
-
- Enter your payment transaction details.
- Press F2 (Date) to change the transaction date, if needed.
- In the Account field, select the Cash or Bank ledger.
- Provide the payment details.
- Under Particulars, select expense ledger for which you are making this payment.
As always, press Alt+C to create a ledger under Indirect Expenses, on the fly, if an expense ledger does not exist. - Amount: Enter the payment amount.
- Under Particulars, select expense ledger for which you are making this payment.
- Provide Narration, if any, and accept the voucher creation screen. As always, press Ctrl+A to save.
- Share you invoice with your party. Print, e-mail, or WhatsApp the invoice.
Once recorded, transactions are automatically reflected in relevant reports. Navigate to Gateway of Tally > Display More Reports, and select from the following:
- Day Book: All your transactions for the day appears in this report.
- Trial Balance: Confirm the impact of the payment transaction on the overall accounting balances.
- Profit & Loss Account: Reflects the expense in the relevant category, affecting the profitability of your business.
- Balance Sheet: Tracks the financial position, showcasing any reduction in cash or bank balance due to the payment transaction.
Existing TallyPrime User | Upgrade to the Latest Release
Upgrade from Product
TallyPrime makes it simple to stay updated with the latest features and enhancements by allowing you to upgrade directly from the product. Here’s how you can do it:
Step 1: Take a backup of your data
It is recommended that you take a backup of your company data before upgrading to the latest TallyPrime release.
Step 2: Upgrade to the latest TallyPrime release
- Press F1 (Help) > select Upgrade.
If you are using TallyPrime 5.0 or later versions, look for a red dot beside the Notification icon in the top-right corner of TallyPrime. Click the icon to view upgrade details.
- Follow the Upgrade Wizard.
- Restart TallyPrime after the upgrade to start using the latest version.
Step 3: Continue recording your transactions
You can continue to record your day-to-day transactions with your previous data intact.
Upgrade using setup.exe
You can download the setup.exe file for the latest release of TallyPrime and follow these simple steps to upgrade to the latest version:
Step 1: Download the setup.exe file
Step 2: Update to the latest version
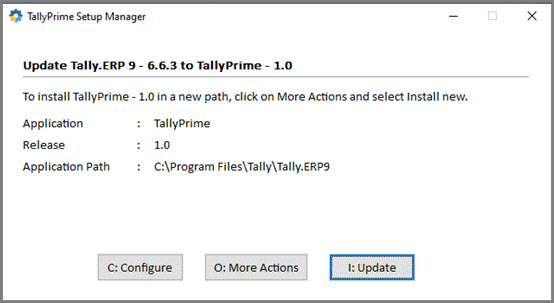
- Press I (Update), if you want to update to the latest version of TallyPrime.
Alternatively, you can press O (More Actions) and select one of the following options:- Install New, if you want to install TallyPrime afresh, without updating your existing Tally application.
- Press S (Start TallyPrime) to begin your journey with TallyPrime. If you would like to explore additional options, then press C (Continue Setup).
Step 3: Continue recording your transactions.
You can continue to record your day-to-day transactions with your previous data intact.
Need More Help?
- Access additional settings by pressing F1 (Help) > Settings to customise:
- Language, country preferences, and startup options.
- Display, connectivity, and licensing configurations.
- Set up data security for your company, by pressing Alt+K (Company) > Security.
- Press Ctrl+F1 from any screen in TallyPrime for more help.
FAQs
Can I use both TallyPrime and TallyPrime Edit Log?
Yes, install them in separate folders to switch between versions.
How do I download TallyPrime?
Download from Tally Solutions and follow the installation steps.
Have more questions? Visit the FAQ page.
Start your TallyPrime journey today and simplify your business like never before!

